Leaderboard


Popular Content
Showing content with the highest reputation on 08/22/20 in all areas
-
A reasonable plasterer would cover 30 boards per day 80m2 7am to 230pm Three mixes A quick one will do 100 3.25 m2 The baring rates are just behind the skimmers and a day per house quicker Forget plastering courses I’ve taken lads on that have done 12 months corses Not always neat enough for sight work and far to slow You need to be careful that your not paying day rate for someone doing 40 M2 per day You don’t need to pay out for a labour We just pre fill all the joints and beads then tip four or five bags into a tub three times a day 30 minutes of mix 15 washing out Stood watching for the rest of the time I do have a gang that load PB £1 gf 1.5 1st floor They often out earn them plasterers Peters spot on with spraying You still need to finish the plaster But also not worth the masking up on something like a house3 points
-
Treading on the shoulders of giants, you are!2 points
-
So you’ve got about 0.25 cubic metres, which if that was sand would be about 350kg of sand (it’s about 1.6 tonnes to the cube) so I would get 14 bags of sand and 2 bags of cement to be on the safe side.2 points
-
3.6m here clear span between brick pillars. If anyone wants to give me a Tesla to try can I have a Model S please as I'm not so keen on the look of the 3.....2 points
-
First all my apologies as this blog entry is about about a year late given that we moved in August 2019, but better late than never as they say ! Moving on from finishing the shell, we moved onto completing the inside. We knew from previous experience this would be the most intensive part of the build and had tried to make as many decisions up front as we could regarding bathrooms, kitchens and flooring, nevertheless there were still a lot of decisions to make. Everything went broadly to plan with the electricians, plumber, carpenters and decorator all working well round each other and coordinated by the builder who had put up the shell. There was an awful lot of work ordering everything and making sure that material was on-site at the right time. There was the occasionally thing that didn't go to plan, most notably the kitchen where i had the bad luck to have my kitchen delivered with many missing and damaged components and a supplier who took 8 weeks to sort everything out. The trades were proactive and happy to suggest how we might achieve what we were looking for which was a great help, but by the end of the project we were both fit to drop. Self build is a very rewarding but exhausting business. Here are some pictures of the finished house. There is still a little bit of landscaping work, the fencing and some furniture to sort out and I guess at some stage we will sort out some blinds to replace the high-tech cardboard that is doing the job at the moment. Following the build, we sorted out the VAT refund - 500+ invoices and a £32,000 refund for VAT. I ordered just about everything and given the number of invoices I got someone to prepare the submission to HMRC this for me which was money well spent. The electrical certificate, certificate for the unvented cylinder, building certificate and warranty were sorted out and finally the last submission for the CIL exception was made. The Dog seems to like her new home ! Still a bit of work to do in the garden View from the study window1 point
-
Hello! I've researched this forum before but never joined, so now is the time I think: I'm embarking on a barn conversion...a very slow barn conversion. I have a static caravan on site with electric and with water to come in September. I'm hoping to be living on site by Christmas all things being well ;0)1 point
-
Ah understood. The old cottage that we demo’d had skews per west coast vernacular funnily enougH. With my replacement new build there is no dry verge capping the gable end tiles, that’s not done around here and my turnkey builder doesn’t do their roofs like that and they are a builder of very high reputation etc. They do dry verges when they use concrete Marley duo etc but I’ve never seen any of their houses with slate being capped etc nor with the clipped tiles. Understood reasons for it being done on the islands though. thanks for the compliment. It’s Siberian larch board on board.1 point
-
The Crown Inn at Broad Hinton is the pub nearest to the geographical mid point between you and I. If I had @pocster's post code I could find the mid point between all three. Found a great app where you can put in up to 10 post codes and find the mid point. Made my Saturday night!1 point
-
Yeah ; her grout lines are nice .1 point
-
sending you a high-5 down the line. She any good at grouting?1 point
-
Thank Pixie for us.1 point
-
This is dragging on really slow. After a long delay for whatever reason, they cut the access doorway in the end wall and a team have been in under the floor to investigate. The finding is the oil is soaked into all the under floor insulation, and into parts of the timber frame, certainly all the floor. Inside the house, paint is peeling from the door frames and cement falling out from around the door and window frames. The next plan it seems is to take up all the internal floors to see if it is possible to remove and replace the contaminated timbers and then sort out any solum contamination. Owner is getting very peed off with slow progress. Owner thinks it will end with a knock down and rebuild. Also hearsay says the bill so far is already up to £100K which to me sounds like consultants fleecing the insurance industry?1 point
-
Inline . Got to be easier . But not like yours ; mine *will* be inline ?1 point
-
Start on the wall you won't see when you first walk into the room maybe, do your "training" on that?1 point
-
Next time... herringbone!1 point
-
You can use a small fan heater to kick start things if you’ve ever forgotten to turn the UFH on so no big problems there.1 point
-
Tres bien. As for tike adhesive, just butter the wall, enough for 2 or 3 tiles ( maybe more once you pick it up ) and put x number of £2 coin sized blobs of adhesive on the back of the tile. This will give plenty of adhesion and allow you to use the same principal as used for laying the tray, eg pushing the tile in and squashing the blobs until each tile is minted lamb. Don’t butter too much wall at any one time as the adhesive has a much shorter working aka “open” time when spread thinly on the wall Beware to use a level, vertically, as you go up the wall, as this method will see you slowly coming out away from the wall as the courses rise. Keep that in check. Check course by course. You need a bucket of clean water and a nice soft sponge + small paint brush to clean each grout line out when you get a bit of ‘ooze’ coming through. As you go, you’ll quickly get a gauge of what is too much / not enough and you’ll ooze less ( that sounds so wrong ). Every 10 / 15 tiles laid, prise one back off and check how much % of contact you’re maintaining. 60-70% is ample, and panic yea not about gaps at the edges, just ram the grout in, when you get to that stage, and the corners will be just fine. As far as cuts, where to start / stop etc, work it out so prominent features get the most sympathies cuts. @Onoff says he’d have raised the bottom cut higher to get rid of the rip at the ceiling. I think that would have been worse when you look what that would have done to the cut under the window1 point
-
It's not going to be a regular live in house. Just something that will have the comfort of the house and if you felt like it could spend the entire night in there and sleep in the warm and dry. It's totally detached from the house about 8mtrs away.1 point
-
A mate is mulling whether to cover his slatted gate with a bfo sheet of clear polycarbonate to reduce the guillotine effect. The trouble is, the surface will, at least on one side, still be "ribbed" and not smooth. That could catch somebody.1 point
-
I'm particularly pleased with the way my gates coming along. Keeps the super car stable safe at least. SWMBO, pictured, is one reason all my jobs take so long... (Mods, any chance of a tongue in cheek emoji? ?)
 1 point
 -
Once they actually connect ours up, my assumption is we will leave it open during the day and close it at night. We get at least one delivery a day and I don't want to have to constantly be opening and closing it, I wouldn't be surprised if some delivery drivers just give up if you don't answer immediately. I checked, it is 3.5m, 3.4m is as low as I would feel comfortable with, but I am very paranoid about scratching the car. The Tesla that we have is a very wide car. I also wanted people to be able to get vans up to the house if they come with a large delivery etc, you can get a 7.5 tonne lorry through if you have to. Actually the builders got a cherrypicker stuck in the garden just as they were finishing off the house, they brought an artic up the driveway to tow it out, but they then hit one of the gate posts and dislodged it on the way out. They had only built them the week before. As it needed rebuilt we moved it over another 100mm.1 point
-
Quote that in your application.1 point
-
We have a sliding cantilevered gate and a pedestrian gate. If I did it again I would just have one sliding gate and no pedestrian gate as it is very expensive and the pedestrian gate will probably hardly ever e used. I notice that most of the gates around here pu tin recently are solid wood infill. I personally feel they are a bit unfriendly so went for a powder coated steel gate that you can see through. Really though it is a matter of personal taste I would say. I am always worried about scraping the car and we have taken our gate to 3.5m. Our car is very wide, but if you approach the gate at an angle it still feels tight, particularly if someone parks opposite it. I tend to swing over the other side of the road then turn into the gate.1 point
-
Personally I prefer the look of a wrought iron type gate. A solid gate may appear less "friendly" or welcoming, however I do see the benefit of preventing nosy parkers from looking in. However a potential burglar will get over either. I don't think an always partially open gate is sensible, but certainly openable via intercom etc. You could consider a seperate pedestrian gate, but far better to have an intercom to allow deliver drivers entry.1 point
-
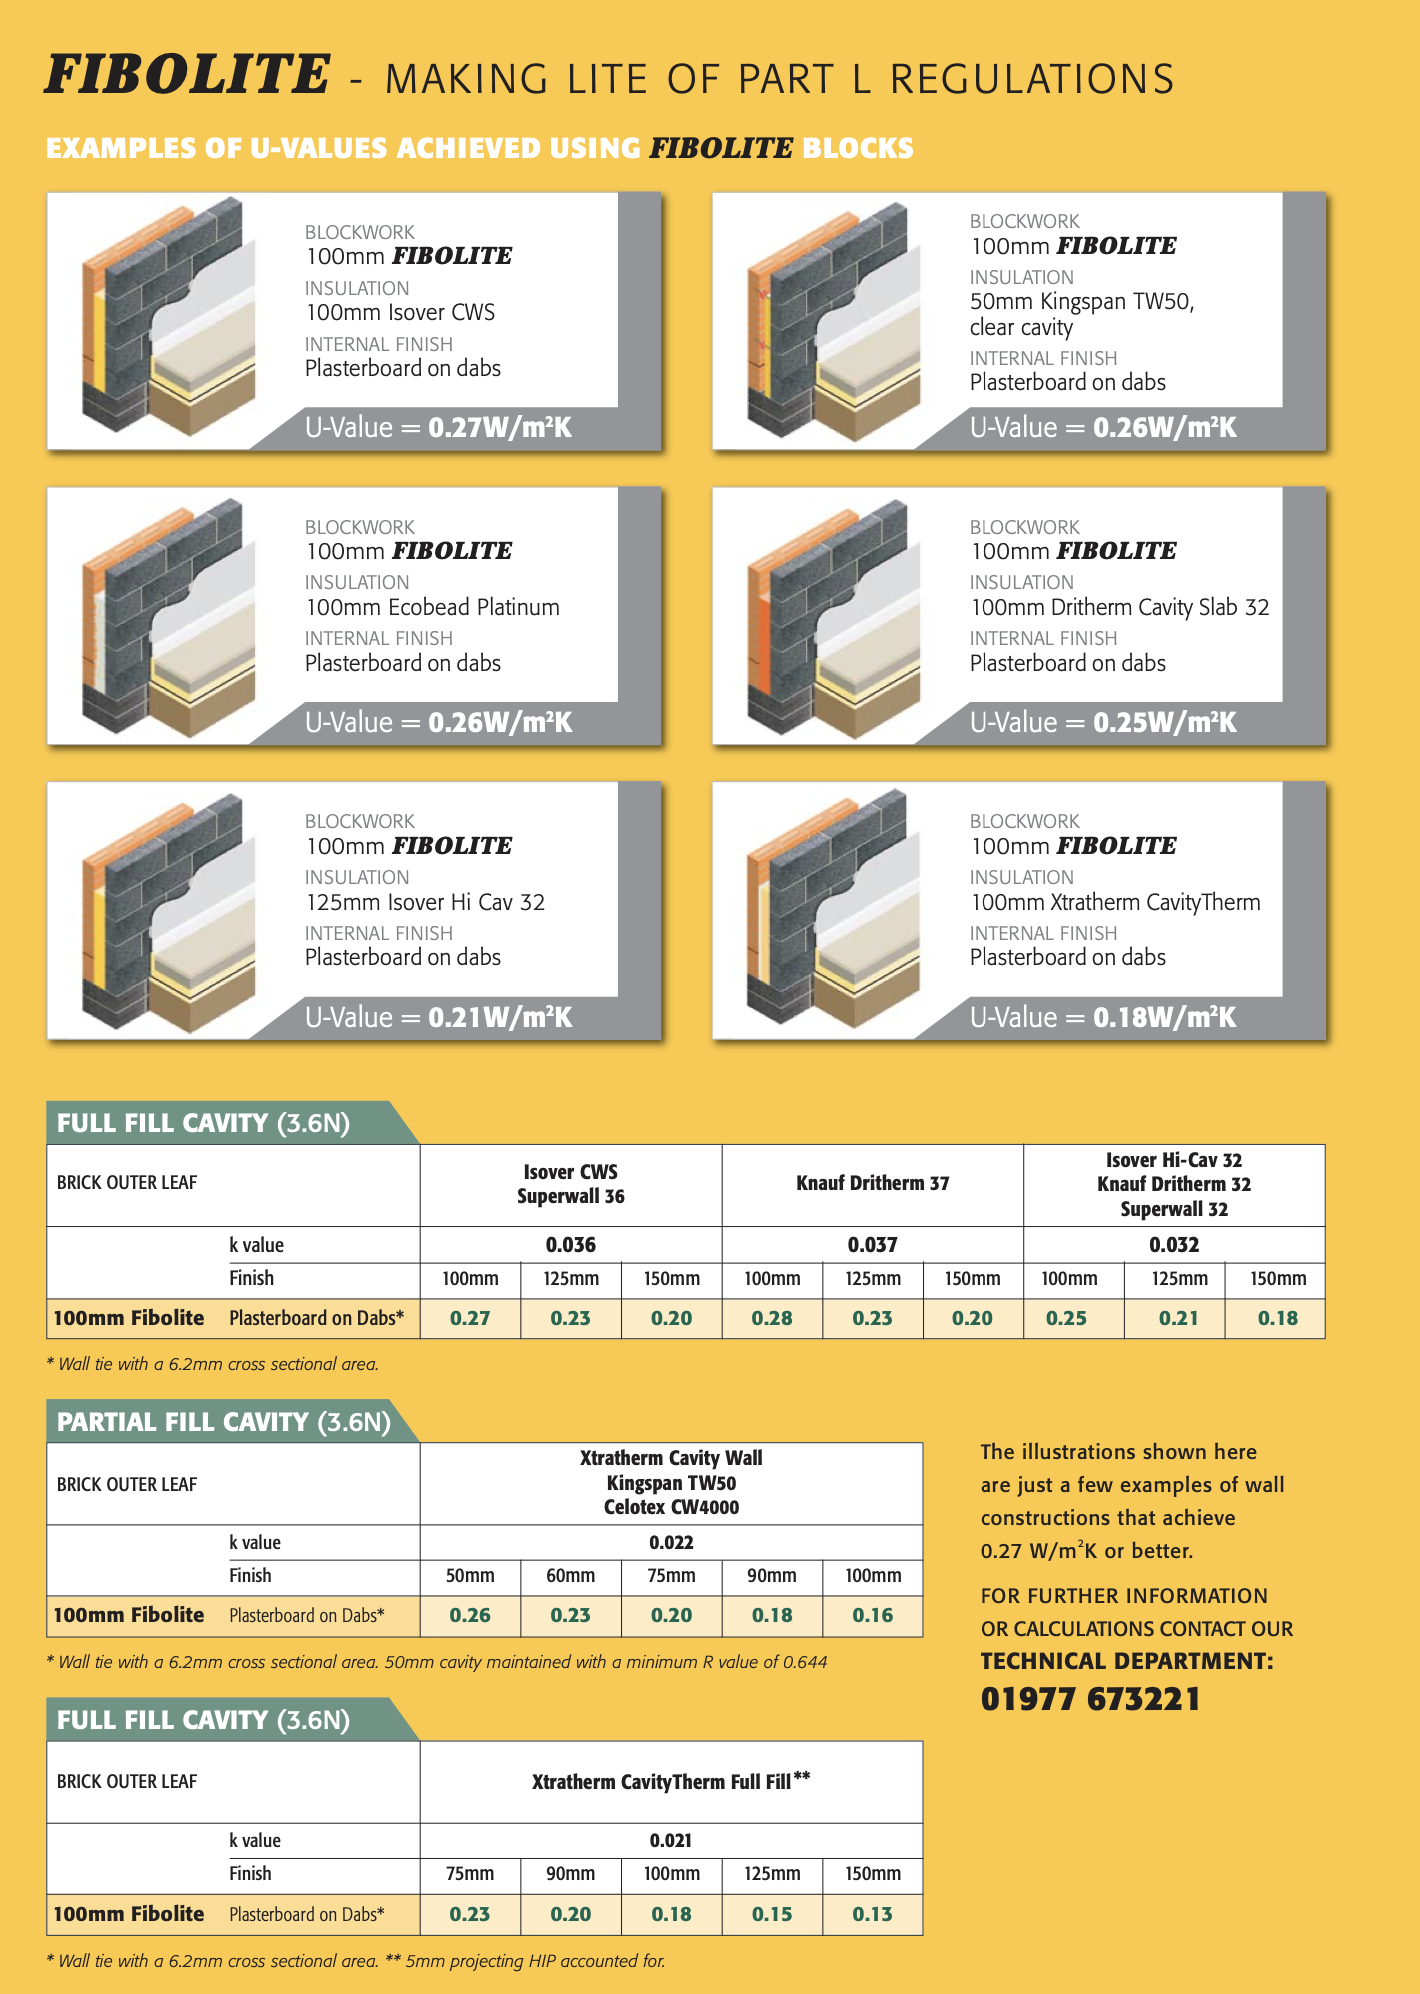
I found this on the Plasmor website - A couple of things - 1. It looks like your build up has a U-Value of 0.25, I would check the SAP calculation has this data and not generic data. 2. You can get that down to 0.18 using Xtratherm CavityTherm but it costs £26ish a square metre compared to about £6 for the Dritherm. The uplift for using insulated plasterboard would be more like £8 a square metre compared to £20 here.
 1 point
 -
Completely usual to have a pedestrian access facility whereby it only opens a fraction. From one of the remote fob buttons, a button in the house, on the intercom etc. (A nice touch I've done is to buy a Ford or whatever pushbutton to go in a dash blank and solder the wires to a gate key fob up inside the dash). An alternative is an opening gate within the sliding gate (with the appropriate safety interlocks etc). A sliding cantilever gate does away with the need for a gate track. The gate control PCB can be mounted down with the motor or in its own remote box on a pillar etc. Don't underestimate the amount of work involved. Plan the cable runs and get someone to double check them. Work out your cable runs to lights, sensors etc and don't skimp on the ducting. Think I've 14 cable entries into my box. Fit safety edges. Typical gate manuals attached (mine's a CB22) Look at the CB2 and it shows clear connections for the pedestrian function. Think how said gate will affect your post and deliveries. You can build a post box into the gate or pillars, fence adjacent etc. Yours will be likely finished before mine is btw. ? cb2.pdf cb22.pdf1 point
-
I'll take some pic's tomorrow and post them (if I remember, nudge me if I forget!) We used these (designed as fly screens for the US market, turns out they keep the hot sun out as well.)1 point
-
There you go Dave APP_2019_0862-APPROVED_-_TREE_PROTECTION_PLAN-8580459.pdf
 1 point
 -
For those who contributed to this I spoke to my project manager re this today. So regarding the dormer flashing /lead work he said it’s not finished and will be flattened and squared, nothing to worry about. Re the clipped tiles he said it was purely a design thing and because I never asked for it No bother to change it back to unclipped tiles if I’d prefer. He said it takes quite a bit of time to clip them like that but ultimately I’m the client and if I want them replaced no bother at all. He reassured me that they weren’t cutting corners or anything, I replied that’s literally exactly what they were doing. I was chuffed with that gag and so was he. Luckily I have a good pm / building company.1 point
-
Hi Moved in on Saturday after 2.5 years but that includes doing up the house we were living in and renovating my sons flat. Flooring still needs laying down stairs and a new kitchen when finances allow,will come in at around 1k per square metre 300 sqm external. Have enjoyed the journey and thanks for the advice from yourselves.1 point
-
Yes, I'm running an exhaust air source heat pump to heat a 260 litre tank (our supplier also does a 300 litres, would a couple work for you?). I'm running it as a MEV system (which help to recover the steamy air from baths and showers) but you could draw the air from outside/garage if you have MVHR. What I like about this system, is that it cost us £2,500 for the heat pump and cylinder (also has a back up dual immersion and acts as the fan for the MEV). Been running it for two months and the running costs is very cheap. My overall electricity usage is 10kwh a day for a family of four. The heat pump is fairly small compared to the larger ones often installed by other self builders but as it just does the hot water the output capacity is maximised through out the year. My general view is that a well insulated house need very little in terms of heating if I ever have a really cold period (I live in Skye, winters tend to be mild, windy and wet, similar to Oban I would imagine) I have our WBS and ours is not a token stove but well designed in the centre of the property, surrounded by dense concrete blocks. If we need a little bit of extra heating in morning then I'll use direct electric heating/heating from towel rails etc1 point
-
Think in simple terms. An immersion heater is 3kW and for 7 hours at night on E7 that is therefore 21kWh maximum put into your tank. An 8kW stove would put the same amount of heat into your tank in a little under 3 hours.1 point
-
Three things you could keep in mind. 1 - Keeping it simple. Emerge from complex analysis to the simplest solution. 2 - Build your cost models to cover capital, bills and a 10-15 year period of time. That is the way Passive House works - it only looks (roughly) for a 95% reduction not Zero Energy because the last 5% may be a nice badge but is not cost effective in emissions terms. 3 - Don't forget passive aspects like pergolas and trees. Ferdinand1 point
-
Just by the pictures, you may not have the relevant gaps for a compriband. I would apply ME501 VV. I only recommend Illbruck, as it's what we use all the time and it does the job, I don't get anything from it. https://www.illbruck.com/en_GB/product/me501-vv-duo-window-membrane-hd/1 point
-
Hoping it may help, I would summarise the differences over say 10-20 years ago as: 1 - A well insulated house gets isolated from the outside environment more, as both heat (insulation up) and air (leakage down). The house itself becomes more stable. A tell tale was insights from quite some time ago (15-25 years?) when people started superinsulating that eg "the temperature in the lounge only goes down half a degree in 24 hours when I turn all the heating off". The overheating in summer thing is the flipside of that that took some time to be appreciated. 2 - That introduces big changes behaviour and management - heating and cooling interventions are relatively smaller (and bills are less), but that also means that there is less scope to fix overshoot and environmental factors with big interventions - when they happen (which is hopefully less frequently). 3 - That in turns mean that control has to be almost designed in, which is why we have all these simulations, PHPP, solar projection models and all the rest. 4 - Two of the differences that we have noticed here over the last several years are a) that low autumn / spring sun is one area of concern, and b) summer overheating in really hot spells above 30C is another. Which is why we have all these wooden lattices around windows, and are thinking about evolving heating systems - either with cooling built in or extra eg split aircon units - to also do cooling or overheating mitigation. 5 - Things like local microclimate and externals such as trees can become relevant. 6 - In my house which was done to perhaps some what better than regs at the time I have some of these issues that I am currently thinking about. 7 - My view is that these factors gradually become more important as spec moves from current building regs towards PH levels. 8 - I find that some of the approaches and tricks used by my-dad-the-architect or my attempts to renovate rentals to higher standards help to address this is my own (somewhat less analytical) manner seem useful, so I talk about those - even though a lot of it has been a combination of gut feel and conviction. Other people have looked at it through a lens of numbers and calculations. 9 - One of your needs is to reflect on this as far as you find necessary for your new house. Then over the next decade you get to test how right you were in your assessment. Action learning ?. Hope that helps to try and express a summary in plain English. Ferdinand1 point
-
Ok so you have to give some thought to the fact that if you are doing a lot of the work yourself and you,’re not a tradesman the build will take longer and the family will be living in a building site / caravan for some time. You might therefore want to think about renting but by the time you add that in you might be worth going more towards a more turnkey service. Your proposed house is huge and it won’t be long before you and wife are living in a very large house when the kids are away. Less of an issue if you intend to sell when the kids leave home. An option for you could be to build a smaller house with less personal involvement. So you all get to move in quicker, perhaps you could do the kitchen something like that, perhaps provide help to the trades. And that’s you in a nice house in the country. Then move to phase 2, with your increased knowledge, and build a big double garage with accommodation above. Something you can do yourself more hands on. So you have the smallest commute between home in country and your project. I was like you wanted to get hands on and save money but wife persuaded us to go turnkey but I’m doing the kitchen. Then landscaping and the most luxurious manshed known to, well, man. House is big enough for us as a family, small enough that when daughter leaves home we won’t need to sell because it’s too big. you’ll have seen those self build TV shows where the fella ends up working 16 hours a day for 3 years and misses his family growing up. But it’s broadcast in a 55min show. Also think god forbid if you got injured or ill mid build.1 point
-
Gorgeous house and great build cost as well! Hate to sit on the fence but it's a bit of both, I love keeping busy and learn new things so I want to get involved for that aspect but also as I think carpentry might be a business I'd enjoy (from a furniture aspect) so think doing loads of bits in the house would be a great learning environment. But there is also the cost part, the more I can save the more I have as a retirement cash buffer. Wife still works but from home and although retired from my main career I wouldn't rule out me finding a work from home job down the line. Kids have few years between them, son is 16 ie will be 18 when build complete so whether he lives with us depends if we get plot within commute of whatever uni he goes to. Daughter is 10 so we can count on her for foreseeable future. A final aspect (on the keeping busy front)... If on the off chance the whole experience is borderline enjoyable and we actually create a thing of value (commensurate with the stress), I also wouldn't rule out selling the final article and going again! (If my wife doesn't kill me first)1 point
-
If laminate flooring, then a suitable foil kit instead of a wire, and either lay straight onto the boards, or level first and then lay the foil + laminate / engineered floor. Any leveller under the foil needs to be 100% dry before being covered!!1 point
-
6:1 sand cement will do it. Just lay tiles straight onto the heater element in adhesive.1 point
-
Yes - there will be enough moisture in the sand for the cement to go off. Makes it easier to level this way.1 point
-
From the Marmox WS; Quote, "The unique patented surface of Marmox Multiboards allows tiles of a much heavier weight to be safely and securely fixed to walls. Being completely impermeable to water, they are doubly useful in tiled areas prone to moisture such as kitchens and bathrooms where they will act as a moisture barrier protecting the walls and floor. Multiboards can be used to insulate and waterproof walls, floors and ceilings and noticeable benefits will be gained by using any thicknesses of 10mm and above."1 point
-
If fitted properly, the insulated boards can be used as DPM1 point
-
you can just use sharp sand and a DPM under them, or a dry sharp sand and cement mix to level the holes. Then the tile backer board on the top.1 point
-
I've been thinking about this as well, and can't find any strict golden rules. I'm going to try to stick to square (ish) rooms where possible & height wise as you mention 2.4m is standard but based on what I have read I'm aiming for 2.7m on the ground floor at least.1 point
-
I used them on this job, which ad an un-insulated 150mm concrete slab. The insulation boards run up to the edge of the shower former, and insulate the UTH wire from the sub-floor below. Not great, but shit-loads better than heating the concrete floor with an UTH setup !!!! You'll be looking about 40p in the pound going south if you carry on with your proposal.
 1 point
 -
Use tile insulation backer boards to level the floor, and then you get a good method to both level and insulate the slab prior to accepting the finished floor covering. What finish do you have intended?1 point
-
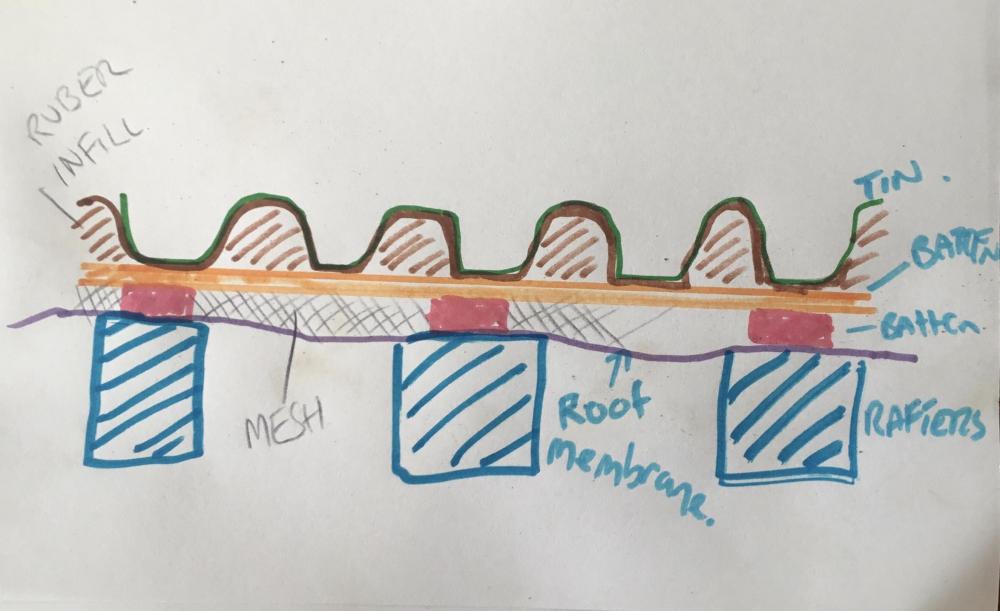
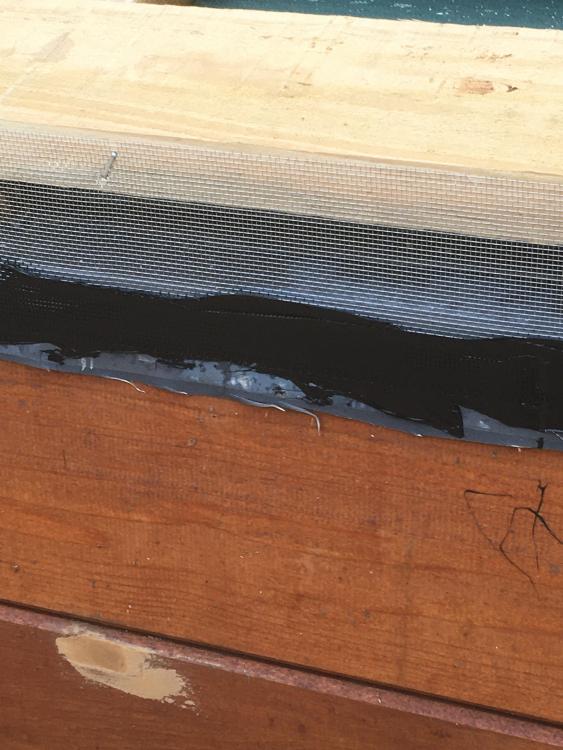
I was told this is to stop water tracking down the edge and on to the gable end.1 point
-
Just get the standard one from the local builders merchants, ask which one they sell the most of.1 point
-
I think @Russell griffiths design is spot on, max ventilation and no wildlife can get in, but as he said space your battens out as required. I really can’t see how the rubber infill is a good thing at the bottom....... you need ventilation. I guess you could fit it on top of the first batten in conjunction with a wire mesh to stop wildlife and let the ventilation work as it would be quite hard to get wire mesh to work with the corrugations. You will need to do something at the top if you live in an exposed location as I have watched water blowing right up my 45 degree roof and water was just pouring in under the ridge and running down the roof membrane and into the gutter at the bottom ! The rubber strip worked really well to stop this.
 1 point
 -
This is how I would do it cover the tops of the rafters with a good quality breather membrane, then a 50x25 counter batten that fits on top and parallel to the rafters then a 50x25 batten fixed on top but at 90degrees to the rafters, fit sheets on top use a ventilation strip at eaves and ridge you want airflow but not bugs. Those battens are 100x25 and are spaced 100mm apart you won’t need to do this, space them how far apart the sheet manufacturers say you need the fixings 600-750mm whatever, remember you won’t be able to walk on anywhere there isn’t a batten. mesh at facia level
 1 point