Leaderboard


Popular Content
Showing content with the highest reputation on 08/03/19 in all areas
-
A very very long and difficult history to our self-build that we will compact into as short a space as possible to save readers much of the grief we have been through. We have always lived in (and renovated) old, cold, draughty and character-full houses, and our last house (a Victorian vicarage) had lots of glass and double aspect rooms and was full of light. We wanted to downsize but couldn’t find anything with similar light and space, and some of the new build ones we looked at were really poor quality. So we decided to self-build and started to look for land – and as some of you already know it’s not an easy task. Then we came across a tired 60’s bungalow on a 1/3rd acre plot about 2 miles from where we were living – perfect location. All the other bungalows on our side of the street had been developed to reasonably dense new build developments with a real mix of styles and sizes, and outside the conservation area – perfect for knock down and rebuild. Piece of cake we thought – how hard could it be to get Planning (little did we know!!!! and if only we had known then what we know now ....). So after a small round of bidding, that was won; not on the highest bid, but with our throw away line ‘offer not subject to anything’. We won the day, we were the proud owners of a somewhat tired bungalow, and then the fun started! First problem was selling the Victorian vicarage in a downturning market which took about 3 years. So finally sold, and knowing how much cash we had, we moved in and started on the long winding road to PP and self-build nirvana. We started with the German kit houses – fantastic quality and build process, and after a few trips to Germany we decided we really liked the modern sharp style that typifies much of new European houses today (or, rather, doesn’t in the UK). As a tip if you want to see literally dozens of show homes visit one (or more) of the (19) Fertighauswelt (think this translates approximately to “ready built house world”) sites in Germany (https://www.fertighauswelt.de/ ) – the best 5 Euros you can spend if you want to look for design ideas. Sadly over time and a Pound sinking against the Euro the German kit house was never going to work. And also working with the site and the budget it really started to make sense to build two houses and sell one to subsidise the one we wanted to live in. Unknowingly we had just created the perfect anti-PP scenario:- cutting edge modern design in a street of pastiche estate type houses; being greedy enough to want to want to build two; and being the last bungalow standing and surrounded by FD&H NIMBY neighbours. Rather than taking you through the gruesome blow by blow story here are the statistics:- Total time from first App to final Appeal decision:- 4yrs and 10months 1 Pre-App – which was a total waste of time and money 7 Planning Applications (inc 3 CofL/ PD apps) - 2 Approved 6 (or perhaps 7) different Planning Officers 3 Committee decisions:- 2 Refuse & 1 Approve, all with prior Officer Approval 2 Appeals:- 1 Refuse & 1 Approve (sadly we didn’t win costs) 105 letters of objection & 1 of support (from a London Architect who loved the design – bless him for that ray of sunshine It was a dreadful process and the main reason for the time and grief we suffered seems to be that we are surrounded by vile neighbours who have friends in high places. The public comments generally had very little planning relevance but included phrases like ‘peeping toms’, ‘covert surveillance’ and even likening our design to ‘Grenfell Tower’. We were stoic and kept turning the other cheek but we sent this last one back to the Chief Planning Officer as ‘offensive and defamatory’ – he said it was perfectly acceptable (to quote Joe Walsh ‘You Can’t Argue with a Sick Mind’)! If we thought the public comments (sometimes called ‘solicited hate mail’) phase was bad then let’s say the Committee phase was much worse. Firstly it seems that the decision is made before you even walk into the room, and that nothing you say will make any difference, or even be listened to. Then the Committee infringed our copyright, accused us of greed and telling lies, and told us that they didn’t care at all that we were planning to build low energy houses. If we had any faith in local democracy and politics we have much less than none now. We are certain that the only reason we got one through the Committee is that one of the esteemed Councillors really upset/insulted the Chair (we decided we really shouldn’t print the exact comment); at which point the discussion divided on party lines and incidentally we won! As mentioned the Pre App Advice was a complete waste of time and money (for us). We offered the Officer 3 options and he agreed what he thought the ‘best’. He also gave us a lot of ‘advice’ which we incorporated to the letter in the Application. He then proceeded to keep changing his mind and we did 3 major re-designs over 12 months until he ‘approved’. It finally went to Committee and was refused. The subsequent Appeal which we lost was true goldmine as it contained real data on what was acceptable and what wasn’t. We then built the subsequent Apps on this and the Officer(s) really couldn’t disagree with the previous Appeal comments. Also in the second Appeal we seriously questioned some of the proposed Conditions and the Appeal Officer took out most of them. A real win and we saved our Planning Consultants fee in having a really onerous Design and Methods condition removed. Certainly worth a shot if you ever go to Appeal. If any of you have been through this sort of process then you will know how personally depressing and demoralising it can be – and we have heard worse war stories! We had great and very patient designers and a superb planning consultant and some amazingly supportive friends and family. Also after the initial setbacks we did have a very focused plan on how to get to where we wanted to be in incremental steps, with a workable Plan B. However our advice would be: only ever buy a plot that has PP for something you want to build (unless you have lots of time, very deep pockets and skin much much thicker than a rhino). So finally we won at Appeal, and we are staring to build two really interesting low energy houses – more in future posts. We will try and keep up a Blog as best we can, and having got that backstory out of the way everything should be easy from now on!!!!!!4 points
-
Well lets say it has evolved and been shaped by the titanic forces of nature and the planning process. Its not quite what we initially wanted and has been compromised and compromised over its various iterations and has sadly lost some of our ‘must have’ features. But it is kinda cute, and we do really like it! The site is about 1/3rd of an acre slopping up from the road and has a shared driveway to our neighbours at the rear. In the middle of the plot is a 3 bed 1960’s bungalow which has seen better days – habitable but not great (and don’t mention the asbestos). The site may look big and easy but it is actually quite constrained – with a shared driveway down one side and a shared sewer running across the plot. Together with the slope and trying to keep the ridge height down to appease the Planners (even though the houses on either side are all 2 or 3 story) it is a tricky site. We wanted lots of light and a feeling of space and openness – so that cliché of lots of glass and open plan. We also wanted an Endless Pool and garaging for a collection of RX7 sports cars. We also wanted a crisp contemporary exterior and don’t like wood cladding much. We also wanted low energy – but not hung up on achieving Passive Haus per-se. Oh and it has to be low maintenance and a lifetime house. We initially used a designer who was really great and had an amazing ability to use space in a really efficient way. However for the final design shown here we used a real Architect (with a capital A). There are those who would argue its an unnecessary expense but firstly he came up with a very creative design in a very constrained environment. And secondly the quality of his work probably helped with Planning. We get on very well and he is doing a fab (but not cheap) job. As we are downsizing we would actually like a smaller garden than 1/3rd acre, so that and the economics, has led us to two houses on the site. We have had a few different arrangements of this over time but have come to two side by side. They are different sizes and layouts but they distinctly read as a pair. Height dictates a flat roof – much hated by our neighbours – and supported by the Officer. Our house is bigger and is cut into the slope with the front out of the ground and the back completely in. It has the entrance hall, garaging, plant and an Endless Pool in the partial basement. The 1st floor is mainly open plan dining, kitchen, living areas, with the Sitting Room opening out to the rear garden at the back. Top floor is 4 beds and bathrooms and is topped by a flat roof. The eagle eyed among you may have spotted the Lift - not needed at the moment but designed in and will be fitted if and when we have the cash. It seemed like a good idea with a 3 story house and us not getting any younger! The other house is smaller and split level. Again cut into the slope but only by half a floor. So entrance hall and kitchen dinning hall are level with the front garden and parking area. Up half a floor to the rear living which opens out onto the rear garden. Then up another half floor to the front two bedrooms at the front, and then up half a floor again to the rear master bedroom. All topped by a similar, but split, flat roof. It is just so neat we almost wish it was ours! The overall design responds well to the site and makes the most of it, and the Architect has done his best to make the front façade broken and not monolithic, but simple (and cheap) it aint! It will be mainly off-white silicon type render with some Rockpanel grey cladding panels and grey windows and EPDM roofing – so sharp and contemporary but not the classic white sugar cube. You may be reading this and thinking its not what I would have gone for and its not my taste - our neighbours probably thought the same. Our answer is that if you feel strongly then go find your own land and build exactly what you want - just put your money where your mouth is (and keep it shut unless you do). Though in the true spirit of BuildHub constructive criticism is always welcome! We have spent a lot of time refining the design and hopefully we make the most of the space but as we all know its always a compromise! So having got this through and arrived at something we really want to build its now time to start - more to come in future posts.2 points
-
Don't over think it. You have a house for x number of people. Buy a packaged treatment plant for x (or slightly greater) number of people. Building regs defines x depending on the number of bedrooms, so building regs says 5 people for ours and we have a 6 person treatment plant. Re fat etc. I work on the basis of treating fat as solid waste that ends up in the wheelie bin. So for exaample when you have finished your fried breakfast, do NOT just put the pan in the dishwasher. Pour what fat you can into the kitchen bin, then wipe out the pan with kitchen towel and put it in the kitchen bin. Then very little fat goes down the drain. Don't put anything down the loo that has not been eaten first, plus a bit of soft toilet paper.2 points
-
I remember struggling with converting from 2D to 3D in AutoCAD. Discovering the EXTRUDE command was a revelation! I have no issue modelling 3D in AutoCAD. It's the thought of learning something new! I reckon something that converts from a 3D AutoCAD model to a .STL file might be the kiddie. (My boy is au fait with Solid Works. Our industrial partner uses Solid Edge).2 points
-
Been a busy few weeks. Following the groundworks, the slab was set out and poured. It was a bit of a warm day, and there was a definite sense of urgency as it went off fairly fast. Now we've got a local joiner putting a frame up for us. It's being built from I-beams on site. I'd planned this all as best as I could, expecting our posi's next week based on what the supplier told us about lead times. It now turns out it will be another 4 weeks. While I'd rather not leave the frame exposed longer than we need to, we can't do much about it now, so we'll have to wrap it up as best we can. At least it's not winter. In the meantime, the tedious business of burying the water pipe continues...2 points
-
"You could heat it with a candle, mate" was what a visiting roofer told me recently. He thought we'd overdone it by installing insulation properly and (horror of horrors) taping joints. But now I AM thinking about how to heat it (our PD outbuilding) and I'd hoping for some advice/tips/sales pitches/etc. This is what it currently looks like: : It's about 55m2 inside - 3 rooms inc. open-plan workshop, yoga studio and a bathroom. Strictly incidental use as it's a PD building. The building is too small for ASHP (IMO) and doesn't have access to gas. We're looking at ways to heat it with 'leccy. Default idea was to stick some electric rads in. But my Polish plumber has persuaded me to look at Termofol, infrared UFH. He tells me it's very popular in Poland. (https://termofol.co.uk/) Has anyone used this stuff, or anything similar? Any good? Limitations? The other idea, which I'm a bit less keen on, is using wall-mounted infrared panels like those made by Herschel (https://www.herschel-infrared.co.uk/) and others. Has anyone tried these? I'm really open to ideas on this. And if nothing works out, I've always got a candle as a fallback....
 1 point
 -
You worry to much1 point
-
That's also an issue with filament printers. The slicer I use (Curua) can add a raft or a brim around the object for you automatically. A raft is usually several layers thick and goes under the part. A brim is just a one layer "land" that surrounds the object like the brim around a hat. A brim is easy to remove so no need to raise the object on supports. A raft is harder.1 point
-
A good pair of secateurs would be much better, Niwaki which are expensive but beautifully made and will outlast you or Felco1 point
-
There are pros and cons to a decision either way. Local circumstances and risk appetite are important factors. Diggers damage things, break down, eat budget. But if you can mend things, maintain the digger and re-sell it at roughly what it cost - what's to lose ? Here's my answer: I took a year and many posts on BH on whether to buy, and then which one to buy: long story short, after 4 years, we're nearly ready to sell our Kubota. I have put 500 + hours on the engine, replaced the tracks, maintained it to a very high standard - dealer only on site servicing. Cost via the purchase route Initial outlay £13k Off the top of my head: new tracks, new track clips and a full 500 hours service £700. Replacement hoses £50. Bits and bobs - massive shackles, official Kubota lifting hooks £150. Massive lifting chain £100. Say £14k Sale: very worst case £10 k Nett cost: £4k Cost via Hire 500 hours (same engine hours as above) = 62.5 days For my type of digger, the cost is £150 per day plus transport : £210 62 * 210 = £13,020 Nett cost: £13k The kicker is that through the purchase route, the digger is available 24/7 at the drop of a hat - sometimes all that was required is a fifteen minute job with a digger that saves a two man / day job. And you cant get that level of utility with a hire digger. Nobody can arrange a hire to suit the requirement for a 15 minute job. Finally - and this surprised me most - most of the jobs done with the help of a digger had nowt to do with digging Lifting, smoothing, nudging, squashing, anchoring, hammering (posts), blocking, holding still enabling one-person working where two would have been required. Even my wife loves our digger " Best thing we've bought to date" she's happy to repeat to anyone who will listen. "Better than the scaffolding?" "Well just about, yes" The key thing is context. Perfect for us : maybe not for you. A 3.8 for £9k? Hmmm - I'm wincing a bit. How many hours on the engine, what are the tracks like, look at the track clips, and how sloppy is the main ring? Proportional controls?Service Schedule fully stamped? With your own digger there's one big disadvantage, yer mates all want to play on it- so I have a garden gnome ready for them. His name is Clarence. "If you can lift Clarence off the ground without knocking him over , you can have a play". To date, only one young lass has managed it. Diggers need a gentle touch.1 point
-
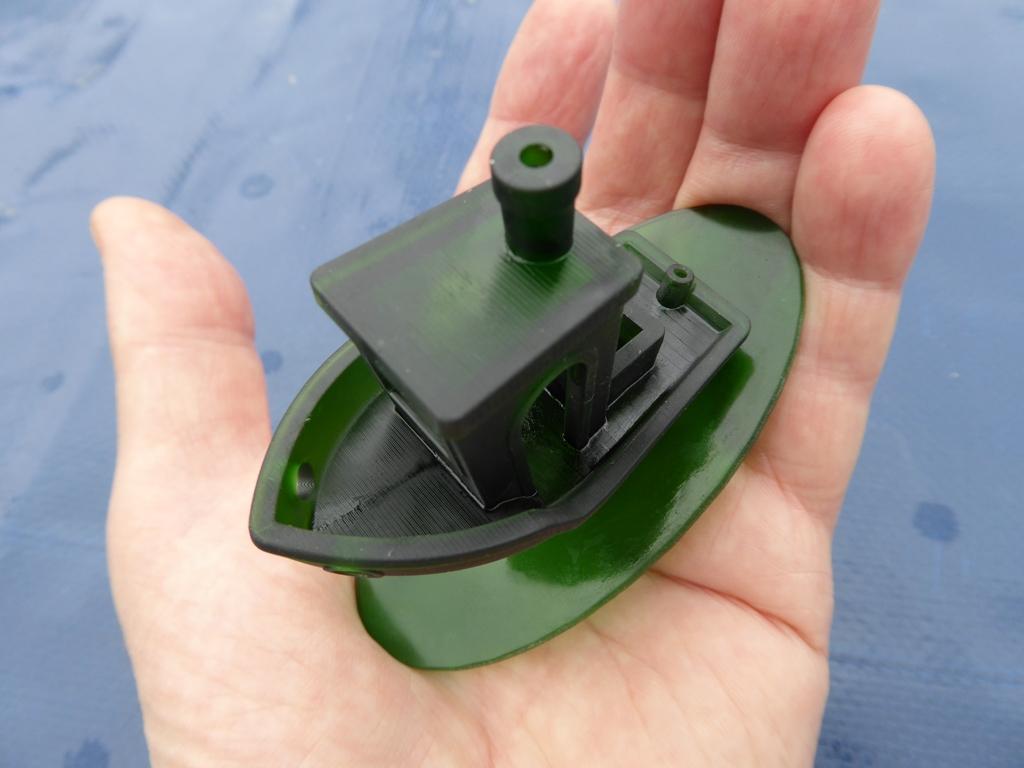
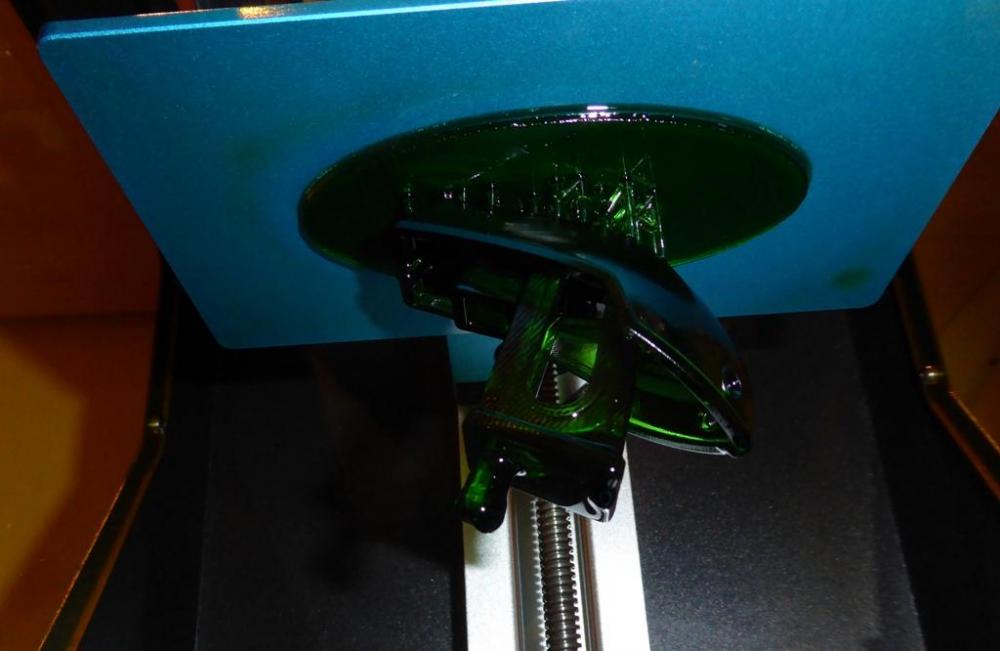
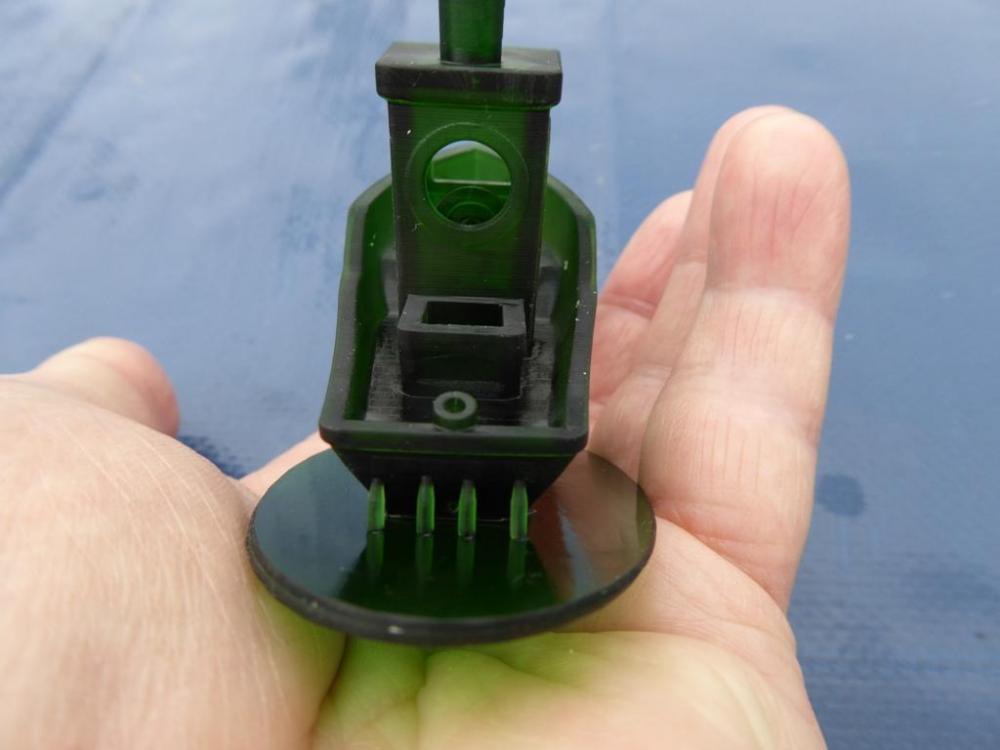
Third time lucky... Took three goes to get the standard Benchy test model to print, there's an issue with resin printers needing a larger base area so that the model stays fixed to the build plate. From what I've learned (largely by experiment) the problem relates to the balance of forces when a layer is separated after it's been printed. The newly cured 50µ layer adheres to the thin layer of FEP film between the exposure screen and the resin. The build platform moves up a few mm after printing each layer, and this breaks the layer away from the FEP film (or is supposed to) so allowing resin to flow in ready to expose the next layer. If the layer adheres more strongly to the FEP than it does to the build plate, then it will just pull off the build plate. The work around is to add a support plate plus supports to the model, and angle the model slightly so that the area being printed at any time is smaller than the area that's adhered to the build plate. This seems to have completely fixed things. This is the Benchy, upside down, "hot off the press" (really straight out of the resin tank) showing the plate and supports I added: And these photos show the same Benchy after being cleaned up and post-cured: Overall I'm pretty happy with this printer so far. Not too steep a learning curve to get it to work well, I just need to get to grips with 3D CAD now. I also want to try out some other resins, as so far I've just been using the sample bottle that came with the printer, which is (unsurprisingly) the cheapest resin available. I suspect that the results might be better with some of the more expensive, opaque, resins. Off to trim all the support structure off the Benchy and clean it up a bit to see how it looks when finished.

 1 point
 -
I would hire the farmer’s, depending on any conditions not mentioned here.1 point
-
This pops up on a regular basis Those that have diggers find them invaluable But with diggers there’s no one size fits all 3.5 is your most versatile Personally I think hire is the best option Certainly in your case £50 is a great price1 point
-
If you can hire one for £50 a day, why on earth pay £10,800 for one?1 point
-
16 kW sounds pretty big for that sort of heating requirement to me. The spreadsheet really gives a worst case result, as it doesn't account for incidental heating gains, from people, appliances, etc. I would have said that a 10 kW unit should be more than enough, and should work with a fairly high efficiency even in pretty cold weather.1 point
-
Plus one for looking at those front legs, triangulation needed on those I would have thought.1 point
-
That's brutal! 32mm pipe? I'd agree there's less chance of freezing under a heavy tree canopy, and the debris on the ground acts like an insulator, so wouldn't worry too much about those sections unless is seriously cold for several weeks. However, anywhere that is rocky is highly vulnerable to freezing, and you'll need to insulate and duct the pipe. MDPE pipes split badly and weaken through frost cycles.1 point
-
Very successful. They were wise enough to get Exeter University involved early on so the area was properly monitored for a couple of years beforehand so they had data to compare to. https://www.cornwallwildlifetrust.org.uk/what-we-do/our-conservation-work/on-land/cornwall-beaver-project https://www.facebook.com/search/top/?q=cornwall beaver project&epa=SEARCH_BOX You might have seen them on Countryfile as well.1 point
-
Our I-beam timber frame with OSB3 exterior racking was covered in Protect TF200 Thermo membrane and survived several months without coming to any harm.1 point
-
Great points as always mafaldina. When we do eat meat, we ensure it's organic. It's more expensive, but it's so much better in every sense. Instead of having meat every day and paying £2-3 for poor quality meat, we spend more and only have meat once a week. It's far more sustainable that way. I feel that the world has become addicted to meat, and the only way to deal with this is to provide cheap, poorly produced meat. Your farm sounds great, and similar to the farms around us (sheep and beef), barring the one guy who wants to build a factory in the middle of the countryside.1 point
-
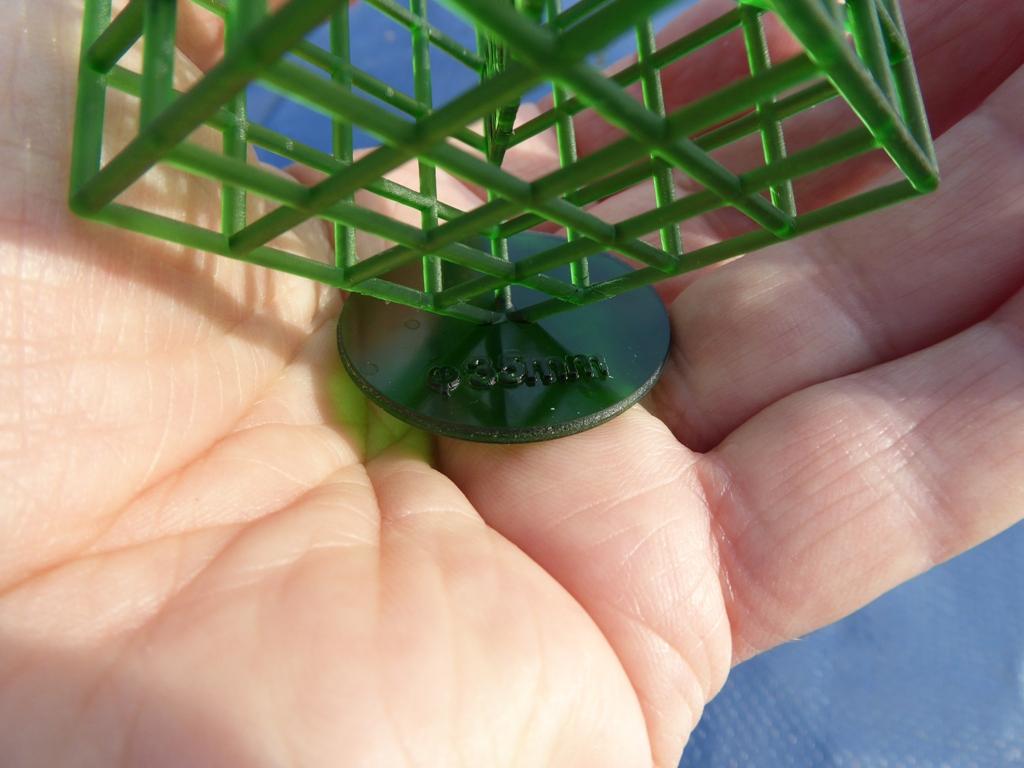
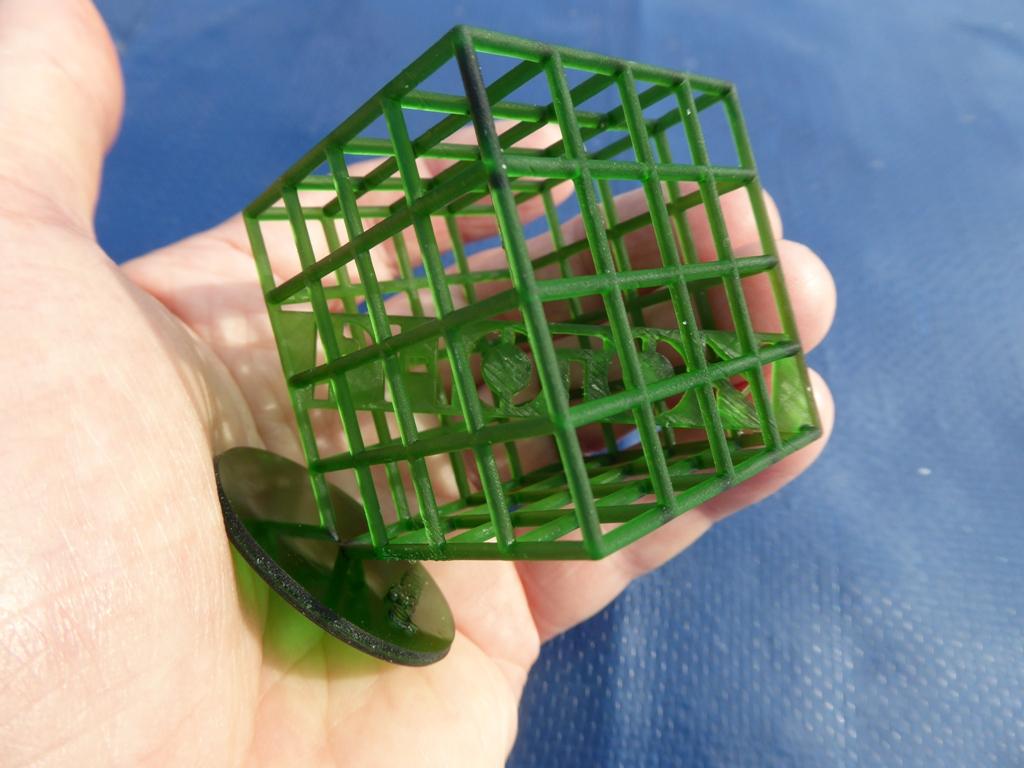
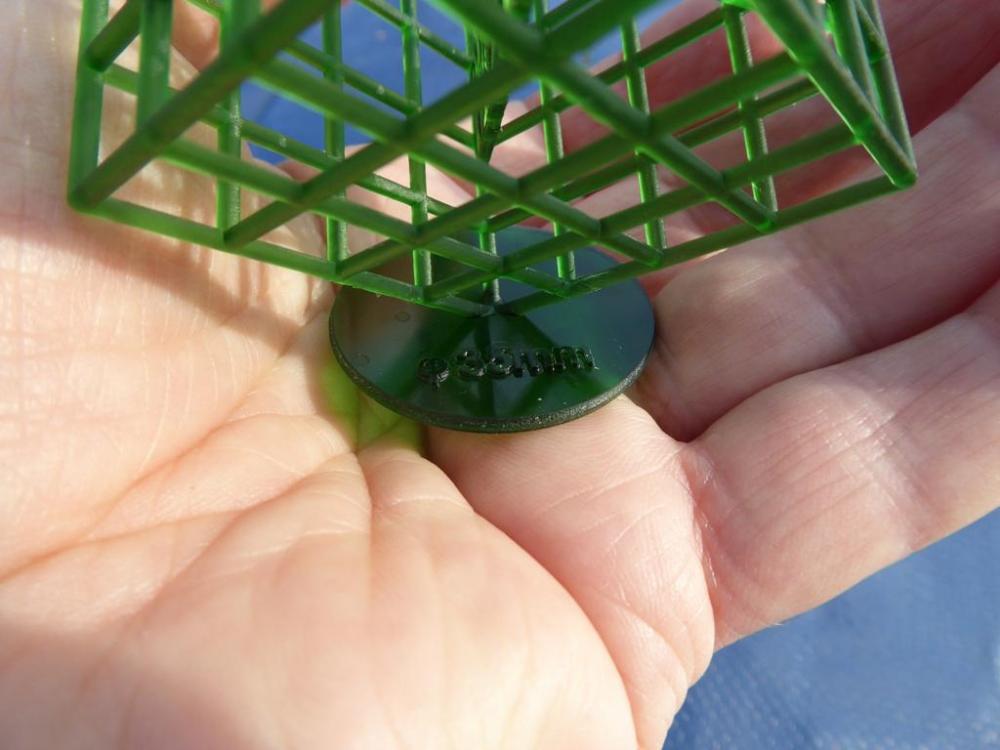
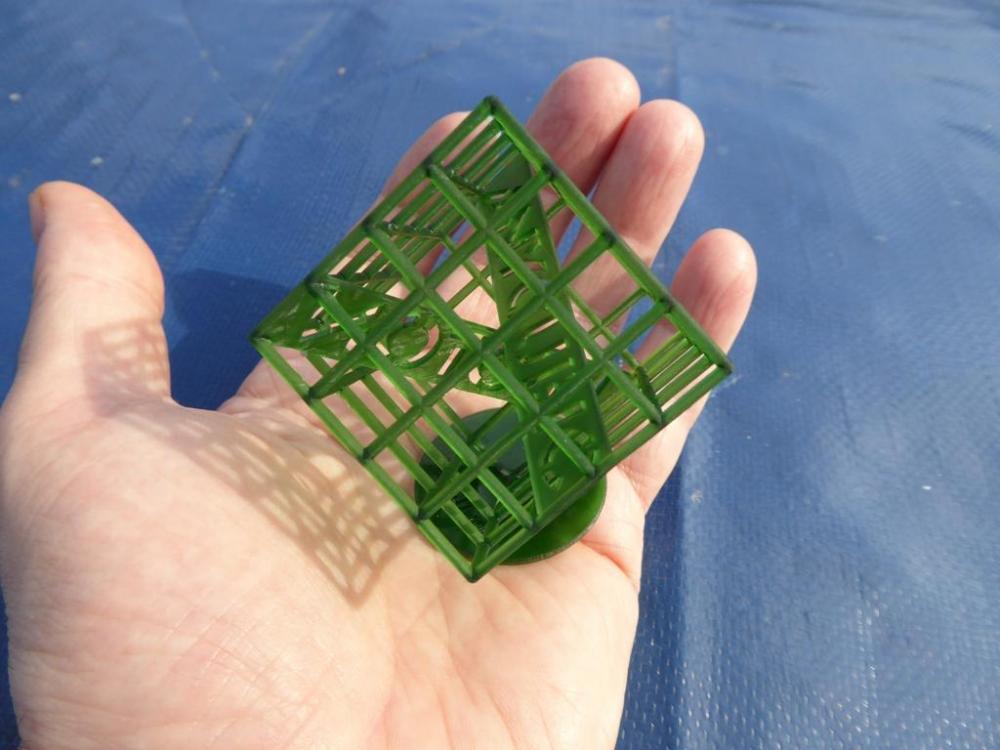
Wow, that's very good. I've been trying and totally failing to print a similar lattice cube on my filament based printer.1 point
-
I have a mix of wired and wireless cameras. The wireless camera is less reliable than the wired ones - it occasionally glitches or drops out. All use a fair bit of power, so if the intention is to run them from solar power then they will need a pretty large battery and panel. The highest current demand is overnight, when the IR illuminator in the camera is on. Typically a camera may draw around 500 mA or so at 12 VDC over night, versus around 200 mA during the day. At a guess I'd say each camera draws around 100 to 120 Wh/day, and to allow for dull days with minimal PV generation, a battery probably needs to be around 5 times the daily demand, so around 500 Wh. The panel needed to keep that battery topped up would need to be sized to run the camera and charge the battery in maybe 5 or 6 hours of sunlight, to allow for winter days where little may be available, so that looks like having a panel of around 100 Wp, which is a fair size. I'd just run a cable and power the cameras using PoE. I'd also look at fitting some extra IR illuminators, as the ones built in to the cameras tend to be fairly directional and don't seem to illuminate the whole field of view that well.1 point
-
Quite impressed with the No Nonsense degreaser from Screwfix. Used to clean the flat roof pre repair painting and on the Golf engine bay too. If desperate for a quick degrease I'll use foam gun cleaner. Acetone I think it is.1 point
-
Chances are they have a contract to provide coverage to 95% of the village - they can then plan to optimize the route accordingly and ignore outlying properties.1 point
-
Oh, sorry Russell, I know nothing about the such legal matters. Perhaps there are others here who might. Notwithstanding, I would certainly contact them and see if you could be connected with FTTP to your new lake house. The price will probably be prohibative but you never know.1 point
-
Just finished cleaning and post-curing my first test print: Pretty impressed with the result, especially as this printer is very much a budget machine. I did the test at 50µ resolution, rather than the 20µ maximum, as increasing the resolution massively increases the print time. This took a bit over 4 hours at 50µ, at 20µ it was predicting a print time of over 15 hours.

 1 point
 -
Some IPAs I've drunk recently taste like they'd dissolve anything...1 point
-
Normal alcohol, or ethanol, isn't that great a solvent over water, infact they are very similar in terms of being a solvent. Isopropyl and isopropanol are totally different chemicals... And you really don't want to drink them! They are commonly found in nail varnish remover and are good at destroying various types of petroleum based products.White spirits is a petroleum based solvent and is good for oil based jobs, like grease and oil based paints. Acetone is another aggresive petroleum based solvent. Methylated spirits is just ethanol with a denaturing agent- methanol, and usually a dye.1 point
-
Don't take this as a recommendation. I needed to make 1 good cooker hood out of 2. One had a tatty nackered case but a working fan, and someone had given me an empty new case. So I needed to swap the workking fan into the new case. But it was caked in grease. I tried all the kitchen and oven cleaners we had in the cupboard. Nothing touched the grease. Then I looked in the garage. White spirit just disolved the grease with ease and it wiped off (a bit like in the adverts for those kitchen cleaners that had not touched it) So I am not recommending white spirit as an oven cleaner, but it does work.1 point
-
I was, when young and foolish, stripping wallpaper off the walls, while drinking vodka with a mate that was helping me. The challenge was to see who was the last one standing. We had to go out that night to meet other friends, we peaked a bit early I think. I won the challenge, but rumour has it, I am still banded from Weymouth seafront unless fully clothed. So I suggest best to avoid all alcohol, or Weymouth, and WPC Wright. Not that she will remember my face, she never looked at it once, saucy mare.1 point
-
The only alcohol I use for cleaning is isopropanol, a.k.a isopropyl alcohol. Relatively cheap if bought in 5 litre bottles and relatively safe if used carefully. Ebay often gets the best prices. Expect to pay around £15 to £18 for 5 litres. I believe that "rubbing alcohol" is essentially isopropyl alcohol.1 point
-
Home Farm. I feel for you and am not surprised the local RSPB were unhelpful. You will need to lobby at a higher level. If they are wishing to remove hedges you might have some leverage there. You need to raise specific objections. Objecting to fertiliser spreading will not get you anywhere, access for lorries delivering/taking away stock, delivering feed might. You might want to contact George Eustice (back as farm minister). He has quite strong views on sustainable farming. This link https://www.cornwall-aonb.gov.uk/blog/2018/5/1/the-future-of-the-farmed-environment-in-cornwall contains a talk he gave over a year ago on his vision for the future of farming and CAP payments AB, worth watching, it also explains how the present system works. Tom Tolputt's presentation also worth a look at. It is possible to farm without antibiotics. My son has a pasture fed organic dairy herd and doesn't use antibiotics (except in very rare circumstances poss 1 or 2 cows a year, they are not milked if he has to), his cows are outside, they don't get mastitis, they are milked once a day only, they will milk for many years not the usual two lactations of many commercial herds. He uses breeds that are hardy (largely jersey crosses) and that don't need to be fed grain/soya. His farm is a carbon sink, they have also introduced beavers to control local flooding downstream. He does not use any synthetic fertilisers and because he mob grazes he fertilises as he goes rather than creating a slurry pool. I have never used antibiotics here, I breed poultry (all sorts) for meat and eggs, beef, lamb and pork (admittedly I am very small scale), my cows and sheep have only ever been fed grass. The biggest issue around food production today is food is just too cheap, there are also too many in the chain between farmer and consumer, all taking their cut, the result is some producers looking at the best way to maximise their profits, large scale IPUs are one way of doing this, if you are only going to make a few pence (it really is pence) profit on a chicken you need to produce an awful lot of them. If you live in the country then buy all your food direct, it's easy, and eat seasonally, do you really need fresh tomatoes or strawberries in January or apples in June?1 point
-
The Protect Bariar has an inbuilt tape at the edges but I didn't trust it, so I made sure each joint was pinched, either behind a batten, or if nothing convenient, I screwed a strip of plasterboard or OSB offcut over the joint to keep it squashed together. For all other joints I used the Tescon Vana that I bought from the German seller on ebay.1 point
-
We are now working our way through first fix for the self build. Our electrician has been busy drilling holes and threading many reels of cables around the house. The other area where we have made some progress is the ducting system. I’ve never ordered ducting before and it took me some time to order all of the parts and then have them to delivered to Skye. This came into two deliveries, both times some of the items were dented and buckled. Some were easy fixed but others required replacements to be sent. I wonder now if this is a common occurrence with others that have ordered ducting online? Once the last parts arrived, I was able to lay it all out to check back to the plan. My plumber will be fitting the ducting which should happen soon. Our brickie will also come back to construct the blockwork for the stove. My next job will be painting the house as the render has now had sufficient time to allow any impurities to be washed away. Although I have been busy with the house and work over the last few weeks, I was lucky enough to be given a wee boat. It was a group effort taking it down the croft and felt great to be on the loch after a few years. Might be the start of a new hobby.1 point
-
20190729_150753.mp41 point
-
Yup I thought about that which is why I measured the resistance across the switch and the heater -- which gave 18Ω rather than open circuit, which would have been the case if the switch had tripped.0 points