Leaderboard


Popular Content
Showing content with the highest reputation on 11/13/18 in all areas
-
Just don’t drink it from one of the bottles in the photo by accident ...3 points
-
With the Velfac system the outward opening ali sash is the same size as the fixed internal timber frame, so if you rendered up to the window you would not be able to open it and nor would it drain correctly. Their detail is to render the returns first, then the window size is the render-to-render size minus 12mm per side and top, and 20mm for the bottom. The window is then fitted with a 15mm cill packer at the bottom and fitted in the opening. The gap is sealed with foam on the inside and Compriband externally. Double check all the measurements as it is easy to mess up.3 points
-
Makes me laugh that it is frowned upon for someone like me to read the rules and apply them to the letter when installing my own tank, yet someone who claims to have the right ticket just ignores the rules. You see that in all trades.3 points
-
Having got all my water issues out into the last post, it's time to move on to happier things and talk about other progress. Actually, that's a little unfair because there is a lot of work in all the flat roof stuff, far more than the pitched roof, and aside from the wet stuff it's going well. At the end of the penultimate post, the solar PV panels were just going on and the pitched roof was also still a work in progress. The building was still a shell with no power and plenty of work left for MBC to do, and outside was largely untouched apart from the buried mains cable that was terminating in the garage, into the meter moved by the meter fairies. Let's start at the top and work our way down. The solar panels are all in now and all the slates around them are done. All the velux windows are in and the ridges were done last week. We have a dry ridge system. I had to ask what this was and was told 'that means there's no gunk underneath the ridge tiles'. So technical that even I could understand it! Here's the stuff that they line it with. When they roll it out, it has a corrugated wave shape to it and each side is sticky - one for the roof ridge surface, the other for the ridge tiles. This is Mike, one of the roofers, bringing the final tiles right up to the ridge before putting the dry ridge stuff over it. And here's a view of the ridge tiles in situ, fixed to the sticky stuff and clipped together. We have 3 ridge lines on the roof, all meeting somewhere over the north east bedroom. A plate of good old school lead was shaped to cover the meeting point of the 3 ridges, creating a neat flashing for the centre. Here's Terence welding the lead to create the flaps going down each gully. Here's Terence putting it into position on the roof: And here's a close-up of the same thing. You can see the fixing for the dry ridge system unrolled next to it. Staying with jobs going on outside, there were some groundworks that week, too. I needed to get the electricity supply cable trench back-filled and whilst we had the plant on site I decided to get a few other jobs done. The Openreach guys turned up that week and the old redundant BT cable was removed, so that old electricity pole is all clear now. My neighbour has already bagsied it, so there's no problem with disposal. One of the groundworks jobs was to open up the ground between the garage and the lane. I'm not getting the driveway done quite yet but I did need to get it clear because my sunamps will live in the garage and it will be a lot easier to get them forklifted straight into the garage from the lane rather than trying to drag them all through the house. Keith got onto it, clearing around the side of the garage a little, too. There is an area of concrete there that used to have a shed on top of it. For the time being, I'm keeping that there as it's nice to have a surface that isn't clay. And then this is the view from the lane up to the garage. This is, in fact, where the pedestrian entrance to the old bungalow was, hence the gate that is still there. Once we've got rid of the scaffolding, we can clear the remaining few feet of the entrance and make the proper driveway. Keith will be doing most of the work on this, but I need to get someone with a ticket to do the dropped kerb between the lane and the verge. It's outrageously expensive for what it is - just for the 6m stretch of opening and 2m back, tarmac surface, that will be the princely sum of £1,200 plus £285 for the licence from the council. And that's the cheapest quote out of 3!!!! I will be continuing the tarmac for the driveway, and also around to the side of the garage so that there's hardstanding for a couple of vehicles next to it. And Keith's final job for that week whilst the plant was still on hire was to scrape the grass from what will be Paul's pond. I marked out the original perimeter and he took out the line for this but then I did that typically female thing and told him it was no good and I wanted it to be bigger. Naturally, he obliged. Not that we had much doubt, but for the sake of interest, Keith dug out a small trial pit within the pond perimeter, about 1m deep. It has filled up nicely with the subsequent rain and shows no sign of draining any time soon. I may have cursed our clay for its giving the need for piles, but we certainly won't need a pond liner. That's most of the outdoor stuff for the time being, so let's step inside and see what MBC have been up to this week as they've starting on the prep work prior to the airtight test. This is scheduled for next Tuesday, 20th November. The velux windows have all been boxed out and they've been drawing the airtight membrane up around the web joists forming the roof/ceiling. This will be the main/shared bathroom and it's only natural light source is the velux. It's rather nice to think I can lay in the bath looking at the stars. Assuming it's not raining. The green tubes on the far wall are for the MVHR. A close up of some of the MVHR tubes to show the careful taping around them where they come through the membrane. This is the main bedroom that has been battened out now. I've wedged some bits of timber under the membrane that's underneath the window to dry out the water that came in at the weekend after the tanked balcony incident. All the battens have been screwed on, much to the chagrin of Darren. It's probably not so necessary somewhere like a bedroom, but in bathrooms and the like where the weight of tiles and mirrors can be considerable, I wanted the peace of mind that the battens weren't going to move for anything and so requested screws rather than nails. This is the north east bedroom, below where the three ridges meet. The guy putting up the plasterboard will be cursing me here. Heading downstairs, the insulation changes a bit here. Instead of being all blown cellulose held behind the membrane, there is celotex in certain places. This is beneath the parapets and the balconies and it's been used here because less depth is required than for the cellulose, allowing the ceiling to be level throughout the ground floor. If blown cellulose had been used, the entire outer edge of the ground floor rooms would have had a step down to allow for this. That's pretty much it for now, but the next lot of work has been scheduled. The vertical slate cladding is booked in to start on 3rd December and this is being done by my roofers as it seemed logical given that they're using the same materials as on the roof. I'm nagging and cajoling them to see if they will do the stone board cladding on the stairwell walls as well; they may say no eventually, but I'm working on it as that will be pretty much all the stuff at height done other than rainwater goods. It would also protect the south west corner of the building nicely, as that's the direction for the prevailing weather. I'm aiming to get some more groundworks done in early December; at some point I need to get the sewage treatment system set in and also the rainwater storage tank. There is, of course, the rest of the pond to be dug out and that will need some muckaway. I'd rather get it done this side of the winter as we can then let it fill up with rainwater and see how it settles. Internally, there's some work on soil pipes and the MVHR, but no sign of the MVHR unit itself. Once MBC have completed their air test next week, we can really go at it with first fix, so I need to make decisions on external electrics. On order is the big brise soleil for the floor to roof window in front of the stairwell. The plans for this look great but I'm waiting on a production date at the moment as the framework is a first fix item. The wooden fins can go on any time after that. Similarly, I have a guy coming to measure up for the external motorised roller blinds for the other large south facing windows. As long as sufficient clearance is left with the cladding, these don't need to be installed as part of first fix so we're not so reliant on a production date for these. They have a lead time of 3 to 4 weeks. There's plenty that I've omitted, I'm sure, but it will all follow in due course. It will be great to get past the air test and make some good progress in doors. No aviation buzz this week, but the hunt was out today. I stood on the top lift of the scaffolding late this afternoon watching the horses and riders galloping over the distant fields down near the river and could hear the hounds baying and the horn being blown. I'm not sure what they were hunting but it all seemed very evocative on a late autumn afternoon and really brought home just how rural our place is.2 points
-
Today our roof lights were installed. We are pleased with the finished product and how they fit. The blue sky and sunshine helps of course. Almost helped take the edge off the unexpected contract lift costs (£1380 in the end, but we have managed to avoid the additional VAT and we got him to lift some roof trusses off the scaffolding which saved a job). Their man on site today admitted that it had taken a long time to get to this point. Not wrong! The photos will hopefully do them justice. Already they make such a difference to the light inside the house. And the feature window (circular on the top, octagonal currently from inside) in the full height entrance hall is really fantastic. Any thoughts on how to get the internals finished on this octagonal light? I was wanting to make it circular (and the window company advises this so that we don't get any issues with condensation on the visible frame (which would be covered by the insulation if we did make it circular).2 points
-
Erm...keep up! Fair play to the lad combining business & hobby.2 points
-
Just spotted another advert on eBay... possibly not as good as the above Kinspan but a nice description! https://rover.ebay.com/rover/0/0/0?mpre=https%3A%2F%2Fwww.ebay.co.uk%2Fulk%2Fitm%2F1835047938752 points
-
The key here is decrement delay, not the thermal conductivity of the insulation on its own. Insulation materials with a short decrement delay WILL allow heat through more quickly than insulation materials with the same U value but a longer decrement delay, that's an inescapable fact and it makes a significant difference in how the inside of a well-insulated and airtight building behaves. Focussing solely on the U value and airtightness of a well-insulated building will not ensure that the interior is comfortable, or doesn't suffer from fairly rapid changes in temperature with changes in external conditions. Low decrement delay insulation with a low U value, like PIR, works very well when there is also a layer of material in the build up that acts to increase the overall decrement delay. For example, a timber frame lined with PIR plus a masonry wall as a rain screen may well perform reasonably well, because although the PIR has a short decrement delay on its own, so will let heat through fairly quickly, the relatively high specific heat capacity of the masonry skin acts to slow down the time taken for heat to travel through the whole structure. With a roof that also forms the ceiling of a habitable room, it's more challenging, as to increase the decrement delay of the whole structure there needs to be the combination of a low U value and a high specific heat capacity in the build up in order to increase the decrement delay. Once heat gets in to a well-insulated and airtight house it isn't at all easy to cool it down, which is something many people are now starting to discover, and not just members of this forum - there were articles in the media earlier this year quoting cases with houses that were only built to current building regs having this problem. You have said you want to build a well-insulated and airtight house, with a low heating requirement. Several of us here have done just that. All we are trying to do is pass on what we've learned from experience. Having lived just up the road from you over in the Rhins, I know your local climate very well indeed, and know that it's generally mild and wet. Our well-insulated timber framed house in Portpatrick, built facing West on the old railway line, used to get a bit warm in summer, but that was nowhere near as well insulated as our current house. I'm absolutely certain that if we transplanted our current house to the site of our old house there it would overheat in Spring and Autumn, as where we are now is significantly colder during those seasons than there.2 points
-
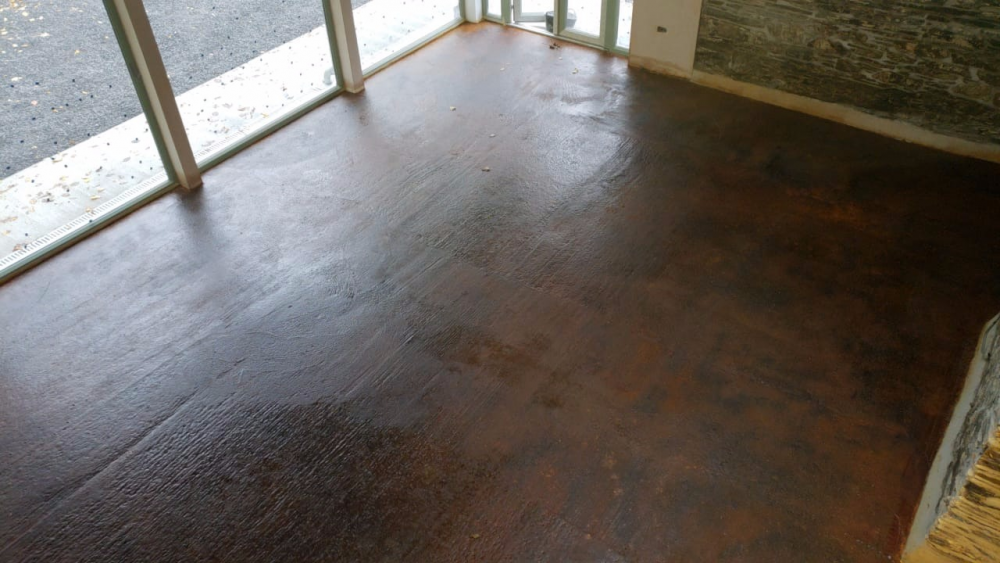
I'm pretty happy with the result. I'd recommend this technique to anyone that wants a cheapish way to get an interesting finish to a concrete floor. It was fairly easy - the most time consuming part was getting the floor really clean to start with. A pressure washer with surface cleaning attachment and a wet vac was very useful for this. - reddal
 2 points
 -
It still doesn’t meet either structural or building regs ..! The absolute maximum a 172mm SIP panel can span is 2.8m and it’s U Value doesn’t meet the regs for England or Scotland as it’s 0.16w/mK Whole house in Scotland is now 0.11 for roof, with a limiting fabric factor of 0.15. You don’t need 300mm roof trusses. A 240mm steico can span 5.8m at 400mm centres. If that is full fill with 190mm rockwool and then 50mm PIR between followed by 50mm over, the roof easily hits the 0.11 required. It’s 290mm deep, has a long decrement delay and will also have a decent sound absorbtion.1 point
-
..? A SIP roof to meet BRegs insulation standard will be exactly the same thickness as one with full fill PIR. Chances are both will need internal insulation or insulated plasterboard. In terms of heat loss, a SIP roof with timber spines will lose more than one built with I-Joists of the same thickness.1 point
-
Not strictly true. You cannot have an accessible inspection chamber on a public sewer within a property. You can apply for a build over agreement and replace the IC with a set of junctions or swept connections and then concrete over the lot. The junctions remain but the IC is removed. The sewer route should be unnafected by this.1 point
-
SIP's as roof panels aren't a good idea, IMHO. They inevitably need internal rafters between the skins, as SIP panels are strong in compression, as walls, but nowhere near as stiff in bending, and the internal rafters tend to create repeating thermal bridges. Also, SIP insulation tends to have a pretty low decrement delay, so for room-in-roof designs there will be a tendency for those rooms to overheat more rapidly when the sun's shining on the roof, and conversely cool more quickly during a cold night. I'm not sure the importance of decrement delay is getting across well here, but it is key to making a living space comfortable; more important than the overall insulation and airtightness spec in many ways.1 point
-
It is .... for timber frame new builds ..! The whole house shrinks and the expansion gaps in the window heads and other openings take up the slack. Ask him how he wants to detail the flat roof upstand junction with the main house to allow the timber frame to drop by 20mm with shrinkage and not tear the membrane roof..?1 point
-
1830mm to the current timber face. Loving the sketch. My joiner (long suffering husband) is up for a challenge. He's done nothing more complicated than a toilet box out so far but he's learning on the job! ? (someone else will be helping put up the plasterboard as we hope to be in before Christmas 2019 ?)1 point
-
Fabulous! So pleased they're in at last, it's been a long hard wait. I can offer no practical advice on finishing the circular window, but can't wait to see it all boarded out.1 point
-
Just playing. Connect the red bits of wood with long studding? Green is the flexi layers Gotta love spending other people's money!

 1 point
 -
Have you seen any kind of wall ties that would be suitable for what you are planning??? Doing a build is hard enough to do so try to make every stage as easy as you can. For what you are looking brick and block will be the easiest. If the boundary wall will be the same height as your wall then you can use blocks as they will never be seen. Any where that will be visible you can build it in brick if that's the finish you want. As for insulation just make the cavity 150mm,175mm,200mm,300mm. Pick one that suits what you want to end up with. More insulation means more heat kept in the house but more cost. So work out what suits the budget and run with that. The wider the cavity the more attention you need to pay to the window and door junctions. Cavity closers or return the block work will be your option. As for the type of insulation that you could put in the cavity I would go with eps beads blown in to fill the cavity. You can also go with rock wool type materials. Have a chat with your architect and see what he thinks will suit your needs on your site.1 point
-
Wow, they look spectacular! Am so pleased for you that things came to a good conclusion. The round one in particular!1 point
-
Errrr .... 15mm too ..?? To give an example of the issue you face, find a 22mm pipe at 3bar and try and force it into a 15/22 connector ... hard work, you will get wet and it will spray everywhere ... Now do it with 90c water ..... A boiler over pressure pipe is designed to take a limited - ie reduce the boiler from over pressure to 1.5-2bar - and then stop. It’s not designed to take the full force of 3 bar water, which will flow constantly once this has trigger or failed, that is being supplied through a 22mm mains pipe.... that’s the worst case scenario. Best case is that the PRV blows and it’s only cold water, but still, 22 into 15 doesn’t go... Combining of discharge pipes is allowed but they must be larger at each junction.1 point
-
Unless you have arms like inspector gadget you aren't going to be able to get enough wall ties screwed in. The wall ties go in every 450mm high so no chance you will be able to reach down and put enough in. If your that close to a boundary wall then brick and block will be the easiest method.1 point
-
I was watching some old episodes of Building the Dream the other night and one had a guy who built his own panels on site. It is Series 4 episode 1 (Newcastle) if you are interested: https://www.channel4.com/programmes/building-the-dream/on-demand/57257-0121 point
-
Well impressed with my lad and his 3 mates the way they're keeping their house rented for uni.1 point
-
I bought some really cheap little thermometers on eBay. Not super accurate, but good enough, and they come with a remote probe that's waterproof, so you can stick it under a running tap (and wait, as they only sample the probe every 30 seconds or so) or you can tape the probe to a pipe, under a bit of pipe insulation. The batteries seem to last a couple of years. These are the ones I have scattered around the place, I only really used them when setting things up; they are cheap enough to be considered disposable, really, at £0.99 each from China: https://www.ebay.co.uk/itm/Digital-LCD-Fish-Tank-Aquarium-Thermometer-With-Waterproof-Probe-Black-631F/123254839016?epid=2292557761&hash=item1cb28f96e8:g:-3cAAOSwg0hbXPzc:rk:2:pf:1&frcectupt=true If you search for aquarium thermometer or fish tank thermometer you will find others that are similar, and some from UK sellers that are a bit more expensive.1 point
-
Heated to a max of 50C, cylinder normally sits at 48 / 49 C when fully charged.1 point
-
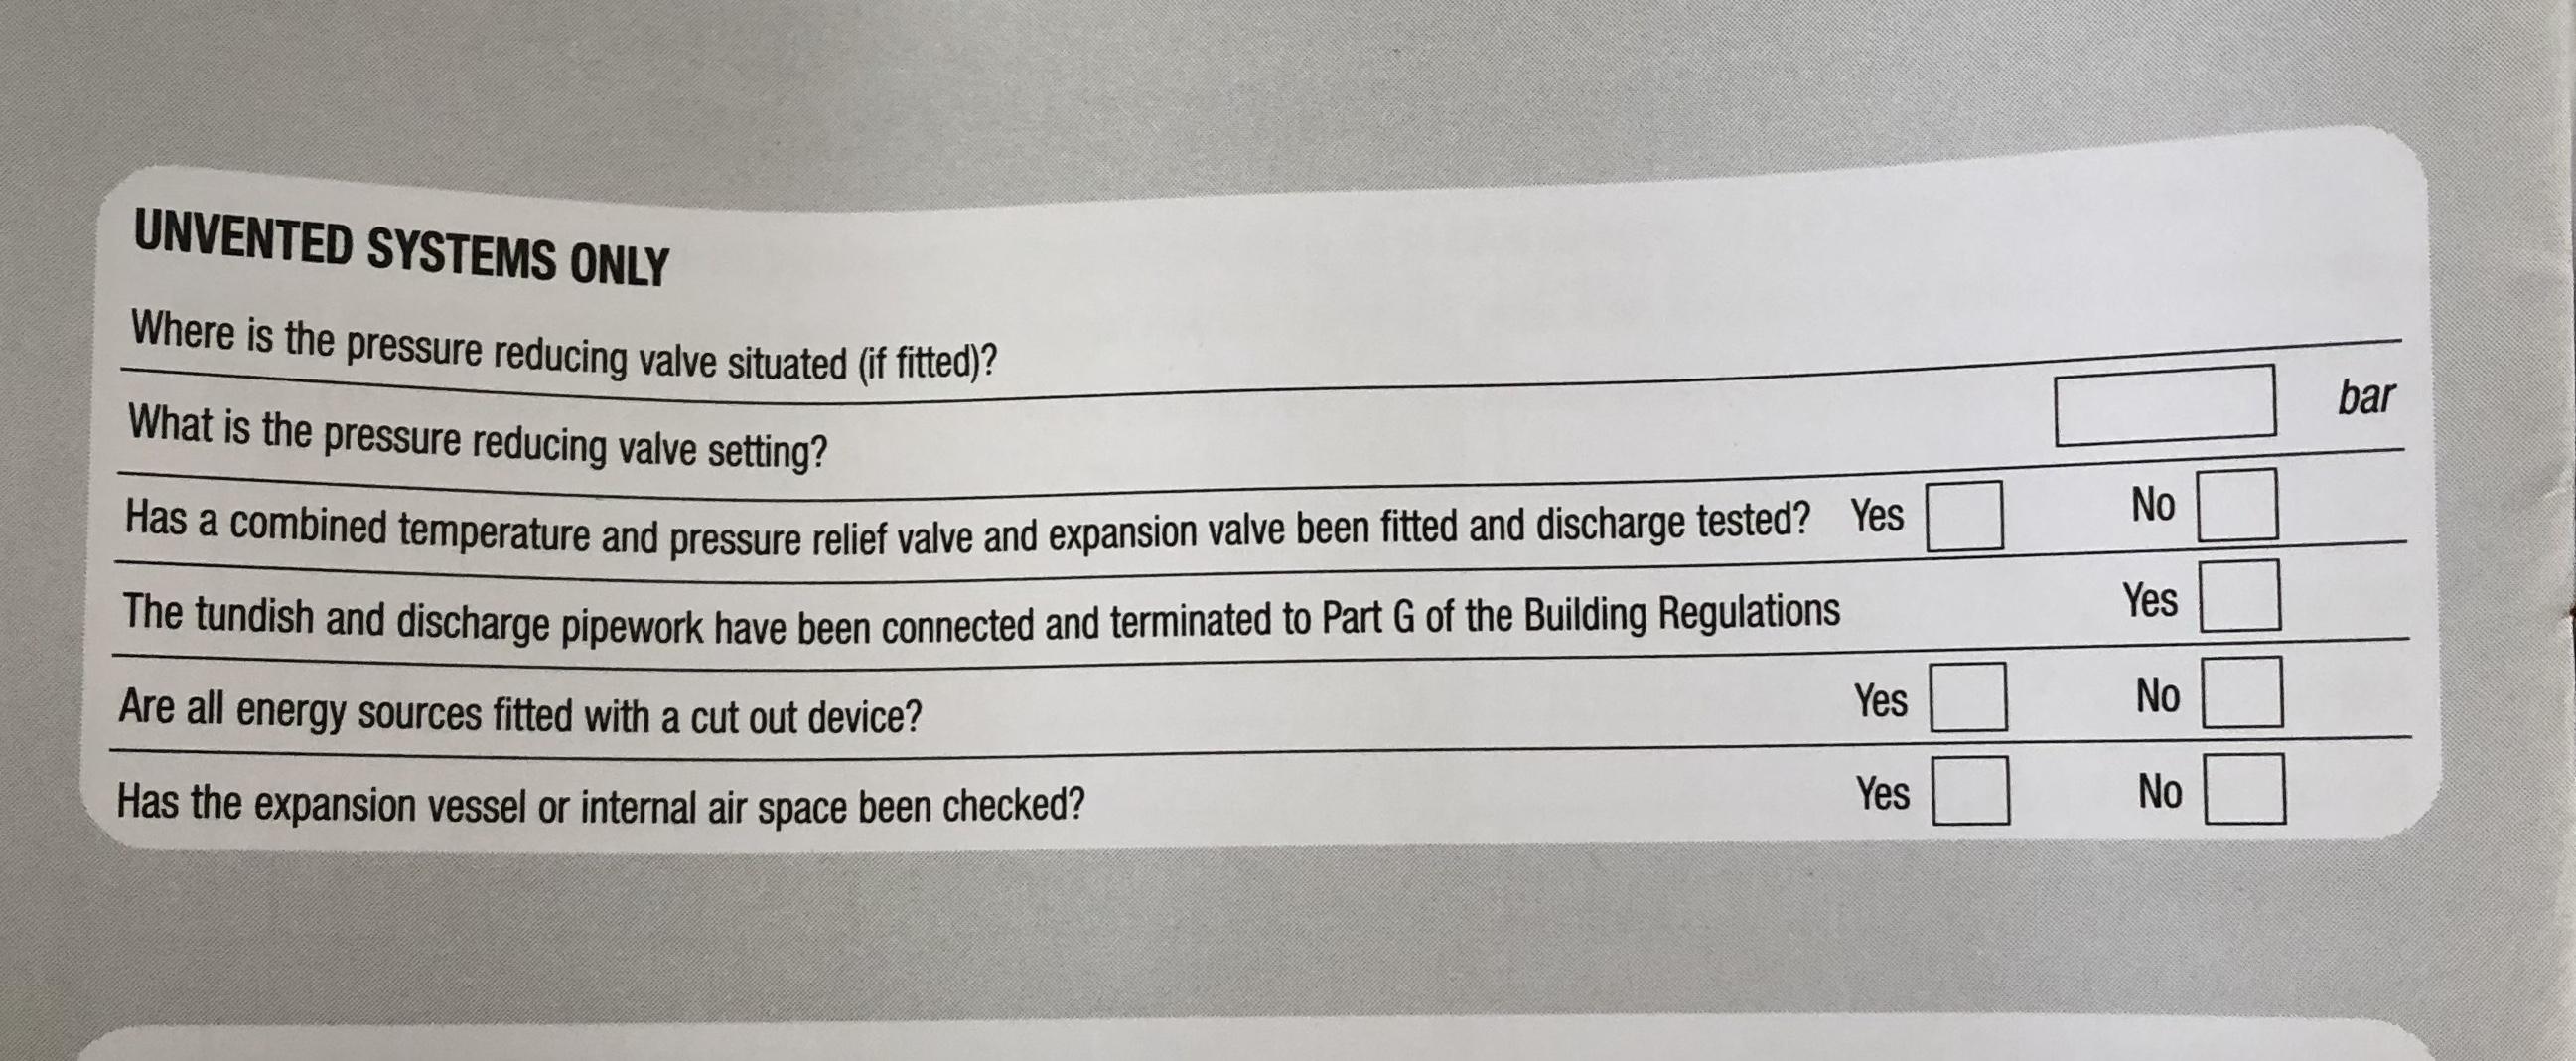
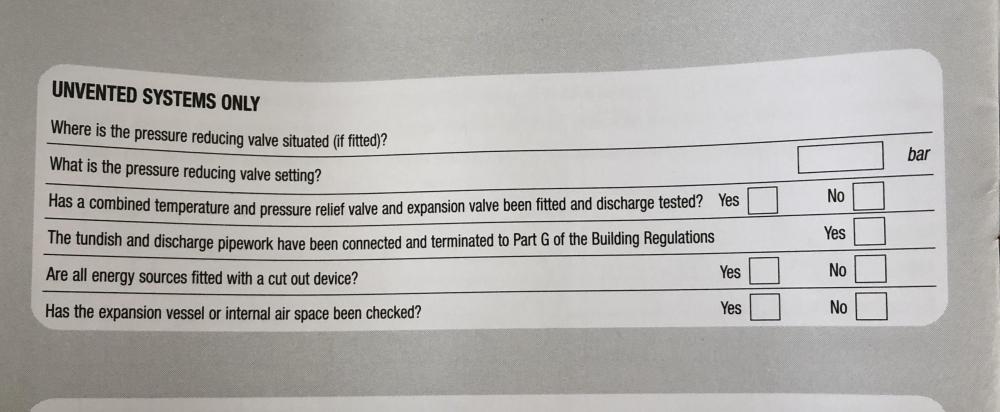
The safety concern isn't being able to see the tundish, it's the air gap at the tundish that allows an emergency release of pressure if the pipe D2 gets blocked, so preventing a cylinder explosion under severe fault conditions. Being able to see the tundish easily is nice, but not at all essential.1 point
-
As part of the process in selecting our preferred DHW / Heating solution, I considered heating DHW to a set temp using the ASHP then topping up with immersion to get the desired target temperature, but on costing it out, found that any savings accrued on the ASHP side in terms of improved CoP were offset by the cost of running the immersion. In simple terms, (without PV) it cost the same either way. Why complicate things when you don't have to?1 point
-
Don’t your tenants mind you spying on them everywhere? One might conclude that you are a voyeur! ?1 point
-
About £4/m2 for the acid stain (you could probably find it cheaper), maybe £2/m2 for the concrete sealer, and then some labor. Probably under £10/m2 - less if you do all the work yourself. If anyone wants to know more about the process, just let me know and I'll detail what was involved. - reddal1 point
-
I don't mind spending some more money on a primer. It's just I'd rather not spend a lot of money replacing all of the materials I've already bought.1 point
-
Can I have some wine now to release stress?1 point
-
Requested cylinder guy to fit a tundish. I see his 'logic' though. But I can't take the risk of a serious issue and by liable. Stained ceiling it is!1 point
-
I don't like this thread anymore. Can't we talk about defunct walk on glass or leaky underground house roofs like before......?1 point
-
My part-time job is investigation work for insurance companies, in the main. Much of it hinges on liability. One thing I can say for sure, with no doubt whatsoever, is that now you know that the installation is non-compliant with the safety regulations you will be liable. The installer may well be able to mitigate the case against him (assuming something goes wrong) by claiming that the client asked him to remove/not fit an essential, critical, safety device. What's more, as a landlord you have a higher duty of care than a house owner, so the chances are that any court will consider that you carry an enhanced liability, even before the evidence that you knew about the non-compliance is presented. The bizarre thing here is that if you had no knowledge at all of the regulations, and would not have been able to tell from just looking at the installation that there was anything wrong with it, you would have had a good argument for mitigating circumstances, and it would have been the installer that would have been almost wholly liable. Bear in mind that this non-compliance will be uncovered in a years time when the annual G3 check is due, too, so at best you're only putting this off until then.1 point
-
Or do as I have and fit a dual rate meter that switches rate as the HP switches from heating to DHW (so switched by the feed to your 2 way valve) and then you have heating and hot water energy usage metered individually.1 point
-
I think I'd just set it up for what you want, including delivering DHW at the temperature you need, run it through the winter until the end of the heating season and see what the running costs look like. You can do as I've done and fit a small energy meter in the ASHP supply if you wish (no more than £20 for a meter and small enclosure to fit it, and a DIY wiring job if you fit it downstream of the ASHP isolating switch), as that then tells you exactly how much electricity the thing has used. Tracking this will give you a feel for the running cost and you can then make a decision as to whether to make things more complex or not, based on how acceptable those costs are.1 point
-
What happened to this thread? It has turned into Toxteth circa 1986.1 point
-
100%. Tell piss face builder to get ‘qualified ring-piece’ back to do the job properly. The installation manual will be handy to have to hand to demonstrate that the tundish MUST reside with the UVC, and his ‘interpretation’ of how it can be done, to make his life easier, is actually a breach of G3. The rules are there to be read and followed, not ducked and dived around. Jeez. Also, and this is VERY important, ask him if EVERY SINGLE mixer outlet ( showers / bath fillers / mono-block taps etc ) EVERY SINGLE ONE WITHOUT DOUBT have the cold water coming from the balanced output of the control group ( the multi function valve alongside the UVC ). If he shrugs his shoulders or cannot answer the question then the UVC is on borrowed time. Ask and update please.1 point
-
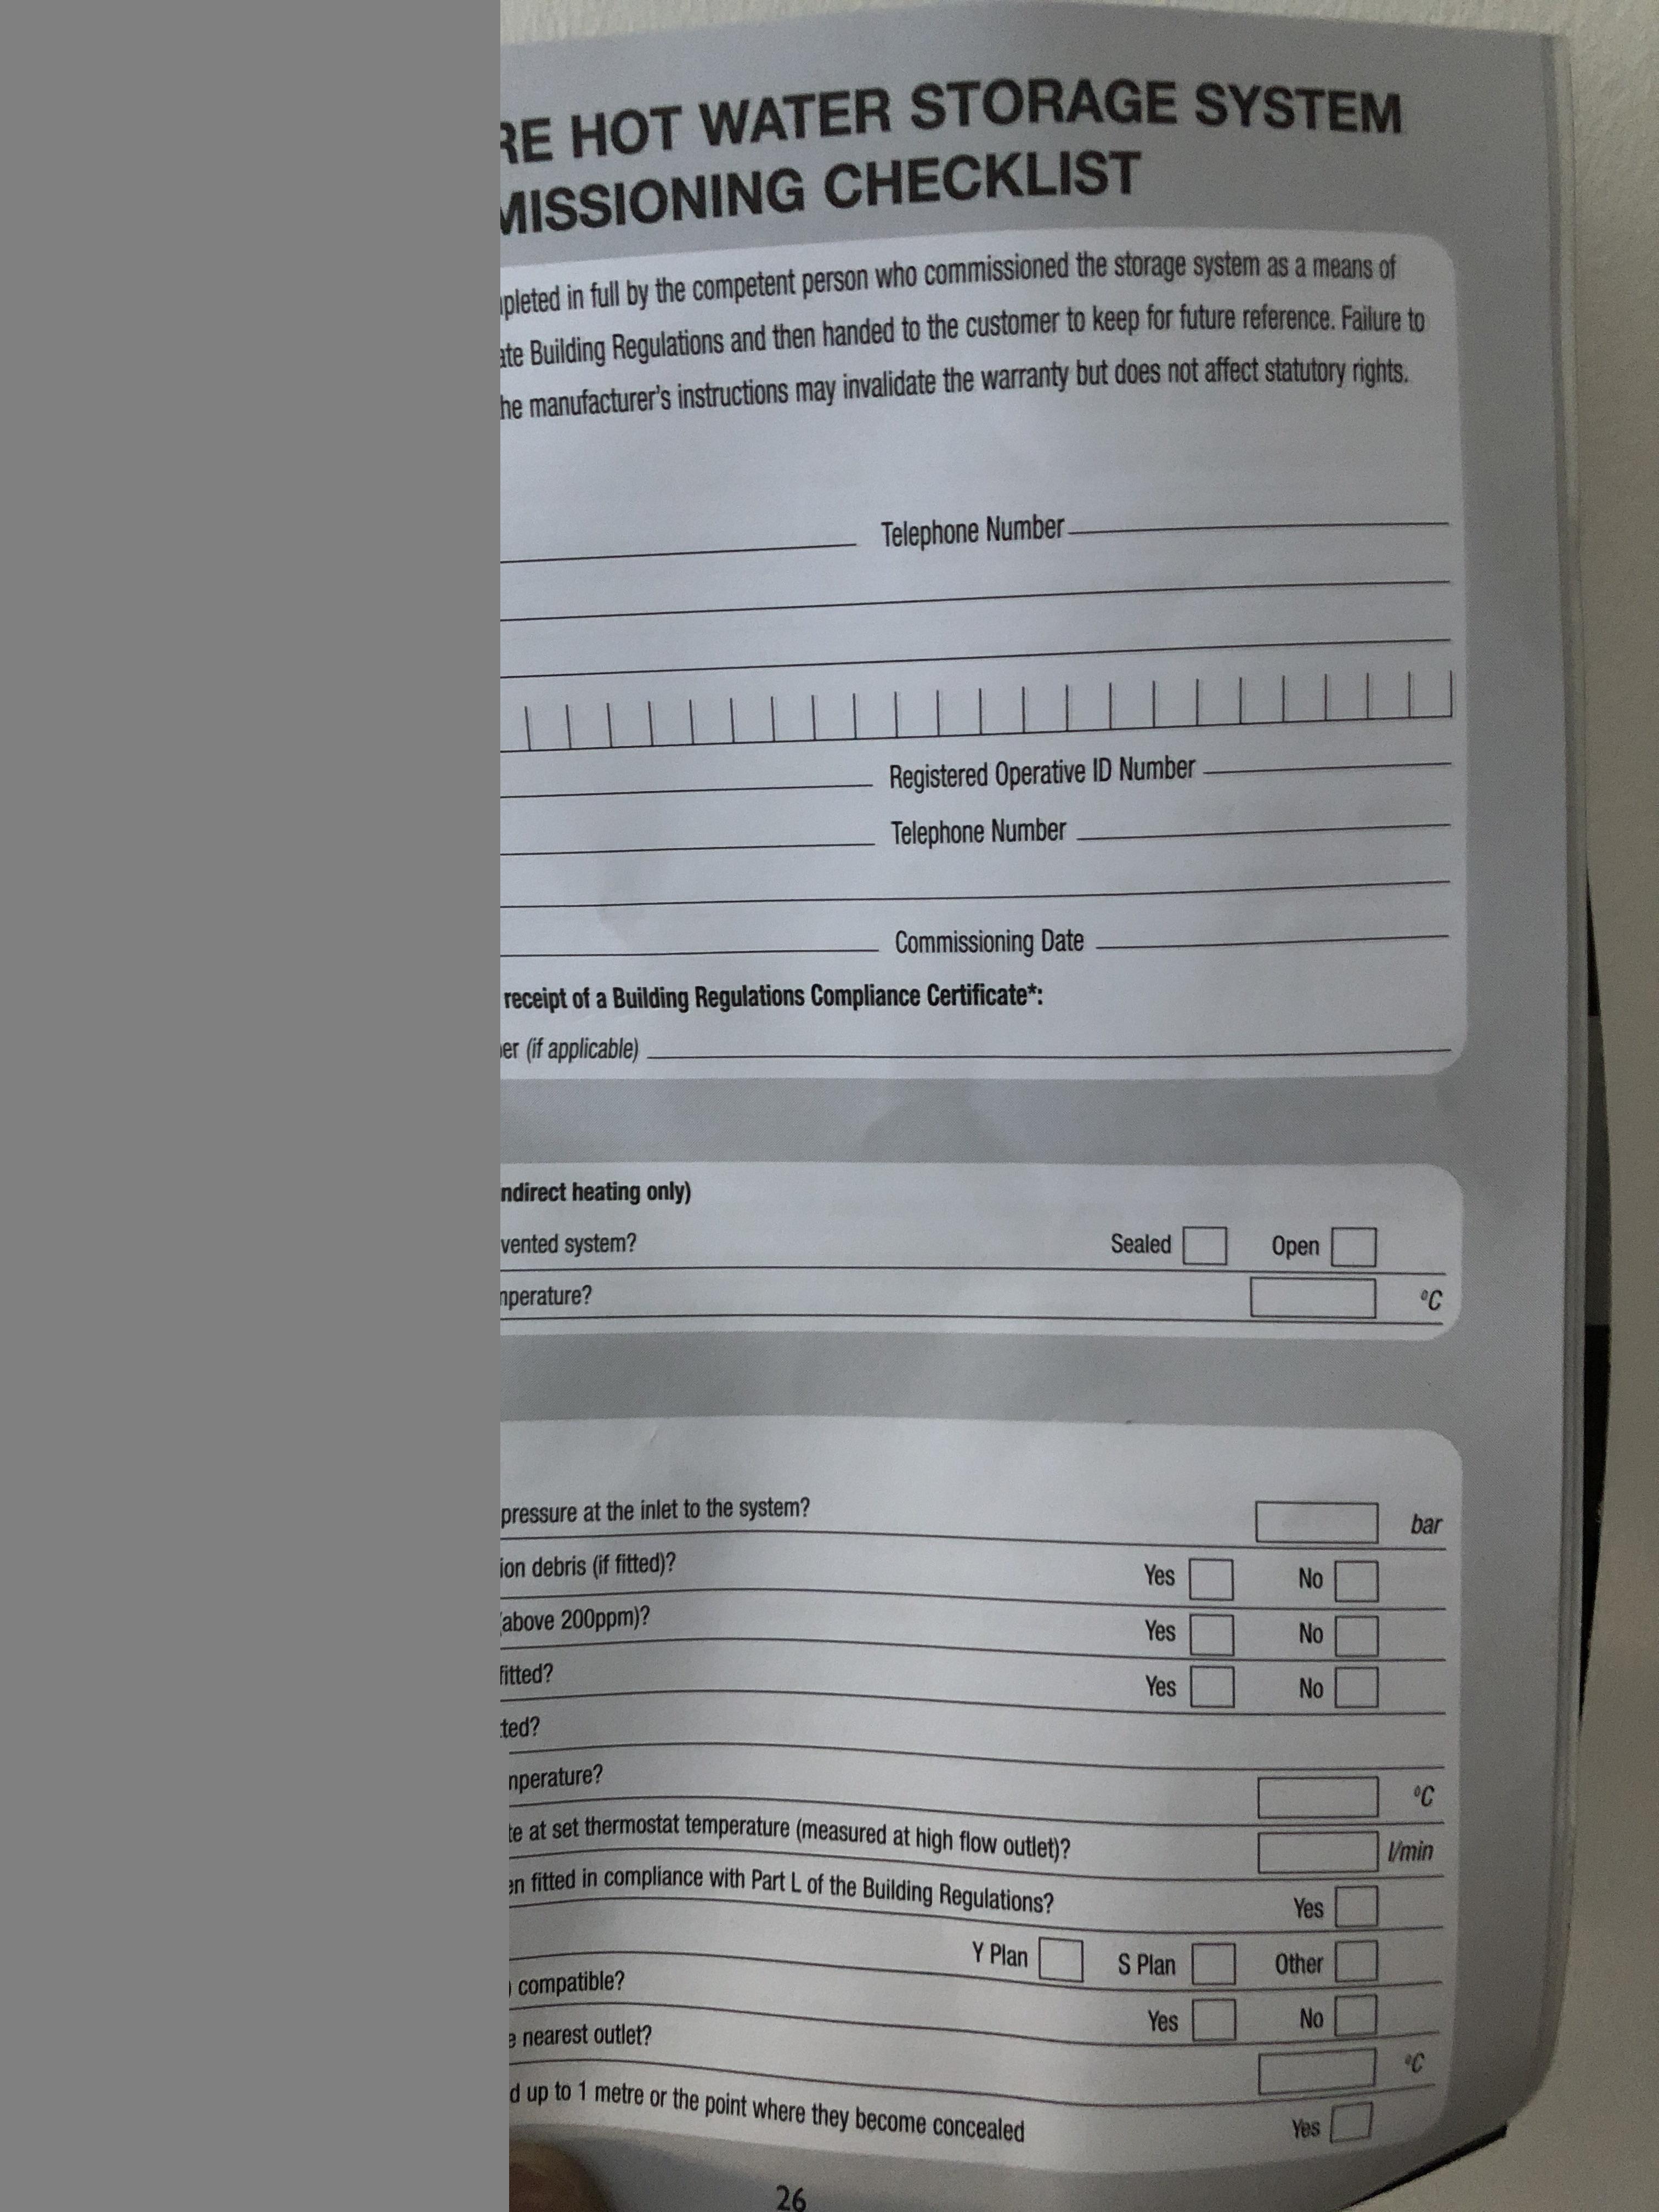
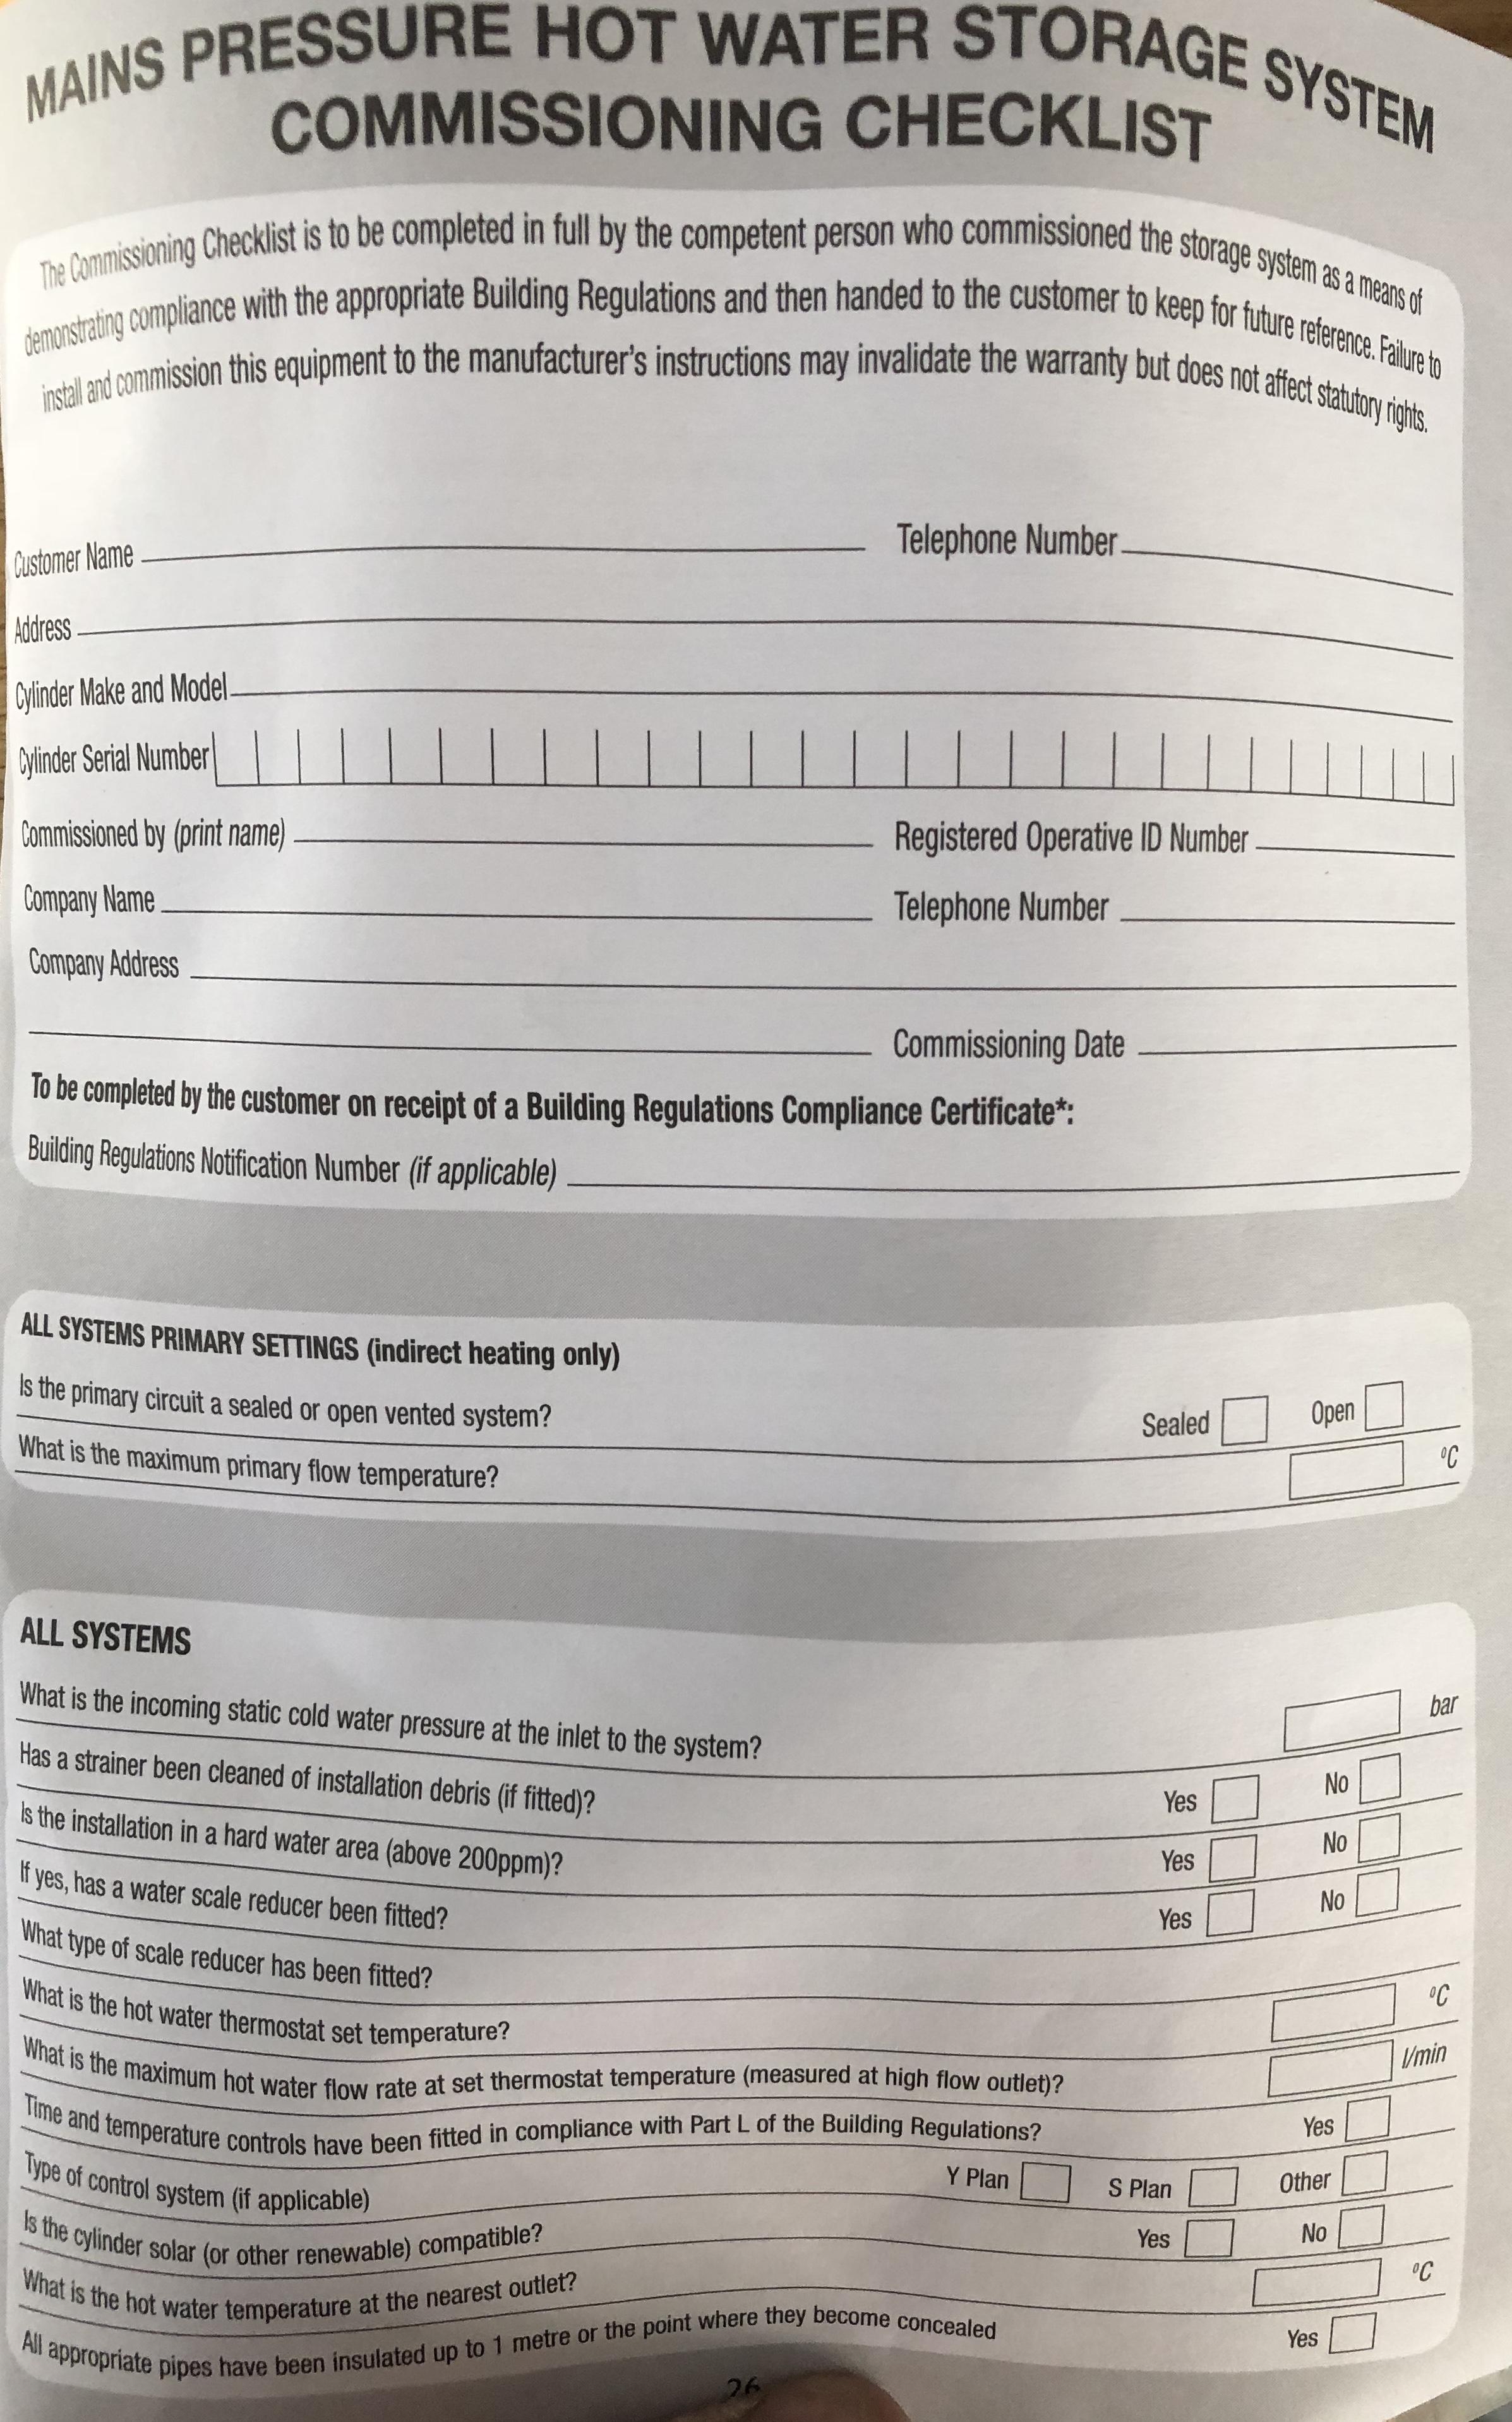
Tank should have one of these ... if you go to the next page under unvented you will see this. Note item 4..... If this has been done to building regs then they have to fill this in, and it has to be provided to you ...
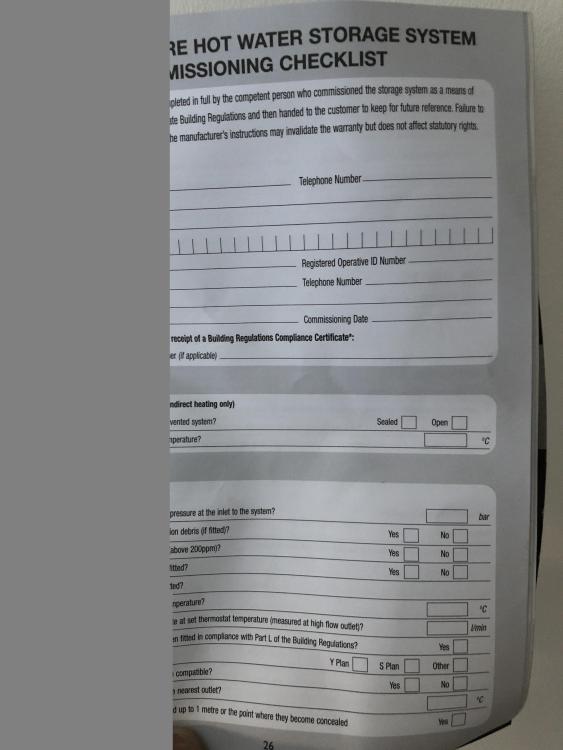
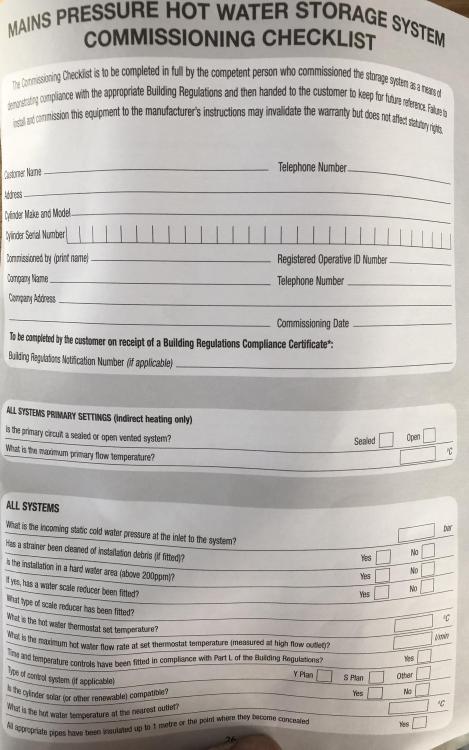
 1 point
 -
@dpmiller, I will expand Jeremy's comment: If we have a Δt of 8°C and don't compensate for it, the time constant of the house will mean that the house will drop about a ¼°C as a result. There is also a decrement delay through the walls; I saw this in my modelling scenarios: if you and a step function in the external temperature, it takes a couple of days for this to make its way through the stone skin and walls. If the slab temperature drops (or rises) from the computed set point then the daily algo tops up or trims the daily heating amount. At the moment, I have this step capped at 1hr, so it would take 3 days to step from 5 hrs heating to 8 hrs or v.v. but I find that this is quite responsive enough. The system also takes in the weather forecast from the met office each night and I could plug this is as a feed-forward term. Next month, I am adding a thermometer in the air-gap between the outer stone skin and the timber-frame and might use that instead if it is a cleaner estimator. Using this sort of data as a feed-forward term could drop the variability even more but this gets me into further characterisation, Kalman filtering etc. and I have other priorities at the moment. @joe90, this is a case of personal preference, and one that can only be developed from experience. Jan and I started out thinking along the same lines as you, but we've come to really like the stable temperature. OK, we end up working in T shirts is we are doing something a bit physical, but that's what we do in the summer anyway: you just have to get used to the fact that the house internally is like the summer all year round -- and we have. You say that there is nothing worse than a cold bathroom in the morning, but that's my point we don't have any cold rooms any time. The house was at 22.6°C last night at midnight and at 23.0°C this morning when we got up. After my old draughty and hard to heat farmhouse, this is just heaven. Yes, we could have the whole house a couple of °C cooler and save maybe £50 p.a. on our Willis heating costs but our personal preference is that we'd rather pay the extra £50 a year and be able to wander around bare footed and in T shirts.1 point
-
Scores of houses are like this, no regs, no BC and no approvals. Simply value it less the room in roof, other than as posh storage, and then retrospectively convert it properly with BC application and then get the house revalued and insured accordingly ( if you need the attic to be a bedroom that is ). It can be a nice kids playroom or cinema room etc, just not a habitable space, but PLEASE do get fire / smoke detectors right the way through all 3 floors regardless. There are some great bluetooth connectivity smoke detector systems out there now which mean no interconnecting cables required, just get 230v to them from the nearest light fitting and job done.1 point
-
I little fan heater pointed at the fins????.1 point
-
I am not sure I want our house at a constant temp!. I am only just getting my heating going and learning how it works/suits us. With the solar gain we get during the day (mostly) and being active. I am sure we need no heating but when tired in the evening we need a warmer envoironment. The same goes for first thing in the morning, nothing worse than a cold bathroom (reason for electric towel radiator and UFH) or cold kitchen for breakfast. I was pleased/relieved when @JSHarris found a simple room stat was better than his complicated programming etc (as I have no idea how to do that). ?1 point
-
If it's anything like our house, then the answer is very little changes. Worst case for us was in the summer, where we had 34 deg C outside during the day and around 16 deg C overnight on clear nights. The temperature inside the house barely changed by more than 1/2 deg, due to the high decrement delay structure slowing the rate of transfer of heat in/out of the building and the overall long thermal time constant of the interior.1 point
-
they should come and have a look at mine! I think there is a general issue with quality control in large scale schemes where social housing is modernised. I read a surveyor report about issues with EWI seen across multiple installations, it was grim reading but I took some comfort in that the problems were all a result of installation practice and attention to detail, and in some cases product selection. In retrofit you are going to encounter all sorts of potential headaches - meter boxes, flue penetrations, stuff fixed to walls, things abutting or close the walls which would need to be moved or create cold bridges, lack of eaves or verge overhang - the horror surveys show terrible corner cutting in the approach to these. And then more problems in addition with poor installation of the boards, fixings and render finishes. I guess when you win a contract for an EWI scheme for a large number of homes, finding the skilled labour is very hard, impossible even. I wouldn't let this put anyone off EWI of their own home, but research carefully good practice and ensure the contractor is skilled and understands the system and its application.1 point
-
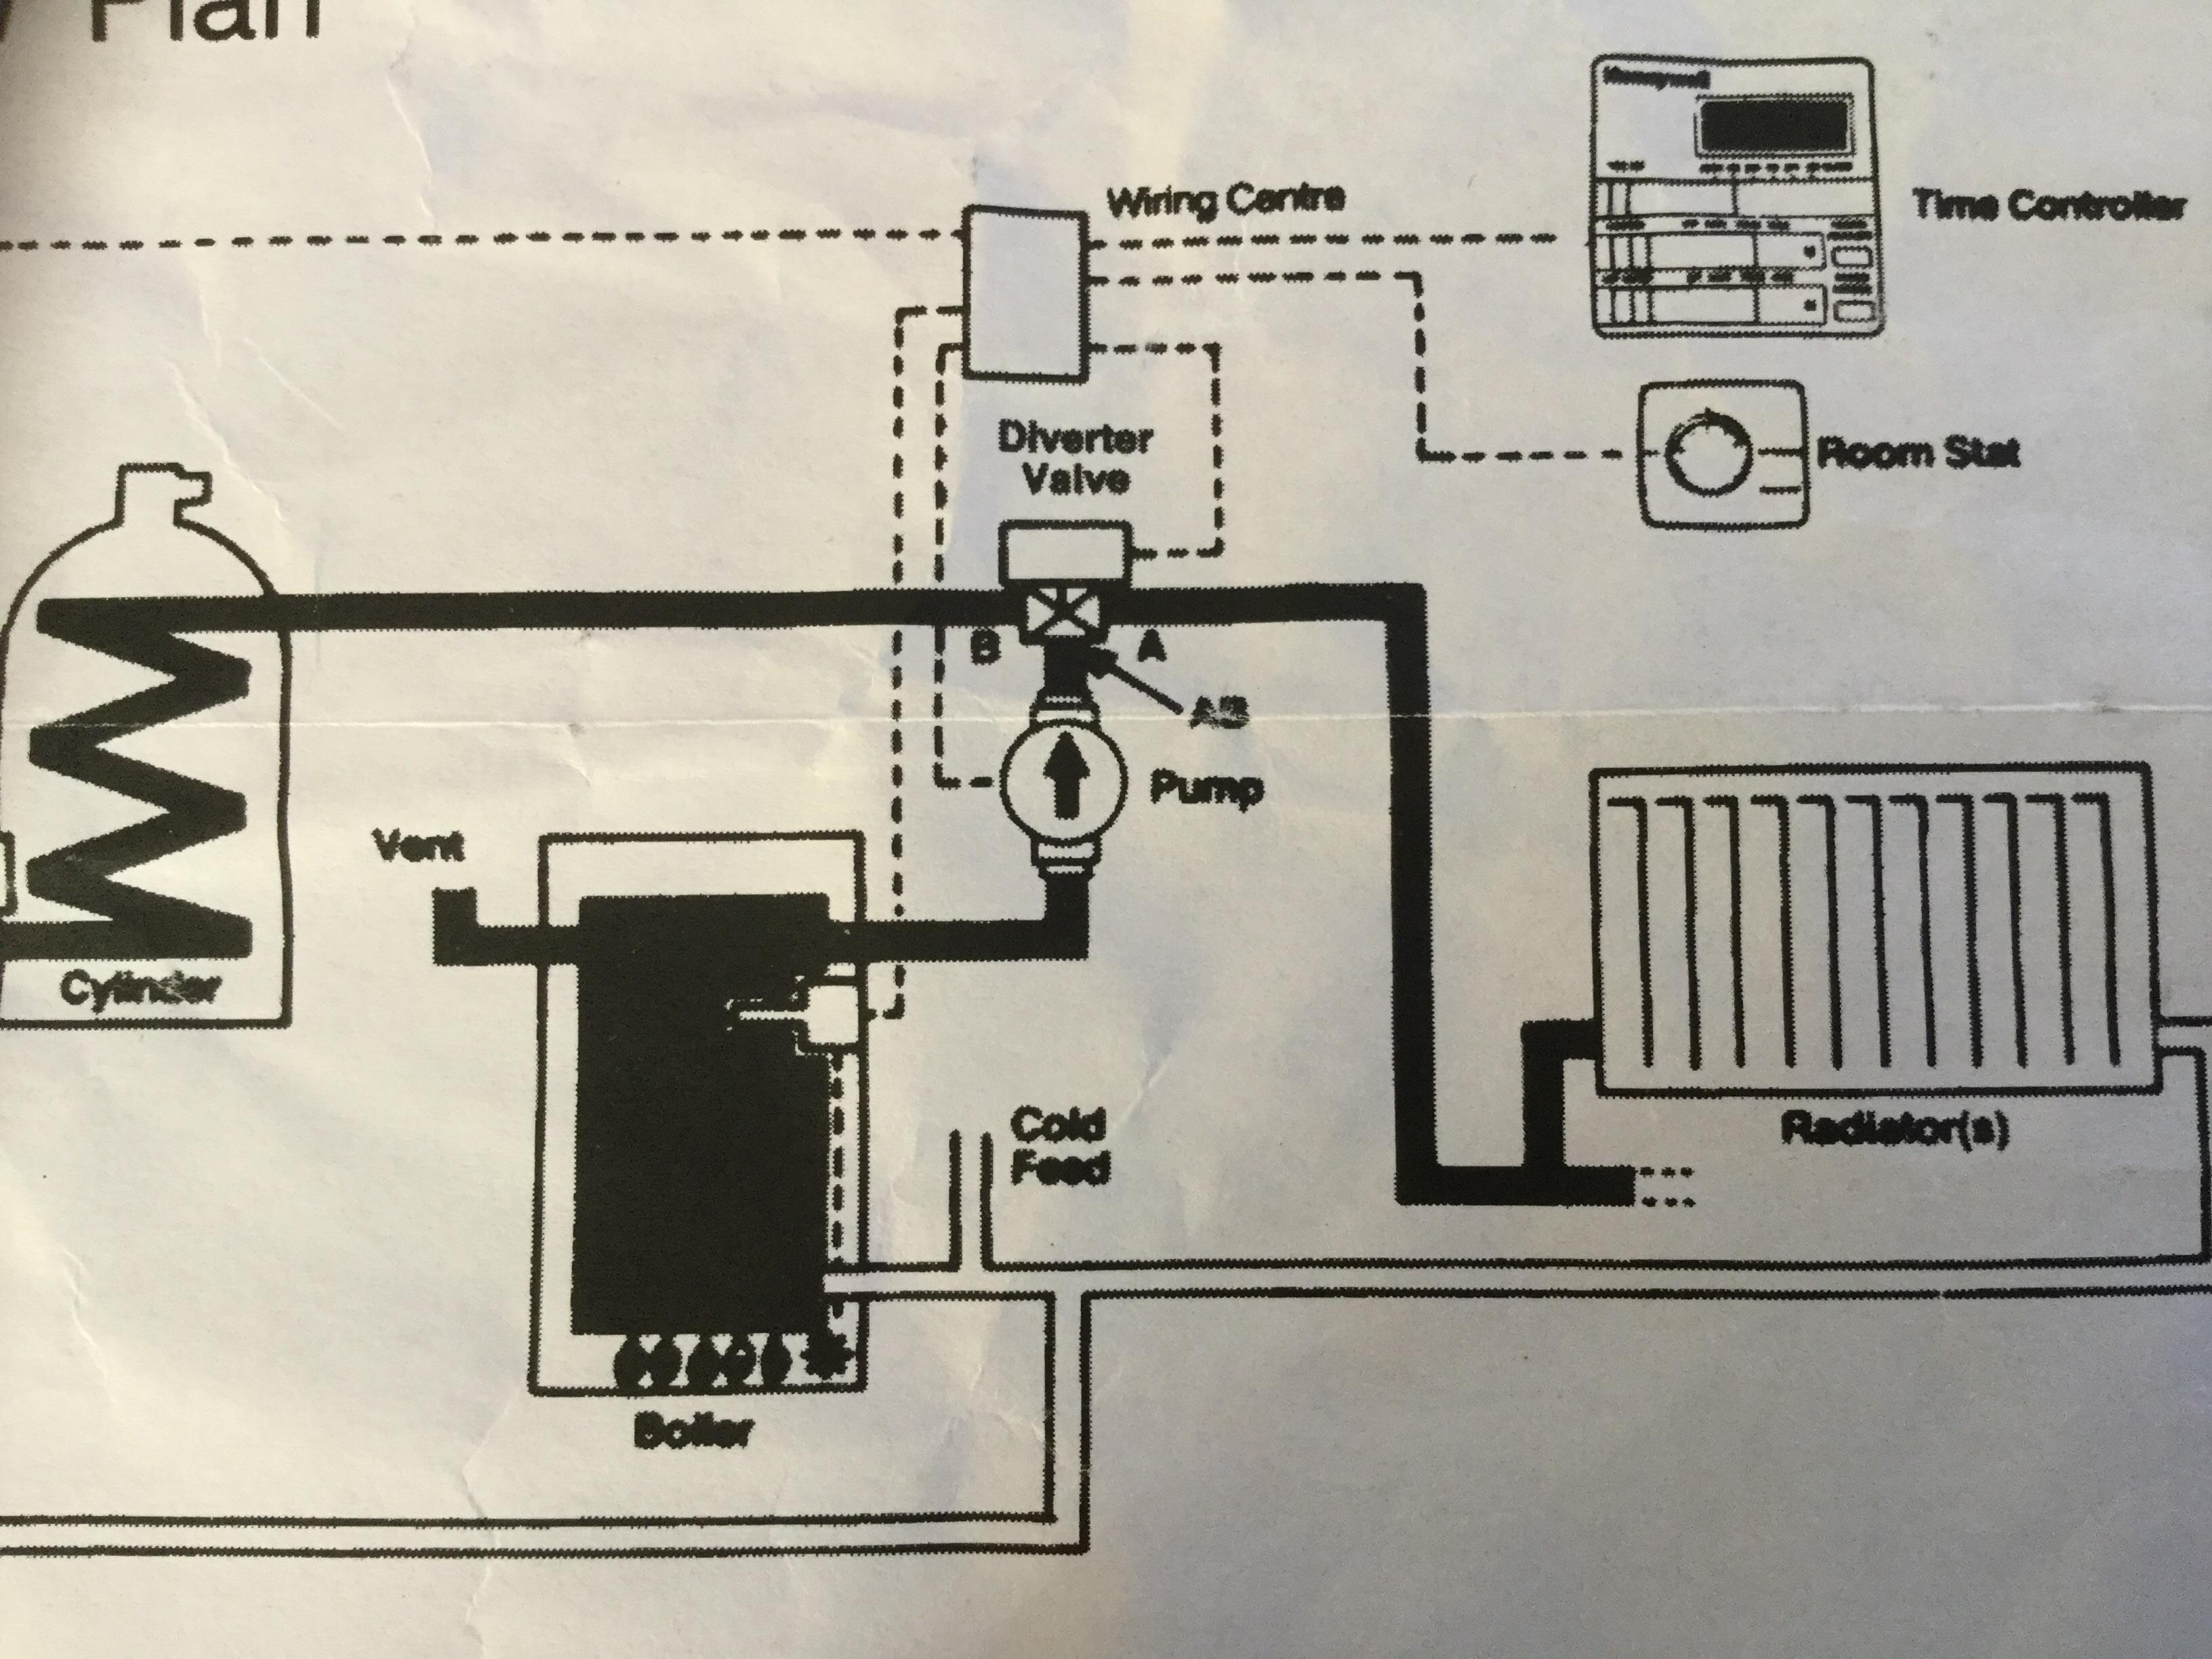
Right, drained it down and took the diverter valve off and confirmed that in parked mode water flows from AB to B. Which should be heating, when powered up water flows from AB to A (DHW). This is as per @Gav_P pic above but not as the drawing I got with the valve. NOTE, I noticed that when using the manual override on the valve it only opens the valve halfway like a mid position valve!!! This must be for drain down only and not to manually operate the valve, this is why when trying the valve I was confused as both pipes got hot, it can only be tested by electrical energising.
 1 point
 -
@Redoctober @Jude1234 @Christine Walker @CC45 Hi, The broker I used is called Mayfair Performance Insurance, 11 Lurke Street, Bedford. Tel 01234 242900 (no connection with them other than as a customer) My reason that i went through a broker is that my self-build is a holiday home which is timber frame and timber clad so a little unusual but the insurance is not too bad - £200 a year for the building & usual 3rd party liability (but no contents cover) I've been using them for a couple of years now and started a few months before I got my building regs completion (but after the highest risk work had been completed). Loss as a result of construction work prior to full completion was an exclusion on the policy. Ian1 point
-
Done correctly it will have a door either at the top or the bottom of the new staircase and will have an escape window Velux or dormer. If it is not intended as a habitable room and is only classed as storage or hobby space, building regs are not required. If it is a bedroom they will need to have a completion certificate and failing that they must not advertise it as a bedroom.1 point
-
OK, so... just in case you have not covered these yet (bet you have, mind) 1 - Make sure all gaps with downstairs are well sealed to air (and runaway beads...). Well-insulated loft hatch? 2 - Ditto make sure that your loft has adequate ventilation - usually via slots at the eaves. and 3 - My normal practice if I am insulating a loft is to work out where I will need to walk in future (eg if some joker has put the boiler up there in the past, or for an MVHR unit or similar) is to fix a walkway at rafter level over the first 100mm layer of insulation, and then putting the remaining 170mm of rockwool over it, congruent with the walkway, such that plumbers and gas men etc can just whip off a couple of pieces of rockwool and have a safe, secure walkway / environment to work with. It also potentially saves me having to deal with elephant holes in the ceiling. To do that with your graphite balls may need a little bit of thought. Ferdinand1 point


.jpg.c21f3ac78c9b7efd90cbdcb312744dc5.thumb.jpg.7adcad4c0e384f5ecd7d56b0618df6e5.jpg)