


Skip to content
View in the app

A better way to browse. Learn more.

BuildHub.org.uk

A full-screen app on your home screen with push notifications, badges and more.

To install this app on iOS and iPadOS
  1. Tap the Share icon in Safari
  2. Scroll the menu and tap Add to Home Screen.
  3. Tap Add in the top-right corner.
To install this app on Android
  1. Tap the 3-dot menu (⋮) in the top-right corner of the browser.
  2. Tap Add to Home screen or Install app.
  3. Confirm by tapping Install.

We have rooflights! (and some tricky joinery to do)

(0 reviews)

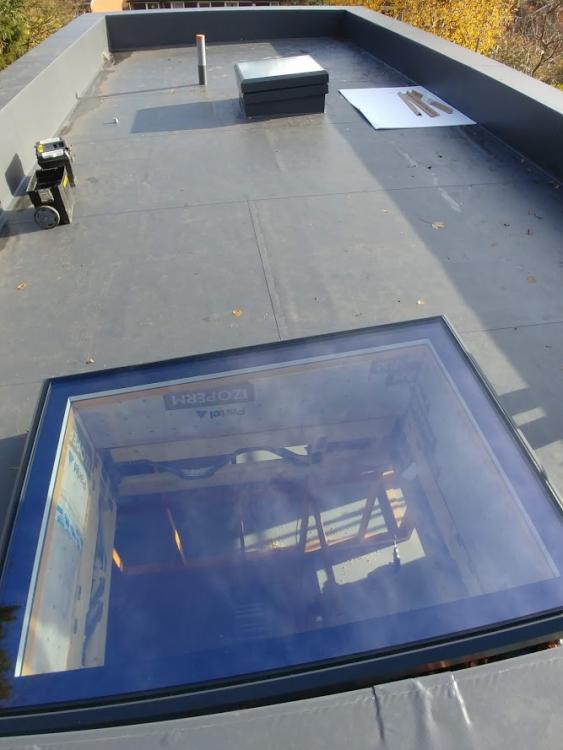
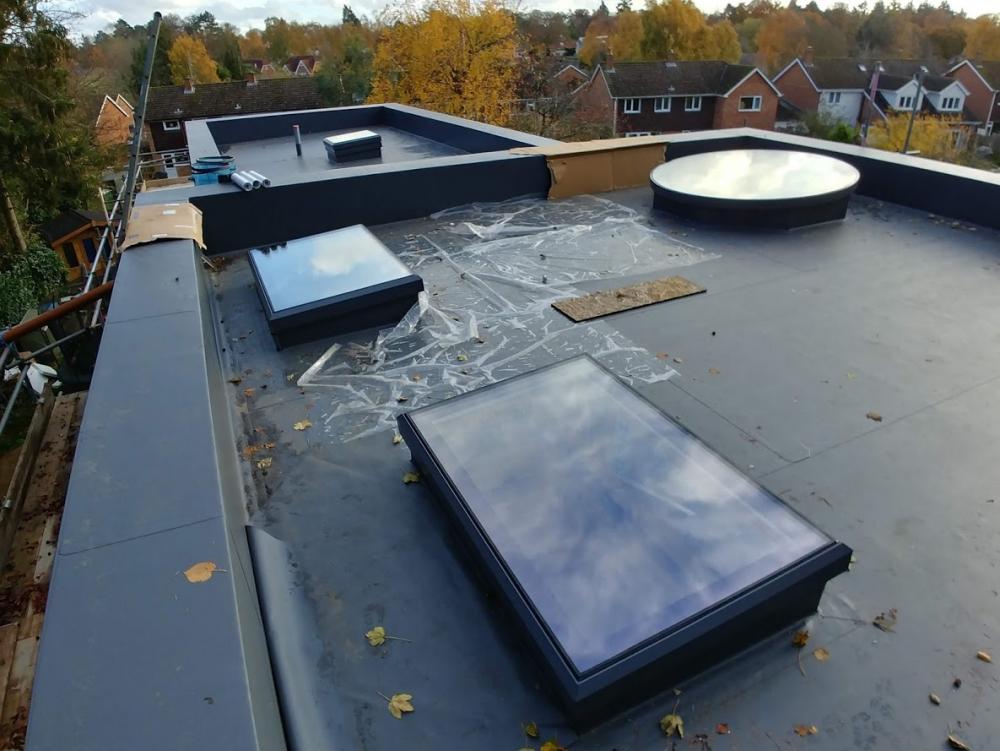
Today our roof lights were installed.  We are pleased with the finished product and how they fit.  The blue sky and sunshine helps of course.

Almost helped take the edge off the unexpected contract lift costs (£1380 in the end, but we have managed to avoid the additional VAT and we got him to lift some roof trusses off the scaffolding which saved a job).

Their man on site today admitted that it had taken a long time to get to this point.  Not wrong!

The photos will hopefully do them justice.
 

5hcDszf95qNRsuAs4Zklnwhvyk7JyeSF_In_z00opxAI8yMvduNXaQL3n7Ks8NlJeCXjMKak0ec8rsGMfcW9SxMLHVi3_2Qjj3Z6oqpIPR6ydygo_psAP3ZLUcqySglUNJ6bB47uz2CeyK_USxxUZ3OqjE1lyfM7p-l7YmggqxUTryQGb7kXEwZhUQbBo4f9vbOnZq6Vs3OBHIBta1ShM6frsABhyvGqhNh8sWevvcpbVcARVe4tpqshfI-RL0F0nf6Qy5DFQVM1i_QfdhcKYFm73nt4xe-O2tP3DFGJlWwDXjtzd4naneS2ylfj90rBPWvUx-0A5WtZygu4ysDrIClUG2zG-pedqL3bKwSYTL47lNTt_jrncR8jd4ilBz0aEOi2D4N9Rwvvyyxvg5j-NgKXg1QAoZ-K7csPNkwlrSPughJn5FYRG5q3_ygoF3eaUBG2H0CU5NRv-btkbVw172WC5zrwsw9QG94Kn77JudI9xx2nlgNzwXWYeblWgBd2qMfDcyC2Ldq74R2OMw6PQrQHvf1Fo4e3duOuQ90r6A9yW6tt8ywE3Jr4qiJ5007p3ZMHftUbybI2Pp03VZ7xieCm0MPBE3JQiiisp-_TqU6d0jsjtDxj1Sid_U_aLuR1XgPJMDtChQjWCI6vHMqMRl8WbcRUxUuaplhUsYN6fXBO8g=w1186-h889-no


hUeH0uaAyJ1VcmO77PQnOZBsi9SKShUJc3Y2vnhpZ5nwyNlRLMTqoI40AuglwEY1lguMwNQa-VvaG1O_btR3x3l1hpyUV2p06DuFMitDQgz9USWXqOzR3SNoZZZEgMAl2iM6tSLi1Vnnjdh6uO_ui1BM-itXyxMdk6PZIW_bBMwaMjYNyyTEily3BUM4fmO0XoPyrtrQIzzcPN6cGl9htlieOLi9OmTD51wli57PnOpdTji_OAkzY0xwD7t4pGkZYJ6-yvsYUDlrzxPkS3b5WxYcejKx6pn6ohncUwS8Bct_jzNk45TMsuc70HUbwDpfuJmIgoqG-l2PL6AJrZMms_TIFD7PW3dO_gp8oibu2cLa0QCJCXGuteDEu6BvYW3-Uw1_81kmdxucGnGMsHR2sS0WljN8ZMzcVCbHaL7VwggcI4tGOCT1rwRYO4JZRQawA0V2A5oaLZAnhdBKTCAj0bRFsFGGQIR1BQ6xCSU4fne7ZJyj4SSH2nQYPDOST29dQVeg5DKu-F00VKOx4uMk2Rz7yvPCMje5fgha5JRALHydPnsCLwhpkUQ9oe8_FLIW3Wlko26bUACfRcR-5_a7tT_x0K7YRBWc-r8z2zG47LT3xinTsqrH_rTRg8-c2neQKq1vnOmfDa0V-bYhuyGPAHhmZrkUvmTB4f8PBlW_6B7DlQ=w667-h889-no


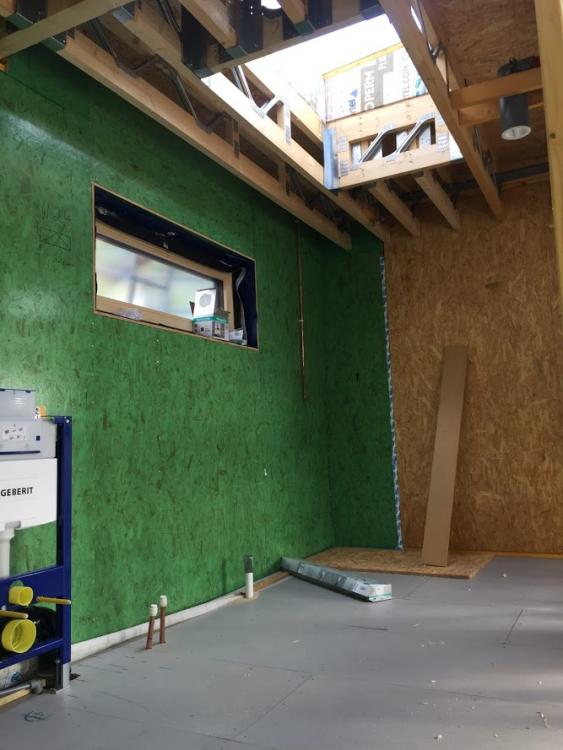
Already they make such a difference to the light inside the house.


8E1hBdJtJMYPfP1D82OBJmq95X9GmmLnExwIyT15SKNkAxfn6CbTCZdkSKNoHdDCABFiuUDJkK-lK9W_8oy8C3fh9AgCNIbyP-s8ryvOPw_H4cZkTaqVKUecOOjqJhdjpYtI02lVgCEcfFk7gYDt-ZXcuWAmK0dd3R9aecTzDXEsOKDLJPRO3Km5FLzsRlMt4trKl3XL5kqUhi7K87Mqa5sDWY8CF1SCg9u1XJkW8UKvjEpqzwj1IjfPgJpUoW05aIdZMDyIZc8qQeii9exwMYUs_UXjFUHqImRdjbphbPTdqk9HMl8ANapljOcgcBomaHLzuFqKuh4HnQ_wIKcBJ709kSsb0NeCkhowNDw4bENY92kQp94YsUqOJty1HNjLrXQEWMvPAX1QKABDh907YJJ_jX3pPA1iKZBCeO5qdtCT-3BVPUxZ1sH6hckF0CQEj25E3u4JY8w2a83rRbkFxL2swoMaaZNAy450R3WFKSnyQgA4u4nVq2yw3fOkvO1KNk92DI_Omam3rX7qZY61GsDQBES-2v60nL0PbS6NqM4nGvgHB-mIvYaDeRqCF79NOpIY9lao5s4bVHT45b-S22tSrjXcqeu35CQVtzXP8YDA48fquivQnk0a7qToi9-H_AaIa8dCNbat7i__hNnXEYBYWNSn8e2MJ1oBqLdhAdP0yA=w667-h889-no


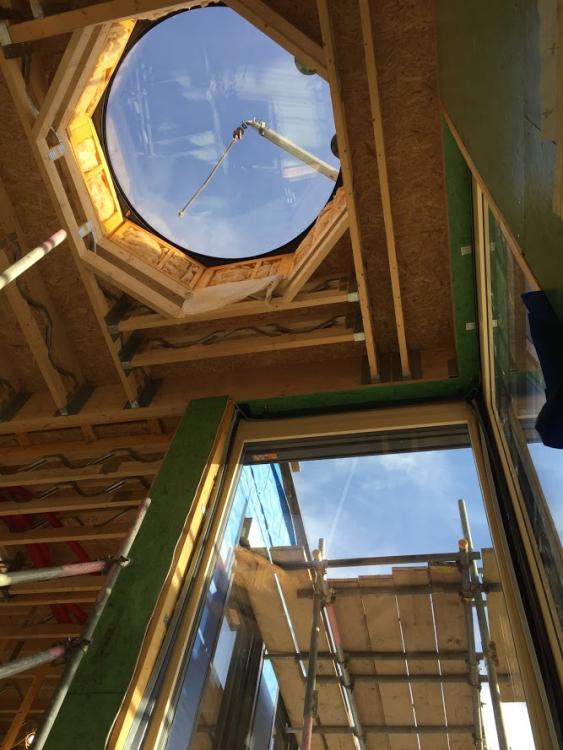
And the feature window (circular on the top, octagonal currently from inside) in the full height entrance hall is really fantastic.
 

FSGC3ZkvsnxRkcoQJYxrP_BiVY6EiETkijBM3HziqK7KEVQJRzndCue35nPuAlbjfDxuTIN-dys2BM5Ve5BsaY2yx4M2ZBFwOtFGl1JYp8I2gj1rAwADgxQ5oX2hR2EUqB4GgQ3MJG87Ms4-d0seqReWo8ceqEL0Q5y-i2XXiyG2x9z7FDxLopETU8mLdUa9Y-eoo7B9aMXkSp0FhfB-L6o3iT0n8cERt6wARrUVmUgrTfGWMdVUSJSrkenn_neO7xE2oEJ03fiAW5PkDdd8YJp9azOs5UauE_r1jE5akL5uKL_QRIrCO2Ukn5_CmCp_Yc5qEzFcwNw7vYRim5OQG5dDVgUxJmI-GSotnmMqasOfEAEduLORJCr7ox8oK-ixtRjRMxrIjm4-i_66vk4KbfmP7q4p41oIfDV6HQcqdjl_59pIBEO_jMBxeMcy4QwaZ7dEoG_lsLydI13hsULDyK6kCXoQYoTwsOwe0-2OYhqqQSptVsANByF5T6-QTqhxy5fE9SPQHTeEse3PxAfNA6YbRGLlAiszqokrhmK1v6pKykJv88c16MObvp1-76ODaPE2KoigTtcc0KoF6Tem2-cVJUUOnDp18TsGVKXlkupJxnXOEmpd8ZZVjvfqQHpc1Yek49OO5tKRvYHohQe-GlfFQSNGHVlvvWkvZBSejjPtcQ=w667-h889-no


Any thoughts on how to get the internals finished on this octagonal light?  I was wanting to make it circular (and the window company advises this so that we don't get any issues with condensation on the visible frame (which would be covered by the insulation if we did make it circular).  

47 Comments

Recommended Comments

Looks very nice.


Laminated ply might be an option for the circular lining.  Not too hard to do, with a carefully scarfed joint on the inside edge to blend it in.  Could even just give it a varnished or oiled finish if you use ply with a nice surface veneer.  There was a curved staircase on one of the house build TV shows a few years ago that used laminated ply and it looked very nice indeed when it was finished.  IIRC they used a boatbuilder to make it, as laminating curves is bread and butter work for them.

Dreadnaught

Members

Wow, they look spectacular! Am so pleased for you that things came to a good conclusion. The round one in particular!

Cpd

Members

Looks fantastic, would second what Jeremy says about ply being a very good option. Plastics would also work  but I have no experience or examples in this but could be looked into if wood was not possible for some unknown reason. 

lizzie

Members

Looks fantastic. well done!

Weebles

Members

Ply looks good and would be able to be finished nicely.  I guess we could shove some insulation behind it in the gaps.

I also found this bendy plasterboard:

https://vcut.co.uk/services/flexiboard/

Anyone used this stuff?

Tennentslager

Members

(edited)

@Onoff what you say...looks like a fairly simple framing job to accept the bendy plasterboard but and it's a big BUT it will have to be dead on to look classy.

The edges of the framework touch the edge in some places...just nearly in others. A travelling @JSHarris is your man...eye to detail crucial.

What's the diameter of the glass inside? Thinking if less than a standard sheet you could do three templates in 22mm ply with a perfect circle and screw into place...?

Edited by Tennentslager

Onoff

Members

Flexible plasterboard in two 6mm layers. Gyproc do one. V-Cut is another make. There's a thread somewhere where @jamiehamy did a curved wall.


Maybe flexible MDF underneath for strength. 

Onoff

Members

Crossed post on the V-Cut, I was still typing my post! 


For a perfect circle you could get ply or MDF sheets water jet cut then space them up the hole then just "line" with the flexible sheets.

Weebles

Members

Had just found the @jamiehamythread.  That wall looks really good.  

Will look at the flexi 6mm plasterboard.  


@Tennentslager Internal diameter is 1830mm.  Don't think I am going to get that templated in one piece?  

Onoff

Members

Just playing. Connect the red bits of wood with long studding? Green is the flexi layers


tube.JPG.c5082268a16280c0a62974db55827fd1.JPG


tube2.JPG.f2a1ee446d51347cb17c392731c5c04f.JPG


Gotta love spending other people's money! :)

Tennentslager

Members

16 minutes ago, Weebles said:

@Tennentslager Internal diameter is 1830mm.  Don't think I am going to get that templated in one piece?  

On second thoughts it might be a burger to fit a single piece in place. I think you know you need a committed joiner who likes a challenge but it is perfectly doable ???

Onoff

Members

23 minutes ago, Weebles said:

Had just found the @jamiehamythread.  That wall looks really good.  

Will look at the flexi 6mm plasterboard.  


@Tennentslager Internal diameter is 1830mm.  Don't think I am going to get that templated in one piece?  


1830mm to the internal plastered faces?

vivienz

Members

Fabulous!  So pleased they're in at last, it's been a long hard wait.  I can offer no practical advice on finishing the circular window, but can't wait to see it all boarded out.

Weebles

Members

7 minutes ago, Onoff said:


1830mm to the internal plastered faces?


1830mm to the current timber face.  

Loving the sketch.  My joiner (long suffering husband) is up for a challenge.  He's done nothing more complicated than a toilet box out so far but he's learning on the job!  ?

(someone else will be helping put up the plasterboard as we hope to be in before Christmas 2019 ?)

Onoff

Members

Make accurate 4-piece sandwiches for each "ring"? Then all bolts & glues together. Circle here is 1830mm dia but can change easily


tube3.JPG.120c2a7e73294aa563d6da1a7190d8cf.JPG

Weebles

Members

He's slumped on the sofa, rolling his eyes......

He has some days off over Christmas so I think this will keep him occupied?

Onoff

Members

(edited)

Say 3 "support" rings, each made from 8 identical bits of "mdf or ply.


12 bits per sheet so two sheets gives 24 pieces - enough for 3 rings:


Little wastage. Could clamp two sheets together and jigsaw but cries out for laser or water jet imo:


ply.JPG.6931979eac624cd8d0326796c4e4e269.JPG


Orientate:


sandwich1.JPG.dca0b6afa2d88850094e84a1da8c6f17.JPG


Clamp/glue/screw. They're 1830 across flats. Inner circle to suit:


sandwich2.JPG.90a63062c74194feb575cf9cbafb6c7c.JPG


Edited by Onoff

Thedreamer

Members

They look really great, you will be pleased to get that job done.

Weebles

Members

39 minutes ago, Onoff said:

Say 3 "support" rings, each made from 8 identical bits of "mdf or ply.


12 bits per sheet so two sheets gives 24 pieces - enough for 3 rings:


Little wastage. Could clamp two sheets together and jigsaw but cries out for laser or water jet imo:


ply.JPG.6931979eac624cd8d0326796c4e4e269.JPG


Orientate:


sandwich1.JPG.dca0b6afa2d88850094e84a1da8c6f17.JPG


Clamp/glue/screw. They're 1830 across flats. Inner circle to suit:


sandwich2.JPG.90a63062c74194feb575cf9cbafb6c7c.JPG


@Onoff What are you doing next weekend?


How would you fix the bendy plasterboard to the mdf / ply (which I am assuming is only 12-15mm deep)?

Onoff

Members

2 minutes ago, Weebles said:


@Onoff What are you doing next weekend?


How would you fix the bendy plasterboard to the mdf / ply (which I am assuming is only 12-15mm deep)?


Tiling! :)


Ply as drawn is 25mm as in each "eigth" is 12.5mm ply. Work in progress this but I can CAD it up. Well worth thinking about asking a local water jet cutter to you. You'd get a super accurate kit of parts to just assemble. I could do a DXF file the water jetters could put straight on their machine.

Weebles

Members

Genius.  What are you wasting your time with tiling for??


Will talk to the resident joiner and the tacker.  Thank you.


Onoff

Members

10 minutes ago, Weebles said:

Genius.  What are you wasting your time with tiling for??


Will talk to the resident joiner and the tacker.  Thank you.


Have a phone around and see who'll cut MDF/ply. Just a quick Google near you and there's London Water Jet, Rapid Laser, Middlesex Laser and so on. Engraving type places might not be able to cope with an 8'x4" sheet btw. Out of interest if you cut MDF with a water jet the edges swell a tad then shrink back!


We can easily knock up something on CAD if you want and I'm sure the collective will have plenty of input.


HTF will you get it up? Scaffold tower and assemble in situ?


I'd likely Sikaflx and pin the MDF to the 25mm edges. Bendy pb to that with pb screws and let the spread do his magic after.

Oz07

Members

Pb will rely on a skimmer or filler doing a good job.

1 hour ago, Oz07 said:

Pb will rely on a skimmer or filler doing a good job.


It will, and I reckon it would be easier to laminate thin ply around an internal cylindrical mould, with a long scarf joint on the inner joint to ensure a dead smooth internal surface. 


I made a hovercraft duct up this way years ago and it worked OK, with the smooth inner surface true to within a couple of mm, as the fan only had around 3mm tip clearance.   It'd need good quality ply, as the cheaper stuff may well have internal voids that will stop it taking an even curve, but wouldn't take long to make.  Probably take longer to cut out three or four MDF discs to make the form than it would to bend and glue the ply around it.  The ply needs to be held in place with ratchet straps whilst the adhesive cures/dries, and it's best to use a slow curing/drying adhesive to allow time to gradually tighten up the ply laminate.  It also needs the sheets of ply to be scarf jointed together before hand, to make a strong continuous length, but that's easy to do with a long scarf jig and a plane.


Account

Navigation

Search

Search

Configure browser push notifications

Chrome (Android)
  1. Tap the lock icon next to the address bar.
  2. Tap Permissions → Notifications.
  3. Adjust your preference.
Chrome (Desktop)
  1. Click the padlock icon in the address bar.
  2. Select Site settings.
  3. Find Notifications and adjust your preference.