Leaderboard
Popular Content
Showing content with the highest reputation on 11/07/18 in all areas
-
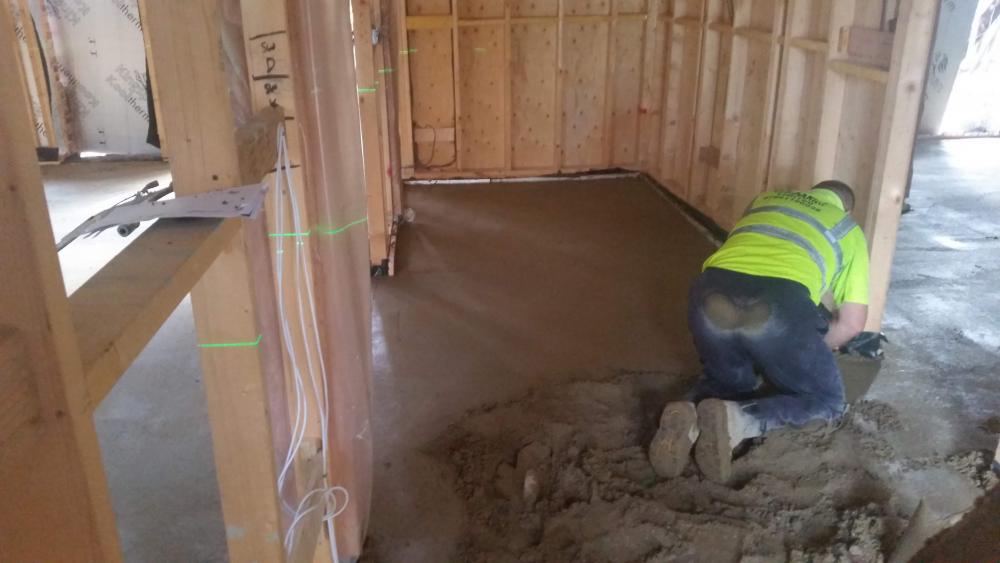
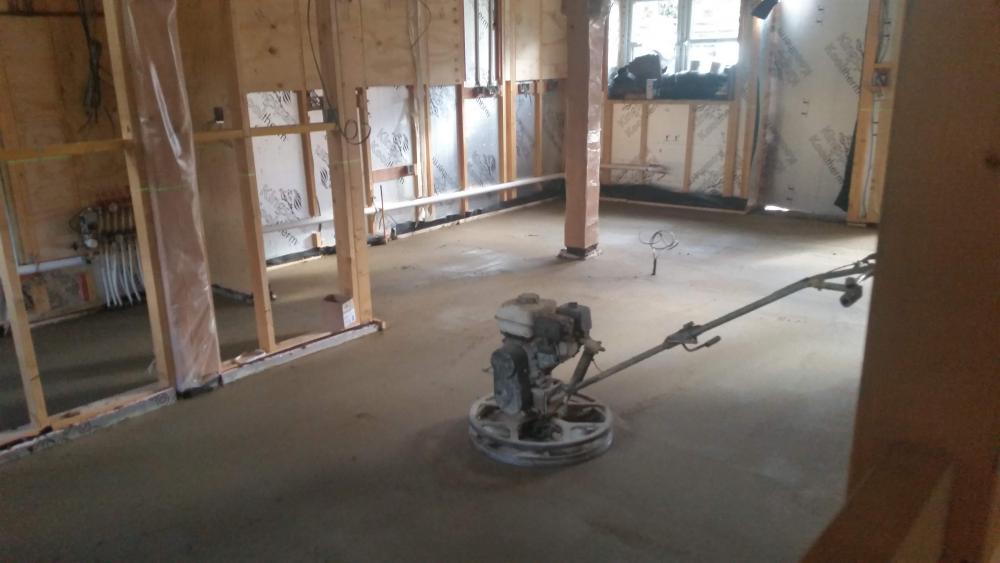
Well the screed went in today....at last I took the Building Controllers advice and tied some wire mesh supports in doorways and across the crossovers where the UFH zones change ....and the screeders left a 4mm gap in these places as well ...just in case of cracking. Lovely job they did ....flat as a pancake !! all in all 6 hours and they were away Really nice lads and best of all a good price So..... a shameless plug for anyone wanting screeding doing in the Luton, Bedford or MK area's Give Ian a call at Alder Screed ! PS I took a few peoples advice in the end on the expansion joints ...and the BCO told me as the areas were not Overly large and due also to the open-plan kitchen that heat difference cracking would be limited (most likely none at all ) ...even without mesh and extra fibre in the mix....but if i DID put in lower expanders ...they would definitely need to be continued to the top ... and the wife hated the idea of all these rubber strips breaking it up...so that kind of sealed it ! So now i will wait 2 months at least before i can tile ....I have lots to be getting on with !! ...once i can get back in !! I have been reading a LOT on this Ditra 25 matting and flexible adhesive...and sadly (as its dear stuff) ..it looks like i will need to go for it.. unless their is a cheaper alternative ... Tiles going down are large porcelain (imitation riven slate) 600x400x10 ...so i dont fancy these boys tenting or cracking ..as they are not cheap either2 points
-
Just figured the reason for the skylights! Did you position them so guests have no option but to park the car and step out over them? Uplighters?2 points
-
2 points
-
....if the weather man says it's raining! So goes the old song and me, too, by the end of this week. The roof itself has been watertight for a couple of weeks now, but there was still significant water ingress from the gulleys hidden behind the parapets formed at the top of the ground floor. However, my flat roof guys have been back on site this week and are working hard. Today they were finishing off the long, east facing balcony and also moving onto the south facing parapet; they will continue around the building and should have the main part of the house all finished off if not by Friday, then certainly early next week. This is a great relief as even though I know that the building would dry out, there is something deeply distressing about seeing puddles of water lying on the slab after rain, despite the main roof being on, so I shall be very happy to have this part of the build completed. Photos of the gullies and balconies to follow later this week. Stepping back to last week for a moment, some of the window snag list was ticked off, primarily the shattered panes of glass. One was in the south facing ground floor lounge area and the other was a unit in the north east bedroom. Norrsken were back exactly when they said they would be and got the main jobs completed so that things are set for the return of MBC. The remaining snag list are a few adjustments to the windows, for example where one of the lift and slide windows is too tightly fitted against the seal/brush and the frames rub when it's opened or closed, and then a few cosmetic issues such as shallow dents in the frames. We've agreed to complete the rest of the list once we're getting into second fix rather than get in the way of all the frame completion and first fix work. Last week also saw the return of Darren from MBC to fix my wonky wall, for which the solution was low tech but effective. A sleep deprived but determined Irishman with a very, very large hammer who was prepared to beat the crap out of a steel beam, and that's precisely what he did. So the problem wasn't so much the wall above the window, but the section that housed the apex steel that sat above the window and that, it's now been decided, has a kink in it. The wall above the steel section and the one below it are both plumb but the inverted V-section above the window isn't due to the kinked steel inside it. I'm assured that everything is structurally fine and that there's no danger of anything shifting in a detrimental fashion and after Darren did his stuff the top of the triangular window section is now only 3mm out, where it started at 12mm and more further up. I can easily live with 3mm and it will easily be lost in the cladding. There is now a kick on the inside, but Darren will put some packers behind the service battens to make sure that the final internal wall is plumb for boarding out and everything else that comes after. And so back to this week, where the first few days have all been about activity on the roof. As already mentioned, the flat roof guys were back on Monday and also back were the solar PV guys. The solar guys had to start by removing the optimisers from where they'd previously left them on the roof as they are all going into the loft space. The idea behind this is that the solar panels themselves are highly unlikely to fail but if any of the optimisers do, it will be an expensive job to get to them to make any repairs. It would involve dismantling part of the roof as well as expensive scaffolding to gain access. Instead, the cables have come through a penetration in the roof and the optimisers will sit in the loft space along side some MVHR equipment, meaning that things are far more accessible in the future. The inverter will be in the garage and the cable has been run down along the roof, going through the parapet and through the garage ceiling, into the garage where it will live with all the sunamps and other kit. This is the route it's taking, to the side of the roof window and underneath the membrane that will line the parapet gully and, eventually, the garage roof. My velux windows arrived last week, which was another relief. My roofer, Dylan, gave me a call to confirm that they were in and the days that his team would be back. We'd already agreed that they would be on site on the 30th to co-ordinate and work around with the solar guys and they all worked really co-operatively, as they have done all along. I'm biased, of course, but I think that my roof is looking really great and the solar panels are pretty smart looking, too. Here are the panels from the other side of the flat roof over the stairwell. And a closer view of the trays and panels. This is the velux window that's over the shared bathroom. It's very low down coming onto the flat roof, but Terence and the other roofers, Pat and Mike, had already discussed this and decided how to solve the potential issue by using some more membrane and glueing the s*&t out of it all. This is the same window from inside. The light from this will be the only natural light source in the bathroom once all the walls are in place, so it's good to see that it floods in from its west facing orientation. We have another 2 velux windows, one is in the already well-lit south east bedroom, which I'm claiming for my own room to do stuff in, so I'm delighted to have it full of so much light. You can also see the prep on the balcony with the membrane being put down. The other roof window is the north east bedroom which will benefit from the additional light given its aspect. Here's a pic of the guys putting the trays into position on the main south facing roof. The pole that's in the foreground of the picture is the one that until recently carried the electricity supply cable. That has now been buried and back-filled today and Openreach will be around on Friday to remove their equipment so I will be able to dispose of the pole in due course. This is towards the end of the day when most of the panels were on and the slates had been put around them. There's plenty more work to come this week. The flat roof team are continuing and the pitched roof team will be back on Friday and possibly early next week to finish everything up there. My groundworker, Keith, is on site now as well, and we're moving all the shrub and hedge related debris from earlier in the year. I'm currently thinking that bonfire night seems an appropriate time to light up, so I may have to buy some sparklers for the occasion. My fire rated door was delivered today from Enfield Speciality Doors and my neighbour, Drew, will be installing that for me. He works in construction and having seen the tidy work he's done on his own place, he'll be doing a fair bit of internal work for me as well as, possibly, the tier cladding on the outside in due course. It's worth noting that I paid a premium to Enfield Speciality Doors to jump the queue in their production schedule to make sure that I got the door in time for the return of MBC. It's the one to go between the utility and garage so it has to be in before MBC return and I was prepared to pay an additional 10% to make sure this would happen. I was chatting with another BH member recently and it seems that fire rated doors really are tricky things to get hold of, let alone within a reasonable timescale. If you also want one that's insulated and looks good, be prepared to take a few months over this, assuming you find anything. I'm fortunate as mine is only between the garage and utility and doesn't need to be pretty. I may add extra insulation later but, for now, I just needed the fire rated door. Soil pipes and other bits will be sorted out as well before MBC hit, then we can really take the brakes off and go at first fix. Yesterday's buzz of the week was the Hercules.1 point
-
1 point
-
1 point
-
@MikeSharp01 whoever wrote this must be a real fun guy! (sorry,two yard tap in too easy to resist!)1 point
-
Proper planning: Going to wet cut these visible rips. The Rubi cutter just doesn't give a good enough edge on these ceramics.1 point
-
yep - looks like that, you start thinking this idea has a future and cancel your PV order.1 point
-
1 point
-
The official word used for those, at least in the Scottish building regs, is “manifestations”. Makes me think you have to stencil a ghost or something, which would not be entirely inappropriate.1 point
-
1 point
-
1 point
-
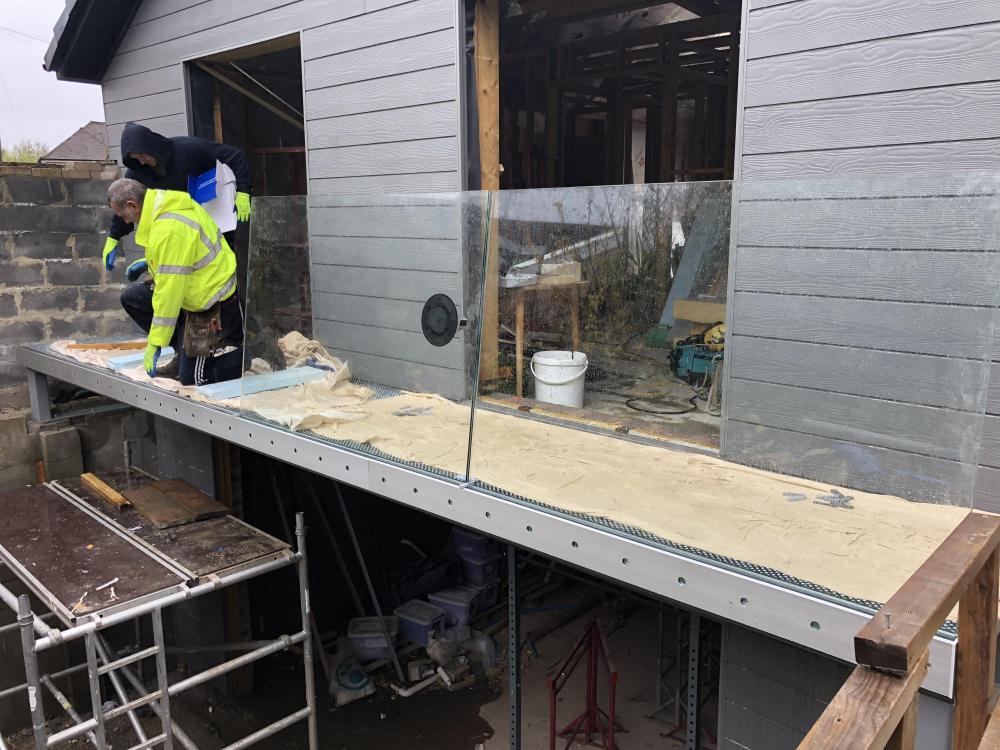
Glass floor...guests below...you've just come out of the shower wrapped in a towel...1 point
-
Is it like the one that goes out over the Grand Canyon......I couldnt cope with a glass floor I'm afraid, no head for even small heights.1 point
-
Before you tighten up, have a look that the olive is touching it's "cone" in the fitting. What can happen sometimes is the pipe is pushed in as far as it will go then tightened. Change the fitting for another, and the new fitting does not have as much room for the pipe, so the olive (already compressed and stuck to the pipe) does not seat in it's cone as the pipe has bottomed out in the fitting first. If you encounter that, shorten the pipe a bit. You learn this when no matter how tight you tighten it, it won't seal.1 point
-
http://nhbccampaigns.co.uk/landingpages/techzone/previous_versions/2011/Part6/section2/appendix.htm#62C1 point
-
I can come crap on some granite if it helps the selection process.1 point
-
Time for a caption competition? "I swear to it, Officer, the Martian was right there !"1 point
-
AND my mate John The Chippy! He walks in and says "Oh, you've a bit of a shadow line there...what happened?" & "Still, is it the first time you've tiled?" Git! Literally carries a tape wherever he goes! "What you could have done is..." is my favourite. I did once consider a tape measure tattoo on a finger, for measuring bolts...1 point
-
1 point
-
1 point
-
Yes, it's a nice size—three bedrooms, which is all we need, but in fairly generous proportions. Thanks so much for the very detailed reply! I'll answer your questions inline. Good questions, still working those out with the architect. Not a conservation area, so that helps. For a heat source, a good new combi boiler is the obvious safe choice. But I'm very interested in renewable alternatives, particularly: Wood pellet boiler, or stove with back boiler. Wood-burning stoves are popular round here and everyone I've spoken to highly recommends them. It sounds like a good way to make use of at least one of the original fireplaces. I'm thinking pellets because the RHI is very appealing. So if we get a little pellet stove, and we're going to be buying pellets anyway, why not use them for heating and hot water? The up-front cost looks OK, not that much more than a gas combi. Air source heat pump—I see lots of discussion of these online but I haven't seen one in person. They sound great but the up-front cost seems to be rather high (Energy Saving Trust says in the region of £6000). So I'm thinking maybe we just give ourselves the flexibility to add one later. To heat the house, we like the idea of underfloor heating downstairs, particularly in the kitchen. And as mentioned maybe a little wood stove for the winter. Elsewhere, I suppose radiators, but I've also come across heated skirting boards, which sound very nifty! Anyone know if they're just a gimmick, or do they work well? It'd be nice not to have to lose wall space to radiators. Yes, definitely! But again, maybe just plan in the flexibility to add it later. We have a very handy south-facing roof with few obstructions, and I'd assumed we'd get a standard 4kWp PV install, but now I'm not sure the roof is big enough—maybe 25m² at a pinch, and I imagine an older roof might need reinforcement? So we may be looking at more like a 2kWp. That's still enough to be useful, and in fact might be cheap enough to go ahead and install it now. I hear the FIT is due to expire in April, which is shame, but I'm not sure it's worth trying to rush a PV installation ahead of the other works. It shouldn't really interfere with anything else, though… I'd love to include a battery but they still seem far too expensive—Energy Saving Trust says at least £4000 for 4kWh. Seems a very safe bet that prices are going to come down. But can you get smaller cheaper batteries now, say 1kWh or 500Wh for under £1000? If so I'd think about getting one of those, and adding more capacity later when it becomes affordable. I was excited about solar water heating for a while, but the more I read about it, PV seems like the smarter option. Electricity is just more useful, PV sounds more reliable, and there are plenty of other ways to collect heat. I think you're right about external insulation, I haven't even bothered to look into that. None of the other terraces in the area have it (I suppose somebody always has to be first though) Ceilings are about 2.9m downstairs and 2.6 upstairs. Front door 2.4m, I don't believe it's original, back doors definitely aren't. The front room and master bedroom are 4.4m long so I think we could survive losing 10cm from the front. The party walls won't need any insulation, is that right? Since they'll be warm on both sides. Great, I'll take a look at that. B is about what I had in mind (and it's what the current EPC says could be achieved with all the recommended measures, although I take that with a pinch of salt). Right now we're an E, borderline F. Will do! My inclination is to aim for decent airtightness, but I'm more concerned with avoiding damp, so I'll see what our architect says about how best to protect the walls and floor. He's suggesting good levels of internal insulation with a breather gap fed by small skirting vents. The PIV and heat recovery extract combo sounds appealing, exactly the kind of thing I was grasping at. For the heat recovery fan, is this the kind of thing you mean? https://www.envirovent.com/specifier/products/single-room-heat-recovery-unit/heatsava/ What are some good reliable brands and suppliers? Interesting. That gives me lots of ideas to think about. Thanks again for taking the time to reply! The stained glass windows I think are fake (although I haven't looked too closely to be honest). I think we can easily get something similar on the mass market, e.g. Penicuik (http://www.penicuik.com/products/decorative-options/). I got some ballpark triple glazing quotes (from http://www.ecowindowsscotland.co.uk) and they don't look too scary, so we might go for that. Eco Windows supplies Rehau "Geneo" windows, apparently some kind of hi-tech fibreglass (http://www.ecowindowsscotland.co.uk/windows/rehau-geneo-windows/). Anyone know if those are worth looking into? They're a little more pricey than uPVC but not by much. It would be great to have stained glass; there are a couple of studios nearby-ish that will make new designs for us, or restore and encapsulate any vintage stained glass we might find. Definitely going to have to visit Glasgow Architectural Salvage when we get a chance!1 point
-
Price it up yourself on Pears Stairs @Christine Walker Easy to do and doesn’t need to be too accurate to give you a ballpark.1 point
-
Welcome to Buildhub! Sounds an interesting approach to building. Have you looked into cross laminated timber construction?1 point
-
A lot depends on the shape of the stairs. A single straight flight will be a fair bit cheaper than more complex designs. We have a solid oak staircase with 10mm thick glass panels and oak newels and banisters. We also have a matching glass panel and hand rail across the top of the landing. This complete oak staircase, including the 10mm glass panels, cost around £2k, from Pear Stairs. Lead time was around 6 weeks I think.1 point
-
I haven't got anything costed up yet so I honestly don't know. When I looked about 18m ago and got a rough quote it was around £2.5K total so a 2K extra bill sounds horrific. I need to measure our space and then go to both suppliers and see what I can get. The temporary ones will defer that purchase for a considerable time.1 point
-
to give the lad credit - it always makes progress - its just that its not always that fast1 point
-
Why is stick framing not that popular? because not many people can do it. It’s that simple its easier to write a cheque out, and it turns up on a truck dont be misled into thinking its easy to frame a house it’s not, you will need a pile of tools, chop saw, circular saw, nail gun i would think your easier route would be to get Cullen to design it, a local sawmill to chop it all up, and you and a mate to put it up, you will need a mate, you will struggle trying to plumb a chunk of timber and fire some nails in it on your own. I stick built our last place, all 360m of it. If I was doing it again I would use an i joist and have it all CAD designed, wider timber area to allow more insulation, timber is all straight. Go to your local lumber yard and try looking for a straight piece of 6x2 you will pick up 4 before you find one you want. If you use an i joist you will probably not build it in panel form but in a true stick sense, this is easier to lift in place as you can add the racking boards after, and the insulation after you have it all water tight. Make sure you look into airtightness, as you will need to detail it very well to get a membrane in place before you fit first floor joists, as it is a pig to detail if you try to do it later. I think @PeterStarck used I joists, read his blog the frame looks fantastic.1 point
-
Go on dad, be a Devil. Go for 2.6 - Dare ya! ? Seriously: really seriously, on the day of the pump, you get to 2.5 meters - what are you going to do if yer man says, "Well there's £300 worth of concrete left in the lorry: want me to dump it " ? I regularly bless the advice @TerryE gave - he suggested digging out a small pit for the flushing out remnants from the pump ; now got two or three nice little flat work areas which can be kept clean and tidy and ready for a temporary work bench.1 point
-
Personally I feel the LT approach is superior to sticky block. Quite a few examples of it in this country but it's generally more popular abroad, especially the States. There was a company in Germany (Lignotrend?) who were making factory built LTs. UK examples I know of: Charlie Luxton's (using I beams in a new build) the Simmonds-Mills retrofit. A well known TF supplier has a solution too which somehow they appear to have got a patent for, but I probably misunderstand why they were granted that. They use EPS rather than mineral wool.1 point
-
Welcome, Iain. This is your biggest enemy at present. No good learning things after you have committed to, or started, a course that will prevent you doing them. So it may be a good plan to take a little more time or learn faster ?. Don't overset your expectations if you are planning a full renovation, or you might suffer from 'bugger we only just started'' syndrome at 6 months. That looks like a spacious small terrace (reminds me of some of the early c1800 ones in Hammersmith), rather than one of the hoofingly-large ones that there are a lot of in Scottish cities. Your thinking is a good start, but there are some areas you need to extend it into imo. Some things IMO missing so far from your list that it would be useful to know are: 1 - Just how far are you cutting it back ... eg are you going to brick or skimming. 2 - What are your plans for the floor wrt eg insulation? 3 - Are you in a regulated area wrt conservation etc? 4 - What are your plans for a heating system? 5 - Are youplanning solar? To my eye EWI (External Wall Insulaton) does not look feasible without doing the whole terrace, so also wrt IWI: 6 - How high are your rooms in general? 7 - Ditto the doors? Are they original and are you keeping them? 8 - How large are your rooms (ie can you afford to lose say 100mm to insulation if you need to)? Have aerogel on your radar if you just need to insulate the front wall and your rooms are small, though your bank account will know when you have bought some. In terms of where to start, I would suggest a Heat Model on the @JSHarris spreadsheet (someone needs to provide a link to where it is now), and also on the Stroma EPC software. That is to understand your house, and also to know where your target is. I would recommend aiming for at least a B on EPC, as it has to be a C for future rental if that will be needed, and is a decent place to aim for. If you are building a 20k-30k extension, then any extra money you spend to take your insulation from "good" to "very good" will be relatively small. ie so do it. If you sweat your extension budget just reasonably well, it should more than cover the other. On MVHR, you need to consider it and balance cost against benefit (including comfort), but you do need a ventilation strategy alongside your energy strategy. The ventilation strategy needs to address the extra difficulty you are causing for for both moisture and air to escape from your more sealed house, compared to the original permeable-walls-full-of-holes. That is, both heat and humidity. I find big benefit from a PIV at the top of the house, and some sort of outlet (eg Heat Recovery fan with backdraft shutter in kitchen or utility, and a low volume trickle setting) at the bottom (usually kitchen). It does make a material difference, either in the case of poor glazing (even single), or with well sealed 2G or 3G, as a intermediate between trickle vents (spit!) and MVHR. It is about providing an alternate route for moisture and air now that you have significantly sealed the walls. Others may argue keeping the walls permeable by choice of material as they do not like full membranes. My view is still to allow the walls to be sealed more but provide robust always on background ventilation. Finall,y remember to integrate your systems in space terms, and keep them maintainable. My last one I brought all the services above the underfloor insulation and plumbing / gas / electrics into channels in the insulation in my floating floor, which I think works. Had separate rockwool insulation under the suspended floor providing an overall insulated envelope. For the next one I will look very carefully at AHSP not gas, underfloor insulation, a floating-floor type underfloor heating system, and electrics running around the edge of the room under the floating floor. That will require good underfloor insulation, and careful tactical consideration for light switches etc. I'll stop there, but happy to answer any questions. My renovations have been mainly rentals so robustness, maintainability and resilience are very important to me. Ferdinand PS You need to decide how to handle those nice windows if you put 2G or 3G in if not there already.1 point
-
When you submit the rest of the stuff for the final inspection (air tests, elec and gas certs etc) you also submit a statement confirming that "Water consumption is less than 125 litres/person/day using fittings approach". You no longer need to do the calculator.1 point
-
Why? They'll only be fairly small gussets of ply going right through so the bridging should be minimal.1 point
-
A similar approach would be a Larsen truss with mineral-wool infill and some sort of render board on the outside. Not sure if you'd need a ventilated cavity behind the board, though.1 point
-
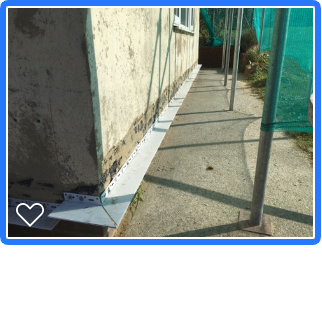
sorry for the photo spam, this is the starter track. I'll dig out the concrete path next year and run EPS down to the top of the footings. I needed to get on with thew main elevations while we had the scaffold. The plinth EWI will be 25mm recessed to form a drip detail, more aesthetic than because a drip is needed. we hacked the existing render off before fitting the track, the existing render had a very pronounced bellcast bead at the bottom and it kicked out about 30mm. The track allows for a push in bead, you fit the EWI and then a mesh bead slots into the track over the face of the EWI, it means you dont have to worry too much about build up depth. Wemico is the place to look for beads.1 point
-
1 point
-
1 point
-
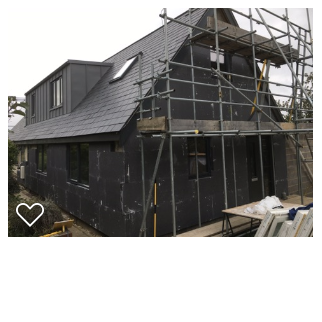
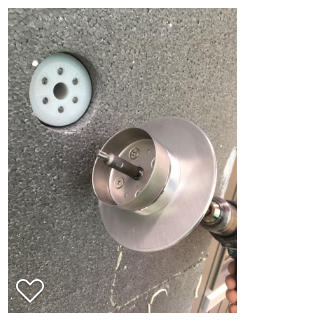
loads we could talk about here. I cant give you a cost off hand for my DIY EWI but I recall it was approx 60% of the quotes I was getting which, again from memory, were in the order of £90 - £120 per meter squared all in. reasons I went DIY in addition to cost saving: method statements from suppliers were often behind the times in terms of detailing. for example, I religiously foamed every joint in the EWI boards to ensure thermal continuity, most of suppliers said they didn't do this, one said they filled any gaps with base coat! I used thermally broken fixings which via a special tool are recessed below the EWI surface, these are then capped with a little EPS disc. As well as being better thermally, this also removes the risk of a proud fixing "grinning through" your render. I also used frame seal beads around all the windows, another small detail but one which greatly improves the quality of the reveal render finish and the wind tightness (no need to silicone). I used a PVC starter track, many suppliers quote aluminium which creates a cold bridge should you also go below DPC. So these were all examples of detailing which would have cost me extra or just not been done. Next up, below DPC. Several just weren't prepared to do it, still caught up in trade folklore about the sacred DPC. I think the tide is turning, many system suppliers now have below DPC details, usually called plinth EWI. Most would require the DPC be continuous so break the EWI at the same level. This has been discussed at great length on the other place, and general consensus is that there is no reason to bother breaking at the DPC for reasons of dampness. This means you could just run one pass of EWI from footing to soffit. However, using a starter track does have the benefit of providing a nice level bed for the first course of boards. In my case it also allowed me to break up the work and get the main elevations done. Next year I will install the plinth layer of EPS below the track, slightly recessed, and then go right down to the top of the footings. I fitted the boards myself. It's not too hard once you've done a few, getting the first course plumb and level is key, then it's pretty easy. An 1800mm level and a 2.4m feather edge were hand for checking flatness and plumb. I got whole elevations within a mm or two variation over the 2.4m straight edge, my renderer was very impressed which meant I'd probably gone a bit overboard! I don't much like the texture and finish of the standard thin coat render which most systems use. Avoid, in my opinion, the acrylic and silicone thin coat finishes, go for silicate which is very mineralic and matt and could be painted over in the future with a mineral paint. Another option would be a use a mineral paint over a nicely float finished base coat, that would be lovely I think and very suitable in a period building. I used Baumit render. Very good product and was very happy with the on site and phone tech support. I used their nanopor fine silicate finish which is a very fine grained and very matt, very happy with it. If you are ever over the east side of kent you are welcome to come and have a look and I'll talk you over the whole EWI experience. You can have some fish and chips on the beach afterwards.1 point
-
When I first joined the site's predecessor I couldn't for the life of me figure why people were using passive infra red detectors in conjunction with insulation! "pir"1 point
-
Well you can get prices for the materials by going to somewhere like EWI Pro, if that's what you mean? Take a look at https://retrofit.support/category/EWI-GL/1 point
-
OK. Make sure you specify the max deflection must not exceed 8mm or 0.002 x span. The standard is 12mm which can feel a bit bouncy. 2 stairs?1 point
-
Welcome to THE forum for self builders. Plans look like a great starting point but if you are appointing an architect you don't want to tie them down too much although you can insist on things like Timber frame, triple glazed windows, not too much glazing facing south and even less facing north if you are going passive. We were very clear with our architect about such things and they went away and started feeding back ideas which I then checked against the passive house criteria and eventually we ended up with a design. In choosing your rchitect you need to be clear about the budget while remembering that, in the main architects don't do money, and make sure you meet more than 1 so you can be sure you will 'get on'.1 point
-
@joe90 Might be worth trying this: https://www.fixafloor.co.uk/ we used it for a few of our oak flooring (bonded to slab) which hadn't adhered during install, and its worked a treat.1 point
-
I have a tape measure tattooed on my penis . I now measure massive things with ease ! ?0 points



.jpg.c21f3ac78c9b7efd90cbdcb312744dc5.thumb.jpg.7adcad4c0e384f5ecd7d56b0618df6e5.jpg)


