
Leaderboard


Popular Content
Showing content with the highest reputation on 04/05/24 in all areas
-
Durisol costs nothing to brace, well 4 sheets of osb and some screws. Nothing wrong with durisol, our external walls took us 4 weeks, (70m x 3m tall) neither of us (2 off) had done or used ICF and neither of are builders. Yes from recycling mostly old end of life pallets, very little cement, made in Wales. Easy for anyone to build from. Render and or plaster directly to the woodcrete. U value of 0.14 out the box, zero cold bridges, very little rebars required. You actually screw things to the woodcrete without issue. Lots of things to like.2 points
-
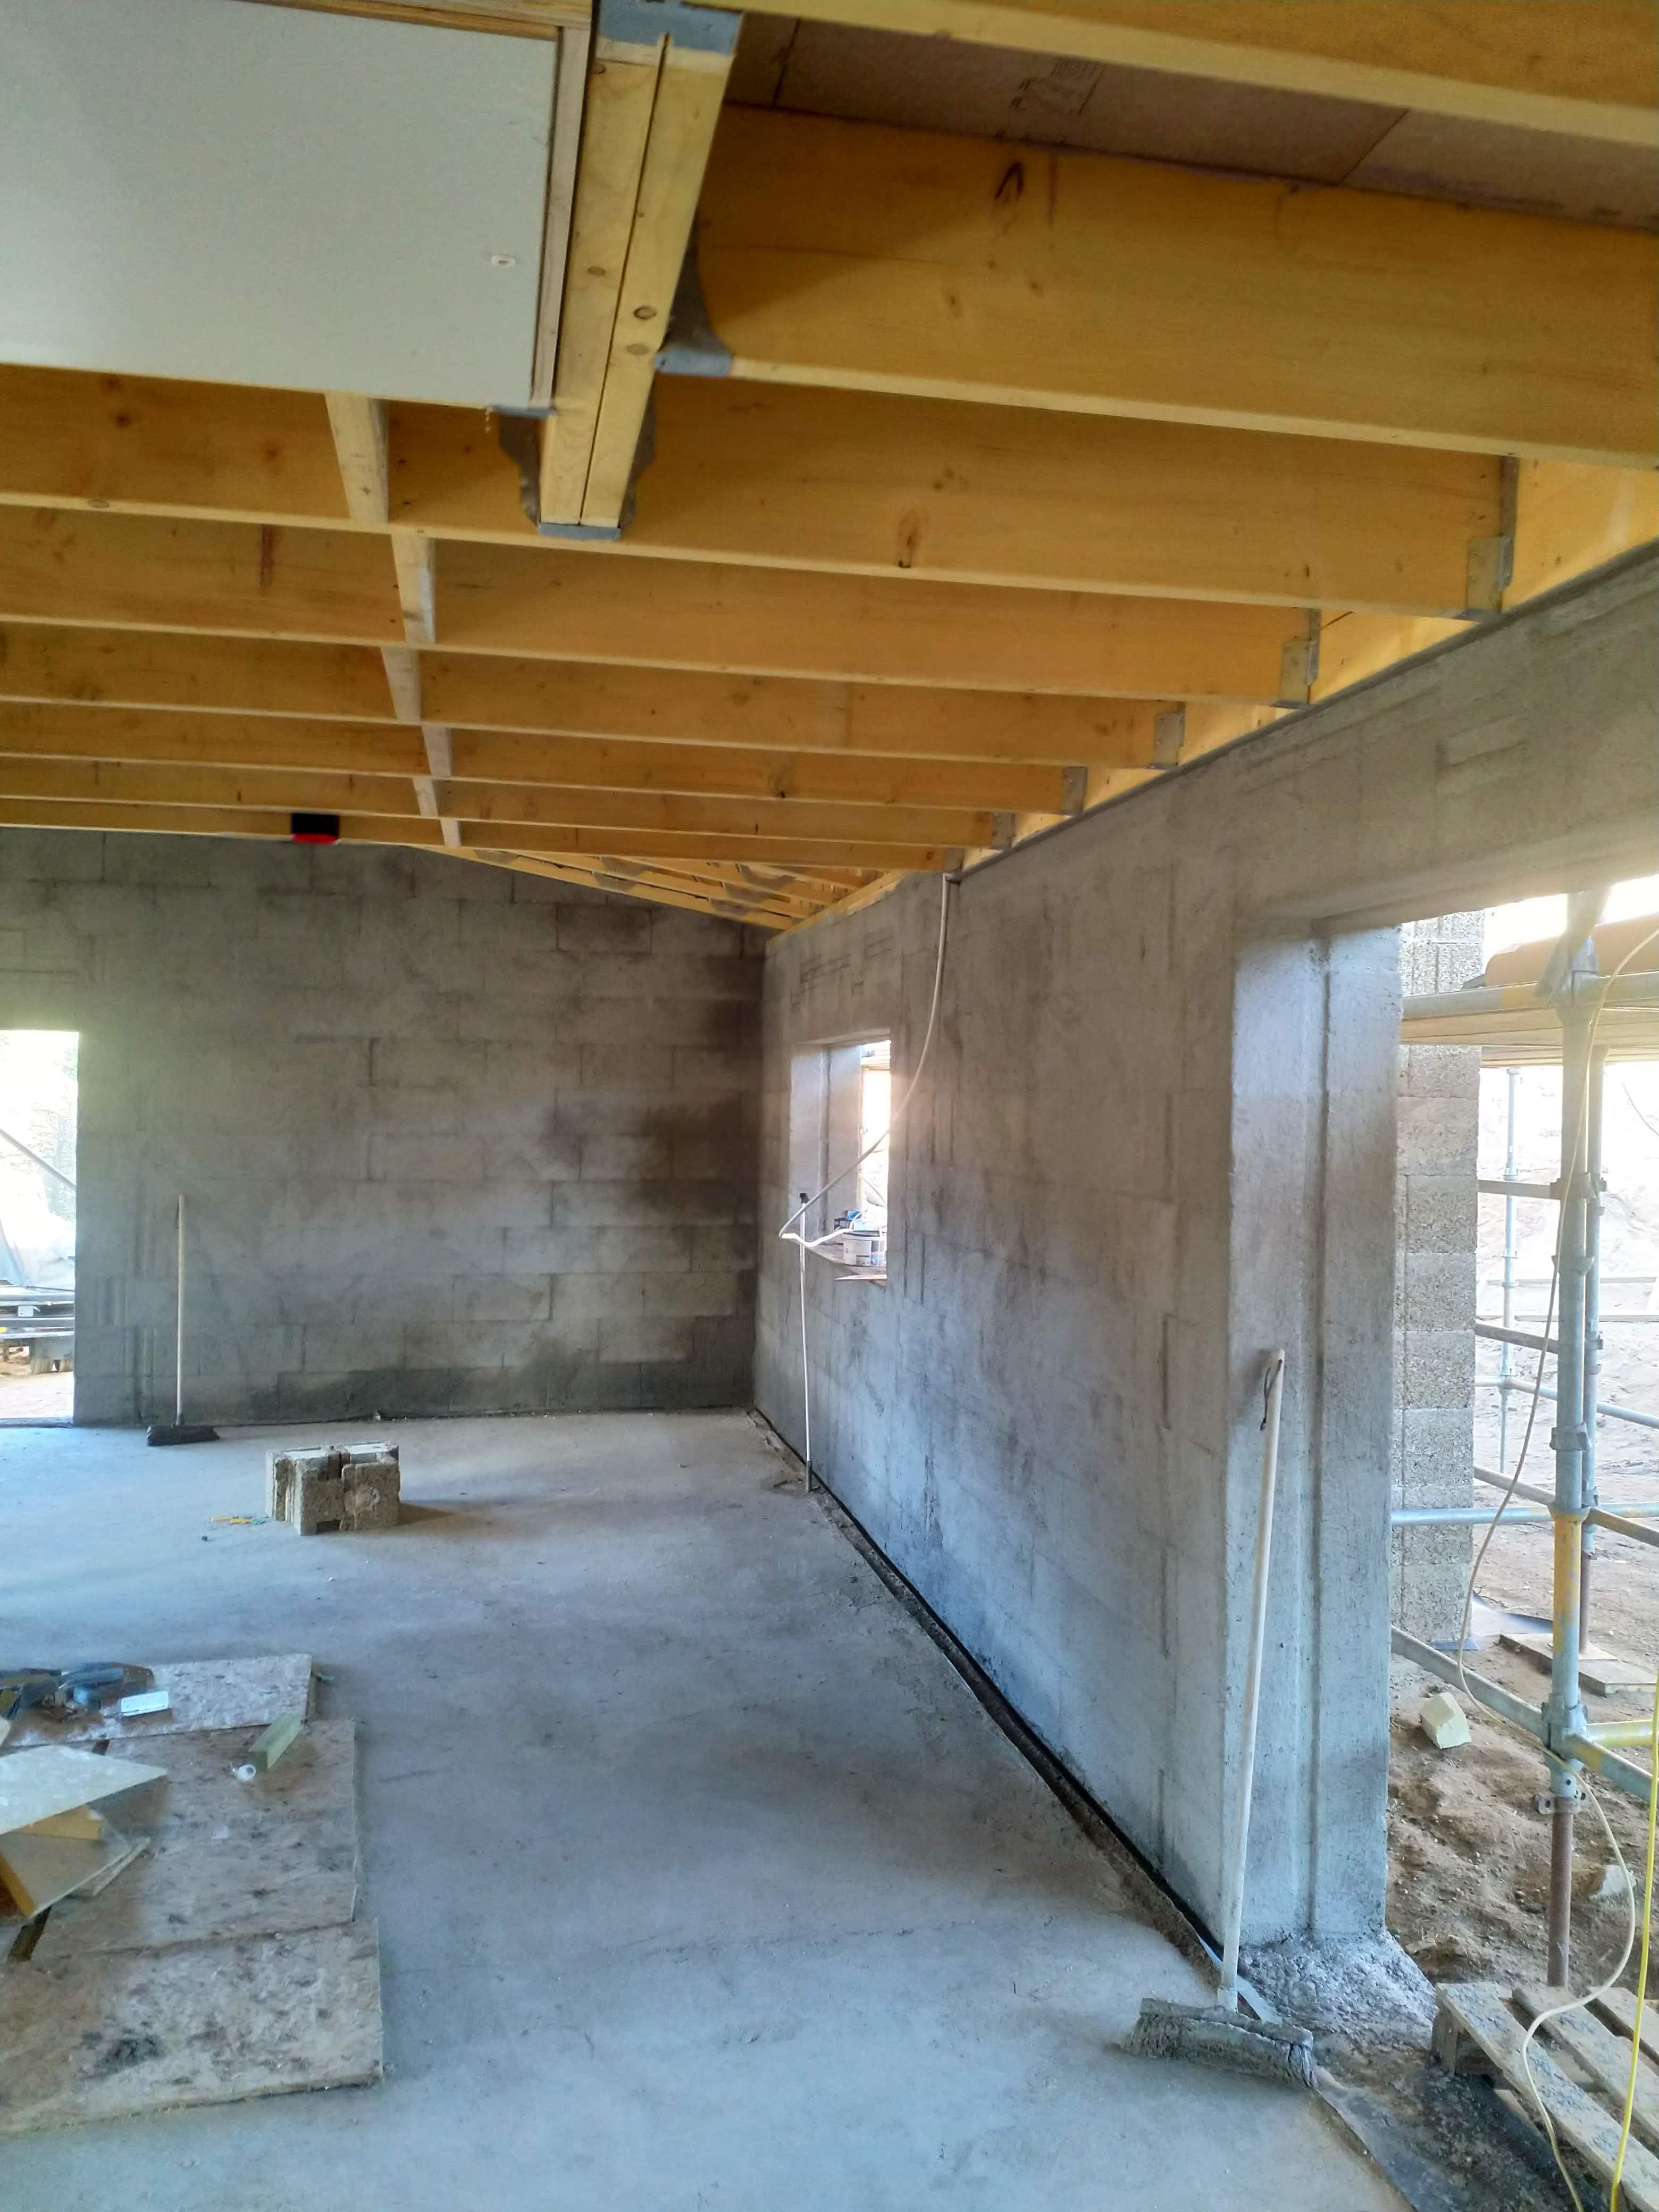
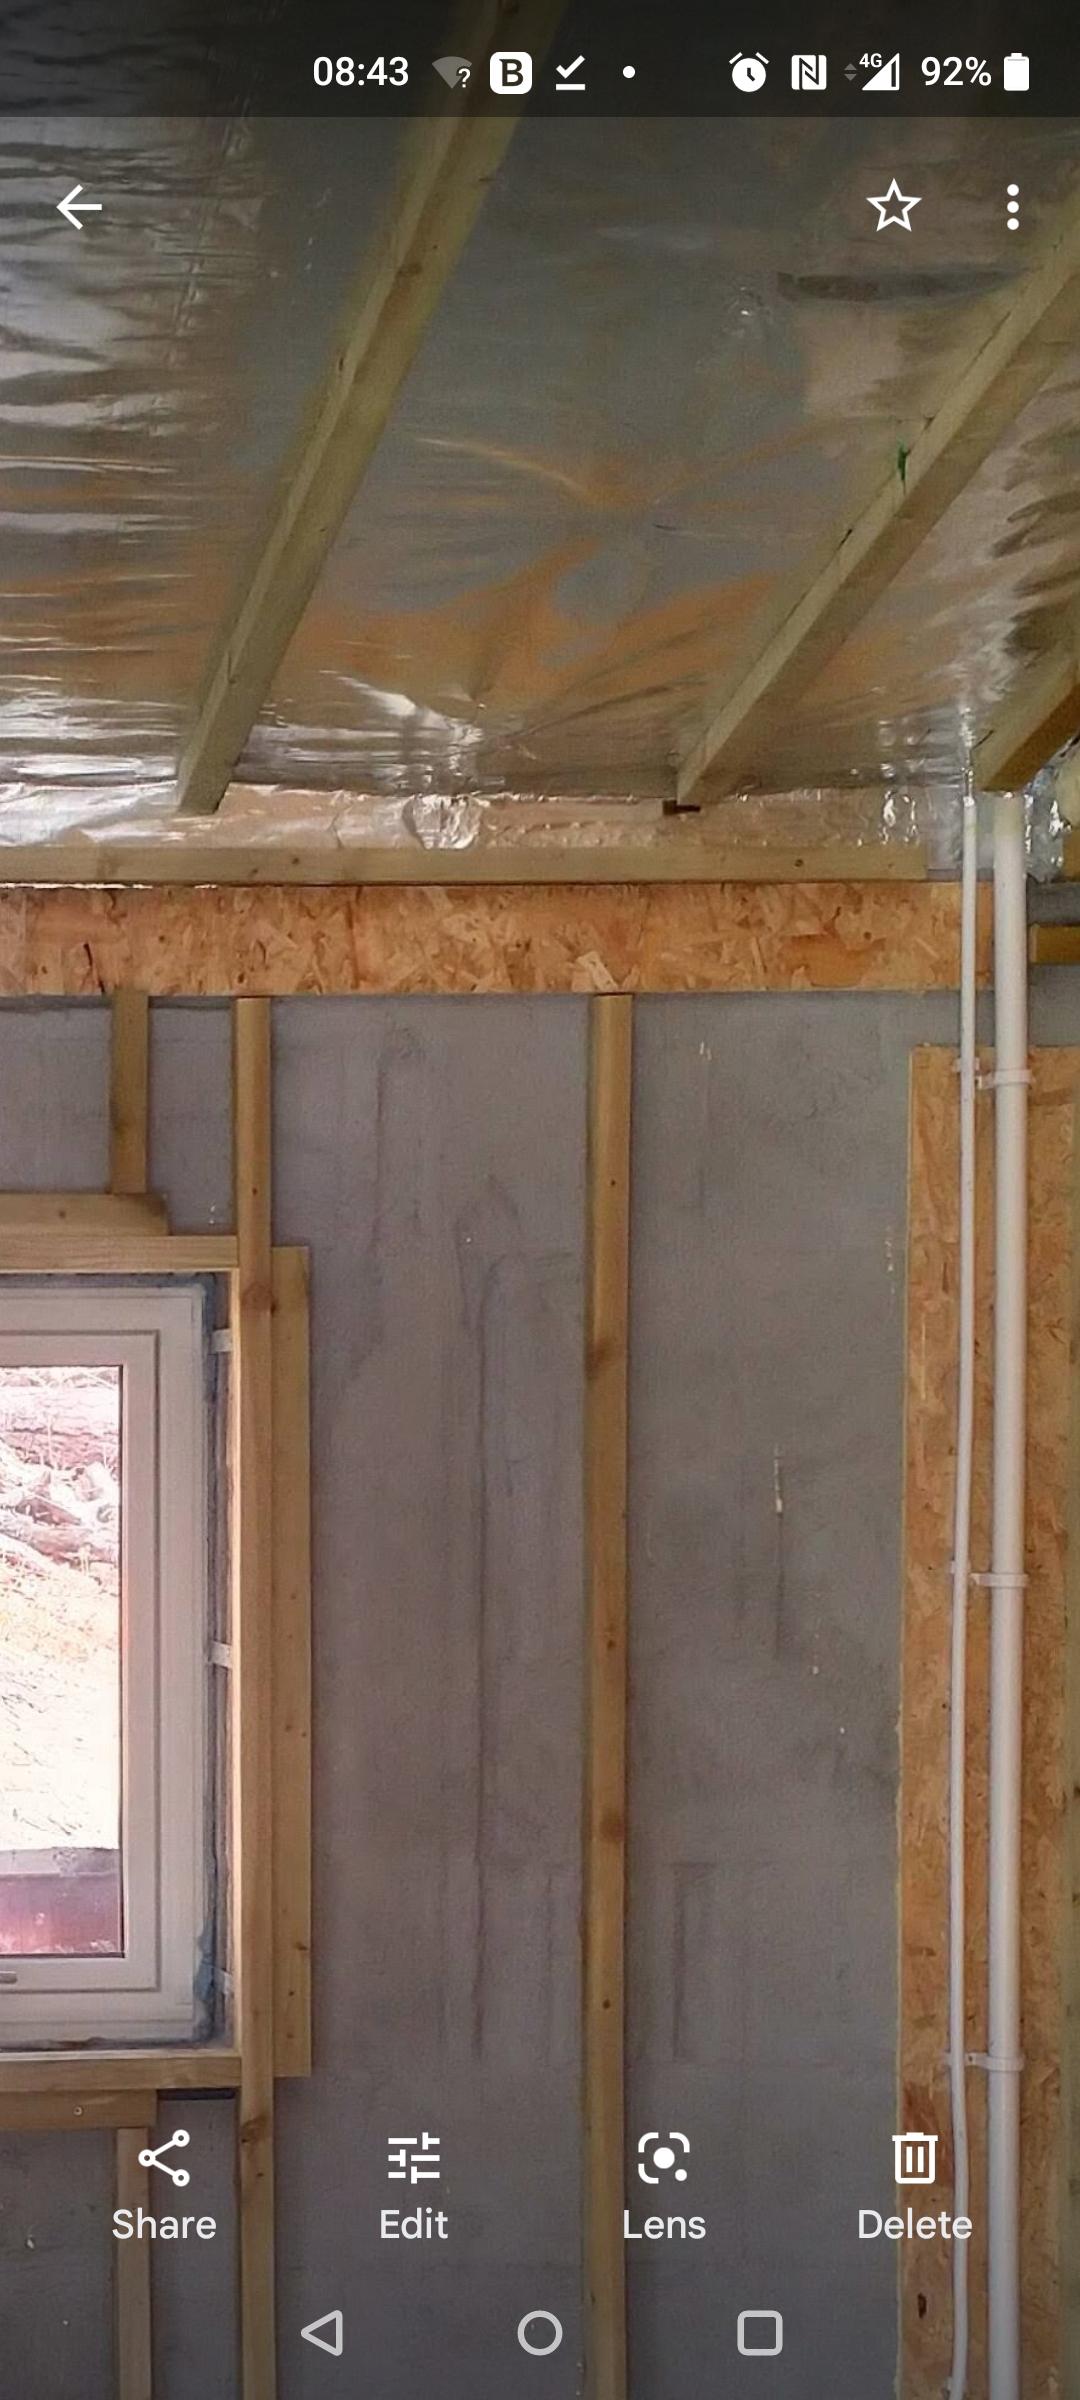
Hello. I am an MVHR Designer and I thought I would weigh in on some of the posts made, as I think they are a bit misleading. This is incorrect. Where i-joists are used, rigid ducting is the norm. The major advantage being the ease of cutting holes in i-joists, and the amount of holes that can be made (following guidelines on the data sheets). People often think of semi-rigid (flexi) ducting as space saving, but clearly with this type of joist you would require far more holes because there are far more ducts. A good designer will ensure the guidelines for holes are not breached. It is straightforward to cut duct with a hand-held grinder, even with a 1mm cutting blade. See my post above, rigid ducting is the norm where i-joists are used for the floor structure. 28m3/hr down a 75mm duct is fairly standard for a lot of companies, however, an optimal design will use two ducts for this flow rate (or higher). Bearing in mind that lower air velocity = lower pressure = lower sound. Most people would rather spend a bit more, have more ducting etc to have an inaudible system, over saving a few quid but having a system they can constantly hear. This is generally true. Rigid steel ducting tends to be lower pressure/sound. Semi-rigid does get unnecessarily harshly judged in my opinion. I have designed perfectly good systems for Passivhauses. In my experience it is due to many early systems being in semi-rigid, and were poorly designed and/or poorly installed. Even though it is straightforward to make connections airtight, I see more often semi-rigid systems with leaks due to improperly connected ducts to manifolds, plenums, etc. With rigid steel duct you just push it together once and it is airtight. And lastly the high volume of air many companies design for each duct. When I design I aim to put less than 26m3/hr down a 75mm (ID) duct, and less than 18m3/hr down a 63mm (ID) duct. To the OP, it looks like a nice system.2 points
-
I’ve got EPS beads in my 1928 semi detached, 65mm cavity and can highly recommend. Not only is it warmer, it’s quieter too!2 points
-
You have not mentioned extra insulation In the Roof and floor areas, it all adds up!2 points
-
Hello all. I'm Jon. I am in the Highlands of Scotland and I have a Sentinel Kinetic Plus B 443028. My machine is 9yrs old and has stopped working, I am a fairly capable home DIYer and have stripped the unit down, but I have my limitations. I'm going to trawl through the forum to see if my issues are discussed, if not I'll create a post of my own so please be nice 😉 Jon.1 point
-
@Carly Lawson there’s nothing to apologise for, I just think you are jumping to decisions after talking to someone selling a product. it’s like the saying, don’t ask a barber if you need a haircut. I would say do more research, and then base your answers on sound evidence. you have mentioned wall thickness a couple of times, unless your land is only a few metres wide then 50mm wider or thinner is not going to matter. the crane comment was in regards to a timberframe house, like saying timberframe was cheaper, but forgetting you needed a crane to put it up. I think we’re hijacking the original post here, so maybe start your one about your journey and hopefully we can point you in the right direction there.1 point
-
Success, tv and poweline work! I can't be blamed for this mistake as I wasn't let near it after I broke the ethernet socket module by shoving the cable in upside down with force 🫢 My argument is that we wouldn't need a splitter or poweline/extender if it wasn't for the other half being insistent on a camera doorbell on the gate so all of this could have been avoided if we just had a normal doorbell.....1 point
-
Hi SteamyTea, I really appreciate all environmental efforts. We try to help where we can (not easy with work and kids) My husband and I have been privileged to spend some time volunteering with a group that is working to alleviate the damage from ghost fishing. It's so upsetting to see the damage done by discarded fishing nets. Thank you for the input. I'll update the forum with our selfbuild adventure. Hopefully we will find the best materials to use. We only get to do this once, and if we end up with something as beautiful as JohnMO's Ecobrix house, we will be over the moon!1 point
-
OMG OMG OMG that is magical!!! I absolutely love it!! Thank you for sharing. What a beautiful setting and design! Gosh, I hope we do something that good1 point
-
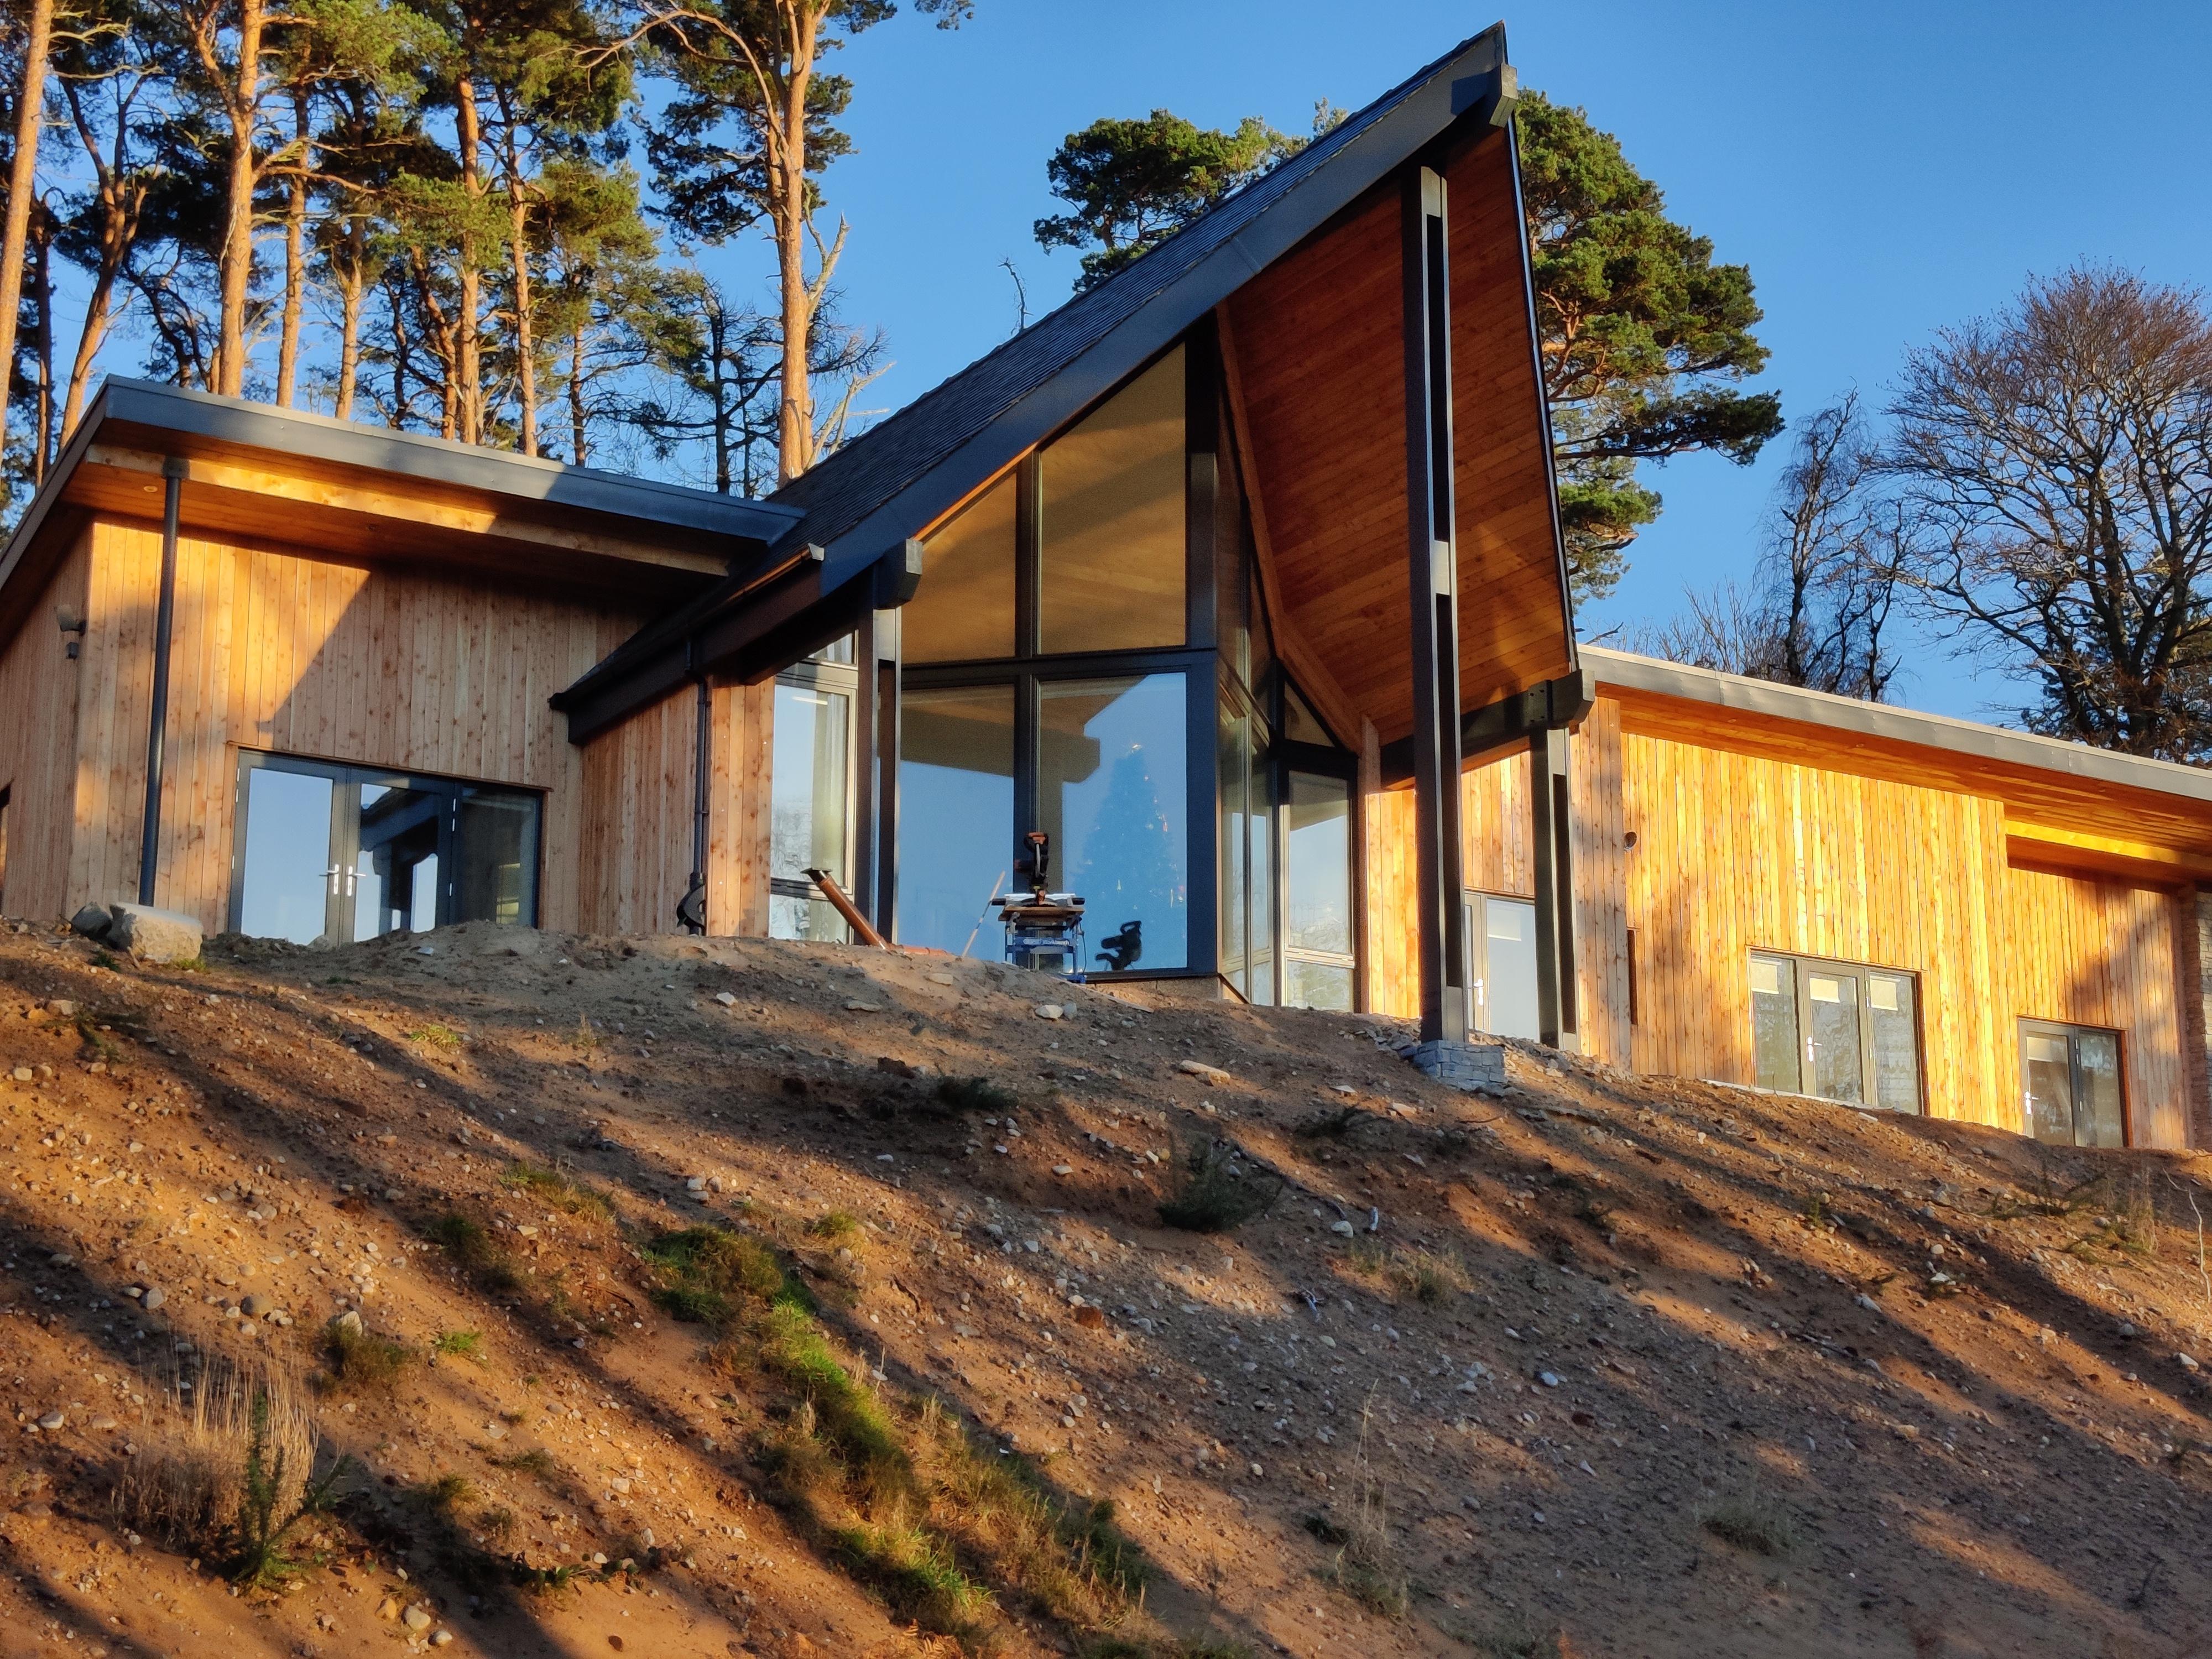
No we didn't render at all, as I hate the stuff. I used stone slips and Scottish larch cladding. Inside we did a lime, cement parge coat for airtightness, and sevice void for from battens screwed to durisol and the dry lined with plasterboard. Doing it again I would miss the parge coat and use a smart air tight vapour barrier membrane, less mess and quicker.1 point
-
Yes DC over the long run, just use normal armoured cable of the correct size. The more vertical the panels the more even the production is over the year. You get a slight lower yield overall but more when you need it. Mine are vertical and more like a fence. I took the 9m2 as floor area it takes up. 40mm thick is a lot of panels1 point
-
Get a good roofing company / gutter supplier to work out the correct gutter size for the area of roof and run. You need oversized gutters and a downpipe as close as possible each end. I'd put an Acco in front of the garage door so I can put a downspouts right in that corner if there is space and save 2-3 meters of run over the garage door before it's discharged. You might be able to remove the other downspout altogether. Really just a case of too much supply of water and not enough discharge capacity. Standard gutters won't cut it. Now they will look and be a lot bigger so that's a conversation to have as they will hang over the neighbours boundary a bit but it avoids an intermediate downpipe on their side of the wall. Worth a look into anyway!1 point
-
If you give me a couple of weeks I can show you. We have this predicament in a couple of areas and I'm not sure. Builder has delivered the aluminium trims already, but a week or two before they are installed or at least trial it,1 point
-
Yes, As for MVRH's I understand the ' only through the lens of money ' and I think they are worth it for damp prevention and generally better feel to the atmosphere in the property, and you are pushing an open door but I read unless the house is airtight don't bother, if you think otherwise I would be interested to know. As for ASHP's I have come to the conclusion of they are ok! Should be called 'ELECTRIC' Air source heat pumps because no one ever seems to get the running costs they were promised by the designer, they aren't any good if you need to place the fan unit anywhere near a neighbours house and they really need a boiler for back up when the weather gets colder. I spoke to someone who had UFH throughout downstairs and he said at best he would call it, low background ambience not heating the room, but I did ask if he left it on permanently like they advise and he kinda fudged the answer. Soo at this moment I think yes definitely to EPS beads cavity wall insulation (upon further investigation) Yes definitely to MVRH and like you said take it on a room by room basis. Any other ideas I am all ears or eyes as it's an internet forum. I have inherited 300mm loft insulation but I think I will insulate between roof rafters as well and definitely insulate with floor with PIR, I have 4"joists on the ground floor and I will have a company we have used before advise me on that underfloor insulation but will probably be 50mm PIR boar and then 50mm their pipe trays with 50mm insulation which gives me 100mm on ground floor.1 point
-
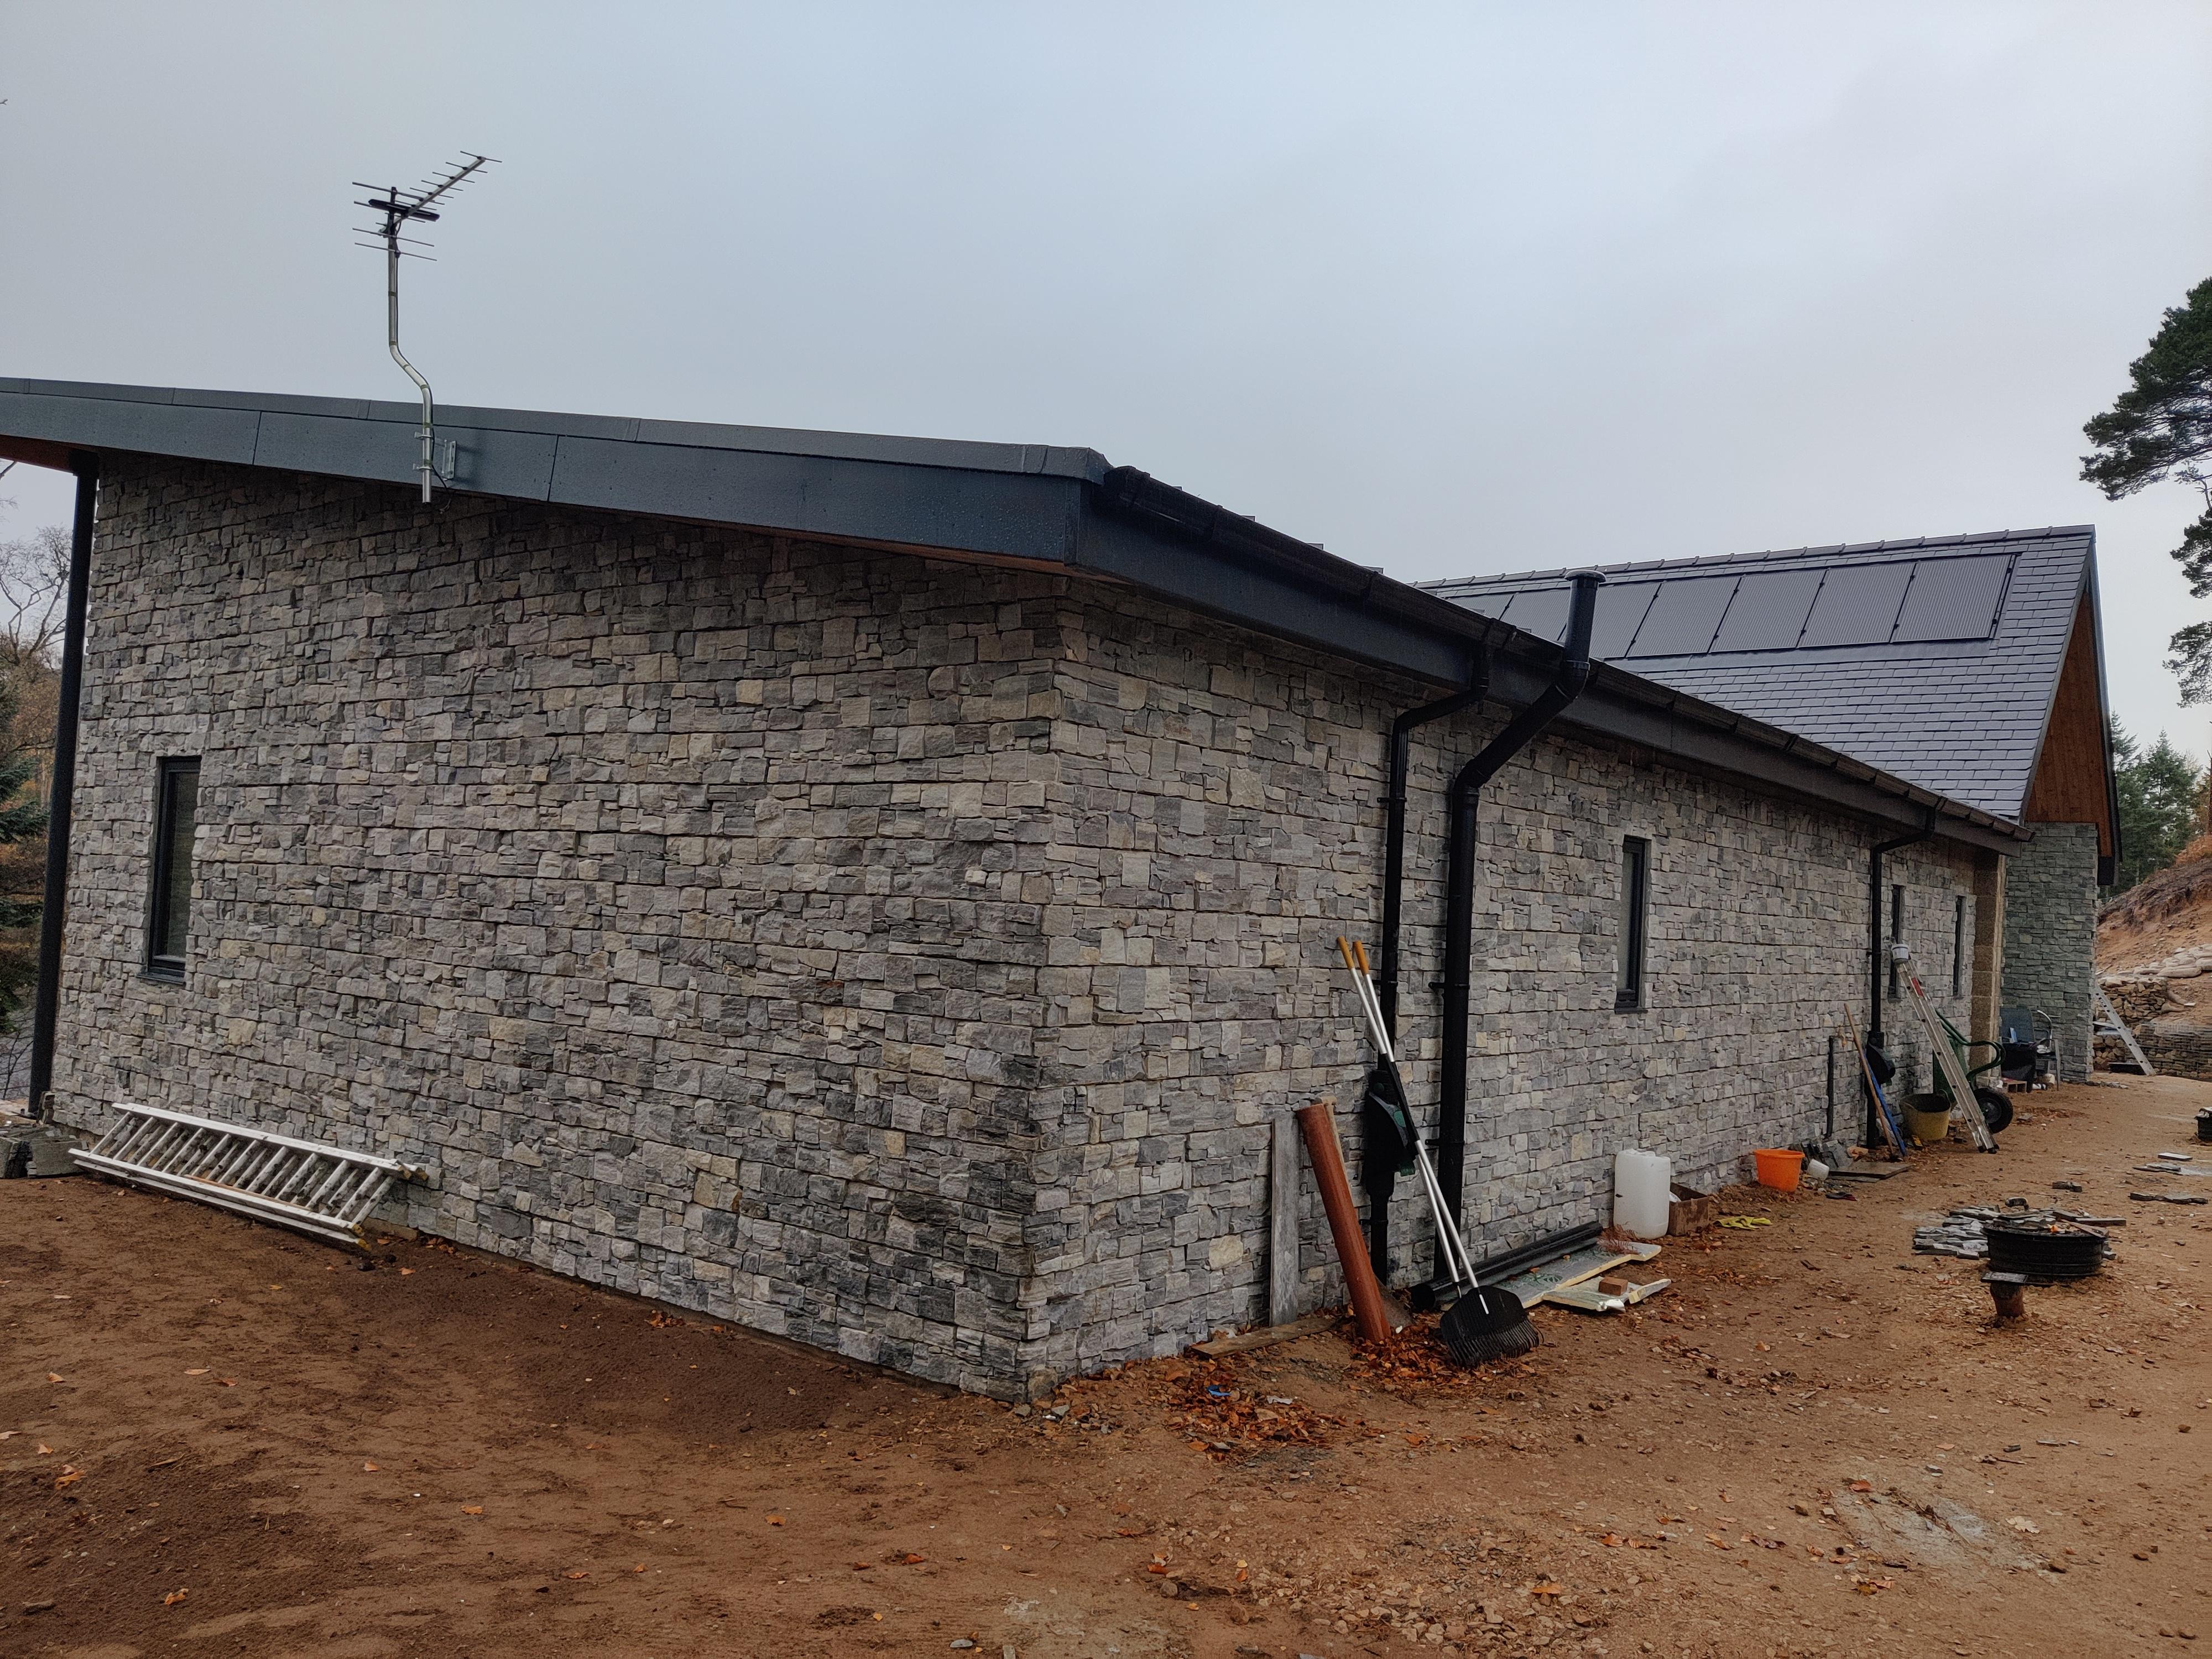
Equations actually result in a figure of less than 20 in these cases which is not physically possible, see my recent post. At the lhs the pnk and green lines do converge though the pink is not that easy to see, soz (the pic is a screenshot of a pdf print of the xls). At the rhs they don't bc I now notice there is a data point missing from the pink line, the missing value at r = 1 is 17.50, same as light blue. This gives an avg temp of 40 to the UFH which is what is required to dissipate twice the design value (2.5kW at 30C). HTH.1 point
-
Fair point but in the unlikely event it all going pear shaped the insurance claim may be problematic. Maybe. Wherever it’s lost from and/or to it needs replacing, so the less the Sunamp/UVC lose the better surely? As a general thing, I can’t think of one item in this house that was bought with a view to when it would have paid for itself. That was definitely not in my head when I decided on the Sunamp or, more recently, the battery. Who knows, if the Sunamp soldiers on for 20+ years it may well have paid for itself over some other option but I won’t be sitting down to do the sums.1 point
-
We have this, just bought the bits and installed it, roofer helped with the PV panel bit, although I actually installed the rails and panels, I wired it all, installed it all, commissioned it all. I didn't need or want the system MCS certified and as I was 100% self consuming I was not interested in any pay in. I just fired off a G98 to the DNO, I think. A friend who happens to be an electrician came and helped as he wanted to learn how to do it (I had already done PV on the shed and garage) - so I taught him how to do it all, from how to design the system to crimp up MC4 connectors etc. and he wrote up a minor works certificate. Brilliant isn't it! (facepalm!).1 point
-
Some would say not. Like base-rails for EWI, some like a 'proper base'. If your upper layer is to oversail the brick slips it will still need a drip at least, to reduce the risk of the worst-case scenario which is water tracking back into the junction of the 2 layers.1 point
-
If it is just inverters specifically, the I have Solax & Solis inverters, both working away without any connection to the outside world.1 point
-
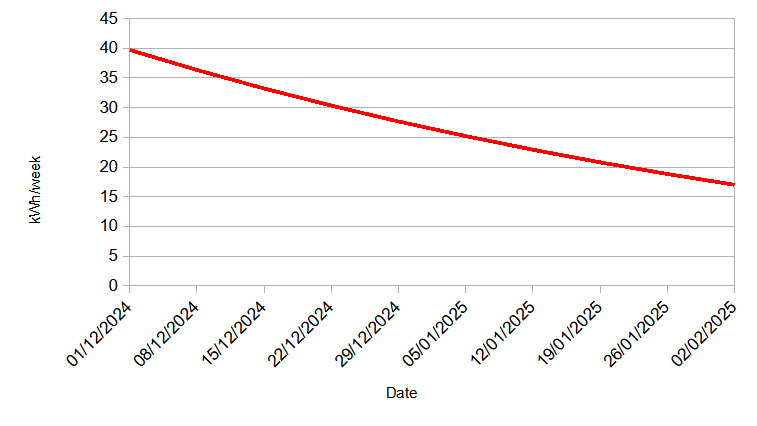
Here’s a quick update we moved in early January. Still got loads to finish off inside but we got all the EWI and render on before winter, fitted our kitchen and a bathroom and for two bedrooms done. Basement is done as well and still not leaking ! I’ll do a more detailed blog later but we are very happy with our self build / eco renovation / it’s just an extension isn’t it?! / (and the only other trade we used was my friend Pete the electrician)
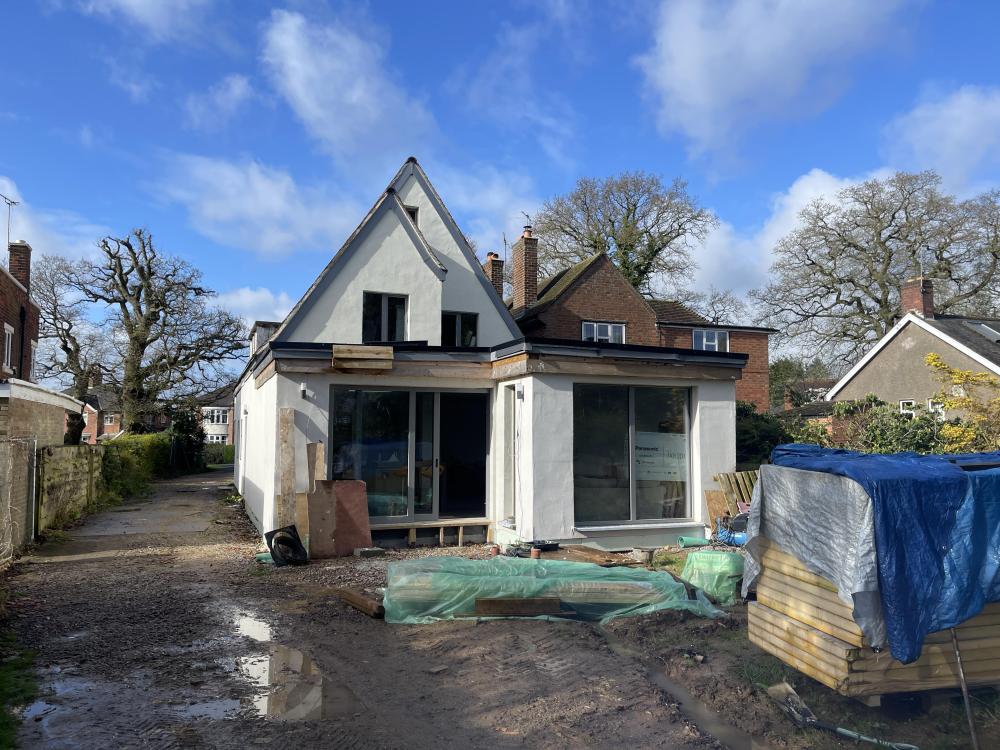
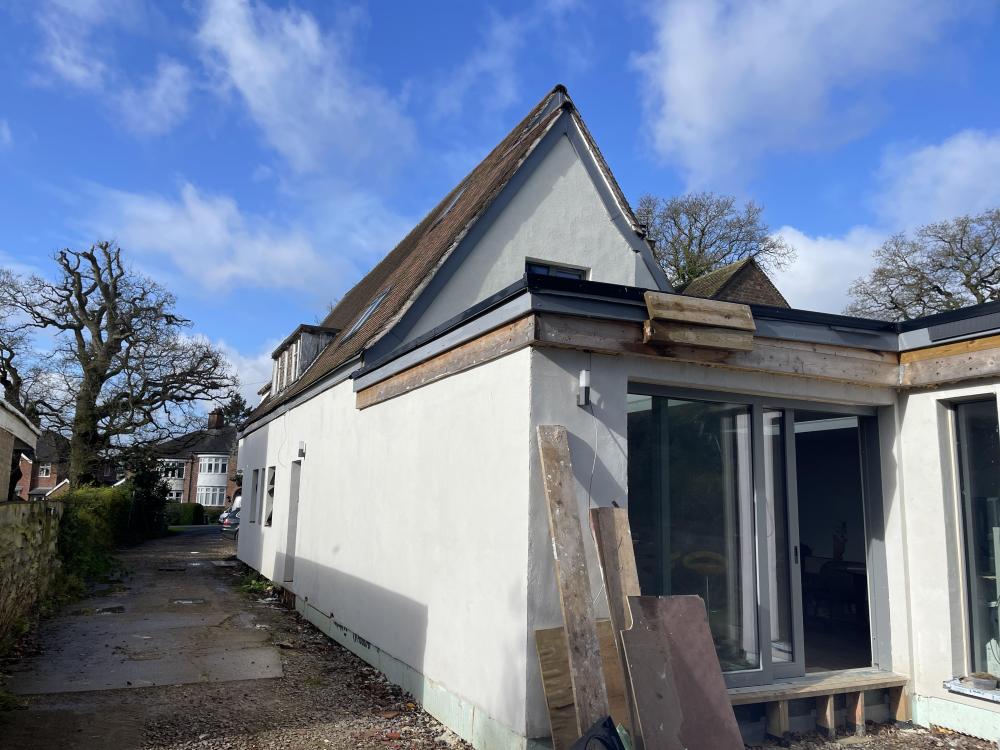
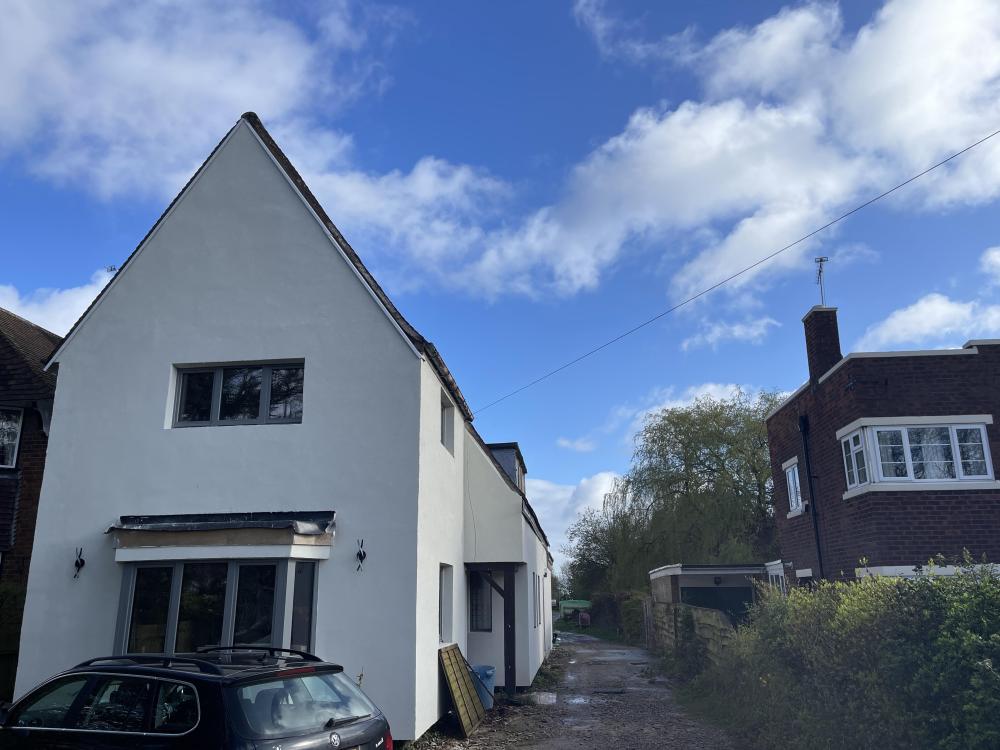 1 point
 -
Regarding heat loss, unless In summer the heat is within the house so is it an actual loss?1 point
-
Don't think so. But it wasn't something I was taking note of at the time. There's an installation guide you could check. But like I said, you can manage it all from within your firewall if you want to. Takes a bit of effort of course. If you do set things up that way, you can't access the device when you're away from home. Which can be useful if it throws some error. Or if you just want to check on what's happening. We find remote access quite useful. Simon1 point
-
Welcome Jon. This is THE forum for people like us. We are all nice people on here, well mostly! Why not start a new topic - 'Repairing the Sentinel Kinetic Plus' and share the story so far. Any ideas why it stopped working? For it to fail completely usually means a fault common to both fans - so the controller somewhere perhaps or it maybe that if one fan fails the other is prevented from running by the controller.1 point
-
Hi Thanks for letting me join your group, I only wish there had been this online advise when I first started my self build many years ago. I have now just finished my third home which like the others I designed and built myself only employing a plasterer nearer the end. I also like to incorporate new ideas into the build, as an early adopter of underfloor heating I made my own manifolds and like to keep the heating and hot water as simple as possible. I also make my own central vacuum systems and when I see a problem I invent new and innovative building products into the build, the latest was to totally eliminate maintenance around the edge of a roof saving money and accidents from falls from height. Andrew
 1 point
 -
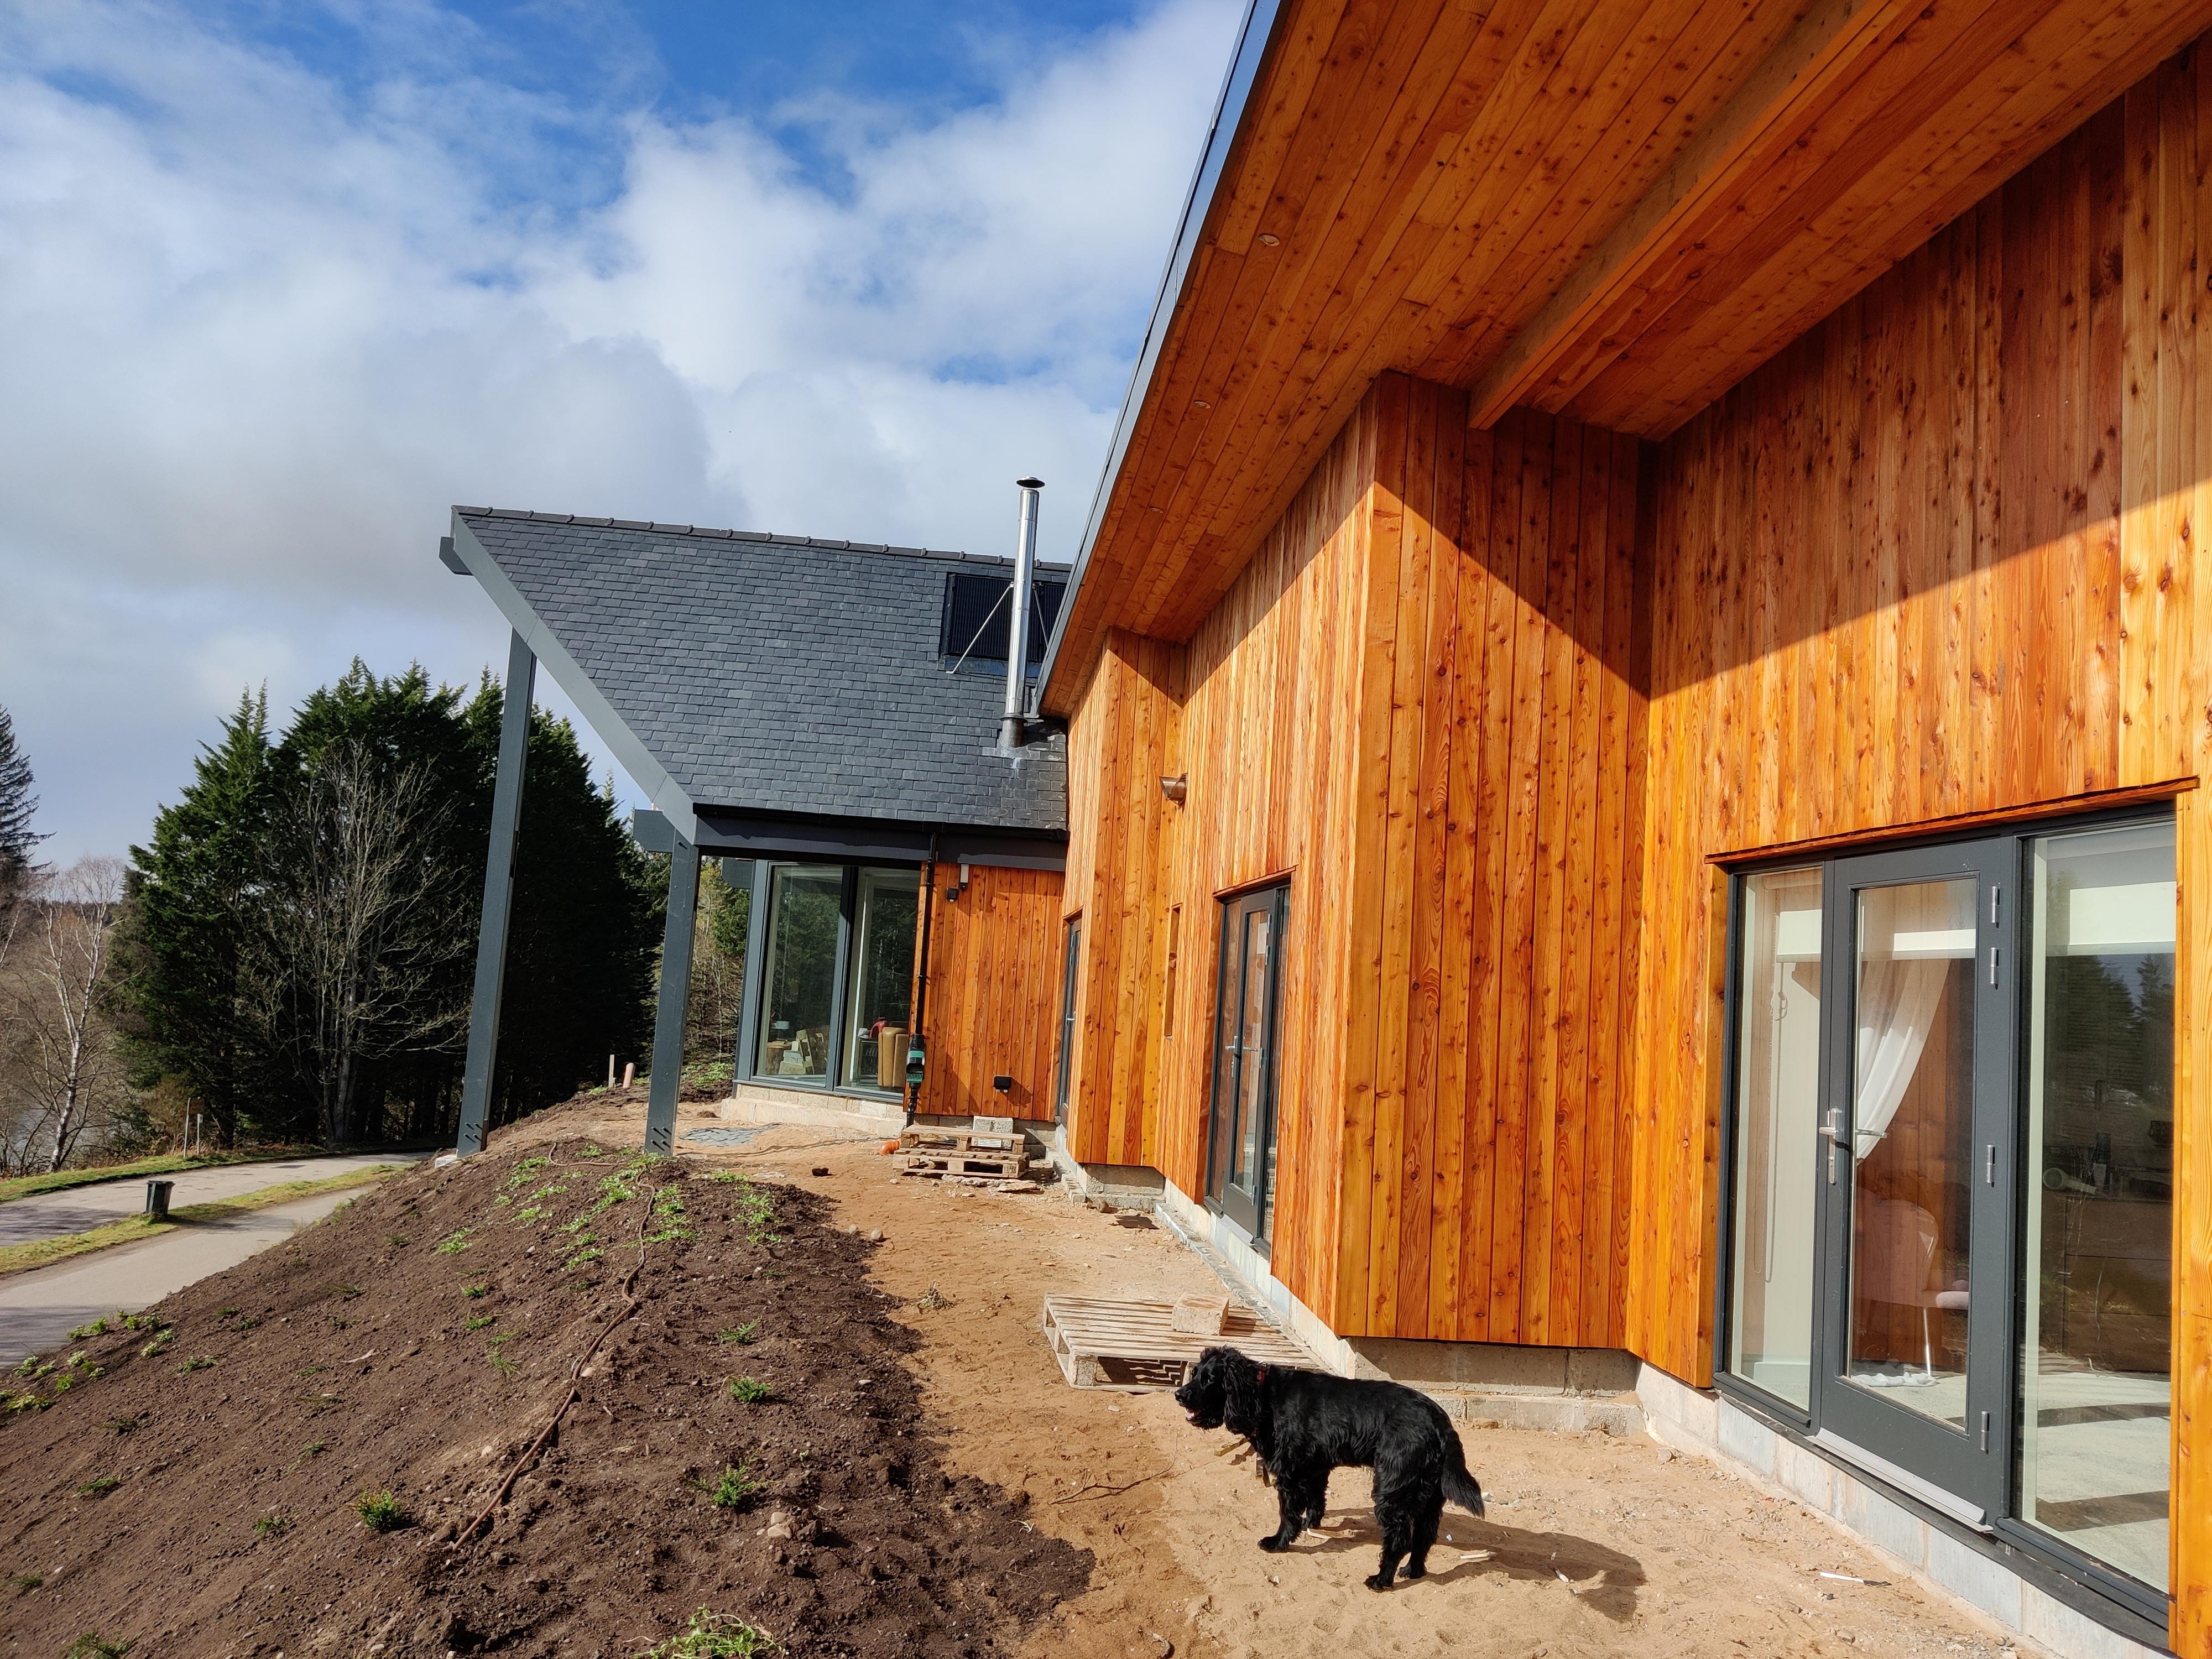
Pics paint a thousand words thanks. The exterior looks pretty smart. There isn't much existing exterior overhangs so EWI would be more awkward. EPS beads and closed cell polyurethane foam are your choices for the cavity fill although the latter is 4 times the price. If you can I'd drill a hole now. It only needs to be 5mm though one leaf. You could patch it with a piece of chewing gum! It will inform your decisions early. Regardless of the insulation there are much bigger gains to be had form airtighness and MVHR/mechanics ventilation. Have you though about any tactica to deal with these?1 point
-
Well done, will have a look at further videos. I do think that you are slightly confusing things as regards the type of BR approval you have. As Temp says above this is nothing to do with planning permission it is simply that with a building notice plans (not Planning Permission) are not required the BCO will visit at key points in the build process to check things out. Full plans BR approval is as it says on the tin, plans are required, which are signed off by BC before any construction starts.1 point
-
The top icon (your pump, below) shows the pump in Constant Curve, CC, mode or better known in older pumps as constant speed, it has 3 settings, yours may be a 2M, 4.5M & 7M setting, corresponding to i,ii&iii, the higher the setting the greater the pump head and the greater the flow rate, its primarily used for radiators and sometimes UFH but the the second icon setting, Constant pressure or CP mode is generally recommended, the settings may be somewhat similar to the CC settings, the difference is that the pressure is held constant at whatever setting you set it to, the third icon shows Proportional Pressure or PP control where the pump head decreases with decreasing flow demand like rads fitted with TRVs, a example is my own, I have 8 rads on TRV control, I have the pump (Wilo Yonos Pico) set to PP 4.6M which gives me my required flowrate of 13LPM at a pump head of 3.5M, as the TRVs throttle down the pump (speed) and head reduce to ~ 2.8M resulting in reduced power consumption and no noise from the TRVs when well throttled down, power consumption varies from ~ 23 watts down to 14/16 watts.1 point
-
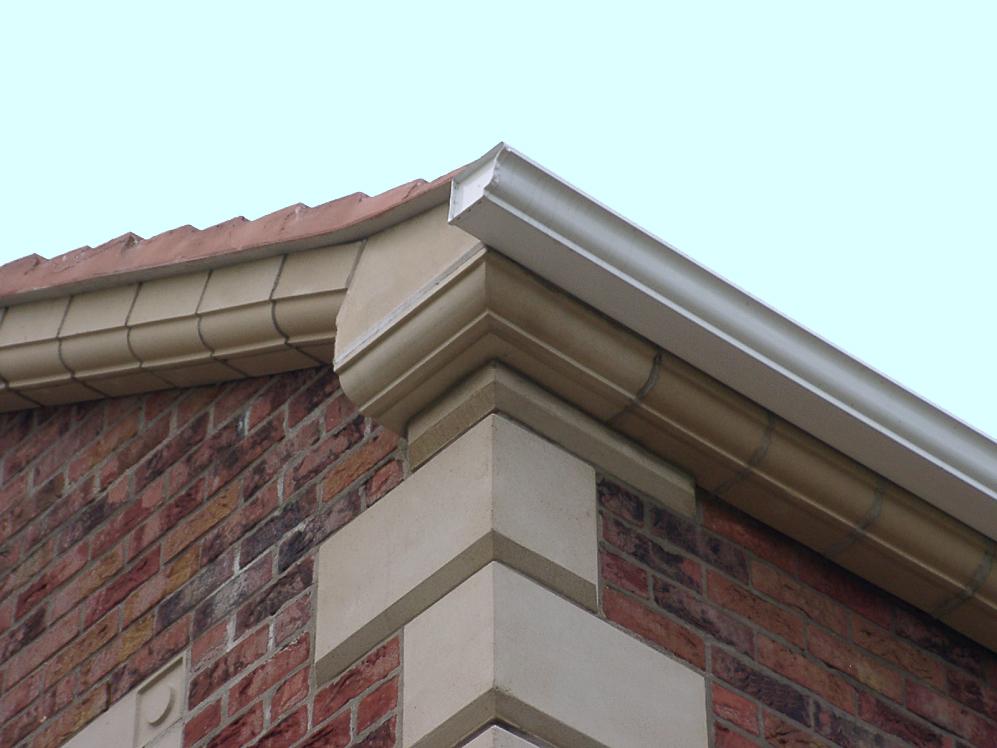
Not sure where to post this, but I thought general joinery, given it's the carpenter who installs the reglet. You can also download a pdf too. https://www.finehomebuilding.com/project-guides/drywall/installing-reglet-trim Another article on the same site had the image below. Using oak would look stunning.
 1 point
 -
None of my SMA inverters need to connect to the internet. (I wouldn't buy them if they did.)1 point
-
A colleague used it on a high end extension recently after the renderer said they'd rather use it and there'd be no cost difference from the specified sand and cement render. The finish achieved wasn't great but it wasn't that bad that he could confidently say it needed redoing. The K Rend rep came out and said go over with another coat which the renderer did with no additional cost for the client.1 point
-
Some companies insist on Webber Rend Whilst the product is ok the reps just want to shift any blame from themselves K reps come out and immediately reassure the clients Perhaps it’s an Irish thing Or they are just better trained than others1 point
-
You need to calculate the thermal losses, then find out the most effective method. Getting the floor right is probably the most important thermal engineering thing you have to do, not as if you can change it once a few tonnes of building are on it.1 point
-
Thank you for that, I might have a word and see if they can offer something for us.1 point
-
I used SAS pro rend, they are based in Cheriton Bishop, but supplied through RGB.1 point
-
I’ve used through coloured renders for forty years I have little or no say in the brand of render that we use on a daily basis But I used K scraped on our previous build and K roughcast on our current Most are ok to use Similar priced and pretty durable The only thing that sets them apart is K rends after sales service is excellent Problems arnt that common But when there are issues K will either replace the materials or stand the whole job re doing No excuses The rep just wants to sort the issue out Other companies blame us1 point
-
My justification was, I am earning, if I don't spend on this, it will go on rubbish elsewhere. The spend now, while I can afford it, is a reduced utility bill when I can least afford it - retirement. It's a better return than a same money in a pension pot.1 point
-
On a related point, even passing meter tails through separate holes in a steel cabinet can cause issues. If you have to do that, put a hacksaw cut between the 2 holes.1 point
-
If steel conduit then no because of risk of eddy currents. If plastic then I don’t see what the conduit is offering. Can you run in SWA as it sounds like meter tails are not ideal here?1 point
-
My architect specified 90mm Kingspan K106 (at £44 per sq m) for a 100mm cavity. The specified tape is also extortionate at £68 per 50m roll My builders found this almost impossible to fit because it requires an absolutely flat internal face and then a "snot-free" finish without sufficient space to get tools or fingers in. This is a stupid specification and the Building Control guy agreed when he came to inspect. We're having K-Rend so he was not as concerned, but his recommendation was to use a 110mm cavity as a miniumum to avoid these problems. I assume that Kinspan use their specificiation because that is the only way that the models give the necessary u-value, architects and designers then take this as written without any regard to the installation practicalities Regards Tet1 point
-
Almost two years into converting a 1970s attached garage. Extended to include home office, wetroom and utility.1 point
-
First major refurb project of an old turn of the century farmhouse and I'll be needing help. Browsing the forum has given me a bit more confidence that I can find the information and help here.1 point
-
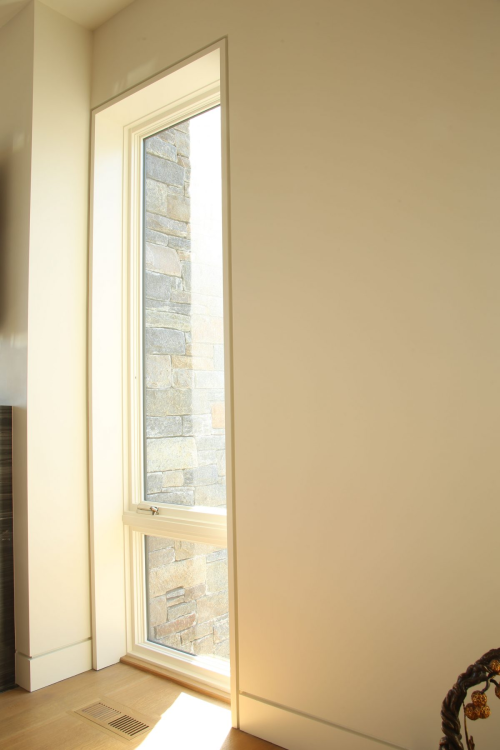
Of course I also put seal around the edges. Well, it is one way to deal with an outside metal door that was either uninsulated or very poorly insulated. Is there really another way, given that the door couldn't be opened (it was soldered together)? 3cm-thick cork means R=0.75. A new, properly insulated security door would have cost around 4000 eur, or so the locksmith tells me (one can find somewhat lower values at https://www.m-habitat.fr/portes/prix-porte/prix-d-une-porte-les-tarifs-selon-le-type-1629_A) - and the R value would not necessarily be higher; any door with an U lower than 1.7 counts as insulated over here, and 0.75 is clearly greater than 1/1.7 = 0.588... I'm putting a home-made thermal curtain (lots of Climashield apex inside a William Morris curtain, with reflective insulation between the laters) on top - but the stuffing keeps sliding down; I'll need to take the curtain to a retoucheur.1 point
-
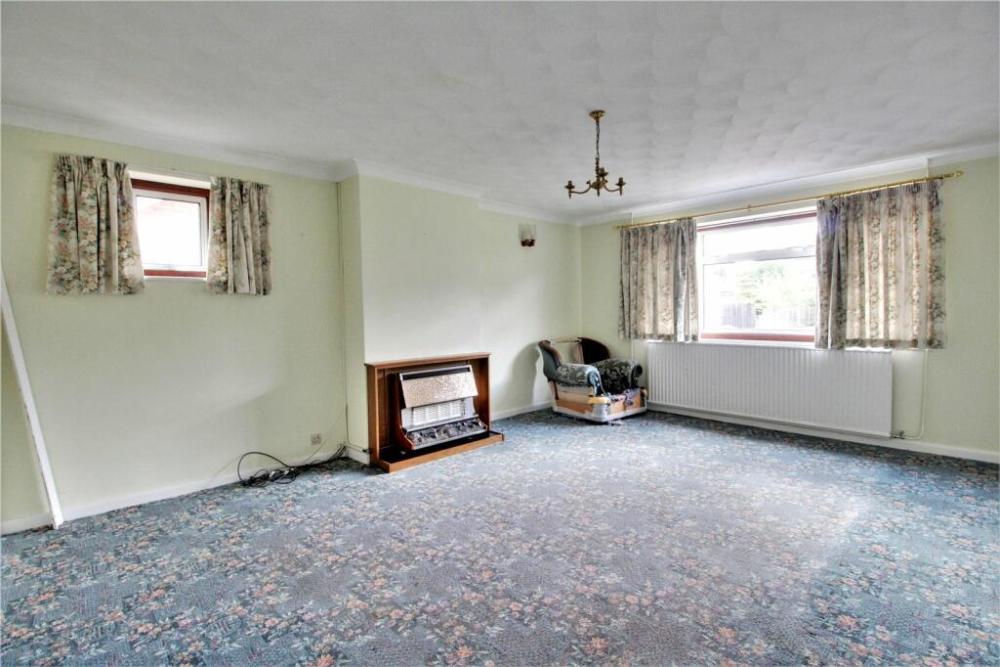
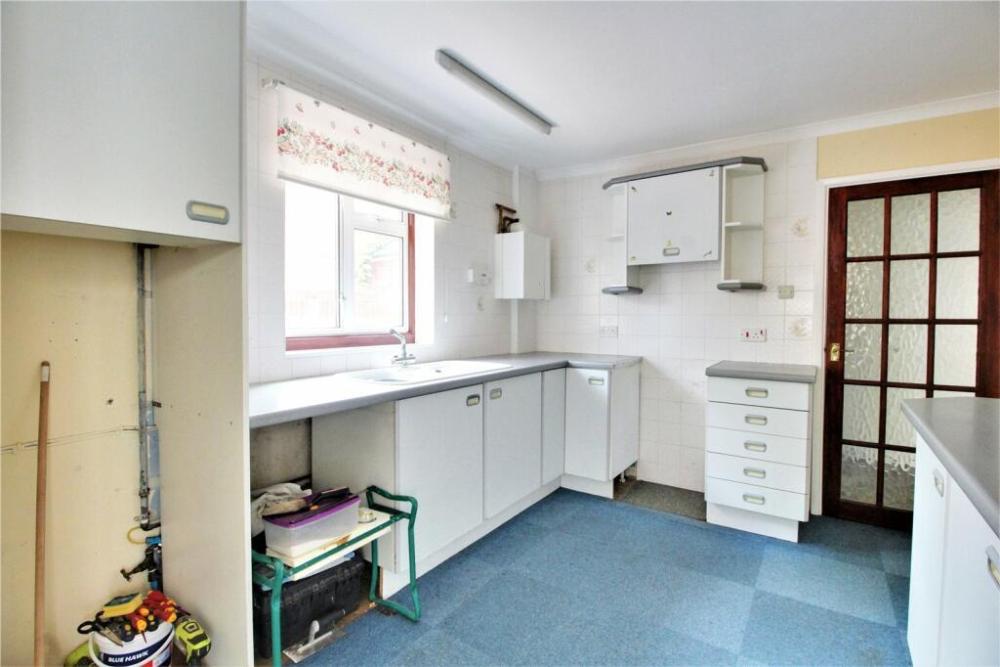
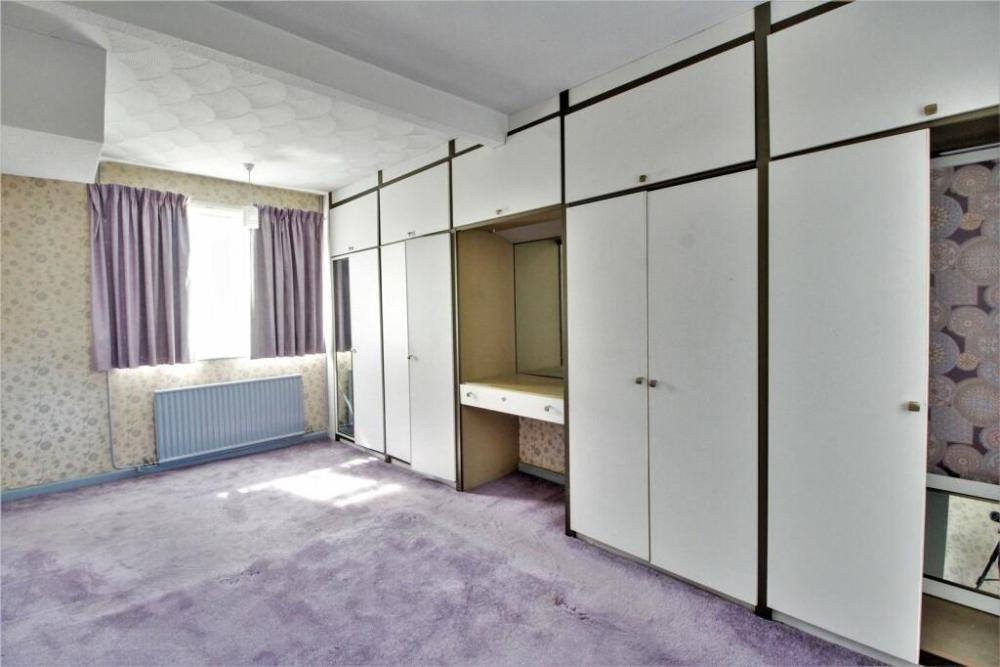
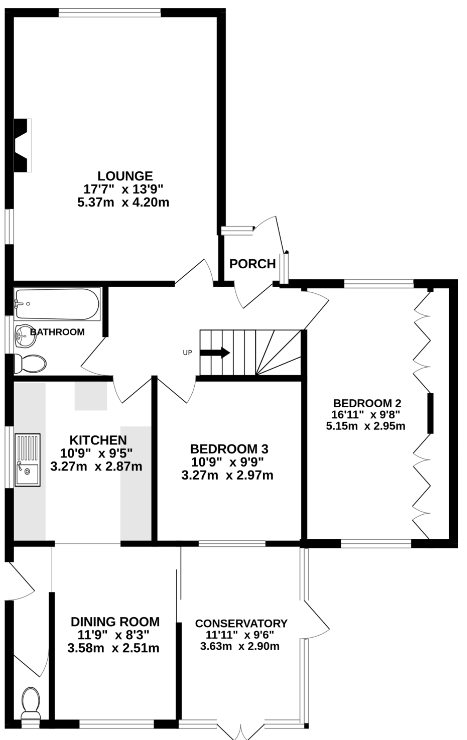
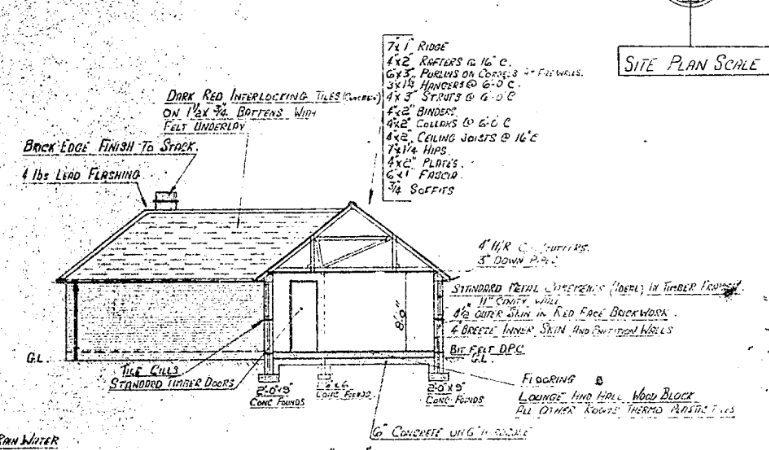
Hey all! TLDR: Heya! We got an old house, lots of work and decisions to me made and done!😮💨 As the title suggests i would like to think of myself a DIYer but not a so experienced one but you'd only learn by doing! It's frustrated me to no end that I'm not as practical as i'd like to be, anything to do with computers, programming, 3D etc is a different story. Hope you guys could help lend some of your experience. My girlfriend and I have just purchased a 1959 semi-detached bungalow which doesn't look like it's ever been updated, or if it has been... it's not been updated well with so many corners cut it's more like a circle. I've had 3 plumbers come to look at our system, 2 couldn't be sure if the heating is a 1 pipe or 2 pipe system, and the 3rd thankfully so confident it's a 2 way, he'll put money on it. As I type this the windows are finally being replaced and have already started to feel warmer! but still a bit colder inside than it is outside. With having moved in not too long ago and things still packed away. I'm hoping to take advantage of that and try where I can to do things right and get the place rewired from the get-go! Heating will be next. The house is a bit of an odd shape at the back and everyone we've spoken too has suggested to square the back off where the conservatory is which has led us to look to reconfigure the layout of the inside overtime, but bearing in mind this is a multi year project having been quoted 60k for a 25m2 ish single story extension to replace the conservatory and build to the side a bit. As we look to reconfigure over time, the main dilemma fighting in my head at the moment going back and forth is how to do UFH! All the radiators don't look like they've been updated since with no TRVs and just big blocks of iron. We know which rooms won't and will change and by how much thanks to the magicplan app, We've also got the original planning permission for the house when it was built. We supposedly have 6" (152.4mm) of uninsulated concrete floor under our delightful carpet and lino floor (no asbestos). I've spoken to companies like Wunda, Continal, Nu-Heat etc about retrofitting on top of our slab knowing we'd lose head height. But they seem confident their 15-20mm channeled polystyrene boards with the pipes embedded into them would be enough insulation to keep heat loss going into the slab to a minimum and I think they said max 8% downward loss. Supposedly the bottom thickness between the bottom of the pipe and board is the same for the 15mm or 20mm boards, they just reduce the height at the top and use smaller pipes. The other side of the battle is thinking do I just break the concrete room by room and redo the floor but i'd look to do this DIY! The main reason I'm contemplating UFH knowing having the whole house done is known to be really pricey, is because we know some walls are going to be removed when we eventually extend and reconfigure. We intend to keep the current radiators in the rooms that will change, such as bedroom 3, Kitchen, bathroom, and dining room and put UFH in the lounge, hallway and bedroom 2. In the future, we will extend the UFH to the other rooms and have had these UFH companies look at the current layout and our future intended layout to make sure the system could flow into the other rooms after the extension. This turned out to be a longer post than I thought but good to get it all written in one place! Any suggestions, or insights are GREATLY appreciated!
 1 point
 -
By way of 2016-17 prices, our village plot was worth about £150-200K, bought-ins about £350K, labour and profession fees save by our contribution maybe another £120K giving an effective total of £650K which was about what roughly comparable houses were selling for in a village setting at the time. OK, splitting the plot off probably lost us only about £50K off the selling price of our old farmhouse. We have no CiL then and saved on stamp duties so probably saved ourselves maybe £250K on buying a "comparable" previously built house in the area. Except of course that you could buy a passive-class house and certainly not the exact spec that we wanted nor to the build standard that we actually achieved. There were some major cost elements imposed by the LPA, e.g. local stone exterior skin, and natural slate roof, that added to our bought-ins. At today's prices we would probably be looking at £750-800K to do a custom build to this spec. Can I suggest that it might be worth looking at an MBC twinwall TF build as an alternative to ICF at least for the main living space? Their warm slab and TF design patterns have been well tuned to a passive-class standard over more than a decade's refinement. I agree that if you've run your own building company, then you and whoever else in your family that worked in it will have lots of relevant experience, and you will have many areas of expertise in-house that you can either use directly or to enable a decent level of quality control. One thing that many here evangelise is achieving a passive class build as this has major running cost savings, as well a far more comfortable living environment. We are in our early 70s now, so we appreciate this as we age. We keep our entire house at 21-23 °C (the first floor bedrooms are a couple of degrees cooler than the ground floor) 24 × 7, and really miss this when we visit our children and other relatives. I personally would recommend that you or one of your close family really gets their head around the implications of building to passive class: where the heat goes and (through solar gain) where it comes in. Relevant contributions of: slab losses, external walls, roof, fenestration, air exchanges. Get a good feel for the impact of U values and how these reflect unit costs and performance; air-tightness and air exchange losses, and so on. You will need to make various trade-offs to optimise costs vs achievement off your overall spec, and you or someone you really trust has to make these decisions. Achieving this class of house requires an attention to detail both in design and in construction. It is not unusual for two houses with the same nominal as-designed spec to vary in as-built performance by a factor of 2. An example "close to home" is that my daughter's living room is impossible to heat economically: the large panel of bifold doors leading onto the garden have a poor U-value and leak terribly; areas of wall and ceiling insulation are missing. You haven't mentioned your age, but I infer that you are getting close to retirement and therefore this will be your property "to retire into", so living comfort will be important. You've mentioned a gym and workshop but what you have mentioned in bridging space to the exterior: a conservation or atrium. I am not talking about the 5 × 4m bolt on the side of an existing property, but in your case you have lots of area to include a decent spacious environment that to could properly integrate into the building fabric, and that could connect you to the garden. OK, not needed in the summer where you are planning to build, but this could extend you comfortable "outside-ish" space for another 3-4 months of the year. BTW, even Nick (@SteamyTea) would admit to being a tad irascible at times; yes, he is also very particular about units, dimensions etc., because the implications of kW vs kWh, etc. are a lot more than a little "h". He is also well respected for his contributions here by the forum regulars. 🙂1 point
-
They say the third one you get right... 😆1 point
-
Personally I like fully enclosed for cleaning. I can spray all the glass on ours with descaler then hose everything down with the shower head right to the edges.1 point
-
Actually doing my new bathroom took the fitter 13 and a half days, including a totally new sound insulation layer, subfloor, floor, ufh and tiles, and an entire @Onoff of pfaffing. F704A76E-1B3F-4540-B885-AD03DEA530D4.MOV1 point
-
Hut a.k.a sex dungeon0 points
-
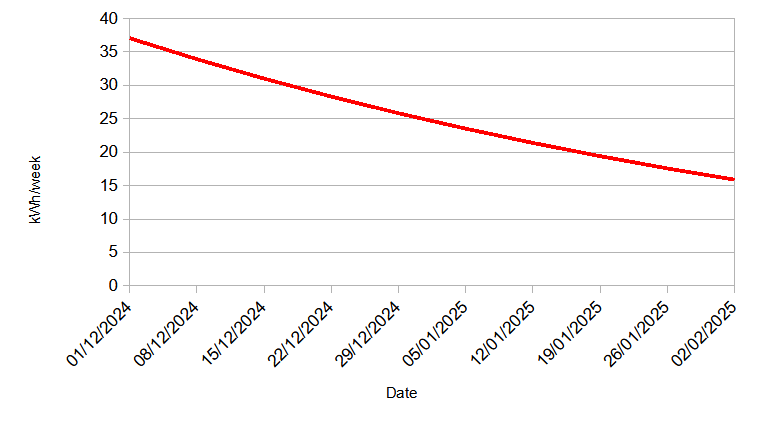
I use about 300 kWh/month in the winter to keep my house warm. So approximately 10 kWh/day. Initially I shall assume that there is no added input in December and January, so I need to store 600 kWh. Water would be the most cost effective medium to store energy in as it is cheap and easily transportable. Water stores about 0.00116 kWh.kg-1.K-1. So I would need, if I could get a ΔT of 40K (40°C up to 80°C as anything below 40°C would not really be useful) to store approximately 6,500 litres. If they were stored in rectangular vessels, I would need 7 m3, so quite a big hole. That is before adding insulation. Realistically PIR with a k-value 0.025 W.m-1K-1 is the most practical. So how much would I need. Assuming that my ground is at 10°C once deeper than 1 meter, the vessel is 7 metres long, by 1 metre wide and 1 metre tall, I would have a surface area of 30m2 to insulate. If I added 1 metre of insulation onto each side, then that is 9m by 3m by 3m hole I would need to dig, 81m3, the surface area would be 126m2, that is about half the volume of my house and nearly the same surface area (house is 184m2). So what would the heat losses be. R-Value = 1 [m] / 0.025 [k-value] = 40 U-Value = 1 / 40 [R-Value] = 0.025 W.m-2.K-1 Power [W] = 0.025 [W.m-2.K-1] x 126 [m2] x 70 [ΔT] = 220 W or 5.3 kWh/day. Knocking up a quick mathematical model, the losses, before any usage, look like this: So that is 254 kWh of useful energy lost. So what to do. Two options really (well 3). Add more insulation, which is expensive. Doubling the thickness will give a surface area of 270 m2 and a volume of 275m3. That is now much larger than my house, but no matter, lets work out the losses as I am full of hope. 2 metre thickness of insulation works out as a U-Value of 0.0125 W.m-2.K-1. Now this throws up a strange result, the losses are actually greater, 272 kWh total, because the total surface area has increased by 144 m2. Now there is some dispute as to where the thermal losses should me measured. I always use the outside area as this is larger. Just for a laugh, and I had a good snooze this afternoon, let us see what the losses are when using the surface area of just the water container, the 7m x 1m x 1m, 30m2. At a U-Value of 0.025, it is 60 kWh total, and at 0.0125 30 kWh. Now the truth is it will be somewhere between the two and without a much more detailed model, which allows for the corner affects i.e. effectively thicker insulation. So shall we settle on 155 kWh total losses. The second way is to increase the volume of storage by an extra cubic meter, that would store an extra 45 kWh but loose some of that to losses, about 7 kWh total. So we would actually have to add another 4m3, so a total storage of 11m3 of water. Now we could change the geometry to get the smallest surface area to insulate. This may need a custom container that is cube 2.25m on each side. Adding a metre thickness of insulation would expand that to 4.25m on each side, so a volume of 77m3 and an area of 108m2. The losses would now be 208 kWh total out of the original capacity of 510 kWh. Still not enough. Let us for a cube 3m on each side, that is easy as you can buy 1m by 1m by 1m vessels easy enough, and stack them in a cube. So that would have a storage capacity of 1254 kWh initially (at Δ40) and losses with 1m of insulation of 301 kWh, leaving a possible useful amount of 950 kWh. Big hole in the ground though, 5m on each side, 125m3 which is only 35m3 less than my house volume. Now I have only worked this out for a laugh, but I did it a few years back when @DamonHD and myself discussed it before, I think I came to the same conclusion, which is my third option, don't (expletive deleted)ing bother.
 0 points


This leaderboard is set to London/GMT+01:00