
Leaderboard


Popular Content
Showing content with the highest reputation on 02/19/20 in all areas
-
We knocked down our bungalow called “Yaffles” and HWMBO was desperate to have a new name but then proceeded to veto every suggestion for a full 18 months. In the end, during a long car journey, we decided to solve it. The kids and I came up with every name under the sun. Everyone got the right of veto. And we ended up with 2 that no one vetoed. One was Hazel House, the other Hazel Lodge. We went for the latter. All inspired by the witch hazel tree in front of the new house that has just about survived the build (being hit by a skip has caused some damage but it is still alive). (Owls Hoot was his favourite but that got vetoed ?) in light of the fact that we still have the caravan the council has notified the RM that we are Hazel Lodge Caravan so that’s what we are until I notify them otherwise. Makes changes of address difficult sometimes as some websites don’t allow you to overwrite the database option.2 points
-
Working on your own, and listening to that oft-repeated question is starting to get to me. I've started replying "How long's a piece of string?" Going from a working environment where I really did have lots of control, a secure operational, strategic and policy overview of what I was doing to one where on site most days I work hard to make just a little progress: its wearing. If I hear that stupid saying "Do something today that you've never done before" once more ?. Thats what I do almost every single day. It makes you focus on the little stuff - on the nitty gritty detail. After a couple of years of that I haven't got the wherewithal to lift my head up and see the bigger picture. And at the same time I am well aware that we only just got planning permission - had we applied a month or so later, in all likelihood we would have been refused. The guy on the plot next to us was refused. He applied just a little after we did. Ah, stop moaning Ian. Just Bloody Do It. Thanks for the replies folks. Ian2 points
-
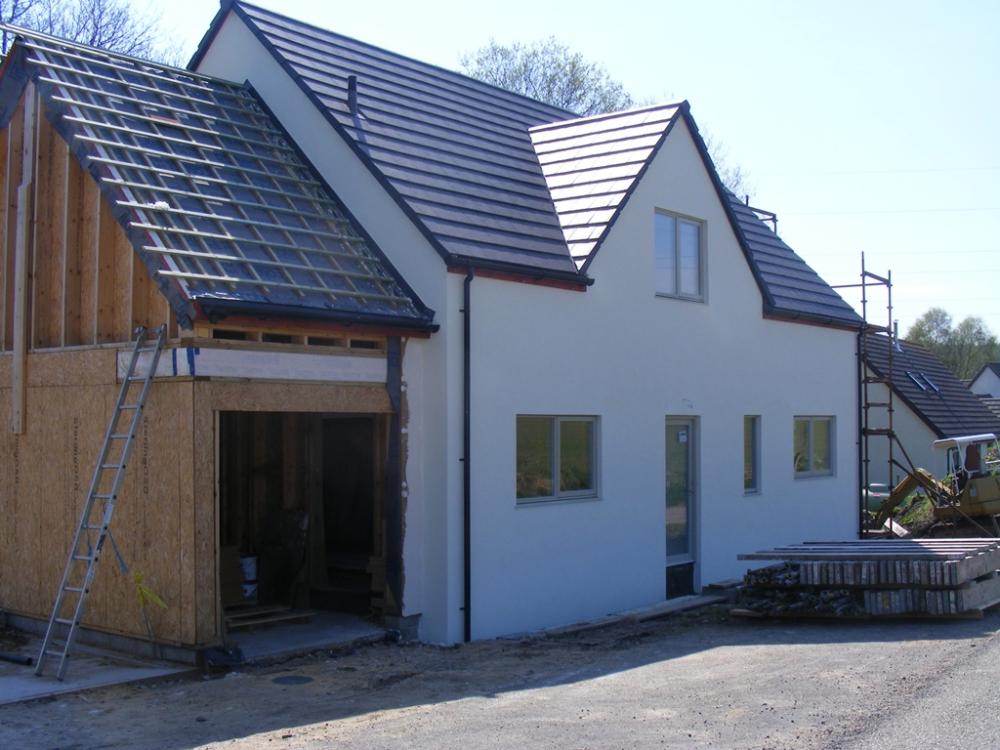
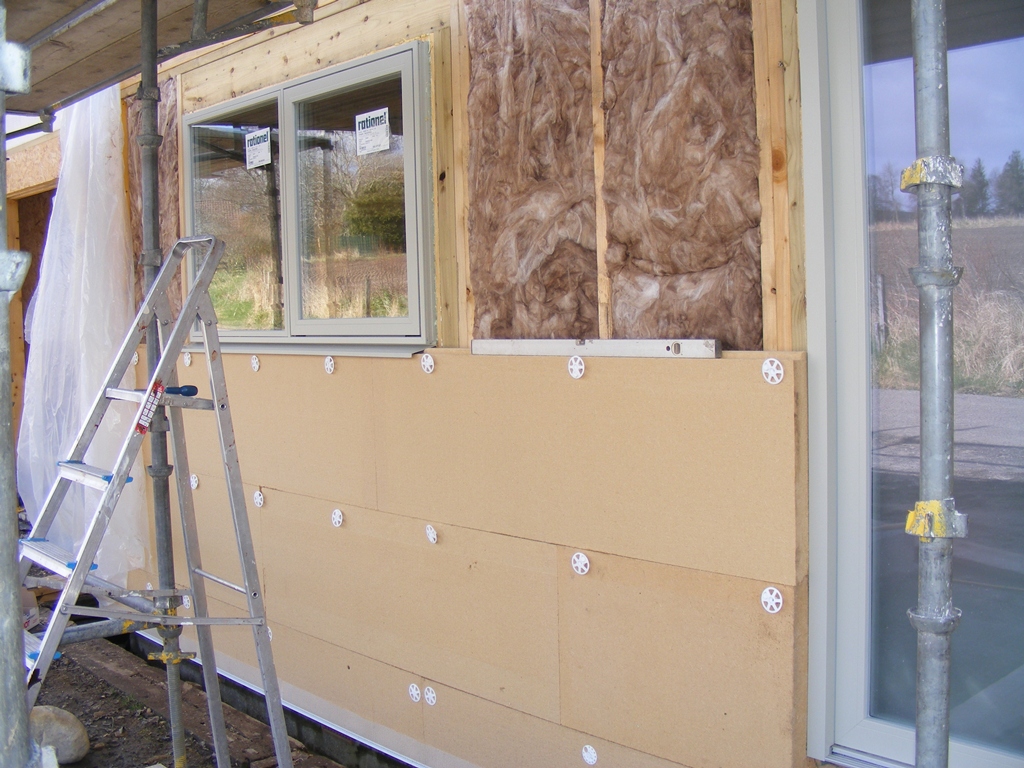
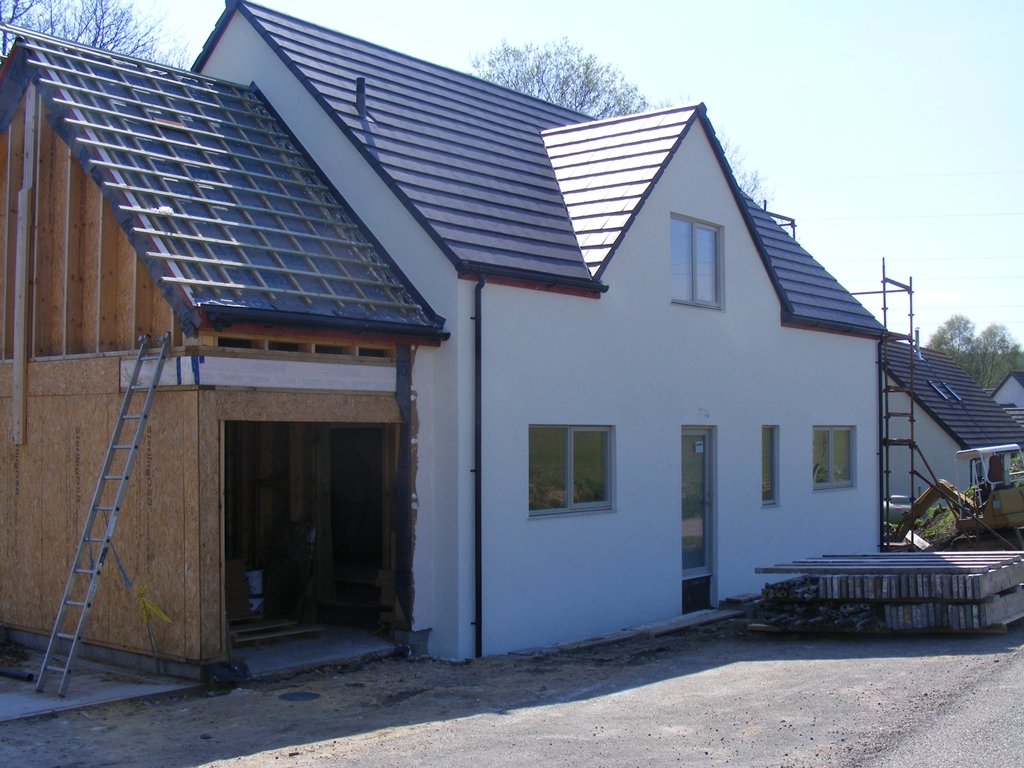
A lot of people ask me about the detail of how my house is built so I thought it worth a thread to explain things. First off, I didn't want an "ordinary" timber framed house with a cavity then a brick or block outer skin. That outer skin just costs a lot of money and adds nothing to the insulation of the house, it's just an expensive rain shield. I still wanted the traditional Scottish look of a white rendered finish but I want all elements of the wall make up to add to the insulation and air tightness of the property. The solution is a timber frame, clad with 100mm thick wood fibre external wall insulation boards (I used Pavatex, but other makes are available), and the render goes straight onto the wood fibre board. Here's a picture to make it clear: In that picture I only have a few of the fixing screws in place. A lot more were added and then driven fully home. The board is fixed to the frame with long screws with big plastic spreaders to stop the screws pulling through the board. There are a few twists to the frame however. First thing you will notice is that it is not an "ordinary" timber frame. For a start it's built with much thicker timbers than normal to allow more insulation in the walls. But secondly people keep telling me i have put the frame up "inside out" The OSB racking layer is on the inside of the frame. That's done for vapour permeability reasons with the least vapour permeable layer on the inside. With this build method you can either fill the frame with blown in insulation from the inside once the wood fibre cladding is fitted, or in my case I have chosen to use Frametherm 35 as it's less than half the cost of blown in insulation but gives the same U value. So I am fitting the insulation from the outside as I fit the wood fibre cladding. Insulating only that bit of frame I expect to get clad in that day as I don't want the insulation left exposed to get wet if it rains. The render is a lime based system from baumit.com. It has 3 layers, a base coat that is mixed from dry powder, then a primer that is painted on, then the top coat comes pre mixed in tubs. A fibreglass mesh gets pressed in to the base coat before it is dry. Overall benefits of this approach Vs an ordinary timber frame with blockwork outer skin: Simpler foundations (no need for provision to support the outer brick or block wall) More insulation for a given wall thickness More of the job can be DIY done, perfect for self builders. And an unexpected one, because there is no cavity, there is no need to pepper the wall with weep ventilators, so you get a clean render finish with no "warts" And here is what the finished and rendered front of the house looks like.

 1 point
 -
I'm a roofer and a lead worker. It is an awful job and needs fixed by someone that actually knows what they are doing. Get 3 quotes from other roofing/lead companies and don't let that guy near your roof again. If he requests let him collect his scrap lead when the job is redone1 point
-
It is really difficult to get it to fit as sometimes the studs are a bit thin or the boards are thick. Use 130mm or you will struggle to get the plasterboard on.1 point
-
Not sure your conclusions about the apparent COP are valid TBH, and may be a bit misleading. COP for any particular ASHP is almost entirely determined by two main external factors; the temperature differential between the outside air temperature and the heat pump flow temperature, and the humidity of the outside air. The flow temperature doesn't normally change at all between leaving the heating on all the time or having the heating come on and off, so any change in COP you're seeing has little or nothing to do with how you're choosing to run the heating. The most probable cause for a slightly better COP, aside from mild weather, is possibly a change in the average humidity over this period. Moist air contains more heat than dry air, as the heat exchanger in the heat pump can condense the moisture out and recover heat from the water vapour as it changes phase from gas to liquid. Also, the point about switching a heat pump off during the day being less efficient is incorrect. There are significant advantages to only running a grid powered heat pump overnight, and having it turned off during the day, as the grid tends to produce much lower CO2 emissions during the night than it does during the day. Running costs are also almost halved, as overnight electricity can be around half the price of day time electricity. It doesn't matter where you buy your electricity from, as there is only one national grid supplying every home and business, so all the "green" suppliers do is effectively buy offsets so that someone else pays for the CO2 produced by the energy they re-sell. It doesn't make the grid any less carbon intensive to use a "green" supplier, other than possibly some of their revenue being directed towards building more renewable generation, perhaps (not sure that's true, really, either). If you want to check the emissions from the grid at any time, then this site is useful: https://gridwatch.co.uk/co2-emissions . You can check the current grid emissions from that site at any time to see how "green" the electricity is that you are consuming. Finally, we run our heat pump from 00:30 to 06:30, during the off-peak period, and let the heat stored by the UFH in the floor heat the house for the remainder of the time. This is close to the least harmful way to use electricity, in terms of the impact on emissions.1 point
-
Well ! Eclisse didn’t tell me this ! But ..... Apparently with a glass door you get a wooden doorstop post ( !! ) that glues over that vertical . So you can screw through the face of it . None the less I’ll wait for the actual door to turn up ....1 point
-
This was why the name had to go. I hated Bagpuss as a child...... (apparently it’s actually to do with the call of the green woodpecker, which we occasionally see in the garden....)1 point
-
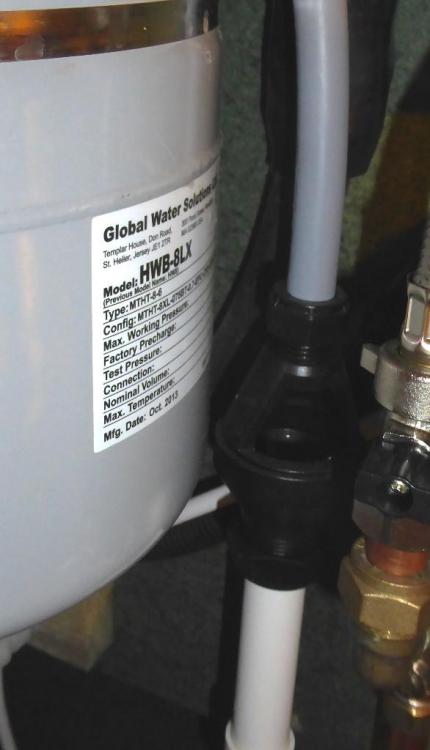
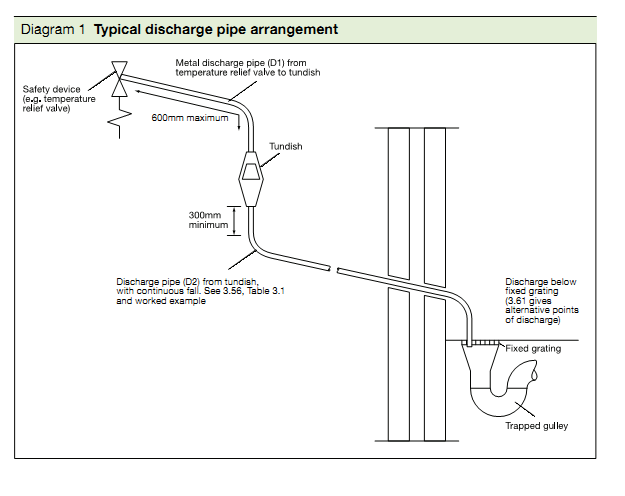
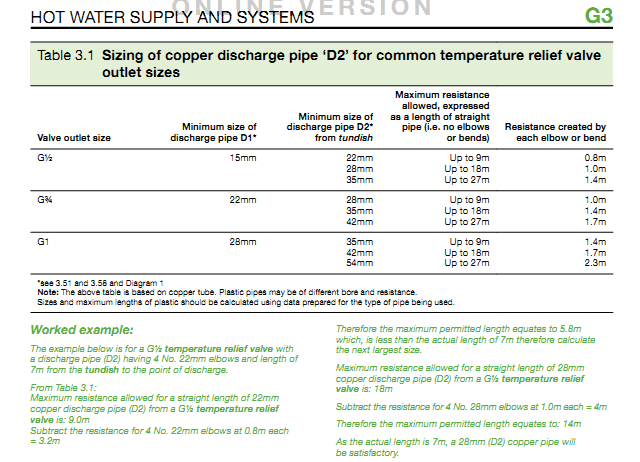
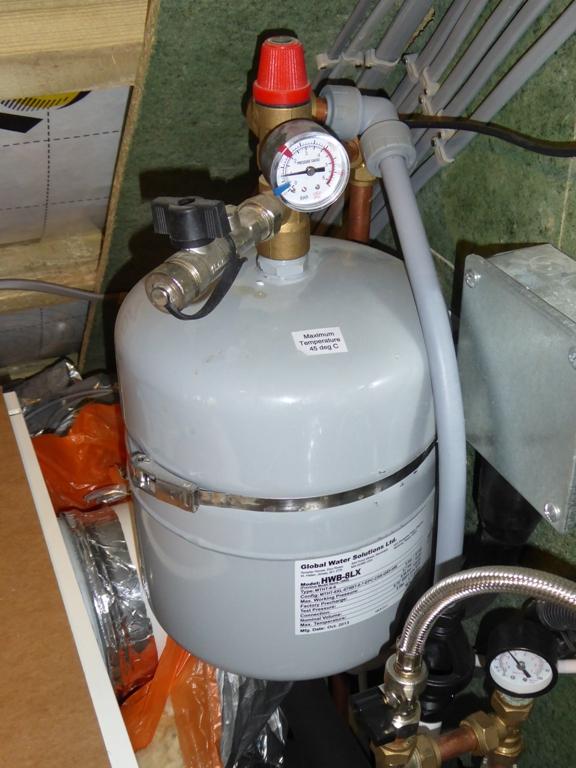
Not sure if this helps or not, but I've just taken a couple of photos of our UFH expansion vessel: The bit with the cap on at the front is the fill loop connection. I've added red and blue max and min markers on the pressure gauge, just so I can see at a glance if it's in the right zone. The fill loop is the flexi that can be seen at the bottom (I use the same flexi to fill the UFH and the buffer tank, they are separate). The feed down to the UFH is the copper pipe right at the back. The bit of grey pipe is the overflow from the PRV, OK in this case as the maximum temperature is restricted by the ASHP, so plastic is OK in this case. If there is a risk that the temperature could get very high then the overflow needs to be in copper. The black plastic tundish can just be seen at the bottom of the pic. Here's another view showing the tundish fitted to the waste pipe: The drain from the tundish feeds down to a large diameter drain that runs through a trap downstairs. This trap is kept topped up by the water that is drained from the water softener, so cannot dry out. The same drain is also used for the PRV outlet on the buffer tank (that one is set to 1.5 bar, because of the tank limit) and again plastic is OK as the buffer cannot ever exceed the ASHP maximum temperature (the ASHP cannot ever get hotter than about 60°C even under fault conditions). For Willis heaters I think you would have to assume that, under fault conditions, the water could exceed 100°C (because of the pressure) and so make sure that the overflow, tundish and drain followed the requirements in the regs for the safe discharge of boiling water and steam. Details are in Part G3:

 1 point
 -
Read all of @Bitpipe's posts in the basement forum. This is a good start:1 point
-
It's also way off topic and little relevance to 99+% of the membership of Buildhub.1 point
-
I'm out of this debate, as it's getting personal now.1 point
-
A few others within our plot: Become Happier Correctly Tonight Landlady Builds Confirms Conspired Microfilm1 point
-
Got to be one of the funniest ones so far!1 point
-
The plans were validated, with a target date of March 30th for approval.1 point
-
Our rendering contractor said steel mesh can cause problems with adhesion of the render to the eps as well as leave the render exposed to corrosion damage to the mesh should any of the galvanising become damaged during installation. We installed a fibreglass mesh which was fixed to the EPS and then rendered over. 2+ years later there is no damage whatsoever. Fibreglass apparently resists burrowing rodents.1 point
-
@BotusBuild @Conor There's a useful NHBC design document for basements here: http://www.nhbc.co.uk/NHBCpublications/LiteratureLibrary/Technical/NHBCStandards/filedownload,58385,en.pdf1 point
-
We're doing an insulated raft basement. No issues. What he's talking about ground temp is nonsense. Yes, ground temp will be about 7degrees, which means you'll have a consistent temp delta and heat loss, meaning you still need to insulate!! One word of warning re ICF and basements, I've had issues finding a tanking solution. As you can't check the concrete pour for completeness, and the joining webs are potential water bridges, using a waterproofer in the concrete can't be used as a reliable barrier. So if you want somebody to provide a guaranteed system, they will push you to an external barrier membrane as well as an internal cavity system. Fortunately, I've found a builder that will use a single system and is happy to provide the 5yr warranty.1 point
-
Looks like it. Here's where "stumpy corrupted salads" is, in the middle of the Alaskan wilderness, near Prudoe:
 1 point
 -
Sorry, I didn’t add the internal elements. From inside to out: Plasterboard Service batten 50mm celotex 200mm celotex (between 225mm rafters) breather membrane 50mm batten OSB Roof Sheet1 point
-
I would not worry to much Ian about using resin on the base attachments, it is the wall ones you need to make sure are solid.1 point
-
Yep it’s all good. Zero issues. It’s still happily blowing bubbles into my poo at it’s set intervals ?1 point
-
I can't help but be reminded of this xkcd classic (and I mean no offence by this; indeed if anyone deserves it aimed at them I'm as guilty as the next man!):1 point
-
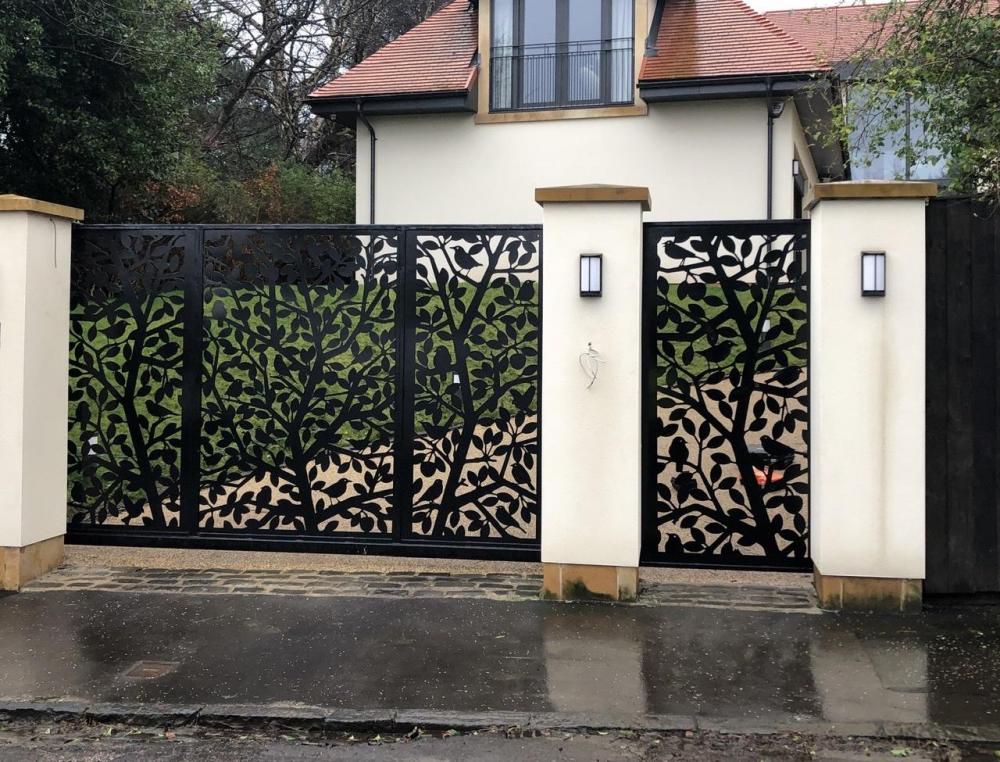
These are our gates. It took so long to get these made it wasn’t funny. I scoured google images for different pictures of gates and found something similar being sold by a company in Canada on Etsy. They refused to sell me the pattern. Eventually I found the owners and paid $300 for 90 patterns as they wouldn’t sell me one on its own. Anyway what you are looking for is a cnc pattern that can be cut from sheets of steel which are then powder coated or painted. I wish I could tell you how much this costs but for us the quote was just for gates and we would tell them how they should look. Etsy is a good place to look or Google images. Lots of people sell patterns for just a few pounds if they have what you are looking for available. Some people do sell this kind of panel on line. If you can find someone selling it ready made it will be a lot easier.
 1 point
 -
I think op is asking in the real world what's likelihood of these systems failing? Could some contaminated ground or a spillage cause damage to the eps? Is rodent damage a genuine concern once the building is finished? Can rats burrow? Are they likely to burrow and chew through eps? All valid questions id have thought I'll leave it to others with the system to answer as I don't know1 point
-
Getting away from warships for a moment, perhaps we should have a poll for the qualified electricians on here to ascertain the truth to the burning question about DNO cables and non DNO cables in the same trench and the proximity to each other.1 point
-
Solar PV has to be cheap to justify itself now. I spent £1500 self installing a 4kWp ground mounted system, financed by expected self usage of £250 worth of electricity per year giving a 6 year payback time. Much more than that, and I would not have bothered. I think you would have to be "dedicated to the cause" to pay more than that for a professionally installed system. At 4kWp batteries are not essential. Simply by using the big appliances in the daytime (washing machine, dishwasher, tumble dryer) and diverting surplus PV to the immersion heater for additional water heating, I have kept export down to a minimum. I would like some battery storage but that would have to be cheap, so not yet. Battery storage would become more important if you fit more than 4kWp as it then becomes harder to self use all you generate.1 point
-
Only on the Internet can a discussion on 'Minimum distance between DNO feed and another protected circuit' lead to a pissing contest about deep fat fryers on warships. Whilst it is mostly making me cringe, a small part of me is in sheer admiration of the impact of the Internet on mankind... and how actually I wouldn't want things any other way! ?1 point
-
Hi, I have been living in a static caravan adjacent to our plot for the past few months. I have a wife and two girls and we have been managing fine for the past few months. There are a few tips I would share. Cite your caravan in a sheltered area from the wind and rain, fortunately we have a large outbuilding to our south side, an embankment to the east and trees to the north and west. We have heard but not felt the past two storms. Additional insulation where possible, I added 2 inch foiled insulation board to the underside of the static home (keep vent paths clear) and added a thick skirting to the caravan. This stops the winter draft sapping the heat from the under side of the caravan. We also put rubber matting over the tin roof above the sleeping quarters. Rain and hail amplify off the tin roof! My wife is a light sleeper and found this beneficial. Space is obviously a premium. Take in things you essentially need. We downsized significantly, including clothes. Use as you need, try and keep it down to 1-3 pairs of everything each (cept skivvies, need several). If you can, add a sizable sheltered porch area, we have a 2m2 one but could have don'e with a bigger one. We have a retractable washing line, cat box and seats out in it. Very handy. Static homes can have a few draughty spots, esp with built in furniture. Find and insulate as you see them. Because they are draughty, you may get moisture build up inside. A 2kw plug in de-humidifier will be essential. it will keep furniture, clothes, carpet dry. Keeps the RH of your caravan down, which if you are staying for a long period is essential - I wood burner will help do this too. Thankfully we can wash and dry clothes nearby which saves a lot of set up. If you can, you could use an ex-site office iso container - it will have connections for light, heat, water and foul waste. a used 20ft one can cost 2-3k. We have two children in one small room - it used to have those skinny single beds and room for not much else. We took those out and put in small bunk beds, slots in nicely and left more room for ikea storage furniture for toys/clothes. If I remember any more il post them. Good luck, it definitely is an experience - always remember its only temporary and its for a greater goal. Don't let cabin fever set in!1 point
-
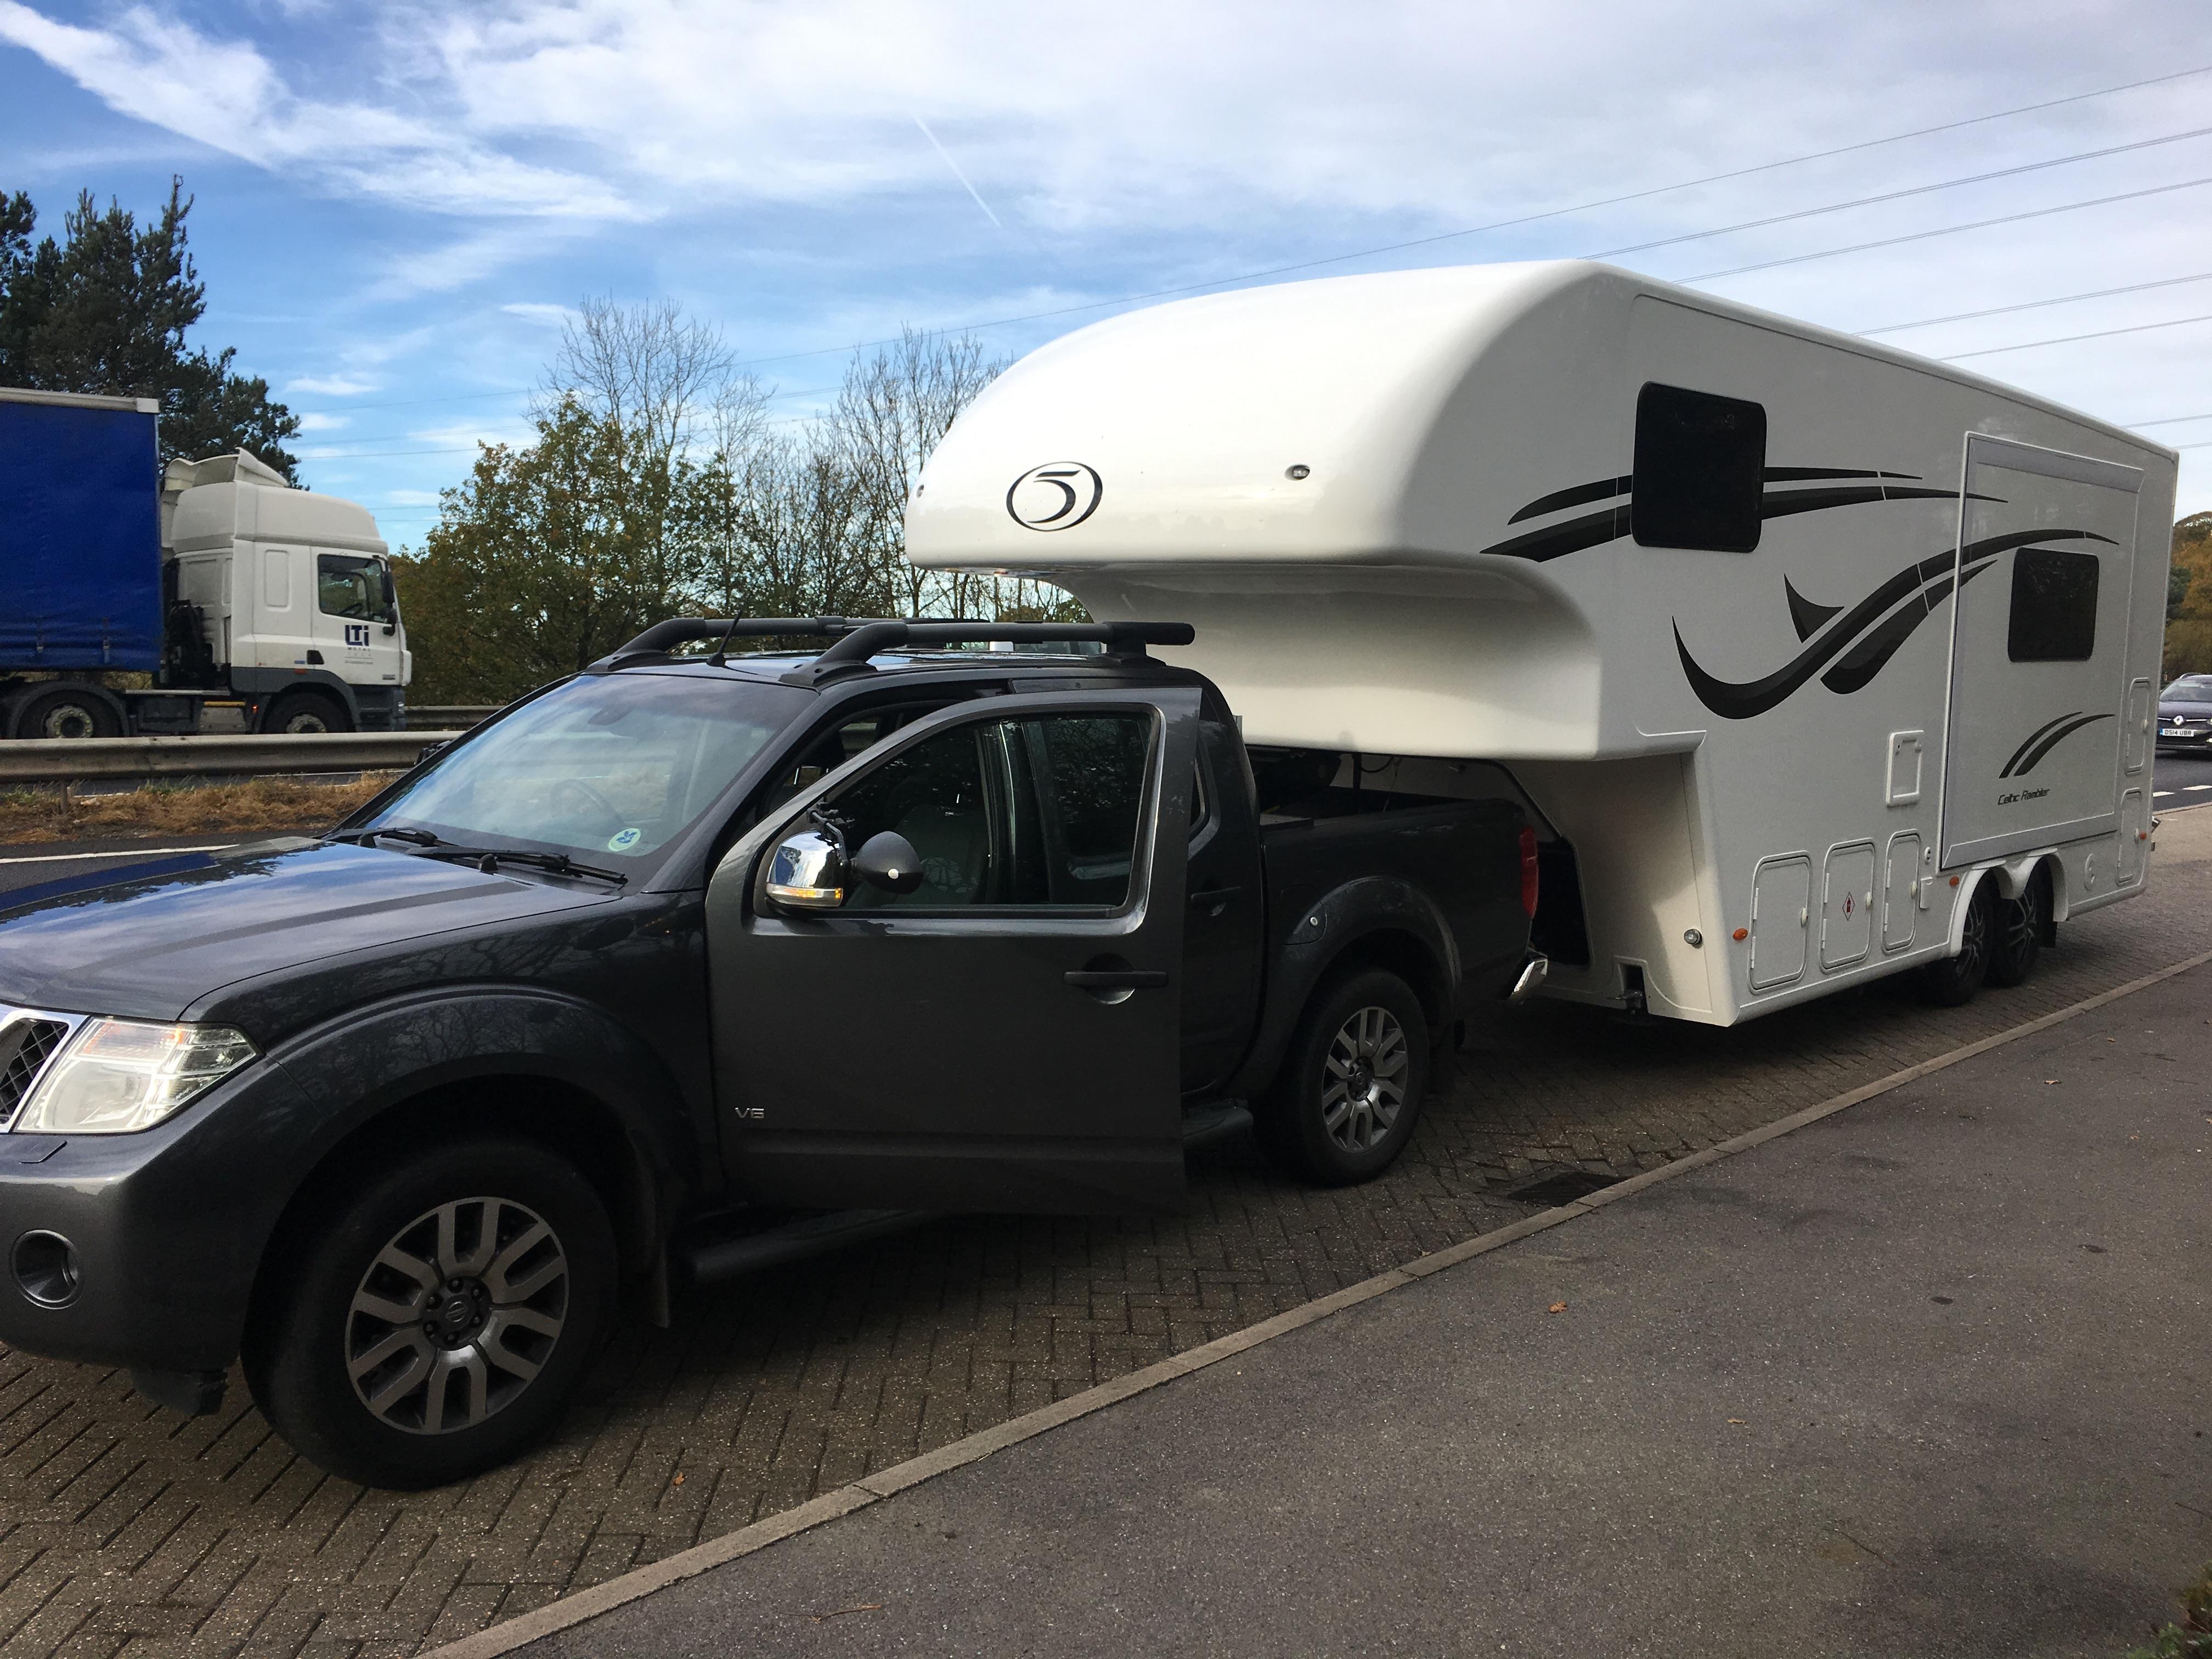
This is what will be in at some point, simply because we already have it. In Portugal at the moment riding out the latest storm.
 1 point
 -
Hi all, I originally started just researching on here for self build related information, which I have found an absolute wealth of. But struggled to be able to easily find pictures , with the exception of the Blog's which are really helpful. But more recently I've found Instagram to be extremely helpful and full of brilliant self build accounts which document peoples journeys, mistakes, advice and it's been really helpful finding suppliers, architects, sureveys, contractors etc to see their work beforehand. It really helps provide confidence selecting people and also to see who has done what before and see their work beforehand and also see others journeys, mistakes etc. I have also now started a self build account on there to document ours. Was wondering who else uses instagram for this and also has a self build account? Hopefully this helps others to find more information on self building1 point
-
"Deflate Member Wriggled" is in the middle of my entrance!!!!0 points
-
My eps blocks have been exposed for a year and a very persistent bird has pecked a 60mm diameter hole in the outside, I think discovering the concrete core really put a downer on his plans.0 points


.jpg.c21f3ac78c9b7efd90cbdcb312744dc5.thumb.jpg.7adcad4c0e384f5ecd7d56b0618df6e5.jpg)


This leaderboard is set to London/GMT+01:00