
Leaderboard


Popular Content
Showing content with the highest reputation on 02/13/25 in all areas
-
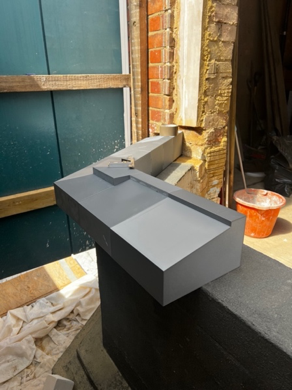
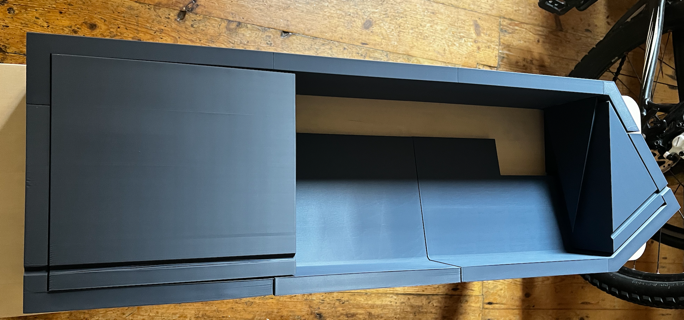
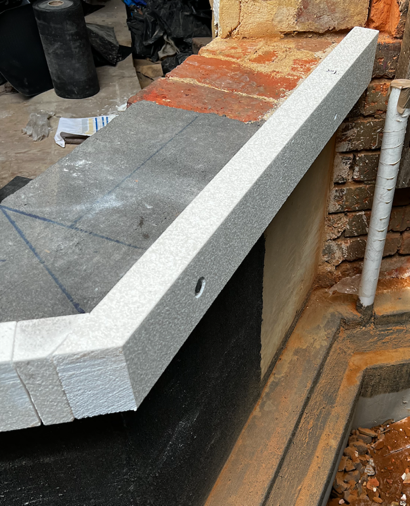
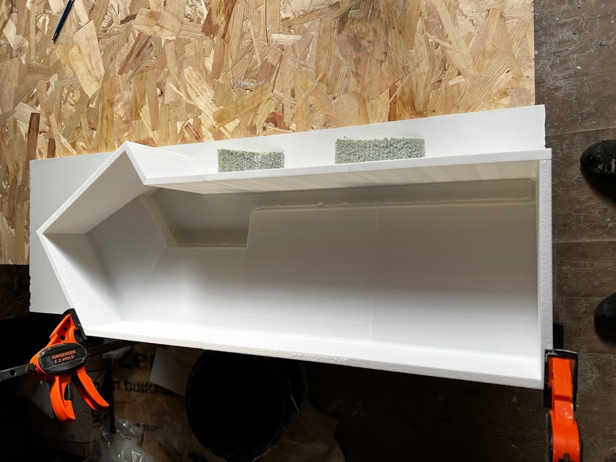
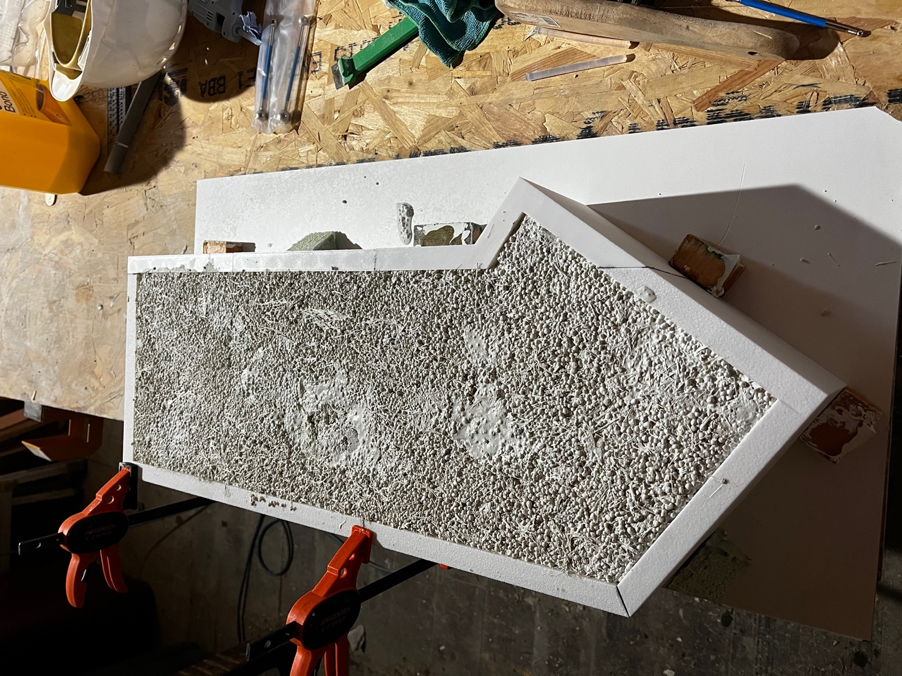
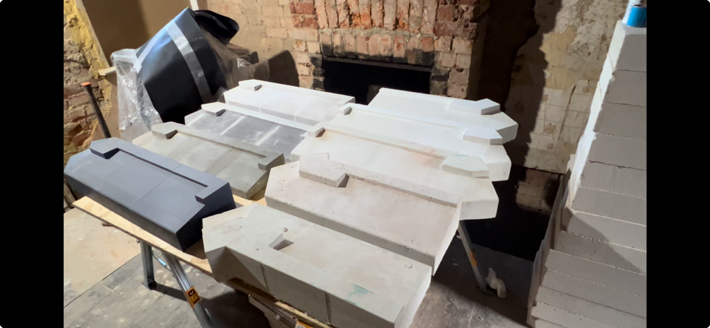
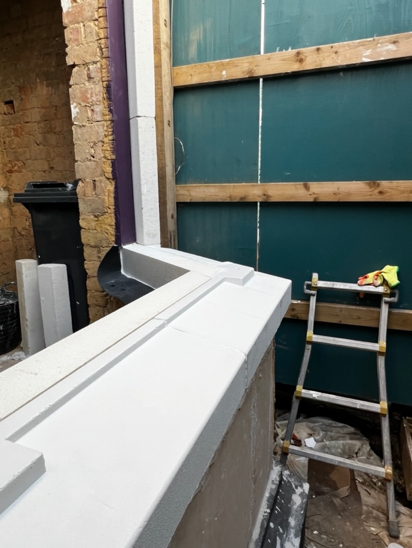
We’re rebuilding a Victorian bay window with a focus on thermal efficiency and restoring some period detail. To achieve this, we designed and cast our own bespoke window cills using GFRC, 3D printing, and innovative materials like glass bubbles to reduce weight and improve insulation. This post shares our design process, casting experiments, lessons learned, and the final results. Design I used SketchUp to produce the design for the side and centre cills. The bay has external wall insulation so the cill was designed deep to accommodate 10mm aerogel, 50mm PIR, render and the offset from wall. The 10mm aerogel was something I wanted to try out, and doesn’t add much compared to just using 60mm PIR. For some reason the grey versions of aerogel with a 0.015 thermal conductivity are not easy to find, so settled with the 0.019 grey blankets. We are targeting below 0.15 U value. The EWI gets us to 0.16 with additional internal insulation needed to be below target. The cills themselves are a thermal bridge 210mm deep then 100mm of structural insulation for a 0.34 U value, I haven’t yet decided on the further internal insulation to get below 0.15. I am trying new things out with this and will try VIPs. I have a budget for trying out new insulation. 3D printing The first concept of the design was printed out in a 3D model, including a wall return, stools for the jambs and mullion and underside drip. And later its mold to test the casting process. Structural insulation The plan was to install the cills on the exterior half of the wall, then given the deep cills a section of structural insulation was fixed into the wall to provide some support for the cill in case they were used as a step. Here this is fixed to the top of the wall and replaces the 50mm of PIR which otherwise would have been used. Casting Once the cill designs were done, I made a mold of the cills for casting with concrete and sand. The mold was 3d printed and via some experimentation manage to find a way to get a stone effect for the face coat. The idea of casting my own cills started while looking at GRFC concrete countertops, so my mix included glass fibres. The hope is that they prevent cracking, but the cills are already substantial so they probably don’t need them, but I kept with my original mix design. I don’t think the glass fibres added much to the process, except additional complication. If its reduces cracking then that’s helpful. Glass Bubbles I later tried an experiment using glass bubbles. Half the sand was substituted for glass bubbles to improve the thermal efficiency of the cills, (only a little) but its main advantage was in reducing the weight so it was possible to move the cills around with some ease. It also helped reduce deliveries of the sand. I was using a white sand which was an annoying bulky delivery. The glass bubbles tended to rise to the top of the mix, here the top is the bottom of the cill which was problematic for creating a flat surface. I later experimented with covering this to produce a flat surface but I manage to instead amend the mold design to be fill from its back. The advantage of this was that the slightly uneven surface was in an area where it didn’t matter and also the glass bubbles would be situated more evenly towards the back of the cills thus helping with the thermal efficiency of the cills on their internal side. Test casts I had about eight different cills cast before being totally happy with the design and the casting process. I experimented with using cast stone dust, but with a bad result (probably from my poor face coat application) so I moved away from a “bath stone” look to a white to be further finished. Completed Cills Once the cills were done, I was able to see how to progress upwards for the rest of the bay window. At the start we were happy to accept the bay would be a thermal bridge requiring lots of internal insulation. The benefit with this design is that much of the insulation is now external saving on the floor space. It took some time, which I have and I am happy with the result. Since I installed the jambs and mullions and making the header/lintels copying the original design in the area. Plus the cost is much reduced. The original plan was to spend 30k on the bay window build, as a standard build, that cost without windows relying upon insulation being done separately afterwards. Instead we have managed to spend 5k on tools and materials, including £500 for a 3d printer but lots of my time.

 3 points
 -
All stowed away in the built in cupboards. You have got to keep a neat shed !3 points
-
Been a while since I have looked at contract law. But this may help. A4ID-english-contract-law-at-a-glance.pdf2 points
-
As you say, there are loads of options. But the point is they all require work (and thus time and cost) to fit. By using the almost universally fitted TRV interface, the time to fit becomes negligible. We aren't after perfect, linear flow control. Just flow control that is "good enough"2 points
-
No. Not so. Even if there was some implication, no contract has a space to write in the interest per day. 8% per annum maybe. They are playing at being lawyers, thinking this will intimidate you. It is bullying. Again. It looks as if they are used to behaving like this. Clearly the last thing they want to do is return to complete the work. Prepare your mindset for the next stage. They may well now write you a letter by a solicitor, because they generally do the first letter cheap or even free. When you read it, you will see that it is rather generic, because it is simply writing what they are told to write. You just write back, stating what you have said on here already. And that on reflection you paid too much and will seek for redress if this proceeds, plus costs.2 points
-
IMHO a judge won’t stand that some bs made up extreme interest rate with zero written contract stipulating that . Burden would be on the claimant to justify the rate . 3000% is rather hard to justify - sounds like profiteering…2 points
-
Been there bought expensive. Paid 4x more for a kitchen in the 90s than I did in 2021. One in 2021 no better or worse. They are all MDF with a plastic cover at best. A good design is way more important, with parts available in the uk, for when the installer messes up.2 points
-
Hi all I’m about to start my wraparound extension on my 1930’s semi and I am absolutely certain I’m going to have more questions than is probably reasonable about many aspects of the build. I’m hoping that here I will be able to find the guidance I need and also, I’ll be able to guide others should I have anything I can contribute to their efforts. Here’s to mess and upheaval! Simon2 points
-
@Robsco1, my garage is actually a full ICF build with an insulated foundation. I didn’t go so far as to put in UFH!!! I’m sure this made the garage much, much more expensive. But my only motivation at the time was to keep the superstructure construction as simple as possible. The garage and house were built at the same time, with the same crew and same materials. On concrete pour day the trucks just kept coming and the crew just moved the pump from the house to the garage. Most of my self build decisions have come down to simplifying a process. You can chase cost and quality, but my experience, in real life is that actual people and processes are the weak point. So whatever you save in a material decision could actually get wasted because the execution eats away at that saving. But an insulated, ICF garage might be going a bit far. 🙂 I appreciate that your circumstances are very different. Only you can answer the cost benefit analysis, but you are pretty much free to do whatever you want. I’ve only built the two foundations, but the process of constructing an insulated foundation is very straightforward, but it will be more expensive than just a regular raft.2 points
-
I had an issue like this a while back with a Worcester Bosch combi, did my head in finding the fault, but eventually I just set my ‘magic’ electric test pen on the wire supplying 230v to the integral pump and hey presto…..intermittent fault on the PCB. The relay that powered the pump was failing, but had not failed fully, so it was giving a on/off output and the pump was starting and stopping in a random pattern (indicated by the led light in the test pen going on and off which was giving me a visual confirmation). It was very hard to find this fault tbh as for some strange reason the pump was nowhere near as sporadic in operation when servicing DHW, but these things are sent to try us! My assumption was that it was easier (less current draw through the relay) to pump locally to the PHE than it was to pump to 10 rads, therefore the failing relay was more ‘reliable’ on DHW and less when running heating. Changed the PCB and problem solved. Time, labour and parts costs to fix an old Biasi is a wasted investment imho, sorry, and if you now have to change the PCB to eliminate that then you’ve forked out a lot of dosh on an old boiler. Sadly this sounds like an on board control issue, bearing in mind I’m not there to test and trial it so is my best guess, so likely the PCB would need to be changed so it can be ruled out. This could also be the same issue caused by the relay operating the gas valve, or the gas valve itself. It could also be the air switch on the fan, or the fan itself, or either of those relays…….. My advice on the other thread was to not put good money after bad, and I’m sticking with that advice. Abandon this boiler and fit a nice, quality brand, new one, possibly you may get some help or a grant depending on your circumstances. Call citizens advice to rake through all the schemes out there and see if you can get any help towards this. I shudder to think what you’ve spent so far….and you probably have changed all the parts except the one(s) that’s broken….2 points
-
Hi all, appreciate all the knowledge the site has given me the last few months. Now straight to the MVHR sub to ask some questions, and give back of course.2 points
-
Meter reading at start 544.019 m3 Meter reading at end 544.439 m3 Condensate collected 612 grms Boiler run time 67mins Flow temp 30.5 to 33.6 Return temp 24 to 26.5 Avg kWh 4.66 kWh1 point
-
I bought an ex-hire mobile welfare unit from auction and it has been a lifesaver. No need to hire a toilet, (for 15 months) a place for the guys to have some lunch other than their vans, and the gene coped perfectly for the 4 or 5 1/2 days of power outages that we have had since we started where the crew have have run lights and a number of power tools off (not sure how if it really is only charging the battery?) Admittedly after 15 months of 6-8 people on site each day, the toilet door is falllng off and the seating area is now being used to store the guys tools, but even that has been a blessing. Once we have finished in about 3 months, I'll have it serviced (and the door mended!) and resell it for what I paid for it (i hope!)1 point
-
Rats are worthy enemies For our troop, we now have - employ - 3 tomcats: two real hunters and one um, well , nice boy. A decent German air rifle, some night vision equipment and night sights. They are currently keeping their heads down. I'm getting the local rat pack to pay us a visit this coming autumn. Where we are, we'll never be far from them. It's just a question of constant vigilance especially in late summer and early autumn. Good luck @Big Jimbo1 point
-
https://www.plumbnation.co.uk/joule-cyclone-platinum-unvented-250l-indirect-short-cylinder-302-19749?utm_source=organic&utm_medium=shoppingfeed&utm_campaign=googlebase&gad_source=1&gclid=CjwKCAiAzba9BhBhEiwA7glbagdV4fjHIm0Nbv5QTbyua3ayiSpIs0bGjZWV14UmKhapS2XfvEY_AhoCyLkQAvD_BwE1 point
-
It's one of these https://www.mrcentralheating.co.uk/water-storage/unvented-cylinders/thermowave-18-litre-unvented-potable-expansion-vessel?gad_source=1&gclid=CjwKCAiAzba9BhBhEiwA7glbaqbL_VFwijXyCmtOYqZedccRbzUq-NnH4RZxg7MUGEn2gvyofQtMVBoC2ywQAvD_BwE1 point
-
The EV provided by Joule isn't actually a (the) Joule product. It's a Global Water Solutions EV. As an update. I pumped the EV back up to 2.5 bar to see what would happen. Noise got much worse. Even just opening basin tap caused fairly loud noises from the EV/cylinder. I let it back down to 1.5 bar and if anything seems slightly better than before. Only opening the bath tap wide open suddenly causes the gurgling/vibrating noises. If opened gently it's just a moderate hiss as the EV empties presumably. Also notably I tried measuring flow at hot bath tap. Got 28 litres per minute. So significantly more than the outside tap directly off the main. I guess this is proof the EV is acting as an accumulator. I can only think it must be the large difference between static pressure and dynamic pressure causing the noise. Maybe the diaphragm bottoming out? For now it's only a minor problem in it's current state to be honest. I think the only way to fix is to get a better flow by upgrading the main.1 point
-
I haven’t even reckoned it up 😁 While there’s an indoor swimming pool and a massive flat roof that doubles as a balcony 300k I would of estimated 1.3 Hes paying ridiculous amounts for fitting out Weve put curved walls in all over Most to be tiled We have another to start about two miles away Same Architect Half the size 3 mil spend 4.5 high ensuite between to bedrooms WHY
 1 point
 -
The first timer I bought, cheap on eBay, did not last long. It did fail safe though. I spent an hour in B&Q looking at them, then bought the above cheaper online.1 point
-
1 point
-
You shouldn't use a typical smart plug. Some might be nominally rated at 3kW at 240VAC they can rapidly heat up especially when powered up for a few hours. I control my 3×immersions (2 in the UVC and one in a Willis heating my UFH) by decent din-mounted contactors in the MCU. These are rated at 20A at 240VAC for a straight resistive load. These have a design life of 50,000 cycles. Their coils are driven at 24 VDC (at 10s mA) by an IoT relay board controlled by my HomeAssistant system. I've done posts on this if you want know more. My TL;DR is that it can be done but you need to know what you are doing to avoid the fire risks.1 point
-
I don't give up easily, I assure you, and if it was any other boiler or newer I'd say hang in there, but pouring money into a budget (and old) boiler such as a Biasi is like paying expensive vet fees to squeeze 2 more years out of your favoutite goldfish.1 point
-
Yes ! They seemed pretty good . Any issues were resolved quickly . I installed it so did occasionally get things wrong - they were quick to sort .1 point
-
Looks like they sell the Nobilia range. Have you used them personally and any feedback to share?1 point
-
They may just mean 8% annual interest accruing daily. Otherwise they are idiots.1 point
-
https://uk.kutchenhaus.com1 point
-
As the inventor of one of those smart TRVs there is indeed typically only a very limited range over which most valve bases show an analogue response (and sometimes being in it causes undesirable noise), but yes that particular TRV does try to make use of the bit in between on and off where it can.1 point
-
If you want handle less, with solid doors, have you thought about getting a local cabinet maker who specialises in kitchens to help? Most decent kitchens use high quality hardware such as Blum or Haeffle for the drawers, hinges etc, so a good cabinet maker should be able to use the same bits and hit the same quality as a German manufacturer for a lesser price whilst being bespoke to your layout/design. There are loads of really interesting materials that you can use, ply, valchromat, Fenix NTM, and an almost endless list of different veneers that you can have applied to ply such Formica, various wood veneer, Fenix etc. Not sure where you are in the country, but take a look at the sort of thing this company do, there will be similar companies nationwide https://www.instagram.com/woodworksbrighton/1 point
-
It's easier to do as @Russell griffiths suggests. Concrete to a flat surface then drill and use epoxy and stud bolts. But ask your SE: there are complex loads on a goal post. It's worth painting the lower levels of the steel, using specialist paint or bitumen. Any steel encased in concrete won't need paint.1 point
-
Good morning. Been quite some time. I doubt anybody will remember me, but I used to enjoy participating on the forum. Only reason I disappeared a couple of years ago was, wife got ill, and to be honest, I found myself getting depressed. I don't think I even realised the depression, until I came out the other side.....I have missed giving Pocster a hard time for his solweld skills though. I hope all of your projects are going well. I must say, I'm looking forward to being back. The skill and knowledge level on the site has always been fantastic. Together with the willingness to share that knowledge, and the pitfalls, and good times. The only thing that would be useful to me at the present time would be if anybody has any recommendations for a really good planning consultant in the Hertfordshire area. Anyway, I look forward to participating again in this excellent forum. Best of luck to all. Regards Jim1 point
-
@Onoff shed is still performing as an excellent shed
 1 point
 -
Your main bedroom I would do 40m³/h other bedrooms 20m³/h. That gives 80m³/h. I will get to lounge in a latter Extract, kitchen 48m³/h and bathroom 32m³/h. So fully balanced and not over ventillated. Lounge depends on your layout. Ideally you would've as through flow. That is excess air from upstairs (48m³/h) would flow through the lounge to the kitchen. For this to work you need a path from the stairway through lounge to kitchen. If that doesn't work because of layout, you need a supply in lounge and extra extract in bathroom and kitchen to balance flows. Boost set 20% above normal Have you undercut doors?1 point
-
@Big Jimbo Glad to see you're back. We've sold up and moved West, and I've got a new moniker. Formerly known as PeterStarck.1 point
-
Respectfully disagree. The LPA is wasting 3x the resource than if the case officer just dealt with it. Oh and the applicant’s resources too, which they don’t count. I think the problem is this: all administrators are being told that they are to be machines without any judgement or common sense, just following the procedures which they know are inefficient or obtuse. Add in a bit of laziness or fear or someone who loves power play and then it becomes a wasteful administrative shit show. Steep it in a bit of LPA ‘we’re here to stop people doing stuff’ culture and there’s your recipe for meltdown.1 point
-
You could go down the Lawful (4 year route) but as @SBMS mentioned, it would cost you more as opposed to taking out an indemnity policy nearer the time of sale.1 point
-
I discovered belatedly that not all planning conditions have to be fully discharged, per se, just complied with. So could you record or film the conversation as evidence?1 point
-
Correct, purest PIR.1 point
-
You can have a toilet/sink/water supply to an outbuilding. Only restriction is that it cannot be separate living accommodation (and even that is vague). nothing I have ever seen about combustible materials in PD… your building can be within 1m of boundary as long as it is under 2.5m at its highest point. building regs nothing to do with and not required for planning or PD. it sounds like you’ve built a fancy, but compliant, shed!1 point
-
"Massive shed".1 point
-
@Onoff. The mesh company . Com Rodent mesh.1 point
-
So posh TRVs then. Not so different from what @DamonHD was doing, one radiator at a time.1 point
-
You should use the exponential 1.3, thats why they speak of weather compensation curves even though heat loss is linear but rad output isn't. So its (39/50)^1.3 = 0.724 and (44/50)^1.3 = 0.847 not hugely different to the above but does become significent at low rad mean temps.1 point
-
My get out of jail card there, these days, is to line the door and window reveals with Marmox boards instead of plasterboard. Insulated plasterboard is quite a pig to work with when you have to cut around the metal fixings plates, especially when it's long thin lengths! Marmox is impervious to water / moisture ingress, insulates, and the grey coating will take a coat of plaster directly so no need to plasterboard over it. Downside is it will take less of a 'hit' from a point impact, vs plasterboard + skim, but if you have a good spread who has put 2 sets on then you should be fine with Marmox + skim + paint. You can easily router out the rear of the Marmox, nowhere near as messy as plasterboard, and it can be bonded on vs screws very successfully.1 point
-
Yeah planning was a PITA for me too. We bought a plot with planning on and wanted to change the design for something much more sympathetic with the area. It took 2 years to get permission, via a bunch of planning cul-de-sacs ... for the the thing we first thought of. So, I'm now a couple of years older and I've lost a bunch of enthusiasm trying to push something simple uphill with a bunch of unelected, impractical, difficult people who love to say no ... trying to slow you up or stop you at every point. A big part of the problem is the '20 questions' nature of planning rather than a dialogue. For instance, a late added condition for us was a particular design of entranceway to a standard design by the LPA. We're on a single-track road so we could never get delivery vehicles past this standard entranceway design without driving over the soft verges. Could we radius it more to avoid this problem? Well ... we refuse to answer you - you need to submit an NMA. Is it an animal? Does it have 4 legs? etc1 point
-
I was just sick in my mouth...... "no" to that too. C'mon people, it just needs taking out and doing again, properly, then just move on with life and admire a nice shower install free from 'ugly' or 'compromise'. I've been fitting bathrooms for decades, and this just can't be fixed as is. @tokyotecubate can you get to the valve from behind? If cutting a plastered and painted wall is the only obstacle then that's 100% the way to attack this, and leave the tiles intact. That could be fixed in a day if there's access to the rear?1 point
-
Talk first. Listen. Pay based on the listening exercise. Its not easy to hold that kind of conversation, which is why most people try to avoid it. (And why many contractors and customers don't answer their phones) Not talking makes the problem worse. If you don't talk first - the whole thing risks escalating out of all proportion. If (say) this issue gets worse still and lawyers get involved the first question they will ask is - did you talk to the contractor first? By the time things get to paper, nobody should be surprised. When things go wrong its ALWAYS a first class opportunity to show some character. Or guts if you like..... Here's a framework to help you think it through for yourself. Its a ten minute read.1 point
-
You withold the plumbing fund, as it is not done. You withold the kitchen repair value. You withold any other sums appropriate to odds and ends (snagging) unless there is a retention sum in the contract. You pay the rest, assuming completely happy. You tell them in writing that you are paying x and witholding y and z, and why. It's common for a business to invoice immediately. Ie might not be a try-on. It's standard for customers to agree and pay with appropriate money held back. In writing, courteously but firmly.1 point
-
I'm not an expert either soso anyone who has a better practical understanding of it please enlighten me more. None the less, this is the internet so I'm going to present my opinion as fact regardless! To mitigate sound transmission. 1. Airpaths - lots of acoustic mastic at any joints and at the walls. Seal all gaps. 2. Reverberation - A layer of fluffy stuff just to stop the drum effect. The stuff you've done is fine. Infact any more will only add slightly more mass and risk increasing the coupling effect of the floors. 3. Impact noises - decouple the surfaces. Carpet, foam strips under floorboards, resilient bars downstairs. 4. Add Mass. Plasterboard, standard or soundbloc or OSB is the cheapest way. Upstairs or downstairs . The more kg the merrier. "Acoustic" insulation adds more mass than regular insulation but it's an expensive method of buying mass.1 point
-
There are two ways sound is transmitted through the floor: airborne sound and structure-borne sound. The insulation you've added takes care of airborne sound, so it will deaden the noise of Taylor Swift from above. However, it will do pretty much nothing to deaden your missus dancing around. To deal with that you'll need to add some kind of cushioning over the joists - a thick underlay if you're putting down carpet, or better decouple the floor deck from the joists (or the ceiling below from the joists) to reduce the sound transmission. Others here have more practical experience than I do - I've been focused on airborne sound transmission.1 point
-
HiI would just do dMEV fan set on the lowest rate. Here is what I would recommend, have done a comparison of running cost and heating savings below. https://www.ebay.co.uk/itm/110918389829?var=0&mkevt=1&mkcid=1&mkrid=710-53481-19255-0&campid=5338749401&toolid=20006&customid=GB_11700_110918389829.141234980085~1871630609920-g_CjwKCAjwkY2qBhBDEiwAoQXK5d0Y4QsG2U9JPC4jZvEMGuxN-nZ8u5PCl84Yx8sUrwsA3kzKB7p8xhoCLtUQAvD_BwE Advantages of dMEV Silent in operation, no filters to change, one hole in the wall, will manage humidity boost out the box. Next to no power input. Doing MVHR will cost way more install and run, require loads more labour to install, require frequent filter changes as the flux, will mess with the extract filter. If you are pretty well insulated your typical (14 deg delta between inside and outside) would require 500W with dMEV, and if MVHR is 70% efficient about 400W per hour heat input. (Used a heat loss calculations I had already as indicative) 180 heating days for 8 hours a day about £30-40 a year difference in heating cost. But add in running costs, MVHR is 40W 24/7 so that is £94 per year, and additional filter changes - running at a low speed would possibly half that to say £40 per year. The dMEV would be running 24/7 all year also, but only requires between 0.5 and 1W at it's lowest set speed. So costs £2.30. Costs are based on 27p kWh. So difference in heating saving is taken up in running costs, plus it costs way more to install MVHR (equipment and labour). I went through the same dilemma earlier in the year, and want Greenwood dMEV. No regrets1 point


