Leaderboard


Popular Content
Showing content with the highest reputation on 07/05/23 in all areas
-
4af3a3b61d25366b7b1efa7923eea289.mp46 points
-
Already for concrete being delivered in the morning. I roped my daughters boyfriend and his mate to shovel it for me whilst I “project manage “ (make the tea) and trowel it off with an “easy trowel” on a long pole.
 4 points
 -
It has been a long and windy road up to this point. I bought the plot in February 22 and have had over a year of ecology surveys, useless solicitors including the county solicitor and a few changes of plans along the way before planning was granted earlier this year. The old house which was formerly housing for workers on the fruit farm had been used as site offices for a national house builder. When the builders left it looked like they just finished on a Friday and locked up and went home. There were 30 odd chairs and several desks in there. The filing cabinets were full of the site paperwork and then the kids had moved in and spread the contents around to make it look like the inside of a plasterers van. Finally we got the green light from the ecologists on Monday morning and with the help of have moved straight on to the demolition stage. I am enjoying this bit. 😀😀😀😀3 points
-
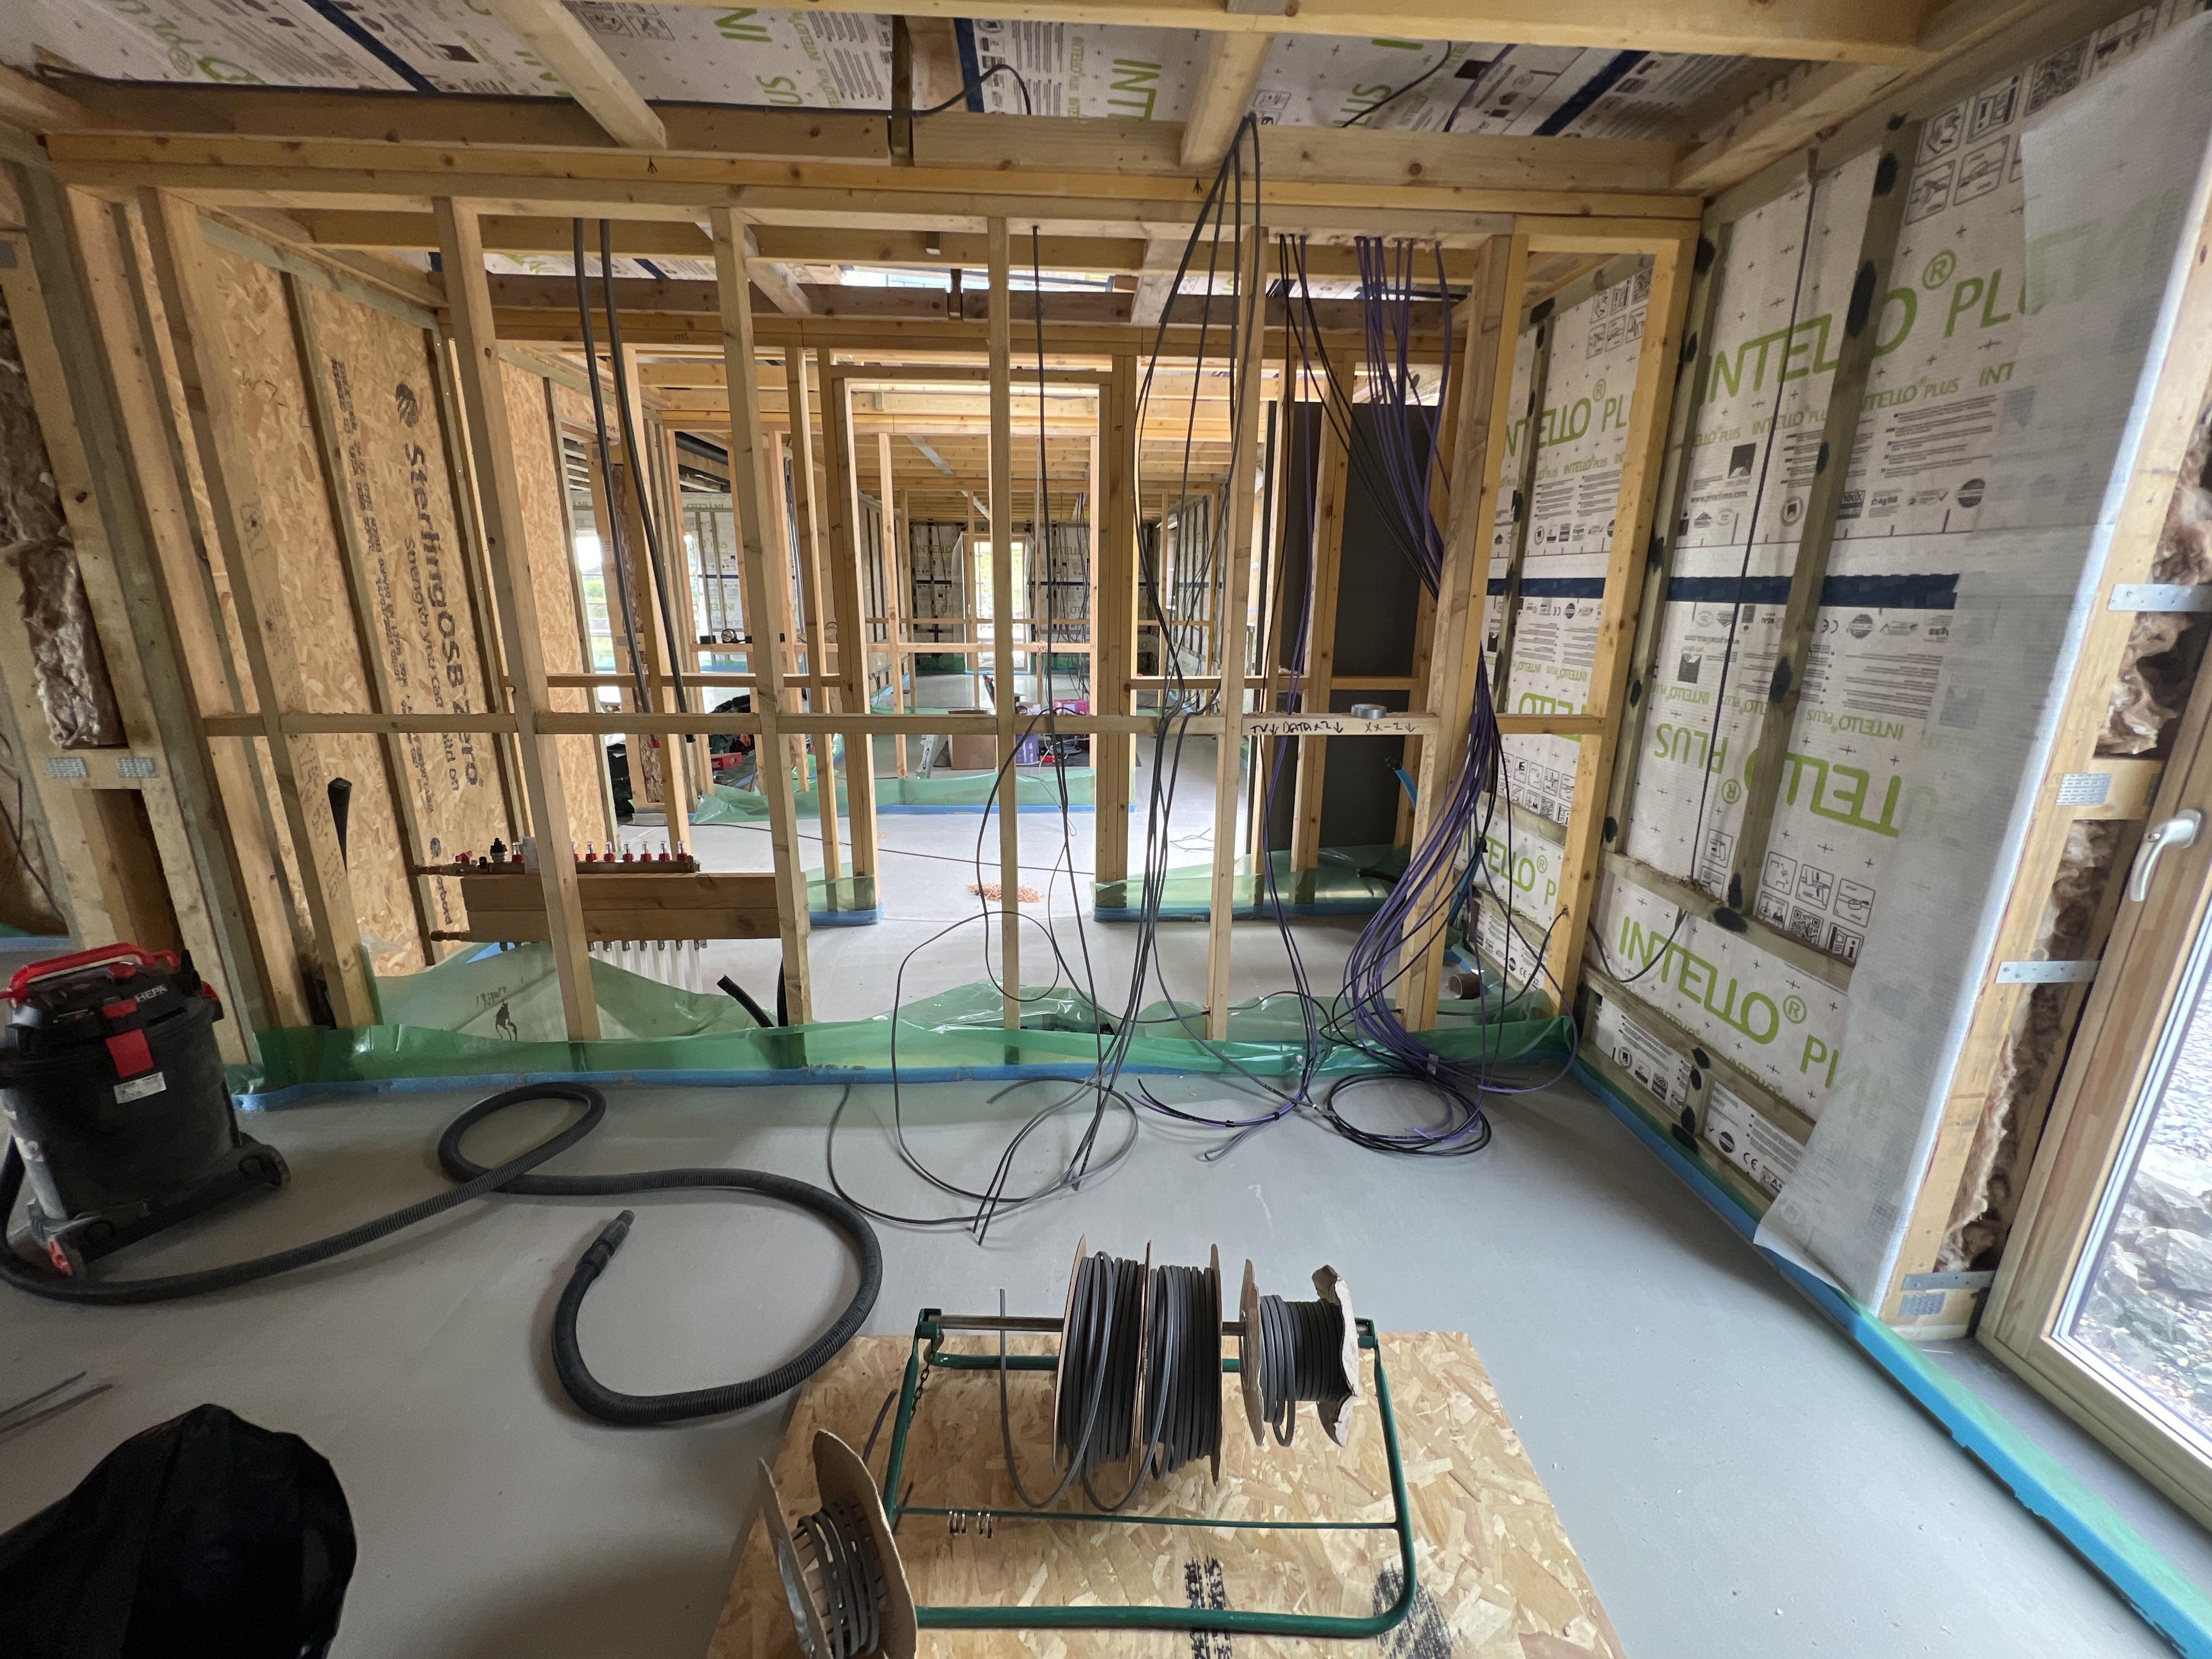
Finally we started first fixing
 3 points
 -
Second 6 panels now in place. The second array is 15 degrees off south in the westerly direction, the first array is 45 degrees off south in a westerly direction.
 3 points
 -
Would be worth setting the mounts up so they could be adjusted through the year. E.g. fixed to a scaffold pole on top, and have a couple different notches or brackets on the lower mount. I can picture it in my head at least. Would be totally worth a couple of hours of work a couple times a year adjusting the angle from ~80⁰ in winter to 30° in summer.3 points
-
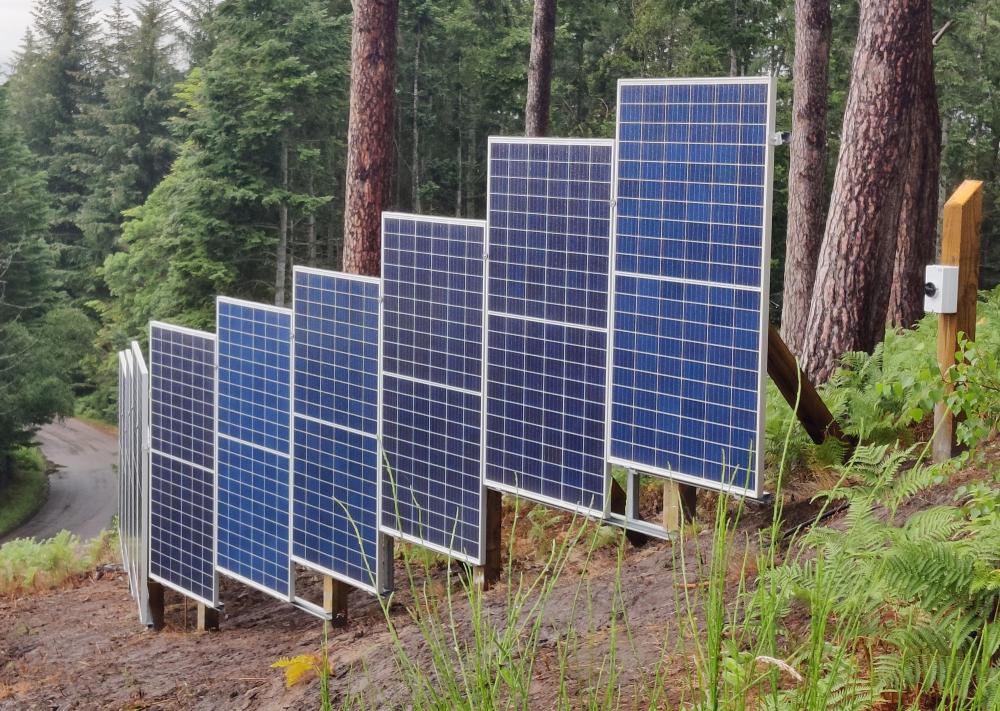
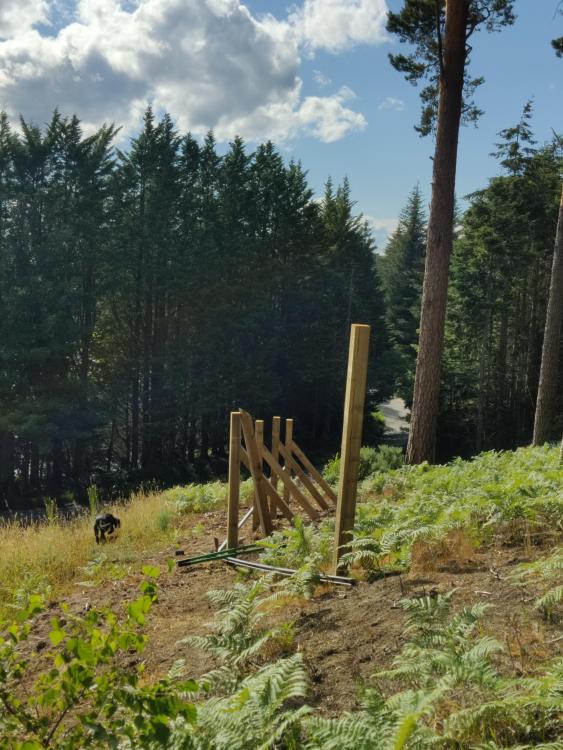
Decided to add to existing roof array. Roof array gets quite a bit of shading from trees and especially in winter ends up with a very short solar day. It faces south east. New array will be ground mounted vertically, more optimised for winter generation than summer. The vertical is also to protect from bits that can fall from overhanging trees. So doing it on the cheap and myself, except the electric hookup. Panels 12x 380W, 2 years previously installed life, bought for £700, plus a 3 hour drive each way to collect. Inverter (solic double mppt) again previously installed for about 12 months, bought for £150, collected on way from work. Isolators AC and DC, generation meter, stickers and MC4 connectors, £99. Mounting frame being made from 4"x4" posts and unistrut. Which is mounted on the hill behind the house. Posts will be postcreted in. Made a start on the frame. One half will be SW facing and the other half SSW facing.
 2 points
 -
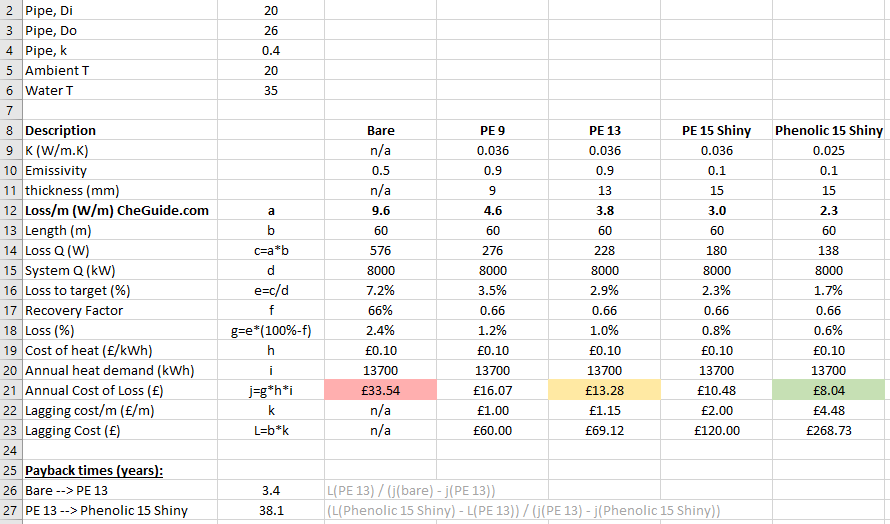
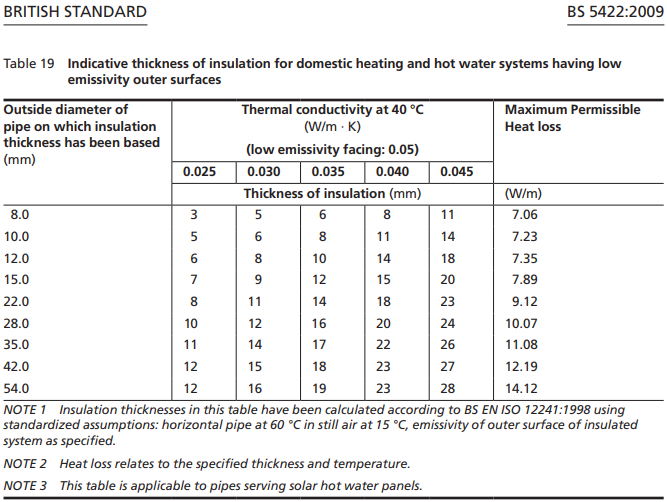
On another thread I think I worked out that there is little point in insulating domestic hot water pipes unless you have a circulatory system. Cold water pipes should be insulated to avoid condensation. I've been wondering about UFH manifold feed and return pipes and did some calculations I thought were worth sharing: I adapted the pipe insulation spreadsheet from the CheGuide.com. The table shows the amount of heat lost in the feed/return pipes. 'Recovery Factor' represents the usefulness of heat that is lost since it isn't truly lost, it is staying within the heated envelope, but in the wrong place. I intend to have a relatively uniform heat and so most of the heat will be 'recovered'. Various insulation scenarios are considered with the resulting annual cost of lost heat as well as the cost of the insulation (material only). The payback time for insulating PE 13 (e.g. ScrewFix) is just 3.4years. The payback time of upgrading from PE 13 to Phenolic 15 Shiny (e.g. Kooltherm) is 38years. That ignores interest/inflation. There is no consideration of the carbon costs, either of lost heat or insulation manufacture. 'Cost of heat' is based on £0.30/kWh electricity an a COP of 300% which is hopefully pessimistic, but who knows these days. Not everything comes down to cost obviously, but using 13mm PE insulation looks to offer the best compromise for my system based on a relatively low 35C average flow/return temperature (e.g. 38C flow, 32C return). I hope to have lower temperatures than that, in which case the payback times go up higher. If however you run your ASHP flow temperatures at 65C, the payback time of upgrading to Phenolic 15 Shiny would be about 13 years.
 2 points
 -
got to say, I like this - well done.2 points
-
I can see no point in a gap at all 🤷♂️2 points
-
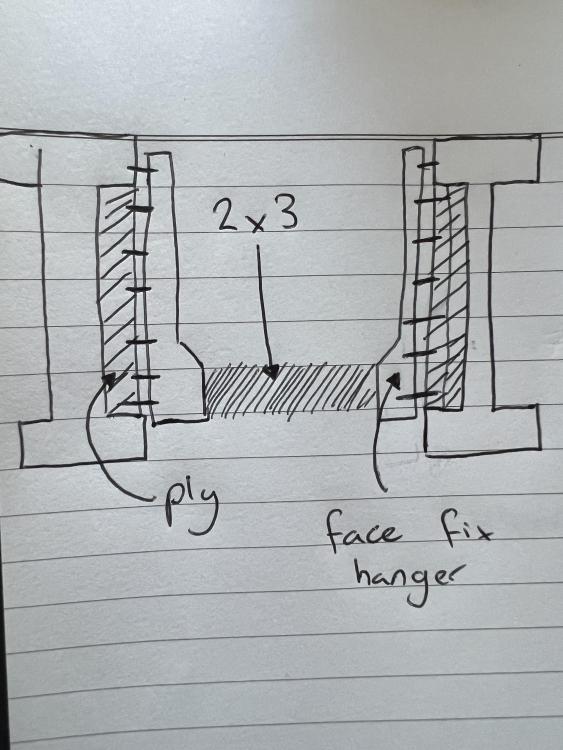
Frankly you have to do what you feel comfortable with mate. That’s a good idea above with the hangers, just bring them lower so the 3x2 bottom edge is level with the bottom of the lower chord.2 points
-
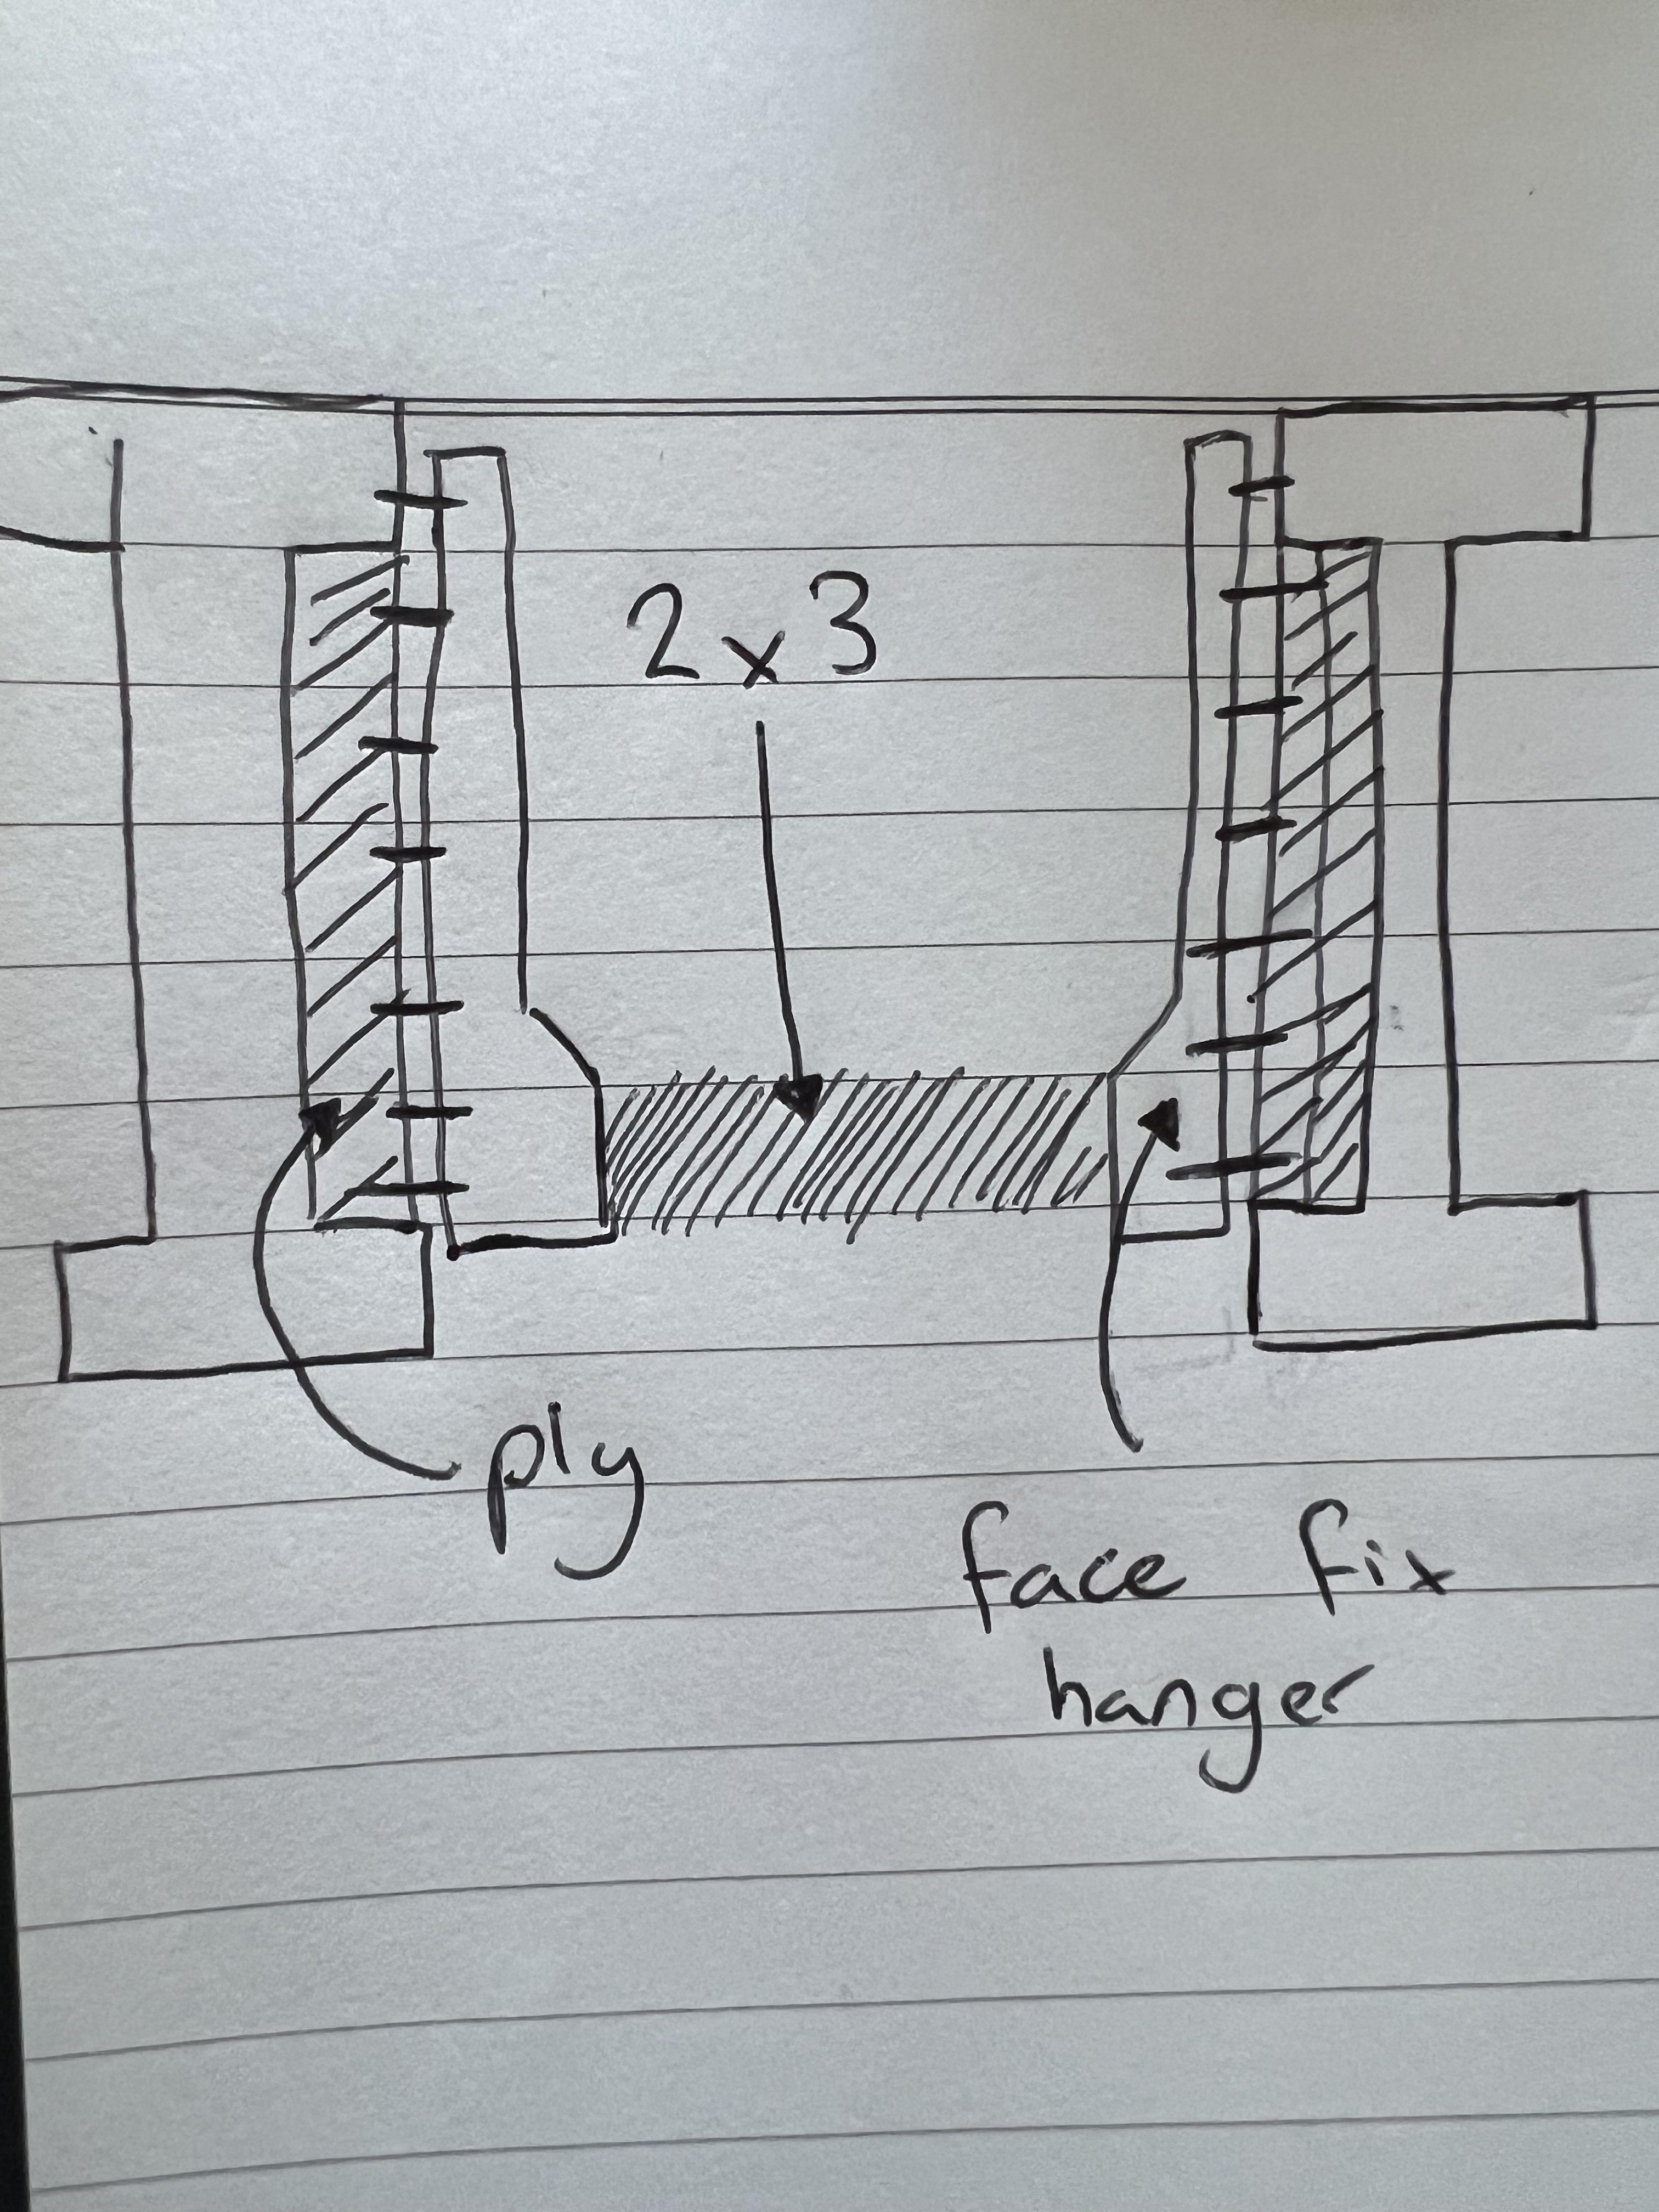
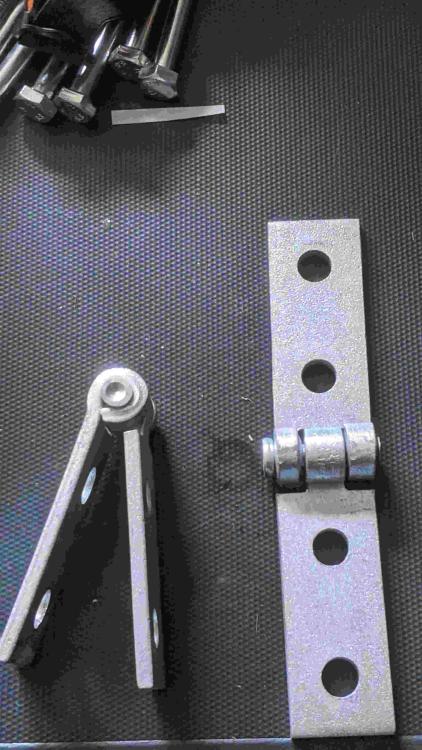
Cheers for the diagram, I agree I probably would get away with screwing into the bottom flange but I’m reluctant to do so just on the basis that it’s strongly advised against… ultimately damaging/splitting/cracking a joist is a huge problem I don’t want to encounter. I like both those ideas, keeps it relatively simple. Another approach I was considering was screwing some plywood to the inside of the OSB and then using a face fix joist hanger to run a 2x3 joist between:
 2 points
 -
Overkill for the loads you are talking about but a hockey stick would mean you only need a small screw fix into bottom cord while the load is taken on the top face of the bottom cord.
 2 points
 -
If you want to, and can fix a batten from top to bottom cord then this makes a very good fixing point, again there is no problem screwing into bottom cord but don’t ever notch it or drill a big hole through it. Bottom cord is in tension so removing material reduces its tensile strength.2 points
-
Our previous was I joists and I simply fixed to the underside of the joists The extractor is ridiculously heavy at 40 kg I often fit two layers of 15 mil sound boards to the underside of these joists Who ever has told you this hasn’t got a clue
 2 points
 -
That sounds like a very good move, especially if the “perpendicular joist” is fixed to both top and bottom rail . (Over engineered but I am like that 😎)2 points
-
NHBC coming to inspect on the 18th, I'll let you know how it goes2 points
-
I have mine wall mounted with a vertical channel every 2 panels with a hinge mount to the 6 panel frame. I have 2 sets of wooden beams for winter and summer settings, less than a hour to change each set of frames for 6 panels from one season angle to another. The hinges are at the mid point with equal weight above and below so as long as there is no wind a set of 6 panels will pivot using one hand.


 2 points
 -
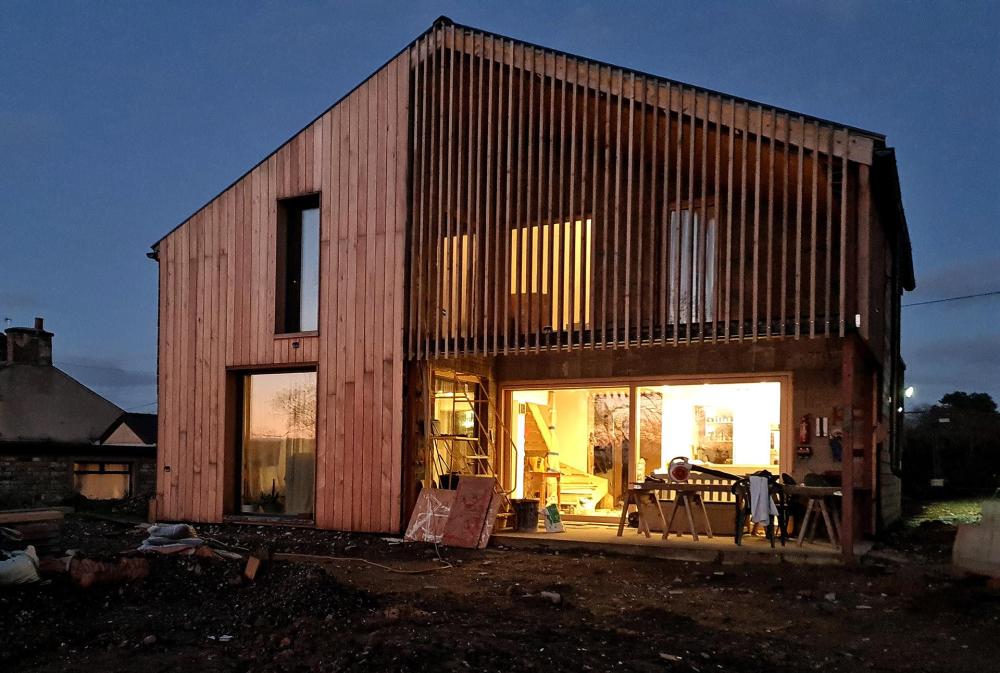
No comment on the windows but that's a great looking house.2 points
-
The one we did in Oxford was stop-beaded, plastered, painted and so on. Bathrooms in and done, kitchen fitted, M&E complete, and THEN the happy polish guy turned up with a van-load of pre-made & swung units. A couple of days and they were done, zero issue. You can design out any problem These guys slept on site, using packs of acoustic Rockwool as mattresses . That's what you call 'saving your digs money', but on a whole new level.1 point
-
How do you formally discharge a non-dischargable condition 🤔1 point
-
We have our own on here.1 point
-
I second get rid if it’s not used, take down below roof level and tile/slate/whatever over.1 point
-
Most of the builders yards have connections with various door suppliers. I had an account with lowdens so they use Doorways in Belfast. When I had the price for what I needed I went round the other places to see if any could beat it then went back to doorways with the quote that was less and they knocked money off to get the sale.1 point
-
The Growatt 3600 spec sheet Ive just looked at says you can have 5kw of PV connected, so you may be able to add another 1.4kw ish to the existing inverter without involving your DNO. How much PV can you get on the garage and what direction does the garage and existing array face?1 point
-
There are a number of window manufacturers. we sent out to about 6 for quotes and then narrowed that down to 3 before finally choosing Norrsken. you'll find that every company comes back with different figures. keep trying and then whittle the companies down to ones that fit your budget but also that you feel comfortable dealing with as sometimes that peace of mind is worth paying more £££1 point
-
I'm just installing additional panels two x 1710W about 52m from the consumer unit. Have calculated the voltage drop and power loss in AC and DC and found the losses in DC were basically half the AC losses. So you may want to consider having a split array on the garage roof, then run a 6mm2 4 core armoured cable from the garage to house and mount the battery and inverter there. Armoured cable can be surface run if you want.1 point
-
Demolish and rebuild may be best.1 point
-
Howdens are OK but a PITA to deal with.1 point
-
yup. nice doors are ££££ https://www.doorsofdistinction.co.uk/1 point
-
I used a decided shielded CAT7 daisy-chained for 1-wire, and radial CAT7 runs to each room for tree and IO. This means I've got more cores for IO in each room, and means I get 20+ 1-wire devices on a single Loxone extension. I found the following worked well: - 1 pair: DQ+GND - 2 pair: VDD+GND - shield: GND I haven't tested to see if i) twisting VDD with GND or ii) connecting the shield to GND had the most impact, but I know I had some issues before doing this.1 point
-
We were advised to get a Lawful Development Certificate from our LPA which confirms that the development has started. We didn't in the end for various reasons, but that's what I would have done had I needed to.1 point
-
I just love a hash 4af3a3b61d25366b7b1efa7923eea289.mp4.2618557127cdcfbcb915c3701917b219 Bit extreme, I would have just redecorated.1 point
-
I've taken 2 weeks off work to do as much boarding as I can. 2 1/2 days in and I haven't touched a piece of plasterboard. didn't realise all the prep work of dropping ceilings/battening/noggins etc would take so bloody long! at this rate I'll be lucky to have done any boarding before I'm back to work. 😞 fair point well made.1 point
-
@nod is probably right in that it needs no additional battens (and he has already done this) , the OSB is almost impossible to remove from the top or bottom cord but if your worried just run a vertical batten, 2x1 from top batten to bottom batten in the four corners of your “thing” using wood screws (or bolts if you want to be OCD) then simply hang your “thing” from the bottom cords. 🤔1 point
-
Add a strip of 11mm OSB to the beams, then plasterboard? Or stick with 13mm. At 35mm and within the heated envelope means this is neither here nor there tbh, just make sure you fully fill the voids where the pipes exit up high, to stop convection losses from the room to the attic. After that, I think you can relax.1 point
-
I only use 9mm or 13mm in PH settings (9 on cold water and 13 on ‘hot’ heating / UFH) but I always use 25mm wall for DHW and DHW HRC. The grey stuff is cheap as chips so just fit 19mm and be above the standards. Remember that part L is a dogshit standard and nothing to ever be bragging about, hence the recommendation to go “overboard”. Once you’re at the price point of 9mm or 13mm, you may as well go to 19mm. I’ve been looking into insulation for my current Passiv Haus project (as PH standard has just tightened its belt also) and there’s extremely little in it between the black neoprene (Armafalex / Armacell) stuff and the grey (Climaflex ) stuff, to the point that for the significant cost difference it makes better sense to me to go one size thicker and stay with Climaflex. For DHW and DHW HRC runs I’ll stick to 25mm wall Climaflex and tape along the seams with the Armacell 3mm x 50mm adhesive ‘insulation tape’ for belt & braces.1 point
-
Toolstation do better pipe (thicker) than Screwfix, titled bylaw something.1 point
-
Below is a table from BS 5422:2009 which assumes 60C pipe and 15C ambient. Looking at 28mm pipe it has a minimum thickness of 16mm for 0.035 W/m.K which is the best you can hope for from PE and 20mm for 0.040 W/m.K which is perhaps more realistic. At a 35C average flow/return temperature moving from PE13 to PE20 reduces the loss per metre by 20% from 3.8 W/m to 3.1 W/m, but both are massively under the maximum permissible heat loss of 10.07 W/m.
 1 point
 -
30kgs as a frame is nothing weight wise for solid or engineered joists, if you were hanging a 30kg light fitting on one screw then I may be more concerned but your frame will be spanning 2 or more joists so very little localised load. If you can get access ok then screw through the web. If you are worried the bottom cord may come away from the web then don’t be, the glue used is incredibly strong1 point
-
Interesting thread. I'm starting to realise how little I know about all of this. In the spirit of being an absolute dummy, am I right to think that the most basic system would comprise panels, MPPTs, and a grid tie inverter, plus necessary isolators etc? Would there be any need to even tell the electricity supplier? Is the inverter clever enough to sort out how to share the loads around? (I know a reasonable amount about off grid PV, because I'm currently living off grid on my boat, but I'm a total novice when it comes to grid tied systems).1 point
-
My kit & partitions are spaced to use full sheets then cut out openings. Yes, there is waste but a lot of it can be used in other areas but it’s a better job with no risk of cracking.1 point
-
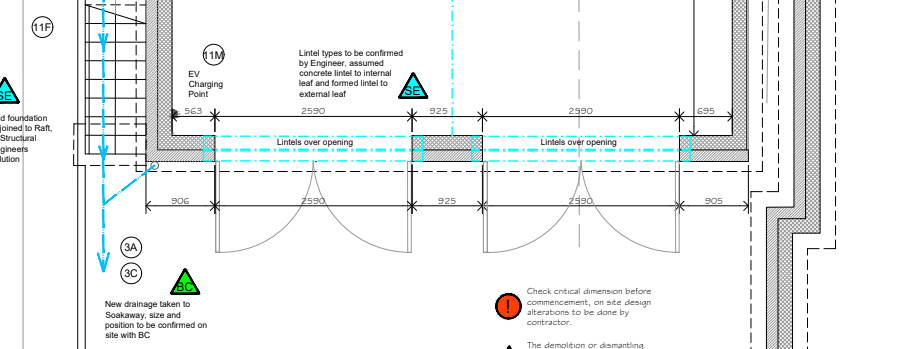
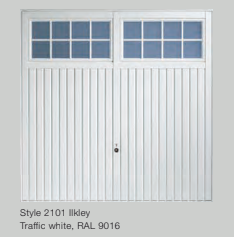
Hi AliG. Apologies - those are the old sizes from the planning application. I should have blanked the numbers out. We're now planning a pair of 8 ft wide / off the shelf doors 2# Hormann 8’0” x 7’0” framed retractables in Ilkley designs with white powder-coat finishes and standard plastic handles: 8ft sound ok ? openings will be 2590mm block to block. Doors will be up an over retractable. I also saw an example where you buy an open frame and add you own woodwork etc. Could be an option. Thanks for pointing that out.
 1 point
 -
A few things to consider If you wish to sell the electric generated the whole install needs to be done by a MCS installer. You pay more, but you can sell the electric for 5 to 10p kWh. Not MCS, means you source everything yourself and just about anyone can install. But ideally the electric hook up would be done by an electrician. Plenty of companies are out there that provide full kits. Batteries, if you are installing 3.6kW array, you can self consume everything you produce, so battery benefit in my view is questionable. Roof integrated requires no tiles below the the solar panels, so saving are made there. Pretty straightforward once you get your head around it. Basically the PV panels connect together, go to a DC isolator into an inverter, to an AC isolation switch and then to your consumer unit. It's never plug and play, so don't let anyone convince you otherwise. But it shouldn't be complex. I am in the process of installing a ground mount array of 3.6kW for a total cost under £2000. I have a combination of new and used parts. This is not a MCS install, if it was it would cost 3 to 4 times more.1 point
-
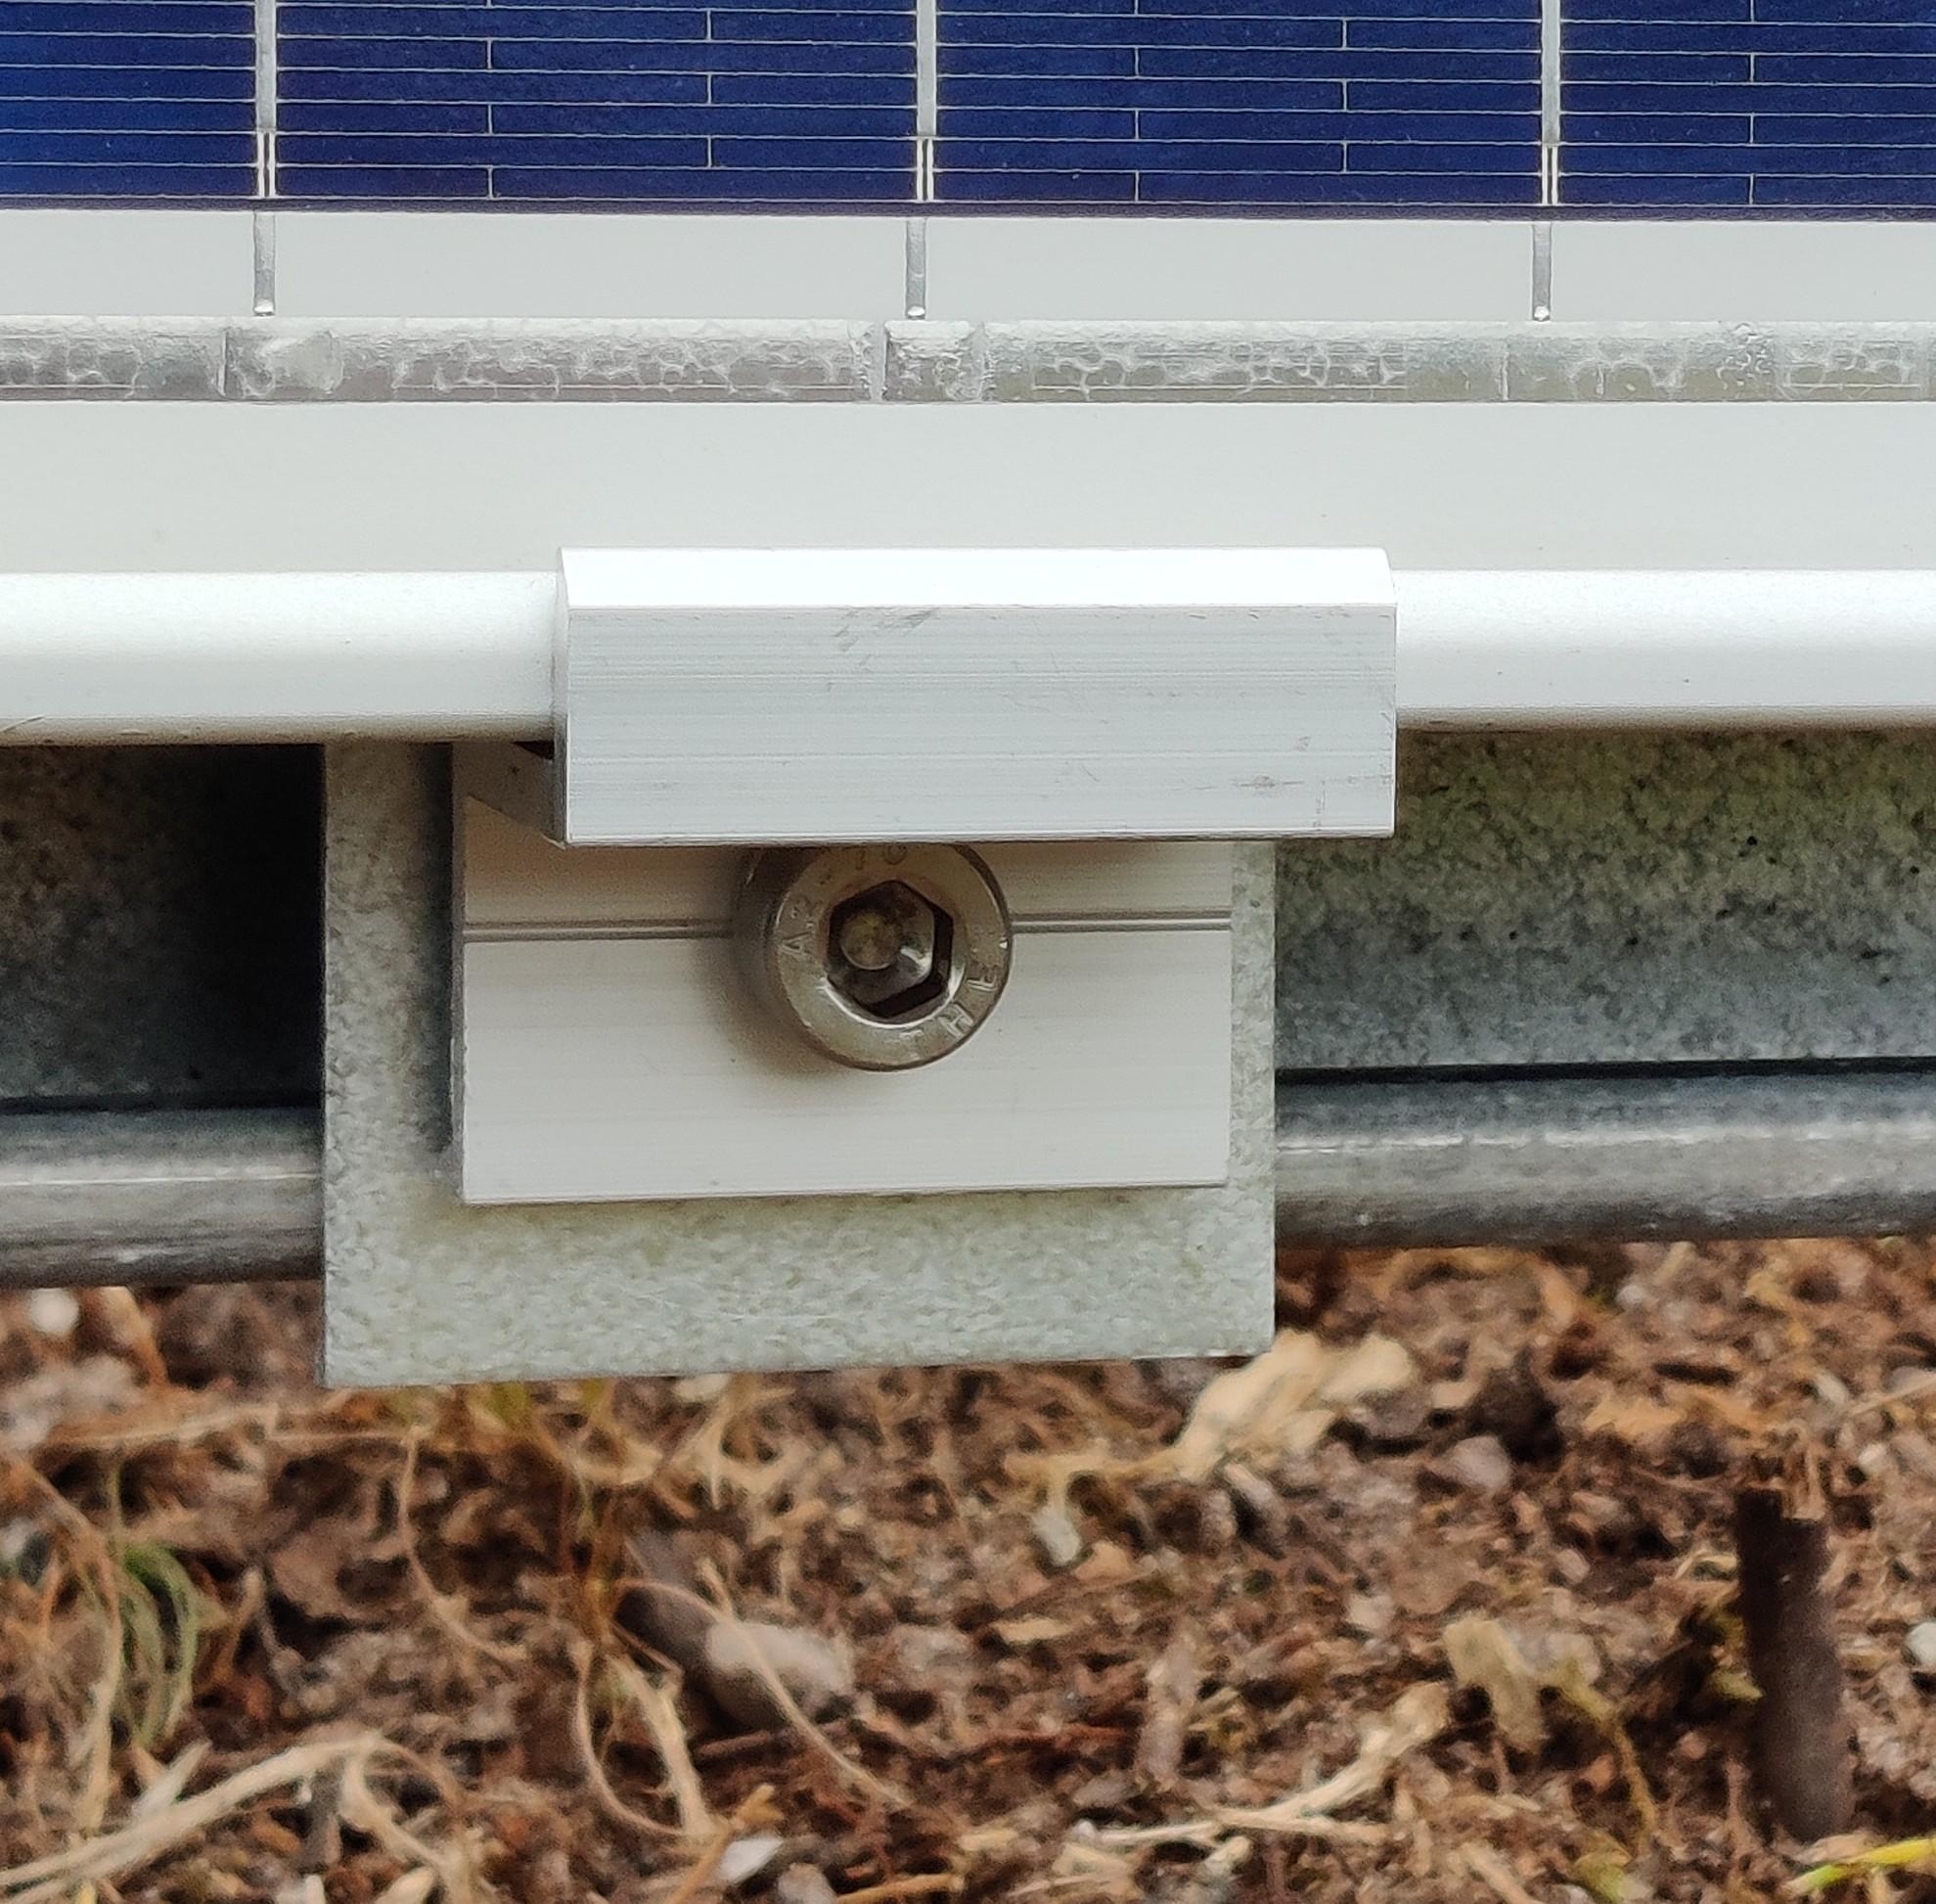
Fixings, basically two bottom fixing to take panel weight and upp centre fixing used. Bottom and centre ends have used end clamps from Amazon, centre I used EPDM washer, and 40mm diameter stainless steel penny washer and M6 bolt. Bottom fixing required an additional 50mm flat washer for the clamp to bear on to.
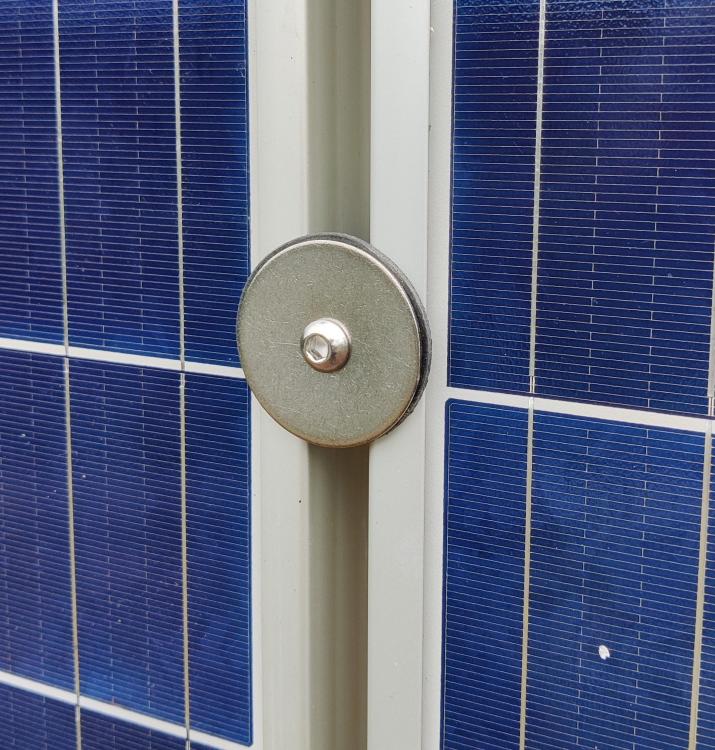
 1 point
 -
https://www.amazon.co.uk/Silverline-427633-Impact-screwdriver-bits/dp/B000LFTU1O/ref=asc_df_B000LFTU1O/ Just twist the right way, then twat it with a mallet.
 1 point
 -
STUNNING VIEWS1 point
-
Forgot to add cost of posts and postcrete. Circa £400. 8 x 2.4m and 8 x 1.8m posts and 24 bags of postcrete. Screws etc are just left overs from other jobs. Unistrut, 42 X 42mm x 6m, 5 off required, M8 spring nuts, £300.1 point
-
Make sense? That depends on your priorities. For us It did (does) because we wanted lots of glass. And we love the noise made by hail and rain. Yes, there's a bit of solar gain, yes it's a bit cooler in winter than optimal. On balance we're very happy with Gaulhofer : this is what it looks like .....
 1 point
 -
openreach rely on google streetmapping (i uncovered this on the call with them) and as it's an unadopted lane google dont come down so they have no visuals of any poles to know what's theirs! hilarious. no records at all from how she described it.1 point