
Leaderboard


Popular Content
Showing content with the highest reputation on 06/05/23 in all areas
-
A busy couple of weeks and favourable weather has seen some progress at The Windy Roost. When in use the word I, or we, I mean Mandy my wife, and me. So far that's the only labour on the build. Mandy has worked office based for 40 years before we moved here, so this is an all new world for her, and although she regularly tells me she's older than me, and she's needs a day off, I can't be more proud... It seems that the engineers really worry about the wind here, which is fair enough, but you would think no house has ever stood the test of time. The 40M perimeter of the house required 288 H10 starter bars, after installing the radon barrier inside the shuttering, I used some 8x2 timber, (that will later be used to frame the gables), and drilled lots of holes and feed the L bars though. These were spaced as per spec and to suit the poly steel blocks. Checking the dimensions, diagonals and rechecking this was all secured in place. The 8x2 timber made pouring the shuttering difficult. I made some pour boxes, but this had limited success, so ended up using the 7 ton 360 & bucket method, a Caithness speciality, and the bonus was the concrete truck driver is also a very skilled 360 operator, which speeded up the pour. I think Stuart now counts as the 3rd bit of labour on the build. Rebar work in progress. 4 cube of concrete and all dimensions still bang on. Next day stripping the 8x2 was to be honest, a pain in the ass. But a few hours later all the shuttering was removed and we were ready to install the radon barrier over the sub slab joining it to the previously installed barrier now under the footing. Sand blinded, and then added 20 ton of 40mm be to dust in preparation for the slab after the foundation block pour. Installing the poly block we loosely set all four corner blocks, leveled them using plastic folding wedges, and measured the lengths, widths, and diagonals. We strung string lines around the blocks to ensure the corner blocks were in line. We sprayed the footing with marker paint, and then marked the blocks in position onto the footing. Then one by one we set the blocks in position and fixed in place with fire rated expanding foam. Checking the level with a laser level and double check with a dumpy level. Next day we filled in between the corners, gluing the blocks in place and ensuring the blocks are straight level, again using the string lines and levels. We cut holes for drains, ducts, and sealed the gaps with foam. The poly steel block are t&g and also come with clips that lock the blocks together. Before we closed the sides we needed to feed in horizontal H10 rebar🙈. We tied the horizontal and starter bars together, and also tried the rebar to the metal grids in the blocks. To close the runs the blocks needed cutting, luckily our cuts didn't cross the metal firings in the block, so it was simply cut with a hot knife. Then glued (foamed) in place. These cuts were braced with 4x1 screwed into the metal firings with bay pole screws. Foundation course in place. Mandy starting to tie the bars, you can also see the clip between two blocks. Concrete day. 3 cube. Concrete pumps don't exist up here, I was quoted 2k to bring one up from Inverness. I fabricated two 1200mm OSB form boxes, which sat between the top of the ICF block and formed a funnel, and used the 360 and Stuart to pour the concrete into the forms. We had two pokers on the go and filled one funnel, and while the bucket was being re filled, vibrated and leveled the concrete, filling the forms alternatively, and moving the empty form along. Mandy was a demon and just got in with it. The whole 3 cube took one hour to place. So paid £15, waiting time and a drink for the 360 operator. It went really well. We cleaned up the top of the forms, then checked the walls. We didn't prop the forms before, and used the rebar to be sure it wasn't going anywhere. Inspection showed there was some movement especially in the areas where a I removed one side of the ICF for door ways. This was easily rectified with some timber wedged and screwed in place. About 15 props in total were required. I was really impressed with the strength and quality of the poly steel blocks, only slight issue is they do have a slight wave along the block, but screwing timber to the metal firings lessons this and over all after the pour the walls are straight. Next slab prep, drainage, and lots of insulation.2 points
-
I’ve done both methods - I think I prefer timber . Metal was ok ; as others have said every piece is dead straight . Always feels a bit rattley . Sometimes I bolt the steel to the wall and then osb it for a ( perceived ) better fixing . Timber more sturdy imho ( appreciate if you install metal all the time you might disagree ). Speed wise ; I’m slow on either ! Also with timber ; off cuts I find a use for . Metal less so . For walls ! - ceilings - metal if you can 👍 ( not a dig at @Thorfun )2 points
-
I'd have said the same in the past but having just built my first metal framed wall I think I'd go the other way. Easy enough to cut with a pair of tin snips, which are cheap & easy to buy. And because they slot into the channel and don't have to be perfectly flush if you do cut it a few mm short it's not a problem whereas wood really needs to be a perfect tight fit. Saved me a lot of time on this one as it's meeting a sloping ceiling. So if you're likely to make (small) mistakes measuring, metal is more forgiving. Not to mention I've found as a DIY builder it can take more effort/stern conversations with merchants to get hold of straight timber and if you don't have joinery experience can be harder to know what's acceptable/how to pull things back into line, which can be completely avoided with metal.2 points
-
@Jenkithe suds manual might be a useful place to start for some detail. I use this for schemes approved by building control. Item Detail (ciria.org)2 points
-
Don't bother installing and get on with life, you will use for the first month and be really happy, then no one will ever use again.2 points
-
First of many ASHP questions. So currently we have DHW set to heat to 42 degrees between 3 and 5 in the morning, this gives us enough hot water for the day. From the smart meter app we generally use between 1.5 and 2.0 kWh and it gets to temperature in around half an hour. The initial thinking was that at this time of day it would not interfere with the heating, but now I have turned the heating off for summer, I was thinking it may be slightly more efficient to run it when the air temperature is higher in the day time ? Thoughts please.1 point
-
This looks useful: https://magic.defra.gov.uk1 point
-
Plenty near us, 12 months later the slates look perfect, the tiles have started to get yellow moss, algea all over them.1 point
-
This is the conclusion we came to as well. And there’s even less of a difference when they’re wet (I used the hose on them as it rains a lot in the UK I thought it was a good test to perform). So we went with the cheaper slate and our roofer was impressed with the quality and uniformity of them.1 point
-
All the local tile companies, Lagan tegal Northstone breedon etc will all have reps who will gladly call round to site with samples for you to look at. I got loads for mine and set them all out on the roof and then stood out on the street and made the choice. You would be surprised how little difference there is when your on the ground looking up. In the end I picked a flat concrete tile.1 point
-
I just quickly amended the link, as I first linked a 3 wire unit and you need a 5 wire unit(s). That link is sound if you want to order these. Cheaper than the PlumbingSuperstore (AKA JTM Plumbing) too!!1 point
-
If you have a cheap overnight tariff then heat at night, if you have solar heat when sun on the panels. Other than that when it's most likely to be warmest.1 point
-
https://www.screwfix.com/p/honeywell-home-v4043h1106-u-2-port-motorised-valve-28mm-28mm-compression/40705?tc=ET2&ds_rl=1249404&gclid=Cj0KCQjwj_ajBhCqARIsAA37s0yvv53xnxJzJUITu9KDNeych3N2aLa6BFjubSNJxYbxeE5-ZmBygvUaAsP7EALw_wcB&gclsrc=aw.ds I think your pipework is 28mm, just check to see if it reduces after the first manifold and goes down to 22mm. If so, adjust to the second ZV being 22mm not 28mm. You can put the both where the 28's T off so all your wiring is local to the first pump / first manifold, eg the second ZV doesn't need to be at the second manifold (so no running of more cables for no reason) Tell your guys about the planned inclusion of the ZV's, as it will provoke a little tweak of the wiring, plus the inclusion of 2x wireless stats (if you want to get them fitted now it would probably be more economical for them to nut this in one sitting vs multiple visits / retrospectively adding them).1 point
-
Yes, for marketing reasons some slates are called Hastings , Ascot etc, but come from Spain or Portugal. Others from the same source have Iberian names Lots of different quality levels which are noticeable up close. Second hand Scottish slates are unwanted when selling and £3 each if buying.1 point
-
No idea . With any HA there probably is a loxone plug in . Personally I go for cheap replaceable stuff . What’s good today will be shite / obsolete / unworkable tomorrow. Personal opinion of course . X10 ? , Sonos ? , Logitech squeezebox ? , msx 🤣1 point
-
Hmmmmmm Now then ! I used a recommend installer on here to setup my manifold with uvc etc . They said no blending required as that would be for different requirements e.g ufh and radiators . That statement will cause blood to boil ! Anyway ! If you stick self regulating actuators on those valves the delta is 7 degrees I believe . I have these . Linked to a simple off the shelf control box then through z wave / zigbee switches . Controlled via HA with multi sensors in each ceiling . Contrary to what people think … SWMBO requires bathroom to be hotter than bedroom . Mistress requires her bedroom to be cooler . So whilst ‘ multi zone pointless - heat it as one ‘ - you can satisfy everyone ; and I’m not just on about the heating 😉1 point
-
Just insist on a 2-port motorised zone valve being fitted to each manifold, as they can be connected to room stats and you can at least turn one off whilst the other still runs etc, but not without zone valves on each manifold.1 point
-
In a nutshell.1 point
-
Nope. That blending set isn’t suitable for flow temps sub 30°C. Do not install that. The one I linked goes accurately down to 20°C.1 point
-
Do you mean Fischer? This is worth a read. Just one of many. https://www.asa.org.uk/rulings/fischer-future-heat-uk-ltd-A19-1033945.html1 point
-
Hello everyone, i am doing a build in my garden and project managing it myself (wish i hadn't but hey ho). My next task is a studwall and i am thinking does this attach to the ceiling rafters. my instinct is yes it must. i just want confirmation so when a this is done i have some idea. Yes i am female never undertaken anything like this before but i am not as green as i am cabbage looking. And i have saved money.1 point
-
i will be using metal for our drop ceiling, just not going for the office grid shaped look is all. 😉1 point
-
Why not keep the standing seam look and move from metal to a mechanical fix welded seam EPDM like Sarnafil? The seams are heat welded on profiles
 1 point
 -
Not quite! Just go buy a box of PB screws and screw one in every 150-180mm and do that along each joist. DIY job tbh, and you'll know it's done correctly then. Then just fill each one and get the decorator to sand back and paint again. May as well just yank off the band-aid and deal with this once.1 point
-
I got a 50mm one a long time ago that twisted 90° in 6m. There was even worse at the bm and the yard man complained we were leaving the rubbish bits behind which nobody would want. His logic was that every delivery is to include some rubbish.1 point
-
Thinnest screed is no screed, just do a floating floor on pre grooved insulation panels. Not suggesting this company but the first one that came up on a search https://ambienteufh.co.uk/product-category/floating-floor/1 point
-
It is worth writing your strategy with references to the suds hierarchy. Makes it easy for the bco, or planners, to accept without passing on to another party. Bottom line....no more water running off site than always has, perhaps less. And spreading it out and delaying it as you propose may even reduce problems downhill. A French drain parallel to the slope is a cheap and easy soakaway, and often the best.1 point
-
We were never consulted on this at all, so I'll talk to them about why they put it in the 'suggested' location. But, I've asked them a few things and don't get any response. I will ring them when I get a chance as maybe my emails are not getting through.1 point
-
Large picture canvases. Can also hide a bit of carpet in the back of them.1 point
-
There were drain back systems that got around the problem, and the opposite freezing problem. As long as your pressurised system can handle the pressure, there should not be a problem, but even a couple of kilos of steam blowing off at 6 bar is potentially deadly.1 point
-
Good point, not something I thought about who would spec this. But, we always thought when looking at the conversion that the treatment plant would be in the East field, but the SE has put it in the North field. My point is more, they did this without discussing with us and I'm not getting any response from them about why they put it there and why they choose the specific model, personal preference, simplicity or a genuine reason. I must also note that they never visited the site before doing these drawings. A different dept had been previously for the contamination / soil survey so I guess they just used those drawings.1 point
-
Just think of the time, money, and effort one could save if scene setting wasn't "life or death"..... Once you live with the (then seemingly rational) constraints of the choices you made during the design and construction phases, you may regret this pursuit and it's price tag. All I hear from adopters of HA is how it has a short lifespan, support and equipment longevity issues (becoming obsolete), and how much it costs when shit breaks, and then breaks again. And again.1 point
-
Okay, maybe not fourteen feet, but certainly more than 12’, including the flue pipe and cowl. The fire box starts at 90cm from the ground (like a kitchen worktop, you want it to be comfortable to cook), the fire box is about 75cm high. That takes you to about 165cm. Then there is the top support for the hood, the hood, the flue and the cowl. It was a thing of beauty.1 point
-
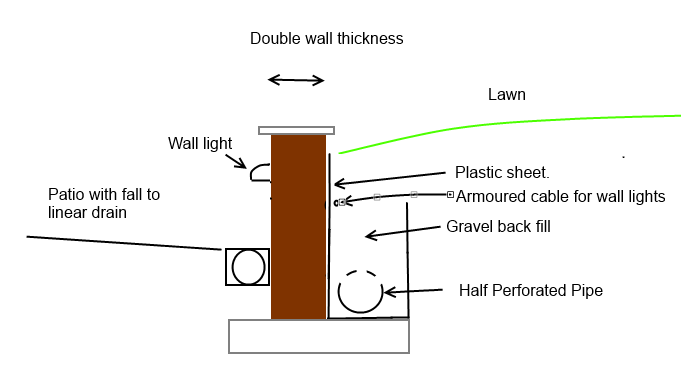
This is roughly what we did. the plastic sheet and french drain on the uphill side seems to keep enough water out of the wall that moss doesn't grow on it. The top of the wall was/is capped with same stone used for patio but some sections have come loose over 15 years. Perhaps no SBR used? The armoured cable for wall lights has potted junction boxes one per light. The Paving Expert web site is also good for all things related. They have a slightly more robust design.. https://www.pavingexpert.com/featur03#retain Perhaps bookmark their site index. https://www.pavingexpert.com/pavindex
 1 point
 -
Welcome We are in Fulwood Preston Doing our second self build at Woodplumbton1 point
-
Welcome and good luck with your project, not me personally but plenty of great minds on the website to answer your questions.1 point
-
Beam are based in Belfast, they sell Titon MVHR units rebadged, at less cost than direct from Titon, worth asking them.1 point
-
Mostly block But there are a couple that make up two of the bathrooms The one we are building has just a couple of studs which I’ll do in timber As they are specified for racking and will need cladding with ply on both side Anything else Drop ceilings etc Will be MF Ask me if I’m Parge coating 😂1 point
-
No idea, worth a question - I just designed and installed myself. Pretty simple once you get your head around the requirements. I used 90mm semi flexible duct and a combination of normal terminals and Coanda effect supply terminals to keep duct length as short as possible.1 point
-
There's a few potential gotchas to this approach. - many of those mini drivers are constant current, not constant voltage, and Loxone don't make any native CC drivers - wiring multiple fittings on CC drivers means series wiring and higher voltage driver which is not hard but can trip up the design - using a different driver typically invalidates warranty on the light fitting (not that they can prove it but still) - running low voltage working makes the house electrics non standard and potentially much harder to maintain for someone else in future as they need to match fittings to drivers on a given circuit If you're happy with these limitations, then the overall approach can work very well and much more efficient and higher quality dimming than mains phase cut dimming, which really is a kludge technically speaking1 point
-
+1 and is what I was getting at when I said do all the lights need dimming! the other great thing about centralised lighting automation is you don't have to have everything dimming on day 1! live with the lighting for a bit and if you feel that something is missing or needs dimming then you can just add that circuit to the dimmer module and suddenly you have dimming where you didn't before. 🙂1 point
-
?? Why doesnt that help? You either want to stay within the law or not regardless of what others are doing. ENA database is easy enough to search for compliant kit1 point
-
You need to look at this in the correct order!! First off, if you want to have the potential to export all you can generate then you need to speak to your DNO and likely put in a G99 application. No point in looking at inverters until you know what capacity is allowable. Secondly, look on the ENA inverter type approved database and make sure anything you shortlist is on the database. If its not then you can't legitimately connect it to the grid. Then start looking at the specifics you want1 point
-
But I wouldn't. Amateur builders like me make lots of mistakes in cutting, and wood is very forgiving (and an extra piece is easy to find). Also, normal domestic tools suffice. Metal has advantages, but with professional builders.1 point
-
yes, a length of 4x2 on floor and another on the roof, you may need noggins in between the rafters to take it.1 point
-
This is what I did on a bigger outbuilding with tiled roof. How much is necessary I don't know.. Install duct for electricity. I used rebar hammered into ground and cable ties to hold duct in position. Level ground and compact with wacker plate. Add hardcore and compact in two layers. Add 25mm sand blind and compact. Add shuttering and plastic sheet to stop concrete losing water before it sets up. Pour concrete and level with top of shuttering. Push heads of long bolts into the concrete to later bolt building down. I used threaded rod and nuts. Support while concrete sets if necessary. Put lengths of pipe over bolts to stop you being impaled if you trip over.1 point
-
300mm reinforced concrete slab... for a BBQ? Seriously? First, the slab is too thick, not needed. Secondly, if you build the slab properly, the slab will be a raft found, the BBQ will move with the slab, therefore the tree/BBQ should be OK, as the tree does its thing it may move the slab a bit, but it will move the slab and BBQ construction as one. I think for this I would be happy with a 100mm slab, A252 or A393 mesh set centrally with 50mm cover top and bottom obviously, and 50mm cover at all edges or you risk it rusting and popping and a C20 concrete. You could stick in another 25-50mm if you want, but 300mm is madness.1 point
-
We found a local guy, who was about half of the quote builder came through with. Fortunately in very quick succession we confirmed the quote, found slots in his diary and IN THEORY it's only a 1 week delay by the time he installs come 3rd December. Just good fortunate I got quotes a couple of months ago as a precautionary plan B!!! Still a chunk of £2500 materials more then we intended, but a lot less then builder quotes via CEF. Im on my 2nd g&t this evening... Damage recovery mode continues....1 point
-
Just a small note: even if your inverter were on phase A and your house consumption on phase B you'd still get the financial benefit of self-consuming any PV generated at the time yuor appliances are in use, due to "polyphase net metering" implemented in 3 phase smart meters. You would of course need a 3ph meter to achieve that! But what you have now is perfectly sensible use of a 3ph supply head too. Just slap a single phase meter on it and sit comfortable knowing you have more options in the future should you require it.1 point
-
I previously asked bpc about cleaning ducts and was told this was not longer needed with the antibacterial internal coating that is in their red pipes1 point


This leaderboard is set to London/GMT+01:00