Leaderboard


Popular Content
Showing content with the highest reputation on 06/04/23 in all areas
-
This looks useful: https://magic.defra.gov.uk2 points
-
We used Durisol, would use again. 365mm will give you a wall with a U value of 0.14, but only if you include a service void, if the plaster direct the U valve falls slightly. Do not get a normal builder to build with Durisol there is a high probability he/she will balls it up, the corners especially. You can screw things directly to Durisol (with the right screws) such as service battens. A service void make plumbing and electrics easy, otherwise you have to recess them. Durisol is very abrasive, so will wear cutting tools quickly. You have to read and follow the build manual, once you start pouring the concrete there is no second chances. Concrete used as like water when it goes in, you cannot use vibrating tools to help compact, hence the water like consistency, the water open nature of the Durisol structure allows the concrete to naturally dewater. You will need to factor in several concrete pours and possibly cement pump hires as you fill with concrete every 6 layers (1.5m or so). Have the architect design the flow of the building around the size of the blocks (corner to corner length, corner to window opening etc) and don't have too many corners (unlike our house). Airtightness - Durisol is not airtight or water tight - advantage and disadvantage. You have to know where your airtightness layer will be and it has to be continuous, so something to think about. Mine was inside so a could make the roof structure airtight inside also. So I parge coated the inside, but you also need to seal the floor the wall junction and roof to wall junction and around window/door returns. My parge coat was a concrete/lime mix and wall remains breathable. Some food for thought2 points
-
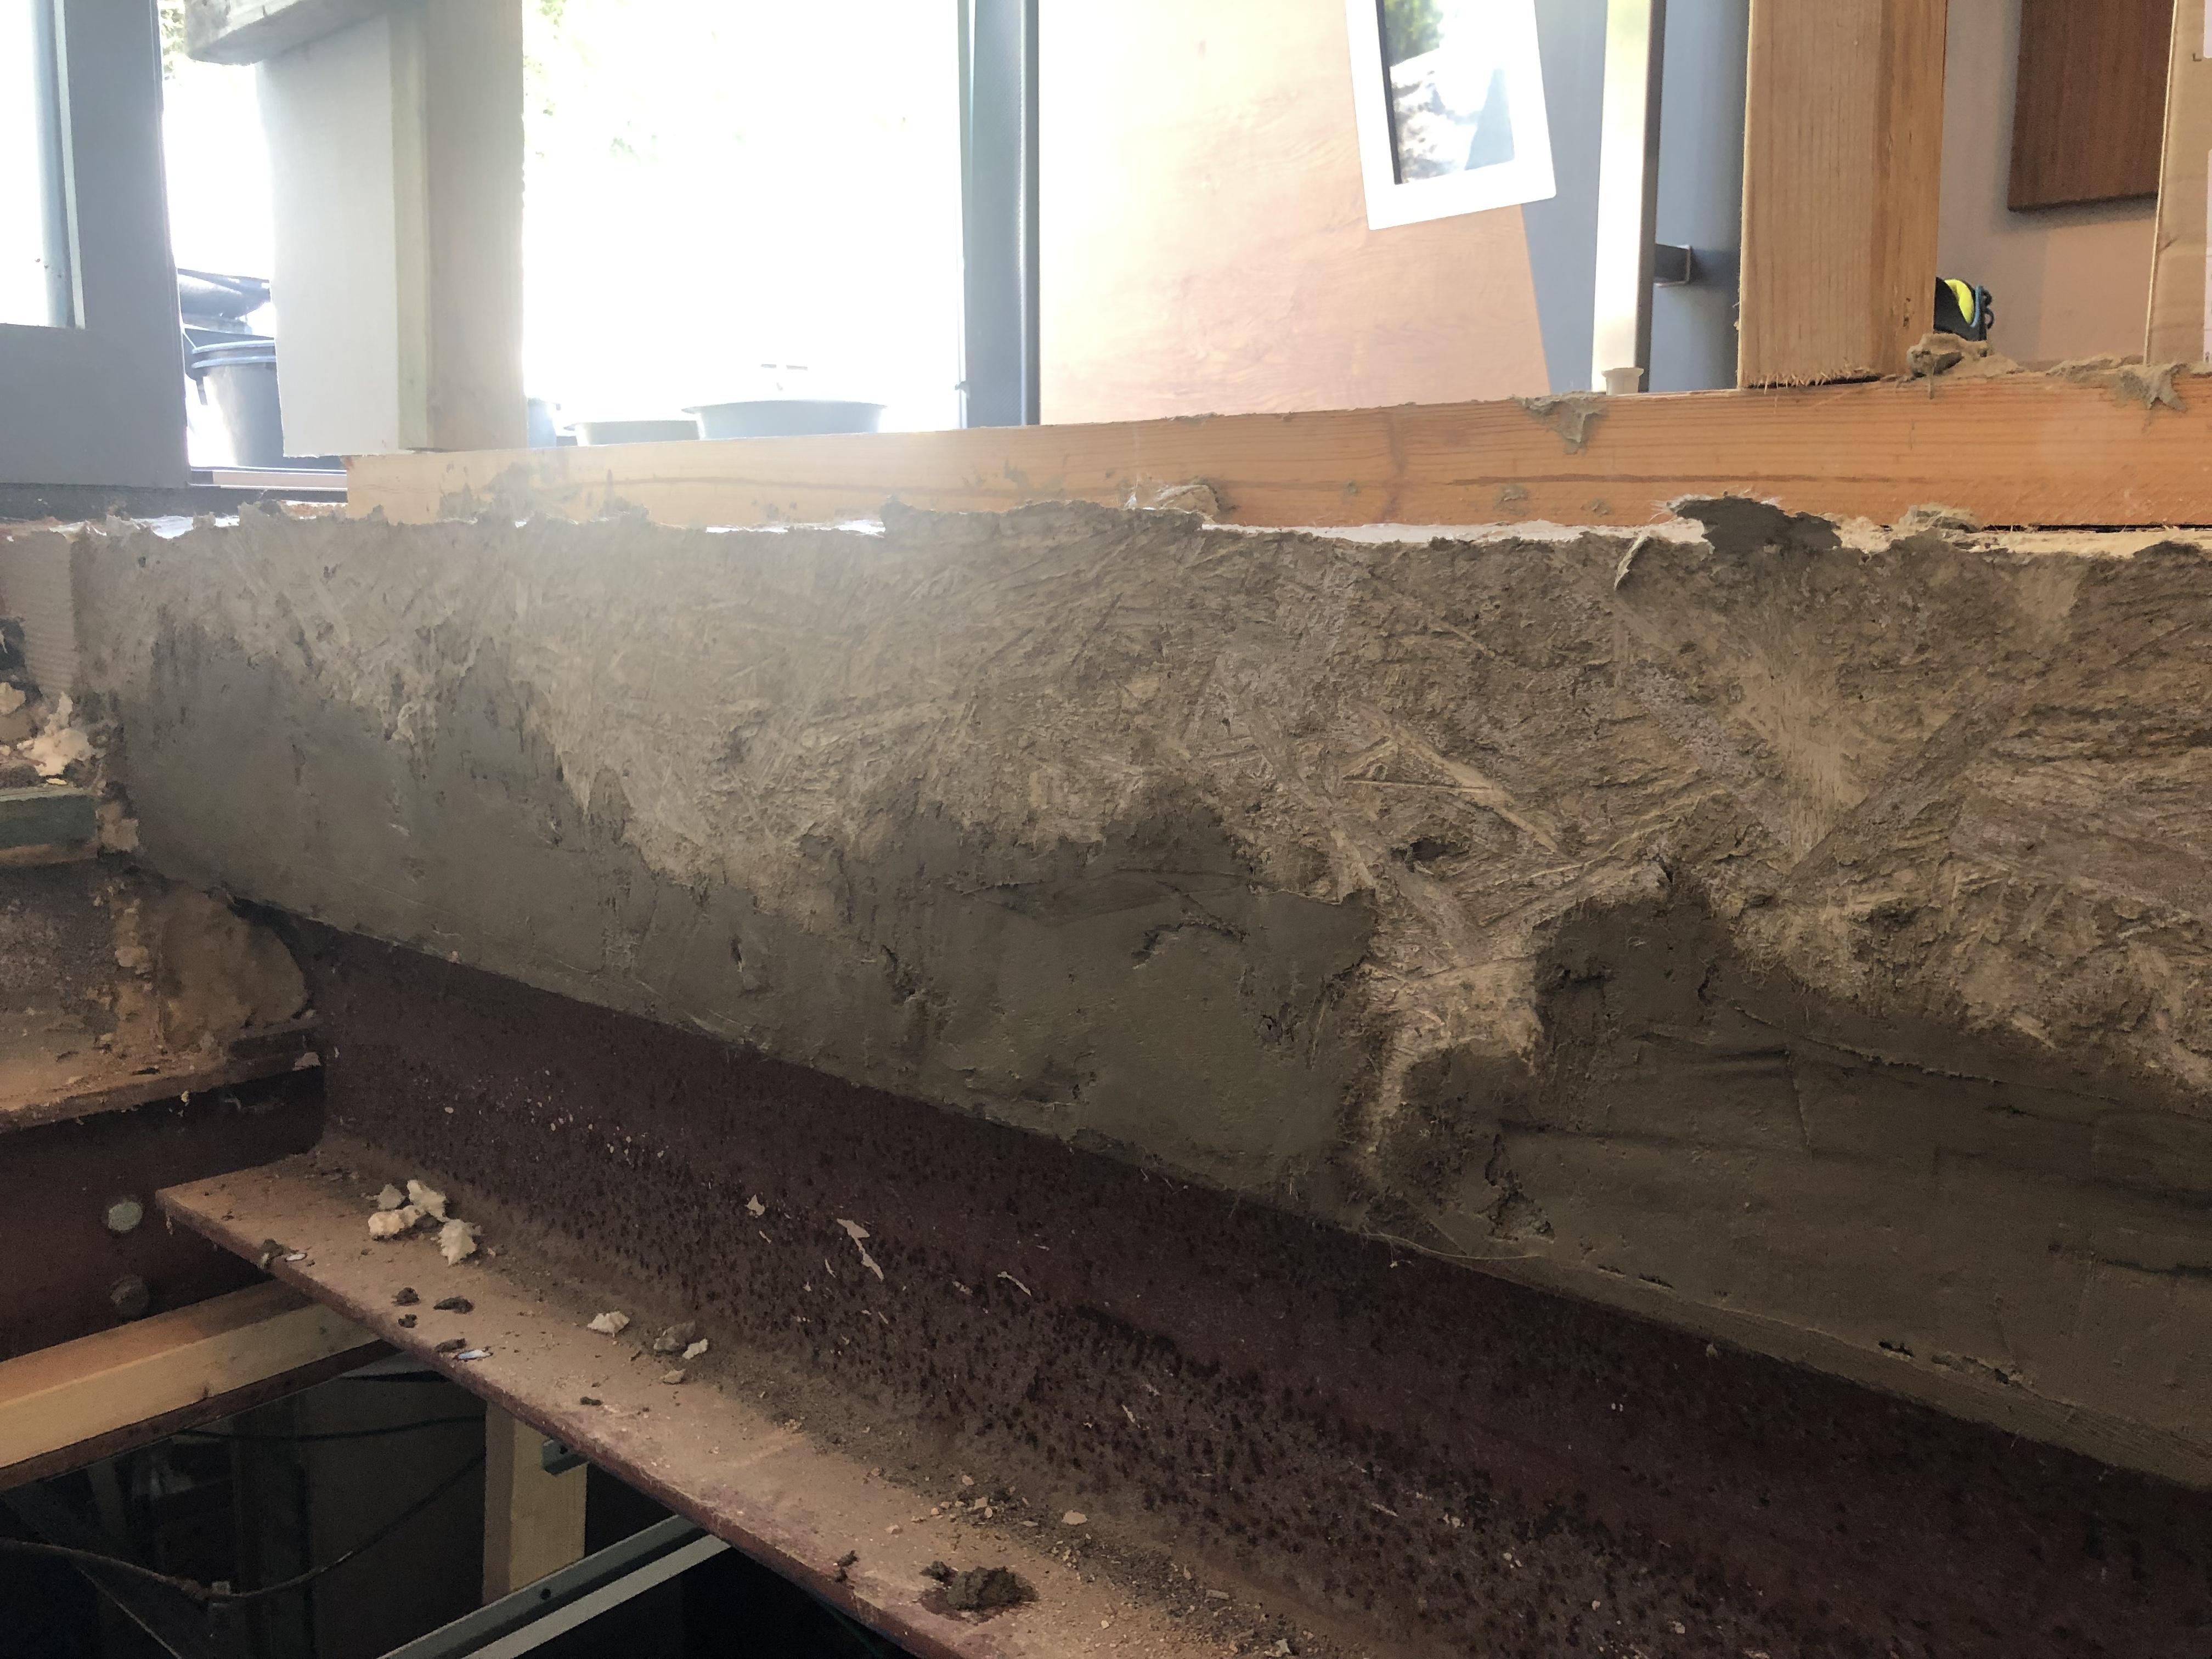
Brushed sbr on the exposed gaps . Chucked a bit in the cement mix , also added some fibres . Looks fine - no chance of slumping . Doesn’t need to be perfect . This area is where the staircase apron will fit and associated balustrade
 2 points
 -
Welcome. Good advice above. When using ufh there are other advantages: warm feet make us feel good, so the air temperature ( air heated from the floor) can be lower than the norm (tell people it is 20°t though.) So the air isn't so warm and there is energy less wastage when doors are opened. I don't agree about the single zone, as some rooms can be cooler. As @ProDave says, upstairs bedrooms may not need heating at all. As all your space heating is from the floor, this needs lots of insulation, not forgetting horizontally to the outer walls. No carpets, or get special ones that let heat through. Ceramic tiles are best. Because of the CoP, the rating of the air source heat pump (ASHP) is the output, and the electric supply is 1/4 or 1/5 of that, hence a normal mains supply is enough. Structure....what would you like? Then it can be made to work. I could never get ICF to work out commercially, but many swear by them and I can see the attraction for DIY.2 points
-
Pretty sure the volumes moved by MVHR aren’t any way near enough to redistribute heat in the way you are hoping.2 points
-
As many on this hub are aware DIY self-build is a slow and sometimes lonely process, particularly when you are a novice. HID knows how to build, but he's never had to make the plans or decisions previously, he's just been told - dig that trench, lay that foundation etc. etc. So, we are finding having to explore in depth every step is time consuming and pretty tricky and there is no one place with all the details. We don't know what we are looking for - how do you know what to look for when you don't know what you don't know. I'm an avid reader and have read dozens of building books / magazines / articles etc. etc. But, they all assume that you are just looking for interest and that you are just going to hand over to 'an expert' This includes the architect, SE, BC In the last month it's been; How to lay DPM for level thresh-hold doors. How do level thresh-hold doors work How do you leave the cavity under DPM, full or empty Then there are the cavity closers, closer clips, cavity trays, level thresh-hold drains. And, other things that I can't even think about at the moment. But, all that aside we are progressing Trench filled First layer of foundation blocks 2nd layer of foundation well underway with the brick level lower to allow for the level thresh-hold doors DPM put down , with blocks on to stop it blowing away as it doesn't stick to the mortar, another thing I didn't know that it's just held down by the wall above. This one also doesn't show the 2nd membrane for the inside which is now there and rolled up. Two of the temp door frames in situ, built from old wood from the barn and last for now, the start of the internal wall, the right hand end carries on to join another wall which needs underpinning and a padstone, hence just keep out the way for now. Next steps are more frames as 4 doorways along this wall, Carry on building the internal wall up to lintel height Then insulation as the external wall goes up. And the cavity closers of course and lintels. This wall (wall A) has been very straightforward as it never existed, it was the open side of the barn, there are also no drains here, just 4 doors. This carries on around the corner (wall B1) which is also new, but that then comes to wall B2 which already exists and needs underpinning. Progress should be quicker now, until we find out what we have forgotten and we get to the existing walls.1 point
-
Plasterboarded and taped, not plastered. Didn't insulate in the 50mm void, would if I did it again. All our ceilings are vaulted and insulated between and under rafters. Basically 350mm of spray foam. AVCL, batten service void and plasterboard.1 point
-
like this. https://www.toolstation.com/galvanised-cover-frame-24-x-18/p94026?utm_source=googleshopping&utm_medium=feed&utm_campaign=googleshoppingfeed&mkwid=_dc&pcrid=&pkw=&pmt=&gclid=Cj0KCQjw7PCjBhDwARIsANo7Cgm522m2PwNr16AiI-aV6V-d7ILWmmZSDaLjt0YJQETs2kdpoD0sZIoaAtGQEALw_wcB&gclsrc=aw.ds1 point
-
Most houses are single phase so ask for a single phase quote 18 kVA thats approx 80 amps single phase.1 point
-
Not sure what you are disagreeing with Dave like to disagree on most things. You want 200lt of hot water at 40⁰C, you will be told that you are wrong and need 500lt at 60⁰C. You want a small car that does 70 MPG, you will be told that they don't exist. Post up some data, you will be told it is lala land statistics. Ask to see his data, or calculations, you get no response, because there isn't any.1 point
-
Open up microwave and twist off sounder from circuit board/ desolder.1 point
-
Glad you asked. SE is a specialised branch of being a Civil Engineer. So they may actually be CE but few know what that is. How often do we see ," ask your CE" in these pages? The SE has probably done a degree in Civil Engineering, then chosen to veer towards structures. Many practices do all CE fields including structural. So a CE can do structures and drainage, and roads and bridges and dams, but tends to let an SE do serious structural stuff, esp if complex. Therefore there is no concern.1 point
-
Agreed. We will work through it1 point
-
Just thought you need complete sections of wall, so the concrete doesn't just come out of an open end.1 point
-
Yes it funny to watch, grey slug goes in the top, clear water out the bottom. The structure of the blocks and the resulting concrete shape, is like a lattice structure, not a solid chuck of concrete like polystyrene ICF. Don't see any reason not too. We had had some very small sections of wall between doors and corners so these were filled by buckets, so as not to move anything with the pressure of a cement pump.1 point
-
Yes, but... The same effects can be created with different compilations of lights, rather than the same lights at different intensity levels. I've only used dimmers where I have a single group of lights in a room, ie. Bedrooms. Other rooms that have, say, main ceiling lights, some wall lights, LED strip and a 5A lamp or two can be combined in numerous different scenes to provide different lighting levels.1 point
-
Interesting. The water drains away but without taking cement with it, ie the blocks act like a filter? That could still leave more water in the mix than the theoretical optimum, but perhaps that doesn't matter as it is filling voids, not the entire structure. Entirely for my curiosity, could you theoretically be laying blocks, with another person mixing concrete on site and following behind? None of the excitement of whether it will hold when the big pour goes in.1 point
-
I think this will be more of a building control question rather than planning. There are rules about how close to a building the treatment plant can be, from memory more than 15m. I think planning is only concerned with demonstrating a viable scheme, so once that is achieved, any alternative location would work. Any scheme would need to be approved by your building control officer, so I would start there. I’m pretty sure you could substitute for any alternative treatment plant. A lot of people dislike the bio disc units because of the moving parts and greater mechanical complexity.1 point
-
Not that was specified by Durisol or structural engineer. I was was pouring in December so plenty cold enough.1 point
-
Does it need a curing retarder in the mix?1 point
-
No plasticiser, less than 10mm (I think) aggregate, very high slump. The water basically drains away. We had 2 deliveries of concrete, plus a batch mixer for about 4 hours (for a part fill of Durisol by bucket and several other concreting jobs around site) and 2 hires of cement pump.1 point
-
9kW heat pump will probably consume 3 or 4kW of electricity. 7kW charger That would all run from my 12kW supply allowing for diversity, ASHP mostly used in daytime, charger mostly used overnight. Especially if you are not even using the charger. To be asking for a 100kW supply for that is madness. A typical domestic supply is about 20 kW. You need to get to speak to someone. When I was enquiring they offered me the 12kW supply at a cheap price, I think they offered that, hoping I would say no, I need more in which case I would then be helping to fund a network upgrade somewhere. But my supply has been entirely adequate.1 point
-
I like the idea of Durisol over the other ICF systems because render and stone slips can be applied directly to the surface on the outside saving time and money ( those who I have seen that have used it have liked it a lot) also again internally there is no need to plasterboard the surface it can wet plastered straight to the surface . Again saving time and materials1 point
-
CoP or coefficient of performance. Is basically how many units of heat you get, for how many units of electricity you supply. So a CoP of 3 is one unit of electricity and 3 units of heat. The lower the difference between outside air temp and the water heating temp the better the CoP. So heating water to to 25 degs yields a better CoP than heating to 50 degs.1 point
-
They do mains dimmers too. Buy 2x of these (16 chan) http://www.whitewing.co.uk/acdim.html1 point
-
heat pump - not decided yet but it will have to support cooling out of the box. Wont be MCS scam install either. control/flow/valves will leave to the plumber. Your missing a trick on solar. It's cheap and has immediate payback. 75mm cavity (0.6 is a typo I would guess?) may just scrape past regs but its very very poor U value even using expensive insulation. Insulated plasterboard as well unless you can make the cav wider. for showers im allowing 5 simultaneous @ 19L/min and the washing machine, dishwasher etc. basically worst case. accumulator to maintain flow and starting of with 2 x 300L with space for 2 more. see how we get on. I'll keep adding them until running out of hot isn't an issue. Poverty mode for hot water isnt an option.1 point
-
https://www.varmepumpsforum.com/vpforum/index.php?action=dlattach;ts=1505933467;topic=65119.0;attach=49952 link to the file in question https://www.varmepumpsforum.com/vpforum/index.php?topic=65119.msg690076#msg690076 link to the post1 point
-
Hello, stranger! Yes, as with everything the government are involved with, a complete cake & arse party. Forget it. Better option would be to chase any grant for fabric improvements like insulation (cavity & EWI) and 3G. How infinite is your supply of properly seasoned (20% or less) wood?1 point
-
OAT are just the output kW at different outside temperatures. SCoP is just taken as a function of flow temperature. It does not take account if WC, just the flow temp stated. Biggest thing is get an ASHP good SCoP at the flow temp nearest what you expect to flow. Then the biggest change after that, is the install. Things like small buffers piped as a 4 pipe, will kill CoP anyway.1 point
-
My Adroit DV96 from Airflow is actually a Finnish built unit, and I cannot say I have masses of experience but I had a Nuaire previously and found it pretty basic / parts super expensive, hence I replaced it. I control the unit from my phone using their cloud services, its super comprehensive, with detailed data. I really love it!1 point
-
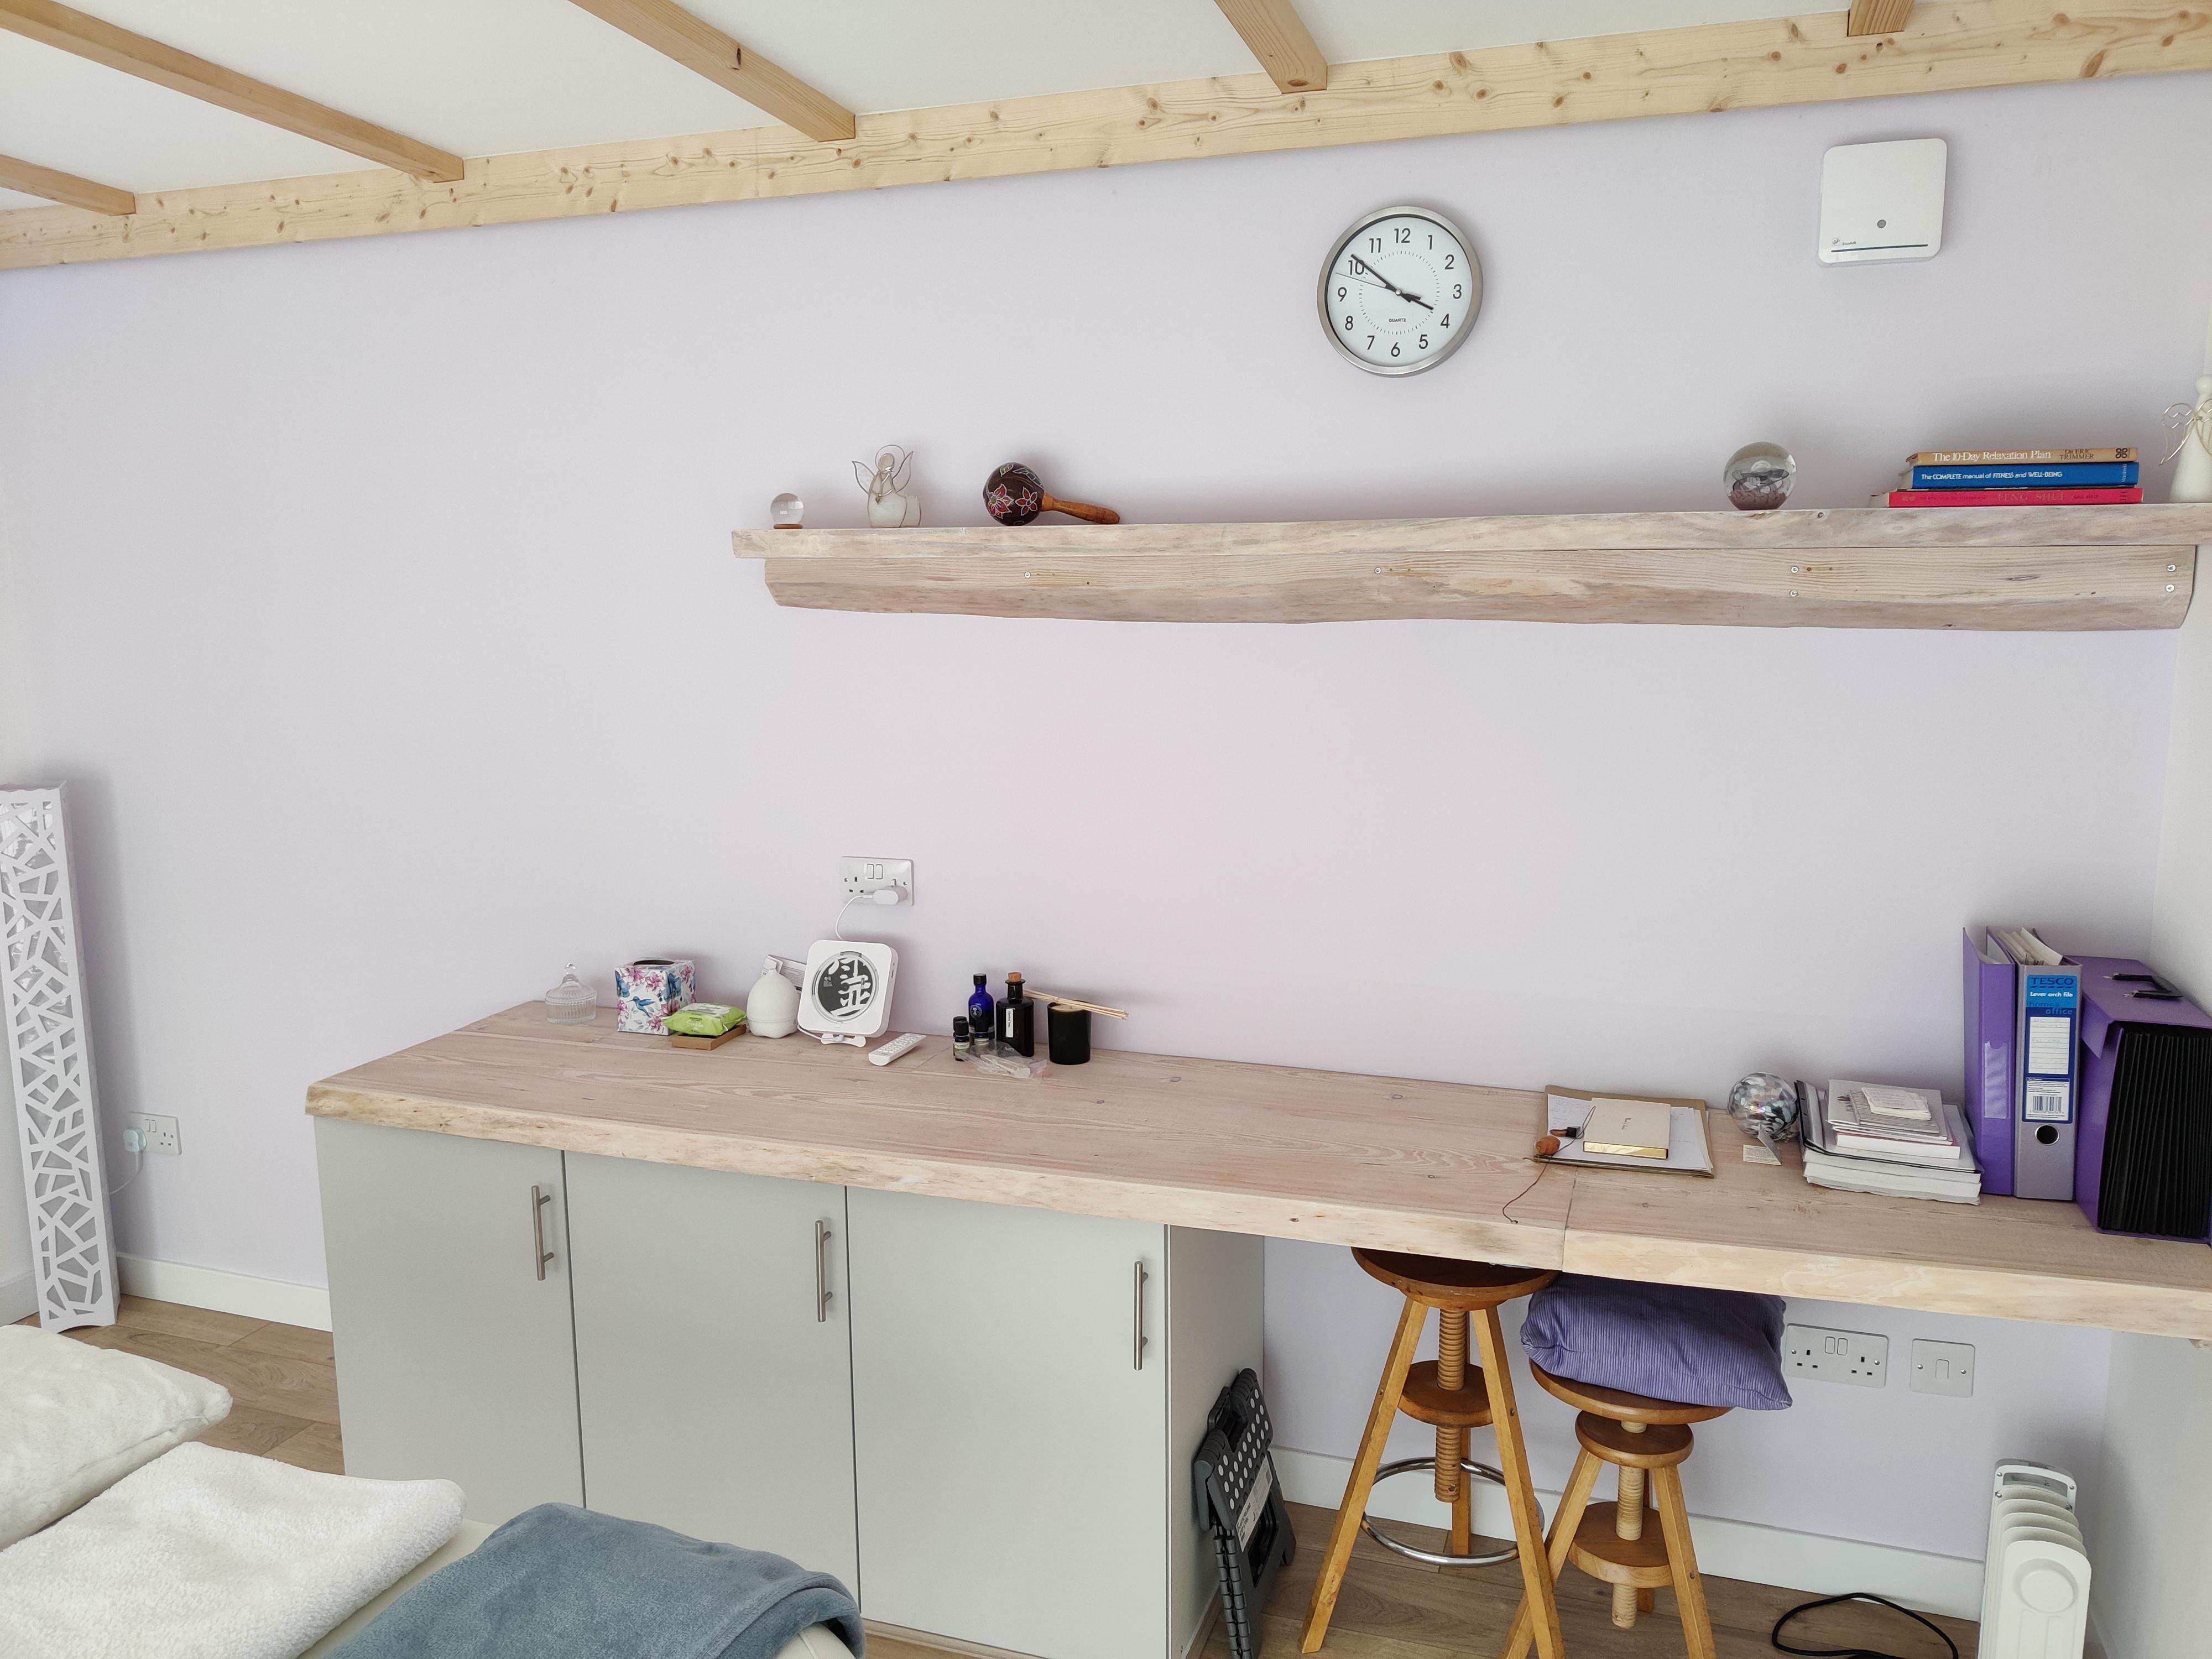
Work surface which is 3.5m long and the shelf are made from a tree we took down (Scottish larch) and we had it cut into planks. Work surface is made from 4 pieces cut, biscuit jointed and glued. Both the bench and shelf were then lime waxed. The units are Howden kitchen cupboards, instead of using the plastic feet and kickboard, I just made a 20mm plinth for the units to sit on.
 1 point
 -
If you are installing MVHR just keep it simple. Push buttons for boost in wet rooms. Set the flow rates per building regs, until sign off, then reduce based on number of people in house. 90mm semi rigid, to easy to install, minimum number of runs and quite. Titon HRV, are good, made in UK with good technical and spares support. I had an issue and they were great. No call centres or people who have never seen a unit, trying to talk through a problem, like most companies these days.1 point
-
If you have a cavity tray,you can take the corner bricks out,leave the odd brick out along each run (say every couple of metres) and rod any mortar droppings with a length of batten from each end. Best to do it before it sets though-if you need to get vigorous you risk damaging the tray. Or (my preferred option) use full fill cavity batts & everyone’s a winner 😀1 point
-
I went thermally broken because, if I recall correctly, it makes as big a difference as upgrading from double to triple glazing but significantly less extra cost. I went with Keystone which need cavity trays either way. I believe some Catnic lintels don't need cavity trays. Also, I heard windows under eaves often don't get fitted with cavity trays. I have cavity trays all round. It's also worth remembering how much harder the inner leaf part works than the outer. The outer leaf may only be carrying a small triangle of bricks whereas the inner leaf could have to support floor loads or roof loads.1 point
-
This sounds like a lot. I have had a quote @ £7k All in but its for a branched system using Regavent and their own unit. I wont be using these people though, because A: If you see inside their unit it looks like total rubbish . B: They appear to insist on a branched system. C Having seen a partial install of theirs the ducting is held together with gaffer tape and untrimmed cable ties. So, i used the £7k figure, and costed a Brink 400, 90mm ducting and all the fittings @ approximately £5k. Which leave me £2k to install it myself and get some help in to finalise and commission/ get it signed off properly. Wish me luck1 point
-
CVC Systems for me, every time. Brink Flair units plus the 'new' Air Comfort ( AHU for tempering ) work brilliantly and extremely quietly for my clients. I'm not a fan of large bore series run ( branched ) systems, due to cross-talk and the sheer size of the ducting. VERY unaccommodating to get the rough the fabric of a build. The radial 92mm ductwork is a doddle by comparison, eg to get through joist voids / confined spaces etc.1 point
-
Insulation boards in a cavity wall are bad news. The theoretical perform is almost impossible to achieve. Mortar droppings will get on the joints of the boards. Wall ties will not line up properly the boards will not sit flat against the inner leaf due to the nature of blockwork. All these gaps mean that on a windy day the wind will blow freely through the gaps. Your insulation is then doing little more than it would if it was thrown in the garden. Thermal bypass/thermal looping are some names for it. The only realistic procedure I can see for board in a wall is to build the inner leaf first. Use properly aged boards that won't shrink. Foam and fix boards individually to the inner leaf as per an EWI job. Ensuring all the gaps around wall ties and between boards are filled with a good age proof expanding foam trim back the excess and tape with foil backed tape to cover every gap. You'll need to tape the edges of the board's too if you're using foil faced boards like PIR or pheonlic (kingspan) to prevent gas migration or the performance of the board will decrease with time. Your bricklayer will hit you on the head with a breeze block of you ask him to do all this. Insulation manufacturers are shysters and snake oil salesmen. Before you buy the kooltherm consider that it is 3 times the price (pre install) of EPS beads for the same U value installed and will perform worse in real life. The last few 0.01 W/m2K of a wall U value makes almost no difference anyway compared to airtightness and ventilation losses. EPS beads/mineral wool batts, real world U value of 0.21 and forget the boards is my advice. Medium density blocks internally, wet plaster and you'll have a very cheap and high performing wall.1 point
-
@JanetE, I have a file of notes taken from EB and BH, so I copy the relevant stuff here (from @JSHarris I think...) First the basics. There are separate HMRC forms for receipts where the VAT is broken out as a separate figure and where VAT is just included in the total price. HMRC will accept spreadsheets that look like these forms, and have told me that they are happy if there is an extra serial number column at the left. I'll post copies of the blank spreadsheet versions we used later, once I've cleared all the data out. HMRC need the receipts to be ordered in the same sequence as they are entered on the form, which is where the additional column is useful, as you can pencil a serial number on the top right of each receipt to more easily keep them in sequence. I found that we had loads of till receipts, rather than A4 printed receipts, and there are two main issues with these. The first is that they are heat and light sensitive, so keep them somewhere cool and dark or else they will fade. The second is that they are a pain to try and keep in order, so staple each one to the centre of a sheet of blank A4 paper. This then allows the serial number to be pencilled in the top right corner, makes them a LOT easier to handle and allows you somewhere to write notes regarding ineligible items and then write the calculated VAT or total price figure down. The latter is important. You need to go through every single receipt and check that there are no tools or other ineligible reclaim items on it, and if there are you need to mark them, recalculate either the VAT (for a receipt where VAT is given separately, or recalculate the total price (for a receipt where VAT is only included in the total price). The receipts need to be in date order and must contain evidence that you are the purchaser (so your name has to be on it, and for a till receipt this may well just be the name on the card used - so take care to use a card with your name on it). The receipts also have to have the sellers name and their VAT number. You cannot reclaim VAT from a non-VAT registered seller, or if the receipt doesn't have the VAT number on it. This latter point is a pain, as I've found several online sellers who fail to put their VAT number on the emailed receipt. In each case I've had to contact them for evidence of their VAT number, but things would have been a lot simpler had every original emailed receipt had the VAT number on it to start with. If I were doing this again, then I'd start by keeping better control of the receipts from the moment I received them. In the case of emailed or web page receipts, printed off, then I'd have checked straight away if they had all the correct information on (my name, suppliers name, VAT number, date, etc) and asked the suppliers to correct any that weren't in order. I'd also have started stapling till receipts to sheets of paper to better be able to file them and keep them from getting faded, torn etc. On some of these I'd have made pencilled notes on the attached paper that better described the items. B&Q, in particular, use a very abbreviated description on their receipts which makes it challenging to work out what the items are. Finally, I bought a lot of stuff via Ebay, at a good price, but virtually none of it has an eligible receipt. Many of the sellers are probably not VAT registered, but even those that are very rarely give a receipt with their proper company name and VAT number on, so unless you are saving more than 20% by buying on Ebay items may well not be the bargain they seem.1 point
-
nope.0 points
-
0 points