
Leaderboard


Popular Content
Showing content with the highest reputation on 03/28/22 in all areas
-
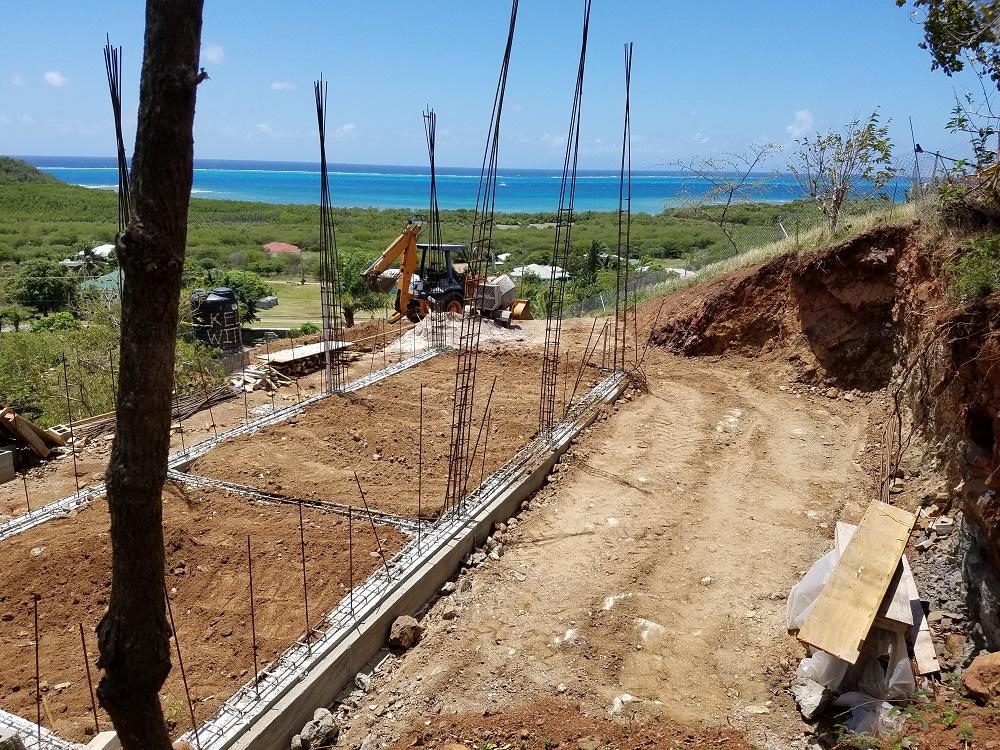
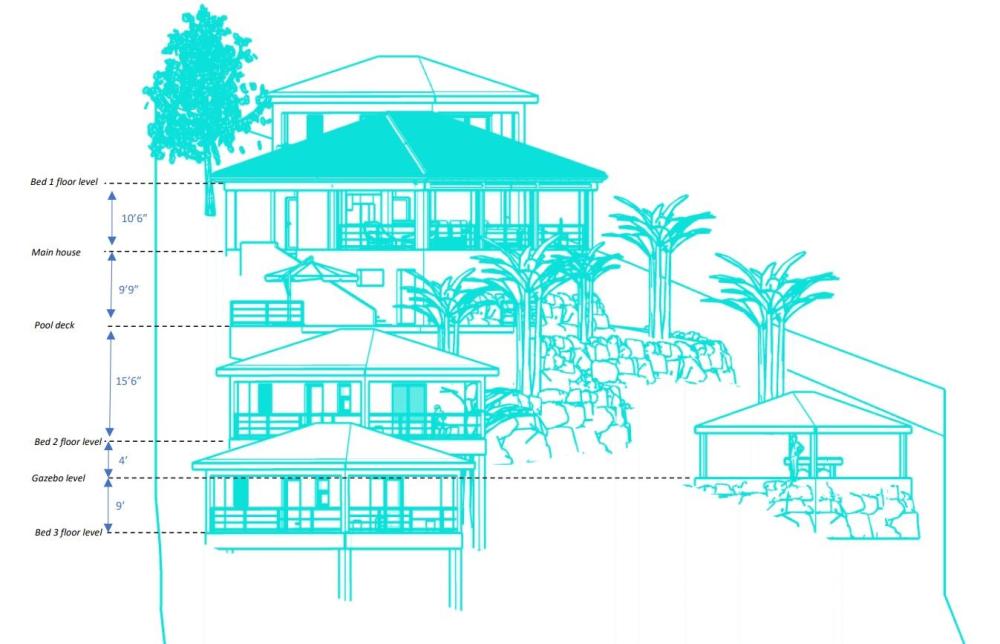
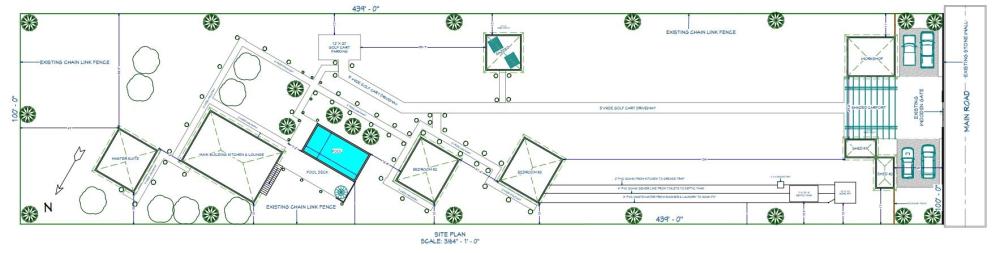
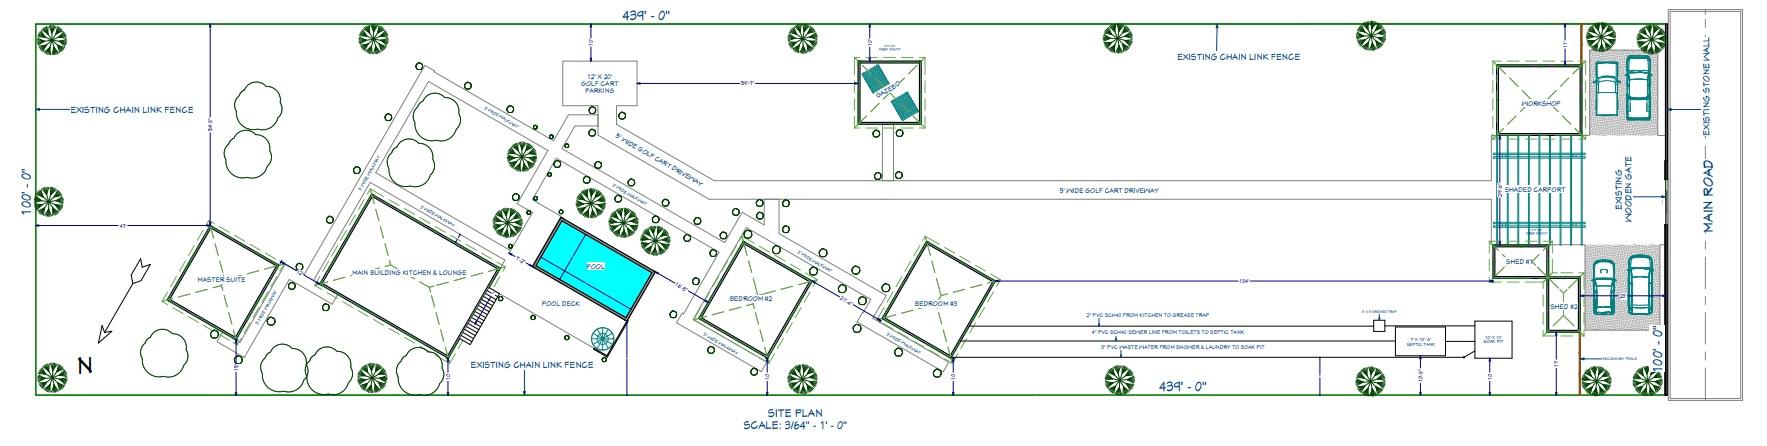
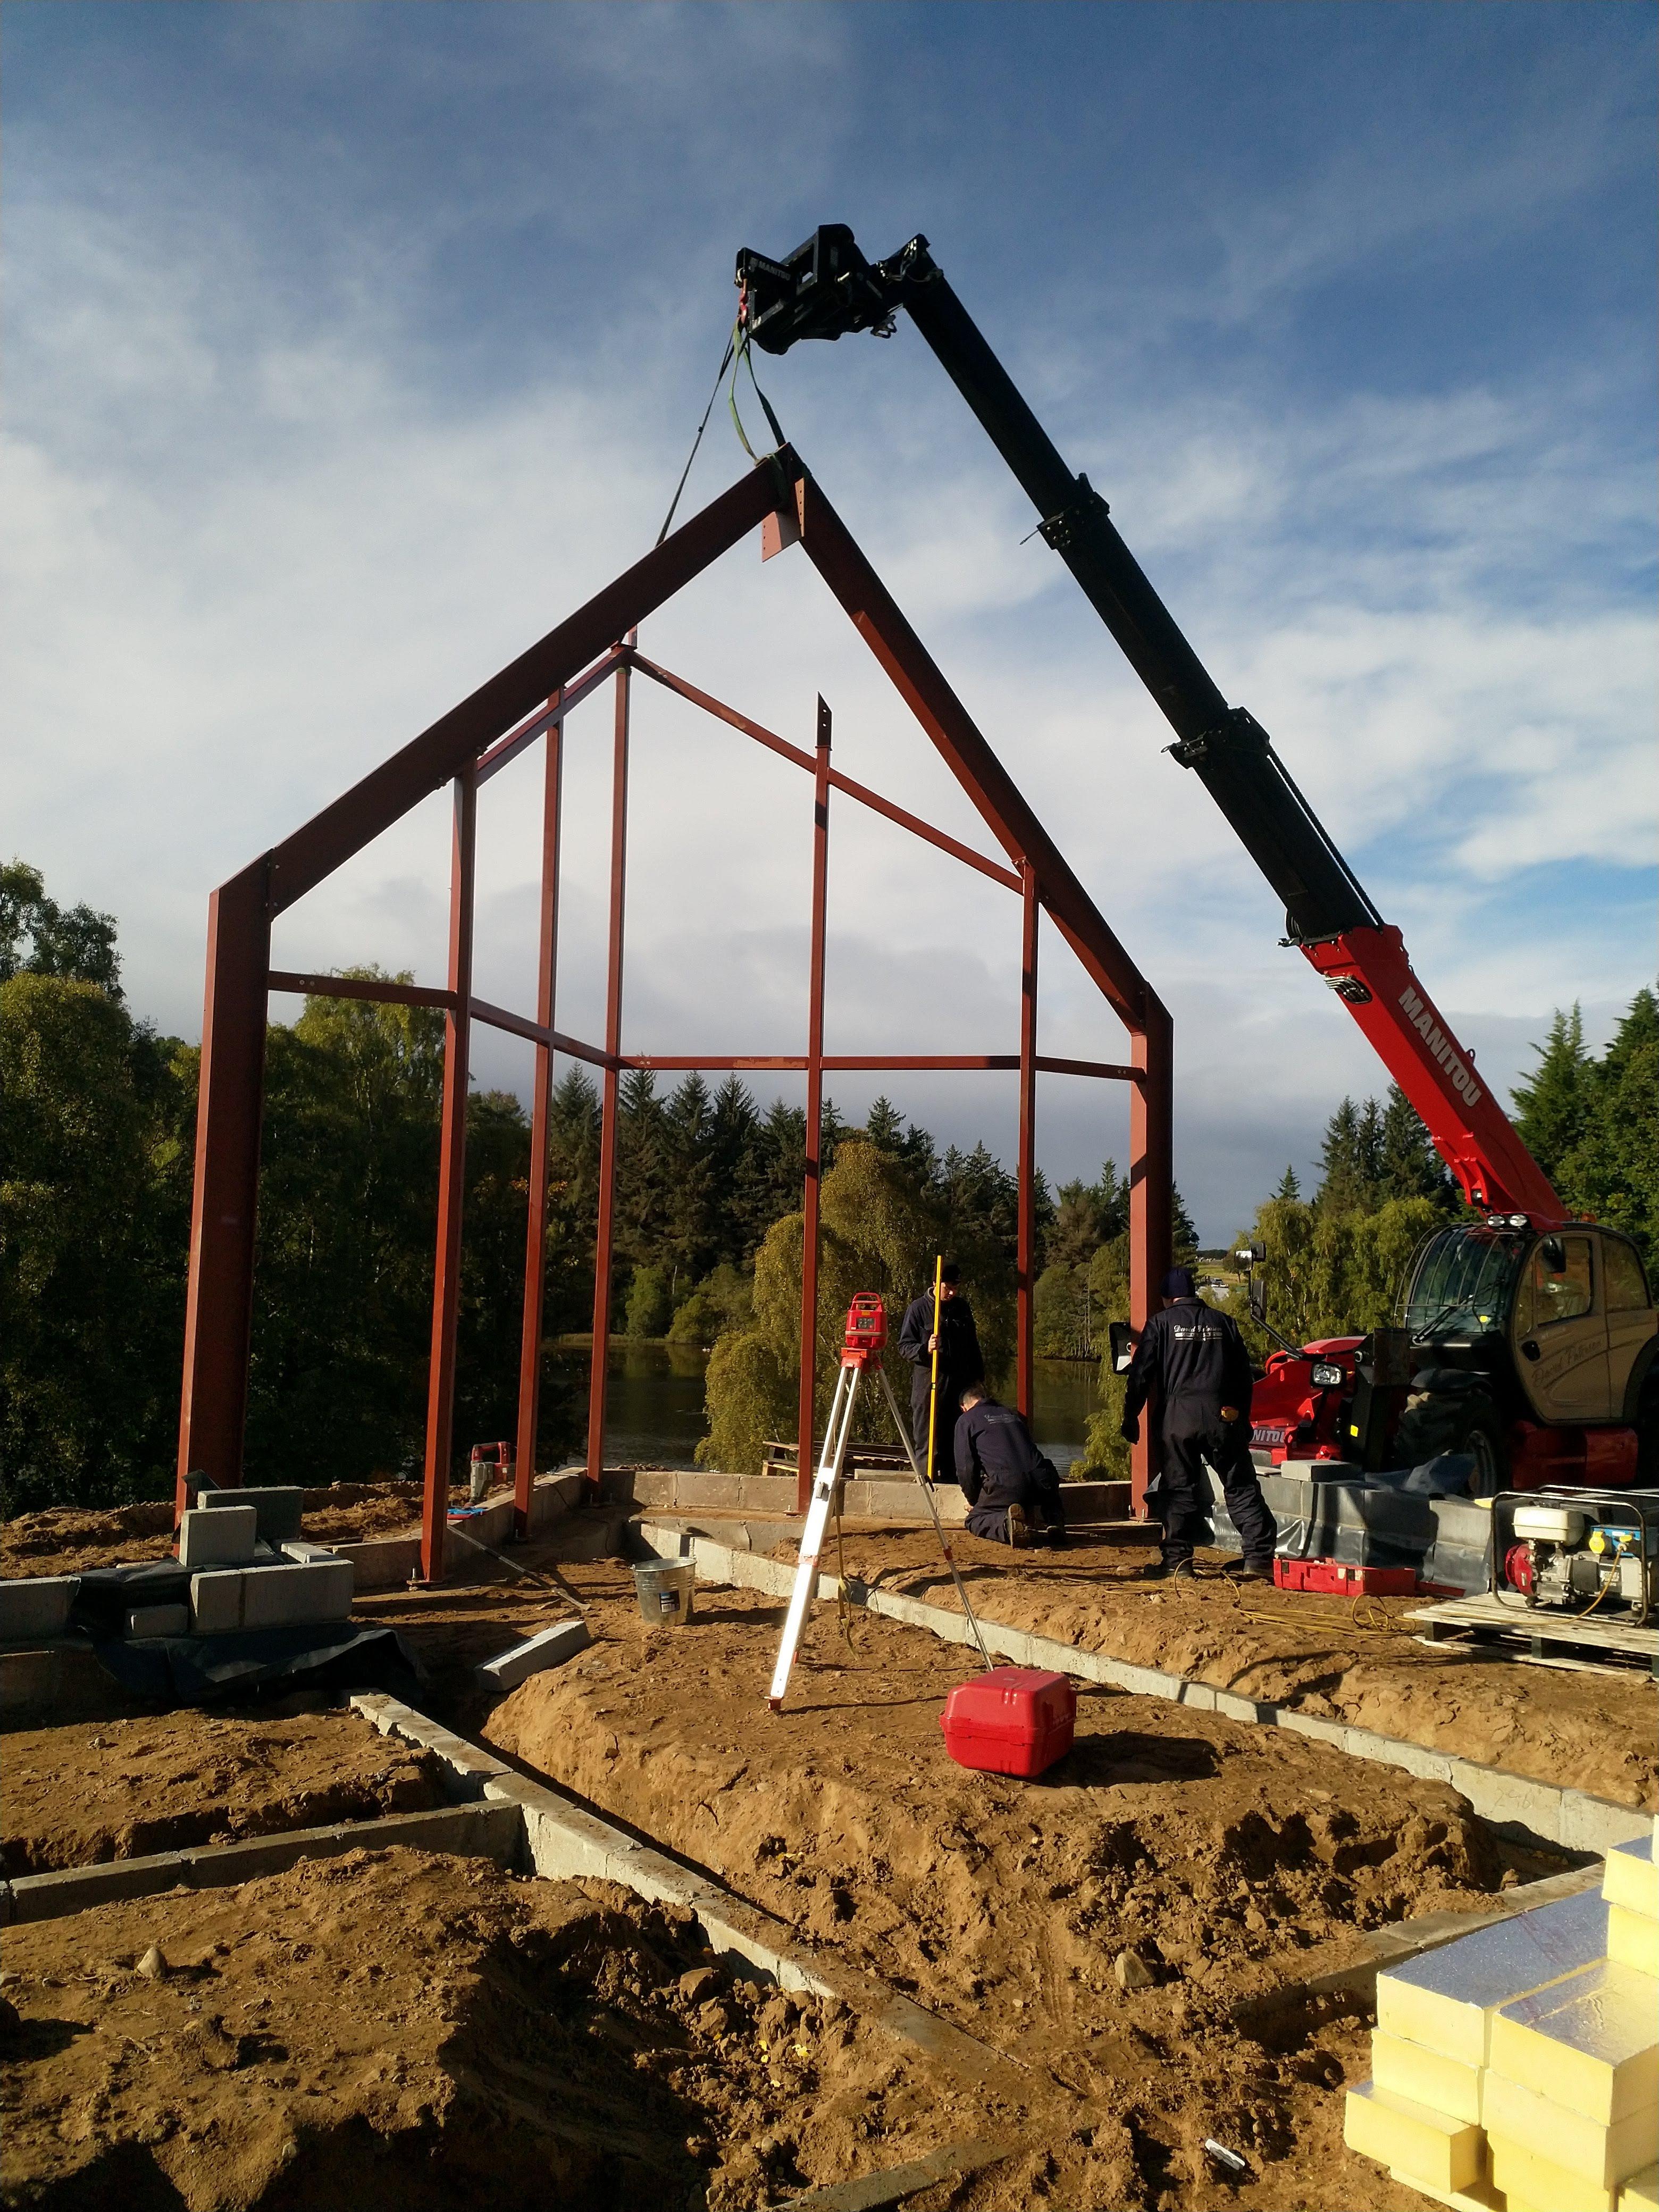
Hi, new to the forum, have kept coming across the forum every time I've googled for a solution to a problem, so thought I ought to finally join! I'm English but moved to Antigua 6 years ago, and finally bought a plot of land last year and started building in the new year. Quite a few challenges building out here, but also quite a few advantages too. I'm doing a self build (although I do now have a local builder helping me to get out of the ground on 2 of the 4 buildings - cheating a bit I know, but it was taking me forever plus I was missing some key bits of knowledge/experience). It's also my own design, and I don't have an architect or project manager (other than myself)...so a text book case of "how not to build a house"? I do have some experience from doing my own extensions and house gutting and renovations in the past, but I've never done a complete house or new build before. The plot is one acre, on a 6/12 slope (aprox 26 degrees) and the key unique concept is modular buildings - instead of one big house there will be 3 bedrooms and one main house all as completely separate buildings and not connected. The advantage being that, given the relatively steep slope then the construction can sit into the landscape much better with less excavation of granite (and the disadvantage is that you get wet if you want to go to bed and it’s raining!) The main house is 40’ x 28’ and is one single open plan space of kitchen/dinning/lounge that is also open on 50% of the walls – there is no glass or windows at all in this building...in order to benefit from the cooling trade wind breezes. There will be integrated roller hurricane shutters for storm conditions. Construction is mainly cast reinforced concrete columns and beams (with 16” cinder block shear walls) with open/cathedral ceilings of 3x6 rafters and 1x6 v-joint/t&g roof boarding. The entire construction is 100% off-grid. Water is collected from roof gutters, fed into a 30,000 gallon water cistern for domestic fresh water. Self composting septic tank & soak away. 12kW solar array with 25kWh lithium-ion batteries and 18kW LF inverter. Hot water via a 300L all-in-one heat pump. Another interesting feature is UFH in the main building. Since there are no windows then air conditioning isn’t possible (and shouldn’t be needed) but in order to prevent the concrete floor slab and superstructure building up heat and radiating it back, then hydronic UFH will be embedded into the concrete pour and supplied by a monoblock heat pump (obviously running in reverse / cooling mode!). Heat pump will only be active during the day (when there is sun on the PV and excess power) and the thermal mass off the concrete will store much of the energy (along with a large buffer tank, circa 500L). Tons of other details but don’t want to send everyone to sleep on my first post. I’ll include a couple of pics of progress so far. I also have a few questions to ask so will try to make another post or two during the week. Pics: (Front half of main building, forming utility/basement. Rear half will be 30k gal cistern. Then main house floor will be over the top) (Master bed, up in trees overlooking the whole plot down to the road)

 4 points
 -
Just a quick update to my special friends here - mr Punter was spot on as mr Nasty got to his senses and withdrew from JR. We are building again. Any advice on how to (legally) annoy mr Nasty after everything he put us through - would be really appreciated keeping count of virtual Champagne credits 🤩2 points
-
Agree with the floor damage, we use floor protector and don’t employ dafties2 points
-
And if you ever want to change the LVT, with that down first then skirts, you have a real pig of a job on your hands downstream . And a lot of downstream trades / risk to the floor. I should have added that sorry. LVT / other floor covering ( as applicable ) into the voids where appliances go. Still pointless going under all the units and sending good money into the darkness never to be seen again. That money can go towards paying for the paint2 points
-
LVT down skirtings mist kitchen final painting. flooring down- nice easy surface, no cutting around haffits etc. skirtings, primed varnished etc mist coat, less mess when kitchen is in. fit kitchen finish paining and use.2 points
-
thanks all for the advice. hired a core drill this morning, used a platform rather than a ladder and have drilled 8 holes so far (107mm) and, even though the drill is bloody heavy for this weedy middle-aged man, it seemed to go through pretty easily.
 2 points
 -
If you make a mess of the paint spraying, you'll end up not saving anything as they ( the professional painters ) will have to rub that all back and make good. How confident ( competent ) do you feel you are with that? Painting, mist coat Kitchen goes in, less plinths and cornices LVT goes down, minimum amount only eg waste of time going under the units.2 points
-
Hi New to the forum thanks to some great advice at the hoebuilding show this year. My partner and I are hoping to self-build, as many of you know, it's nigh on impossible to find a plot, so we are stuck. We are pretty much on the brink of giving up our hopes, but giving it a last ditch attempt at finding somewhere. We are based in Birmingham and all we see is giant unaffordable plots or tiny pickets which seem terribly over priced. The reason for the build is for us to be able to do all our work from home. Looking forward to being an active member of this forum. Good luck with your builds!2 points
-
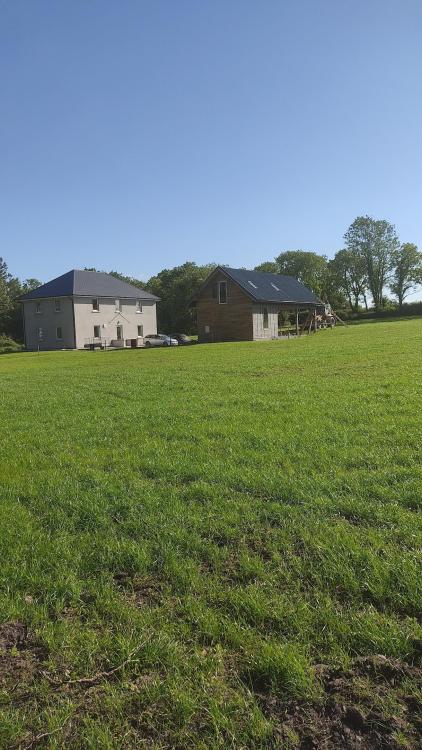
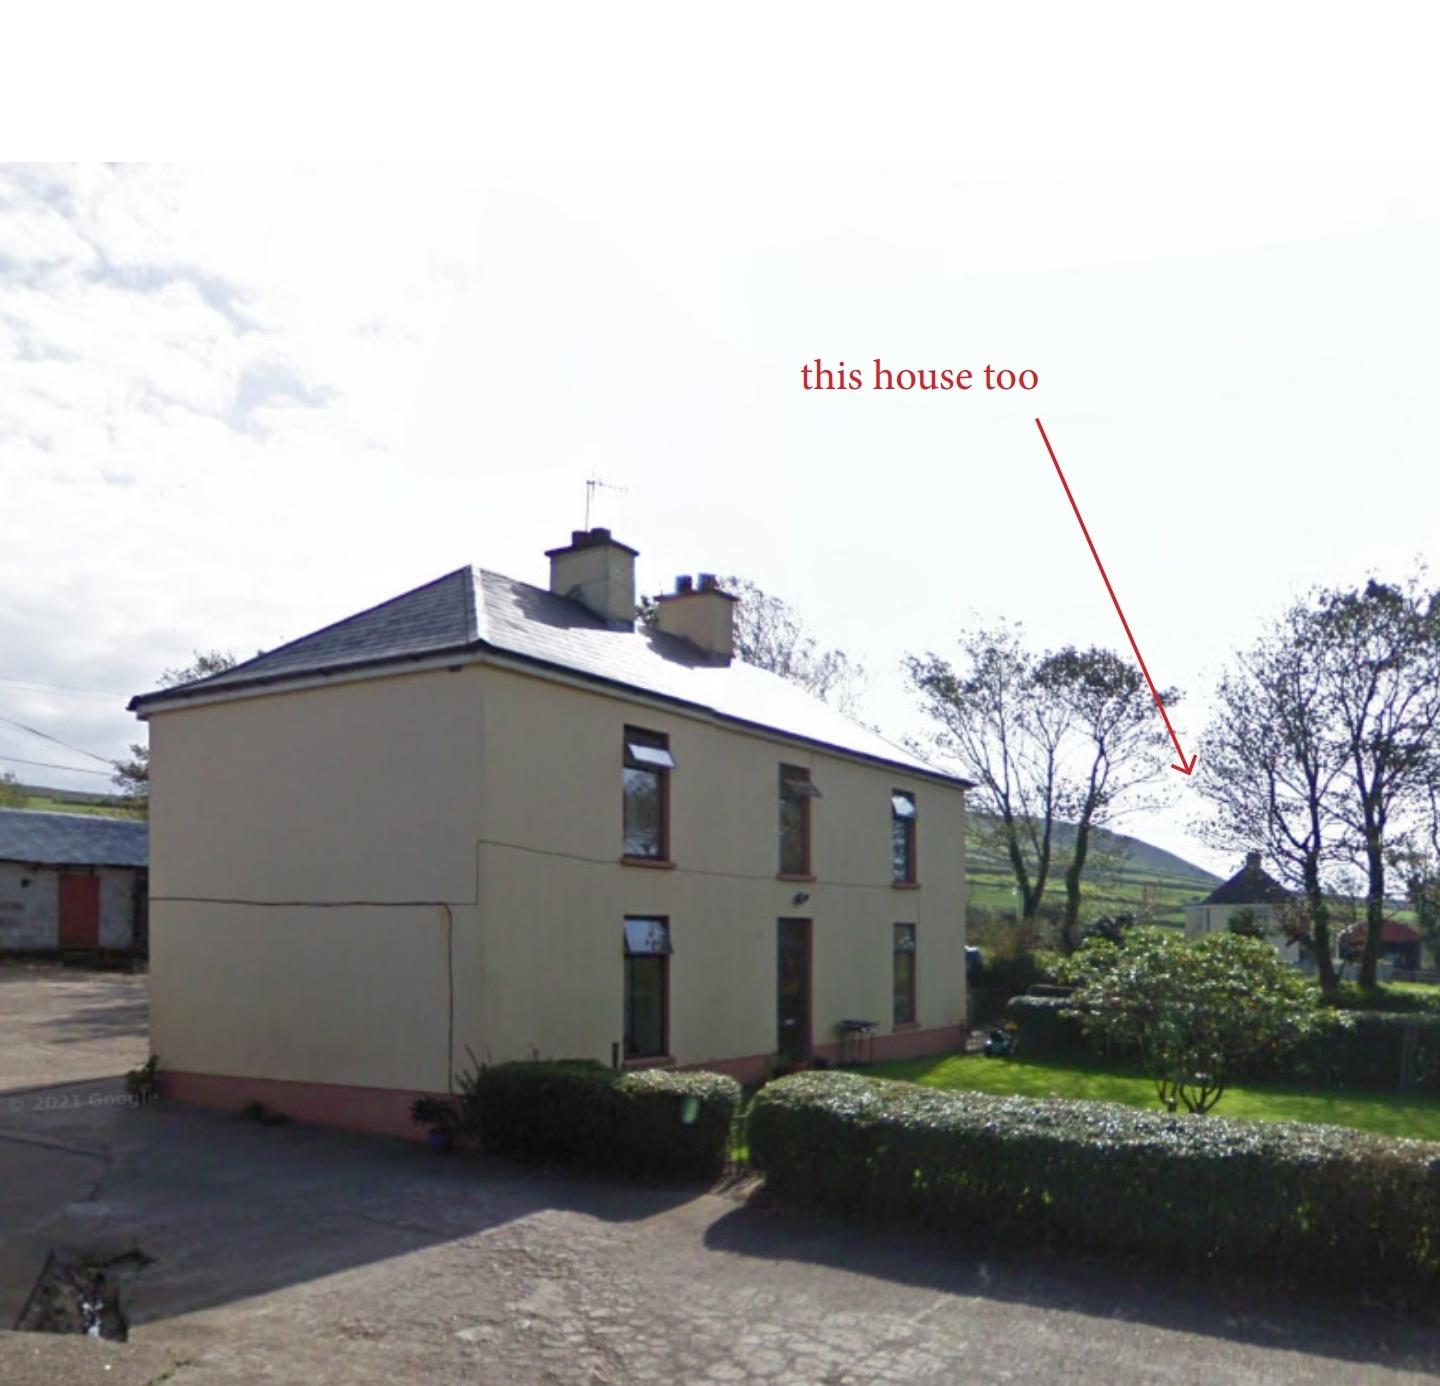
@ETC Here's our house. I'm quite fond of plain farmhouses, although ours is a bit fatter i suppose.
 2 points
 -
I've been tracking our electricity use in our new build since last March. A little background. 2 story 186m2 (175m2 Treated floor area). External footprint 114m2. (150mm concrete slab over 200mm graphite EPS) Strip foundation. External wall area 249.4m2. (Masonry build 250mm cavity with SS ties and EPS bonded bead insulation. Wet plastered both sides. External Glazed area 36.6m2. 3g Veka Softline 82 UPVC. I modelled all junctions myself in THERM and did the best I could to eliminate any significant cold bridges, the details were similar to Denby Dale except the threshold's which were I suspect a one off with fiberglass grating. Roof was a trussed hip design, copy again of Denby Dale's but with 400mm of blown cellulose. Sealed roof design as per the Tyvek Supro booklet. Windtightness continued with all junctions externally being sealed with airtight paint. There is one 150mmx4m area of block which hasn't been done. Airtightness tested at 0.31 ACH 50. MVHR is a Proair pli 600 unit with a passivhaus efficiency of 86%, care taken to insulate the very short run of ducting into and out of the house. The 1 soil pipe was fitted with an AAV. We installed no central heating. Instead we use a 2kw plug in rad on a timer. For DHW we use a 300l UVC direct cylinder on night rate electricity. PHPP predicted 14kWh/m2/year *175m2 = Total of 2450kWh total annual energy for heating. Our daily electricity usage was 18.1 kWh/day in the summer months. Of this 10kWh for DHW. ( 2 adults + 2 preschool kids) Our total annual usage was 9876 kWh. Isolating DHW at 3650kWh and everything else at 2956 kWh left 3270kWh for space heating. It is almost 33% more than PHPP predicted. Although it is still not much energy at 18kWh/m2 I'm a bit disappointed. I have a couple of theories about why this might be the case. Please jump in with more knowledge/info if you can. 1. The house was still drying out. Some say a heavyweight house can take over a year for this to happen. 2. The insulation manufacturers overstate the K values of their products, EPS ( although it is my preferred plastic insulation!) seems to have dropped from near 0.04W/mK to closer 0.03W/mK in the past few years by changing colour. 3. The house was often closer to 21 deg rather than the 20 deg in PHPP. 4. Maybe I made a b*lls of creating my own weather dataset from the closest met station ( Cork Airport) 5. I was using an old version of PHPP which I gather has higher internal gains than the newer ones. 6. We had locally less sunshine (I haven't checked this)? 7. Mrs and Kids wander in and out with the doors wide open more often than I calculated for. ( Obviously I never do this!) 8. I haven't properly balanced the MVHR (a cheapo DIY attempt as usual) 9. The main south facing open plan living area has a floating ( never again) LVT floor which doesn't allow the concrete slab to soak and store the sunlight as much as a ceramic or glued down floor. 10. The floor was laid when I wasn't here so I'm suspicious quality of floor insulation fitment. 11. Maybe I made a mess of PHPP. Overall I feel somewhat vindicated by the choice not to bother with central heating. The house is comfortable without, a heated slab might have been even more comfortable however and would allowed more energy buffering on cheap night rate electricity. An A2A is probably on the cards at some stage but the likely saving might only be €200 per year when a 10 year lifespan is considered. Better ideas include properly balancing the MVHR, getting a thermal camera to check insulation. Maybe putting towel rads in the bathrooms to have them warmer and the run rest of the house cooler. Inputs welcome.1 point
-
I have a friend who built his own house in the Bahamas. For hurricane resistance there were standard local details, which basically meant use wood and a certain number (neither more nor less) of nails. This gave it the right strength and flexibility. It has withstood a couple of hurricanes ( as did the crazy paving steps into the sea that I did...pleased with that while other docks were washed away.. Materials were all from Florida, with anxious waits for the boat to turn up.1 point
-
Smile and act as if nothing important has just happened, and never ever inform him in advance of anything you are going to do unless you are legally required to do so.1 point
-
Having won at Appeal myself against a particular neighbour (and the council), just wearing a smug grin whenever I met them was enough for me.1 point
-
The best way to annoy him is to ignore him and get on with building the house. Pleased it's ended well for you.1 point
-
Just been looking at our photos and there was a week between the final measurements and them being on site to install.
 1 point
 -
Appeal?1 point
-
Hence the low crime rate.1 point
-
I am too jealous to offer any advice.1 point
-
All expenses paid of course. It must be a joy to build with nobody checking what you do. And no need to spend a fortune on heating or insulation. And i don't think we will be discussing air tightness or mvhr on this project either.1 point
-
Welcome, I think we need to send out a BuildHub delegation to inspect your works when complete!1 point
-
Hi and welcome. Nice project but don't expect us to know your local building regulations. So with so much of the main house open / no windows, are they a really honest lot there so no risk of burglary?1 point
-
probably not so bad with LVT but in our last house (new build by a mass builder) we had tiles which were obviously laid after the kitchen went in and when I had to get the dishwasher out from under the worktop I couldn't do it as the tiles were so high the feet would retract enough to get the dishwasher out! ever since then I have decided that I will take the extra cost hit and tile under the units.1 point
-
Welcome and what a lovely plot/view. I engaged a main contractor to put the shell up as I would take forever to do it on my own (and I am too old for that ) you will have enough to do with all the “other things”, looking forward to questions and pics of the progress 👍1 point
-
Very impressed you got those holes so close together. No idea if that's a good idea or not I remember doing our MVHR through the timber frame, had made no provision for penetrations in steels or frame so was totally winging it. Had to take out a few noggins to get all the duct in, house still standing...1 point
-
Its G99 fast track for energy storage, the installer did this for me. Products and installation came from here: https://www.solar-energy-store.co.uk/1 point
-
This apartment block captures the simplicity I'm after. Obviously it's a different scale but I think it gives a good idea.
 1 point
 -
The stuff from PSW trade is not the same as Wunda - not by a long way. I’ve fitted both, they are chalk and cheese. And only go with the Wilo pumps - they are virtually silent.1 point
-
Outsourced energy, is where got my UFH parts, worth a look1 point
-
Type up a rough list in an email and send it on to a few builders and plumbing merchants and see what they come back with. Doesn't need to be exact or fully complete, just enough to get an idea E.g. 10x coils of 200m 16mm PERT pipe 2000 60mm ufh staples 3x 8m lift 28mm circulating pumps 3x 8 port stainless steel manifolds 3x 22mm actuated valves 50m 22mm PET pipe. Then take it from there and finalise the list with your chosen merchant. I did this and saved over £1k.1 point
-
I bought all my UFH kit from ebay, pipe, manifolds, actuators, and a cheap generic UFH controller box.1 point
-
At our last house we used to heat our 185 litre DHW tank to 45C with an EASHP. Our mixer showers and our bath thermostatic valve worked fine. Only two adults in the house and we never ran out of hot water.1 point
-
When I was playing around with PHPP, using 2010 Version IIRC, my house was 13kWh/m2a at 20C and 15kWh/m2a at 21C. I also found the results varied a lot depending on the climate data used. I plugged in several different sets but all I can find now is the data I created using Meteonorm for my area, when I was in East Kent, which I finally used. I also created an average for SE England from Met. Office data which gave results of 11kWh/m2a. I decided to be cautious and settled for the 13kWh/m2a.1 point
-
Well, not so sure about that... This is a real risk - friends built a basement near us and found an underground Thames feeder stream running through their plot during survey. Had to de-water during build (expensive) and SE designed a very meaty slab to prevent the hydrostatic pressure pushing the basement out of the ground. As it was their rainwater harvesting tank popped out twice during the build. I can see the logic here, we had a small area where our external basement stairs come to ground level and while it made sense for the excavation & retaining wall to follow the line of the stairs, was much simpler to just chop out and cast a square box, what you loose on the additional muck away and concrete you gain on speed and simplicity of construction. From their data sheet, https://www.recticelinsulation.com/sites/default/files/downloads/Eurothane GP Technical Datasheet.pdf the compressive strength of 150mm board is 140KPa for 10% deflection, so almost equivalent to EPS 150 grade. By comparison EPS 200 which our SE specced has a strength of 200KPa for 10% deflection. EPS 250 and 300 is often specced for sub slab applications also. The calculation will depend on the weight of the whole structure above the insulation and point loads will factor also - one for your SE. WRT insulation thickness, you need a thicker EPS sheet than PIR to get the same R Value - we used 300mm for under the slab and 200mm (of EPS 70 grade) for the outside basement walls - so the trade off is more excavation & muck away vs cost of PIR / cost of EPS. You can obviously stack up individual thinner sheets of insulation to get the thickness you need or buy as a single block.1 point
-
Just remember to turn the nut not the fitting, so the washer doesn't twist as you tighten1 point
-
So looking at the spares it’s 54812 and comes as a pack of 5 but it’s out of stock/back order pretty much everywhere ..! It looks a fairly standard rubber washer so I would go down to the local hydraulic place and see if they have anything or if you can wait a few days order a pack of these https://www.bes.co.uk/1-2in-nitrile-hose-washers-pack-of-10-11474/1 point
-
Ah. OK, a flat faced washer will sort it. https://www.screwfix.com/p/arctic-products-fibre-pillar-tap-washers-2-pack/7893j1 point
-
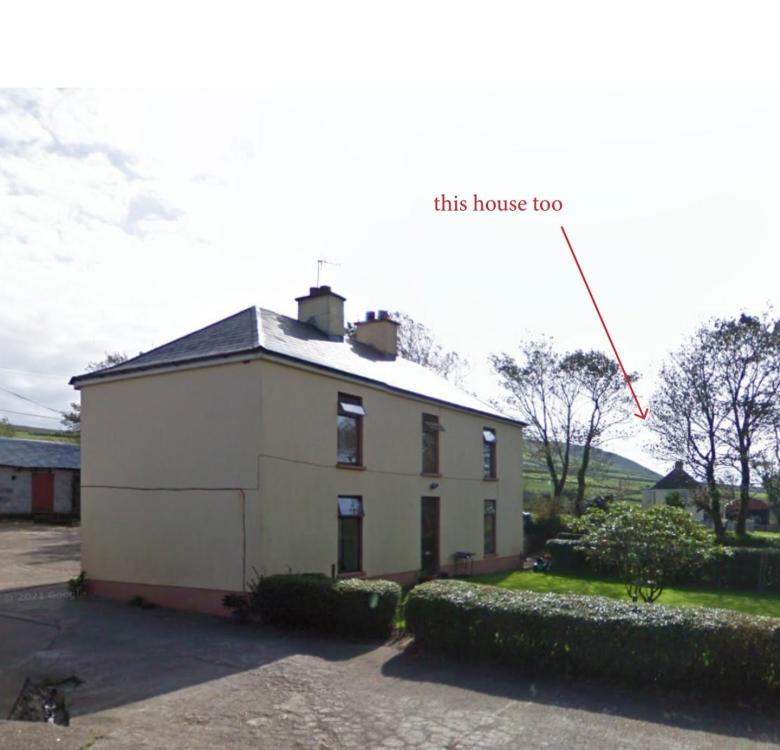
These are two neighbouring houses. Think there are a lot of similarities.
 1 point
 -
same here, fabricator installed for us. he came out measured the site and se gave the heights.1 point
-
It's hard to get the feeling across in the model but I know myself what it will be like. That said, if I was the only one that ended up liking my own house that would be plenty!1 point
-
Just cooked outdoors on the Chinesium (£18 from Banggood) fire pit. Didn't use bought charcoal. Just collected dead wood got going with some silver birch bark peelings.1 point
-
Sorry, not much help other than to double check where the water is coming from and to try PTFE on the male threads. My plumber leant me his, couldn't figure out how to connect it to the UFH manifold so connected the garden hose to the drain valve instead 🤣1 point
-
Should be a rubber washer in the end of the fitting ..? Is it not there ..? Best / quickest way to use these is to fit a 1/2” to 15mm push fit (ironically Speedfit is easier as it doesn’t need tools to release it. Then you can just test your connection once and then just push it onto the end of any pipe.1 point
-
OTT indeed lol. Not ever used one myself, but I've seen those types of fittings before. I think that fitting relies on the integral part of the union being in contact with the target union, and then the pressure applied by tightening the nut creates the seal. Do you have a pic of the inside of that fitting please?1 point
-
I got the fabrication company to install our framing. Anything he finds at fault during installation, he can fix at his cost. Got him to also confirm the drawings were inline with the dimensions on site before final welding. All in all no issues.1 point
-
Possibly someone trying to use like a gas boiler? Lots of on off cycles, not sized correctly?1 point
-
If it was me, I would buy a solar kit of panels, inverter, isolators, safety stickers etc. Buy what you can physically install space wise and what you can afford/want to spend. Install it, in your case through a roofer and then an electrician or just a roofer then you doing the rest yourself (some inverters are wired to a 13A plug - yes you just plug it in!). It will work, it will be fine. The MCS registration is all about FIT payments, I don't want payments, I want to use all my energy because I am not generating energy for them to pay me 3p kWh. I would rather heat my garage than give it to them. The government need to get the DNO's told to cut all the nonsense and let people get on with it, which will encourage a massive shift towards small scale PV install. The DNO doesn't want you to install solar is the blatant truth. There are no structural implications in 99% of the case, the roof has been designed with snow and maintenance load. Maintenance load is 60Kg per metre squared, once the panels are installed you will no longer be able to load that roof with the maintenance load, the lightweight solar panel is about 12Kg and more than a metre. No wonder no one is installing PV when homeowners need to jump through hoops like all of this. A desktop survey? Honestly, in other words they know fine well their service is total nonsense. How any self respecting SE could provide desktop surveys for something like this and claim it to be worth the paper it is written on I do not know. You didn't hear it from me!1 point
-
I did indeed press go, and so glad i did with the way energy prices have gone. I'm going to write an end of month addition to my blog about it, as i've discovered lots of things which just aren't mentioned online, things which are worth knowing. In terms of the pylontech and solis inverter, yes really pleased with them, wouldn't hesitate to recommend.1 point
-
Check the planning permission from when the outbuildings were converted....most councils remove all PD rights for the whole development. This leaves you requiring PP for anything you may wish to do. The openness argument really falls flat in an enclosed garden area.... even in greenbelt.1 point
-
Ring beam - essentially put a 6x2 across both ends of the floor so your floor joists are screwed to this (or use joist hangers for even more strength) and it creates a “ring” of timber. Latest span tables here but a C16/C24 44x145 will be fine at 600 centres and supported mid distance. If you’re thinking of putting anything heavy in the centre of the front span (French doors etc) then just double up the front joist or even just put an extra pier of blocks so there are 4 on the front not 3.1 point
-
It isn’t a problem But you must have an expansion joint in every doorway if you are tiling mans matting under the tiles1 point


.jpg.c21f3ac78c9b7efd90cbdcb312744dc5.thumb.jpg.7adcad4c0e384f5ecd7d56b0618df6e5.jpg)


.thumb.jpg.bac90f3bbf6868cf2118d010d936c99d.jpg)


