Leaderboard

.jpg.c21f3ac78c9b7efd90cbdcb312744dc5.thumb.jpg.7adcad4c0e384f5ecd7d56b0618df6e5.jpg)

Popular Content
Showing content with the highest reputation on 01/10/19 in all areas
-
First off - an apology. I've been lax in getting this next instalment posted. Several days away over the holiday season led to several days more trying to sort out family issues, which have since spiralled out of all proportion. I think I have now put the genie back in the bottle, so on with the show. Where were we? Ah yes, we'd poured the basement walls. They'd gone a little wonky (because I was a numpty and failed to install adequate bracing on the outside of internal T-walls), but we had walls that we could build up from. Time for backfill and construction of the remaining foundations (our basement is only 60% of the width of the above-ground house). Before that, we needed to fit a drainage channel around the basement walls & slab. Here's the groundworkers putting the (terram-wrapped) french drain in around the slab/wall junction, which was then covered in 10mm pea gravel to a depth of 500mm, and then 40mm clean limestone: This actually led to one of the most enduring memories of the project to date. I was laying the drain outside the far corner of the basement (where the cave-in nearly smashed the wall apart). The groundworkers had decided that they wouldn't get in that part of the excavation (between the concrete walls and the bank) in case of further cave-ins, so myself and a couple of mates sorted out the drainage channel. Unfortunately, it had rained a lot over the weekend, and was muddy and slippy and wet... Standing on the edge of the slab was precarious to say the least, and I'm not the most svelte individual... Long story short, I fell into the mud. Which sounds funny, but at the time, it was rather terrifying, because of the depth of said mud, and how much effort it took to get me out of the mud. Don't believe me? Here's how deep it was: Took 2 people to lift me out of the mud, and I came out without one of my boots as well, which has never been seen since. I had to walk home, because I didn't have a change of clothes, and I had come to site in the Jag. So over an hour, with outside temps being about 3C, trudging home feeling very sorry for myself. At least my mate lent me a pair of boots! One detail I haven't mentioned prior... The basement walls are 10" thick concrete core, but the above-ground walls were designed to be 6.25" concrete core. The mathematically-astute among you will have already worked out that gives 3.75" (or a touch over 95mm in new money). This was intentional, because I figured I was a clever so-and-so, and could use that 95mm as a bearing surface for concrete floor beams. Genius, eh? Well, maybe. It did give us a nice bearing surface, and it did remove a potential cold join between pours at ground level, so big win there. However it then entailed removal of a large amount of EPS from the inside of the blocks so that the beams would slide along on this concrete (because a crane wouldn't get on site very easily, so we used manual labour to move the beams), so the labour aspect was considerable. It took better part of 2 days to remove the EPS (and resulted in about 3 builders bags worth of EPS fragments sitting in our basement), and another 2 days to set the beams in place and start laying the infill blocks. Here are the beams going on: And here are the floor blocks being laid: Here you can see the EPS having been removed en mass from where the beams had to slide. Don't worry - it's not a giant thermal bridge, because we put EPS back around the beams once they were in situ properly (albeit much later in this story) we have now put insulation above the floor beams for the UFH to sit on top of, and we will shortly be putting insulation under the floor beams in the basement ceilings too (cos we have a load left over) (The big hole is where the stairwell is going, in case you're wondering!) We backfilled at the same time as laying the floor beams. More precisely, because of a battle of wills between the engineer and the groundworkers, we backfilled to approx 50% of depth, then laid the beams (with the walls evenly loaded all round by the backfill to "prevent asymmetric destabilisation and collapse") and finally finished the backfill. 440 tonnes of backfill went in around the basement - that's a lot of stone! Next up was the remaining foundations. Building Control had specified a minimum depth for the mass-fill RC footings for the rest of the house, because of the massive lombardy poplar trees at the front of site. A nice big strip was dug out (2.5m deep at the front, and 1.5m deep at the back of the plot - furthest from the trees), and filled with concrete. The engineer had specified cages of 16mm rebar to make our ground beams that linked the mass-fill footings to the basement walls, with clay heave protection, so we dug out from the clay capping over the backfill, formed shutters with the heave protection, and dropped in our cages: Once the concrete had started to cure in earnest, we laid the first course of blocks on the new foundations, and linked into the basement wall blocks. The steel reinforcement is probably overkill, but better safe than sorry when your engineers starts saying "you don't want the two halves of the house to separate"... The blue pipes were my attempt to ventilate under the block & beam floor that we were going to lay over the new foundations. Turns out that Building Control didn't care a jot about that once they saw how much backfill stone we had placed - not sure why that would matter, but there you go! Concrete was poured in this course of blocks to stabilise everything, and get us ready to carry on with the build. Myself and a couple of mates laid the remaining floor beams in a weekend: That'll do for now - as my Mum used to say: "keep 'em wanting more!"3 points
-
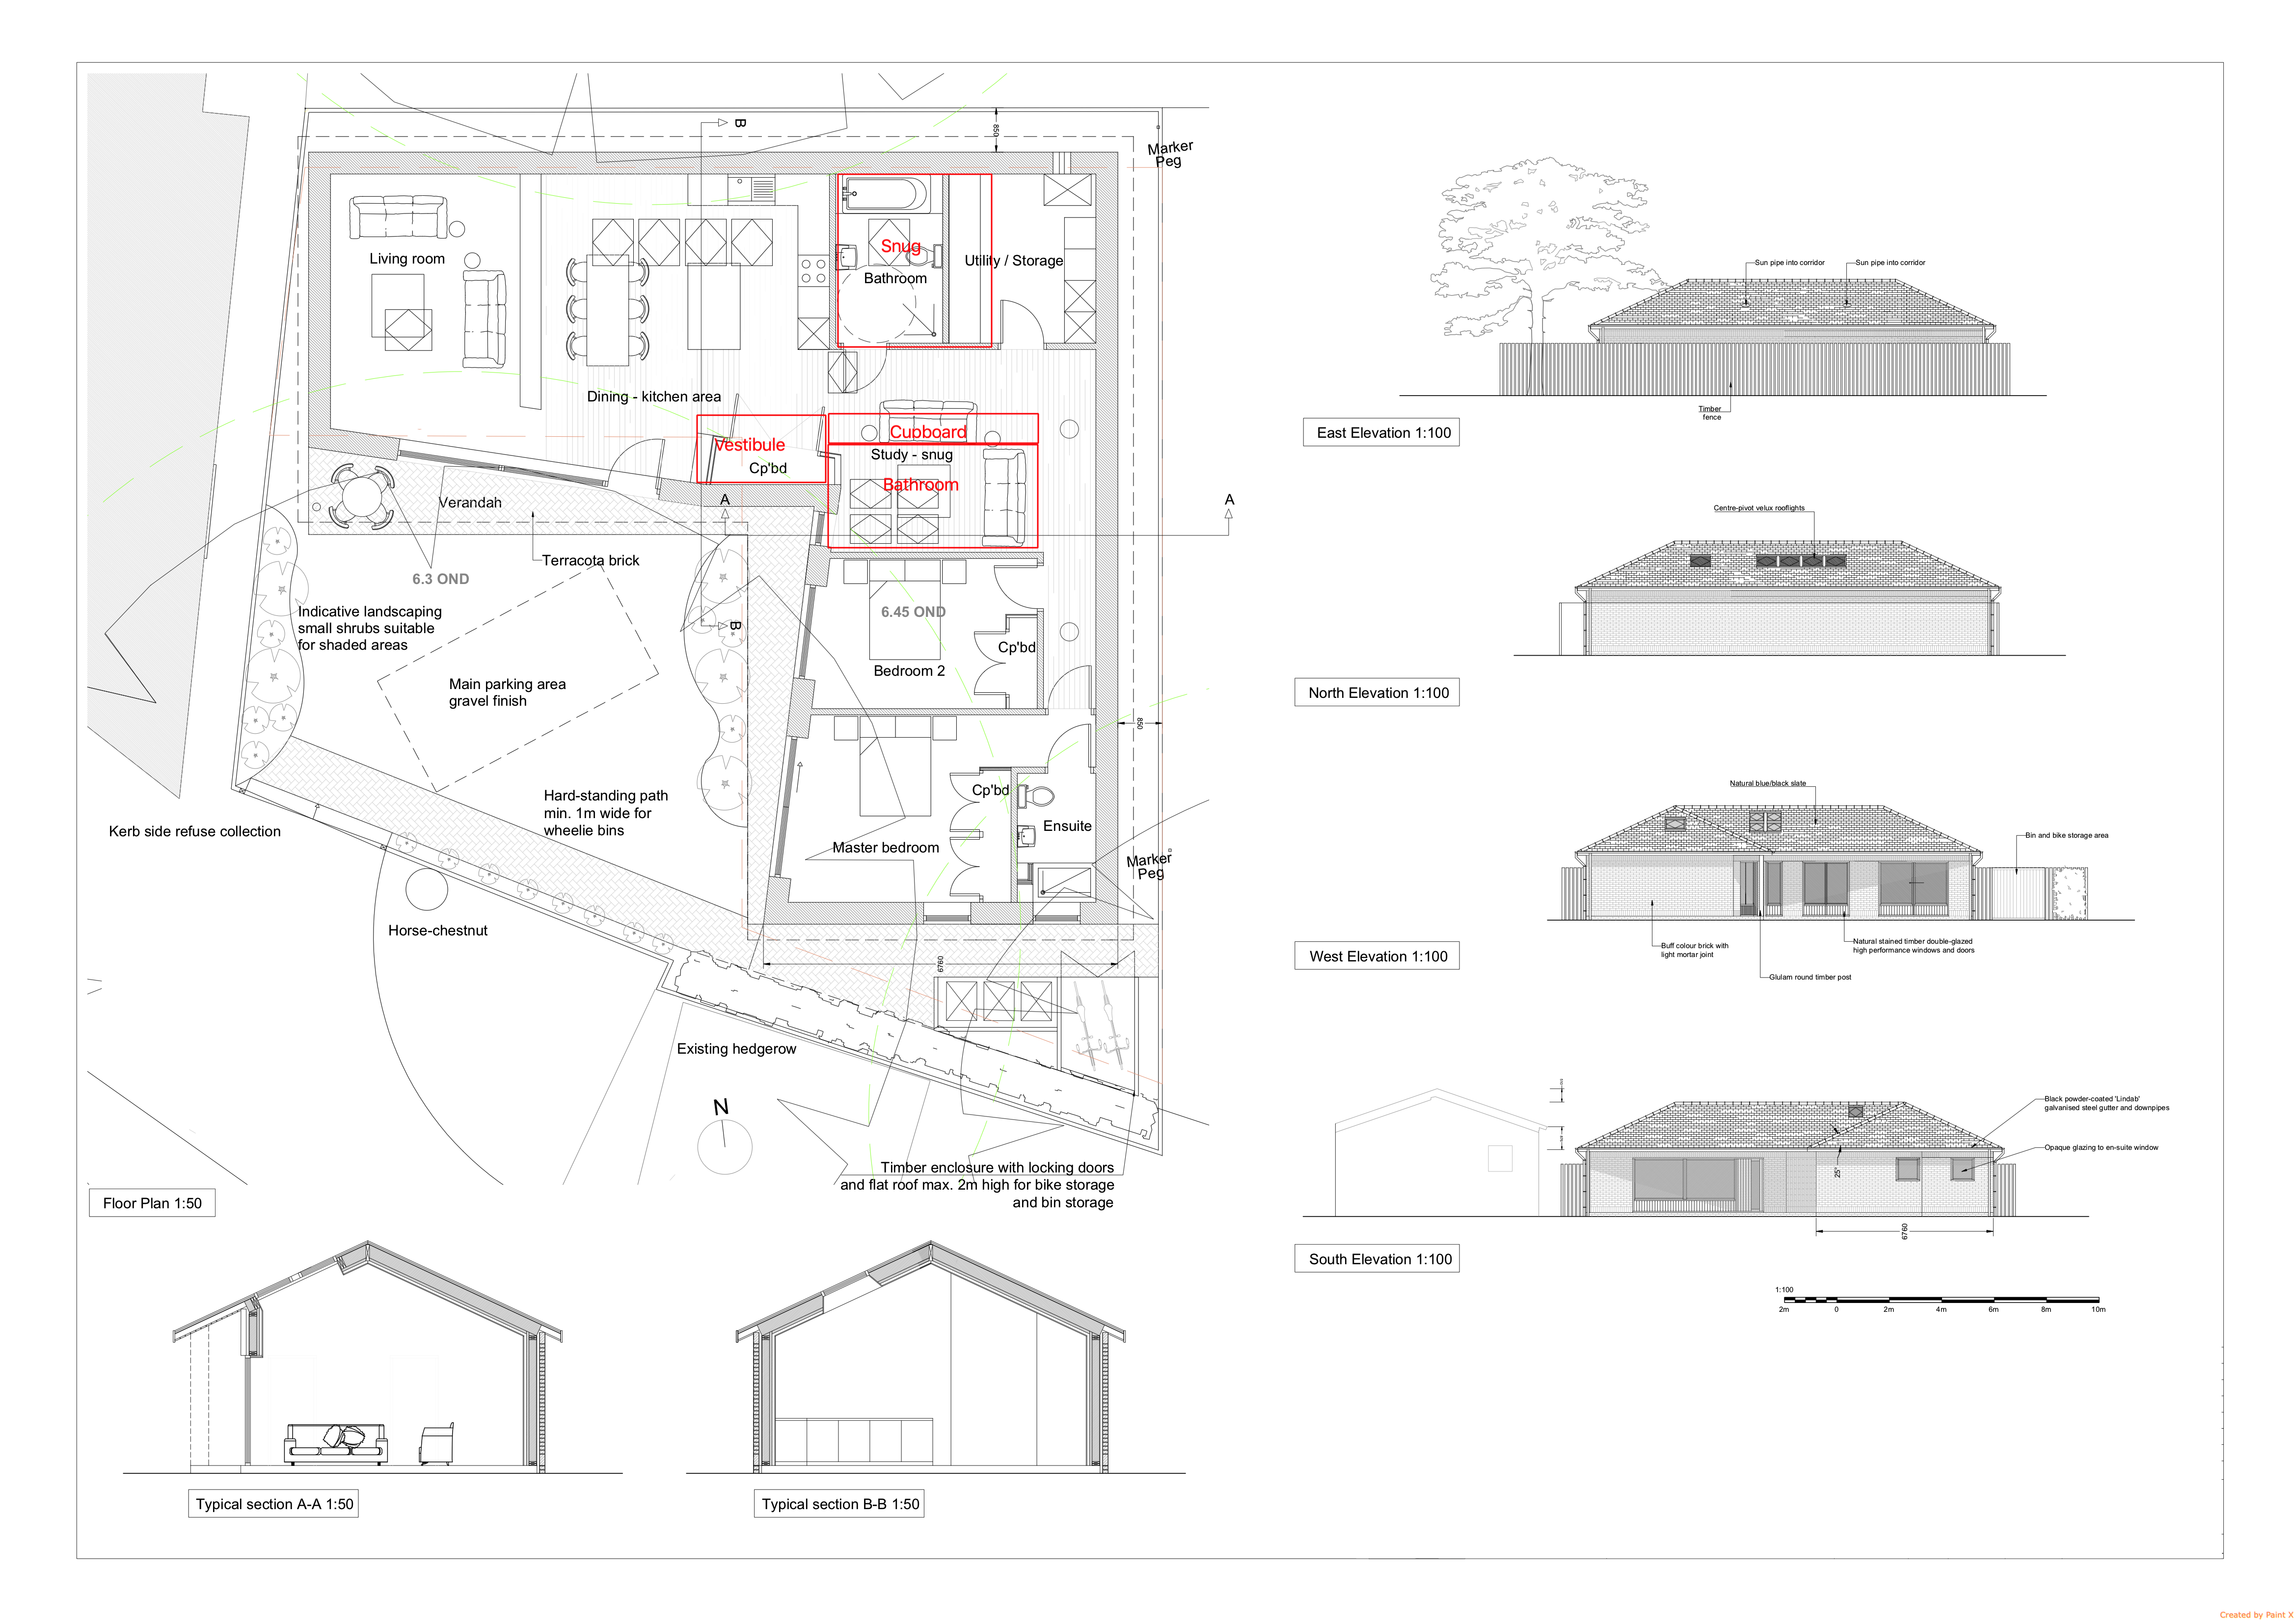
I came to this when my parents' house was referenced. The design makes good use of space, by not having a hall you maximise living space, but it is not a design for everyone and I do think you have to be careful. It is easy to create a feeling you are inhabiting a hall/pass through space and not feel comfortable. I think some of the comments re the snug reflect this. Also I tend to agree that I would not like the front door opening into the kitchen. I would feel quite uncomfortable if people make a delivery and we are all sitting down to dinner for example. I am very curious why that cupboard has been put in next to the front door on one of the places that you can have a proper window, it seems a missed opportunity. Having looked at it, I have very roughly annotated the plan. Basically swap the snug and the bathroom. The bathroom will be nearer the bedrooms, it could have a door to bedroom 2 also if you like. Put a large cupboard along the bathroom wall and take away the current cupboard to allow another window. Actually even better, you could move the front door towards the corner and have a vestibule so that it doesn't open directly onto the kitchen rather than having an extra window.You would probably make the utility a bit smaller which you could do with a larger cupboard. The snug could be incorporated into a much larger kitchen, you might want to change the kitchen plan or separated by a wall. You could still leave it open to the hall but people would be walking past not through it. This fixes the roof window issue that people have as you just continue the row across the kitchen roof, The small window in the wall will be enough for the bathroom. It could save you a couple of roof windows also. You also won't have the roof lights on the front of the house anymore, they will all be at the back. This would also allow storage above the bathroom as there won't be a roof window there now. I don't often comment on the aesthetics of houses and it is hard to tell from a black and white picture, but I feel it looks quite old fashioned. Maybe it would look better in a render. Is the plan to have the outside of the windows natural wood and the guttering black? Maybe making everything black would be better (I might be biassed as that is what we have). I am not a fan of those small wooden panels below the windows, why not just have larger windows.
 1 point
 -
The main reason people have built the way they have in the past is responsiveness. If you don't have much insulation, you lose a lot of heat, so you can treat a thin screed almost like radiators, in that it will heat up fast, but also cool down fast. Once you have a lot of insulation, like those of us with passive slabs, the slab becomes more like a storage heater. For that reason, having it thicker works better, plus why pay to lay two loads of concrete when one will do? We did actually effectively end up with a screed on our slab, but that's because we went for polished concrete (late decision). There's no insulation between the slab and the screed though. There'd be nothing stopping you from topping a slab with a separate screed, but why would you if you plan to cover with flooring anyway? If you have any bits of concrete spills left sticking up, you can just grind them flat with a scrabbler or a floor grinder. Lot cheaper than a complete screed!1 point
-
It may not be on any use to you I fitted all our kitchen but left the quarts to the exsperts There seem to be two major players Both in my neck of the woods One at Southport The other 3 miles away in Preston Granite U.K. We went with Granite UK The more expensive of the two It took six to carry the the island worktop in and they were going to kick there shoes off on the way in There guy that came to do the templates spent four hours checking and re checking There’s only a small amount that I haven’t done myself and the few bits I’ve brought a contractor in Ive not been happy with Onthe day the wofktops where fitted I was tied up at another job Im quite picky ( Very) They did a faultless job im not sure how comitted you are But a may be worth giving these guys a try1 point
-
A fire engine has 120m of hose reel on the appliance that is used for the initial attack at any house fire. The object is to control the fire using the least amount of water as this is converted into steam and anybody trapped inside or the firefighters doing the rescue do not want to cook themselves. By the time you need the larger size hose it is a point and shoot exercise and you are trying to contain that fire to one house and not set other houses on fire .1 point
-
It has been a few years since i actively used release forms but broadly speaking it your subject of filming is to catch the build itself not the people doing the build, they are considered incidental and you don't need to seek permission. HOwever based on what your saying if you want to document everything for interest then arguable that means the people working are the subject of the footage, therefore you have to get them to sign a release form even if you don't ever intend to publish the material. Just Google, 'actor release form' and it should get you what you need. CCTV I know less about but again broadly if your purpose is security you have to define the area being monitored and if anyone requests a copy of footage of themselves whilst on site, you are obliged to provide them with a copy, but can charge a fee for this. This might have been my first useful - semi educated reply on here - yayyyyyyyy1 point
-
I claimed the VAT on all the paint we used and they didn't question it. I just considered it to be a part of the house, TBH.1 point
-
One of our windows is like this, so perhaps we could tackle that one to save some costs!1 point
-
Multitool works better than a padsaw imo for cutting into an already skimmed wall if retro fitting. You can get it dead neat. Treating the edges of the cut hole with neat pva keeps it all together too.1 point
-
@Nickfromwales thank you.....the weekends entertainement looms1 point
-
To add my tuppence worth. I have a Cramer Fugi 5 piece kit which I use for siliconing. The only place I have found it tricky to use is if I'm trying to do a basin behind a tap. https://www.ironmongerydirect.co.uk/product/cramer-fugi-applicator-kit-5-piece-711919 https://www.youtube.com/watch?v=GBT3kvbocbc1 point
-
Masking tape is you friend. Don’t leave it on, it must be removed immediately after tooling / finishing / dressing the silicone. A cup of water and baby wipes are essentials, and always wet your finger before attempting to smooth. Smooth the excess over onto the masking, and peel away when happy. Once peeled the silicone edges will fray slightky, so one more wet finger or wetted tool run should finish the job nicely. Maybe a practice run on some scrap first would be best to get you ‘fully trsined’1 point
-
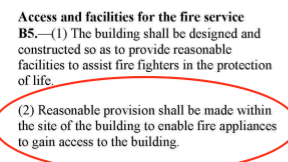
@JSHarris Yes, a good point Jeremy. The regulation is incredibly vague unless there is more to it that I can't find: http://www.legislation.gov.uk/uksi/2010/2214/schedule/1/made
 1 point
 -
We have a 25mm supply to the house which works but we see some interaction between outlets and I would fit 32mm if building again. This interaction is not due to pipes within the house. If you fit 32mm pipe you can still fit a 25mm meter so no extra charges. We are in an area prone to burst water mains. Its burst three or four times in 10 years. Each time I get the impression Anglian Water turn the pressure down a bit to try and prevent it happening again.1 point
-
https://www.southernwater.co.uk/sewer-ownership-changes https://www.southernwater.co.uk/films-explaining-the-changes See the vid on semi detached properties. They are now responsible for the shared lengths of pipe.1 point
-
From attached Ofgem's guide to non-domestic RHI, para 4.40. Haven't read through the whole document, but it seems that where you have separate council tax bandings (as in my case for house + cottage), you can retain the "domestic" nature of both properties without needing to apply for PP for conversion to business use, and still be eligible for non-domestic RHI, subject to fulfilling the other requirements. BTW this factsheet also states on page 2 that if your main house and annex/outbuilding are supplied by a renewable heating system and have separate EPCs, then you may not be eligible for domestic RHI! guidance_volume_1_v5_publish_0.pdf1 point
-
Thanks for the tips! Haven't even started building but I reckon buildhub has already saved me several £££! Ps @newhome I have also read and re-read your vat thread - so useful.1 point
-
I think you guys just helped me dodge a bullet with our first build which we are planning to do a VAT claim on!1 point
-
might be worth looking into a set of silicone formers as well, running a nice even bead can be easy sometimes, but if you mess it up these make it loads easier to sort out. they make the job a LOT less stressful! you wont need a set that big, but a single one will probably cost at least £2-3 at a merchants,1 point
-
A numpty question from me @Nickfromwales. Are you supposed to scrape out the old stuff first?1 point
-
It's just like shoes - you can never have too many different choices ? ? ??1 point
-
Kudos to you both for keeping going! Most people would have been filing for divorce come the new year I imagine!1 point
-
How about you put a 'turning area' in as cheaply as possible. Then once you're signed off, build your garage on this prepped area..! Thinking about it, I'd do that. Just play the game a bit.1 point
-
As I understand it, any drain which has more than one connection is adopted by the drainage authority, so this would be included in that. Request a sewer plan (small fee required). You will need to fill out the form from Southwest Water for a new connection. From what you say, this would be via a new manhole which you would build to their standard spec. As it is on private land you do not need to use a streetworks approved firm to do it. If you plan to build over or near the drain a further approval may be needed.1 point
-
Yes. But needs care and appropriate lintels. Creating two was the first DIY construction job I ever did. F1 point
-
Here are my thoughts using those check points mentioned in another thread. Does the plan clearly convey an objective? Yes. How well does the plan achieve that objective? Pretty good. Would I enjoy a short holiday let in the property? Strong yes with its walking distance to central Cambridge but mostly it is a refreshing alternative to most British domestic house design. Would I want to own or build this property? Strong yes. I think the market would financially reward the builder, it provides a non car based lifestyle in a global ivy league university city. The design provides something different in a city where buyers should be receptive to innovation. As a buyer of the property I would start discounting from the asking price to fix the elements of the internal design that do not work for me. Specific comments: Like others I had a bad reaction to the sky light arrangements. The sky lights look like adhoc retro fits implemented to fix a design error, the net result is a roofline that resembles a maintenance depot shed. Suggest fewer larger non square roof lights. Having said that I do appreciate that black and white technical drawings tend to over emphasize detail and in real life these skylights might visually melt way. I would want to rework the landscaping to create a late afternoon patio outside the main bedroom to catch the late afternoon sun though I appreciate your current focus might be internal privacy from the road. The snug simply does not work and it would take some particularly creative internal decor to improve this. I cannot think why I would head for the snug when leaving the kitchen because the living room is the same number of steps away with much more window area. If you wish to retain the snug you could adopt some ideas about creating a cosy space by looking at traditional rural spanish houses that have a hunker down for the winter inner living room. I would swap the utility room and bathroom around and have the bathroom door facing down the bedroom corridor. The occupants of bedroom-2 should find the bathroom closer and this will also improve the coupling of utility room and kitchen. Keep the kitchen/living partition wall. The design is already open plan enough and that wall helps specialize the spaces. Finally and a biggie. I don't like the 1960's aspect ratio of the principal windows. I would subdivide them with pillars though I fear this would cause havoc with you carefully crafted solar gain calculations.1 point
-
After the Christmas hiatus, I am finally getting around to placing the newspaper ad. To my pleasant surprise, the cost has dropped by a third since before Christmas. Unexpected but welcome.1 point
-
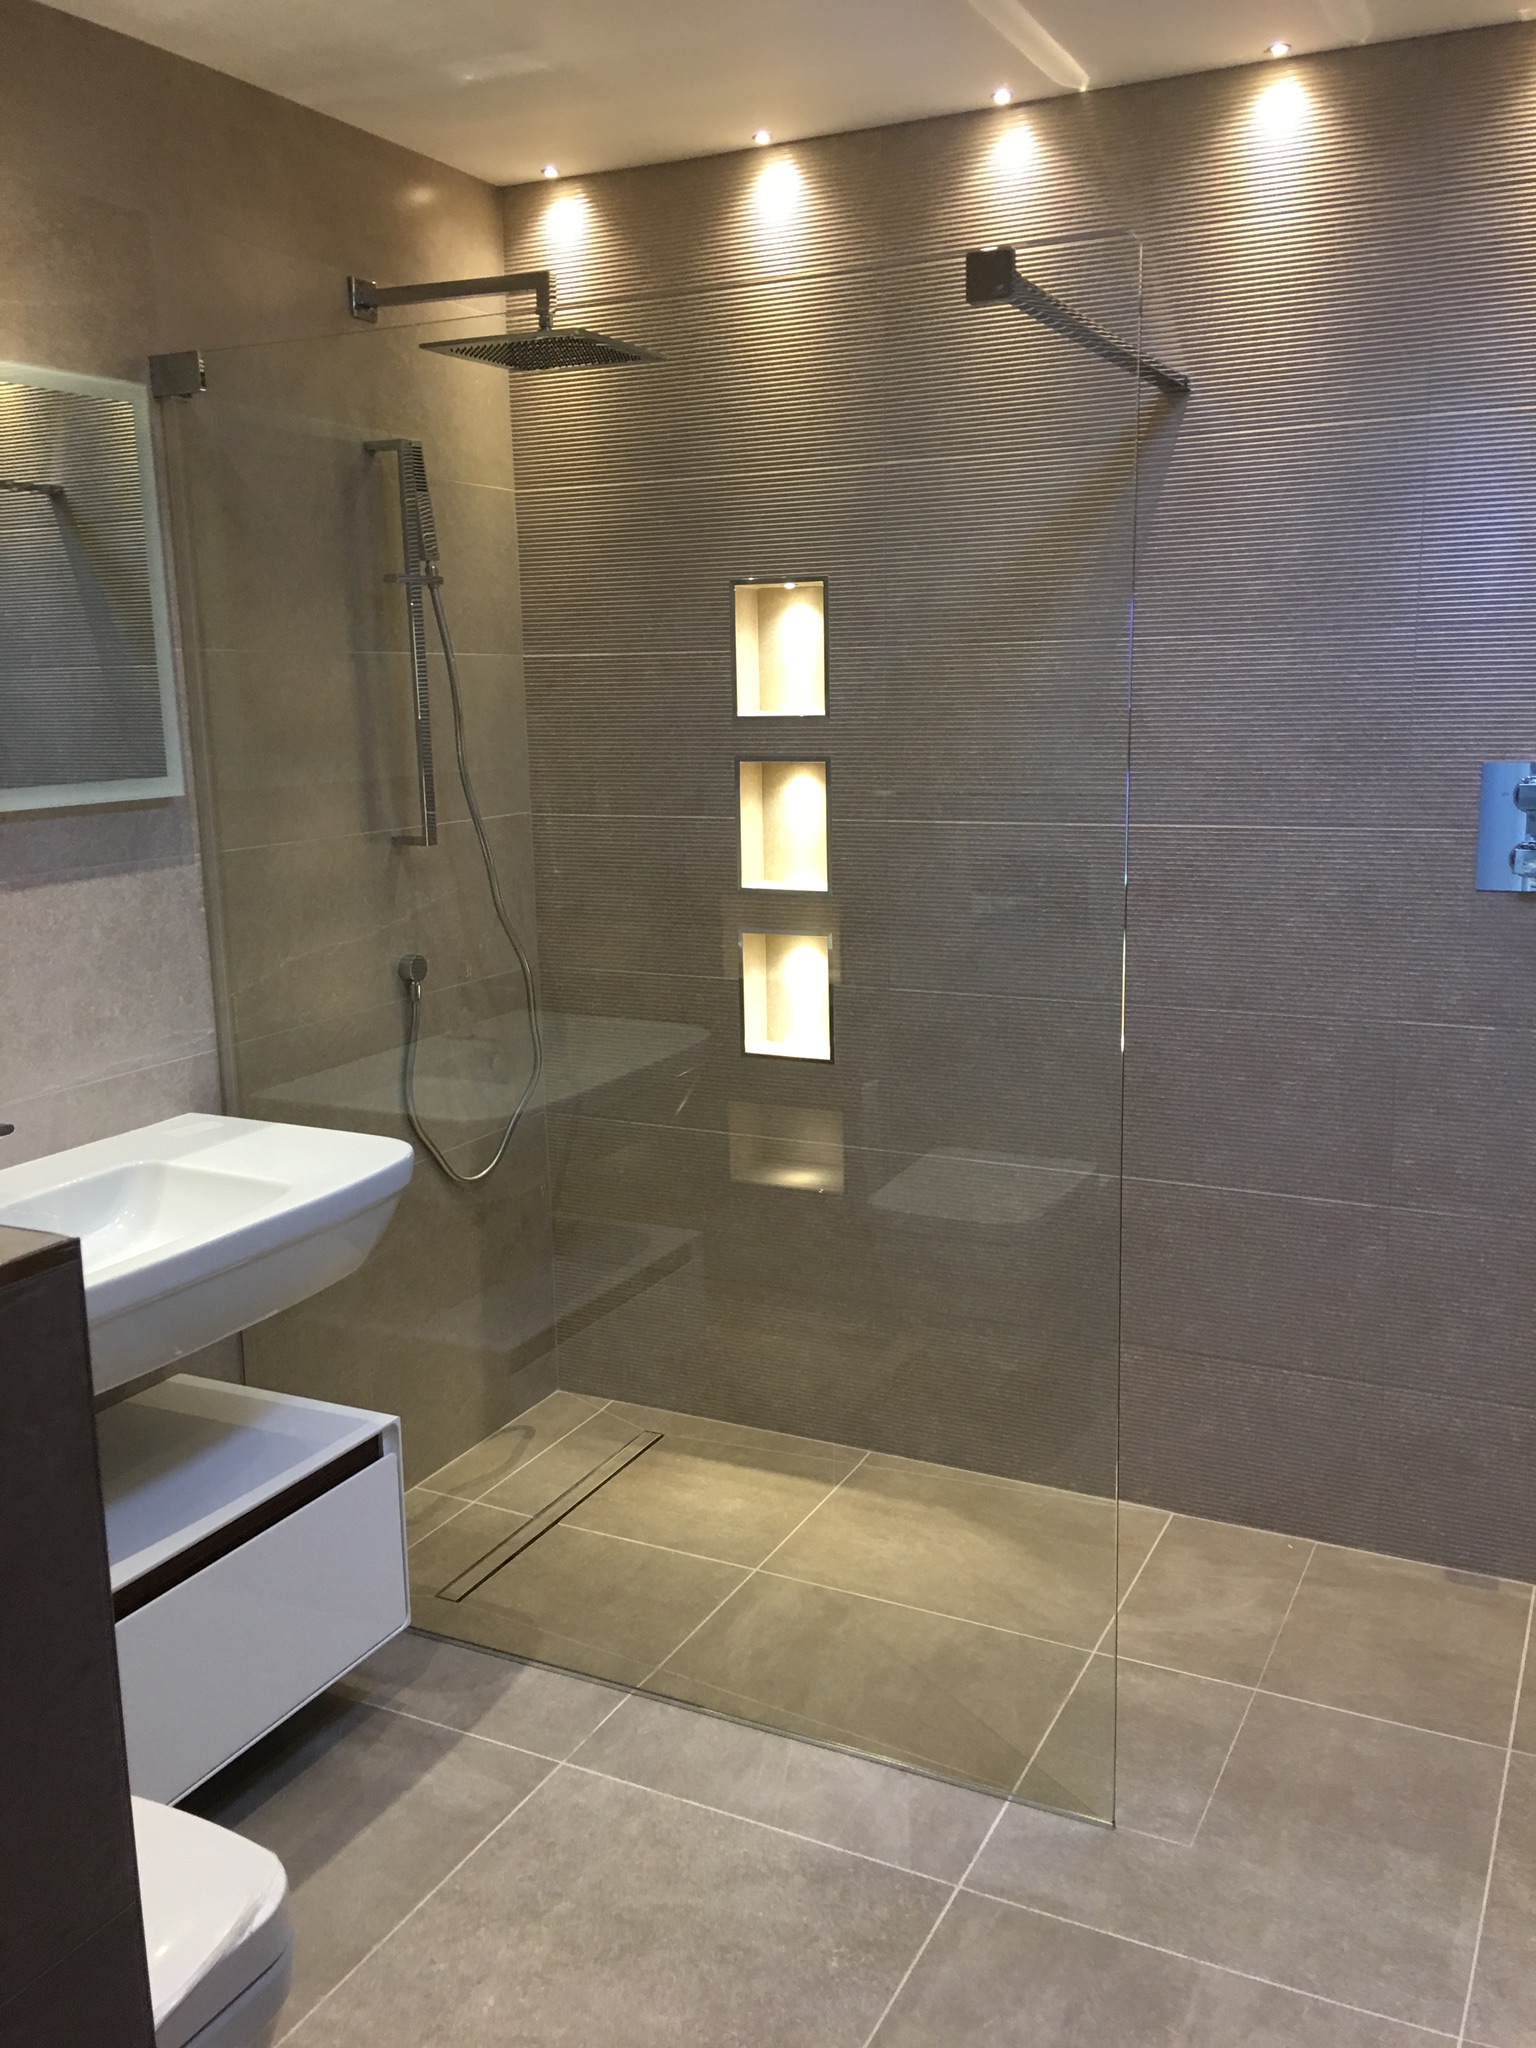
Ive got a flat floor wet room, tiles and a linear drain that is tiled. Very sleek. This is on the mbc slab.
 1 point