Leaderboard


Popular Content
Showing content with the highest reputation on 07/11/18 in all areas
-
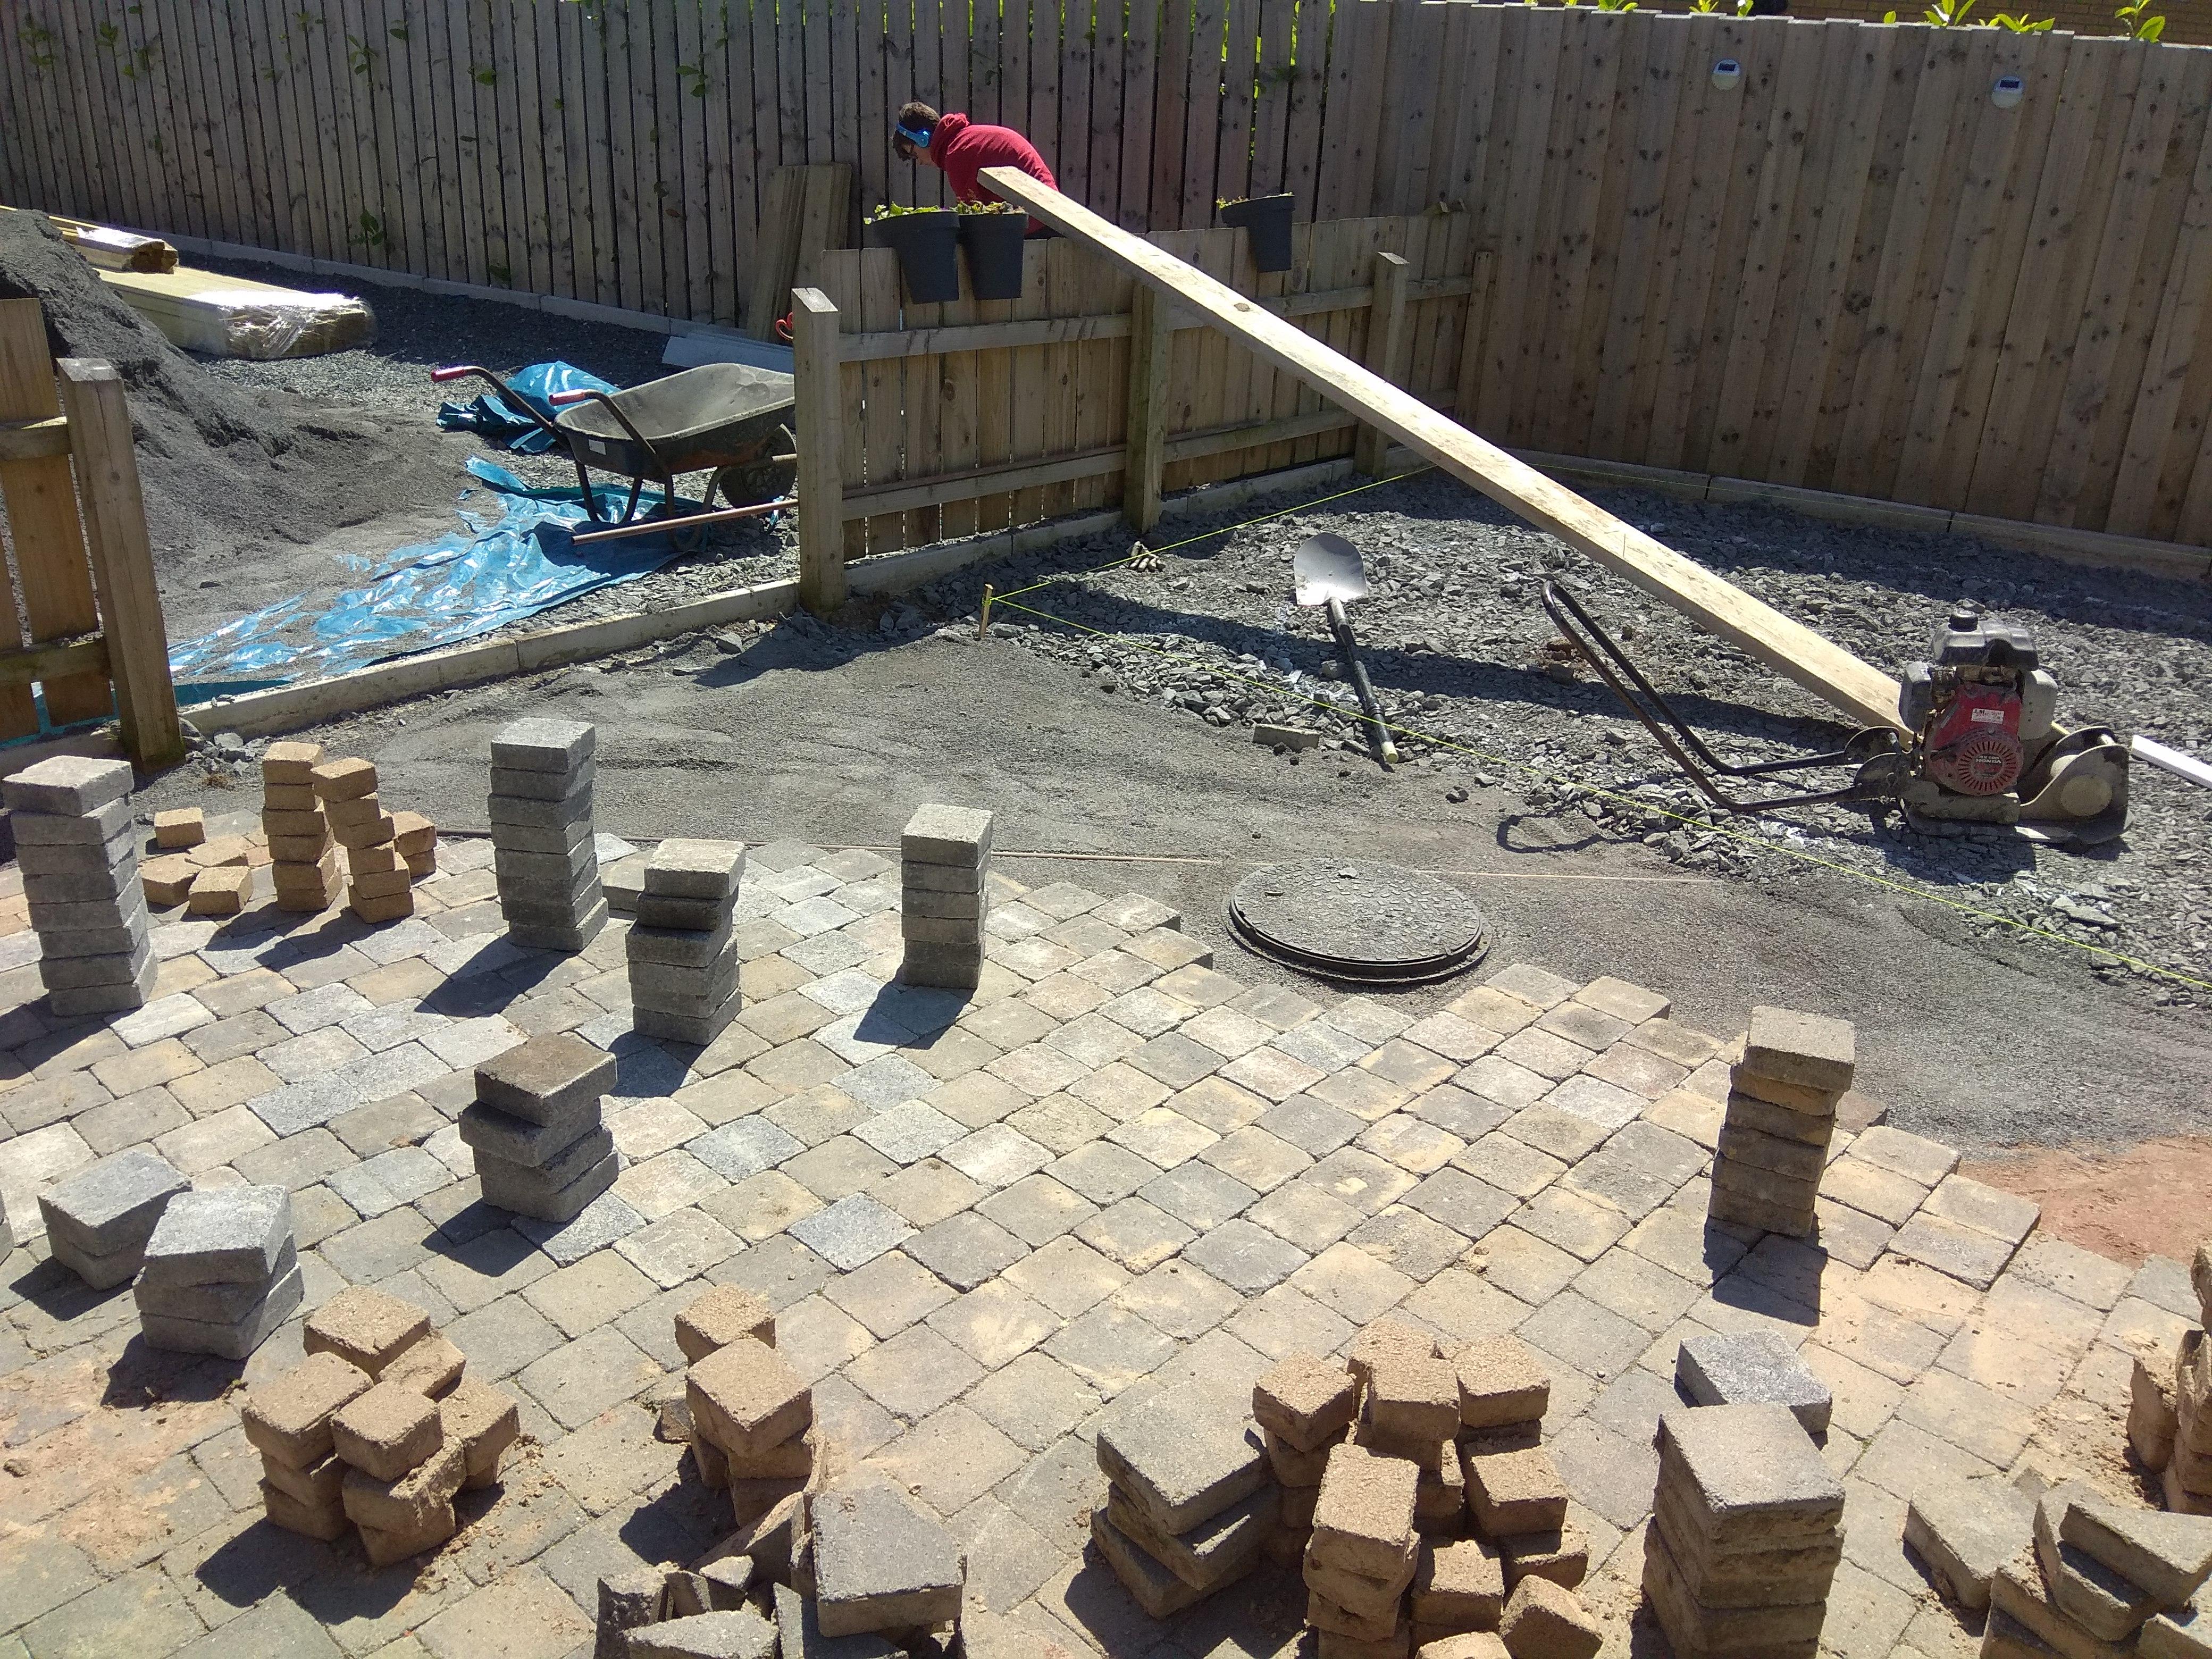
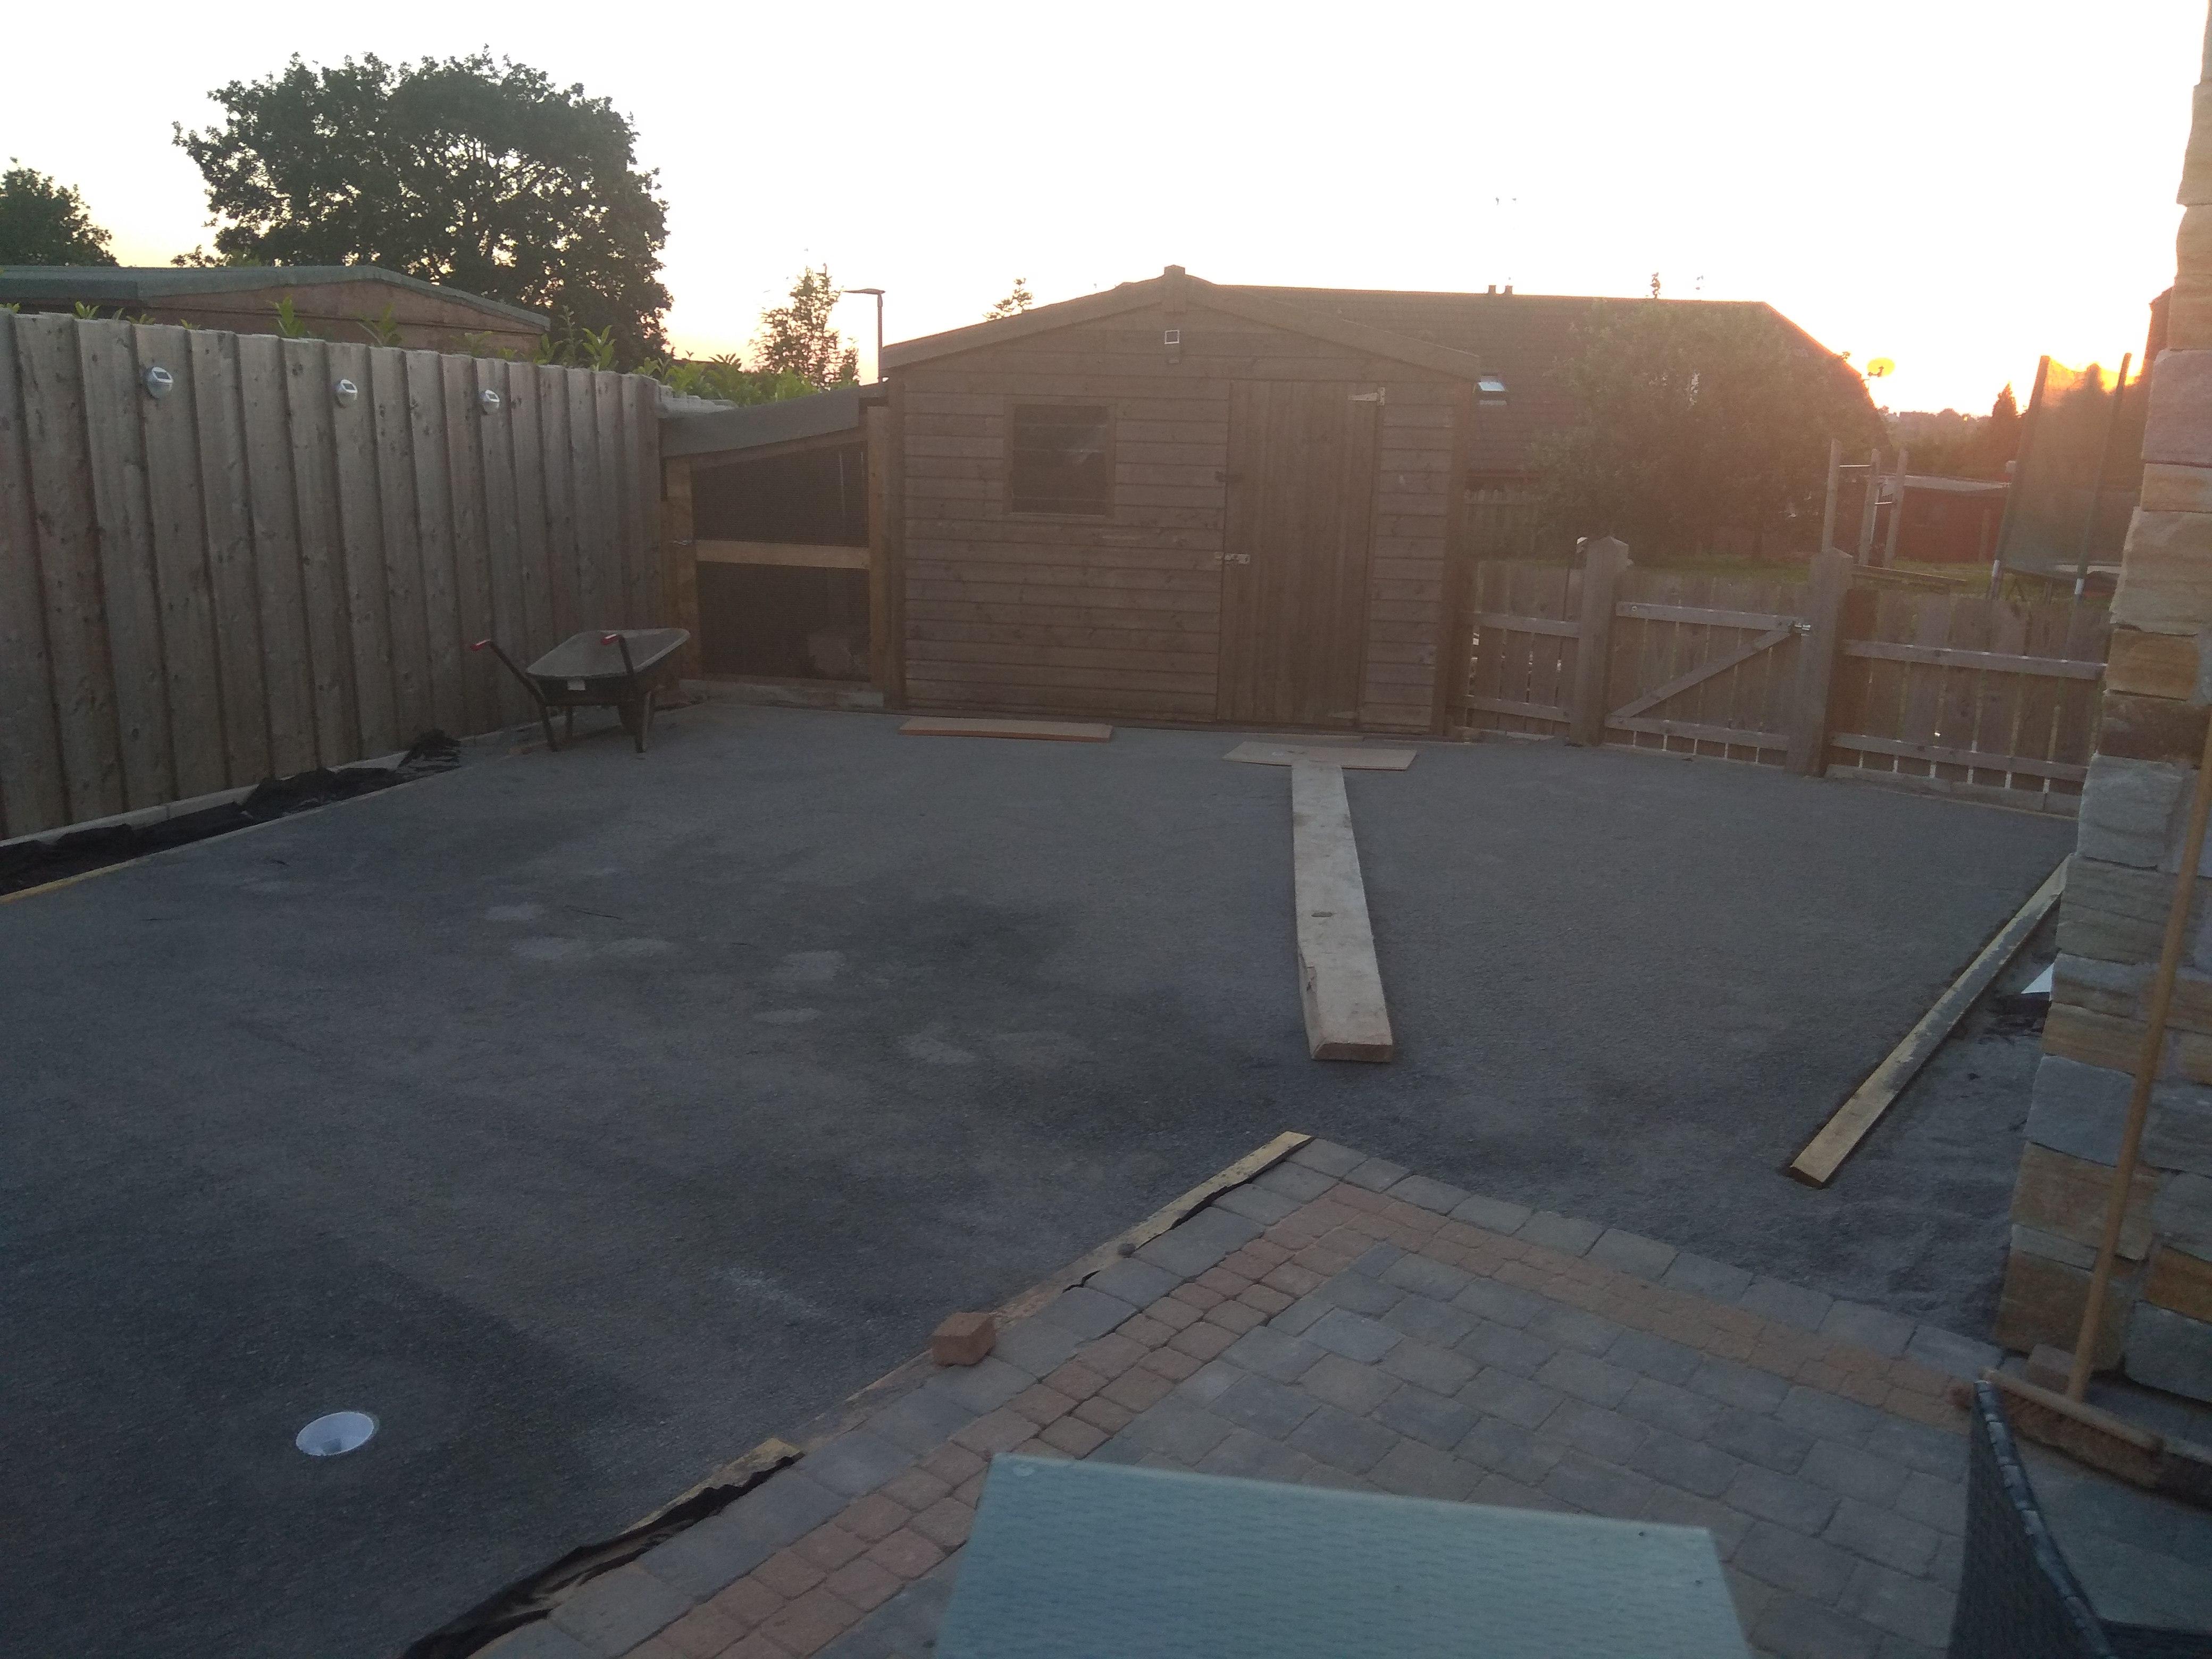
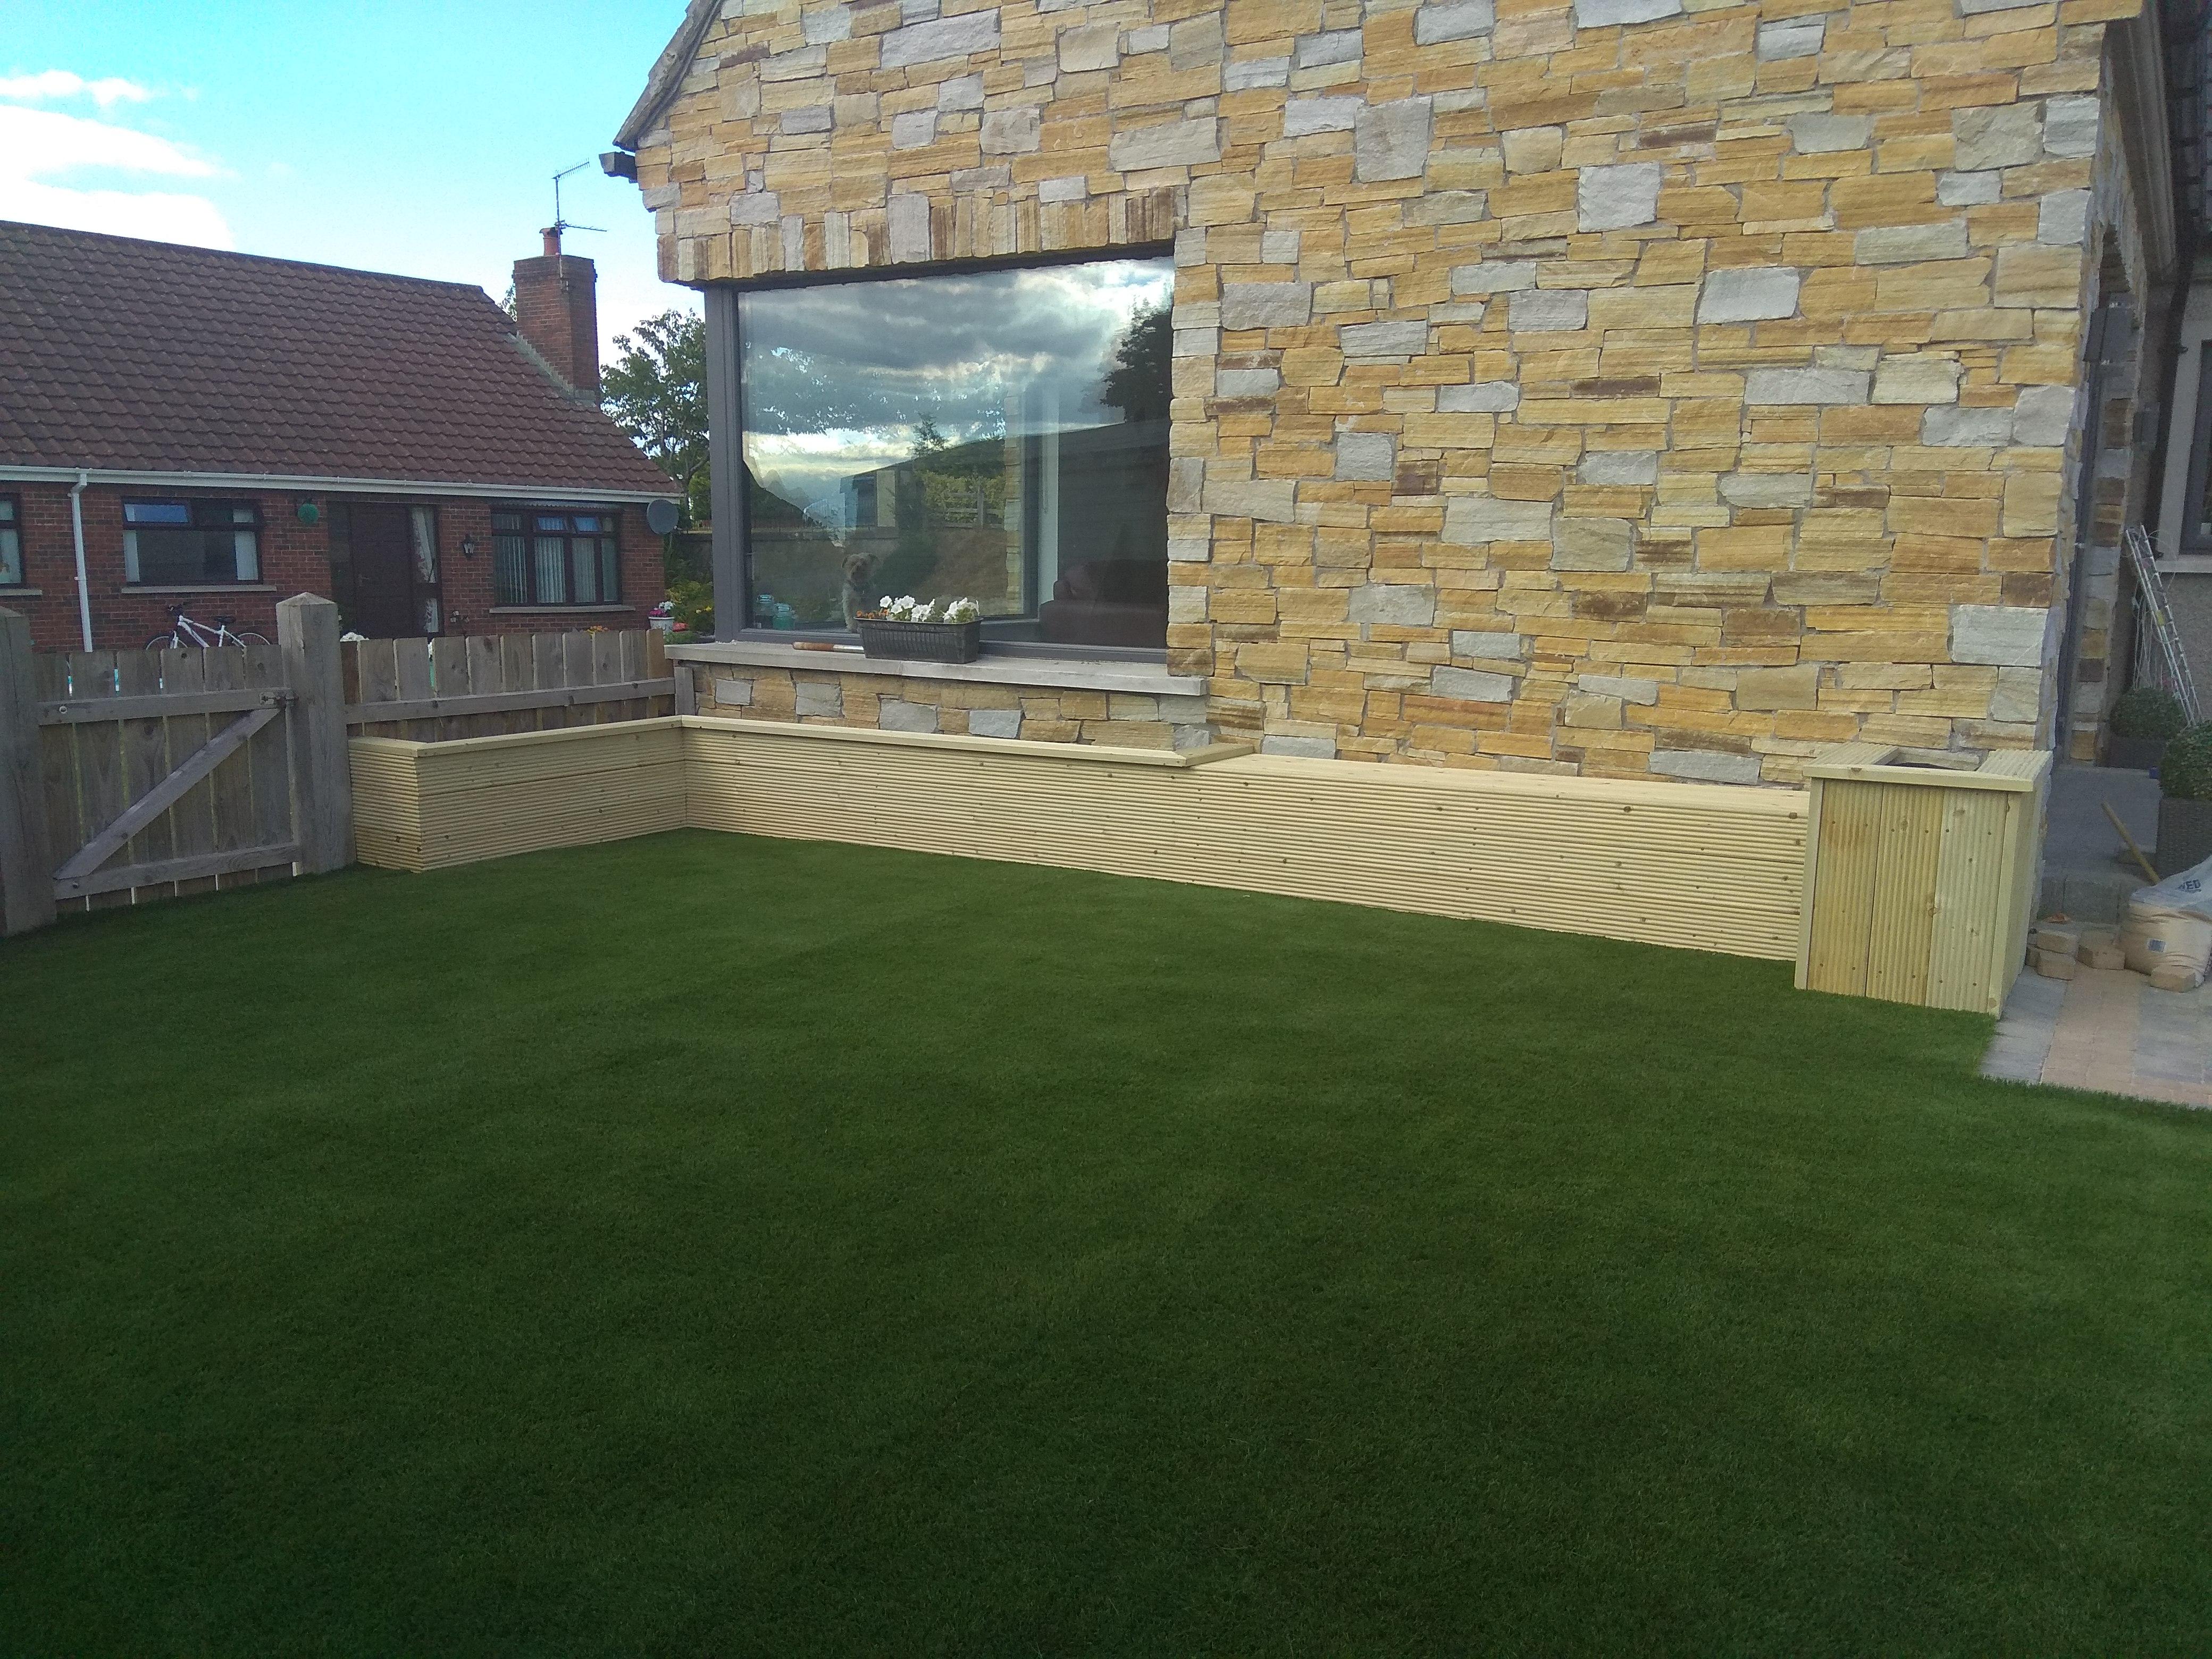
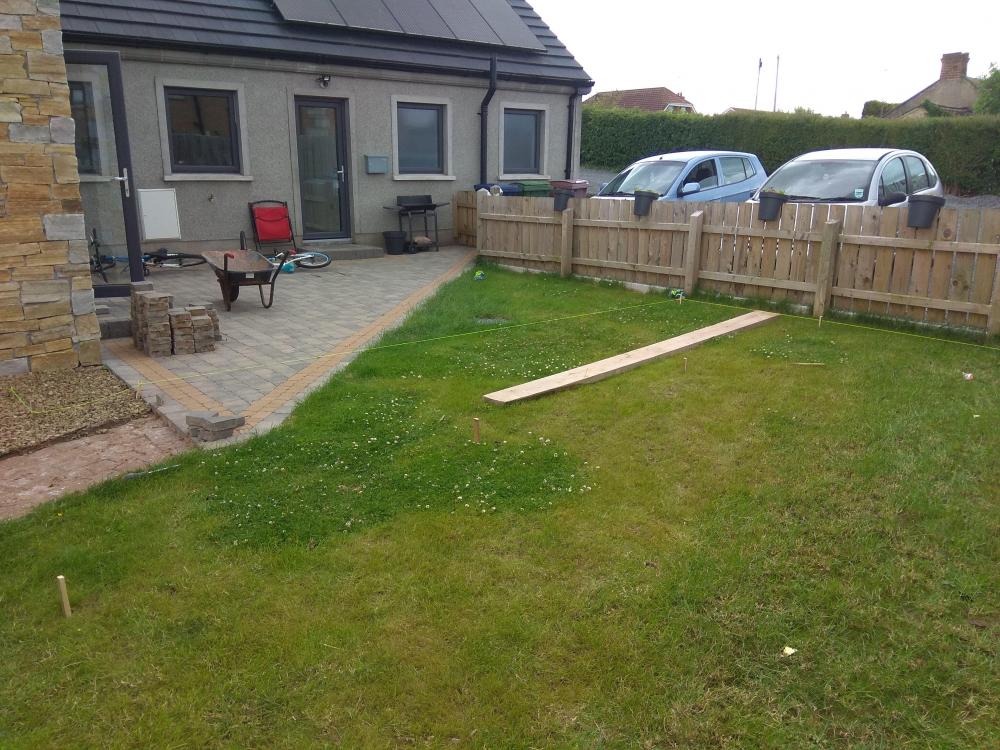
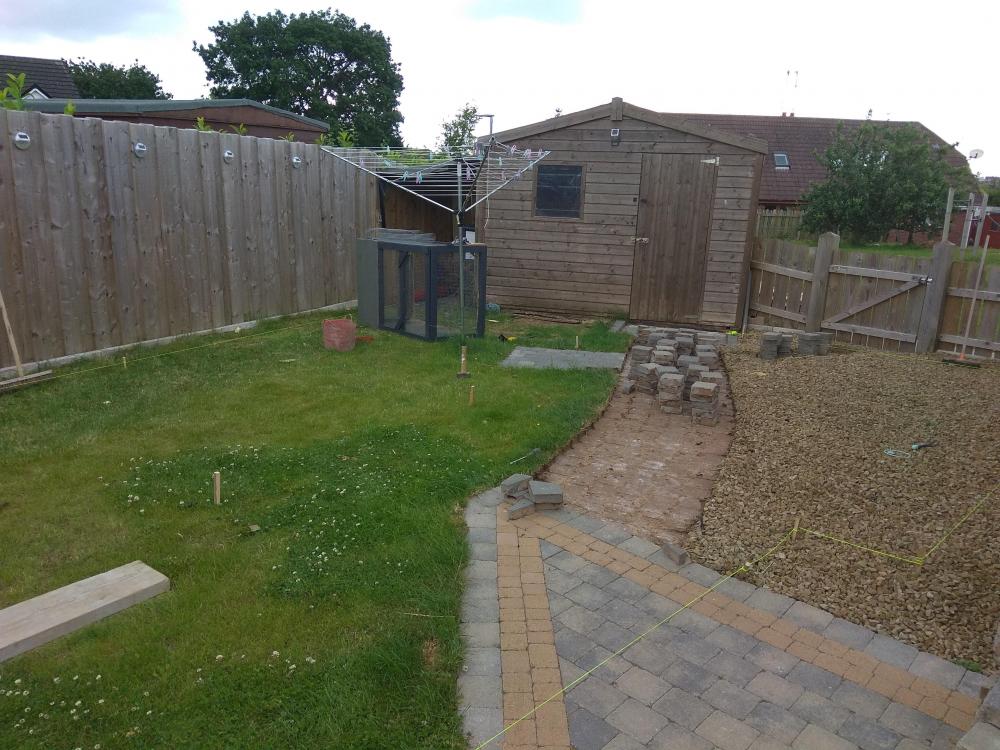
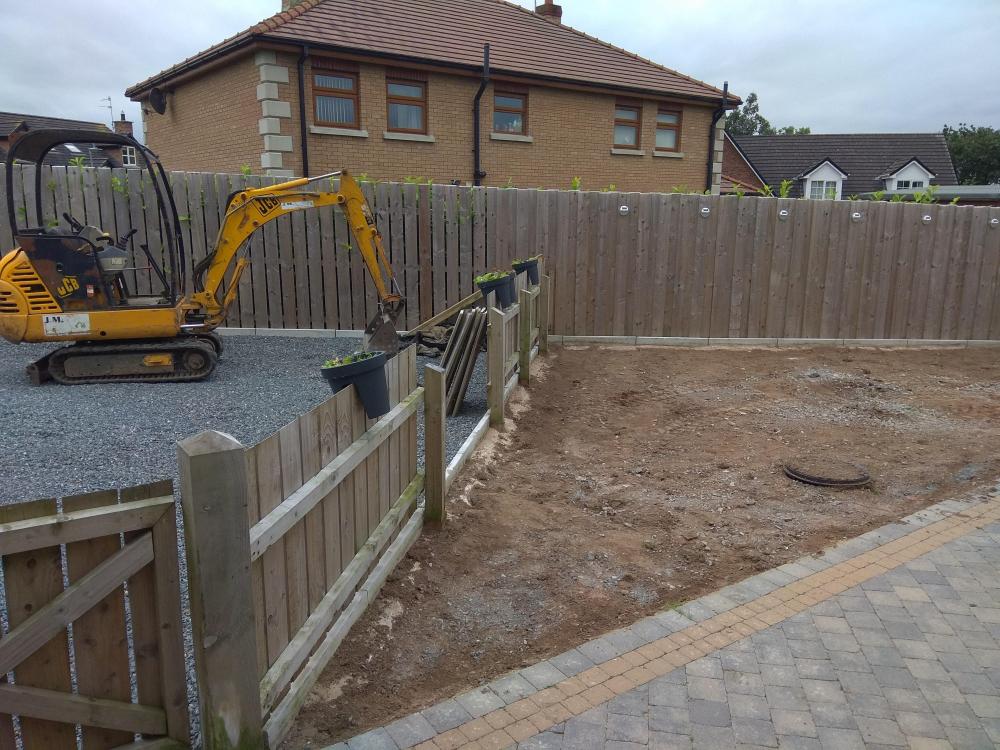
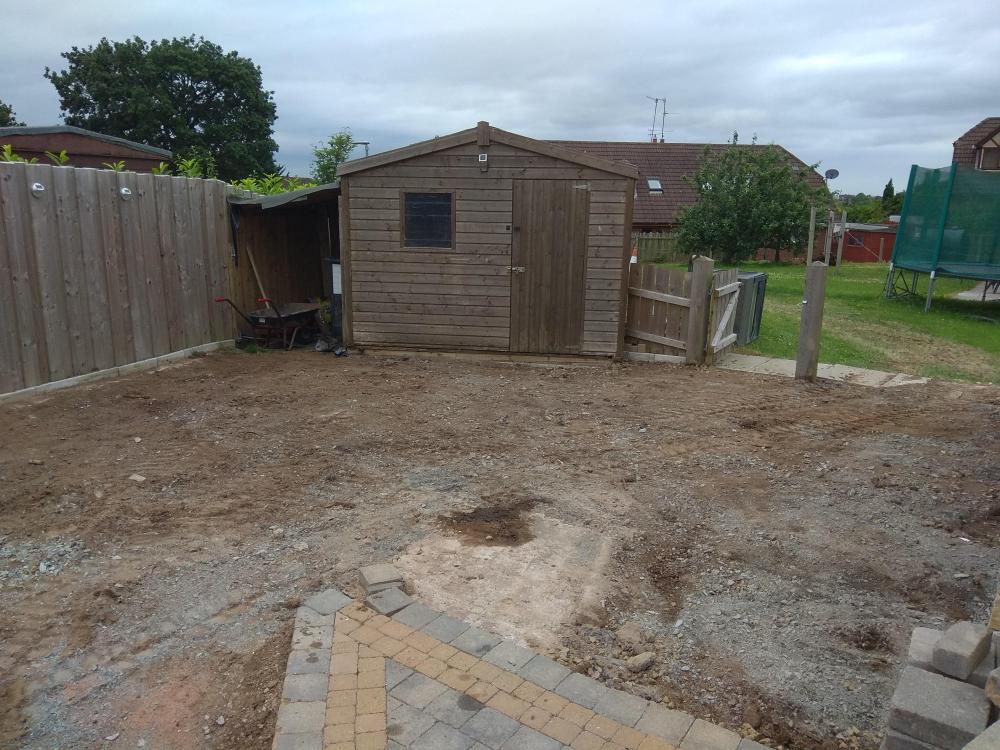
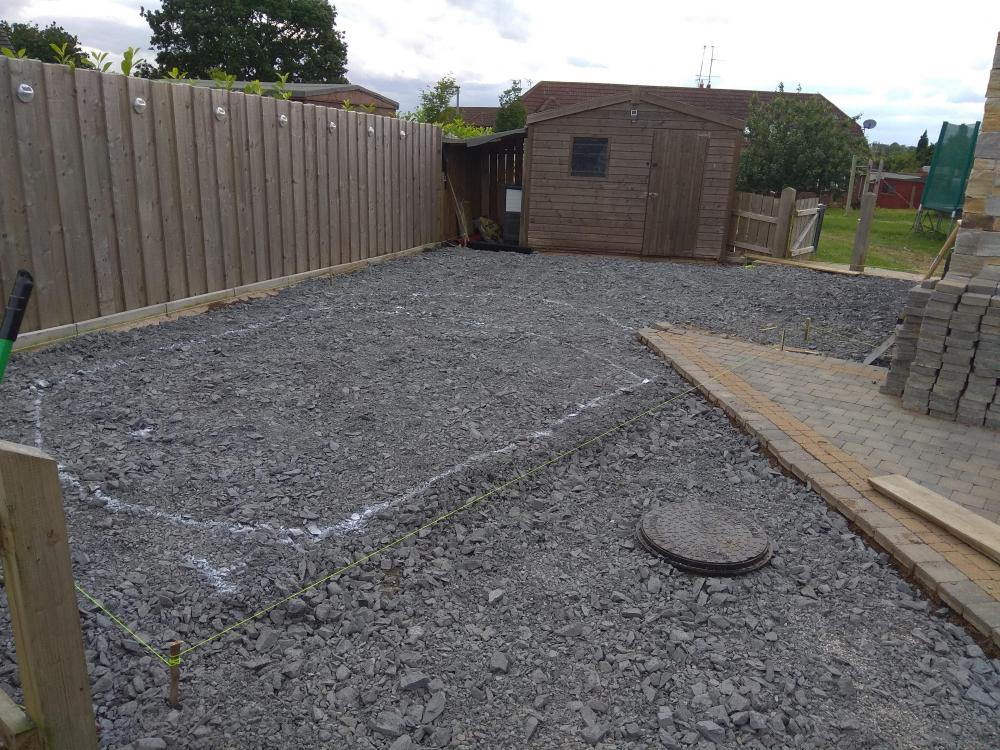
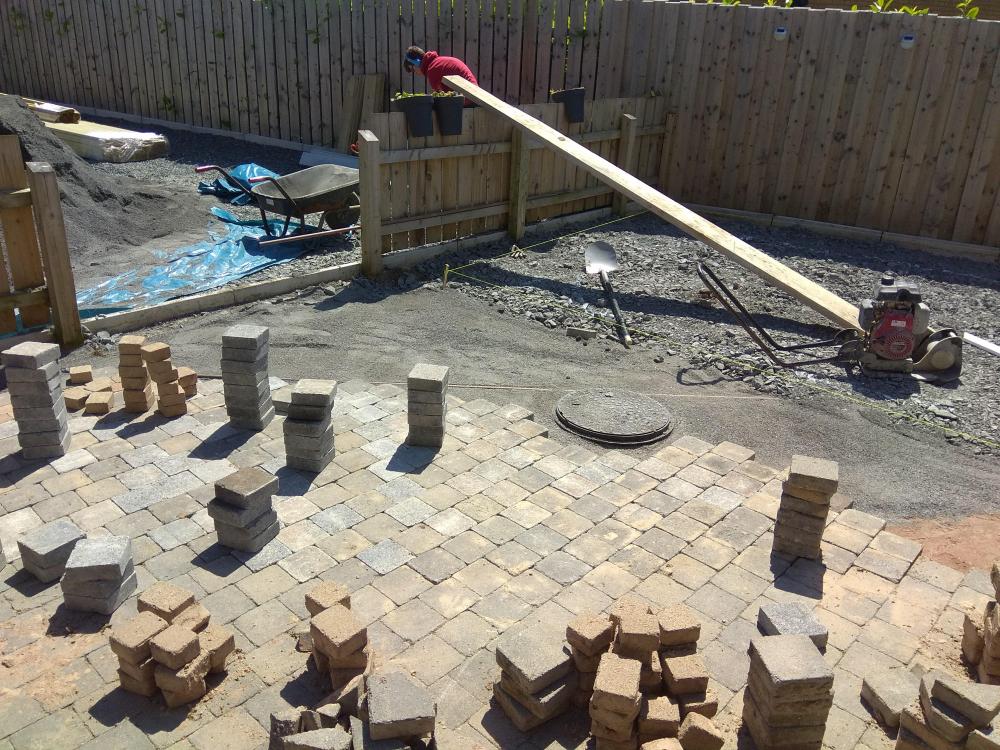
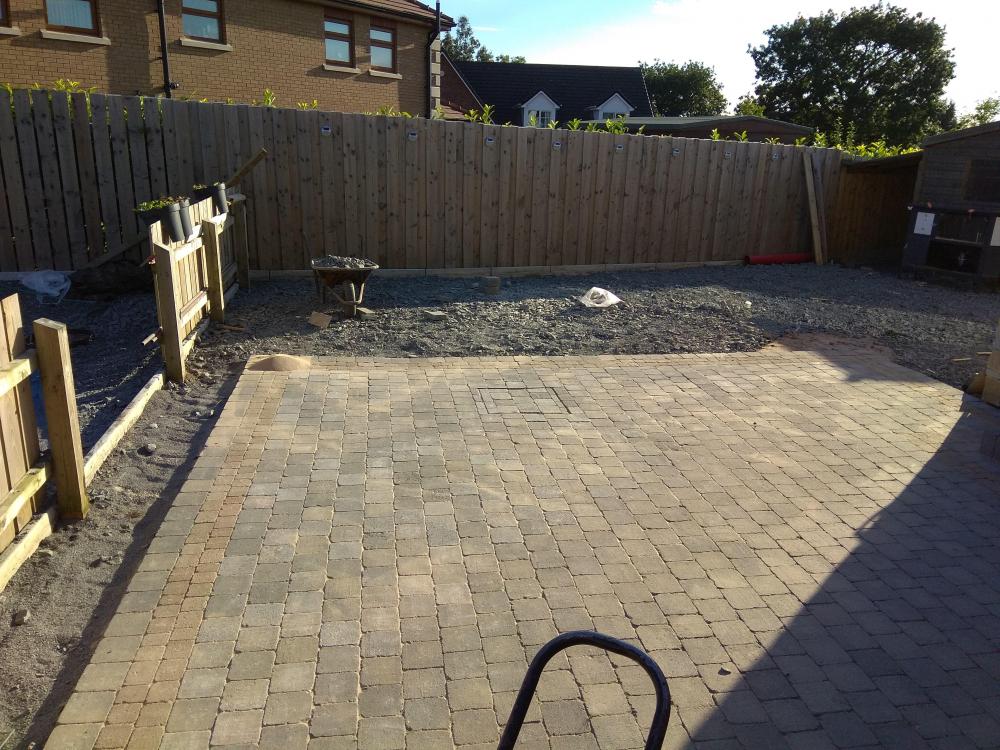
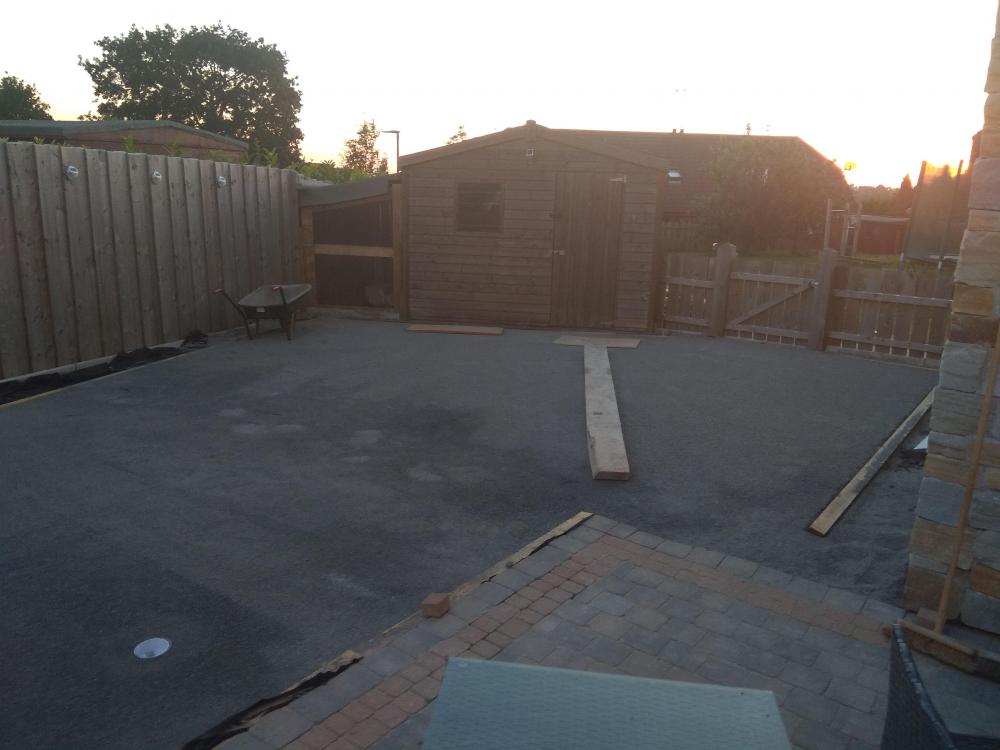
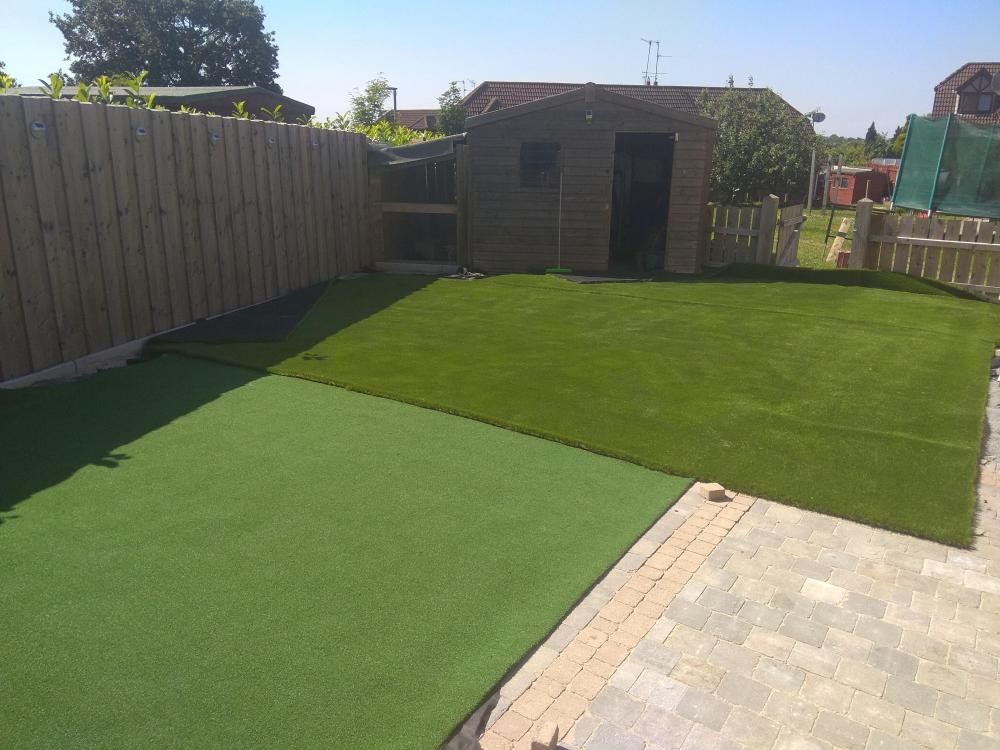
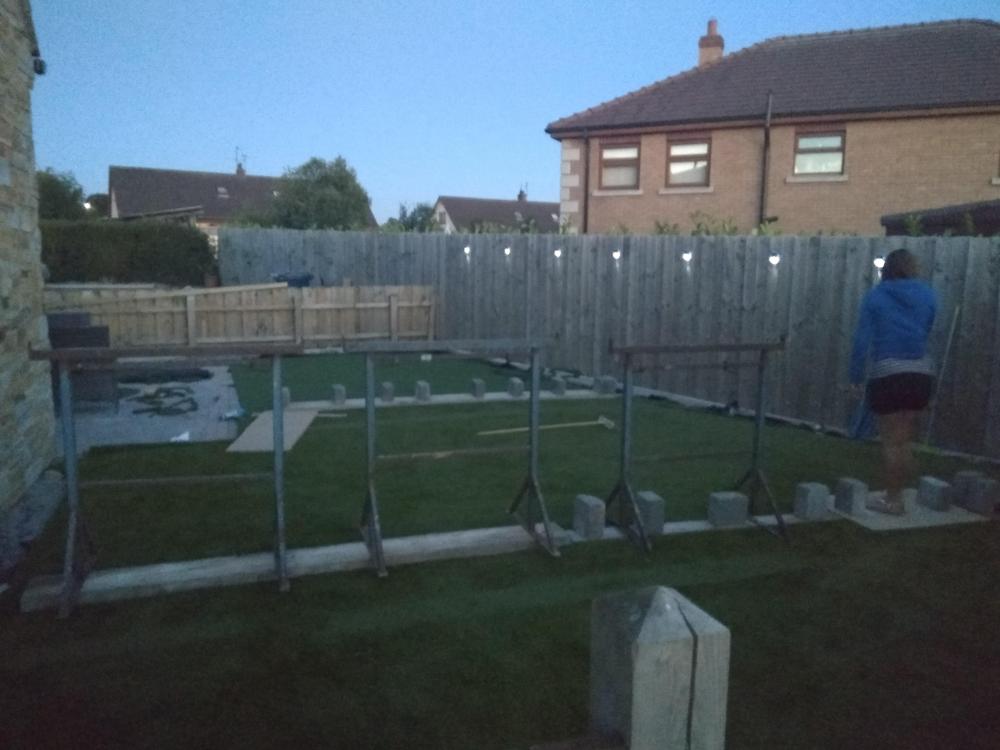
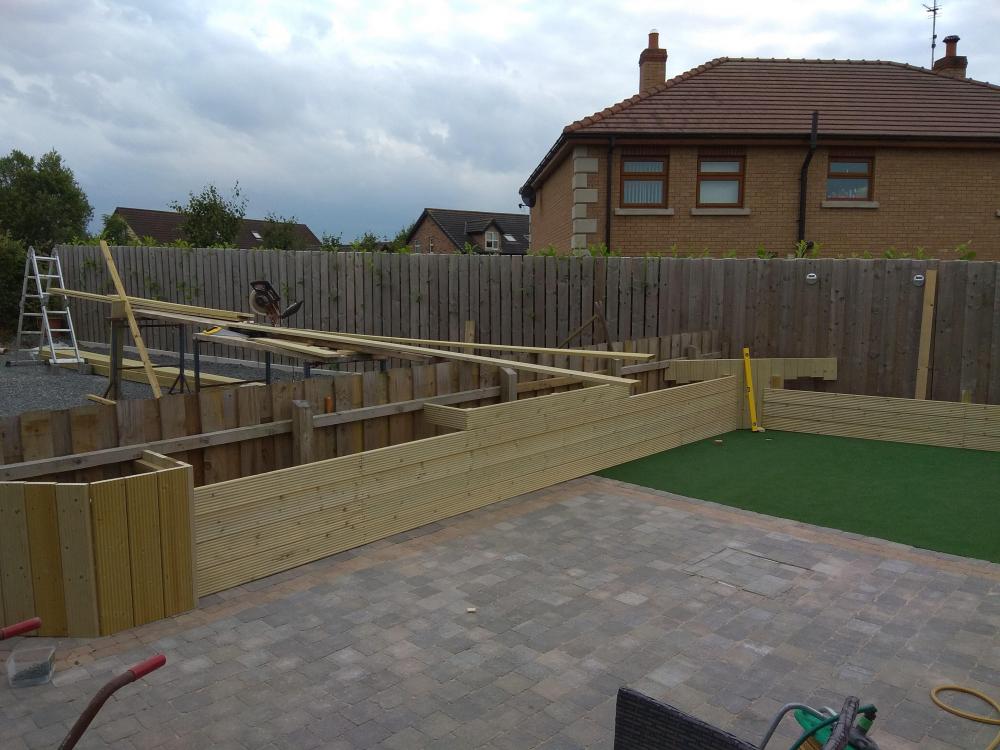
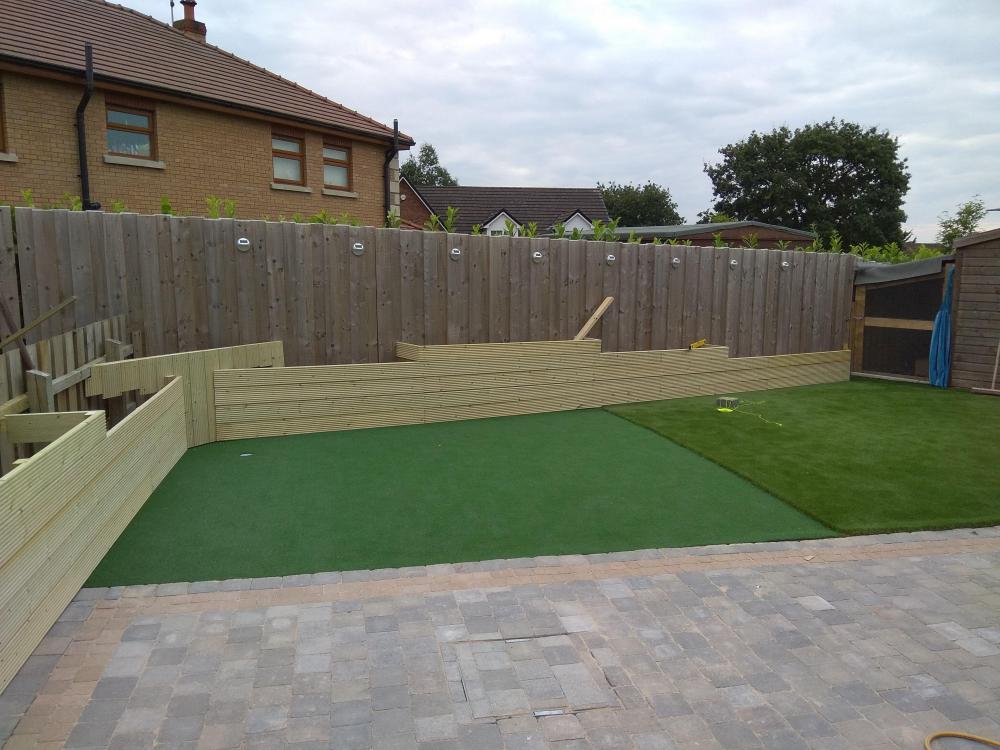
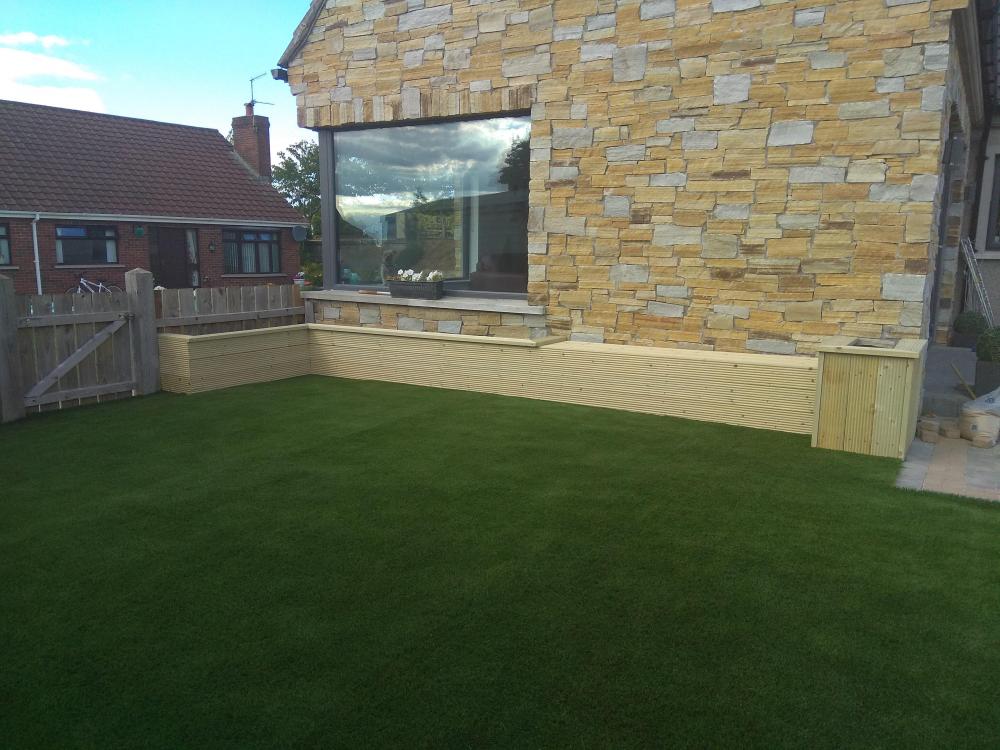
So near 4 years after moving in the day of reckoning finally arrived, the boss uttered the dreaded words " right you that back garden needs sorted". After trawling the web Facebook and finally Pinterest we decided on a look. As a sidenote Def a woman invented that pinterest app no way would any man create something like that which is full of things to put ideas into a wife's head. First job was to dig out 10t of soil. Hired a digger started to remove the soil and was able to use it to fill the bad bits in my mum's garden next door. Waited all day for the stone delivery and it never came. Digger was collected the next day at 9am and stone arrived at 9:50am. 8t of crush and run wheeled in by afternoon. Next delivery was 6t of quarry dust and all the rest of the materials that I needed. Dust laid down to extend the patio out to form a large rectangle of approx 8m*8m. Paving bricks all in so next step was the base of the artificial grass. There is roughly 80mm of hardcore wacked in and then 60mm of quarry dust wacked and screeded to suit for the grass to sit on. Black weed membrane gets put under the hardcore and then on top of the dust. Never realised how heavy the roll of grass was. Took me the wife and the young fella to get it moved to where it could be rolled out. As a keen golfer I wanted a putting green so the garden has a mixture of putting green grass and 40mm grass. All rolled out and trimmed to suit the joins where glued together using the jointing kit and then weighted down with everything I could get from planks, blocks, trestles and a wife. left over night to let the glue set the next step was garden planters around the edge. I looked at using everything here from decking to iroko cladding to even blocks and plastering it up but in the end we went for decking boards. Can be easily painted and replaced if any damage is done in the next few years. Have the top section to put on tomorrow and then fill with flowers and herbs and then hide the shovel and Spade for another 4 years. Should have it all wrapped up for Thursday just in time for the rain.
 4 points
 -
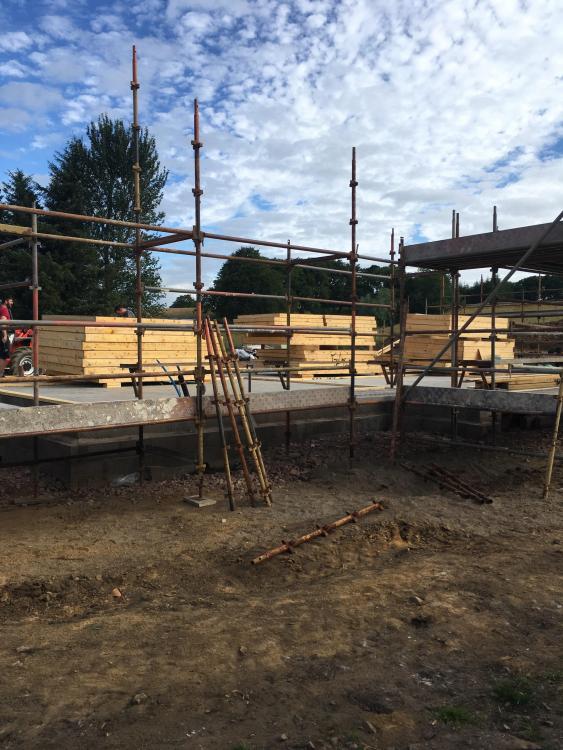
It’s started!
 3 points
 -
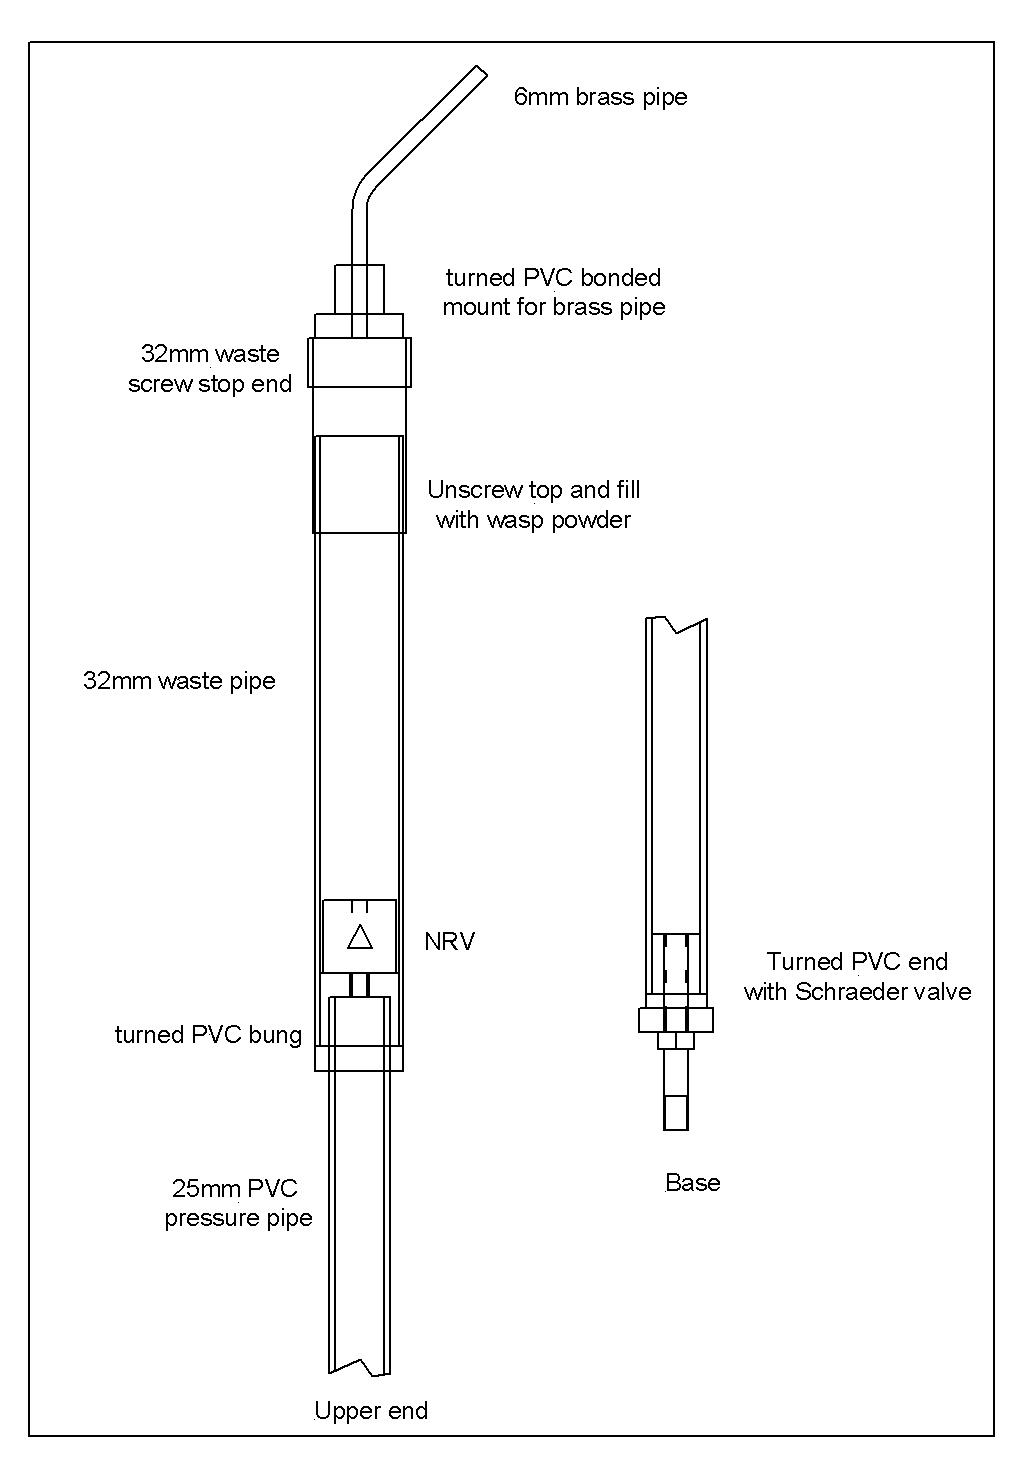
We had a small problem at the old house, wasps had started to build a nest in a corner of the roof, flying in and out via a small gap in the facia board. This is right next to the drive and I spotted them yesterday when laying the gravel, and as it's right next to the entrance to the house there was a high risk of getting stung later in the year, when they tend to get more aggressive. Last time we had a similar problem, on the other side of the house, above our bedroom window, I didn't spot it until late in the summer, by which time the nest was the size of a football up in the loft and we could hear the noise in the bedroom underneath. I had to pay a bloke from the council around £50 to come out and deal with it, after my own attempt to puff insecticide powder in the hole resulted in my getting multiple stings (no fun when your up a ladder). This time I did a bit of digging around on the web and came across this gadget: http://waspnestkiller.co.uk/acatalog/Dustick-High-Reach-Dust-Powder-Applicator-dustick.html for close on £200. Looking at it in use (there are Youtube videos of people using it) it seemed ideal, as you can stay on the ground and just poke the nozzle in the hole and pump in insecticide powder. I wasn't going to pay £200, so last night I went and had a look to see what I had lying around. I found a length of 1 1/4" solvent waste pipe, an 1 1/4" solvent straight joiner and a screw on solvent end cap. I also had some 50mm diameter grey PVC bar, some 6mm brass pipe, a length of 25mm PVC pressure pipe (20mm bore), a very low blow off pressure fuel-type non-return valve and a Schrader valve with a 1/8" BSP thread on it. All the parts were glued together with ordinary pipe solvent cement, which works just as well on the bits of PVC that I turned up. So, this is roughly what I made up. First the drawing of the two ends: The way this works is that you unscrew the top with the brass pipe, and fill the bit of waste pipe with insecticide powder. This doesn't need to me marketed as wasp killer (I found it hard to buy wasp killer powder in the local garden centre) it just needs to be a powder containing around 1% or so permethrin. Ant powder is usually the cheapest way to buy the stuff, and it works very well against any form of insect (including beneficial ones, like bees, so use it with caution). With the top part full of powder you can screw the lid with the brass tube on, as shown in the photos before (taken after use): When assembled, the whole thing looks like this: It could be made a lot longer, but our house is a bungalow so I cut the 25mm pipe down to make it easier to handle. The non-return valve in the base of the upper section just stops powder going down the 25mm pipe - not sure whether this was needed, I think I could probably have got away without the bit of 1 1/4" waste pipe, but it is easier to pour powder into the larger opening. Finally this is a close up of the Schrader valve at the lower end: To use this I connected a tyre inflater to the Schrader valve, that was connected to my compressor (at around 90 psi). The brass nozzle was poked into the hole where the wasps were coming in and out and the air trigger quickly pulled to blow almost the entire contents of the powder container neatly into where their next was. I then beat a hasty retreat, as permethrin tends to get wasps a bit mad for a few minutes, before they snuff it. I went out half an hour later and there was no sign of wasps at all, other than some dead ones on the ground. Best of all, there was very little sign of white powder when I'd sprayed the stuff in, as unlike the puffer bottles, this gadget squirts a high velocity narrow stream of dust directly into any hole. The only thing I had to buy was a bottle of ant killer powder for around £2.50, and I only used around half of it. The rest was made from "may come in handy bits", plus the use of my small bench lathe. It took me less than an hour to make - the longest bit was waiting a couple of hours to make sure the solvent cement had gone off, before I could have a go at using it. If anyone wants to borrow it they are welcome. I think it would work every bit as well with something like a bicycle track pump as a compressor, as it doesn't need a lot of air (a 1 second burst was about all it took to empty the container).


 2 points
 -
WTF? Just finishing the second two mist coats and it looks lovely. SWMBO wanders in... S: "Looks great, is that the top coat?" Onoff: "No" S: "Top coat next?" Onoff: "Yes" Wait for it... S: "I don't mind matt on the ceiling!" ??? Then! S: "But I want gloss on the wall!" Onoff: "You can't have gloss on the wall it'll look crap, get proper bathroom paint!" S: "That's what I meant" ???2 points
-
@Nickfromwales says he only needs his nails done once every other month....?2 points
-
I tend to avoid the 'sticky stuff' these days, though I am always looking at houses and wonder why composites are not used more. Seems silly to me that we can make complicated shapes that are waterproof from cheap hand laminated GRP i.e. a fishpond, but we make walls and roofs of houses from small components with joints between them. And they tend to be put together by people with hangovers and little education in material science.2 points
-
@Russdl and I were just discussing PHPP in a private discussion and we wondered who on BH has experience of actually using PHPP to design a house. I know @PeterStarck did his own calcs, and he was kind enough to show them to when I visited his splendid build in East Kent. Who else has a PHPP model for their house, or is preparing one? (For those wondering, PHPP is the Passive House Planning Package, a huge and complex spreadsheet for calculating the thermal and other characteristics of a building, produced by the Passive House Institute in Germany and available to buy for about £200. It is a requirement for a certified Passive House. More info here: https://passipedia.org/planning/calculating_energy_efficiency/phpp_-_the_passive_house_planning_package.)1 point
-
Blimey, I did not know this could happen to plastering, and from Mr Charles Luxton himself. What was the cause? How can this be avoided?1 point
-
kudos for the guy showing his mistakes. especially with the magic of editing available.1 point
-
In case we had to get shot of it before we popped our clogs is the main reason. Or maybe lack of faith in me getting it right ? Probably the latter. Probably justified, time will tell.1 point
-
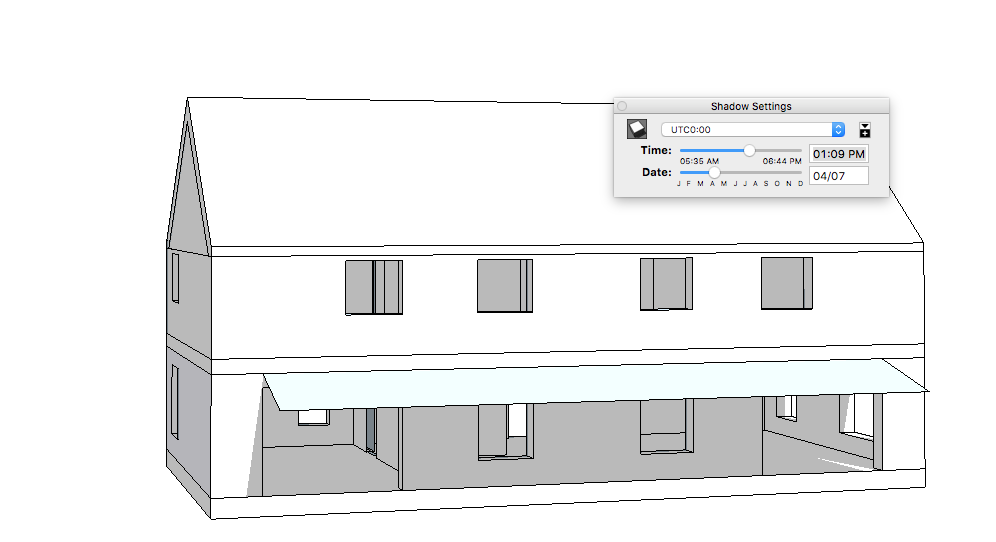
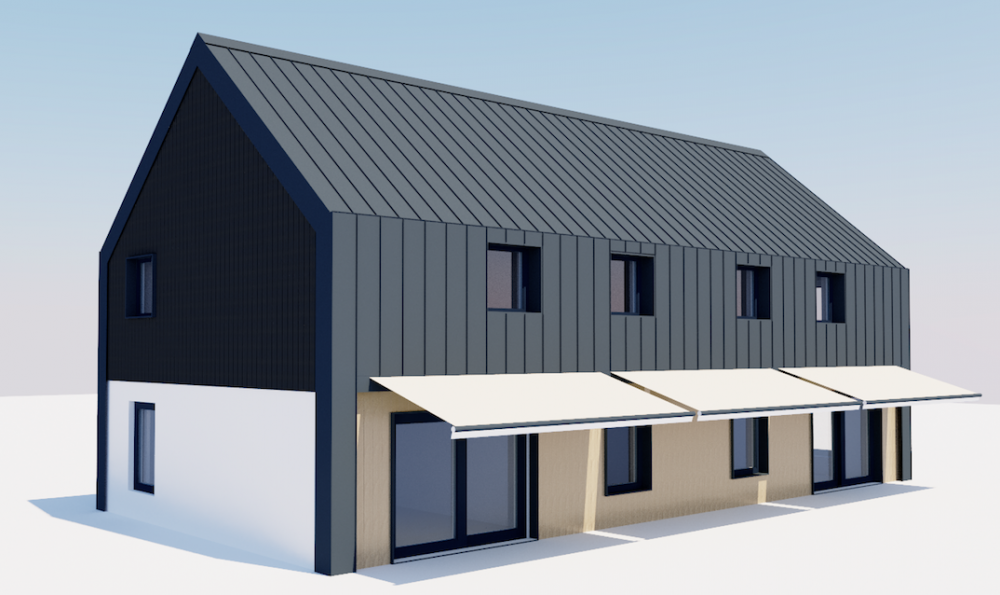
Still on the fence, but falling towards 'not' (if permitted, we all know the rules) I've loved and loathed messing with the PHPP in equal measure. My geo-located Sketchup model has probably guided me more than the PHPP as you can produce the sun/shadows for any time of the year/day and it really reinforces that gut feeling. It's around 190m2 and may look something like this.
 1 point
 -
Only admin can grant blog rights. @PeterW or @JSHarris. We simple mods cower in the sidelines, fearful of ever feeling their wrath. ☠️1 point
-
The first thread I just linked has all the info and links in it.1 point
-
In this earlier video on his plastering, he mentions that the interior plastering is more like a two layer render, for a nice texture, and being really good for the airtightness. He wanted to avoid dead flat surface and sought a slight "rub" to the texture. A scrubbed sponge finish with different textures on the walls and ceilings. He seems to have been experimenting. I suspect he's regretting it now.1 point
-
@Russdl I would love to and will do so if I can. But because of planning constraints, the form factor of my planned home will be very poor (4.6) and so we are struggling a little. Its a modern bungalow with lots of roof windows but behind a tree. It may come to the point where the compromises are just too great (or too expensive) to make it under the thresholds to get certification, in which case we will almost be there and instead I might go for the lower certification (the PHI Low Energy Building Standard). Irrespective, I will proceed in the design and build as if we are going for Classic certification, with the air tests and rigorous attention to detail as, in my opinion, that is what brings a comfortable home.1 point
-
That's it - it's out in the open! Here's my post to @Dreadnaught to add to the debate. ~~~~~ Hi Dreadnaught. So as not to drift the thread too much from the 'house cooling ideas' I thought I'd message you directly. Are you doing the PHPP yourself and if so, how are you getting on? My first dealing with PHPP was with an 'expert' who was a complete clown so I bought my own copy of the PHPP and started entering the data myself - and, if I'm honest, I've been struggling with elements of it. After a while I went to see another 'expert' who agreed to review my attempt, he was definitely much much better but he'd still missed some school boy errors that I'd made, which I discovered after learning stuff from my meeting with him. Also he was going into minutiae that I hadn't for one moment considered. For example, the timber frame company we will most likely go with use nail plates to join elements of the timber frame, his modelling of this in the PHPP proved that the claimed U value was incorrect (if you factored in the amount of timber in the walls and the metal nail plates), so I've taken that on board in my PHPP but not even started on the roof construction! Despite that I've managed to get my overheating down to zero using awnings on the southern elevation of our planned house, but I wonder, have I? What else have I missed... I'd appreciate your thoughts. Cheers. Russ.1 point
-
You need to start a proper blog @Christine Walker otherwise everyone will think your build is defined by extortionate prices .1 point
-
Not the most eco-friendly option (depending on where you buy your leccy from) - but mini-split air con units are the best money I've probably ever spent. All bedrooms fitted with them back to a single outdoor unit - the only drawback being that they can only do one function at a time (all cooling or all heating). Budget approx £1000+vat per room inc fitting.1 point
-
Exactly that @newhome1 point
-
I'd agree, I read every passive house publication available for several years before even starting on our build. However, as a note of caution, I still screwed up... I know others that have built passive houses that have found that theory doesn't translate well into practice, and have had to take some additional mitigation measures in order to avoid overheating, which in some ways is reassuring. If I were starting again now, then I would be very focussed on two things. Reducing incidental heat gains (appliances, lighting, cooking etc) and providing adequate comfort cooling. The two biggest problems to solve with a passive house are the provision of hot water and a way to provide comfort cooling in sustained warm weather, and the two are linked, as a lot of hot water systems can introduce a significant heat gain into the house right when you don't want it.1 point
-
My site will be getting busy from next week onwards. Piles go in on Tuesday then lots of other stuff after that. The site is in north Dorset if you'd like to come for a reccy.1 point
-
Not sure you can access ebuild forum anymore, so, a Tony tray is an airtight membrane that extends from the internal airtight layer below the joist, round the outside of the joist ends and back in to join up with the membrane above the floor. Tony used it in a brick and block build but the principle is the same with timber frame. It stops the joist penetrating the airtight membrane which is difficult and numerous to seal up.1 point
-
Really coming on now and looking great. £300 is nothing in the great scheme of things and certainly doesn’t compare to the stress it caused you I’m sure. PS I don’t know what a Tony Tray is either ?1 point
-
Aren't they a bloody great thermal bridge, too, which will create cold spots (with the commensurate risk of condensation) at the base of each of these posts? Questions need to be asked about how the thermal bridging has been addressed, in my view, as well as building regs compliance.1 point
-
Posh or what - I drank White Lightening - much cheaper1 point
-
You should be supplied with a full set of structural calcs from them. You should also have a spec saying what is included. Make sure the sole plate is completely level, walls are plumb, hangers fully nailed, floor fixed in accordance with spec, roof trusses / rafters mechanically fixed, rafter feet have correct overhang, fascia (if included) fitted at correct height, window / door / rooflight openings correct, thresholds cut out on completion of frame and whole work site left clean and tidy, as these are all things that some erection teams tend to "overlook".1 point
-
Ah, the bat to eat the flies and moths, clever tactic. I like it.1 point
-
Some observations. Designing out cooling is quite easy and effective. I am doing it now with PHPP for my build. As mine is a modern house, I have more freedom to play with window sizes and architectural features, such as overhangs. Floor to ceiling glass is to be avoided and I am doing so in my build. The glass below knee height offers little extra light but much extra heating gain. Building regs require an openable window in every habitable room for purge ventilation. I wish it didn't, I don't want them in my modern house as it it does not have any conventional windows, just large frameless roof lights and architectural glass. Problematic. Purge ventilation is sometimes defined as 4 air changes per hour (ACH). Most MVHR work at about 0.4 ACH. Trying to achieve it with an MVHR will lead to hugely over specifying the MVHR and require much bigger ducting. I know, I tried. The MVHR I needed was 271 kg! Using water UFH for cooling delivers that cooling in a sub-optimal place, the floor. Sub optimal for convection. And if not carefully controlled can cause condensation. I decided against it. In the end, I plan to put in a conduit for a split air conditioner in case I need it in my Passive House. Because split air conditioner are highly common they are very very cheap in comparison (about £800 tops) and finding someone to install or service it will be easy I imagine. I will try the house for a year and install an air conditioner if I need one. Its easy to over engineer the solution and get carried away. I am aiming for a very simple, as simple as I can make it and for it to be cheap, and maintenance free.1 point
-
Acetone stores for a decade or more in my experience if kept sealed.1 point
-
Disposable shower cap is your friend . Appropriated from a hotel.1 point
-
It never worked to start with, in spite of being sold as new. Then when pushed (and they had to be pushed) they admitted it was an obsolete model and they could not support it, so they replaced it with a different make and model.1 point
-
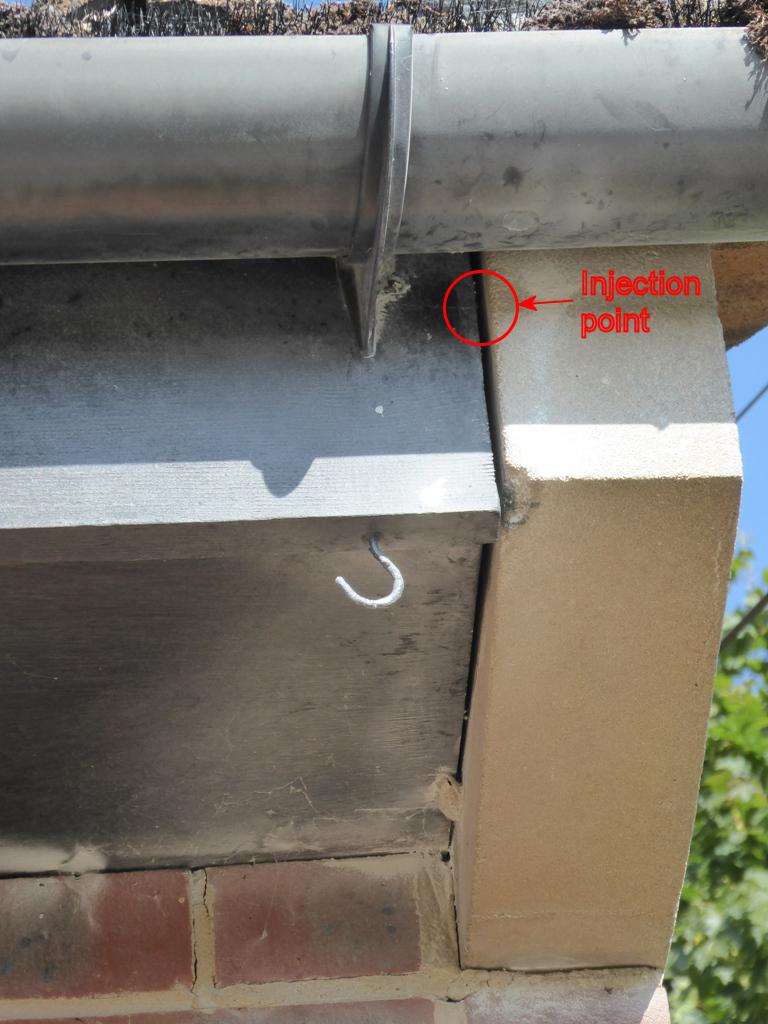
I went up in the loft and couldn't find the nest, so am guessing it was down under the insulation right in the far corner. I wasn't prepared to lift the insulation to find out, after my last experience, as it would have taken me a fair time to try and escape. It was also bloody hot up there. This is the hole they were getting in through, with the point where I injected the powder ringed. The rest of the powder around has blown out of gaps at the edge of the fascia/soffit:
 1 point
 -
Dichloromethane is better for Polyurethanes, it will dissolved them when they have cured. Not flammable either. Why we used it when I was moulding PUs.1 point
-
Acetone stores for ages in a sealed container. It's not that nice to your hands though. MEK (Methyl Ethyl Ketone) is every bit as good as acetone, but a little bit safer to use and slightly less harmful to your skin, Nail varnish remover often contains a moisturising additive, something like coconut oil, to reduce the effect acetone has on removing the natural oils from the skin. Both acetone and MEK will attack a wide range of plastics (but not polyethylenes) so need to be used with caution. They are very good for degreasing stuff, but I find they evaporate too quickly to be that useful as a degreaser, so prefer to use something less effective, but safer and polar, like isopropanol, which will wash off with water.1 point
-
@newhome - removing writing (sharpie) from tupperware box lids when you put different food in them for the freezer.1 point
-
The most exciting time of the build IMO. Enjoy.1 point
-
It is acetone, and only dissolves uncured or partially cured foam, rather than cured foam (I don't know of anything readily available that dissolves cured PU foam). Rather than buy the spray cans, I buy 5 litre cans of acetone. Typically these are around £20 for a one-off 5 litre can delivered, cheaper if you buy more, as half the price is the hazardous materials shipping cost. I found that stripping the gun and dropping the parts in a jar of acetone did a better cleaning job than using the spray alone.1 point
-
I like to think she took a while to choose me but got the perfect result! When rollering, using a 9" roller, then the roller diameter is obviously greater than 20mm, probably about 60mm. I'm thinking how do you stop paint on the END of the roller transferring to the wall? Or is it that you aim to not roller that near to the wall?1 point
-
Nice work @Declan521 point
-
So paint it black if you are worried about your hats... but that only shows the mistake in not painting it all one colour to hide the join. Or do it polish style with the join 50mm down the wall. There’s something to be said for a flexible ceiling paint .. Wickes do one ... and also for easiclean bathroom paint. Insist on the right rAnge and you can restrict the boss’s choice of shades.1 point
-
Made a tub kind of thing from of cuts of the decking for the planters. It's lined with polythene with nail holes for drainage and then another layer of the weed membrane. Against the stone work I put another layer of 300mm dpc that I had in the shed so nothing can soak through.1 point
-
Looks good. Artificial lawn is an interesting approach to a no-grass garden. I took mine out and have ended up with something more like a traditional cottage garden. Love the hit and miss vertical fence. I will be interested to see how those decking structures survive. Did you line the planters? How did you handle the ones against the house wall?1 point
-
Fine morning's work there mate!1 point
-
Looks great, well done1 point
-
List price about £2K I believe.1 point
-
and a hat!1 point
-
......."or I could just make a paint sprayer" ?1 point
-
I've never painted a ceiling "properly". I'll start another thread.1 point
-
Grow a pair and get the bloody matt on!!!1 point
-
No no and no Just put the Diamond Matt on ..!!1 point