


Gus Potter
-
Posts
2339 -
Joined
-
Last visited
-
Days Won
29
Everything posted by Gus Potter
-
I'm slowly doing up an old 1960's house with a solum space. Have a wood burner with a duct running from the solum space up to hearth level with a grill just under (50mm) the inlet to the stove so the cold air shoots up straight into the the stove intake. Suits me for now. Once I I get round to upgrading that part of the house I may change it to a direct air intake.. but like the trickle ventilation it provides. @saveasteading "Yes, downward smoke is not nice. I have always (no, learnt how to) overcome this with a lot of effort, just as with the first fire with a cold, damp brick chimney. A small hot fire to start with (paper and kindling, and then it is ok." Have a look at an OH cowl.. so simple as no matter how the wind blows it draws.. you can make you own experimental version too! They work on the Venturi effect.. you'll be captivated! "or is Inverness weather different?" Oh yes.. but that is the joy.. great part of the world.
-
Well that's a poke in the eye with a pointed stick
Gus Potter commented on LSB's blog entry in Little Stud Barn
Hello @LSB Hope this helps a bit and gives you some food for thought, even if just to help you rule things out. I have made comments / suggestions / rambling thoughts in italic in line with your text. Firstly don't depair and think the worst, hard to do when you are at the sharp end. I haven't posted to my blog for a couple of months, mainly because we haven't been able to progress until we got the Structural Engineers report. This was promised in 2 weeks and ended up taking 10. Hopefully they dropped you a note explaining why things were taking longer as a common courtesy. I now suspect that this was because they didn't want to tell us the news. Don't suspect anything at this stage keep an open mind. Our build is a barn conversion so we've had to jump through lots of hoops. ,making lots of money for other people. But you will have something a lot of folk would give their back teeth for. But, particularly for the SE, first it was the report where they said to planning that the barn was convertible. The SE may have been looking at the condition of the walls and could they be retained as planning constraint, maybe that was their brief? Cost would not have been a significant factor. Then the 1st phase ground contamination report, no issues there. Good. Planning approved with condition of phase 2 contamination report. No significant problems constraints with that? Any other conditions other than just getting the investigation done? Then we started preparing the site, documented in previous blogs, we did this thinking that it would benefit us with the SE report to get the building regulations drawn. How wrong we were. Maybe not.. just by messing about on site you can gather valuable information that can be used to solve a problem. One of the limitations of the barn conversion was that one side of the building can only be 2.2m high. We worked around this by designing rooms so it wasn't needed for walking. Yesterday, I received the report, only to be horrified to see that this low side of the building, 2.2m remember, needs underpinning foundations of 'at least' 2.4m. How can a single storey build possibly need foundations deeper that the height of the building. The opposite side is 3.15m high to the roof, here the SE say we only need 1m deep foundations, figure that out. The soil is not clay, not sand, there are a few 3" elm trees that are being knocked down so no large roots. From what you have said it seems like the soil is the crux of the matter. The roof loadings and the self weight of the wall are not onerous given the size of structure you have. I'm just speculating but are the walls close to a boundary with trees on the other side? Has the SE not realised that the Elms are young and to be removed.. then speculated that they will grow into large trees? It could be a simple lack of communication! Digging deeper if this is not a communication issue. You mention that the soil is neither clay nor sand. It may still bit bit expansive.. prone to swelling / shrinkage.. much depnds on which part of the UK you live in. Some of the Gault (fissured) clays in England are sensitive to ground and moisture changes, If for example you live in parts of Northern Ireland, Norfolk, Stirling in Scotland, the Severn type estuary regions in Wales then the ground can move about to a good depth. Another thing is that your SE may have identified a band of silt.. so not clay or sand.. and this is another type of material. Silts are tricky to build on so maybe the SE has, luckily for you picked up on this. But, it gets worse, they say that this must be done 1m at a time, doing 1st meter, then 3rd meter, then 5th meter, then 2nd meter etc.etc. This particular wall is 25m long. They have no issues with the existing internal walls. Unless you have spent say 10k plus on a pretty comprehensive ground investigation.. maybe with an interpretive report I can't see (willing to learn though) the justification for concluding that the founds can be significantly shallower for the internal wall.. which may be load bearing to some extent. This makes me lean back towards the trees rather some tricky layer of soil in the ground. I've never been so glad to be stupidly busy at work to take my mind of this fiasco. So, what do we do. Relax! Have a chat with the SE. The thoughts I have are: 1. Can we knock down the back wall leaving the rest and build only 1m deep like the wall on the opposite side, but I would still need to get planning. 2. Do we write off all the work we've done and all the money we've spent (lots) and try and get planning to start from scratch with a kit house. It would have to be self build though due to the extremely limited funds available. 3. The long wall splits into utility, 2 x bathrooms, 3 x bedrooms and a pantry. Do we knock down the wall for each room and then rebuild it bit by bit and with what foundations. 4. Do we start on the high side of the conversion and work backwards ignoring the problem for now. The sides vary from 1m front to 2m foundations at the back. The most disappointment I feel is that the SE passed the building as fit to convert, including digging holes to look at the existing foundations with no mention of anything like this. I don't know if it makes any difference, but the original SE was probably about my age, in his 50's, whereas the recent one (same firm) was barely out of nappies and didn't want to talk to us when he was here to discuss anything. What I have done is: a. Requested a meeting with the SE and his manager to ask why so deep and about a new wall. If we can knock down the wall and put in 1m foundations then that is manageable as with the digger we can knock the existing one down and dig the trenches before getting a groundworks crew to do the rest. b. Started compiling an email to send to the planners, but with the current situation I don't think I will hear anything. Also, I'm a bit wary, if we say what is required can they pull our planning and still not allow us a new build. c. Started looking at some kit companies who provide self build kits to get some ideas of costs. The one thing that we cannot do is dig down 600mm x 2.4m a meter at a time. Maybe a groundworks company could, but at what cost for what, in reality, is a tatty barn which, if we could have got planning we would gladly have knocked down and crushed. I spoke to the planners after we got planning to ask about this route and we told that we had no chance. Here's a little reminder of the layout. In summary see what the SE's have to say. If you get no joy then dive back on BH. Provide as much info on the ground as you can and some cross sections so we can see where the roof loads go, the wall thickness and so on. BH members can then have a few more bits of info to work with. Look forward to your next post/ blog once you have got over this bump in the road. All the best. -
How deep are the puddles & how much higher are the high spots compared with the water surface. For all. If you can when your SE is designing any concrete slab or an IFC basement ask them to indicate on the drawings the level and flatness tolerances of say the hard core under the slab relative to a datum. Next maximum and minimum slab thickness relative to the datum. This is important as it can impact on what is going above.. say maximum and minimum thickness of wall plate bedding, slab performance and so on. Some times your Architect will also specify a flatness and level for a slab based on the floor finish requirements. It's good practice to do this. There is a difference between slab level and slab flatness. For example take a rectangular slab. One long end could be sitting 15mm above the other. The slab is sloping from one end to the other. It could be perfectly flat in between but if say it had depressions or high spots in it pretty quickly you can see that if you add the figures together then you invite problems with the super structure and flor finishes. It takes a bit of work to get your head around how you spec these things. A lot of SEs will use the BRE TR34 guide which relates to industrial floor design but it's easy to adapt for the self build market. On the other it is important not to go over the score and try and get things any flatter than the need to be.. you will just waste money.
-
The roof timbers will have been slowly creeping and shedding load to other parts of the structure.. which have just eventually given up the ghost.. hence the sudden appearance of the opening mortar beds.
-
Never fitted them on my own house for the following: They start off working great. But. 1/ The kids get lego in them. 2/ They are manky as you can't get into hoover out the track. 3/ You have a thick wall. 4/ We don't live in Japan so the while they may look great in isolation? 5/ What will happen if you are the one who gets a duff set of bearings.. what is you strategy for fixing the running mechanism.
-
Reuse ICF EPS for cold roof insulation
Gus Potter replied to Dunmow's topic in Roofing, Tiling & Slating
If you have a lot then you could flog them. Neat SE / geotechnic trick is to use EPS blocks outside a retaining wall. This reduces the earth pressure on the wall in cases and can result in significant savings. It's a long storey but if there is any interest? -
Another boiler size question
Gus Potter replied to Barryscotland's topic in Boilers & Hot Water Tanks
Barry.. I bet you that at some point 20 C is not going to cut the mustard! Anyway before you set your hat on 20 deg C check what you need to do to comply with the Building Standards. Cut yourself some slack and make sure you can heat the house up from time to time above what you may want on a day to day basis. Also remeber that is is no fun feeling unwell and you can't just heat the house up.. see man flu.. horrible. You are going to spend all this money.. have a fab kitchen.. other stuff no one else has.. why, when it gets really cold here in Scotland (-20 deg C yes happened in Lanarkshire not just up North) not have a bit of spare capacity to keep you all warm. That is the great thing about Scotland is that it can get really cold and that is when you can come back into your castle and think.. did we not do well! -
Another boiler size question
Gus Potter replied to Barryscotland's topic in Boilers & Hot Water Tanks
Nick Thank you for you posts.. learn something new all the time. I posted this a while ago but I made a DIY temporary UF manifold.. it's working great although I had a pro plumber to do the boiler as I was out of my depth with the gas. I've not touched it since getting it working about a year ago.. few controls.. just shows you how simple a UF heating system can be.. and cheep to maintain. Less valves, electronics.. it's good cost effective engineering. If you are not bald with the above have a look below. xxx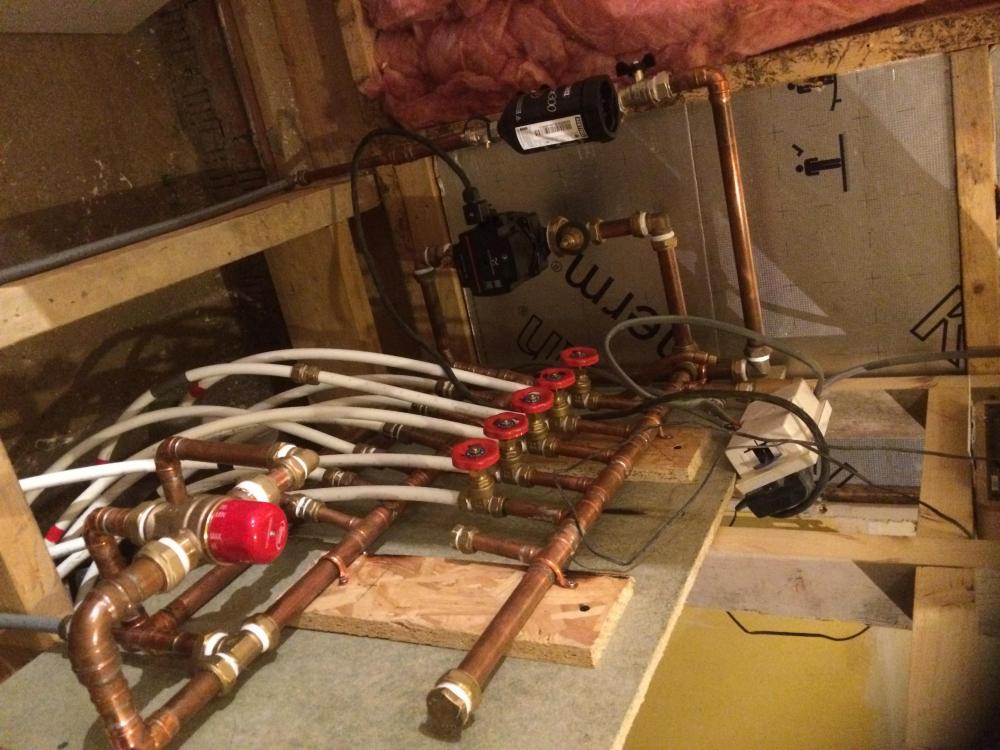
-
Another boiler size question
Gus Potter replied to Barryscotland's topic in Boilers & Hot Water Tanks
Ah.. then if it's a new build then it probably will be ticking over. A few personal thoughts.. Now one decision I made was to say to my self.. hey look Gus.. do your best to get the place well insulated. That cuts down the normal Monday to Friday running costs. But the whole point of putting in this work is to create a place we can enjoy not just during the week but at the weekends. It's also important for kids.. they need to be able to feel that a house gets warm and cold from time to time.. how are they going to cope when the go away with the school.. or move later to a flat where they have a more testing environment ? I'm Scottish based so we like to party.. we have a big piece of glazing we can open to the outside elements. We also have a front door that gets's opened and shut as folk come and go. We like to have a few fags when we party.. so the windows are open too! We cook and eat stinky food! Now a heating system that can't be cranked up is not for us.. I'm a designer and while I talk to Clients about energy performance the best designers dig deep and explore how their Clients want to actually live and if they want to be able to show off their new home... have a party / dinner and folk are warm. Once you start digging then folk are not so keen.. when you say.. hey every one will have to wear long johns by the way if the want a fag and open the windows.. or if you have cooked some thing stinky.. or have say Stinking Bishop cheese which I like.. but few do. Another point is that my Mum is 93 years old. She does not appreciate a fancy heating system if she can't come to visit and the place is not a good 24 -26 degrees. Barry have a look at how you really want to live and take it from there.. you can still do great stuff that will give you a cracking house. -
Another boiler size question
Gus Potter replied to Barryscotland's topic in Boilers & Hot Water Tanks
That's a good start Barry. As an aside I have a 1955 -1960 ex council house that I have.. been experimenting with, some regrets a times, on the other hand some parts are working out well. It has a mixture now of underfloor heating and radiators. New gas condensing boiler but just popped my head outside to see a huge plume of steam.. so maybe not condensing that well but the gas bills seem to be going down. We are still living in a building site but still happy. You starting point here is to see how well you can insulate the existing bungalow. You could look at external wall insulation, I'm not a great fan of filling cavity masonry walls as often with ex council houses say you have .. yes timber wall plates bedded in load bearing masonry.. they are only 3/4 of an inch thick but they are there! So you have to be really careful not to do something that causes them to rot. Next look at insulating internally. The big thing is the floors. On paper when you say go the the Kingspan U value calculator increasing the floor insulation does not appear to have as much bang for your buck as say doing the roof. But have a look at the gaps under the skirtings and around the edges of the floor boards! You'll be amazed at how much warmer you can make the place by cutting out the drafts and adding a bit of insulation to the floors. Now taking this (above) into account you are splitting hairs regarding boiler sizing. What about asking the plumbers if they can provide a boiler that modulates / can be adjusted between the two values. Do the work and insulate / make air tight carefully. Then if you feel the boiler is coming on too often and then shutting down (cycling) get the gas engineer to adjust the burner controls? -
Hello S_M Don't worry about trying to discern between the two offerings at this early stage. Just get as much info as you can. Try and get used to the jargon first, take a qualatative view. All these companies make it difficult if not impossible for you to make a direct comparison.. don't try and second guess them at this stage. Remember that the online quote systems etc are just a way to get you interested. By all means look at other things like spread sheets.. but again just learn the jargon.. dip in and out. Once you get a better feel for the terminology turn back and look at what you want to build. It it something that is say a very standard off the shelf offering.. like buying a TV or do you want tweek the design, have big glazing openings, open plan? Also, where are you in the country.. top of Scotland or in Kent?, what kind of ground are you building on, how well do you want to insulate the property? To get the best response from BH you may want to post more info..yes you need to give something to get something back. A lot of folk won't often want to share their spread sheets as they are particular to their own project.. they can be really dangerous to use on you own project which may be a diferent animal. It's all doable! Just you need to keep doing the work to make the savings. Hope this helps.
-
Also look at Peter's suggestion if you can. If you are diving by Stirling then nip into see Sterling Precast in Spingkerse Ind Est (different spelling). The factory is amazing, try and get a tour, then go for lunch. Last time I was in they were very helpful, make a good job too!
-
Another boiler size question
Gus Potter replied to Barryscotland's topic in Boilers & Hot Water Tanks
Was wondering single storey or double storey house? -
Are they decorative? Casting them yourself is an art and tricky if you don't have the right gear and curing process. The edges will tend to chip too unless you set chamfers inside the mould.. not look good. lastly you could also get salts appearing on your home made coins.. not a great look either. Can you describe what you want to do in more detail. Do you have cement bands round your windows. You can step the banding at the corners so they look like coins.. takes time to set up the beads but it can be done. It would maybe take a day per corner to set the beads. You can buy precast coins that are 120 /130 thick and you render into them but with the supply problem this may get you out a hole?
-
@canalsiderenovation Joined BH about a couple of years ago, maybe a bit less and caught the end of your project. Enjoyed reading about your journey.. even though it's a day job for me! Oh.. and the walk in stuff looks great. Delighted for you.. Enjoy your new home and well done..
-
LPA Missed Deadline on Non-Material Amendment
Gus Potter replied to harry_angel's topic in Planning Permission
I'm not an expert on English Planning as Scottish Based.. But in Scotland a domestic Planning application costs £202. What would happen if you just submitted a fresh application, take the punt and see what they do? Explain that you felt forced to submit a new application as you had no response and you felt that this was the only way to get a reasoned response to your non material amendment ( called a non material variation in Scotland). Never tried it though..just a thought. That would put them in a bind if you caveat it this way. Harry yes you can try and leveraged but if you have burnt your boats already by playing hard ball then frankly you are stuffed and need to suck it up. If you have spent a bit of time building relationships and engaged with the planners early on then it should be easy..- 17 replies
-
- 1
-

-
- planning
- planning permission
- (and 1 more)
-
"I'm female so I think this increases chances of happening as I've read so many stories about this happening!" I my career I have met an awful lot of blokes that are brain dead. They can't multi task for example. I too have the odd brain dead moment, perfecting multi tasking is a struggle as I'm a bloke so speak from experience. It's not a so much gender thing these days.. it's just a lack of understanding and pride in the job. The trick is to write down on a bit of paper the things you want to ask. No matter what stick to your guns and don't let them side track you. Stick to the list. You can just copy and print off parts of the BH posts if you can and say.. can you answer these questions. If you feel vulnerable then ask a friend to attend. But make sure you hand over the list of questions. If they refuse to accept the list then that is their issue, offer but don't force.Then if you feel that the meeting has become aggressive ask them to leave immediatly. Say to them.. I feel uncomfortable as I feel you are being aggressive so get out of my house! But don't think I'm not going to chase you for your shoddy work..as a parting shot let them know they are far from being off the hook. Do not elaborate.. let them mull it over. Don't muck about. Sometimes getting chucked out of a meeting can crystalize a builders mind.. especially bullying builders as they realize that the Client may well be holding a bigger stick than they first thought. It gives them time to reflect and from time to time they come back with their tail between their legs. They may not of course but if so better to know this now. If they don't come back then you have the option of getting a new joiner to screw up the plasterboard, they will know a plasterer probably and you will get it finsihed for xmas.
-
Hello James. Hope this helps.. it's a bit of a ramble but hopefully you can pick out bits that suits your predicament. saying that it seems you are offering an olive branch which is the right thing to do... morally and legally. Legally is the nuclear option. Although hard to do take a step back and ask yourself.. why has your neighbour felt the need to take legal advice.. it may of course not be formal advice she has sought and paid for! For example you could be a member of the NFU (Farmers Insurance) who offer a free preliminary legal advice service. Look back and think.. is this reaction from the neighbour a symptom of some thing else.. this is the key to resolving disputes like this in an amicable way. You need to look at your own behavoir.. make sure you are / have been acting reasonably while you have been living next door.. tough but..that's what you need to do. Do this and you'll then have a sound footing to progress as you'll know you are not acting unreasonably. To expand..take a step back and think.. what may we have done that has precipitated her action. After many years in the construction industry I have learnt that the best way to go forward is to take several steps back. It may well be that you are having this issue due to something that is unrelated.. that is neighbours for you but it's often the key to defusing a situation. Try and unlock this. You may need to eat some humble pie.. but in the long run that can save you a lot of stress and reduce your financial risk. In terms of you taking proactive measures to treat on your side of the fence. 1/ Question one is.. are you absolutely sure it's not dog wood? I have seen some surveys that have declared knot weed.. but it was dog wood. 2/ It's not clear who may be responsible for the source, you with your imported soil or the neighbour. I may be that you / neighbour have a bird feeder and a mallard duck has just dropped by for a free meal and had a bit of the rhizome root stuck to their feet which has come off and grown where it can. 3/ In terms of you treating it. When it come to litigation on stuff like this a court will often look at who was most proactive in attempting to resolve a situation. If you are a domestic home owner the courts cut you a lot more slack than say if you are a hard nosed developer. If you can show you have made a reasonable attempt to mitigate the intrusion then this falls in your favour. I would suggest that you write / talk to your neighbour and explain that in the best interests of both parties you are going to say spray with the weed killers that are avialable from B&Q in order to prevent the situation getting any worse. Invite her to suggest alternative measures. Acknowleged that your relationship has broken down to some extent but that in the long term you wish to live comfortably side by side in a harmoneous way. Explain that while you disagree on who is responsble it is prudent for both of you to mitigate the risk. Now it may be that your neighbour is also lurking on BH. If so the same rules apply to you! Fail to engage with James94 and you are on shaky ground!
-
How to drill holes through my external wall for the big MVHR ducts?
Gus Potter replied to Dreadnaught's topic in Timber Frame
Good spot.. learn something new here every day here! -
Vent Axia internal humidity
Gus Potter replied to Pocster's topic in Mechanical Ventilation with Heat Recovery (MVHR)
Can you not just open the window.. sleep on it and when you wake up.. bingo you'll have the solution? -
Hello TryC. It's a shame you have to post about this. To cut to the chase. No matter what folk say about dot and dabbing to hold up ceilings the bottom line is that for it all to work each layer needs to be able to carry the weight and for a ceiling not to fail due to the added vibrational effects. It is possible to dot and dab ceilings but often the ceiling is a concrete slab. It's not that common now but you you used to see it a while back. In your case it looks like the dabs are stuck to a painted ceiling.. probably emulsion paint. This is the weak spot and no supplier.. say British Gypsom is going to warranty this. From an SE point of view.. it either needs to come down or be screwed to the joists. Unless the installer has access to load tables / test information that says it's ok to stick stuff to paint! It's not going to happen.. if it does I'll donate fifty quid to BH. Once screwed it will be safe but it is probably going to crack. To stop this you'll need a good quality scrim tape of a good width, a plasterer that knows their stuff.. they may say it has to come down as I'm not putting my name to that. Sorry to upset but best be safe.
-
These are worth having a look at. Also Sabre fix do a similar product and a few others. Often I'll spec these on an extension where I'm using the roof to stop a long TF wall moving at the head horizontally, either outwards when you get wind suction, inwards when wind pressure and in both cases you can get quite a bit of wind uplift with a shallow pitch roof. You put one bracket each side of the rafter (still with the birds mouth to get the bearing of the timber) staggered so the nails in from each side don't clash. One good thing is that these brackets have a manufacturer declared performance to resist load in three directions. For an extension the extra cost is marginal compared with the savings you can make else where from time to time. I agree with MG about the skew nails but in this modern day an age your there are fewer joiners that actually know how to skew nail properly. Most just use the nail gun, the wrong nails, don't really take care to look at the grain of the timber at each junction.. they just hash on. The brackets are more idiot proof.


-
Yes agree and someone could be badly hurt, even worse. Always add mechanical fixings right through into the timber joists.
-
Selecting DHW cylinder for ASHP + solar thermal
Gus Potter replied to muhrix's topic in Introduce Yourself
This does my head in.. Not you Iceverge it's the formula! Yes I'm a philistine but I want hot water to come out the hot water tap! If you go to parts of Africa the air is that hot 40 deg C plus, I have lived there! If you have towels to sterilize, a greasy pan to clean after frying a Mars Bars you need 60 deg water! Fine if you can live this way.. you can also spend money on a boiling water tap.. but it will take you an age to fill a bucket of water to clean the floor after the dog has left a message. Yes I recognise there is no free lunch here but from my experience your average member of the public when buying a house is not going to be too keen on purchasing your house when the water temperature is the same as what comes out of a cold water tap in parts of Ibiza? For the self builder looking to improve their asset value and make it attractive to a wider market if you wish to sell on.. keep it simple stupid and save your money. Insulate the house to death, detail the design so that you don't get condensation that compromises the structure. Find the right way for you for extracting energy from the outside.. that may be your local gas / electricity supplier or ASHP/ ground pumps / wood fire stoves etc. Also balance this against how much heat comes in during say the summer and how how you get rid of that. -
Hello MG_Wales Welcome to BH from me as a kindred spirit! Gus

