


Gus Potter
-
Posts
2383 -
Joined
-
Last visited
-
Days Won
34
Everything posted by Gus Potter
-
Another boiler size question
Gus Potter replied to Barryscotland's topic in Boilers & Hot Water Tanks
That's a good start Barry. As an aside I have a 1955 -1960 ex council house that I have.. been experimenting with, some regrets a times, on the other hand some parts are working out well. It has a mixture now of underfloor heating and radiators. New gas condensing boiler but just popped my head outside to see a huge plume of steam.. so maybe not condensing that well but the gas bills seem to be going down. We are still living in a building site but still happy. You starting point here is to see how well you can insulate the existing bungalow. You could look at external wall insulation, I'm not a great fan of filling cavity masonry walls as often with ex council houses say you have .. yes timber wall plates bedded in load bearing masonry.. they are only 3/4 of an inch thick but they are there! So you have to be really careful not to do something that causes them to rot. Next look at insulating internally. The big thing is the floors. On paper when you say go the the Kingspan U value calculator increasing the floor insulation does not appear to have as much bang for your buck as say doing the roof. But have a look at the gaps under the skirtings and around the edges of the floor boards! You'll be amazed at how much warmer you can make the place by cutting out the drafts and adding a bit of insulation to the floors. Now taking this (above) into account you are splitting hairs regarding boiler sizing. What about asking the plumbers if they can provide a boiler that modulates / can be adjusted between the two values. Do the work and insulate / make air tight carefully. Then if you feel the boiler is coming on too often and then shutting down (cycling) get the gas engineer to adjust the burner controls? -
Hello S_M Don't worry about trying to discern between the two offerings at this early stage. Just get as much info as you can. Try and get used to the jargon first, take a qualatative view. All these companies make it difficult if not impossible for you to make a direct comparison.. don't try and second guess them at this stage. Remember that the online quote systems etc are just a way to get you interested. By all means look at other things like spread sheets.. but again just learn the jargon.. dip in and out. Once you get a better feel for the terminology turn back and look at what you want to build. It it something that is say a very standard off the shelf offering.. like buying a TV or do you want tweek the design, have big glazing openings, open plan? Also, where are you in the country.. top of Scotland or in Kent?, what kind of ground are you building on, how well do you want to insulate the property? To get the best response from BH you may want to post more info..yes you need to give something to get something back. A lot of folk won't often want to share their spread sheets as they are particular to their own project.. they can be really dangerous to use on you own project which may be a diferent animal. It's all doable! Just you need to keep doing the work to make the savings. Hope this helps.
-
Also look at Peter's suggestion if you can. If you are diving by Stirling then nip into see Sterling Precast in Spingkerse Ind Est (different spelling). The factory is amazing, try and get a tour, then go for lunch. Last time I was in they were very helpful, make a good job too!
-
Another boiler size question
Gus Potter replied to Barryscotland's topic in Boilers & Hot Water Tanks
Was wondering single storey or double storey house? -
Are they decorative? Casting them yourself is an art and tricky if you don't have the right gear and curing process. The edges will tend to chip too unless you set chamfers inside the mould.. not look good. lastly you could also get salts appearing on your home made coins.. not a great look either. Can you describe what you want to do in more detail. Do you have cement bands round your windows. You can step the banding at the corners so they look like coins.. takes time to set up the beads but it can be done. It would maybe take a day per corner to set the beads. You can buy precast coins that are 120 /130 thick and you render into them but with the supply problem this may get you out a hole?
-
@canalsiderenovation Joined BH about a couple of years ago, maybe a bit less and caught the end of your project. Enjoyed reading about your journey.. even though it's a day job for me! Oh.. and the walk in stuff looks great. Delighted for you.. Enjoy your new home and well done..
-
LPA Missed Deadline on Non-Material Amendment
Gus Potter replied to harry_angel's topic in Planning Permission
I'm not an expert on English Planning as Scottish Based.. But in Scotland a domestic Planning application costs £202. What would happen if you just submitted a fresh application, take the punt and see what they do? Explain that you felt forced to submit a new application as you had no response and you felt that this was the only way to get a reasoned response to your non material amendment ( called a non material variation in Scotland). Never tried it though..just a thought. That would put them in a bind if you caveat it this way. Harry yes you can try and leveraged but if you have burnt your boats already by playing hard ball then frankly you are stuffed and need to suck it up. If you have spent a bit of time building relationships and engaged with the planners early on then it should be easy..- 17 replies
-
- 1
-

-
- planning
- planning permission
- (and 1 more)
-
"I'm female so I think this increases chances of happening as I've read so many stories about this happening!" I my career I have met an awful lot of blokes that are brain dead. They can't multi task for example. I too have the odd brain dead moment, perfecting multi tasking is a struggle as I'm a bloke so speak from experience. It's not a so much gender thing these days.. it's just a lack of understanding and pride in the job. The trick is to write down on a bit of paper the things you want to ask. No matter what stick to your guns and don't let them side track you. Stick to the list. You can just copy and print off parts of the BH posts if you can and say.. can you answer these questions. If you feel vulnerable then ask a friend to attend. But make sure you hand over the list of questions. If they refuse to accept the list then that is their issue, offer but don't force.Then if you feel that the meeting has become aggressive ask them to leave immediatly. Say to them.. I feel uncomfortable as I feel you are being aggressive so get out of my house! But don't think I'm not going to chase you for your shoddy work..as a parting shot let them know they are far from being off the hook. Do not elaborate.. let them mull it over. Don't muck about. Sometimes getting chucked out of a meeting can crystalize a builders mind.. especially bullying builders as they realize that the Client may well be holding a bigger stick than they first thought. It gives them time to reflect and from time to time they come back with their tail between their legs. They may not of course but if so better to know this now. If they don't come back then you have the option of getting a new joiner to screw up the plasterboard, they will know a plasterer probably and you will get it finsihed for xmas.
-
Hello James. Hope this helps.. it's a bit of a ramble but hopefully you can pick out bits that suits your predicament. saying that it seems you are offering an olive branch which is the right thing to do... morally and legally. Legally is the nuclear option. Although hard to do take a step back and ask yourself.. why has your neighbour felt the need to take legal advice.. it may of course not be formal advice she has sought and paid for! For example you could be a member of the NFU (Farmers Insurance) who offer a free preliminary legal advice service. Look back and think.. is this reaction from the neighbour a symptom of some thing else.. this is the key to resolving disputes like this in an amicable way. You need to look at your own behavoir.. make sure you are / have been acting reasonably while you have been living next door.. tough but..that's what you need to do. Do this and you'll then have a sound footing to progress as you'll know you are not acting unreasonably. To expand..take a step back and think.. what may we have done that has precipitated her action. After many years in the construction industry I have learnt that the best way to go forward is to take several steps back. It may well be that you are having this issue due to something that is unrelated.. that is neighbours for you but it's often the key to defusing a situation. Try and unlock this. You may need to eat some humble pie.. but in the long run that can save you a lot of stress and reduce your financial risk. In terms of you taking proactive measures to treat on your side of the fence. 1/ Question one is.. are you absolutely sure it's not dog wood? I have seen some surveys that have declared knot weed.. but it was dog wood. 2/ It's not clear who may be responsible for the source, you with your imported soil or the neighbour. I may be that you / neighbour have a bird feeder and a mallard duck has just dropped by for a free meal and had a bit of the rhizome root stuck to their feet which has come off and grown where it can. 3/ In terms of you treating it. When it come to litigation on stuff like this a court will often look at who was most proactive in attempting to resolve a situation. If you are a domestic home owner the courts cut you a lot more slack than say if you are a hard nosed developer. If you can show you have made a reasonable attempt to mitigate the intrusion then this falls in your favour. I would suggest that you write / talk to your neighbour and explain that in the best interests of both parties you are going to say spray with the weed killers that are avialable from B&Q in order to prevent the situation getting any worse. Invite her to suggest alternative measures. Acknowleged that your relationship has broken down to some extent but that in the long term you wish to live comfortably side by side in a harmoneous way. Explain that while you disagree on who is responsble it is prudent for both of you to mitigate the risk. Now it may be that your neighbour is also lurking on BH. If so the same rules apply to you! Fail to engage with James94 and you are on shaky ground!
-
How to drill holes through my external wall for the big MVHR ducts?
Gus Potter replied to Dreadnaught's topic in Timber Frame
Good spot.. learn something new here every day here! -
Vent Axia internal humidity
Gus Potter replied to Pocster's topic in Mechanical Ventilation with Heat Recovery (MVHR)
Can you not just open the window.. sleep on it and when you wake up.. bingo you'll have the solution? -
Hello TryC. It's a shame you have to post about this. To cut to the chase. No matter what folk say about dot and dabbing to hold up ceilings the bottom line is that for it all to work each layer needs to be able to carry the weight and for a ceiling not to fail due to the added vibrational effects. It is possible to dot and dab ceilings but often the ceiling is a concrete slab. It's not that common now but you you used to see it a while back. In your case it looks like the dabs are stuck to a painted ceiling.. probably emulsion paint. This is the weak spot and no supplier.. say British Gypsom is going to warranty this. From an SE point of view.. it either needs to come down or be screwed to the joists. Unless the installer has access to load tables / test information that says it's ok to stick stuff to paint! It's not going to happen.. if it does I'll donate fifty quid to BH. Once screwed it will be safe but it is probably going to crack. To stop this you'll need a good quality scrim tape of a good width, a plasterer that knows their stuff.. they may say it has to come down as I'm not putting my name to that. Sorry to upset but best be safe.
-
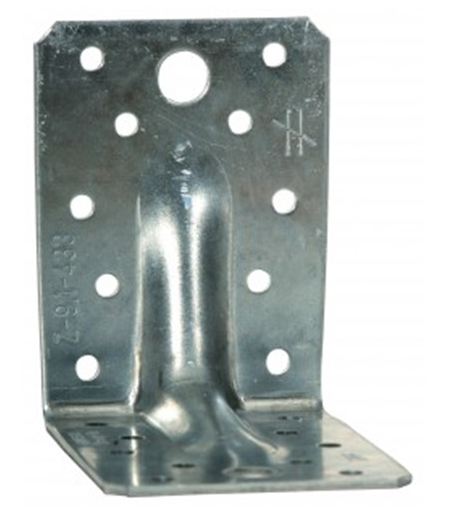
These are worth having a look at. Also Sabre fix do a similar product and a few others. Often I'll spec these on an extension where I'm using the roof to stop a long TF wall moving at the head horizontally, either outwards when you get wind suction, inwards when wind pressure and in both cases you can get quite a bit of wind uplift with a shallow pitch roof. You put one bracket each side of the rafter (still with the birds mouth to get the bearing of the timber) staggered so the nails in from each side don't clash. One good thing is that these brackets have a manufacturer declared performance to resist load in three directions. For an extension the extra cost is marginal compared with the savings you can make else where from time to time. I agree with MG about the skew nails but in this modern day an age your there are fewer joiners that actually know how to skew nail properly. Most just use the nail gun, the wrong nails, don't really take care to look at the grain of the timber at each junction.. they just hash on. The brackets are more idiot proof.

-
Yes agree and someone could be badly hurt, even worse. Always add mechanical fixings right through into the timber joists.
-
Selecting DHW cylinder for ASHP + solar thermal
Gus Potter replied to muhrix's topic in Introduce Yourself
This does my head in.. Not you Iceverge it's the formula! Yes I'm a philistine but I want hot water to come out the hot water tap! If you go to parts of Africa the air is that hot 40 deg C plus, I have lived there! If you have towels to sterilize, a greasy pan to clean after frying a Mars Bars you need 60 deg water! Fine if you can live this way.. you can also spend money on a boiling water tap.. but it will take you an age to fill a bucket of water to clean the floor after the dog has left a message. Yes I recognise there is no free lunch here but from my experience your average member of the public when buying a house is not going to be too keen on purchasing your house when the water temperature is the same as what comes out of a cold water tap in parts of Ibiza? For the self builder looking to improve their asset value and make it attractive to a wider market if you wish to sell on.. keep it simple stupid and save your money. Insulate the house to death, detail the design so that you don't get condensation that compromises the structure. Find the right way for you for extracting energy from the outside.. that may be your local gas / electricity supplier or ASHP/ ground pumps / wood fire stoves etc. Also balance this against how much heat comes in during say the summer and how how you get rid of that. -
Hello MG_Wales Welcome to BH from me as a kindred spirit! Gus
-
Selecting DHW cylinder for ASHP + solar thermal
Gus Potter replied to muhrix's topic in Introduce Yourself
Hiya muhrix. You'll find lots of different takes on BH.. the great thing about BH I find is that you get loads of ideas, food for thought and friendly support. To get the best out of BH, just keep asking questions. But try if you can to provide some detail on your particular circumstances. This way you'll get the best feedback. I'm definitly not an expert on ASHPs compared with some of the other members of BH! -
Selecting DHW cylinder for ASHP + solar thermal
Gus Potter replied to muhrix's topic in Introduce Yourself
I'm a bit of a philstine.. My sister lives on Tiree. She has a big house used as a B&B with lots of demand on the UF heating and hot water. The house is served by twin ASHPs all facing the prevailing wind which pretty much blows all the time. Temperatures rarely drop to a level ( say below -4.0 deg C) where the pumps really need to work / think hard. They cycle fine on the defost mode and so on. They also have a big water cylinder and the controls are pretty simple. Any excess heat energy is contained within the building envelope any way so it's trapped inside the building. Have a look at what is outside your house, sheltering effects from the wind and so on.. think / start / review from the basics.. is the location right? Am I going to get good air flow outside without the fans having to work too hard? It's easy to neglect this. Often you can't see the woods for the trees.. you know you want one but don't carry out a full review of your design.. often because you don't want bad news. The design of ASHP's is an iterative process just like Architectural Design. Yes the tank (Tiree) may be over sized and the controls simple but when you look at the long term costs in terms of maintenance it's a no brainer. If you have the environment in mind remember that if you make your system complex every year at least one part is going to go faulty.. person in a van to fix..plus often top up of inhibitor.. parts will fail just before or during the xmas period so you'll get no points here. Look the simple stupid option, some times it's cheeper / more practical in the long term to over size say the HWC but keep the works inside simple. Keep the controls as simple as you can. Yes it's tempting to get carried away at this stage but once the novelty has worn off and you get back to normal life or want to sell the house on.. imagine trying to explain to a prospective buyer how the system works! I would go back and force yourself to look at how simple and stupid you can make this. Compare the costs over the long term then take a view on what suits yourself.- 25 replies
-
- 1
-
-
- ashp
- solar thermal
- (and 2 more)
-
After 7 years ; moving in ….
Gus Potter replied to Pocster's topic in General Self Build & DIY Discussion
Fantastic news. Always have enjoyed reading your posts. Look forward to season 2. Have you considered updating your avitar to reflect.. you have finished / reached practical completion. Is season two the snagging? or do you have something else in mind? -
Hi Jilly. Looks like you are really making progress... remember your posts about protecting steelwork.. Can you set up your LPG system based on you getting an ASHP later. Yes buy the LPG combi boiler but set it up to emulate an ASHP although temporarily running at a higher temperature. You can get a cheep boiler to see you through to the next stage, a regulator and a couple of 47kg bottles. Make sure you get it serviced.. may be able to sell on later second hand to another BH member? In the grand scheme you have taken a lot of time /care to insulate the house so even though you may spend a bit more on the gas you'll have no standing charge for a mains gas connection. The main thing is to plan it so you don't have to lift floors etc later? Also, if you do it this way you can enjoy the bathroom and so on.. waterfall shower with plenty water? filling a bath in jig time .. clean your teeth and not wait that extra time for the warm water to arrive at the tap..(yes there are some on BH that clean their teeth in cold water but I'm a philistine) it means that you can enjoy the things you have bought now rather than waiting till later.. yes it may cost a bit more on gas.. but you deserve a bit of luxury surely? Just thinking out loud.
-
Hello Saintryan. To get the best reponse you probably need to post more info as there are so many different permutations. Maybe some photographs and a desciption of what the wall does. You can also have a look at permitted development rights. While you may feel despondent from time to time you may get a good bit of advice here on what options you may have.
-
Often what you can do is to ask your preferred spark to work this out for you. Offer some money and.. if they feel they are going to get the job they will just do it for you, while at the same time giving you valuable tips on what and what not to do. It's often over looked but sometimes getting the spark involved early when you are not under pressure can save you a pile of thinking time later.
-
Hi James. Hope this help you form a view on what approach to take. I would imagine that BC throughout the UK generally follow the same principles when adding an extension as they do here in Strathclyde. The first thing we do (as you have done) is to identify the wall type; solid brick, thick stone, brick/block cavity wall, brick/block with timber frame on inside and /or anything else. If facing brick then when we add on an extension to say a two storey building or where we have exposed (to the weather) brickwork above we always retro fit a cavity tray, stepped for a pitched roof butting onto an existing external wall, flatish trays for a flat roof. The reason for this is that we know from bitter experience that water gets through facing bricks, particularly the perp ends (the vertical bit of mortar at each end of the brick) and also through the bed.. the type of pointing makes a big difference as it can channel water back into the cavity. Good weather proof pointing can look untidy or takes more labour time to execute. The cavity tray serves to catch any water penetrating the outer leaf of brick. When water does, it runs down the inside face of the outer leaf. Also, you can get condensation forming in the cavity depending on how your insulation is set up. The tray catches this water and sheds it out through weep vents. Incedentally the weep vents can also help vent the cavity of say a timber frame. To sum up the above.. when you add an extension to a cavity wall with facing brick the risk is high that you will get water dripping in over the new doorway to your extension. BC in our neck of the woods expect to see a cavity tray when there is facing brick. This makes sense. However, if you have rendered walls then provided the wall above the roof of the extension is well rendered, in good condition, not too high and does not contain too many movement joints then BC are happy with a wraggled flashing into the outer leaf, provided it is well detailed and sealed. The render serves as a water proof layer. Now potentially you may get some condensation occuring in the cavity but for extensions BC are fairly pragmatic. I can't remember a case where I have been called to look at water ingress over a say a door slapping and found that it is due to condensation.. maybe because the walls are strapped out on DPC? Now we need to apply some common sense. Have a look at how your extension faces. If at the head of a Welsh Valley prone to driving rain (80 -100 mph winds) then maybe fit a cavity tray. If in the cultured west end of Glasgow and well sheltered with a rendered wall then probably ok with a wraggled flashing. If you look about your own area you will see loads of extensions with wraggled flashing, no retrofitted cavity trays. On a new build the NHBC will always insist on a cavity tray but that is understandable. If in doubt drop your BC officer a note and just ask what they will expect to see detailed. Or you can post more detail on BH, maybe a drawing, info on the wall type, what direction it faces and how much wall is above the new roof of the extension. This may be enough to let you form a crystalized view?
-
Yes welcome Kalispera. I know you can ski in Greece but Kefalonia seems not to get temperatures below freezing at any time. mostly down to about 5 deg C in the coldest month? Keep posting as interested in what you are doing. All the best with the project.
-
Had not appreciated that the plan had an ammenity strip, my fault. Time change though.. getting your hands on the land is the first step (at a sensible price).. then if you are able, bide your time and the current regime may change in your favour?.
