


Gus Potter
-
Posts
2339 -
Joined
-
Last visited
-
Days Won
29
Everything posted by Gus Potter
-
Hiya @selfbuildnewbie Good post and you have indicated the orientation. Not sure about having the store on the front elevation. Here is a thing. Folk on Build hub have an eye on the cost. Architect's say just don't put gridlines on their early concept drawings. It's bonkers as they also leave out critical dimensions so it is really hard to see how the walls line up between the floors. I have been doing this for a while and most Client's appreciate it.. it makes it so much easier to have a discussion. If you can, try and put some gridlines on your drawings and see if it helps you locate things in your mind. Charlie.. philistine here but is lopp sided not a indicator of art and crafts influence?
-
Great thread this.. much to ponder. There is no easy answer / the perfect solution. Having worked on the odd old building and converted steadings over the years while keeping up with modern approaches, new materials etc I'm often led back to first principles, practicality in terms of analysis (thermal performance in the real world) , keeping the cost down ( labour costs low = easy detailing for example) and to look ahead at future maintenance and how easy it would be to rectify an issue locally without trashing large areas of walls and the associated disruption. For me the starting point is always to look outside first. Here is a list of some of the things I like to gather info on. Ground levels, soil drainage at the base of the wall, the pointing.. the shape of the pointing on a brick / stone wall is vitally important and that if rendered then the type of render, general condition, drips on window and door cill details are examined as are flashings and anything else I can think of. For old buildings like saveasteadings the gable detail / cope and skew putts for example all need careful examination as do any chimneys an old flues. For @bighouseproblems the type of brick / it's porosity and mortar are of particular interest. Other things worth a look at are the aspect of the building, how sheltered is it from the drying / cooling effects of the wind, is it over shaddowed and where in the UK is it located..altitude and distance to the coast, the realtive humidity can often be a significant driver in a coastal location. each wall will behave differently so for economy / simplicity you are seeking a reasonable compromise. Yes, you can run computer models.. SEs for example use some complex finite element analysis.. but that is (hopefully) always coupled with common sense, reasoned judgement and appreciation of the limitations of the computer model. The same applies here.. any say computer analysis is only one part of the puzzle that helps you make an informed judgement. In general for walls above ground I'm not a fan of sticking any butuminous or water proof stuff to the inside of the walls like render. Not a fan of chemical damp courses or other gizmos. The idea of the warm batten is good in principle but.. you often have cross walls that form an integral part of the sturctural stability system of the building so you need to detail for that. Already it is getting more tricky. While on paper you can make a blank wall work the problems always seem to crop up in say the corners! To make it work you will need to detail well.. and live in the builders trousers for a while so you can keep an eye on their every move! Practically my first port of call would be to maintain a cavity between the external wall and your inner insulated envelope. You can essentially build a non load bearing stud partition. The studs can be fairly slender. You can bracket them mid height with plastic angle brackets to take the bounce out of the wall.. if you want to get carried away and are worried about metal brackets causing a repeating cold bridge. Next you can insulate beteween the studs with insulated plaster board over to prevent ghosting and to boost the insulation effect. Ghosting often happens particularly in kitchens. The studs are a little cooler so the fat condenses here and so does some of the moisture. This manifests as darker shading in your wall finish. Now this all may sound like something out of the dark ages until you get a price from the builder to install and stick to the inevitable complex detail. If a problem occurs, usually under / over a window or in the corner then its often much easier to access an independant non load bearing frame than some other options. Now in many cases you can introduce controlled trickle ventilation to the cavity in old buildings.. it needs some thought but often achievable. I would encourage examining the simple stupid option in the round, cost this and then if you want to get more innovative at least you have a bench mark to work with.
-
What's you gut common sense telling you? If you have lots of west facing glazing then overheating is a significant risk. If you are trying to shave a bit of the capacity of the heating system to deliver / make savings.. then.. if you have kids the doors get opened and left opened! Teenagers tend to open a window to have a fag or throw up out of them after socialising, you may too! Lastly remember that from time to time we may get 15 -20 deg Celcius.. would be a shame if this happened at Xmas when you have all the family round and you can't warm the house up for those who are frail say. Seriously though North light glazing is a cracking concept particularly if you are say a painter..or the like.
-
Hi Charlie. I started out nearly four decades ago, cut my baby teeth on the contracting side and when I was about 40 went back to uni to get the qualifications and experience I needed to handle structural design, reason being that I could see a way where I could become a designer. I had got fed up building other folks ideas. For me I think design is holistic. You could equally start out as an Architect and become say an SE if you wanted to say perfect the art form of exposed structures or, you could specialise in other areas that say relate to environmental / civic structures, dams for example. I now make a living working for myself as a designer, mainly now in the domestic market. It's a great job.. I wear many hats but there are enough Clients out there that pay me for my offering. For me one key (it has served me well) was to first recognise that the domestic market is very.. very much a people business. I have found that you need to spend a lot of time learning how to tease out what your Clients "need" as very often they have no idea what they do "need".. some have not actually sat down themselves and thought about.. how many kids are we going to have.. who is going to cut the grass, why do we want open plan when we need some quite space.. many many questions need to be asked. There is so much information to gather before you even start on thinking about the design. In fact is easy to to fall into the trap as a designer where you think. ah.. that is the design in the first few minutes.. that is an indicator of poor design and trouble ahead. Some Clients appear to have all the answers.. but you'll always find that just as in life folk can't think about it all. Some Clients are like this because they are nervous.. personality! It's up to you to understand this as it will serve you well later when evaluating how risk averse your Client may be. For all we often call this Client requirements and these can be sub divided not least into "hard" and "soft". The domestic market is very much different from the commercial market where you are often dealing with other professionals or people that are used to say running their own business and want say an extra steel shed to expand. Teasing out this information is a skill that takes time to perfect, you need to be able to build a rapport, sometimes you just can't so that is the time to walk away.. if you don't gell then the old expression is.. what is for you won't go by you. Once you get good at it then you can start to understand better what makes your Clients tick. Then it gets interesting as you start to think.. ok I am getting a feel for the Client's design boundaries, approach to risk and how they may think, the soft side. What do I have in my design tool box that I can start to introduce. What works for me is this. If you want to do great design that is of beauty, functional and is going to out last you then it all starts with the soft side and that first interaction with your Client. Before you start getting out the sketch pad ask the questions about how your Client lives just now.. empathise (takes time to learn) and they will tell you the rest with a bit of prompting. That has value.. trust is build and if you fee is a little higher than a competitor.. you'll often get the brief anyway. Charlie.. you mention vanity projects.. you are pushing at an open door here...
-
Up in Jockland here we have apparently sold off the wind rights to the sea bed for £700 million for off shore wind turbines.. and you think you have worries! For all.. who live south of say the border line on the map. Remember that although some in the southern end of our Island may want to get rid of the Scots.. the UK will lose about a third of the land mass if the "difficult" Scots bail out, and a huge area of current UK waters! Also, it could no longer be Great Britain as it will be "Smaller Britain" if that. Worth a thought. Fracking is another option but in the short term we need to be extracting as much as we can from the current assets we have to prevent short term volativity and fuel poverty. We have some complete bammers up here in the "Scottish Parliament" (glorified town council) .. so for BH members down south.. you may complain but try living up here.
-
Have you considered making an FOI (freedom of information) request. I can be a helpful tool. I have had a recent application stalled. The officer kept phoning me so I had nothing in writing, also was writing me fobbing off emails to cover themselves and stall. Spelled it out to them that I was going to make an FOI alongside making a formal complaint and want to see all the info including all the in house emails.. he said you won't get to see them all if any. I said that is exactly what I need as now I know where you are hiding stuff and where to concentrate my efforts. Two days later it's all sorted!
-
Insulating a pebbledash solid wall and damp concerns
Gus Potter replied to Ben Weston's topic in Heat Insulation
Just wondering.. Sounds like your extension may have lots of glazing for example so you are needing to do some compensatory U value calculations. Have you really looked at this in the round. It's an old house and to insulate the original walls is going to cost a lot and you'll loose gross internal floor area if you do something on the inside which could impact on the value of the house. It's also going to be pretty disruptive. I would have a good review of your strategy before committing to messing with the original walls. EWI sounds good.. but what about the rain water pipes, the apprearance of the eaves and roof overhang, the ingoes to the windows.. you could make your house look cheep and nasty from the outside? Now is the time to take a step back, really test your design approach, make sure you are doing the right thing before you commit. It may be that you need to go back and review the extension design. Reviews can be good as you may actually end up with something better! -
That site looks sweet! Sets a bench mark. But to burst your bubble no protective mushrooms on the top of the exposed rebar. On the hole take that as a compliment. For all. When you are digging strip foundations say in clay don't run round with a spade smoothing the sides.. you want them a bit rough so the concrete gets an extra key down the sides.. wierd but..
-
Nod.. I think this needs some qualification from you as could be confusing to new BH members. For me it's about making sure that folk do things in a safe way and don't encounter problems later if someone asks for verification that the founds are ok. Yes there are many practicalities when you get on site.. like bucket size. Often to change buckets and try and dig founds of different widths costs more in time and increases the setting out complexity.. ground is mucky stuff and the spray painting lines say can get lost in the heat / excitement of excavating and getting started. Yes on a large commercial job with all the technical/ setting out back up varying found types are doable. You don't want to be digging for Britain (you'll get the sack as a designer) but we are talking self build / local builders/ diy here and what is practical in this context.
-
Hiya. Here are a few thoughts and for all. There are quite a few different types of foundations. For example some are designed to interact with say a concrete slab (like a raft) and we call these reinforced foundations like a reinforced concrete beam you may see when you look up at the ceiling of a multi storey car park. Some are designed when you may be on variable ground or ground that may have a significant soft spot in it.. say over an old well or basement. The reinforced concrete spans over the soft bits. The foundations are designed to act like beams. Under the ground the layers of soil often don't lie flat.. and are often tilted, but your building (hopefully) is level so the foundations need to span over the transition in the soil layers which settle by different amounts. Here you often look at reinforced foundations.. like a concrete beam. Reinforced concrete has a lot more steel in it and the codes specify a minimum amount of reinforcement which is a bit of a bug bear for folk that are doing ICF basements.. but hey ho. One key to this is to recognise that concrete is not good at carrying tension forces but very good at carrying compression. You put steel in to carry the tension forces. Now you can also have simple concrete strip foundations. These work in a different way. You often see a light weight steel mesh specified, say an A142 mesh. This mesh is not there to act as reinforcement like a beam in the carpark but only to mitigate cracking as the concrete cures and does what it does. It's easy to mix up the two different concepts. Spread (strip) foundations are designed to act in compression only. The width of your strip foundations is generally governed by the overall thickness of the wall and the thickness of the foundations. The concept is that the load from the wall speads out at 45 deg through the depth of the found from the outer edge of the walls.. thus the concrete does not experience tension forces. Historically this was achieved by using corbelled brick founds or big flat stones. The diagram below hopefully helps understanding.

-
Have a good look at the timber joint. You'll probably see the timber has cupped a bit and there is a tiny gap. If so I would treat yourself to a Sable saw and buy some stiff metal (hack saw) blades for it. Also get some wood blades at the same time as you then use the sabre saw for a whole load of other stuff. Get in about it and cut the nail at the timber interface. If you try and prise it apart you probably wreak the wood. Up in the air will be tricky as as soon as you cut one nail it will jamb the saw. Or use the chain saw and use the offcuts in the stove!.. the stove / chain saw is probably the way to go. You still will recover some good lengths for use in the garden and so on. Before you put it aside for garden use examine the timber as some could be really high quality and worth using for decorative purposes internally. Yes interesting. I think there is a bit more to this. Some sketeches would be helpful.. just some line diagram stuff on a few sheets of A4. These old roofs and traditional type design often need a bit of finesse. Sometimes the solution is staring you in the face, but you can't see the wood for the trees. The next trick is to know how to prove it using modern calcs.. but this can on occasion be time consuming as you need to convince the checking Engineers that the design is valid.
-
Pragmatically I would consider the following. Show them what you think is wrong. The "Something protruding through internal face." is one point you can really hang your hat on. A lot of the rest, while unsightly is hard to benchmark against any standard. Yes the door is tight.. normal would be a 2.0mm clearance on an internal door.. 3.0 mm on an external door..when fitted in a mid range moisture content / environment (who decides what that is?) but who can say the reduced gap is not due to the moisture content of the surrounding fabric etc in your house? I would open negotiation on say paying 25% of the cost.. thus you are asking for a refund but not all of it. At the end of the day you may get enough of a refund to be able to say.. hey we got a good quality door but badly fitted.. but for a good price. Once it all gets knocked about a bit then the current pain wears away? If the door sticks then a good joiner should be able to sort it out with a bit of thought. From their point of view (supplier and fitter) it's not a total right off so your installation may come close to cost neutral from their point of view so they may play ball.
-
Don't touch the flanges of the posi joists.. it's dangerous, a big safety risk and you could really trash your house..
-
What an interesting project. 1890's.. maybe corbelled brick foundations or stone laid flat both on compacted earth. I seems reasonable to conclude that when the flags were laid (6ft clearance) the ground must have been fairly dry. For me the next stage would be to investigate outside, where you can, to see what might have changed over the years. If possible I would excavate modest holes outside down to the level of the bottom of the founds and see where the water levels are, while also gathering info on the founds themselves as you'll need this later. In some ways you need to think laterally / holistically. For example: 1/ Have the neighbours / previous owners built something that has changed the water levels and how the water flows in the ground. 2/ Do you have leaky soil / rainwater drains. 3/ Have you found old clay tile drains in the garden? .. these can be small sometimes about 3 inches in diameter with a flat bit on the bottom. They get blocked over time and stop working and can cause the ground water to rise. 4/ Is there / could the be a leaky mains water supply pipe that no one knows about. You can test the water to see if it is treated (potable water) if it is then you need to find the source. You can also install a rough ground water monitoring system yourself using some perforated pipe with a bit of gravel round it. This means you can fill the holes back in and dip them every couple of weeks. You'll need a datum.. but you can use a water level or a laser level for this.. plenty on BH. It may yield some clues as to the direction of flow of the ground water. Once you have this information you'll be better able to select the right option for the basement, maybe save yourself a lot of money?
-
That is some photo. Just wondering how the the screed / concrete is supported through the opening in the left photo.. it's got a bit of work to do to get past the pipe insulation..and what is that small portion of stud wall sitting on in the left photo? Like the curved walls. Right hand photo looks impressive with neatly clipped pipes.
-
Surface water drainage calcs
Gus Potter replied to eandg's topic in General Self Build & DIY Discussion
@eandg try and get your hands on a copy of BRE disgest 365 Soakaway design..wait here on BH! It's an 8 page document with some worked examples. Also it's simple enough to help you get a handle on the basics. Once you grasp this it will help you form a view as to what will and won't suit your site. If you get the bug you can automate it with excel.. and play! Now you may have a discharge constraint. You have probably come across flow control valves, say the Vortex / Hydro brake type and had a glance at the cost. With a bit of careful design you can do this on a small scale using a plate with a hole drilled in it.. an orifice plate.. and you find example orifice calcs to work out the flow. What you do need to do it to add some other bits.. a good filter to stop the small hole getting blocked and an over spill. I did a job a while ago using this on a small industrial unit using an oriface plate and a well designed grill filter, silt trap. So long as you can justify the flows and design it so it can be maintained the authority seemed happy, so was I with my effort. Did the hole thing for less than £ 150 quid from memory. -
Remove decorative ceiling joists for vaulted ceiling
Gus Potter replied to tvrulesme's topic in General Structural Issues
In these old timbers I would avoid nails too if possible. The timber will be well seasoned, quite hard possibly and already have a few splits etc in it. The spiked (toothed) washers work well in new timber as it still quite soft, even some of the knots. But with old timber you really need to crank up the bolts to make the washer teeth bed in and form a close joint. You can easily do more harm than good to the old wood, it can split inder the bolt tension load and cause a headache. I would look to see if you can use M12 bolts in cleanly drilled holes. As a ball park you want to look at putting 2 number bolts per joint with 50 x 50 x 3.0mm thick square washers under the head an nut. The trick here is to see if you can get the bolts in while maintaining the edge and end distances. See table below for a guide. End distance is the distance from the bolt centreline to the cut end of the timber. Edge distance is the distance from the bolt centreline to the edge of the timber. Unloaded means that the force in the bolt is acting away from the end or edge. Loaded means the bolt force is acting towards the edge or end. With a typical roof connection the timbers are at an angle so we are left with having to use the loaded values. Sometimes this does not work so you look at M10 bolts.. then one larger bolt.. the joys! Mull this over and have a word with your SE.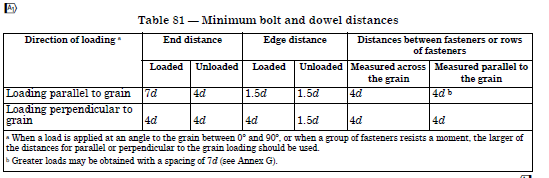
-
Yes would be up for that and chip in with content. There are some great blogs on BH. The trick would maybe be to identify what is current on BH while also covering say basic beam design, how structures stay up and the things to consider if you are say self building or extending. I don't know how hard it would be for the mods to create some kind of indexing system to make it easier for folk to find what they want within the blog? This probably already exists? You could take @Grian Something like this although small and a bit different it has a lot of different structural elements that could be used as great examples. It's not just the structure, it's how it interacts with the insulation, wind.. and so on.
-
Oh yes.
-
Looks like the main house may be a lowish pitch roof.. guessed here as can see the house behind. @BobAJob How do you find a structural engineer? Try the internet and look for local SE's.. you may find a few small outfits, one man bands that keep below the vat threshold so you avoid the 20% uplift on the fee. Also ask friends who have had an extension built say, they may have used an SE. Do I need a surveyor to examine it and advise? Lots of £££ try the Se route first as they often have a list of reliable builder contacts. I think I might get the whole thing ripped off and start again. I think it might cost around £12k to get it done right. I don't mind paying. It's finding a decent tradesman round me is almost impossible. They all just want to get the job done quickly not correctly and onto the next job. Then you end up paying multiple times when you could have just paid once to get it done right. It's a disgrace. If you can post some photos of the roof so folk can see the shape, photos of the outside walls so you can see how it drains at the moment. If you have 12k then you could explore options.. could be upgrading of the walls too or maybe.. just a lantern? pushing it though but.. who knows.
-
In the spirit of BH... you may need to offer up a bit more than an apology! maybe an "abject apology".. or a bottle of something in the post!
-
Hiya @LaCurandera "Kitchen in the "new" 60s extension - good idea which I'll explore. There are services over that side (currently there's a bathroom roughly where the snug is) although boiler isn't. One consideration is that we are unlikely to go back further in that corner (where office is) as that's right on the boundary already and possibly much extra would be within 45' of a rear window of next door. Hence stepping in the extension. So we'd be taking out that left side wall where the stairs might go up which is internal now, but originally external. I'd tried to work with as many currently walls downstairs being unmodified (or at most doors filled in etc). Maybe being a bit braver would be good, although presumably costly. " Don't get too hung up on the services for now, keep an eye on the where the electricity comes in though as shifting this can be an issue. Good point about the boundary issues, daylight and over shaddowing. You also have fire protection.. fire boundary conditions. I would get an SE on board that your Archtectural designer has a relationship with. The SE will just keep a watching brief and give the Architect pointers as to where a small layout can be changed if need be that will save a fortune / bring the job within you budget. Remember that this design is going to be an iterative process. To avoid wasted time and expense get the design team you need together early and let them bed in.. and get to know what you really want out of this house as you live in it over the coming years.
-
As always Steamy you are spot on! and elegant points made. For all, hope this helps the keen tecky. Take a timber floor joist, or a ruler at home. Support it at each end an apply a load in the middle. The ruler bends down so the top shortens and is in compression, the bottom stretches so is in tension. Masonry ( brick walls) are not good at resisting tension.. so if you add enough load to the top of the wall then the masonry never gets to the tension stage. Steamy is spot on.. this is the one of the basic basic concepts of prestressed concrete design. Steamy mentions what is called "buckling".. again correct. Put the ruler on it end and push down from the top. Suddenly it will give way.. this is a buckiling phenomena.. Euler circa 1700's the mathematiccian developed the theory behind this and is a fundamental principle underpinning what SE's do today. So yes Steamy, if you add to much load you risk buckling.
-
Grian.. remember if you make something like this fly, enjoy building it and make some money then you got a leg up from BH.. so a small donation to BH would oil the works! I do think that if you have a local joiner on hand you could build a safe structure for holiday accomodation out of timber frame for not a massive outlay. You could almost have detachable cladding.. in effect the structural TF sits there and the outside cladding acts as a rain screen.. could be just recycled pallet wood at the very basic. As this is a temporary moveable structure not a house that you get a mortgage on that has a life expenctancy of 60 years you can afford to change the cladding and appearance if you wanted to suit you target market. I don't know where you are but the saw mills do some real rough but cheep timber off the outside of the log that can be used for cheep rain screening. You could use all sorts of material depending on what visual impression you want to give out.. I love this stuff. You could have great fun exploring what you can do and how you tailor the appearance to your intended holidaymaker market. My sister has a B & B on Tiree so the market there is split between commercial clients coming to serve the radio mast, fix the fridges in the coop ect and at the other end folk going for a holiday that want to stay in a nice place. Keep posting!
-
Thanks @SteamyTea Much appreciated. Inverted roofs are something not much touched on on BH. More commonly you see them on larger refurbishment development and commercial stuff. They do have their issues but this for something like what @Grian wants to do on a limited budget while mitigating the financial risk, the constraints i.e moveable.. it could be an elegant, cost effective and environmentally positive solution. On the technical side I mentioned TF. You can increase the stiffness of a TF panel (thus better able to resist the sideways wind loading) by adding compression from above so the slabs perform this function.. it's all about getting the different elements of these small light weight buildings to do more than one job.. you look to get your pound of flesh out of them. Yes in a windy spot you will probably still need to tie down with cables for a bit of robustnees but the in the round I think this is worth a look at concept wise.


