IanR
-
Posts
1841 -
Joined
-
Days Won
6
Everything posted by IanR
-
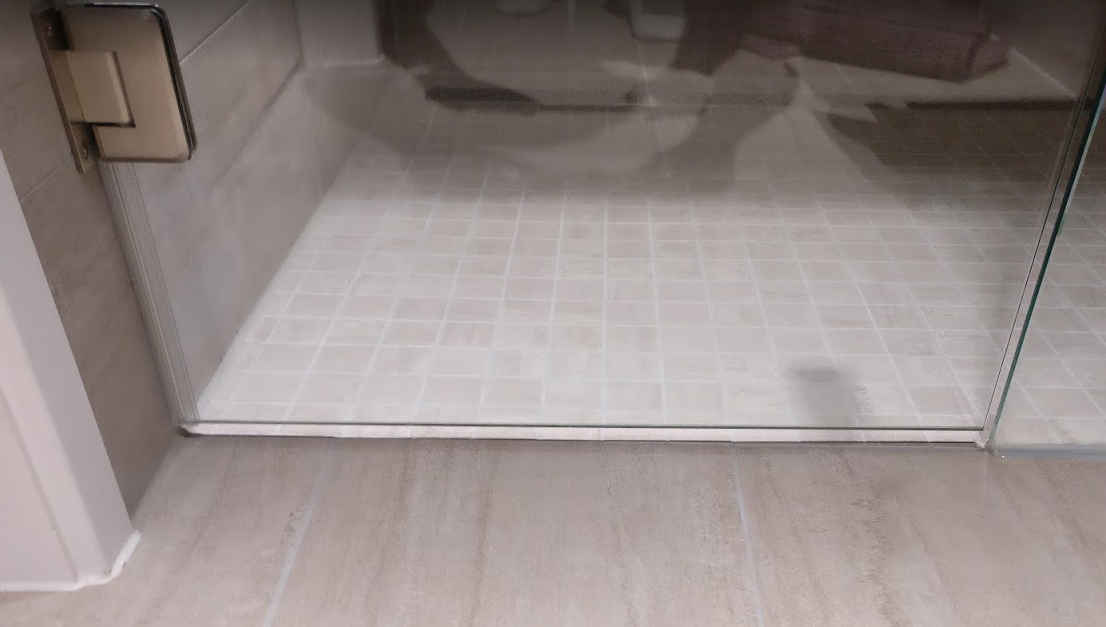
All our habitable area is on the ground floor, and have put UFH throughout, except for Larder. - And we went with low-tog underlay and carpet in bedrooms. Also think about how you're going to do your shower floors in the slab. We went with forming the slope in the slab (post main pour) and tiling directly over the slab.
-
How is that condition worded? The U Values being quoted in the images you've supplied are for a theoretical wall section with studs at their standard (300mm/400mm/600mm) centres. With the extra timber that will be needed within the walls around window and door openings or other structural elements such as supporting a ridge beam etc. the actual average U Value will be higher. Depending on the wording of the condition, you may need to go for a wall build up that provides a theoretically higher U value, such that the actual U Value meets the condition.
-
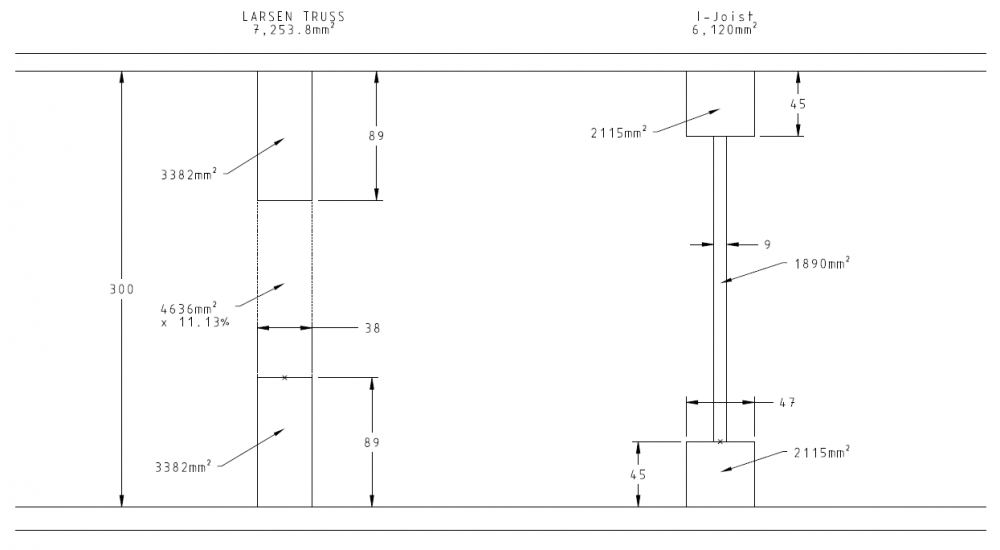
The I-Joists outer flange at 47x45 does the same functions (+structural support), so the section could reduce to this. And the web could likely be ply as other manufacturers of Larsen Truss use. But we're into the arena of small gains so it is likely, as you say, that the choice is one of simplified stock rather than achieving ever gain possible.
-
Thanks for the timber sizing, the original drawing has been updated and that brings the timber fraction more similar. The difference is now not decisive on whether to use one option or another. I still see an opportunity to improve the twin-stud over what I have drawn, reducing the thermal bridge further.
-
I'm also struggling to see the logic behind the price premium for Cellulose. Is the only difference in the quotes the insulation type, or does the Cellulose quote include a different frame technology, ie. twin-stud over traditional. We needed over 200m3 of Cellulose and the installed price was under £15K. It worked out at around £73/m3
-
I don't know that the advantage of a Larsen Truss frame is thermal bridging within the wall structure. When you compare the two systems, I-Joist may have a lower timber fraction than Twin-Stud. The below is making assumptions on the timber sizes within a Larsen Truss based on images I have found, if someone can come up with better timber sizes I'm happy to update. For the centre nogging I've assumed 3 noggings within a 2.4m panel. ***Updated after JSHarris reply below I'm surprised MBC appear to use 4x2 for the noggings, I would have thought they could get away with thin ply, but that's not what the pictures show that I could find. I've also always wondered why, if the outer stud is non-structural, why it's not a smaller section than the inner stud. There maybe be opportunity to optimise the MBC truss. I don't believe there is much scope for cutting holes within the webs of the I-Joist. I can't find the document at the moment, but I was supplied one that was fairly restrictive on the amount of web that could be removed. However, the guys that did the pumped cellulose on my build commented that closed off channels were much preferred as it guaranteed even fill. They were critical of open panel systems as they didn't feel it would be possible to fully fill at even pressure. In my view the advantage of a Larsen Truss over I-Joist is being able to sit the outer stud over an EPS upstand. This allows for a simpler perimeter condition on the slab to avoid a thermal bridge between wall and floor. I-Joist require a slightly more complicated perimeter to do the same.
-
That makes a lot of sense. @bissoejosh was the other member that was using CTD if I remember correctly, although at early stages currently I believe. Mine is a CTD designed frame, as part of a Touchwood package. My build is complete so the frame is not at all visible. I have lots of photos of the frame going up, if there's anything specific you need to get your head around then I may have it captured. I got quite involved technically with my frame design, swapping CAD models back and forth with CTD while we resolved issues around interfacing with the existing steel frame of the building we have converted, and they're are truly excellent at what they do. I don't think there'd be any discernible difference between a completed house built with Larsen Truss Frame than that built with a I-Joist frame. If you are erecting it yourself then you may have to make up the trusses yourself as I'm not aware of anyone setup to produce these as supply only, for a stick build. (I may be wrong I've never searched for this option) Whereas I-Joists are a stock item that is just being cut to length either in the factory or on site.
-
There's a couple of people using Cullen Timber Design to design JJI Joist frames with the possibility of having them pre-cut at the factory, before delivery. Edited to add: but remembering back I thought you were one of them so you know about CTD already.
-
 No gate needed, just pull a bracket or two off and open up a couple of panels each morning. You'll be re-configuring them all the time depending on what you have going on on site any particular day. A straight line of panels tips easy, so not good in wind. If you have to have them straight then an extra couple of panels at 90 degrees to the main fence will stop it tipping. ...Welcome to the forum.
 -
Hi Tom Doing the strengthening work prior to the Class Q Application could be considered as development under Agricultural PD and therefore start a 10 year count down before Class Q could be used, so be careful and take advice. My personal view is that, as long as it didn't change the external appearance then it would not be considered as Agricultural PD, since internal works are not within the definition of "Development", ie. your Section 55 comment. But, your LPA may see it differently and the Inspectorate of an Appeal may agree with them. There are Appeal decisions in both directions so the situation is ambiguous. It may be worth getting and reading Martin Goodall's book: Practical Guide to Change of Use. I believe it covers the subject with lots of case Law references. It came out too late for me, so I haven't read it, but wish it was around when I went through this minefield. http://planninglawblog.blogspot.de/ Edited to add: I know this is in the guidance, but makes no sense since you will have to reinforce around new "permitted" doors and windows as well as numerous other areas that will be required to meet residential Building Regs.
-
I think I'm in the minority on this forum for having a 5m set of bi-folds installed in my new build. Aesthetically the 1m width of each of the doors matches the sashes on the rest of the elevation where large sliders would not have done. The U Value of the Solarlux SL97 that I went with is equivalent to other options of glazing, and there's no noticeable impact on airthightness, although I concede no air test has yet been done. As to their use, we only moved in towards the end of the summer and the outside area is yet to be finished, but we did open them up a couple of times and I'm sure we will be doing regularly once the warm weather is back with us.
-
Steels: paint, galvanise, avoid?
IanR replied to ToughButterCup's topic in RSJs, Lintels & Steelwork
Is it planned for the steels to remain visible, as in the image on you linked thread? If so, I wouldn't go with galvanised unless you are happy with a very industrial look. The finish is aesthetically inconsistent, especially around touch points when it's in the tank. Even if a fixture was made to support them in non prominent areas, which would push the cost up further, the patterning and thickness of galvanising still varies a great deal. If the steels are to be visible, with the likelihood of damage occurring during handling on site, I'd get a corrosion inhibitor put on at the fabricators, perhaps red oxide or similar, then prepared and painted once installed. Looks like you are using a hollow section so don't forget to get the internal coated with something... wax-oil perhaps. Also, if they are visible, assuming welded (hollow) section rather than seamless will be used, get them to tuck the weld seam on the least visible side. -
The best £18 I've spent in a long time.
IanR replied to Russell griffiths's topic in New House & Self Build Design
Very definitely a Google project from its inception. It first broke cover from "Google X" at about that time, but don't think they were handing out (selling) developer kits until around 2014. I was trying to get one back then, but they were only sold in the US. Glad I was forced to wait as the 2nd gen device was a tablet rather than a phone and with a lot more grunt. -
The best £18 I've spent in a long time.
IanR replied to Russell griffiths's topic in New House & Self Build Design
It's not that far away. Google's Project Tango is making progress and with a couple of consumer devices now available and a good community of developers creating apps, it's just about possible now, although not without some manual fudging to get the final result. Most of the Apps are for augmented reality gaming, but there are also some 3D Scanning type apps with a goal of creating 3D and 2D plans of the built environment. Similar to this one: https://play.google.com/store/apps/details?id=com.Wosomtech.EasyBuild I got a Project Tango developers tablet around 18 months ago and it's processing of scans into fully volumetric environments has really improved. What I mean by that is starting in one position within a group of rooms, walking round the area and returning to your starting point and the scan being more-or-less back in the correct place. -
We've got around a 5.5m internal ridge height on a couple of rooms. One is within a larger open plan area, but the area with the vaulted ceiling is around 7m x 6m and this is a great space, each of the walls around it is broken up by either a double-height window, an internal flip-fold door opening or a full height false wall with recess for the TV etc. The other room is in the centre of the house and is around 6m x 5.5m with roof lights above to let natural light in. When first decorated and with all internal doors shut this did take on the form of a squash court, which I feel was down to having little to break up the plain walls between the top of standard height doors and the vaulted ceilings. We'd already seen this with early rendering I did of the space during the design phase so had planned up/down lighters on the walls just a bit above the top of door height and an over-sized book case on one of the walls, plus a few pieces of appropriate artwork (still) to be hung in the elevated area. Breaking up the big expanse of flat walls was key to making this a very interesting space.
-
Looking for a hinged wet room glass shower screen
IanR replied to ProDave's topic in Bathrooms, Ensuites & Wetrooms
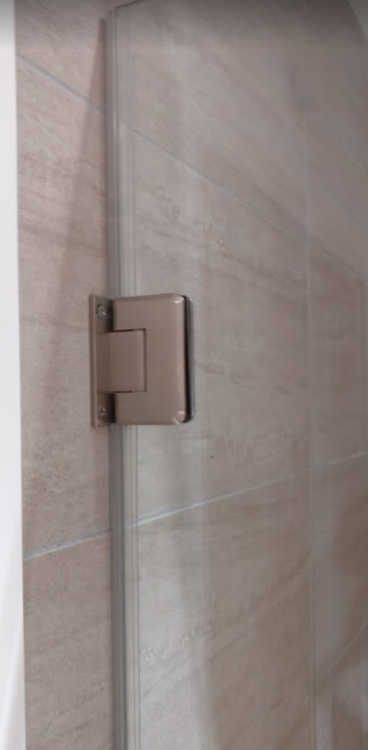
We have something very similar. Hinged glass panel closing to (but not touching) a fixed glass panel. Hung on two of these: with a plastic strip fixed to glass that seals against wall Not touching the floor or side glass We've got a very good local glaziers in Chelmsford (Ace Glass) that do this type of thing. They will make to a drawing, but not sure about shipping.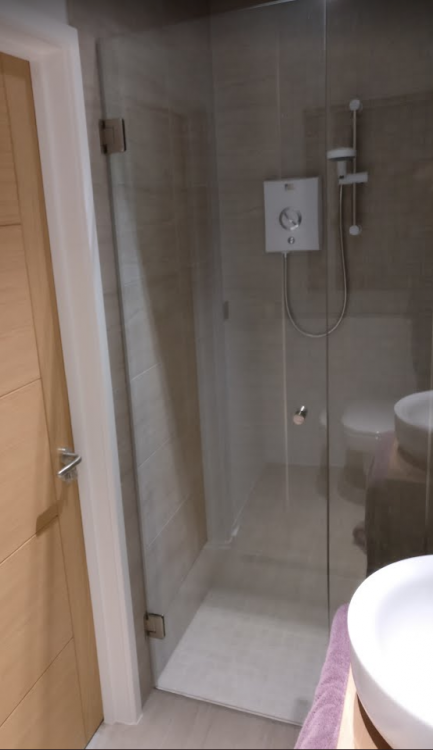

-
I went with HikVision also, have no experience of other brands so can't compare, but price was good, functionality is excellent, and installation is plug-n-play. I would definitely go with IP Camera and NVR, rather than analogue and DVR. Specifically, I went with their NVR DS-7716NI-K4/16P. This one has an integrated 16 port PoE Switch which makes the camera configuration very easy, it's also available with an integrated 8 port PoE Switch instead of the 16, or as a 32 channel NVR instead of 16, although you'd need a standalone PoE switch for the other 16 cameras as the don't do an integrated 32 port PoE Switch. I used mostly bullet cameras outside, but 1 dome under my porch. The bullets I went with were DS-2CD2T55FWD-I8 . They've got long-range IR which are claimed for 80m, but I'd say they're very good for 50m. Before specing the cameras I'd suggest drawing out a plan of the areas you want to cover and make sure you get the right lens size for the field-of-view you need. With regards motion detection, as mentioned above don't expect any system using changing pixels within the image to detect motion to be very robust. You'll get a lot of false positives on external cameras. Luckily the HikVision NVR accepts incoming alarms and you can set up actions on these so you can use a 3rd party PIR to send a signal to the NVR to then send you a notification and some pics of what just happened. We use the same PIRs that switch on the external lights to send alarms to the NVR.
-
I appreciate Sapele is too dark for what you are after, but I did say I'd get a picture of the porch ceiling. This is also a better representation of the actual colour. The ceiling is done with alternate narrow (94mm) and wide (144mm) boards, bevel edged and butt-jointed. The wall cladding is the same boards but board-on-board. It was the spark's idea to recess the spots into the board, which isn't really noticeable in the pic but is a really nice effect.

-
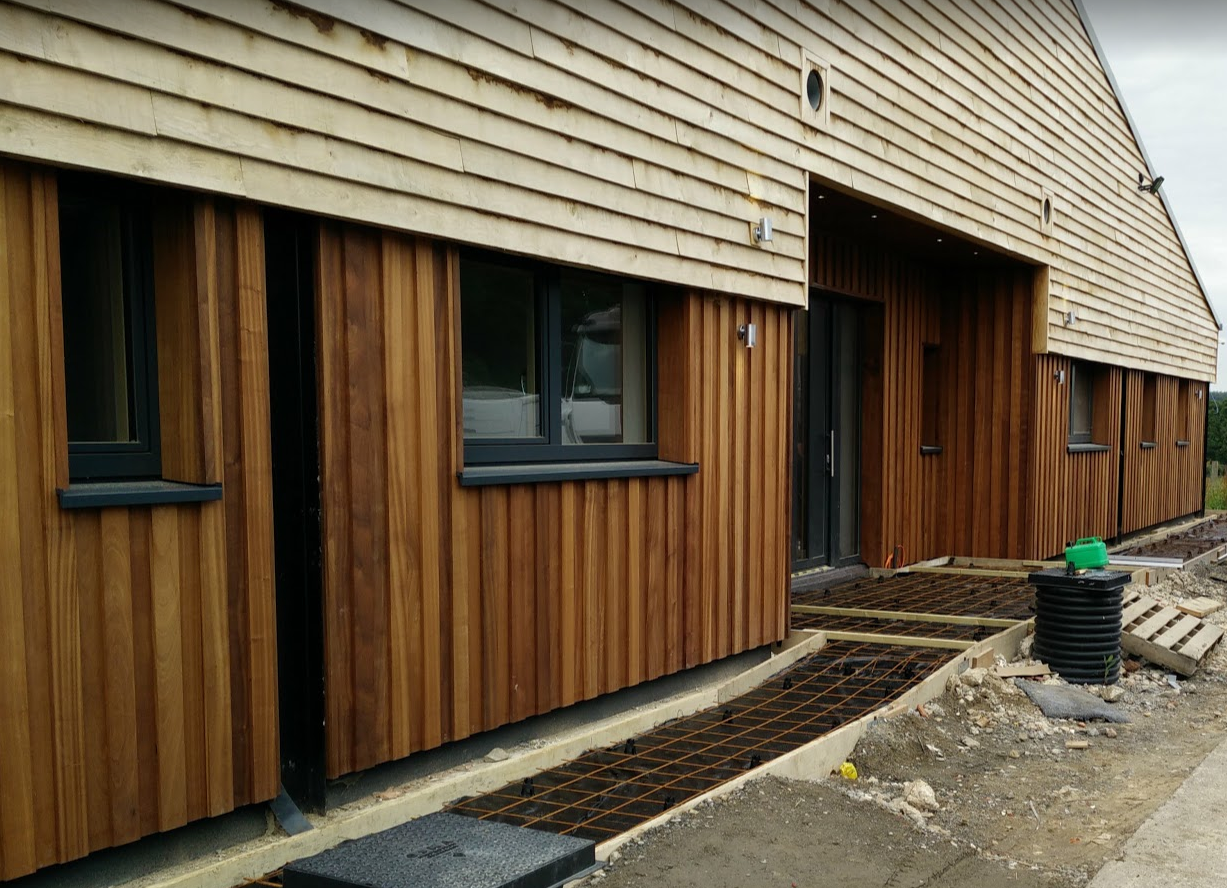
We were after a consistent redish-brown to part of our cladding (incl. porch ceiling) and initially thought we'd be going with cedar but were disappointed with the inconsistency of samples where pinks and yellows would be mixed in with the brown we'd expected. In the end we went with Sapele (PAR) and three coats of clear UV resistant Osmo. It's a lovely deep brown, looks like a piece of fine furniture. If there's enough light in the morning when I leave I'll try to get a picture of the porch to post. In the mean time, not the best picture to show the colour, but to give a flavour. Sapele is obviously the lower half, and only one coat of Osmo at this point:

-
wrt solar gain, I'm thinking of a predictive system rather than reactive. With outside temps dropping to -2 overnight last night it looks like our house dropped its average temp by about 0.8 degrees (down to 20.6) between 22:00 and 07:00 (I block the ASHP from working between these times, not actually sure when the last time heat was put into the buffer, may have been much earlier) At 07:00 it immediately wanted to heat the buffer, but I'd noticed the forecast said that it would be a bright morning, so blocked it from heating. By 10:00 the average house temp was sailing passed 22 degrees and is now (15:00) 23.5. I'm choosing not to dump any heat out as it's forecast a cold night tonight. Had I not manually blocked the heating this morning I'd have wasted a buffer full of warm water. Now, had it actually been over-cast this morning I'd have needed that buffer heating up at 07:00. What would be nice is a control system that was informed by the forecast so that I can stop checking the BBC Weather. In reality I'm using Loxone to control my heating/shading/cooling/ventilation (not yet fully automated). And they do offer a weather service that requires a subscription to be paid. I haven't yet checked if this would provide my controls the info it would need , but I'd prefer to avoid a subscription if I can. A dedicated climate control system would hopefully be more focused on just the climate side, rather that full home automation as Loxone is, and be simpler to set up.
-
For me, a climate/environment control system for a low energy homes needs to be able to coordinate ventilation and shading along with heating and, if possible, predict timing and amount of solar gain to avoid unnecessary early morning active heating, if within in a couple of hours the sun would have done the same passively. This is all based upon my, to date, 1 week of experience of requiring some low level heating in a low energy home.
-
Hi Mark, congrats on winning the battle and welcome to the forum. We're just South of Chelmsford. Before you jump into your Building Regs drawings, you may wish to decide on the Frame and foundation supplier as a number of details will come directly from them, lightening the load on what you need to produce yourself. We used a Touchwood Homes frame and Advanced Foundation Technologies slab. TW put us in contact with an Architect they use to help develop some of the non-standard passive house detailing. It was money well spent and as he knew their frame technology well as well as the slab I ended up getting him to pull the Building Regs drawings together and it turned out very cost efficient. Edited to add: The PH Architect, although British, resides in Australia, which made no difference to the support he gave.
-
Have you tried Airflow direct... for the Adroit unit. Airflow will do the system design in house (free), which is very comprehensive, and then provide you with the BoM to hawk around their distributors to get the best price. I found that BPC don't get such good terms with Airflow so their pricing wasn't keen. Travis Perkins ended up getting me the best price. They had no idea what they were selling me, just quoted on the Part Numbers from the BoM provided by Airflow. Airflow provide you a target price which you should be able to achieve better than through a distributor. That price provided was also "negotiable". When I hadn't placed an order within a few weeks of getting the system design I was chased up by their sales team who promptly re-quoted when I suggested I might go with a different brand of unit. When I sent that re-quote through to TP they came back with an offer that was a few hundred pound less that the target price.
-
I was originally going with Colorcoat as the original quotes of £40/m2 Installed was the most cost effective Standing Seam roof I could find. However in the year it took to get from the costing stage to having a roof ready to clad, Tata/Colourcoat seemed to get themselves in a mess and prices went North of £65/m2 installed. I went back a re-quoted all the different options and Aluminium then came in the most cost effective at a little under £55/m2. I wasn't happy with going over budget on the roof, but using a more ductile material (Aluminium, Zinc or copper) does allow hand dressing of all joints, such as roof-light flashings etc. so you avoid having to introduce another material to seal around penetrations.
-
Assuming doors aren't rebated then I allowed 3 x 3mm gaps for a pair. So, 3 + 533 + 3 + 533 + 3