


IanR
-
Posts
1857 -
Joined
-
Days Won
6
Everything posted by IanR
-
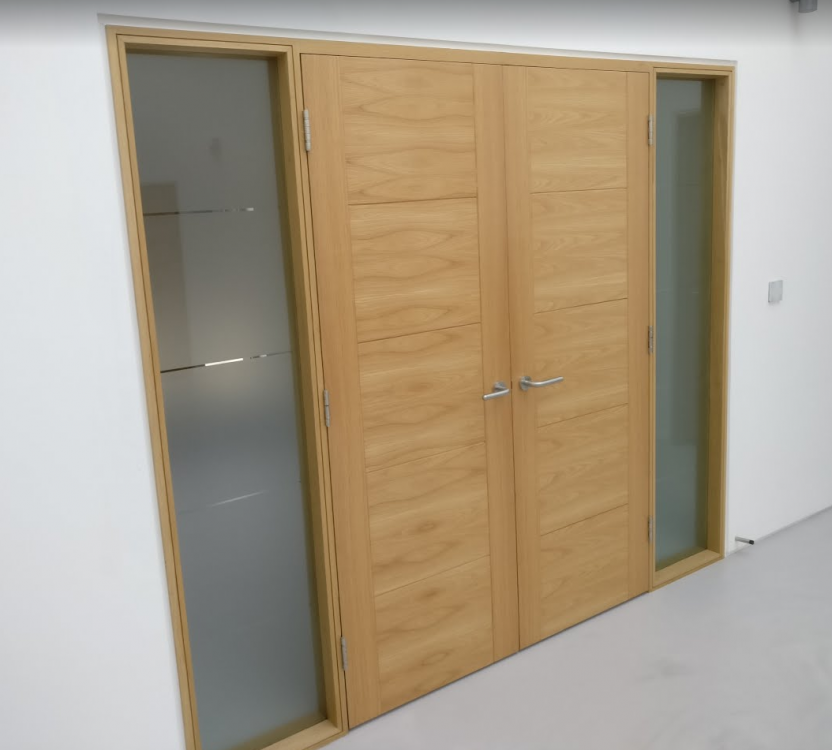
We've put shadow gaps at all floor-to-wall joints and around all door linings in the living areas of the house where we have hard floors. We haven't used them in carpeted or tiled areas. We've used them for their aesthetic. We have minimal steps/rebates/shoulders etc. around any features and have tried to keep that theme running throughout the house. We have used a very simple skirting/architrave in carpeted areas. Our logic to this was that the more hoovering required in these areas would risk damage to the bottom edge of plastered walls if we used a shadow gap against carpet. We also wanted a slightly softer look in the bedroom areas. Some thought needs to go into how it is best to deliver shadow gaps around door linings. Two schools of thought: 1. temporary ply liners in to board and plaster to, then remove ply liners and fit final liners, or. 2. fit final liners and mask/protect then plaster up to them. We went with 1. and found we got some cracking around the liners as we fitted the final door liners. As the liners were screwed in they pushed against the edge of the shadow gap trim and the plaster cracked behind it. This happened on a couple of doors and required chipping out the cracked area and filling. If it was a painted or varnished finish to the door liner I'd try 2. next time, but natural, lacquered or oiled finish and I'd stick with 1. to avoid staining on the finished door liner. We used Qic Trims https://www.qic-trims.com/product/type-r/ After decoration you will need to mastic the gap from the edge of the shadow gap trim to the floor/door liner. There will always be gaps that need finishing. Shadow gaps do seem to mean different things to different people. To me they are a small rebate at wall-to-floor and wall-to-frame junctions that disguises the actual joint in a shadowed area. I know they are also used in conjunction with skirting to create a rebate above the skirting, but to me that's not a "shadow" gap. Our version of a shadow gap:

- 39 replies
-
- 4
-

-
- shadow
- shadow gap
- (and 1 more)
-
Welcome @Cambs and good luck. The shape doesn't look too bad to me for PH Certification, hopefully you'll be pleasantly surprised.
-

Systemair VSR 500
IanR replied to Stones's topic in Mechanical Ventilation with Heat Recovery (MVHR)
Nope, I have a small, commercial Airflow Unit. There was a setup step called "fan orientation" where you're asked to identify which is the Supply Fan. When I entered this wrong the controller swapped the Supply and Exhaust temps. -
Systemair VSR 500
IanR replied to Stones's topic in Mechanical Ventilation with Heat Recovery (MVHR)
I can't see that the Extract Air Temp is measuring what it should be. As part of the commissioning was there a setting to identify which fan was which? It's possible this has been set the wrong way around and along with it the Sensors are incorrectly identified. It would make sense that 11C is the Exhaust temp rather than Supply Temp. I know this one as I made this mistake myself! -
Systemair VSR 500
IanR replied to Stones's topic in Mechanical Ventilation with Heat Recovery (MVHR)
What are the extract air and outside air temperatures when it's achieving 9C? Sounds poor unless very low outside temp and house not yet fully heated up... unless the MVHR is in Summer Bypass mode. Has it got the heating season correctly set. -
I've used Magnet for Larder, Utility and Kennel and am happy with quality and price. Really good Service and delivery, including correcting a couple of errors. Had issues with Howdens in the passed with loads missing from the delivery and then taking many trips back to get it corrected, so wasn't going to do that again. A Trade account gives discounts equivalent to their "70% off Sale", and the sales assistants can then generally do a little bit more, if pushed, by throwing a few bits in for free. We ordered via a Magnet Trade store rather than via a retail store.
-
Conceptual and detail design software
IanR replied to LouiseSJPP's topic in New House & Self Build Design
I see little use in "3D" for the detail design, accept maybe where there are non-standard details/junctions that would benefit from teasing out the issues before it comes together on site. A 2D drafting package should therefore be fine for producing the Building Control drawings and all plans and layouts that the onsite trades will use. An Architectural package will have workstreams optimised for producing such drawings so should save time. Their capabilities are all rather similar so take your pick. For the concept design phase I found a huge benefit in using a 3D application, to get proportions, scale, flow and material selection all the best it could be. I can't see it matters whether that's a virtual 3D CAD model or a physical 3D model, as long as it's a medium that's relatively quick to change and trial different options. The important bit is that is fleshes out any awkward junctions and make you think about how the structure will come together. I used the CAD and visualisation packages I was already familiar with for doing this as the "best" CAD package is the one you already know. However if I didn't have that existing knowledge I'd have used SketchUp. It's free, quick, and very flexible for applying materials and textures for reasonable quality renderings. -
I'm not familiar with the "wicked slabs" and went with Rockwool RWA45 and some very similar Flexi-Slabs. Easy to put in, 100mm bats easily compresses down to a 90mm cavity, and they're very effective at stopping sounds transferring between rooms. This was discussed before here:
-
What does First Fix really mean?
IanR replied to ToughButterCup's topic in General Self Build & DIY Discussion
How are you creating your shadow gaps, mine were as cheap as chips to create. Trim comes in at £1.35/m, with no decoration needed, put up by the tacker at almost no extra cost. Better spread as there's a hard edge to work to and no skirting or architrave to fit or decorate. Win-win. It's not an aesthetic that would look right in every house though. -
Not on a slider, but on a "normal" door threshold my main contractor bodged up the the lapping of the DPC into one of the thresholds. Created a fold that trapped water and funneled it under the threshold and into the mat well. I trimmed off the excess DPC and silicon sealed and with the cill in place it's never leaked again.
-
I'd leave it at 30 (perhaps lower to slow down the warm-up) and give it time for the heat to come through.
-
Before going to 45, can you feel any heat in the floor? What actuators do you have on the manifiolds and what is controlling them? Are they opening?
-
After a long negotiation, ours came in at just under £75/m2 for a 250m2 job. But, as I mentioned in the thread I linked to, the price dropped from £85 to £75 when I added an additional area, but not much extra product was required, just less waste. The quotes I got ranged from low £70's to high £120's per meter. You could tile cheaper, using smaller format ceramics, but pricing is comparable to large format porcelain tiles.
-
We like ours a lot It will take knocks and bumps without showing permanent marks. So far any marks have been able to be rubbed off. We did however have a disaster when the worktop fitters dropped a 2.4m x 1.1m granite breakfast bar on to the floor as they were bringing it into the house. Destroyed the breakfast bar and put a hole in the resin floor (and chipped the structural concrete slab). It's been repaired and the repair is not invisible. While I see every time I walk passed it, nobody visiting has ever commented so it can't be that noticeable. What it is vulnerable to is dropping sharp objects on it, knives in the kitchen for instance. Just like a stone floor, I'd recommend felt pads on the feet of furniture.
-
We went 32mm for 130m run. Any bigger and you have to chlorine rinse before commissioning. I was surprised that the meter, restricts to 15mm, but was told there's not another option. Still get 6 bar at the house though.
-
Anyone used Magic man for window repairs?
IanR replied to Moira Niedzwiecka's topic in General Self Build & DIY Discussion
Yep, we have used Magicman for dents and scratches on anthracite, aluminium clad windows. Make sure you have a very well lit area when they come to do it. -
All our habitable area is on the ground floor, and have put UFH throughout, except for Larder. - And we went with low-tog underlay and carpet in bedrooms. Also think about how you're going to do your shower floors in the slab. We went with forming the slope in the slab (post main pour) and tiling directly over the slab.
-
How is that condition worded? The U Values being quoted in the images you've supplied are for a theoretical wall section with studs at their standard (300mm/400mm/600mm) centres. With the extra timber that will be needed within the walls around window and door openings or other structural elements such as supporting a ridge beam etc. the actual average U Value will be higher. Depending on the wording of the condition, you may need to go for a wall build up that provides a theoretically higher U value, such that the actual U Value meets the condition.
-
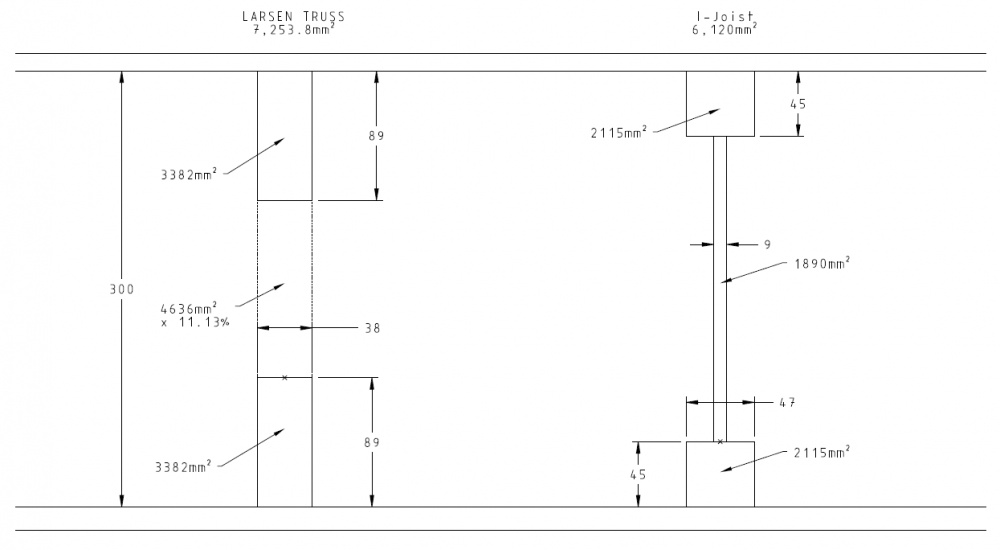
The I-Joists outer flange at 47x45 does the same functions (+structural support), so the section could reduce to this. And the web could likely be ply as other manufacturers of Larsen Truss use. But we're into the arena of small gains so it is likely, as you say, that the choice is one of simplified stock rather than achieving ever gain possible.
-
Thanks for the timber sizing, the original drawing has been updated and that brings the timber fraction more similar. The difference is now not decisive on whether to use one option or another. I still see an opportunity to improve the twin-stud over what I have drawn, reducing the thermal bridge further.
-
I'm also struggling to see the logic behind the price premium for Cellulose. Is the only difference in the quotes the insulation type, or does the Cellulose quote include a different frame technology, ie. twin-stud over traditional. We needed over 200m3 of Cellulose and the installed price was under £15K. It worked out at around £73/m3
-
I don't know that the advantage of a Larsen Truss frame is thermal bridging within the wall structure. When you compare the two systems, I-Joist may have a lower timber fraction than Twin-Stud. The below is making assumptions on the timber sizes within a Larsen Truss based on images I have found, if someone can come up with better timber sizes I'm happy to update. For the centre nogging I've assumed 3 noggings within a 2.4m panel. ***Updated after JSHarris reply below I'm surprised MBC appear to use 4x2 for the noggings, I would have thought they could get away with thin ply, but that's not what the pictures show that I could find. I've also always wondered why, if the outer stud is non-structural, why it's not a smaller section than the inner stud. There maybe be opportunity to optimise the MBC truss. I don't believe there is much scope for cutting holes within the webs of the I-Joist. I can't find the document at the moment, but I was supplied one that was fairly restrictive on the amount of web that could be removed. However, the guys that did the pumped cellulose on my build commented that closed off channels were much preferred as it guaranteed even fill. They were critical of open panel systems as they didn't feel it would be possible to fully fill at even pressure. In my view the advantage of a Larsen Truss over I-Joist is being able to sit the outer stud over an EPS upstand. This allows for a simpler perimeter condition on the slab to avoid a thermal bridge between wall and floor. I-Joist require a slightly more complicated perimeter to do the same.
-
That makes a lot of sense. @bissoejosh was the other member that was using CTD if I remember correctly, although at early stages currently I believe. Mine is a CTD designed frame, as part of a Touchwood package. My build is complete so the frame is not at all visible. I have lots of photos of the frame going up, if there's anything specific you need to get your head around then I may have it captured. I got quite involved technically with my frame design, swapping CAD models back and forth with CTD while we resolved issues around interfacing with the existing steel frame of the building we have converted, and they're are truly excellent at what they do. I don't think there'd be any discernible difference between a completed house built with Larsen Truss Frame than that built with a I-Joist frame. If you are erecting it yourself then you may have to make up the trusses yourself as I'm not aware of anyone setup to produce these as supply only, for a stick build. (I may be wrong I've never searched for this option) Whereas I-Joists are a stock item that is just being cut to length either in the factory or on site.
-
There's a couple of people using Cullen Timber Design to design JJI Joist frames with the possibility of having them pre-cut at the factory, before delivery. Edited to add: but remembering back I thought you were one of them so you know about CTD already.
-
No gate needed, just pull a bracket or two off and open up a couple of panels each morning. You'll be re-configuring them all the time depending on what you have going on on site any particular day. A straight line of panels tips easy, so not good in wind. If you have to have them straight then an extra couple of panels at 90 degrees to the main fence will stop it tipping. ...Welcome to the forum.



