
Leaderboard


Popular Content
Showing content with the highest reputation since 07/27/25 in Blog Comments
-
That's what we do. We don't know the full background or your experience. We may have forgotten what you explained earlier. I've been in the design and construction business 50 years and get people telling me things I know or am even very expert in. I don't mind. Because there are some valuable nuggets in there. And because others reading behind the scenes might gain from the info. Looking forward to following your progress and teaching you how to suck eggs.5 points
-
He said yes.5 points
-
I love problem solving and you cannot beat the feeling of doing so via improvisation. Getting on site in the next 3-4 weeks is going to be a big relief. Having to travel 1hr each way has been a real drag and I think that even though we are moving into a static caravan. It will be into a static caravan that we own on our land and the place we will call home. Living in rented for two years, has felt like living in limbo.5 points
-
This is just getting ridiculous now. Don't you know you're suppposed to have disaster stories, compromises, rogue workers, and budget failures? 😉 You and you're wife must be so happy and proud - deservedly so; you've done an amazing job. Love the terraces, and as @MikeSharp01 notes, we at least deserve an update once the planting has settled in, just so we can be a little more jealous than we already are. 🤣 Love it! ❤️4 points
-
Congratulations. This has been a masterclass in successful self building by managing contractors! More important than that is the contractor selection, project management, etc, and I think it's you (with assist from Mrs P) that has done that so you can feel great satisfaction with how this project has gone. I'm guessing (maybe you said before) your background is in project management and if not it's an even greater achievement. When you have time and if you have the energy I and I'm sure many others on here would appreciate it if you could share as much as you can on your process for managing this project. What your average day looked like, tips and tricks, preparation, etc. I think this could be really useful for those of us with less project management experience!4 points
-
Well that's very kind. There are several things to say: Firstly, we have been lucky. What's the most important attribute of a successful project manager? Answer: Be lucky! Secondly, the blog no doubt gives a slightly rose-tinted view for a couple of reasons: I have not majored on the couple of trades who have been more 'difficult', primarily because it's not fair to trash them when they have no way of replying. Also, I am mindful that where we have had issues that might be down to me - lack of clarity of instructions, clash of styles etc. None have been fraudulent or dangerous. In terms of the process of finding good trades, it's largely down to previous contact and personal recommendation. Those trades we did not already know were mostly recommended by those we did know. Notably the few we have been less enamoured with were people I sought out directly through the internet, adverts etc. but equally that method did throw up some excellent teams (e.g. the plasterers, and indeed the main timber frame company Turners). For national suppliers/trades (e.g. our ASHP team Air2Heat and the MVHR guys Heat, Space and Light) a trawl of BuildHub has been very useful, and reliable. I thought about asking for reference sites but in truth I don't think these are at all reliable; ask any trade for a reference and if they want the job they'll provide one (and often those good trades that don't need the work won't be bothering to provide referees because the whole thing is a bit of hassle for a job you might not get). And has anyone ever followed up a reference and got bad feedback? So I didn't bother with that. The other big thing is communication. I spent quite a lot of time lining people up as early as possible, and talked to them - a lot. By which I mean I kept in regular contact every fortnight or so to confirm we were still on schedule, and check they were still lined up. Some people I just On a couple of trades I got cold feet due to difficulties getting hold of them or lack of confidence they could make our dates, so I switched to alternatives, giving them plenty of notice we were going elsewhere. I have tried to keep the communication up through their work for us too - everyone likes to be told what a great job they are doing and it costs nothing. Build up a stock of that and if you need to call out issues, change things, or beg some favours it lands much better. We have really worked hard to keep people on site happy too - tea and coffee making, free snacks, a well-stocked fridge - several contractors have commented that ours has been a great site to work at. It costs next to nothing and reaps lots of good will. Also boosting good will is paying invoices immediately - I mean the same day, within a couple of hours. We have the cash to fund the project so it does much better for us in keeping trades happy than sat in our account earning nothing in real terms.4 points
-
You will have many more stressful days like that. just think how that plywood saved the day, then every time you have a day like this planned think what could go wrong, and what would save the day, whatever you think will save the day make sure you have it ready. it could be an extra man on concrete pour day or that stack of 4x2 that you found free on Facebook, get it all ready you will find the majority of lads are used to solving problems.4 points
-
Just to report, our underfloor cooling is working nicely: 31 deg C outside, 23 deg C in the house - even with the lift and slide doors open. Beautiful day here in Dorset!3 points
-
Really enjoying your blog. You're clearly doing a great job of the project management. I hesitate to ask, as you already have enough on your plate, but I'd be very interested if at some point when you have a minute to spare (🤣) if you shared some of your knowledge on how to do that well, what tools you use etc.3 points
-
Defo best advice. We always buy a battered upvc door off gumtree etc local to the projects and only swap that out at the very last minute. Have one here atm covered in Passive Purple, so I doubt gumtree will work to get it sold back on now lol. For the sliders @Benpointer, I usually make a plywood shoe that sits over the threshold and keeps the slider open fully, making sure that trades step on that and not the shiny new threshold with muddy boots etc. You simply lift this on/off at the start and end of each day, and make yourself sheriff of the keys so no numpty can open it and wreck it for you. You need eyes in the back of your head as you get the niceties installed, as otherwise even a simple extension lead getting wound back through an open door or window will remove the paint off the frame.3 points
-
Not a blog, but a few words would be interesting. Then in a year you can reflect on those notes and realise everything is fine really.2 points
-
We cover the cavities because we put the insulation sheets in every 4 rows and don't want them to get soaked.2 points
-
We are, but I think I can bend it back around to my house build again 😂 It's also worth checking whether the person has actually asked a question first. In the case of most posts on here that is true, but blogs are a bit different I think. I did ask a question in my first post and the answers were very helpful. As a result of the advice I was given I have now agreed the purchase of the whole (2 house) plot, with the goal of building just the one house on it. I'm really excited about that idea and to be honest I might have just offered for the one plot otherwise, with a whole heap of compromise thrown in for good measure.2 points
-
Nope. As I said to you before - not a Dunoon Daftie 😏 (a friendly reminder).2 points
-
I was worried that when I returned I would find the door locked and a sign on it saying 'No Square Feet allowed' or something along those lines, but the boss was surprisingly friendly. She readily agreed when I said that a serious conversation needed to be had about the price. It's given me hope again, but cautiously so.2 points
-
Other things you need to find out being a rural plot. Drainage. Both foul and rainwater. Is the plot big enough to support a treatment plant and associated drainage field and also a soakaway for rainwater. Taking into account building regs distance from buildings, boundaries and each other? If not is there an agreement in place with adjacent land owners for a drainage field under their land? Have percolation tests been done to prove the viability of land drainage (and calculate the size)? Cost of getting mains water to the plot, or alternative viable private supply? Cost of getting an electricity supply? Access to the plot including rights over any private tracks etc. If it is shared access over a private track how many houses use it already? When it gets to 5 houses it is required to be upgraded, surfaced to proper standards and then adopted.2 points
-
This arrangement happens all the time in England. Conditional Contract or Option Agreement are the standard means. With a conditional contract, you exchange contracts at an agreed price subject to, in your case, obtaining planning consent for erection of a new dwelling etc. There will be other constraints to cover time allowed, appeals, fencing and boundaries, access, working times etc. Once the conditions have been met you are obliged to complete the purchase.2 points
-
Unless you have someone in mind to take on the second plot, just offer for the one you like best. Major hassle and risk once you step outside the self builder role.2 points
-
Good grief, I reckon even I could lay blocks better than that!2 points
-
Great stuff Ben. I very much like the printed wall panels in the shower; I've always wanted to have some with my own photographs but then I looked at the custom prices 8 years ago ! And I love the lack of clutter / junk. If you could put a pin in the diary for an update at Easter 2027 after "one year living in it", that would be really appreciated here - especially I think running costs and how the solar has worked; I think you will be in a running profit. My nerd interest is whether the running costs will change after the structure all dries out. This looks like a forever house, sort of a move to Tracy Island.2 points
-
They are mural shower panels from Showerscape: https://www.showerscape.co.uk2 points
-
GSHP at this depth is actually solar thermal rather than geothermal so the ground used for extraction of heat requires annual restoration by the sun otherwise it does not recover for the next heating season and why the ground array sizing is so important.2 points
-
@Susie @DevonMade Brink are easily as reliable and perform almost identically, better in fact with certain models / sizes, to the Zehnder units, but Brink is cheaper. Beware ordering online as you may not get uk service repair under warranty, as with Brink you need to go through an authorised seller to get after-sales.2 points
-
You call a broken toilet a minor disaster after building a complete house from scratch within contingency and ahead of schedule. That says a lot about what a great build this has been! Good luck for the next three weeks.2 points
-
Keep seeing these threads, and still see zero point with most of what people do with automation. Waste of time and money. But fill your boots. My current lighting scheme, is side lights in the lounge from a normal light switch and 3A wall sockets. Don't need home assistant or shelly or any other smart relay. Got a box of them, all removed, in my cr@p I bought box and was waste of money. 4 years in house, no smoke or heat alarms have ever gone off. They will all be binned at year 10 and replaced with new. If they go there's an issue. Heat alarms in kitchen don't react to you burning your toast.2 points
-
I have been messaging @craig about this and he has suggested possibly replacing the current striker latch for a day latch on at least one door. It doesn't look that straightforward but may be doable.2 points
-
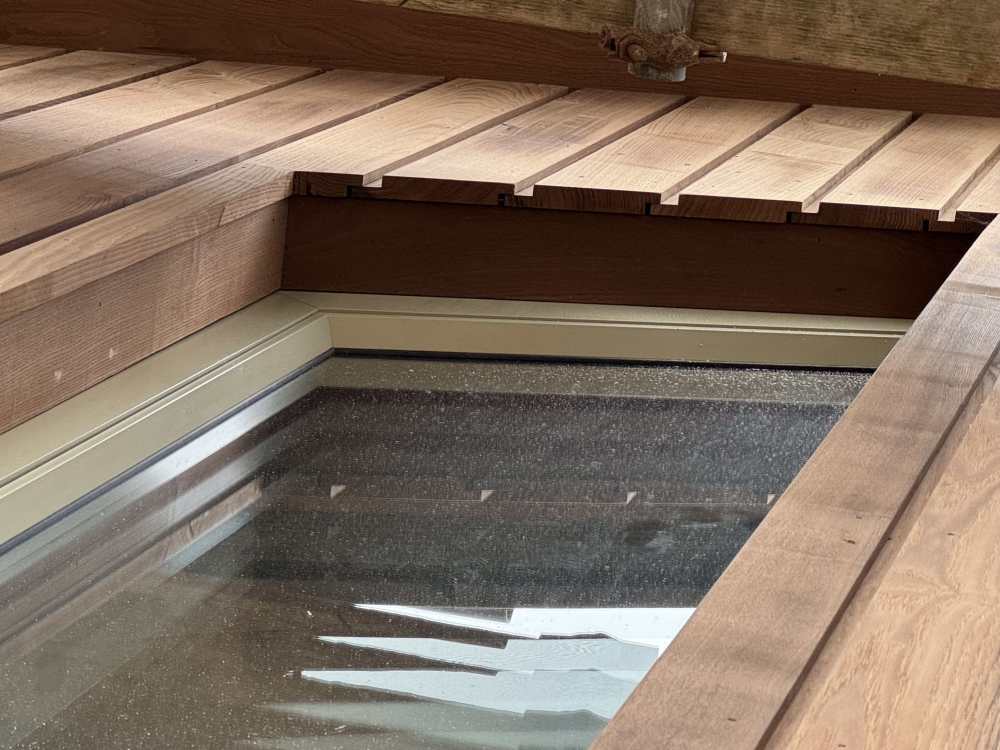
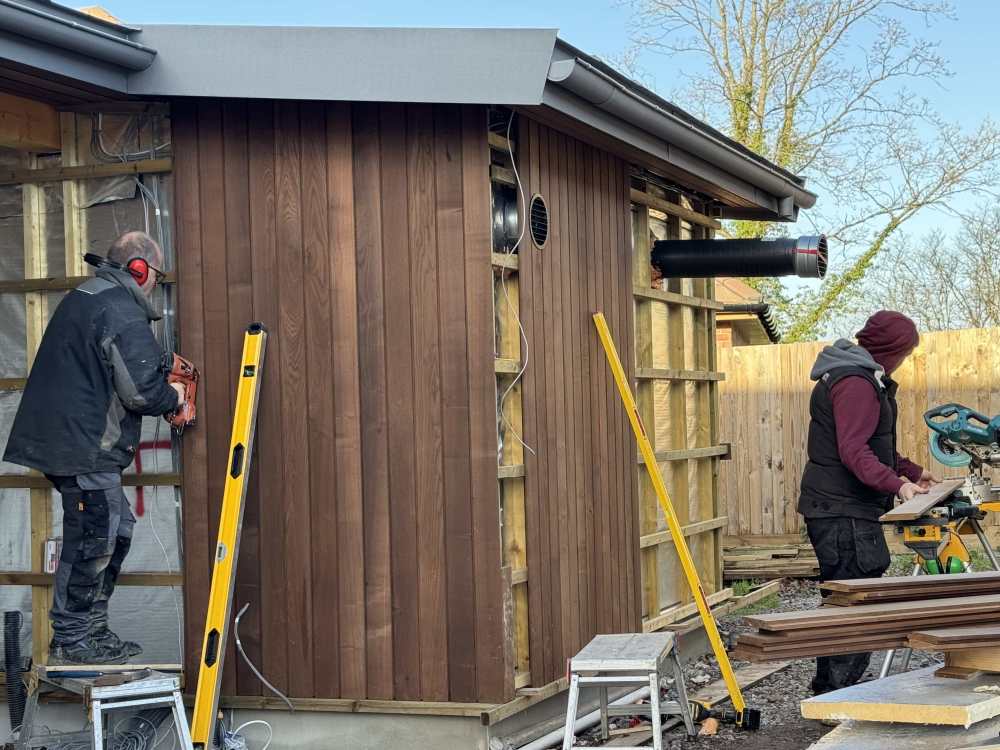
Checked - it's as I thought, they are going to fix a strip of the ash to the cross batten, they have already done this on the tall window (photo looks a bit odd due to it being an angled reveal + the camera perspective). We are not going to worry about weep holes because: ventilated cavity, small gaps between the half lap boards, and its a relatively sheltered east facing wall. The window itself is set back from the cladding and very well sealed.
 2 points
 -
Yes it's Brimstone Ash from Vastern timber. Expensive but really excellent quality - straight as a dye, virtually no knots, and it came really well packed. It cuts cleanly and we haven't experienced any splitting, despite Vastern warning that it can be brittle. We originally intended using western red cedar but discovered that cedar reacts with zinc and we have some high cladding above our zinc roof. The Brimstone Ash is inert (so we are told!). It's about the same price as Canadian cedar but has the benefit of going silver quicker, and it's British, so lower transport CO2 costs. Stainless nails are an absolute must. We're using Timco FirmaHold 16G 50mm Stainless 2nd fix nails through the face - very hard to see. Regarding the edge above the windows. Although it doesn't really show in the photo all the bottom edges are cut at a 30 degree angle to leave a drip point at the outside edge. This was recommended by Vastern. The same for any joins in long verticals, though incredibly I think we have only needed 2 or 3 due to lots of long lengths being supplied and careful selection by our carpenters. For the bottom edges they have fixed them slightly over sized then run a rail saw. Anyway we feel the angled cut at the bottom should stop water pooling on those bottom edges. Further progress on the cladding today:
 2 points
 -
We bought everything through them: design, kit, commissioning, and installed it ourselves. I am sure we could have done the design ourselves but we had too many other things going on. You would have to give Patrick Chester a call or email patrick@heatspaceandlight.com to see if they would just commission.2 points
-
We've had this debate on another thread John. We're note zoning, at least not from a heat pump perspective. We do have room stats controlling loops to specific rooms because we want some rooms (bedrooms, pantry) to be cooler than others (bathrooms). (If you consider that zoning then ok.) I believe your view is that we could control this be setting loop flow rates at the manifold but frankly, I can't be arsed with that 'tweaking' - I'd rather just use a room stat. The 'buffer' is really a volumiser, it's recommended by Panasonic: Volumiser: in the open primary circuit (when all heating – cooling circuits are closed) it is recommended a minimum water volume of at least 30 litres is included.2 points
-
Try to make living there more pleasant look for some patio slabs free on Facebook, build a small patio, build a path to the washing line, put up a small shed that you take your boots off in and work clothes, if the wife starts walking mud in it will start eating in to the dream. build good steps to the static, keep her warm and happy and you can probably put up with the house build.2 points
-
Well done. Hope you enjoyed a cup of tea after.2 points
-
That looks like chalk so should drain ok. And gravel, especially that much, would probably be resistant enough to uplift. Any risk would only be when the tank is empty, so that could be kept to the end of summer.2 points
-
Thank you, thats nice of you to say. I went to a self build show at the NEC when we were waiting for planning permission. When talking to MVHR companies one of them took one look at our plans and said “get holes designed into those steels for your ducts”, which we duly did by making sure the timber frame company designed them in. I didn’t ask them to but they also designed the metal web joists so they all line up too. Bloody marvellous.2 points
-
Thank you @Spinny. The debt collector will be along shortly 😆2 points
-
Looks absolutely amazing, congratulations and well done. You must have worked so hard with huge diligence. A huge inspiration to all of us to keep on keeping on and eventually we will see off all the trials and tribulations. Amazing view through the bifolds (Although I love trees, it might perhaps be tempting to remove the central one to open the vista ?)2 points
-
All very neat, methodical work. FYI you can't really sit stud walls down on to the thinner screeded floors, they need to go to founds over kickers, as you have, especially if there's any loads being transferred down from 'above'. No bullet dodging to ever be had there methinks so you're all good to just cut around these, and the lads are doing a sterling job of it too. Keep the bacon flowing, the grease keeps the elbows and knees lubricated2 points
-
That looks like some really tidy work. Great to see people taking pride in the work they are doing.2 points
-
It's got a nice ring to it but sadly it's not really fair on those who experience genuine bad luck that no amount of preparation which doesn't involve time-travel would have avoided. I'm thinking of those who bought, and largely paid for, a timber frame from a company that then went bust; those who planned their groundworks for the summer only to find that particular summer is the wettest on record (in contrast to us)... We can all think of plenty of similar examples. However, alongside Gary Player's gem: "The more I practice, the luckier I get", it's a great way to highlight that there's often more to apparent 'good luck' than meets the eye.2 points
-
Very kind words but I am still expecting that we will hit the rails and run into the smelly stuff at some point, so let's see how we cope with that. In the meantime, the principal attribute of successful project management imo is "Be lucky". Not too big for a first tattoo Nick 😉2 points
-
So impressed with your progress so far. Lets hope that it continues in the same vein.2 points
-
Building control were fine with me using grano dust as the top layer. So they should be. Sand is often used far too thick to overcome poor levelling of the sub-base. Then it picks up footprints and other shapes which the concrete has to drag along if it shrinks while curing. This is textbook stuff apart from a couple of things which reduce your mark to 99%. Well done. 🏆1 point
-
It looks superb. Well done!1 point
-
In the colder regions of America they sometimes extend insulation out from the foundations, or create a skirt of insulation deeper than the foundations. I think this is for frost heave, but it should also make the temeperature under the slab more stable. Could GSHP pipes be layed under the raft at the same time to take advantage of this, or would removing heat under the slab cause other issues?1 point
-
Great progress as ever! The weather in Dorset, as you say, has been an absolute pain for some time now. It's making our progress slow to a crawl currently! As ever though - Onwards and Upwards1 point
-
Thanks Mike! The plan for hob extraction is to rely on the MVHR. In our last house we also had a recirculating cooker hob... but never bothered to switch it on as the MVHR dealt with smells and damp quickly enough.1 point
-
@Benpointer those windows look great (love the colour too).1 point
-
Such great progress and blog. We are at least few months behind this build and I (J) am using it as a bit of a touchstone. Couldn't agree more on the points quoted above, they really do help, including people being happy to make recommendations for follow on trades and offer advice. Also of course, as mentioned, keeping people updated on progress (or delays!).1 point
-
Nothing really, may be higher sides so the overall height was increased. The original designs are taller and possibly use 7m sheets( very difficult to source up here). But it's not budgged with over 7 or 8 big storms may well extend it in the years to come.once the rest of the projects are out of the way.1 point


This leaderboard is set to London/GMT+01:00