
Leaderboard


Popular Content
Showing content with the highest reputation on 04/24/22 in all areas
-
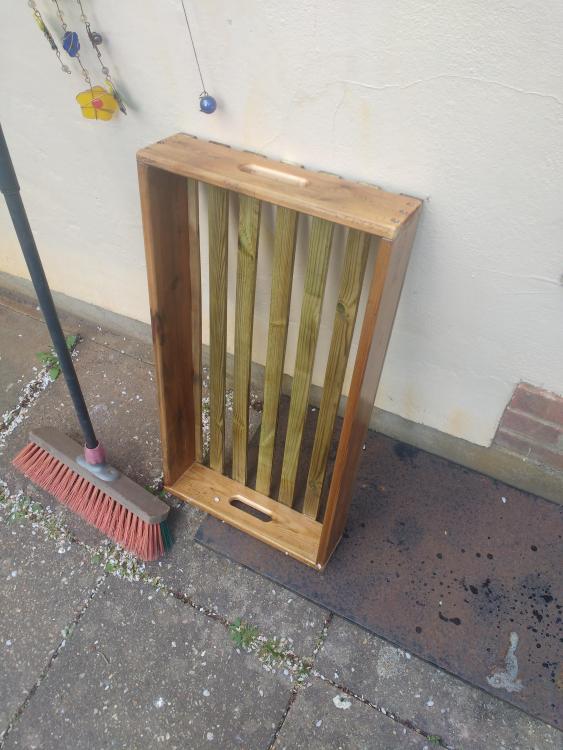
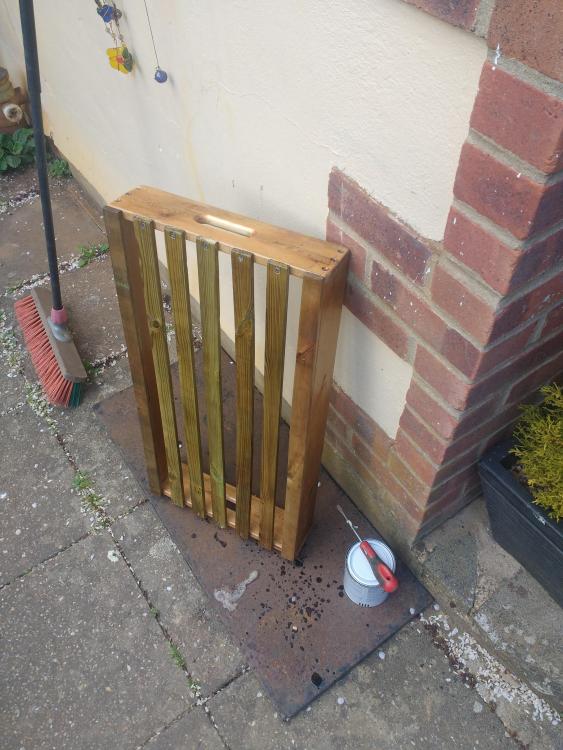
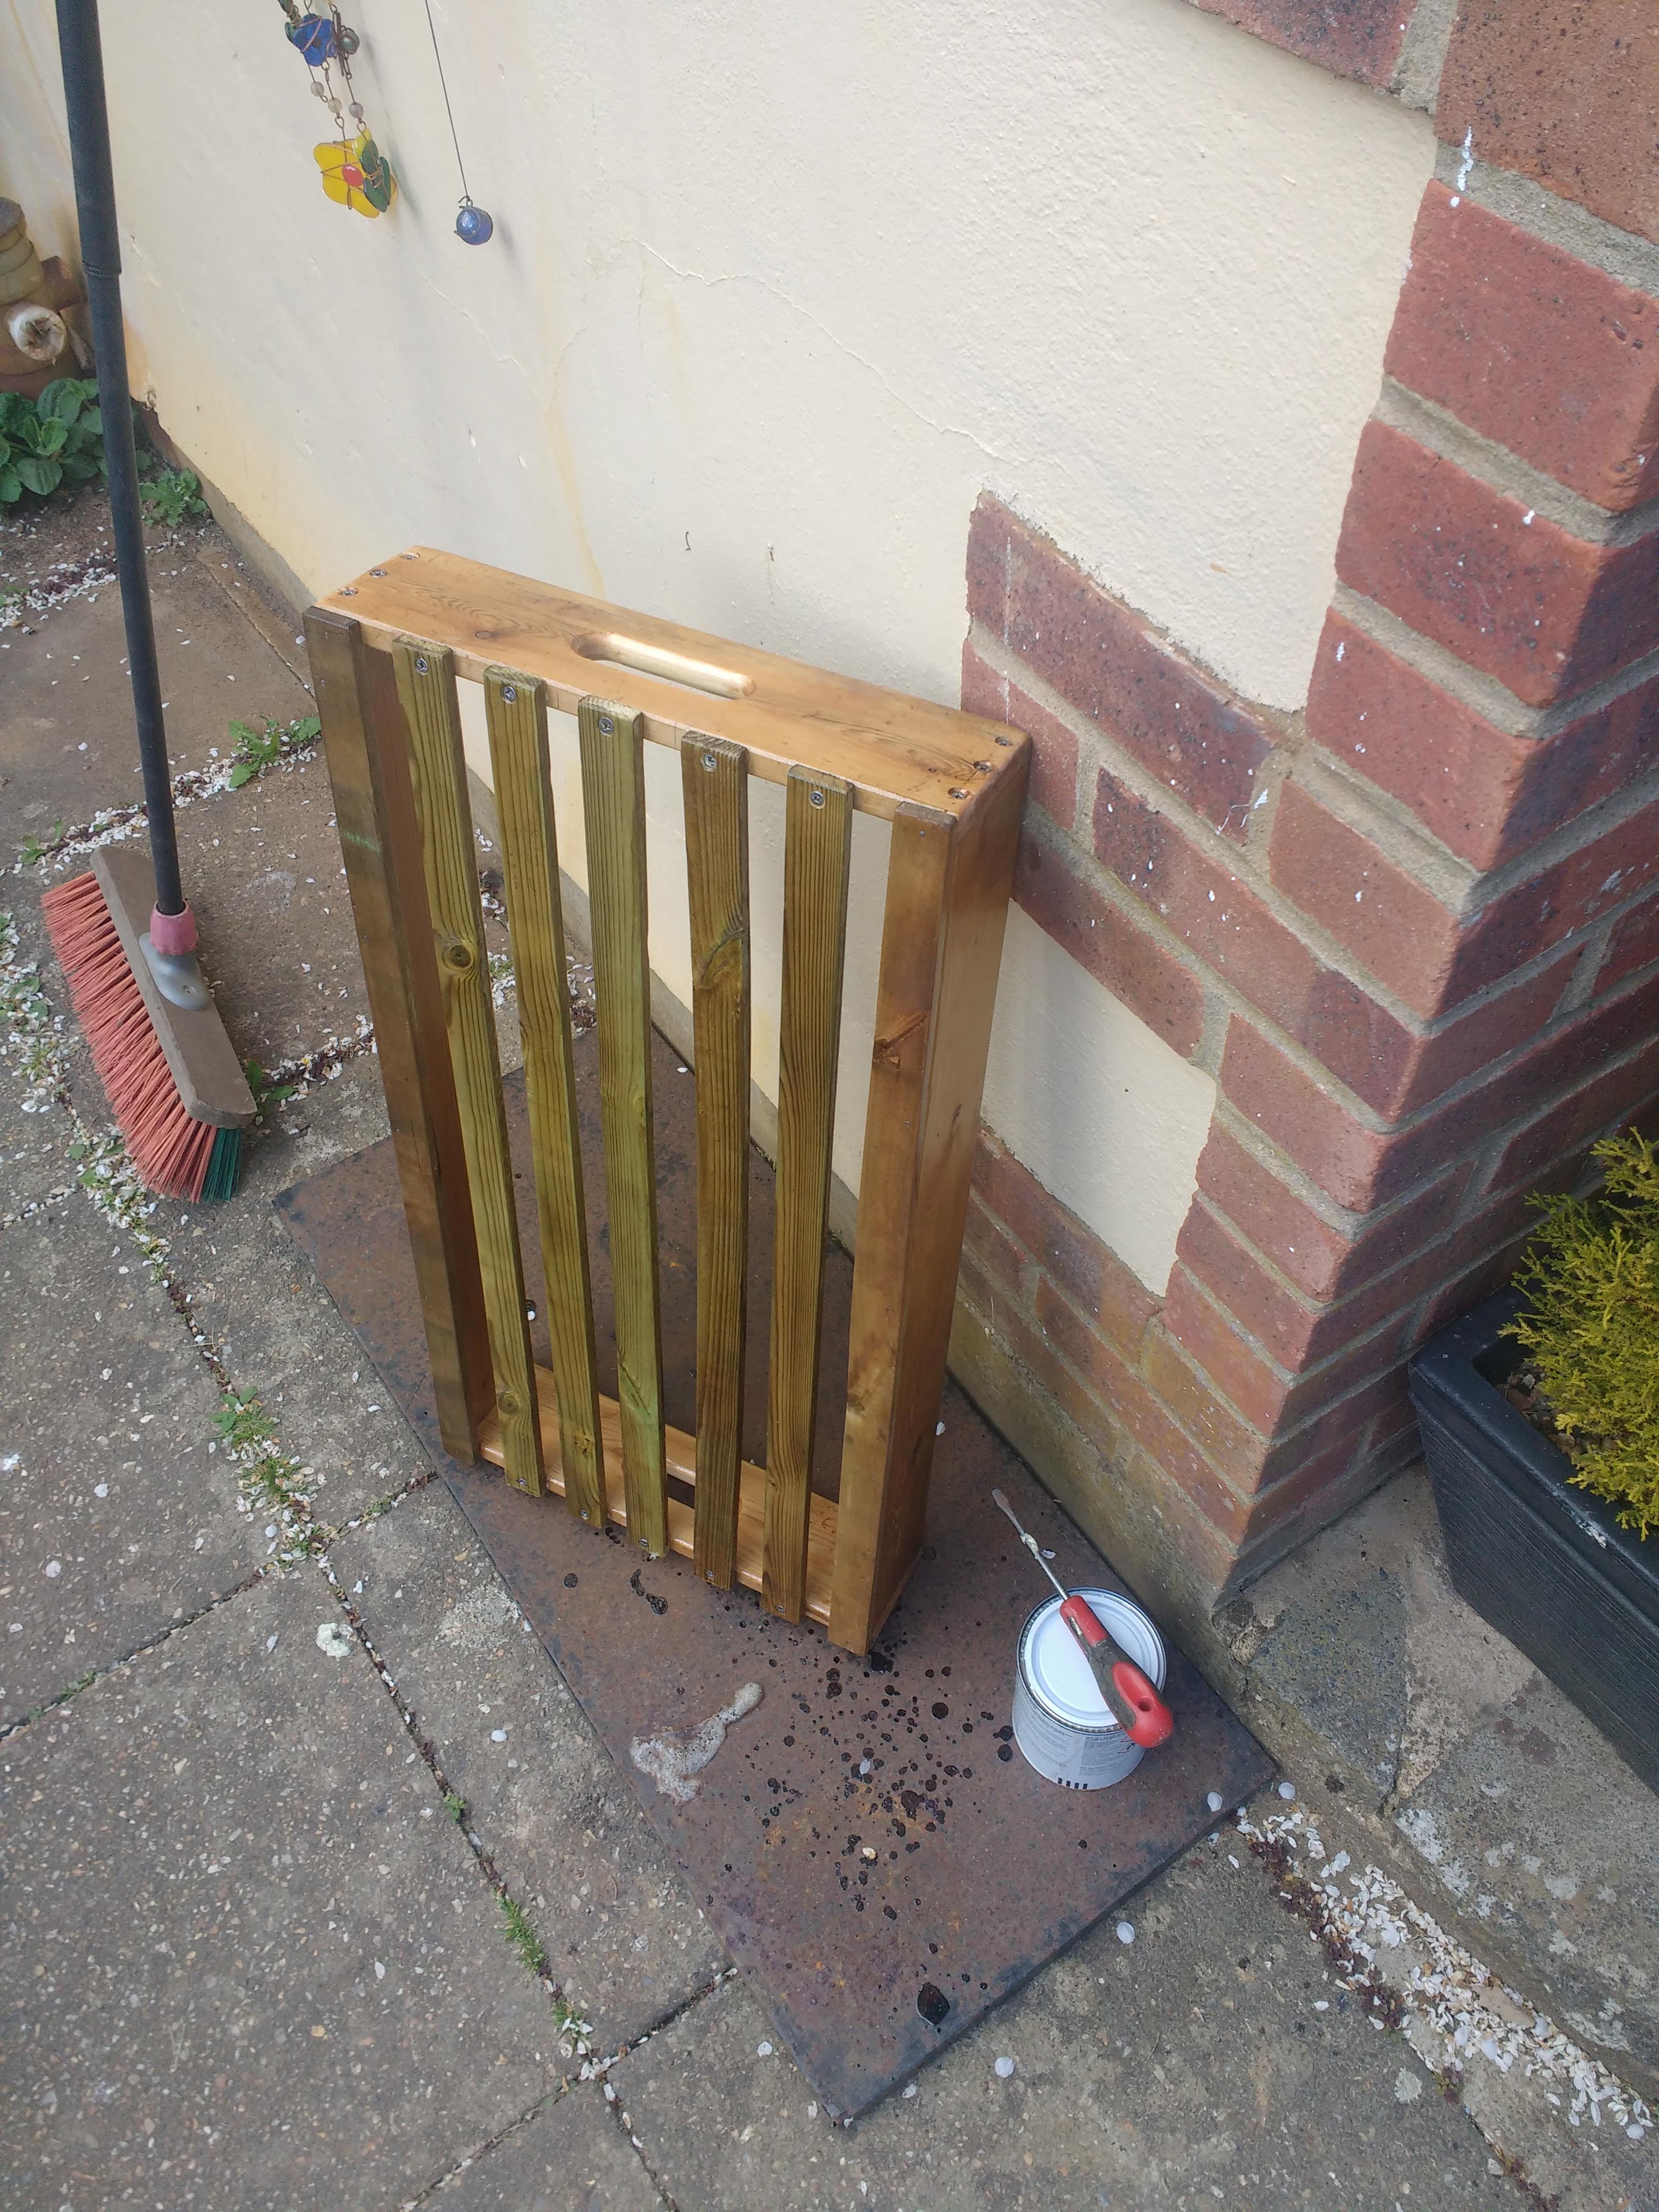
Made a seed tray today from scrap that should take the 50 little pots for my runners. Stainless screws / panel pins and white Gorilla Glue. Routed a couple of hand holds. 1 coat of yacht varnish so far.
 2 points
 -
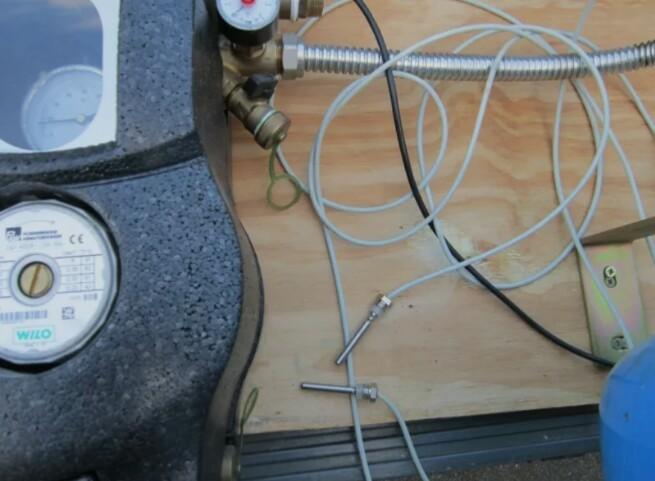
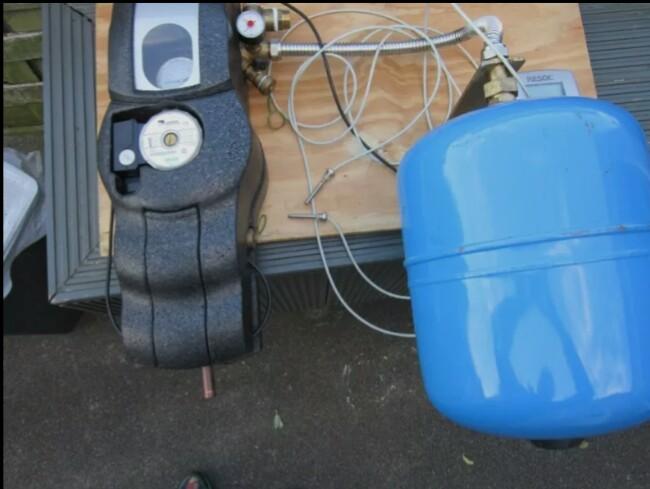
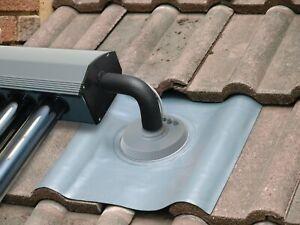
Holy thread resurrection! A big thanks to @Marvinwho visited me yesterday, kindly bringing replacement evacuated tubes to replace my damaged ones. Top man. Had a nice chat too. The plan is then x3 12 tube panels. I've also just scored this tank, controller and pump combo. Bought off Gumtree (for £50) but in Edinburgh! Someone's gone and gotten and is holding it for me. Got a mate visiting rellies up there in July who can bring it back down South. Just hope it works with these panels! Next step is some scaffold up and strip off some tiles. I'm going to renew the felt under where the panels are going. Then stainless steel brackets and some Unistrut to affix the panels to. I need to find a couple of these roof pipe entries cheap or make something similar:


 2 points
 -
Personally I would. buy a staple gun and 2-3 thousand staples. rip out the egg box and throw it in a skip, staple the first 3-4 rows, rip out next lot of egg crates and repeat. do it right now before it turns into a drama with 20 tonnes of screed sitting there.2 points
-
I used some spare MVHR duct to run cables 25m out to my shed recently. We pulled a 6mm SWA, a multicore Hituff, a cat5, and a drawcord, all through in one go with no hassles whatsoever, and that included one slow bend and 2x 90deg soil bends too...2 points
-
Very little in the grand scheme of things. I would just concentrate on getting a membrane that is tear resistant, and does a good job of keeping the rain out.1 point
-
It's all compressions on the panels I have here.1 point
-
Ok so block n beam. make sure you over spec it. Use larger than specified beams, and double them up more often than is specified to reduce the bounce. like everything they design to the bare minimum. regarding your concrete delivery. should you go and pay your neighbours and get a signed contract. if after you first pour they tell you to sod off, what then. it’s a big gamble on someone’s good will.1 point
-
That's what happens if you spend half the day gassing instead of getting on with it!1 point
-
I had a liquid screed in the basement on top of our insulated slab and decided it was actually cheaper to lay 25mm PIR and staple the UFH pipes to that rather than pay for a deeper screed and a.n.other form of fixing the UFH pipes down.1 point
-
Here is a similar discussion with some ideas. https://forum.buildhub.org.uk/topic/17519-ufh-pipes-on-to-concrete-slabs/ Here is a thread at another forum: http://www.greenbuildingforum.co.uk/newforum/comments.php?DiscussionID=6598 One suggestion I liked was to use thin reinforcing mesh, and tie the Pipes to that. Another was to screw the clip tracks to the concrete. A third suggestion was hammer clips, which need a pre-drilled hole. https://floorheating-direct.co.uk/blogs/underfloor-heating/different-installation-methods-water-underfloor-heating-systems https://ufhsupplies.co.uk/product/hammer-clips/1 point
-
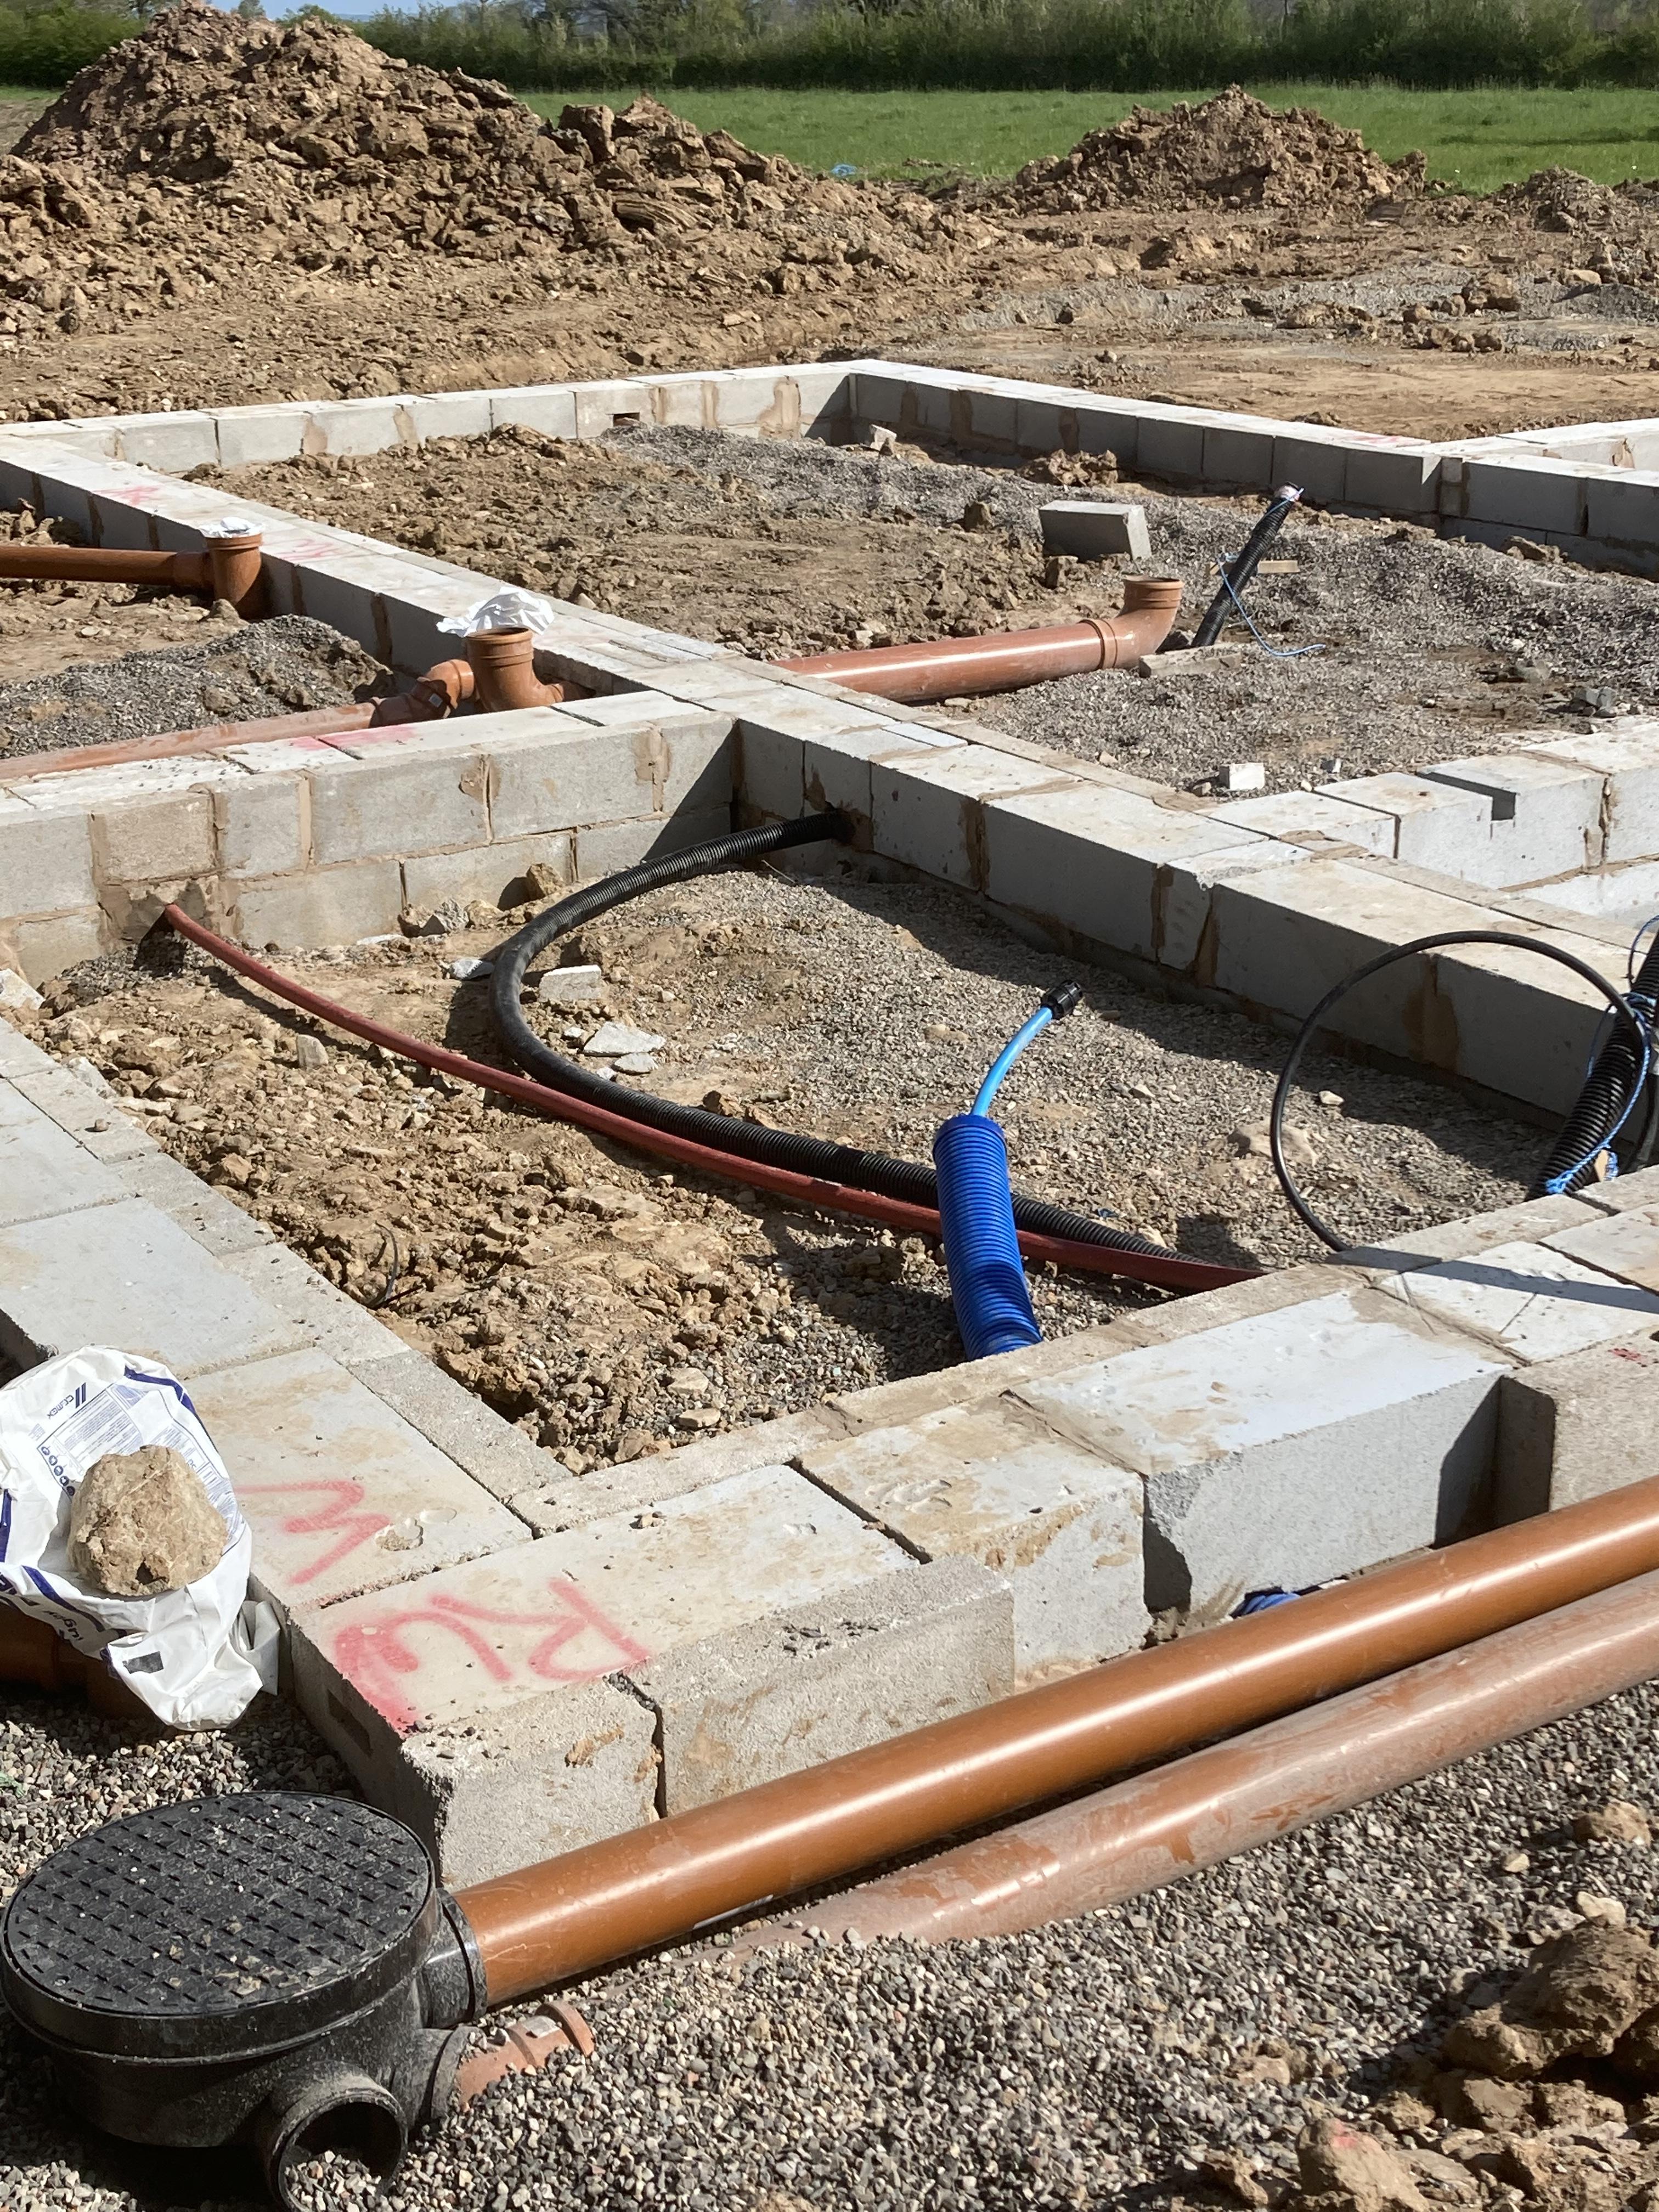
I’ve just finished the foundations BC asked for 300 mil void I wouldn’t have got my internal drains in with anything less
 1 point
 -
You need to get a life 😀 Though if you do ‘enjoy’ mundane monotonous tasks you are welcome to visit ( work ) on my site .1 point
-
And a sign of my lateral thinking. I came by it at a previous employer, on a scrap truck outside a lab being cleared out. I "borrowed" it and over a lunch break found the fault and repaired it. Having repaired it so I knew it would work, I undid the repair and sent it off to the appropriate channel to buy it as electronic scrap. Then as soon as I got it home I knew how to repair it.1 point
-
We ply-lined walls to be tiled.1 point
-
Here's a potential gotcha. For bathrooms, C-studs should be at 400mm c/c if using any 15mm Gyproc moisture resistant grade plasterboard. It doesn't actually say what stud c/c to use if using 12.5mm moisture resistant plasterboard. A Siniat video about metal stud partitions says they should be at 400mm c/c due to the extra weight of tiles.
 1 point
 -
200mm EWI, rewire and new 3g windows. 300mm + attic insulation. Mineral wool batts in suspended floor supported by membrane drooped between. 2 X split unit A2As. One upstairs and one downstairs. ESHP for DHW. No wet CH. You can include a spur for a spare electric rad if you think you'll need it. (I bet you won't) It's the cheapest "proper" solution I can think of.1 point
-
Size the rads for a flow of 45 deg and you’ll be future proofing yourself. As I said, irrespective of what you use to generate the heat, do try and do a heat loss calc and rad sizing exercise. It’s well worth an hour with a tape measure and half an hour in front of excel.1 point
-
yep. I've some info in my build thread1 point
-
Remember this :the VAT reclaim car crash in the making ? Well the claim has been accepted. Today. 9 months after the claim was submitted. Accepted maybe, but not accepted without a fight. Lesson learned? Some Inspectors do not follow the guidance given on the application form: that one simply beggars belief Take note of these key dates and record them formally: the Date of Entry Into the Valuation List, the date on which the Local Authority was informed of Entry into The Valuation List, the date [of the document, not the posting date] the LA tells you that your property has been Entered in the Valuation List I should take my own advice (in my signature line) more often than I do. @SteamyTea's right: I'm cross quite often. My defence? I am cross usually only when justified - and I try to use that crossness to get Scheiβe done. For the Hell of it now, I'm going to submit another claim. For all the stuff I could have claimed for in the last 9 months. See @jack's last post on the subject. HMRC Inspektoren sind Scheiβefresendearmleuchter1 point
-
+1. Big fan here of the heavy duty detergent bottle!

 1 point
 -
Planners asked us to add one into the design of the house. We added it to the design and have not built it. As our kindly architect pointed out, there's no requirement or date in the planning approval to finish the build.....so it's going to remain unfinished in perpetuity.1 point
-
Don't neglect that "cavity tray above roof level". They are some work to fit but they stop water running down inside what was an exterior wall and coming through the brick into your new room. Otherwise +1 to tanking the wall to above ground level then battens, insulation and plasterboard.1 point
-
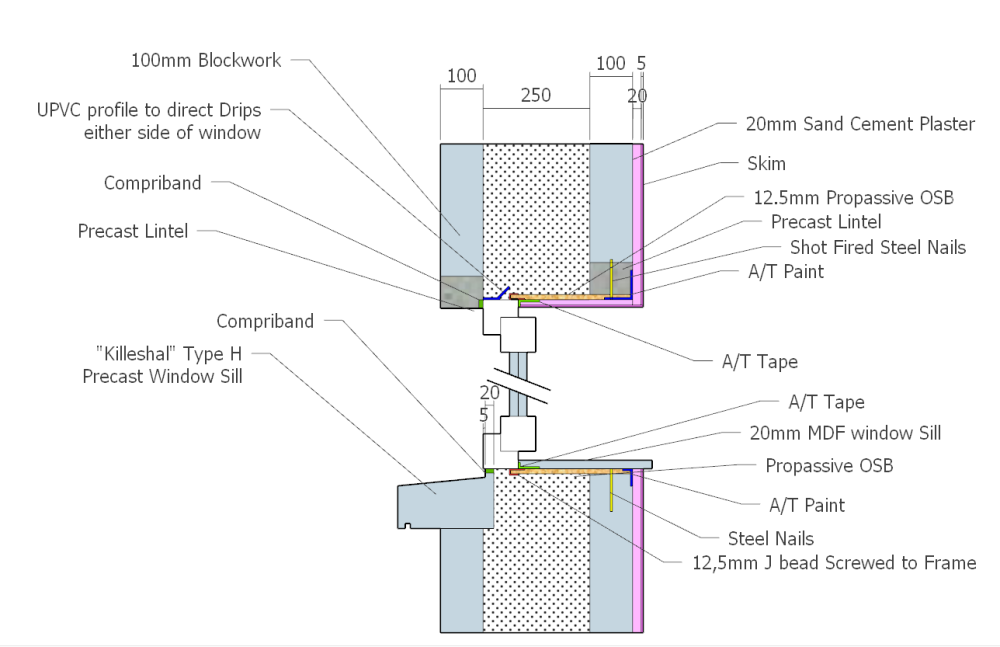
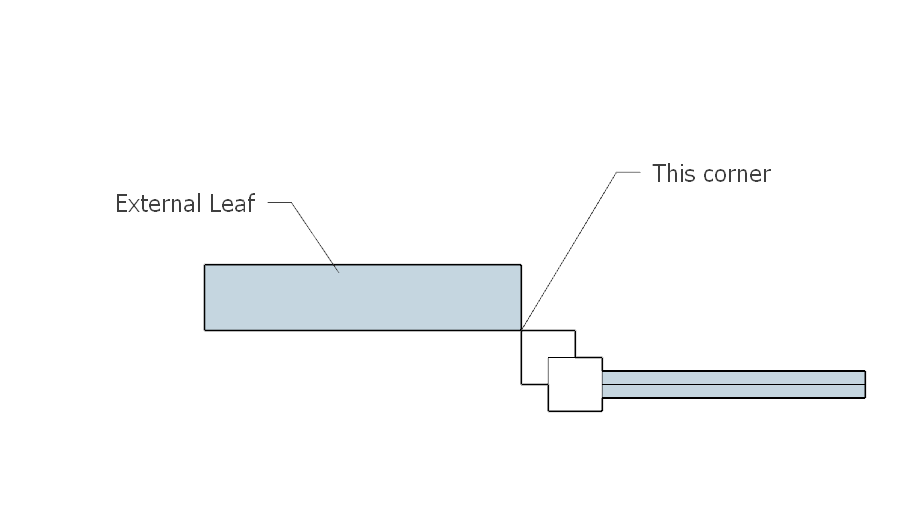
Improved UPVC window installation. I didn't bother drawing the horizontal section as most of the changes are the same. Points to Note 1. The useless cavity tray is gone. A small UPVC profile pre screwed to the frame will now direct any drips/condensation that run down the inside of the outer leaf sideways and harmlessly away. 2. Compriband is pre installed to the frames allowing tidy and quick expansion to seal the window to the outer blockwork at all sides. 3. 12.5mm J beads are screwed to all 4 sides of the window. This will allow an airtight 12.5mm OSB to be slotted in and then shot nailed to the inner leaf for speed. The block layer should leave the upper lintel maybe 30-50 mm higher than the outer one and packers can make up the difference. Similar story with the sill. 4. Pre install the A/T tape to the windows to all for very speedy taping later to the OSB. 5. The OSB to Block junction may be better dealt with with fleece A/T tape and plastered over. You would need a little time with the window frames before the fitters returned to pre install all the bits and bobs. Also cowboy window installers would be no good. The J beads should be screwed securely into the window frames, especially at the base. Some accuracy would be needed from the mason but not enormous. The windows would need to be accurately measured. No rocket science but everyone would need to understand. Its a no mess install, no expanding foam or A/T paint or silicone. Very quick to windtight and airtight. All materials readily available and pretty cheap. If only we could all build 100 houses. We'd get it right eventually! Next task, Incorporate external foam filled PVC electric roller shutters which I would very much like.
 1 point
 -
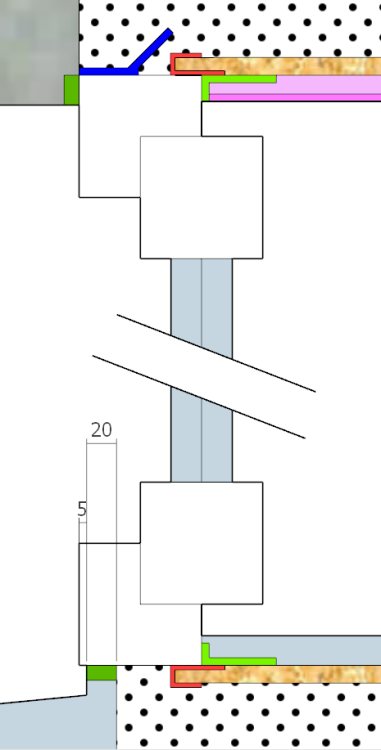
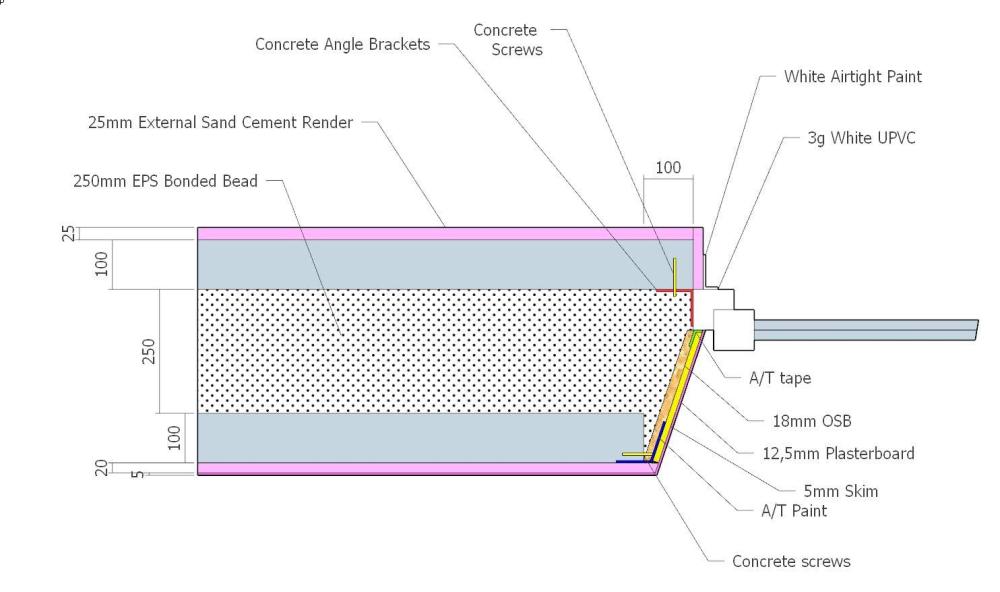
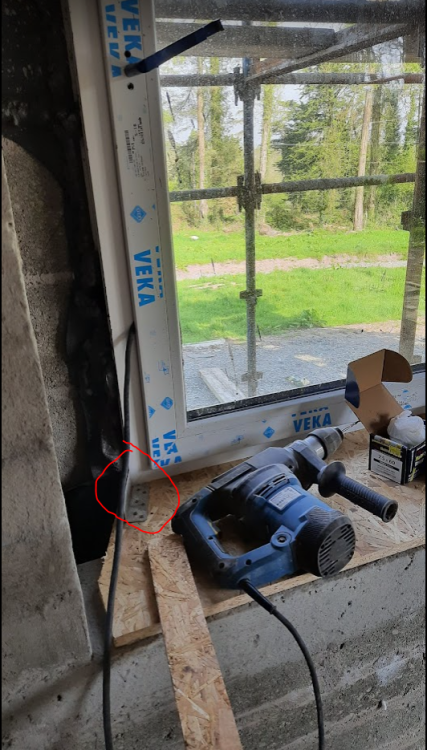
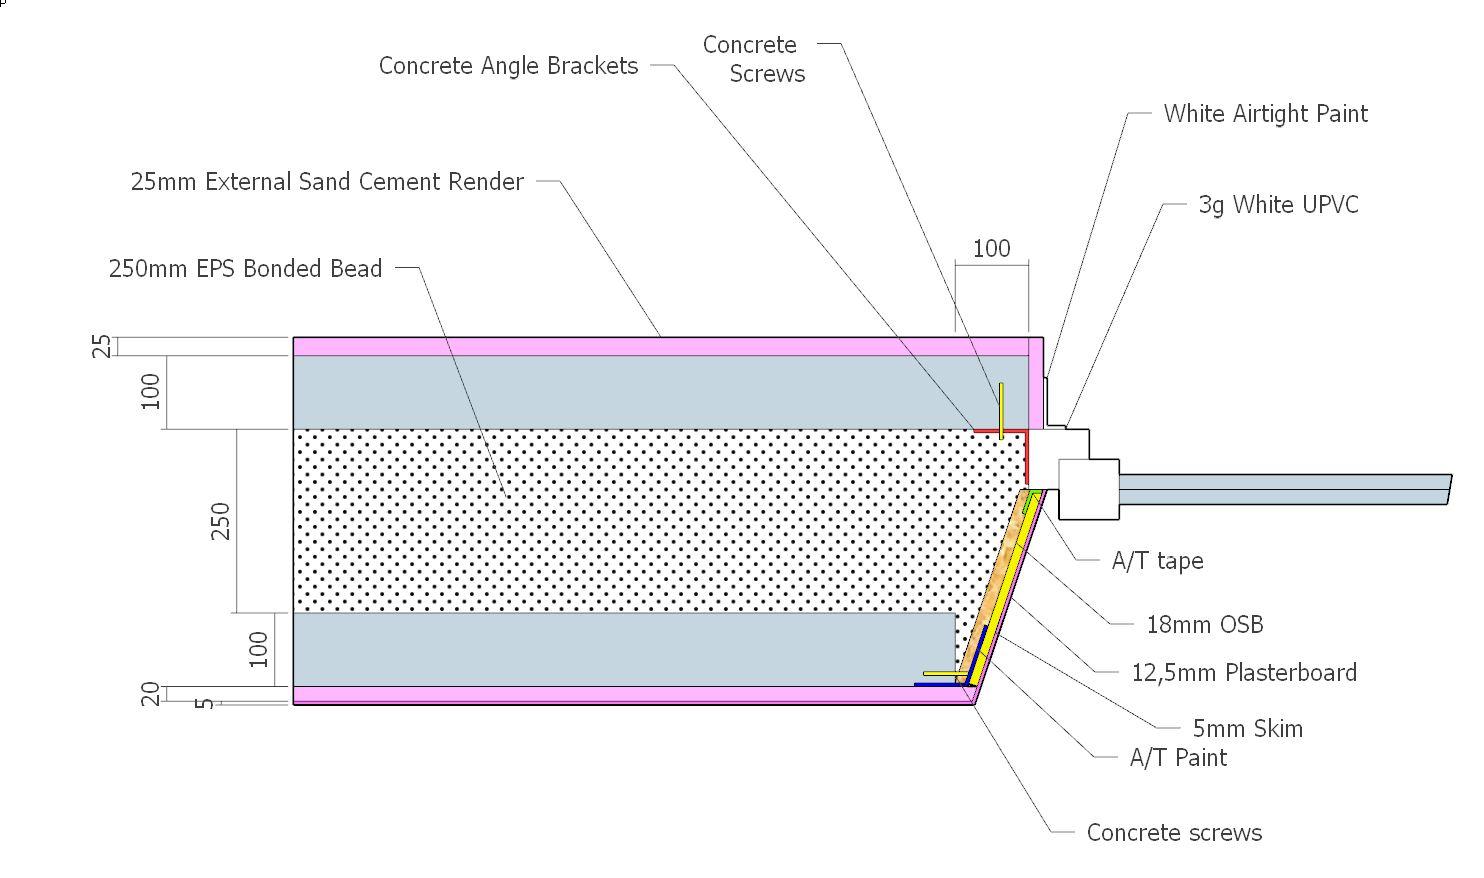
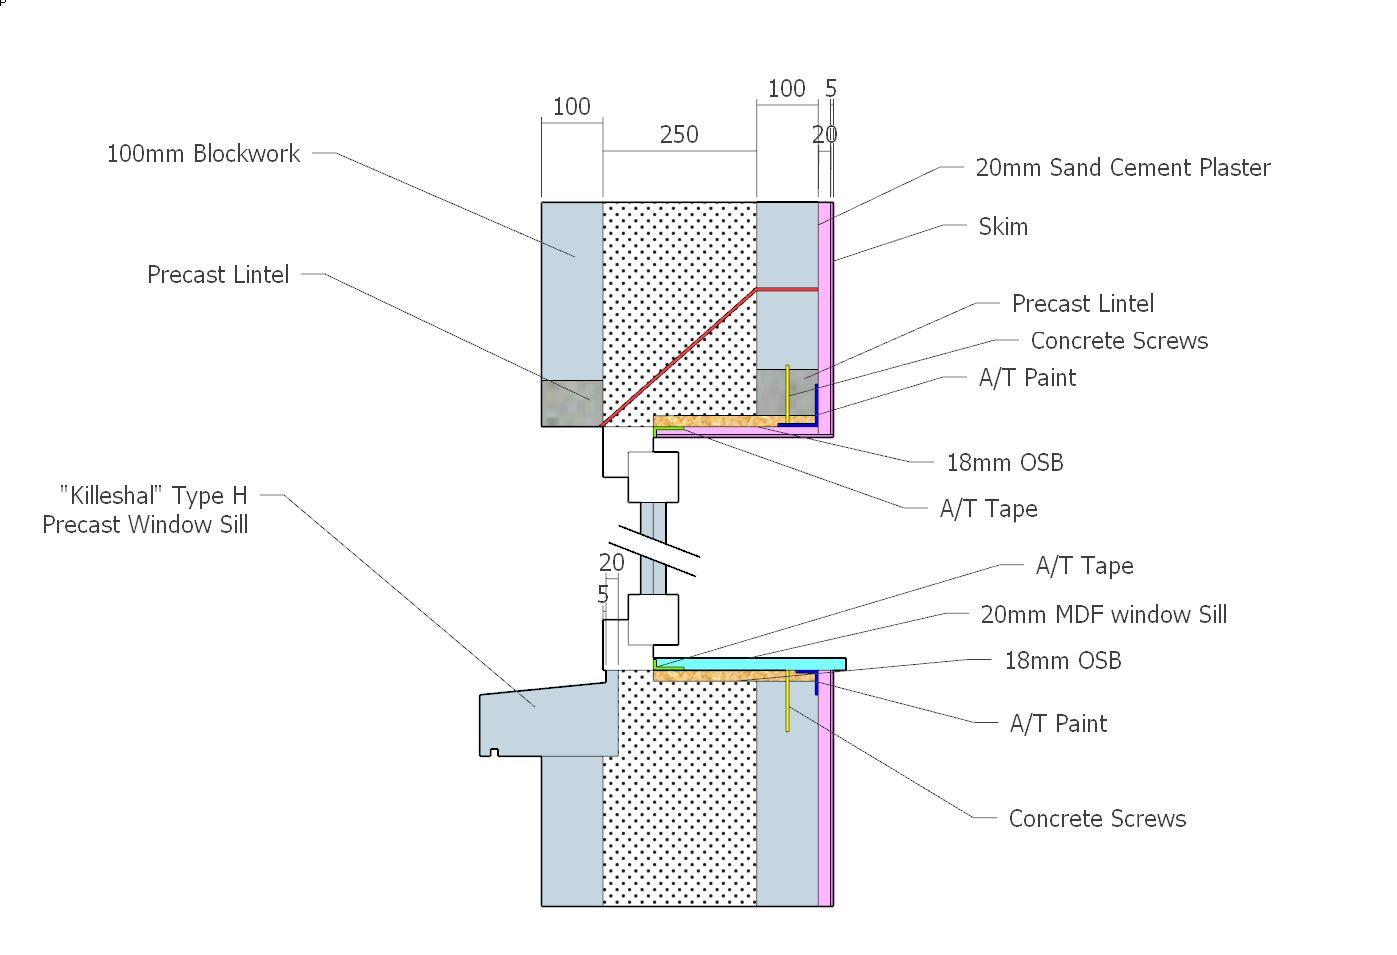
Here is the plan view of what we actually built Here is the section. I've omitted the external render and external airtight paint here to show the overlap of the window bottom on the sill. The windows were installed bolted to the outer leaf first. No connection to the internal leaf. I later cut out and threw away the vertical DPM as I have no idea what purpose it serves in a wide full fill cavity To make the OSB window boxes we first made the base and the top. and bolted them with concrete screws to the lintel and blockwork. Note the angled brackets used to fix the side panels afterwards. The sides were fixed using galvanised angle brackets afterwards. In doing do the whole OSB box became quite rigid despite only being connected to the inner leaf. It was simply floating against the window. As we have quite deep windows I wanted to make sure that a child (or adult!!) jumping on the interior window sill would not collapse it. This was a fear if it was only cantilevered from the inner leaf. Sha Delete From there the Airtightness process was straightforward. A/T tape from the window to the OSB. A/T paint from the OSB to the blocks. Wet plaster over the A/T paint. Plasterboard to the OSB and skim. I used A/T paint to seal the external to the external render for wind tightness. White paint on white windows is a bit of a mess but nobody notices unless they're fussy. Overall we had an excellent blowerdoor (0.31ACH) and the splayed windows are nice. The Sills are solid and perform thermally very well. I had a THERM model somewhere but I can't find it. A 25mm hole drilled in the OSB head and sill allowed EPS blown beads to completely pack out below and above the window. I drilled test holes to check in what I considered the hardest to get to locations and I was impressed. PROBLEMS encountered. 1. The window fitters measured the windows when I wasn't there. I wanted them to get the outer blocks to overlap the frame by 10-20 mm. It would have made the frames appeared slimmer and we'd have had more glass. Moreover we'd have been able to use compriband or similar to seal the outer blocks to the frames. As it was the blocks and the frames met with two opposing 90deg corners ( angle to angle) whick meant that gap was very annoying to fill. In the end a mixture of expanding foam(yuck), plaster and silicone got it done but it was very tedious. I had to seal the frames to the outer leaf for our wind tight layer with airtight paint which was a bodge. It would be awful on coloured frames. 2. Plastic DPC/DPM used as cavity trays and vertical DPM's. What a terrible way of building in the 21st century. They catch all the mortar droppings (sometimes bridging the cavity), often get torn. Prevent a good seal from the window frames to the outer blocks. Generally blow about and slap you in the face in the wind. Total RUBBISH. If I had my way again I'd put an angled PVC profile just over the window head and leave it at that. I cannot see how vertical DPM's prevent water making its way inside in a wide cavity with the inner totally isolated from the outer. 3. The OSB window boxes were very time consuming to make. Maybe premaking them and building them into the blocks would be better. A solution to prevent them degrading in the weather would need to be found. 4. A few hours spent pretaping the windows before install would have saved many hours later on. 5. When screwing the angled OSB reveals to the blocks I was a little over zealous and put a bend into a couple of them. 6. As the OSB was only "floating" against the window some of the gaps around different windows are inconsistent. I don't think anyone else has noticed but me however. I'll add another post about what I'd do differently the next time as this one is getting a little long.

 1 point
 -
https://www.nhbcfoundation.org/wp-content/uploads/2016/05/RR10-Full-fill-cavity-wall-insulation.pdf Worth a read. Kore is a reputable manufacturer. They make the MBC insulated raft. We bought our floor EPS from them. Install is very straightforward with a wide cavity. Problems more likely with narrow cavities. Make sure the installer uses enough PVA glue. I'll have a look for drawings/pics of our window install.1 point
-
In my experience its straight forward dealing with the DNO, but you do need to know what it is youre asking them. In previous posts youve mentioned 20kw, 11kw and 3.68kw. Different rules apply depending on what you want to do. Have you actually looked at any of the forms? They are pretty straight forward. I dont really agree with your frustrations about controlling the public exporting to the grid. If it were a free for all, we'd have melted copper, burnt insulation and smouldering transformers all over the country, and no electric.1 point
-
There has to be a difference between low power domestic systems and large scale generation. The cut off has been put at 16 amps per phase. Now that could have been 12 amps, or 25 amps, but it is 16, live with it. Or fill in the right form and pay the fees. It is a bit like taking a car test, you have to meet minimum criteria, but it does not qualify you to drive an articulated 44 tonner.1 point
-
https://www.theverge.com/2022/3/17/22982166/matter-smart-home-standard-postponed-fall-2022 Now expected Autumn 2022. As I've mentioned before, this is just for publication of the 1.0 standard. I expect it will take 5 years to gain basic, reliable cross manufacturer interoperability and 10+ years to be proven for security, usability and feature set to make it a generally useful for designing into the fabric of a building. [I was going to tag this to an existing thread but can't find it now. IIRC it was ostensibly about garden irrigation so makes sense to fork a fresh topic on this anyway]1 point
-
hope you left a good 5 foot of trunk above ground to make getting the strumps out a breeze with the digger.1 point
-
A lot to be said maybe then for proper old wood screws, pilot drill, clearance drill etc. All put in with a Yankee! ?1 point
-
Different brand but see this video for how they work. Particularly around 2.30 in, he shows how using a "normal" screw you can actually not be pulling your floorboards tight to the joist but in fact cause a gap. I went over my 18mm tongue and groove chipboard floor upstairs with the Spax ones I linked and it cut down the squeaking a Hell of a lot. The floor having been fixed originally with hammered in angular ring nails. The floating floor I did with Spax from the start downstairs has zero squeaks. Feels like a solid floor tbh.1 point
-
Before or after finishing the bathroom? Is THIS thread really 4 years old?0 points
-
NO - "The moral of that story is when viewing as house, get the current owner to go to the the middle of each room and jump up and down......"0 points
-
The moral of that story is when viewing as house, go the the middle of each room and jump up and down......0 points
-
That's a sine of how clever he is...0 points


This leaderboard is set to London/GMT+01:00