
Leaderboard


Popular Content
Showing content with the highest reputation on 07/05/21 in all areas
-
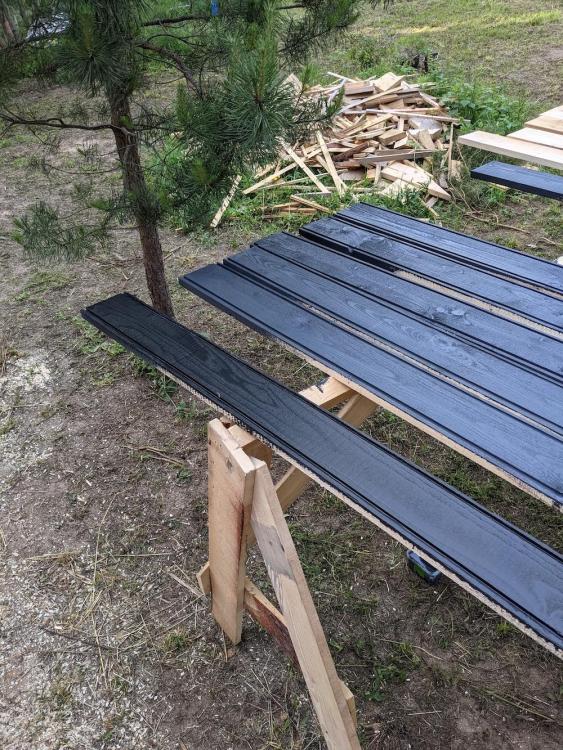
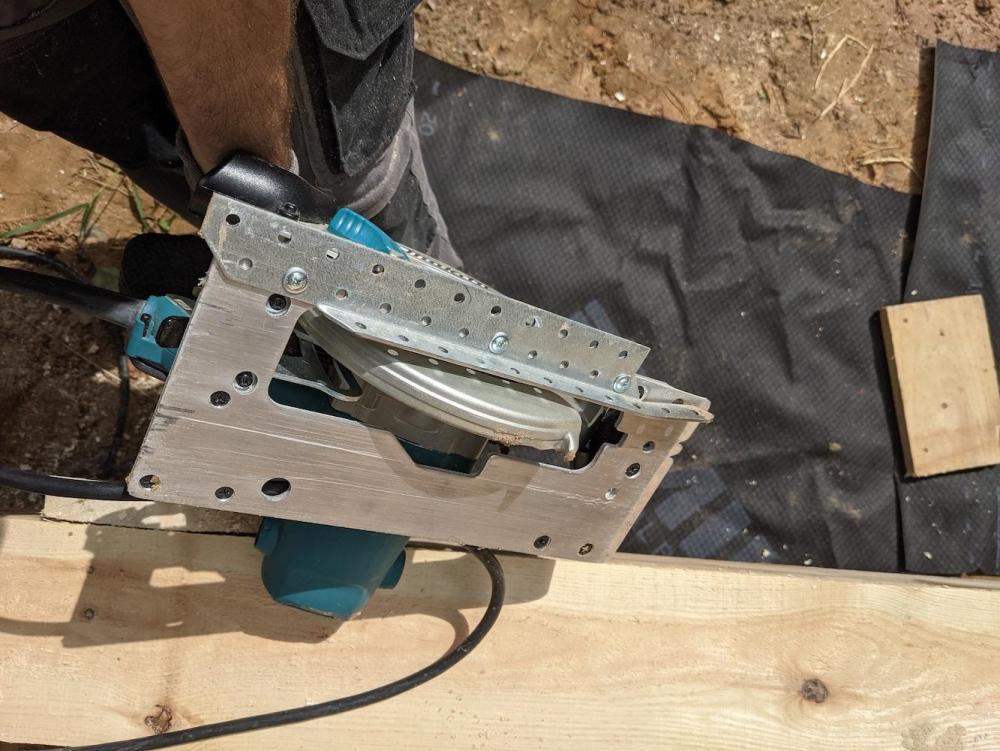
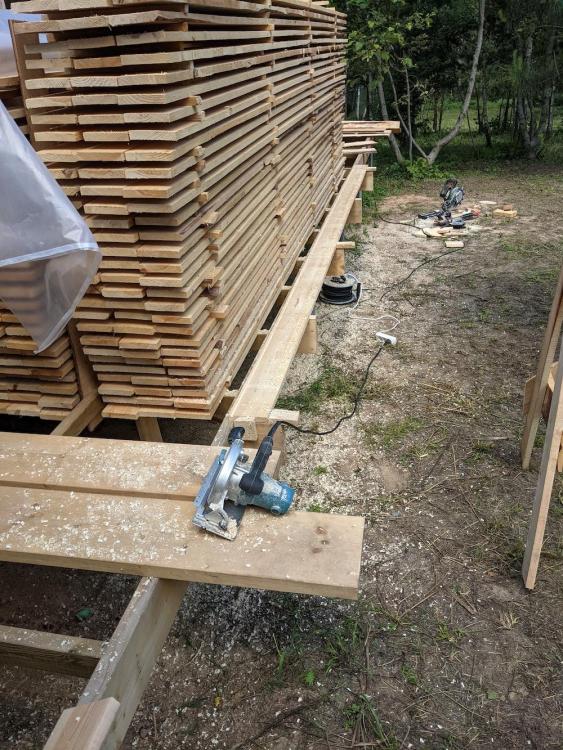
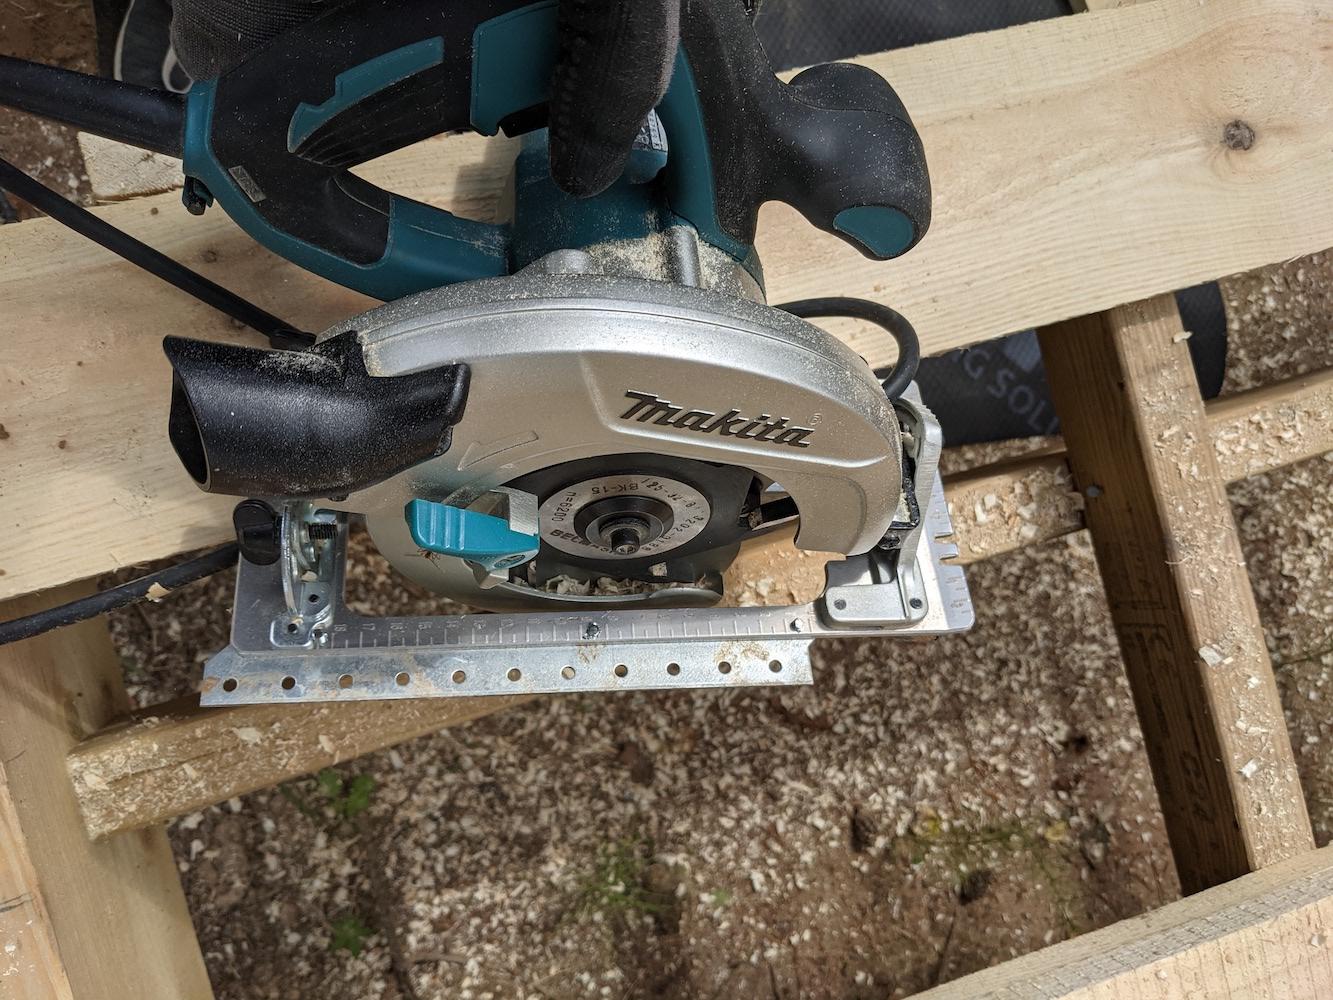
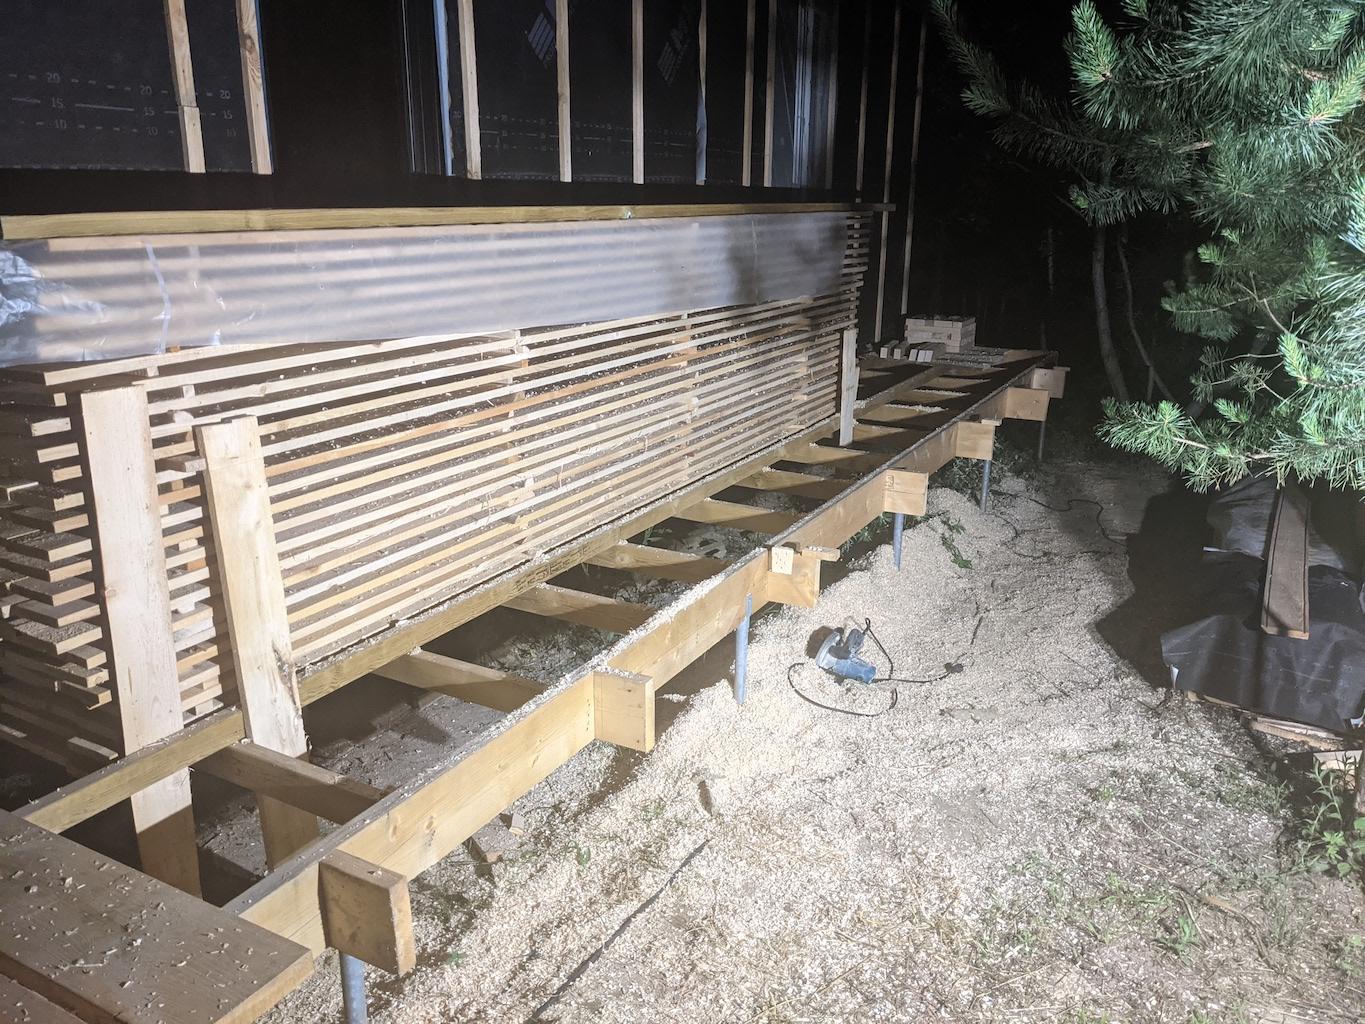
Field update: Screws Painted fat screws all the way. Decking screws are useless for persuading cupping softwood boards to meet their battens. They pull through the face before they pull the wood true. Gold screws are useless for paint. Or, rather, all the good screws that have "milling ribs" under the head and on the shank (which you want to reduce splitting), are also waxed to ease installation. They don't take paint at all and removing it is a ball ache. Painted screws take acrylic paint no bother. Paint LOL at how decent primer and acrylic paint stick to rough sawn wood. If you rest two wet pieces on top of each other and after 24 hours they're as good as glued. The softwood tears before the paint peels; much the same as if you'd glued them together. LOL at how well it sticks to the wife too. She appears to have turned into a Zebra... ? Sand to remove fibrous material. Stiff brush. Prime. 2 hours. One thoroughly brushed topcoat of anthracite. (a cheaper off the shelf colour) 24 hours. Stack. Fit. Worry about how to do the final coat (with black) later. Definitely brush this (stiff 4" fence brush) rather than trying to roller or spray it. You won't get good coverage on rough wood otherwise. If you're worried about acrylic hiding the texture of the wood don't be. It shows through nicely whilst softening some the rough sawn nature of it a little It's more visible in second coat black than in anthracite: We're painting ends to control the drying and hopefully reduce splitting. (a lot of the split ends you get are from the end drying faster than the middle of the board, and being unable to shrink far enough because the middle is still fat) They'll get re-trimmed and re-painted in situ but we figured it's worth painting the backs (for drip edge purposes) and ends (to control drying until they're cut and repainted) Weathergrooves Tedious but not as tedious as painting. Buy a decent saw. (and go with the 1.6 kW 190 mm one not the 1 kW 165 mm one) Install your 8mm kerf blade of doom. Lose the standard saw guide and rig something altogether uglier. Yes they're self drilling screws through the aluminium baseplate. Yes you could make something prettier but no I didn't as frankly a €90 inc VAT saw is a consumable and three holes are unlikely to make it useless for other purposes. Quick jig hung off the side of the proof-loaded eventually-to-be-naughtliy-tall-deck frame. Leave space between your "width stop" and your "end stop" for the chips to fall through (else you'll always be cleaning out the corner) Eat sleep groove repeat. Productivity is ~0.6 km/hour. Suggest 45 boards at a time for health and safety (vibration white finger) purposes - that blade being can be shoved along as fast as 1.6 kW will go (motor power is a limit even with the 125 dia on the 190 mm machine) but it doesn't have many teeth and the chips are huge. Wood There was a day not so long ago that "double cut" used to be a log sawn into boards and shipped. These days it's a log sawn into boards, graded, all the A/B grade removed for reprocessing, and the C grade shipped as double cut. We knew this but...don't under-estimate the labour involved in sorting through random mixed length C grade to find the best bits for each location. (long enough, and either one good face with two edges or one good face with four edges) I'm a little worried about knots and check marks. May need to invest in some flexible sealant for these where they're on the roof. We'll see what it looks like after a few heating/cooling cycles in the anthracite base before deciding.

 2 points
 -
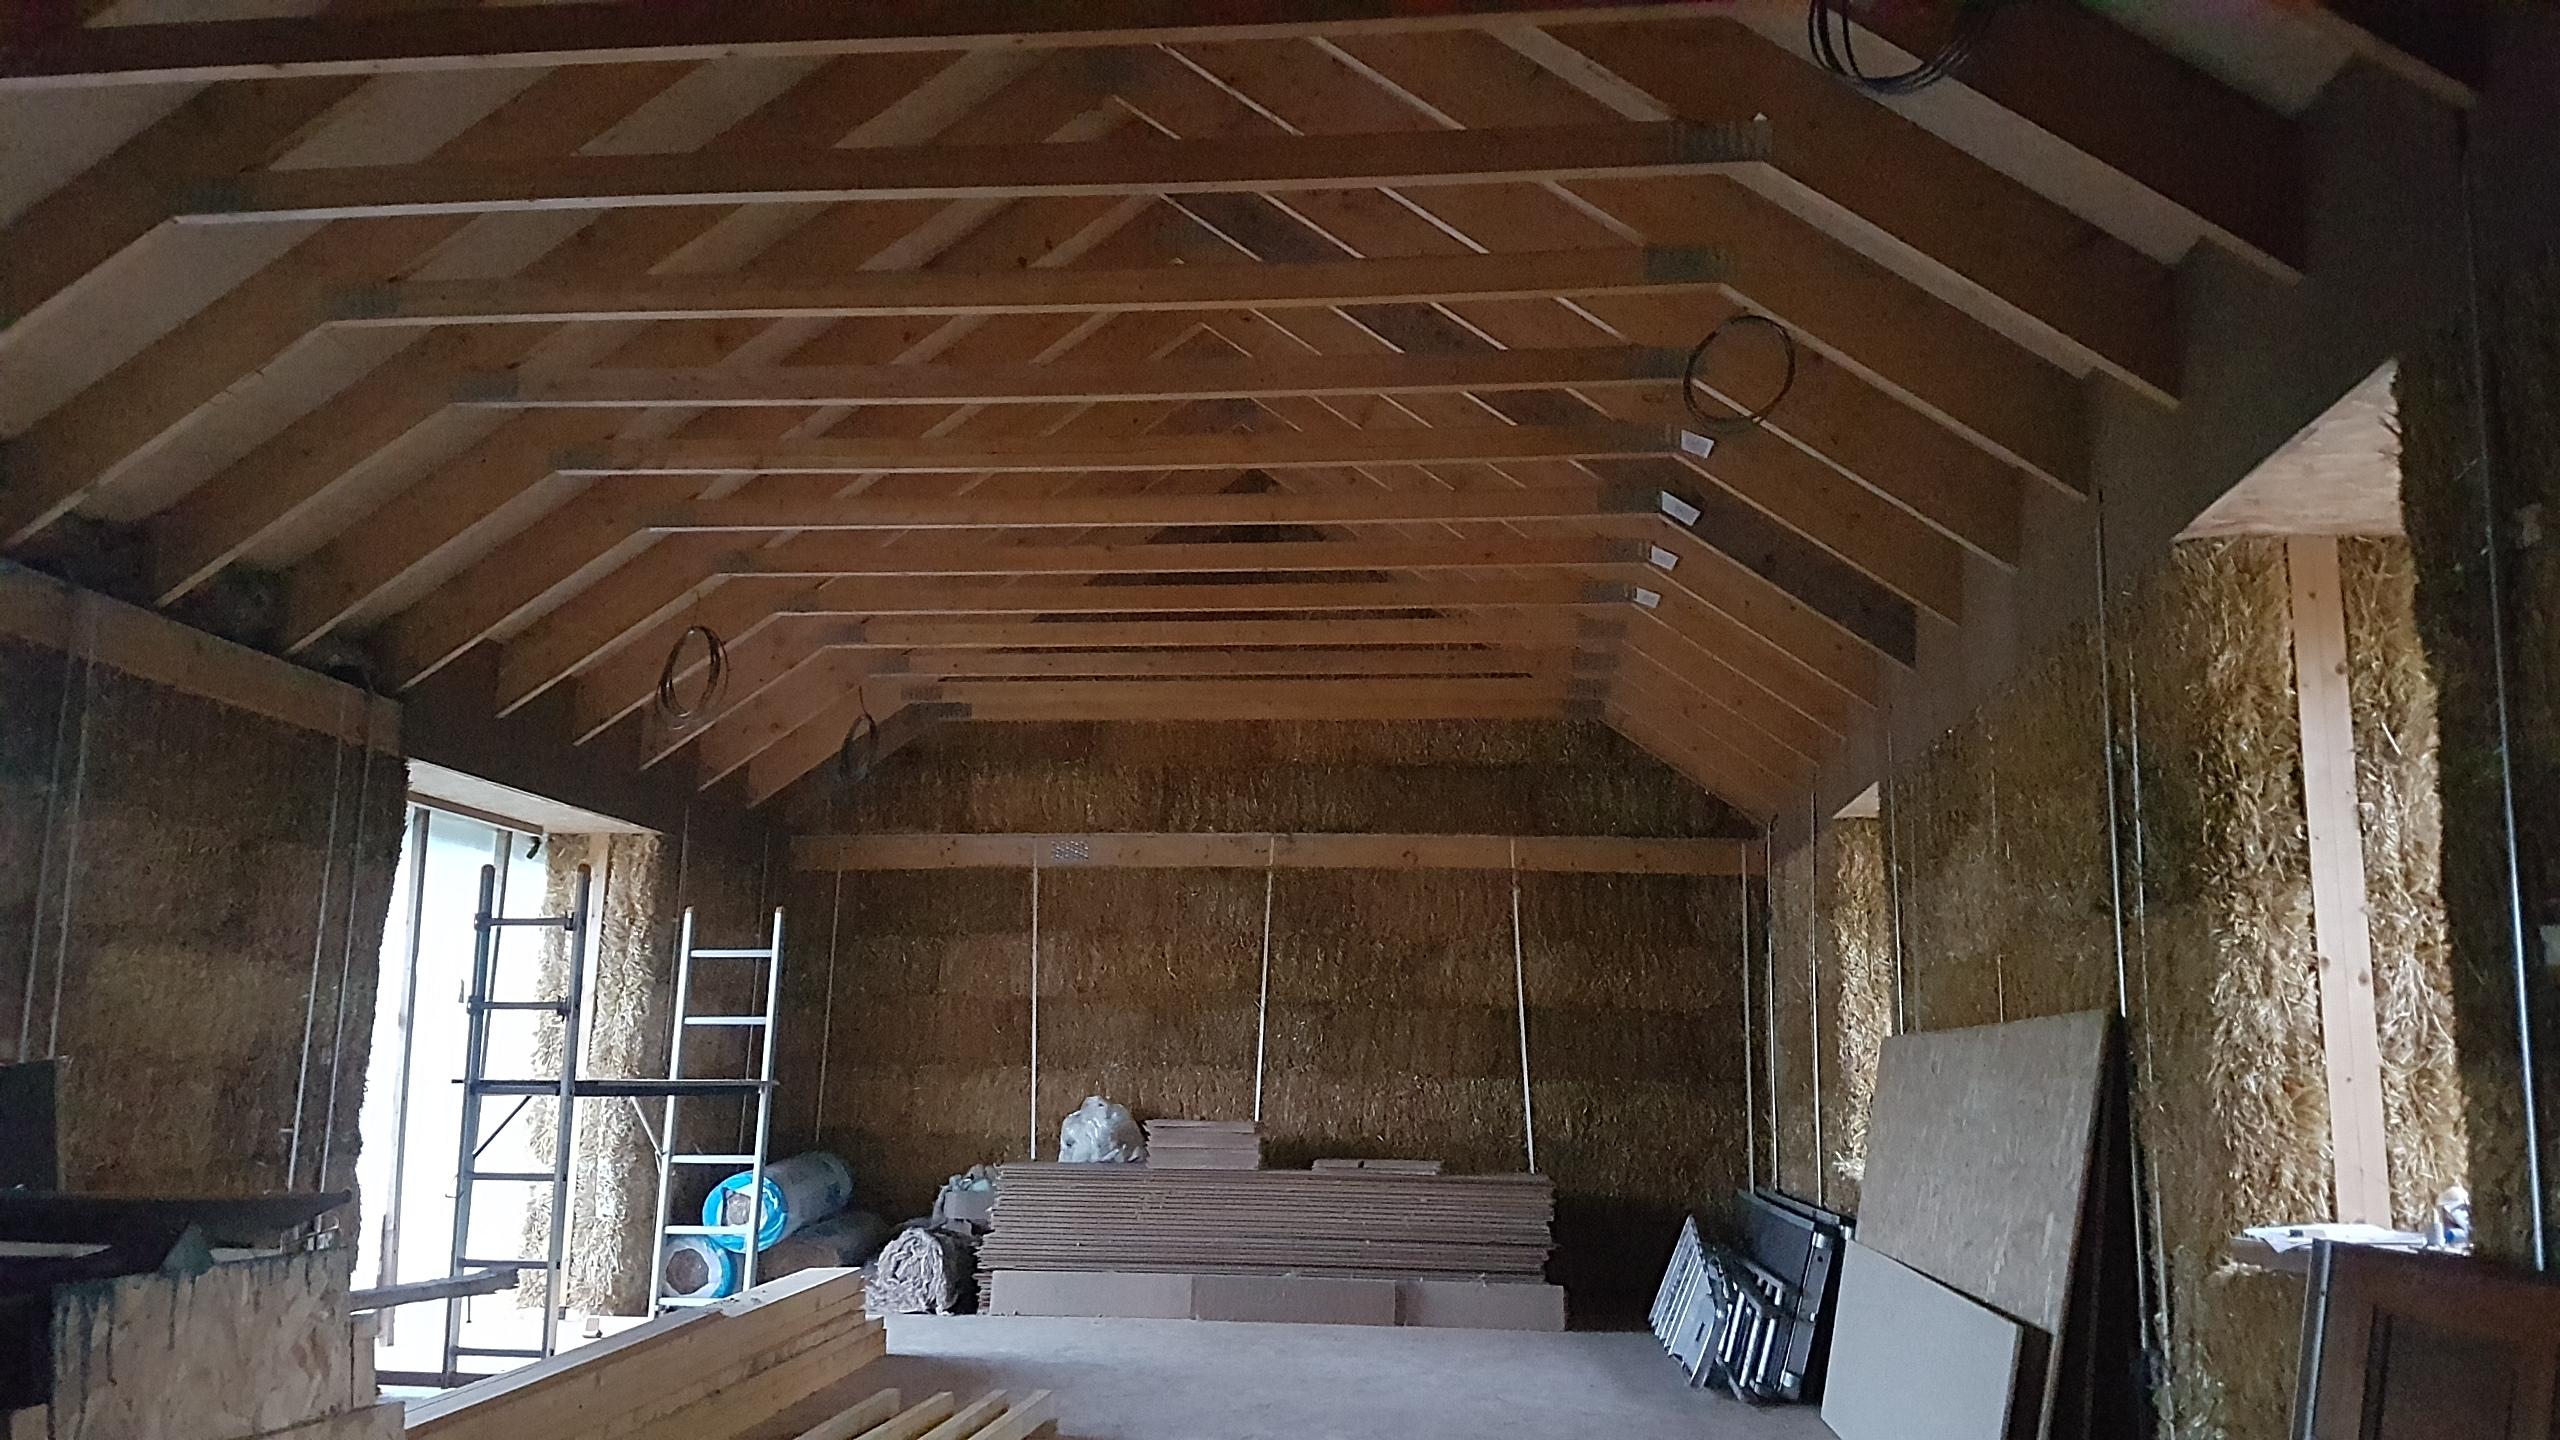
Couple of pics as requested. Load-bearing strawbale walls, lime render inside and out (starting that this week).

 2 points
 -
Yep, temporary kitchen and take your time. We have a couple of portable induction hobs from the Aldi special aisle and a combi microwave crammed into the utility room because that's finished. I am loving how close together everything is, even if at times it's like that episode of Keeping Up Appearances when they buy the shoe box flat in the big posh house.1 point
-
Don't be rushed. Get the kitchen right. If you must move in, set up a make shift camp kitchen until you get the design right for you. I fully agree on Fridge Freezers. Our freezer is constantly full and we occasionally have to turn on the spare one for extra capacity. Why does nobody make a FF where the freezer is bigger than the fridge? Obviously I am not the only one to want that.1 point
-
The problem with kitchens is that styles change. My sister's 1st husband made his own. Then years later, made some more parts to extend it. £5k buys some good woodworking machinery and a lot of timber. When I had my house valued a few years back, the estate agent said she loved my kitchen. It was the original one put in in 1987.1 point
-
This is my work area, I can do 200 meals in 4 hours from it. Go temporary. And freestanding.
 1 point
 -
The firms that do the install normally have the pump etc and buy the products from a variety of suppliers. They should be able to supply what you want.1 point
-
Hi @patp I bet you feel better getting that off your chest! ? Are you seeking kitchen manufacturer references or just seeking advice / guidance as to what path you go down? The issues you raise all come down to what suits you I suppose. To try and offer something, could you not set up a "makeshift" kitchen arrangement in the new place pending a final decision as opposed to being forced into one? It is clearly going to be a big investment regardless of whom you go with, so perhaps a couple of hundred quid on a makeshift set up would make economic sense. As for size of fridge/ freezer - all I would say is that we too are just a couple and I would say most weeks the fridge runs at a 60 - 70% capacity BUT it really comes good as soon as we have visitors / special days. I couldn't imagine having a smaller capacity fridge and then coming unstuck once the numbers within the house start to increase.1 point
-
You can pump sand and cement screed also Most semi dry used on commercial jobs is pumped up to each floor Might be a good option 100 m is fine1 point
-
The external concrete render will mean any moisture in the walls, (possibly coming up from the ground - depends on foundations and DPC, if there is one; or weather getting behind the external render - render varies in how well it keeps the wet out - age, how well the joints are done etc) won't escape outward and will only escape inward. Wuth lime plaster on the inside it can escape that way and not be forced on to appear elsewhere. At that age your building is likely to be single skin brickwork not double with a cavity, so how dry the fabric of the building is will depend on it 'breathing' in line with buildings of it's age. So your lime plaster will buffer moisture (take it in when there is an excess and expirate it when humidty drops) and allow water to escape. If you put gypsum on, that doesn't 'breathe' so any moisture in the brickwork will not escape and could lead to damp problems. JFB has a point that in a small area the effect will be minimal, so your choice if you want to worry about that or not, for 1 sqaure metre you are unlikely to see issues but moisture finding itself behind the gypsum will have to go sideways/up/down to escape. For the reasons I mention: a) You could do, it isn't 'ideal' but it isn't likely to bite you on the bum too hard. b) I agree with JFB the wood fibre on the walls would not be a good idea, it could end up slwoly getting wet and wood does not dry readily without good ventilation. c) no d) You could lime plaster the patch, it isn't that hard but the technique does differ to gypsum and it is a more skilled managing the going off process than gypsum, so you'd need to look it up, or I know an excellent lime plasterer who travels and isn't stupid money, so if you PM me I could give you their details. I only go into the explanation cos you wondered about the whys. But since you are plasterboarding you are making the walls non-breathable anyway. I wonder if the building will cope with that (deoends on whe way it was constructed and how it stays dry, how it is used, ventilated, affected by external weather etc. If you want to look at that sort fo thing more this guy is knowledgeable on older buildings and what helps/doesn't help Energy Retrofitting - why it doesn't work and why it's causing damp. - YouTube This email is about a slightly different question but the forces at work are the same.1 point
-
Probably not as you need special nails for the PPN guns. If this is outdoor decking there is no need to have so many fixings per hanger. Could reduce 12 per hanger.1 point
-
Yes, having helped on a couple of straw builds and initially wanted to build in straw myself I am interested in an update on progress.1 point
-
Screws don’t have the right strength quality for joist hangers, some people have used them but twist nails are the “proper” spec fir using with joist hangers.1 point
-
@Tim Willcocks - this is a fascinating build and I for one am pleased you gave it a "nudge" by your contribution. @Pord67 Any chance of an update? This is certainly one of the most interesting builds on the forum, so would love to hear how it is going [or isn't ☹️] ?1 point
-
Hi. best practice is to aim for minimum of 1:40 in construction, to achieve 1:80 in reality. to work out what 1:80 needs to be take the run (length of the roof) and divide by 80. 2310/80 = 29mm1 point
-
Hi All - so grateful to find this forum as can already tell it’s going to be super useful! My husband and I have been dreaming about building our own sustainable home for several years and now, with a 1year old in tow, a lack of space is making us want to do it sooner rather than later! As with many others on here, we’re trying to find some land in Kent or Sussex but know we may well be in for the long haul as it’s like gold dust in the south east....but where there’s a will there’s a way! Am am I right in saying that building outside of a town’s settlement boundary in an AONB is an absolute no-go? And has anyone had any luck with getting permission to build on green belt land? Looking forward fo sharing learnings on this exciting journey! Heather1 point
-
Morning All, thank you for allowing me to join this community. I'm looking to find a couple of other prospective self builders to pool resources to locate and buy a plot, East Sussex/Kent border or thereabouts. I'll have a look around this more to find a suitable feed, meantime look forward to being a part of this. Best wishes, Tim.1 point
-
I didn’t use panels or clip track just borrowed the forums stapler (best to get a friend to help uncoil the pipe whilst you lay it), dead simple and easy.1 point
-
MKM do a self build account and they also do decent pricing when they know you want quantity. Get a full list sorted, go meet the branch director over a coffee and show them your plans. I have accounts with MKM, TP and Buildbase and probably put 90% of my stuff through MKM as they out price and out deliver the others.1 point
-
Yes, on the toilet pan connection and the 90,° bend. Nothing on the branches. BC happy.1 point
-
Please could you post a site plan, showing the permissioned footprint and dimensions and directions. From the plan you could eke out a little space for Bed 3 by switching to a spiral staircase towards the top end of the current stair. But headroom ...? You could also save a bit of space in the Ensuite and perhaps make the bed end of the master a little narrower. Or swap ends with it. But that would leave the ensuite facing south. Then would change it from a boxroom to a tightish single I won't link to it from here, but I'd consider a new application following the orientation of the one being done on the other half of your plot, which seems to be larger and has permission aiui. But do some intense homework first, as you are doing. I'd also suggest having a walk round the village to see if there are any self-builders who have finished that you could bounce some ideas off, who will have gone through the whole process in your place. Ferdinand1 point
-
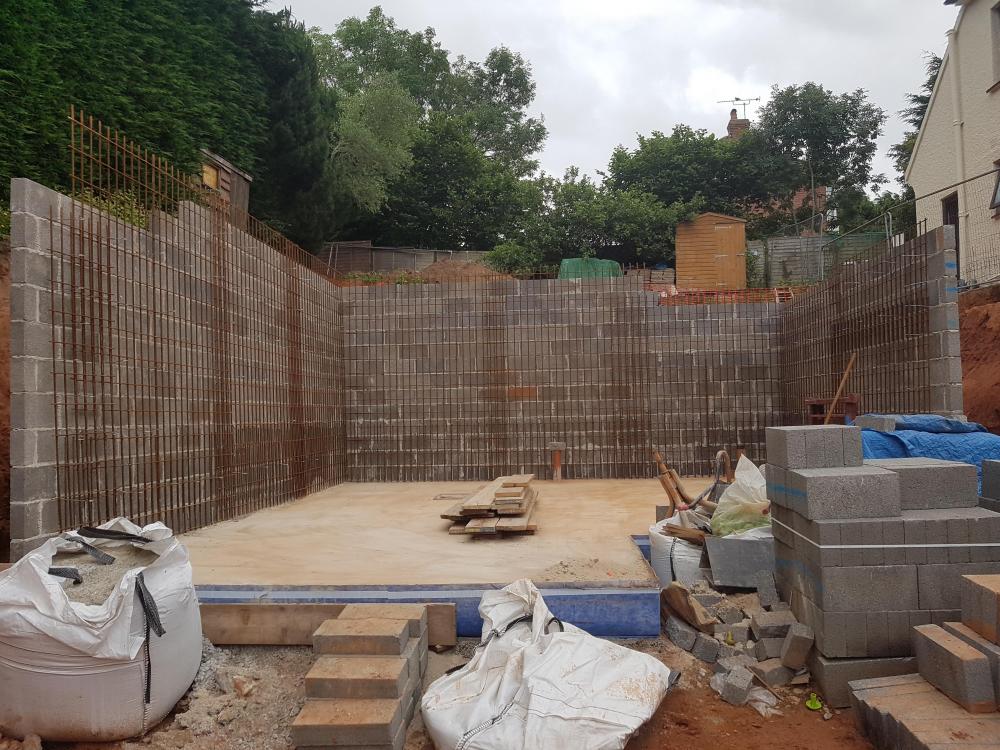
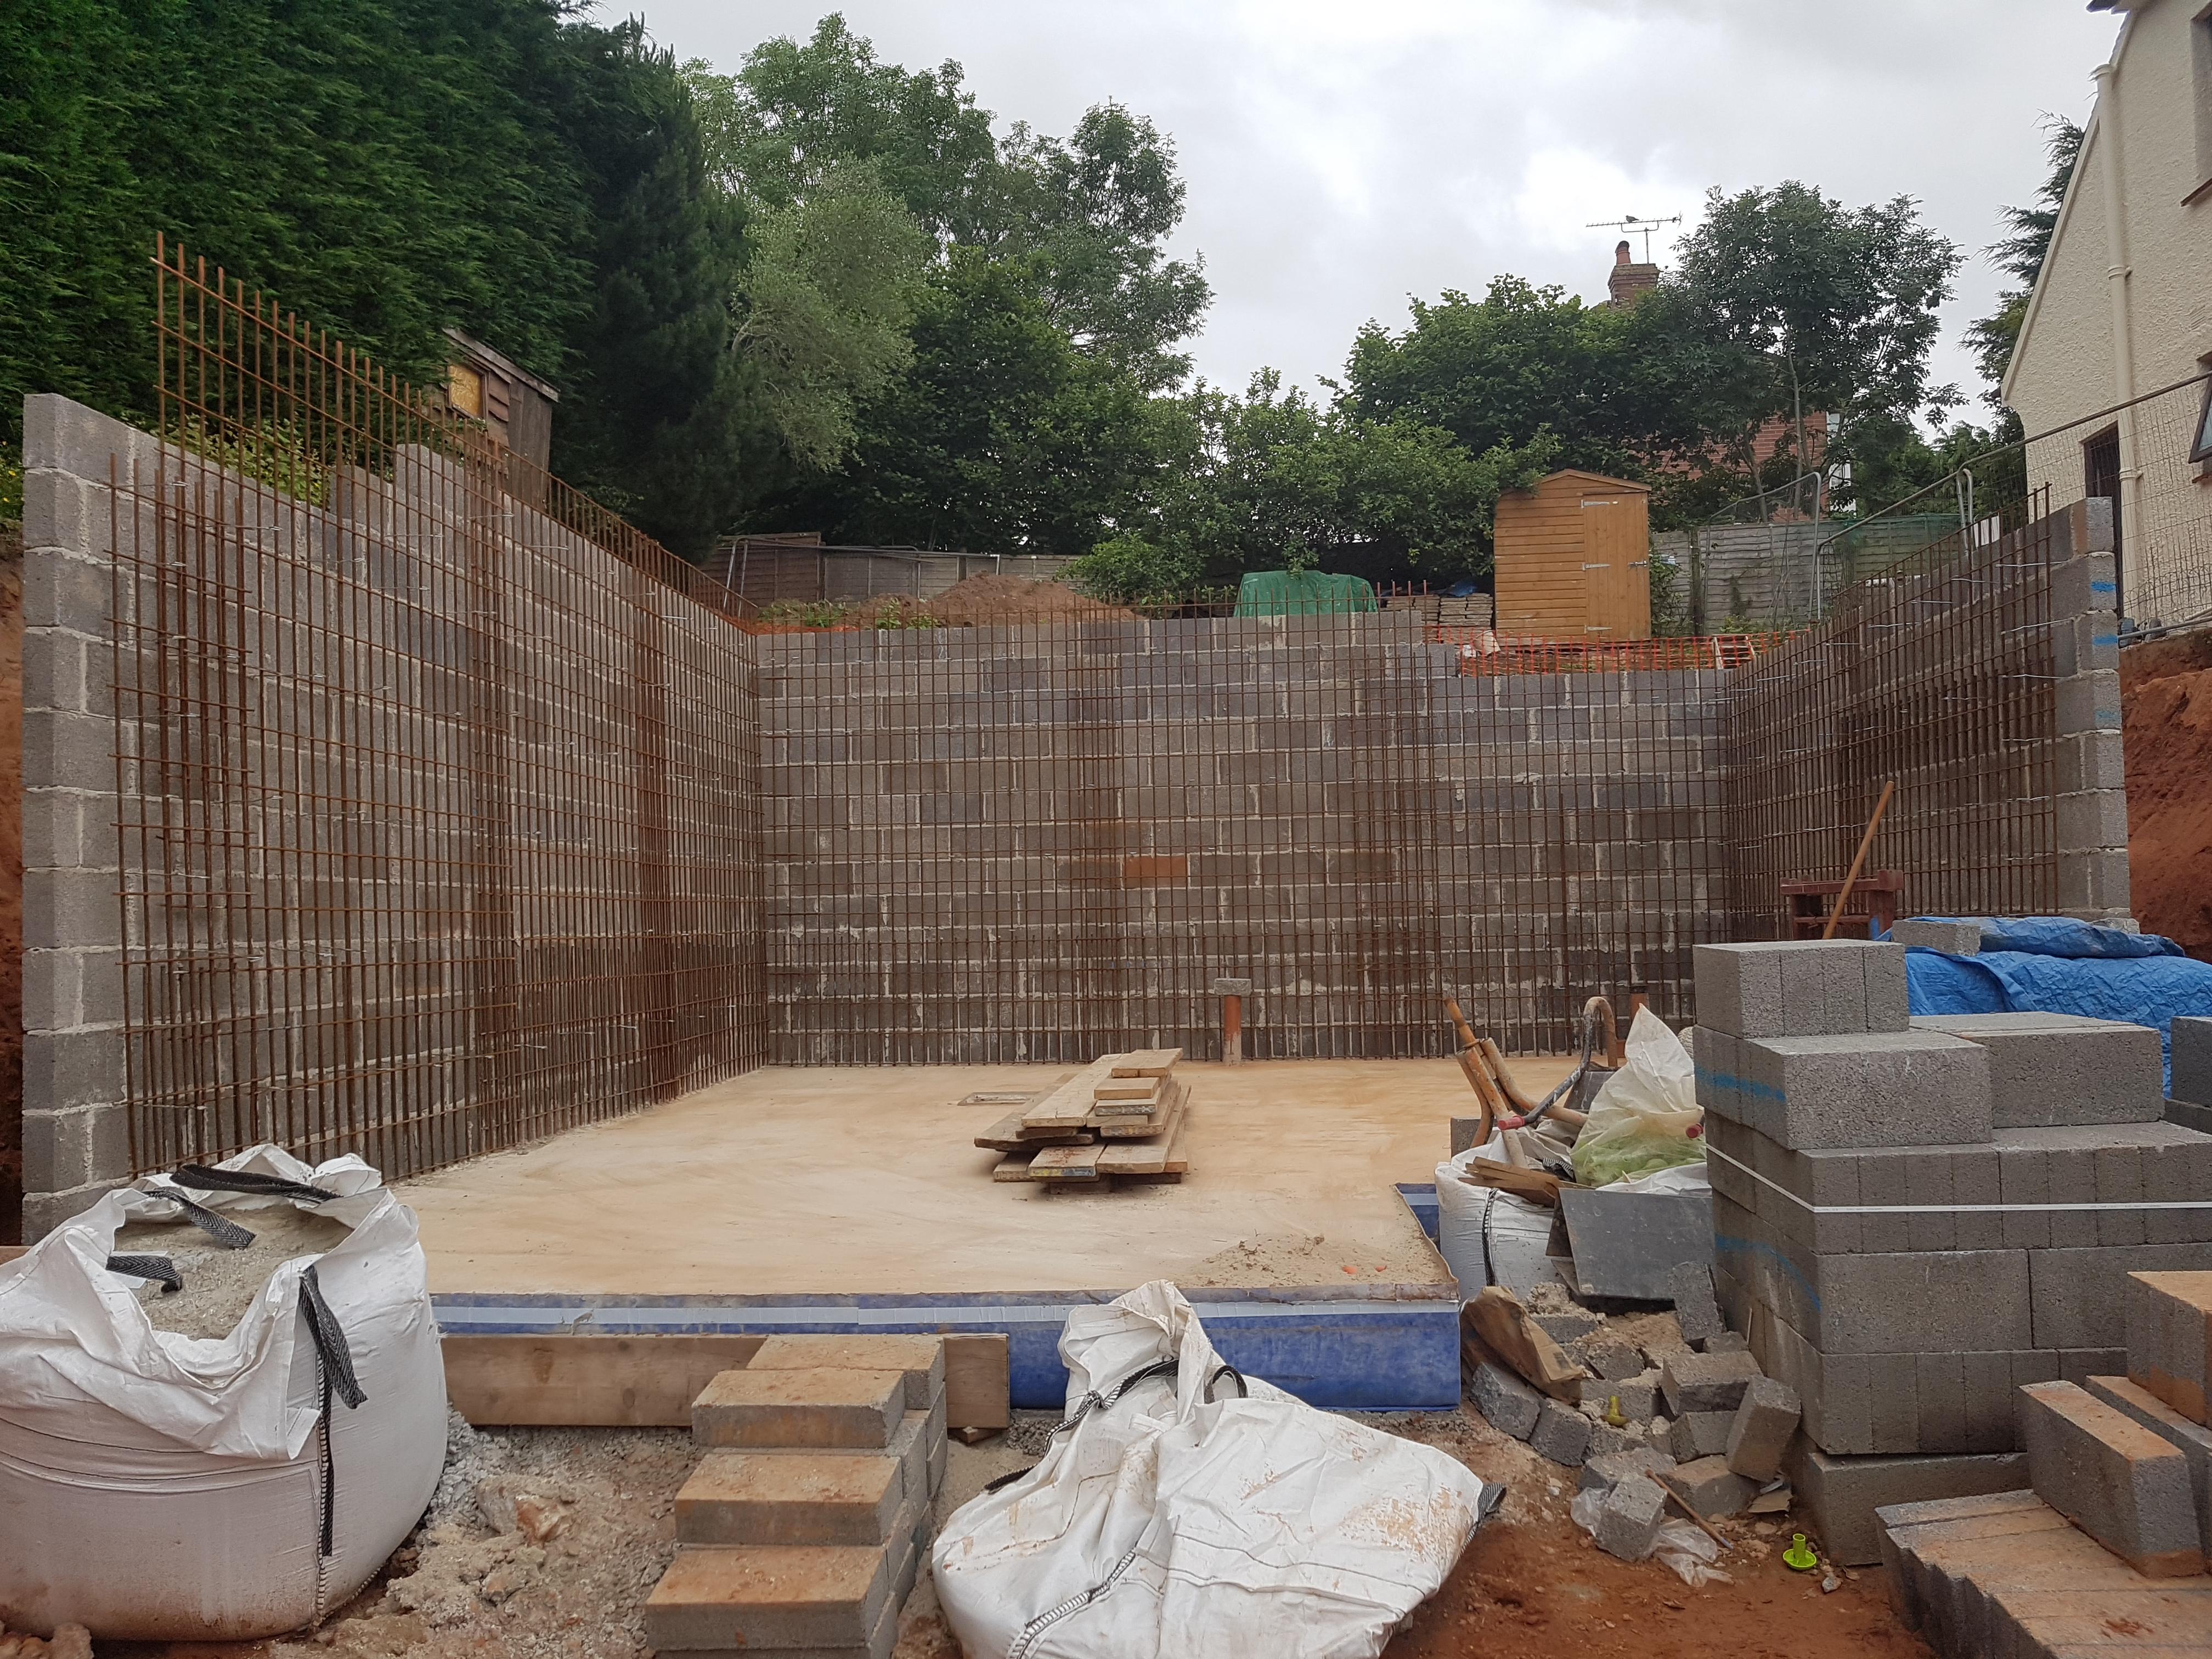
I was supposed to have two ground workers on site on Friday to put up the retaining wall mesh. They were a no show and had to get it up myself, for the brickies to come back on monday to do some of the inner skin of the retaining wall, to be filled later in the week (4 courses) Lugging 80kg sheets of mesh about and vertical was interesting ?. Thankfully the brickies I am using seem decent and reliable.
 1 point
 -
I wish I'd had Gus's advice above 3 years ago! My build would have cost a lot more, but be finished by now, if I had stayed with my original architect. She was expensive, but invested in my build, and I didn't realise, through inexperience, what she was bringing to the table. I lost faith because I didn't understand the process, and it felt scary when she told me I needed to spend a lot more than I intended. There was nothing wrong with what she was doing but she wouldn't/couldn't work to my budget, so I felt we should part. I had loads more problems by changing, so although I've saved money, the extra stress and time it has taken probably wasn't worth it.1 point
-
Good point here from the_r_sole. It's hard to compare designers prices. You can get a set of BR regs set of drawings and calcs cheeply, but that is all you will get. Just enough to get your approval. You can get them really cheep if you are happy with saying say.. ,x ,y and z will comply with clause x, y and z in the regs.. very few drawings or supporting info required. You'll have your approval but the info you have will be very limited..trouble ahead if you don't have significant experience of building and dealing with individual contractors. It will then be up to you to develop and communicate the detailed design information to the contractors ect who are pricing unless you are really doing it all yourself. The less info you give them generally the more heavy they will be with the pricing pencil or build in caveats to allow them to charge you for "extra work". It will also fall to you to take on the liability / responsibility if you get it wrong, BC come to inspect and say. NO! Put it this way. A good skilled trades person who will also keep you right on a DIY build (maybe by saying.. are you sure you want to do this?) may cost £250 - 300 / day as an average UK price. £31.5 - 37.50 / hour. Now chuck in some plant / van tool costs and so on. Just say 40 quid per hour = £ 1600 per week. That is just for one person. For two.. £ 3200 per week. Now an experienced Architect or designer can easily save you this and more. Go cheep and you risk getting bogged down trying to resolve buildability issues that crop up because you are just relying on the drawings you have use for regs approval, trying to source different materials that will still comply with say the U value requirements and so on. The test when comparing fees is to ask this of the designers. 1/ Your fee is this. It is higher than the others so can you convince me that this extra fee will result in an overall saving..mitigate the fee? Tell me how you are going to do this. Explain to me how say you have thought through the buildability aspects so it's easy for local trades persons to build and thus they will be less heavy with the pricing. Are you sure that the materials can be easily sourced and on time to avoid delay on site? Where is the risk in this project to me, can you tell me where the risk lies so I can make an informed descision? A good designer will think about all these things but that "thinking time" and experience comes at an upfront cost. 2/ Your fee is this. It is the lowest! Can you convince me that I'm still going to get the same service and effort of design thought on my build/ project? Can you assure me that you are giving me enough information so that a contractor is not going to get free access to my bank account while at the same time my job is not going to go off progamme, I'm not going to get into trouble by inadvertantly by doing something that may breach the regs.. go for the completion certificate and get knocked back.. ? If your designers don't like these types of questions then.. keep looking. As a last thought.. a washing machine repair "Engineer" may cost £ 60 per hour.. this is your home. While the professional fees may seem a bit steep initially, once you look at this in the round and if you don't have significant experience then a responsive and supportive designer can be a good route to follow.1 point
-
Agreed as above, having built with steel for decades I can say this. in a wet or damp environment you need serious protection, galvanised and painted with special stuff. swimming pools look good with just factory galavanising, special paint, or the 'right' plastic coating. In an utterly dry environment, just like a warehouse say, it will never rust, and primer finish looks good still after 30 years. However , in an enclosed space where potentially there could be damp, I would protect it. Spec's will say sand blast and prime and so on. In reality, a coat of bitumen will stick and protect it, as will single coat paints (Hammerite/Ruberoid etc). expensive but worth it. in your case, I don't know the circumstances. If the steels are on show then of course paint in a suitable colour. If hidden, bitumen, but up to you.1 point
-
I've done a maintainance yard for tanks for the Army a right few years back, the yard slab was 300mm thick with 3 layers of A393 mesh and had a 450mm build up underneath. BUT obviously the build up would be ground dependant, I can't be positive now as it's 10 years plus but I think the build up was dependant on CBR results on formation of greater than 5%1 point
-
Ive said this till I’m blue in the face to pick your choice of icf supplier go to jobs where it is being used and pick it up, look at it shake it work out how it will perform, ask the lads installing it. Whatever you do don't choose it by price and don’t choose it by what the rep tells you. Some of them would sell their granny if they could make a quid and some of them are just downright liars. My rep took me to a site on a pour day, he was obviously confident in his product. I asked him loads of questions and he basically said it was for me to do my homework, not for him to push his product. He told me not to bother asking if there was any movement in the price as there wasn’t, and for me to call him once I had done my research if I wanted to place an order.1 point
-
Strawman, we bought our scaffolding sheeting from Actavo Direct. For insulation in our suspended timber floor we used mainly offcuts of sheepskin to a depth of 300mm. It had already been washed and tanned (twice), and we added borax.1 point
-
Yes, lack of mains electricity is not for everyone. However, once the solar pv and batteries are set up the rewards are considerable. We haven't paid a utility bill in 4 years (only a Calor cylinder once every 4 months or so). Couple of folk have asked about Building Control. It did take us a year to get Building Warrant, but after that they've been no trouble at all, quite the opposite in fact. The good thing is that this type of design is now fully accepted by BC as compliant, and there are engineers who buy into the concept and will certify the design. This method is relatively low tech, low tolerance, and can be done mostly by reasonably handy non-professionals who are prepared to graft.1 point
-
We're going for it the hard way, rendering by hand, but keeping an open mind about reverting to spray if it proves too much. Yes, the entire house sits off the ground on stacks of tyres rammed with pea shingle. No concrete anywhere in the build. No DPC needed either.1 point
-
We did this at the office a few years back. Window and seal was all fine but one of the guys slipped and the edge went through his jeans and got him in the balls. Stitches required.0 points
-
I got my wife to do all ours Seemed happy enough ?0 points
-
Staples are cheap as chips. Not chips of wood coated in glue and squished together to form OSB3 though, they're really expensive.0 points
-
It is near Scunthorpe0 points


This leaderboard is set to London/GMT+01:00