
Leaderboard


Popular Content
Showing content with the highest reputation on 10/24/18 in all areas
-
This forum is all about defeating, and hopefully educating the dinosaurs.2 points
-
Slowly???????????/2 points
-
Fingers crossed you get a bit more progress made with your new guy.2 points
-
My neighbour has just built a large extension, his 11 year old has used the mini digger and was instrumental in the roofing as the neighbour decided the lad was safer up there, than he was as son is light, fearless and had great balance. He also uses all the power tools. This was all done with great supervision and builds the kid's confidence and respect. I was very impressed. This kid won't be a snowflake. He has skills, is confident and I am sure will be successful. Too many kids today are wrapped in cotton wool until the day they are given the keys to a car at 17 without ever learning that their actions have consequences and that, unlike their screen games, they don't get another life. I think, at 12, a kid is old enough to be responsible and not yet at an age where he thinks he knows everything and is invincible.2 points
-
Fingers crossed!1 point
-
Well that’s a quite special building. It’s err special. Yes special covers it.1 point
-
Thanks Gav, yup I have ordered mine from the Netherlands, apart from finding it difficult to arrange a foreign money transfer their communication was good, it will take a couple of weeks to arrive and will report how I get on.1 point
-
Wish a few of the ones I’ve had work for me recently had bothered to do a bit of reading rather than rely on doing in “the way they have always done it...” There are dinosaurs in every industry and I’d rather someone look something up than rely on memory ..!1 point
-
Looks like 40mm solvent weld so you need a HepV0 CV1 and a HepV0 CV3 running adaptor1 point
-
ive just used this on some internal oak veneer its quite nice and subtle
 1 point
 -
+1 for varnish1 point
-
Mine was like a sieve when they came to do the air test mainly down to the windows not being fitted properly. We were under pressure to get the air test done so mbc could get finished and paid. All they did to resolve the many leaks in my building was put tape over the gaps and tell me I should get it sorted..........it was many many months later before I was able to resolve the window issue and get the place airtight, had a fab cert though. The air test people are not programmed for ‘failure’ you will get your cert to the contracted level or better if you have holes/gaps they will temp tape them to get the result and then you will need to sort it out properly afterwards.1 point
-
I'd probably stick with the varnish. Once you white gloss them, you'll need to repaint every few years as it turns through cream and yellows with age. White gloss looks lovely, IMO, but it's not a low mainenance approach.1 point
-
There's nothing to say that you can't attach stuff this way, just not before MBC have done their airtight work and test. It's your house and once MBC have fulfilled their contractual obligations, you can do as you please with it. That said, putting holes into something that's just cost a lot of money to make airtight doesn't make sense to me. On the smartply board, it's the green coating on the board that makes it airtight, not the board itself and so if you've gone through this, you've compromised the airtight quality of the board. I'm at the same stage as you with MBC due back on 5th November to do all the airtight work and they've been very clear all along that first fix shouldn't start until after this so that if there is an issue, it's clear whether it's down to MBC, and they have to fix it, or a third party, in which case they don't have to fix it. I would be inclined to remove any nails/clips/screws/board penetrations and see if there's some sort of temporary support that you can give them, then seal all the holes that have been created so at least you won't get any arguments if the airtest gives a substandard result and it's unclear who's fault it is - at least it won't be yours.1 point
-
I used Cedral Horizontal not too bad . Vertical a real pain !
 1 point
 -
1 point
-
That’s when you realise that the self build is slowly driving you mad! ?1 point
-
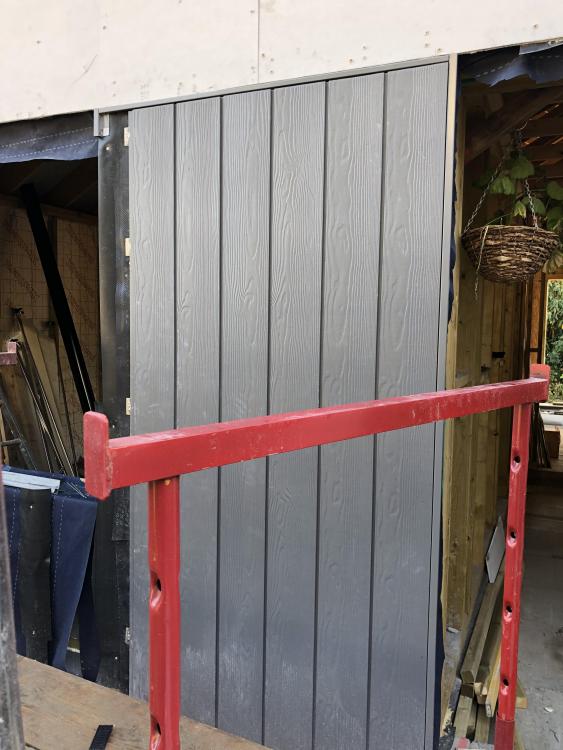
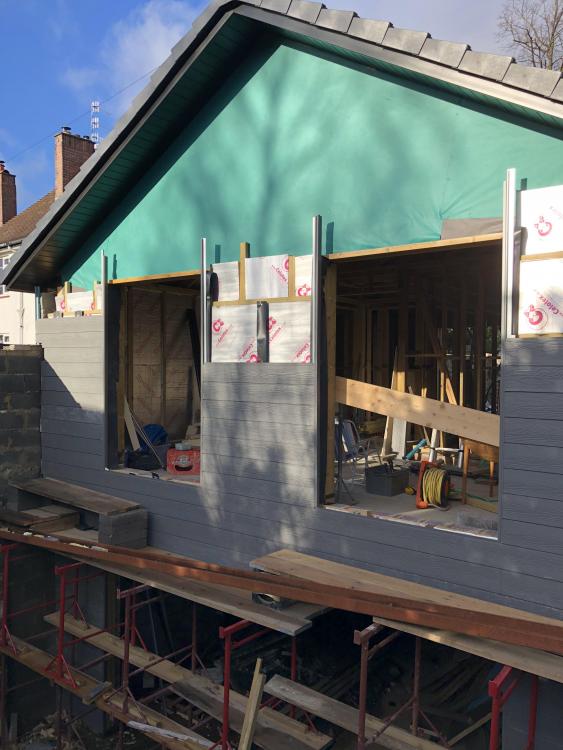
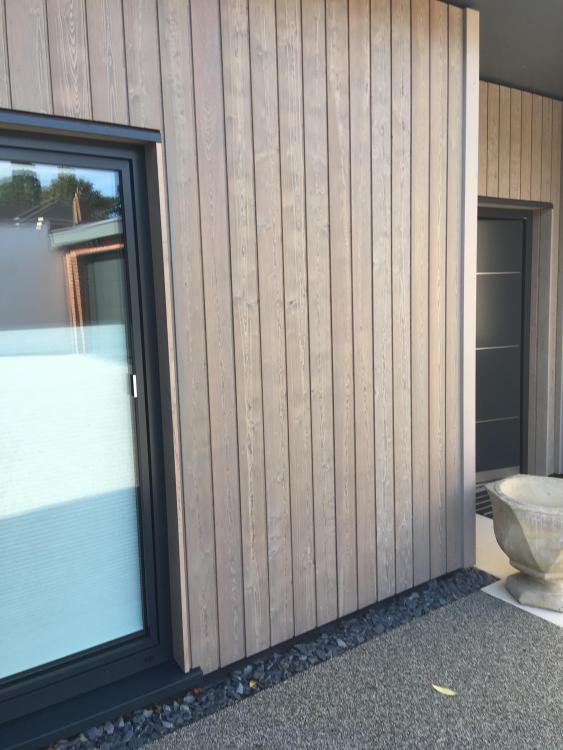
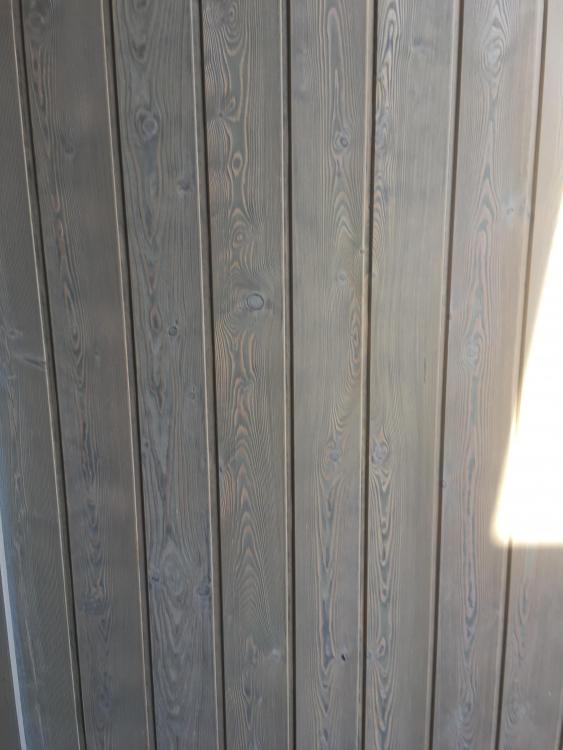
I went for a vertical board with a hidden fixing gives a bit of an impression of shadow gap from a distance. I have the black mesh behind too. I didnt want evey thing in town setting up home in my walls plus its better as rain screen not to have open I was told. I did a last minute swerve from cedar to larch as fell in love with this particular one. Got mine from Vincent timber in Birmingham and they have a good web site and helpful on phone too. Ironic really I searched the Uk for cladding and finally found it 20 miles down the road. Something I highly recommend ...and it was suggested by my ace carpenter is the aluminium ‘head’ cladding over windows. He said if just left as timber it woudl be the bit that deteriorated first and this gave it some shelter. Looks good with the windows too. We got the company who made our aluminium trims around the eps to fabricate them.
 1 point
 -
1 point
-
Don’t know if it can open up any other possibilities for you if you reduce the fall.....it looks unnecessarily generous...at least twice mine?1 point
-
But is that stuff uv stable....don’t want it falling apart after 2 years. I couldn’t find any that was so went for black coated metal insect mesh in that position......though the black coating will probably degrade too. It’s then tedious consistently spacing each board, with nothing to push up to in order to automatically create the right spacing (so make a spacer I hear you say). If you then view your wall from 45 degrees, with 20mm thick square cut cladding you’ll need a 20+mm spacing to appreciate it...... If the meeting board edges aren’t both square cut but at different angles they’ll stand off each other creating a deep shadow gap but also be fully ‘closed’. The perception of gap will be there. Or buy cladding that’s profiled for a shadow gap like https://www.vastern.co.uk/cladding/halflap-cladding/ , but these generally only chop back half the depth so seem to me less convincing. I might be talking rubbish on all this but it’s where my limited experience so far is leading me.1 point
-
The 2800 w is an EU rating anomaly I think, 2 x 2800 W at 230 VAC, is 2 x 3047 W at 240 VAC, and 240 VAC is still our nominal mains supply voltage, despite it being officially labelled as 230 VAC. We fudged EU compliance by creating an asymmetric supply voltage tolerance, of +10%, -6% on the nominal 230 VAC that the EU demanded, so we didn't have to go around changing all the local distribution transformers or adjust their taps. When calculating cable sizes it's better (and safer) to ignore the 230 VAC power rating for resistive loads like heating elements and assume that the supply is still really 240 VAC, as most of the time it is. This makes a small, but significant, difference to the current drawn by any resistive load, plus it's sensible to allow for the current drawn by the heating element under worst case conditions, especially in an installation where there is PV fitted, as that will tend to increase the local supply voltage above the nominal 240 VAC. Our supply often limits at the 253 VAC upper tolerance voltage when it's sunny, for example, as all three houses on our supply phase from the local transformer have PV systems. The 2800 W at 230 VAC rated element in the Sunamp has a nominal hot resistance of around 18.9 ohms, so if supplied with the normal 240 VAC supply voltage it will draw around 12.7 A and if supplied with the maximum supply voltage (say when a PV system is running well) then the current drawn increases to about 13.4 A. The 2800 W at 230 VAC element will run at around 3386 W at the maximum supply voltage of 253 VAC, or around 3047 W at 240 VAC (so the heating element is, in reality, a 3 kW one). If it were me (assuming this is an all RCBO set up, with no RCDs in the box), then I'd just fit a 32 A RCBO and a run of 4mm² T&E to a small CU with two 16 A DP MCBs near the Sunamp installation as the isolators. It's then fine to run 2.5mm² cable to the Sunamps from there.1 point
-
We had a few chips, scratches and cracks of stoneware and veneered doors, flooring etc. These things happen and even if they own up, it's difficult to get anyone to pay out. We used a Magic Man (repair franchise) who came to site and fixed all of these issues (you would never know that they'd ever happened) for a fixed fee - about £250.1 point
-
1 point
-
You could likely replace the rcbo with a suitable sized breaker then feed a small local cu incorporating a couple of rcbos... Then if one goes down it won't affect the other.1 point
-
I've seen open spaced timber cladding fitted over a simple membrane and recently over profile metal sheets. I would have thought roof overhang and how exposed the site is in terms of weather would dictate type of backing.1 point
-
If you want to use it as a basement you shouldn't need to tank it as it is a swimming pool so should be water proof. You could insulate the interior, it wouldn't need much as it is underground, but putting some kind of roof on the part outside the foundations would not be easy. It would probably have to be at least 200mm thick so would either reduce head height or stick out above ground level. Plus it would need to support whatever landscaping you wanted to have. Are your foundations not dug down a few hundred mils into the ground? If so they will go right through the middle of it reducing head height to well below 1m. You will also have to knock out the sides where the foundations sit. I would think just filling it in with hardcore to give a good base for the foundation is the best solution. Even if the foundations could sit on top I would still probably do this. A SE would probably want to look at it. A pool should have plenty of load bearing capacity, but I would think they want it confirmed.1 point
-
Just foun your blog - am reading it backwards but wanted to say I love the look of the house. smashing! We are all feeling for you - all the hold-ups and shoddy work. I am sure it will be worth it in the end.?1 point
-
So a quick update here. I have opened up the unit and found what I think is the OT switch. A Small black switch facing the pump perpendicular to the heating element. InPressed that in but can’t say I heard a click or anything. I then proceeded to re powered the unit and expected the unit to charge continuously but it heated for about 35 seconds (solar LED on solid) and the take a break for about a minute (solar LED blinking) and then started heating again. The element was getting very hot and the cooking again rapidly so I presume it was tripping out on an over temp. I ran the hot water tap to draw some water through the heat battery and see would that release any potential issues. The hot water seemed warm, above body temp but certainly not at 65 Deg (the TRV was fully open) I checked back at the unit and the providing heat LED was on and now the solar light was on solid, not switching on and off as it had done previously. I will await the final results in the morning but this exercise looks to have sorted it....whatever testing one would call that. My main problem during the day is that I’m at work during the SA opening hours so can’t get chatting to them! Thanks for for all the help here....gave me the confidence to start playing with it. r ed1 point
-
I T . W I L L . A L L . B E . W O R T H . I T . I N . T H E . E N D1 point
-
1 point
-
There is a nice plot going to auction in Stannington with guide price of £200k. It is as you say a garden, but quite a big plot. I think it was 1/3 acre. But in Lincolnshire there are dozens of large plots quite cheap. But they seem to be quite isolated from centres of activity. My friend bought a large bungalow with 1/2 acre for quite cheap. But it was 30 mins drive from a supermarket and 40 mins drive to a swimming pool for the kids.1 point
-
This has been discussed extensively before. My view is that the stair angle is one of the best ways of making your house feel more luxurious than usual, and really helps more frail or elderly people. I reckon it gave my mum 5 extra years in the family house. I say make it about 33-35 degrees unless there is a really good reason to make it steeper. This is one thread, with my comments copied below: If I am correct, I think you are a doing a Prime Contractor build on a dreamy site outside London? It deserves a sumptuous staircase. ? Ferdinand ------------------------------------- A staircase with a shallow slope is one of the great hidden luxuries that makes a house feel sumptuous imo, even at the cost of an extra square metre of space (or two). It is like getting the orientation right - people who instinctively like the house may have trouble noticing why. And it makes a significant difference to whether people can keep going upstairs easily when old; we reckoned our parents found it convenient for an extra 5 years+. And far better for the fat people we are all becoming. I lived with the one below for several decades. It is a magnificent bruiser of a thing - Jacobean oak and pine with a gallery but sooooo comfortable. The shallow angle allowed my parents to keep going upstairs comfortably for a few extra years. Originally it had about 28 layers of paint from the Victorians onwards and we had two slaves architectural students who spent a whole summer restoring it. There were 18 steps between floors, which were a little shallower than usual and I think the angle was under 35 degrees. Suggest go for roughly that. And a generous half landing with a window seat, or space for a resting chair, is good :-). But that is more difficult in a modern setting. My other favourite is generously shallow and wide open well circular staircases. Suspect also that when falling down shallow staircases less damage is done as you go down less height for a given length of horizontal travel, as do half landings and curves (you stop quicker hitting the wall or floor less hard). That is just me guesstimating but feels about right. Looking at Jack's numbers, I think I might try for something like 165-70 rising and his 270 going if the house could take it.1 point
-
We are just commencing our second self-build (started onsite last week). In both cases we have used Architects and in both cases have been very happy with the results. We have outlined how in both case we selected and worked with our architect which we hope will assist other people starting out on their self build journey. 1) Start thinking about which architect you are going to use when you start looking for land and not when you have found land. 2) Draw out a requirements list. My approach is to provide a brief / framework for the architect to interpret rather than prescriptively dictating to the last detail. Requirements should be no more than 2 pages. By making the requirements generic, you can apply them to most plots of land. Include in the requirements why you are building as well (develop and sell, house for life etc) 3) Checkout your architects previous designs. There is likely to be a common design pattern and if that is way off what you want then maybe the architect isn't for you. Also go and see a couple of houses - just viewing from the outside can tell you a lot. 4) If you see a plot that is a potential candidate, email architects on your shortlist for feedback. Most architects will provide feedback for free within reason and the reply will help you to decide if the architect is thinking along the same lines as you. Also, meet with your architect before you engage formally to check that they are a person that you can work with. 5) Be completely upfront with the architect about your budget, put it in your requirements list and be very clear what that budget includes and doesn't include. 6) Be completely upfront with your architect about their fees. Fees based on a %age of the build cost are OK as long as the build cost used is your budget for the build at the outset (fixed) rather than the actual build cost (variable). 7) Good architects are in high demand and don't need to advertise so you will need to research (a lot) and do your legwork. Be prepared for the fact that you might need to wait for the architect you want to become available. 8. Check whether the architect has any experience in the build method you want to adopt and the energy standards that you want to achieve. Find out what the build costs have been on recent build projects and how these compared to budgeted costs . 9) Check with the relevant boards that any claimed registrations are correct. 10) Fees may seem expensive, but for the amount of work that goes into a design I have always felt I got good value for money. In the context of the cost of the project it is a small percentage much of which can be quite easily recouped with a little restraint on the fixtures and fittings. 11) If you use an architect local to the build, it is more likely that he will be able to advise on securing good contractors based on experience of previous builds. My architect has more than recouped his fee by drawing up an attractive house that is straightforward to build. Insulation is what we need to get to passivhaus but no more and the size of the house is what we can build to meet our budget (based on his previous build costs) and requirements. Listed below are the requirements we drew up which may assist others going through a similar exercise: Build Budget: £325K (House, Garage) excludes landscaping, external works and professional fees. The Plot There were a large number of objections to the development from residents but planning permission was granted on appeal. Plot width is around 16.7m. Plot length is 44m. Electricity, Water and mains sewerage (but not gas) available at the plot boundary. Functions of the Building Home for ourselves and the dog. Enough room for friends, grown-up children to stay and family get-togethers. Building a house for life as we can’t get what we like on the open market. We love cooking and the outdoors, so it should support that. Combine open plan living combined with a segregated quiet room downstairs Provide a comfortable and healthy interior environment with a stable temperature and no drafts. Design Direction and Requirements Good natural light to rooms is really important with dual aspect windows in as many rooms as possible but not too keen on huge oversized windows that require complex and expensive shading solutions Designed to Passivhaus standards in a cost-effective manner but don’t over-rely on technology that has high cost to install and maintain. Downstairs Open plan kitchen, dining room and seating area Utility room (able to dry clothes in using pulley) Lounge Small Study if possible WC / Washbasin Good Storage – larder cupboard, cloakroom and cupboard for cleaning utensils Somewhere to sort out a muddy dog and muddy boots (A covered porch with a stone floor and bench maybe). Sliding doors or similar out to the garden from the sitting area. Bottom of kitchen window to be level with the kitchen worktop. Back door into the utility room No large step into front or back door WC away from front door if possible Upstairs 3 to 4 double bedrooms. Small study if not room downstairs (or 4th bedroom) Built in wardrobes Cathedral ceiling. Master bedroom should be able to comfortably take a king size be. En-suite in master. Separate shower in bathroom. General Heating / DHW – no mains gas. Solar PV with a diverter? ASHP (noise?) Consideration given to some acoustic insulation between rooms and between downstairs / upstairs. Doesn’t need to be completely soundproof however. LED lighting throughout and up the staircase Point for charging electric car. Ability to use battery storage in the future should it become more cost-effective. No requirement for chimney or wood burning stove. Agnostic about whether the garage is attached or detached, but should have storage for bikes and a little workshop area. Could be modified for easy access upstairs in the future (Straight staircase maybe). Point for charging electric car. Low maintenance exterior for windows and wall facings. House to have a more contemporary feel inside. Outside to tie in with planning / design code. Window frames recessed into the openings. Other Stuff Recess in shower wall for soap etc. Built in bookcases Lots of sockets Sockets in cupboards for charging hoover etc. Room in utility room for dog crate Built in water filter Water softener Lighting on dimmers with switches that gradually turn LED lights on so they don’t blow. Good outdoor lighting (pathways) Outdoor power point / tap Phone point in every room1 point


This leaderboard is set to London/GMT+01:00