Leaderboard


Popular Content
Showing content with the highest reputation on 08/22/23 in all areas
-
We are the opposite, windows and doord shut all day, if the sun's out underfloor cooling on (powered by PV). Basically keep the heat out and don't let it in. Once the temps drop outside or the inside exceeds the outside due to the oversized glazing, then a couple windows at front are opened and rear door opened for a blow through. MVHR on all the time.2 points
-
I'm using yours, tomorrow if they will go ahead, said that I had to do it last week of August.1 point
-
If you have windows open in summer you could turn it off. But ours runs all the time. A good test of an air tight house, is you can open one door or one window on a windy day and you won't get a draught coming in our out.1 point
-
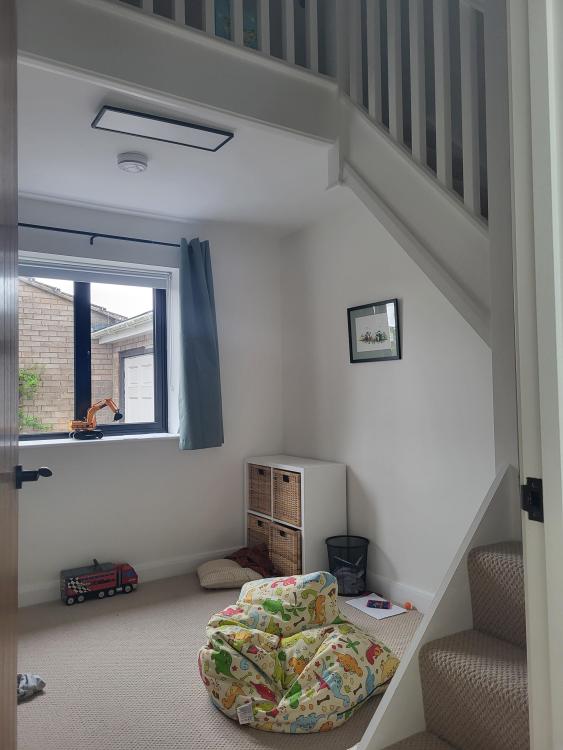
Bedroom Mezzanines, great fun for the kids!
 1 point
 -
In simple turns your heat pump is sized to heat the house and also have time to sort the hot water out. So if your -2/3 day requires 4 kW, and your cylinder heating takes an hour, it's (4 x 24) / 23, so you need a heat pump that can give 4.2kW at -3. Saying the above, my heat demand is just over 3kW and I have a 6kW heat pump, but have designed my system so the heat pump doesn't short cycle, when heat demand is lowest.1 point
-
Just undercut the door, Uber simple, no cost, next to zero noise transfer. Making something costly, complex for no good reason. Spend your money on good design so the noise transfer from the MVHR unit is minimised. Big ducts for low velocity, oversized MVHR unit for low running speed and decent plenum.1 point
-
I couldn’t get VMZinc Anthra due to the minimum weight order. My final price for supply and install of Greencoat PLX was £146/m2 including Lindab rainwater goods. VMZinc was only marginally dearer. Catnic was stupidly expensive for what it is.1 point
-
No idea. Sorry. But the path edge is going to be nice if that helps.1 point
-
And a sketch of a section through the ground, and foundations to see how the 45 degrees from the foundations compares to the excavated ex retaining wall.1 point
-
Plus 1. Though I wouldn’t worry too much about bulb changes, just buy very high quality LED light bulbs. These should last a minimum of 30,000 hours, but some brands state up to 75,000 or even 100,000 hours.1 point
-
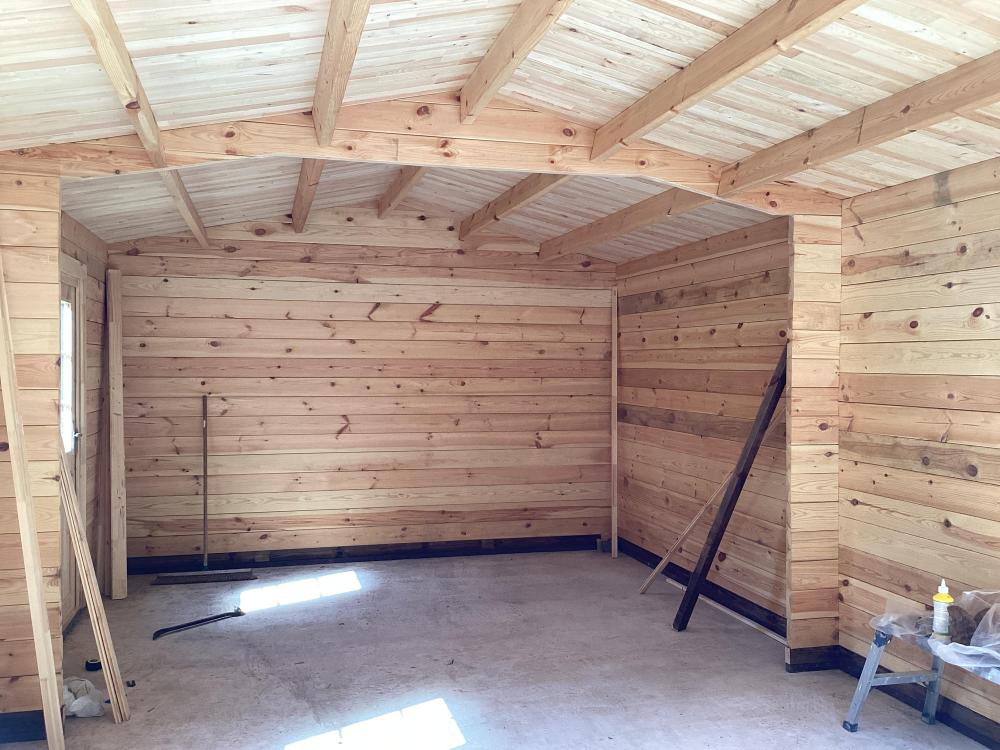
My new garage has a vaulted ceiling 🤣🤣🤣🤣 in all seriousness tho I like them as a stairwell
 1 point
 -
@ETC They can be lower than 1100mm, but will require guarding1 point
-
@joe90 I could try. Im waiting for a quote for blown in insulation. One problem is i'm going to have a load of MVHR ducts up there, so i would rather they were under the insulation.1 point
-
I would have thought that with enough ventilation (that you do propose) it will be ok. I will say however I have come across cold lofts in the past with lots of condensation due to warm moist air escaping from within the house, so make sure your ceilings are well sealed. As you said it’s going to be a bugger to insulate tho 🤯. Could you not insulate with fluffy stuff just before you membrane and batten?1 point
-
I would be tempted to cover it all in a layer of duct tape or equiv, should you detect dampness in the floor will make it easier to chisel out and inspect without the screed stuck to the pipe and fitting.1 point
-
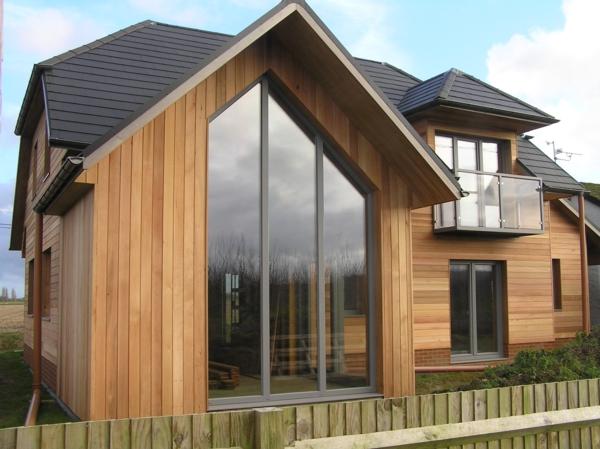
A few years ago just after it was clad.
 1 point
 -
Not sure if this helps or clarifies... https://www.gov.uk/guidance/buildings-and-construction-vat-notice-708#:~:text=Snagging (or the correction of,part of that building contract.1 point
-
Dont over think...... Accept that as a DIYer with basic tools it'll not be perfect. Measure, measure and measure again. Be patient! Don't use Farrow an Ball Eggshell paint!! Seal the MDF....I forgot to. Don't use 6mm stripwood, too unstable, it warps and cups. Use 9mm mdf for the panel and 6mm for the rails ect to make 22mm'ish thick doors. Ideally have the rails ect machined if you don't have the capacity. Get an accurate level!1 point
-
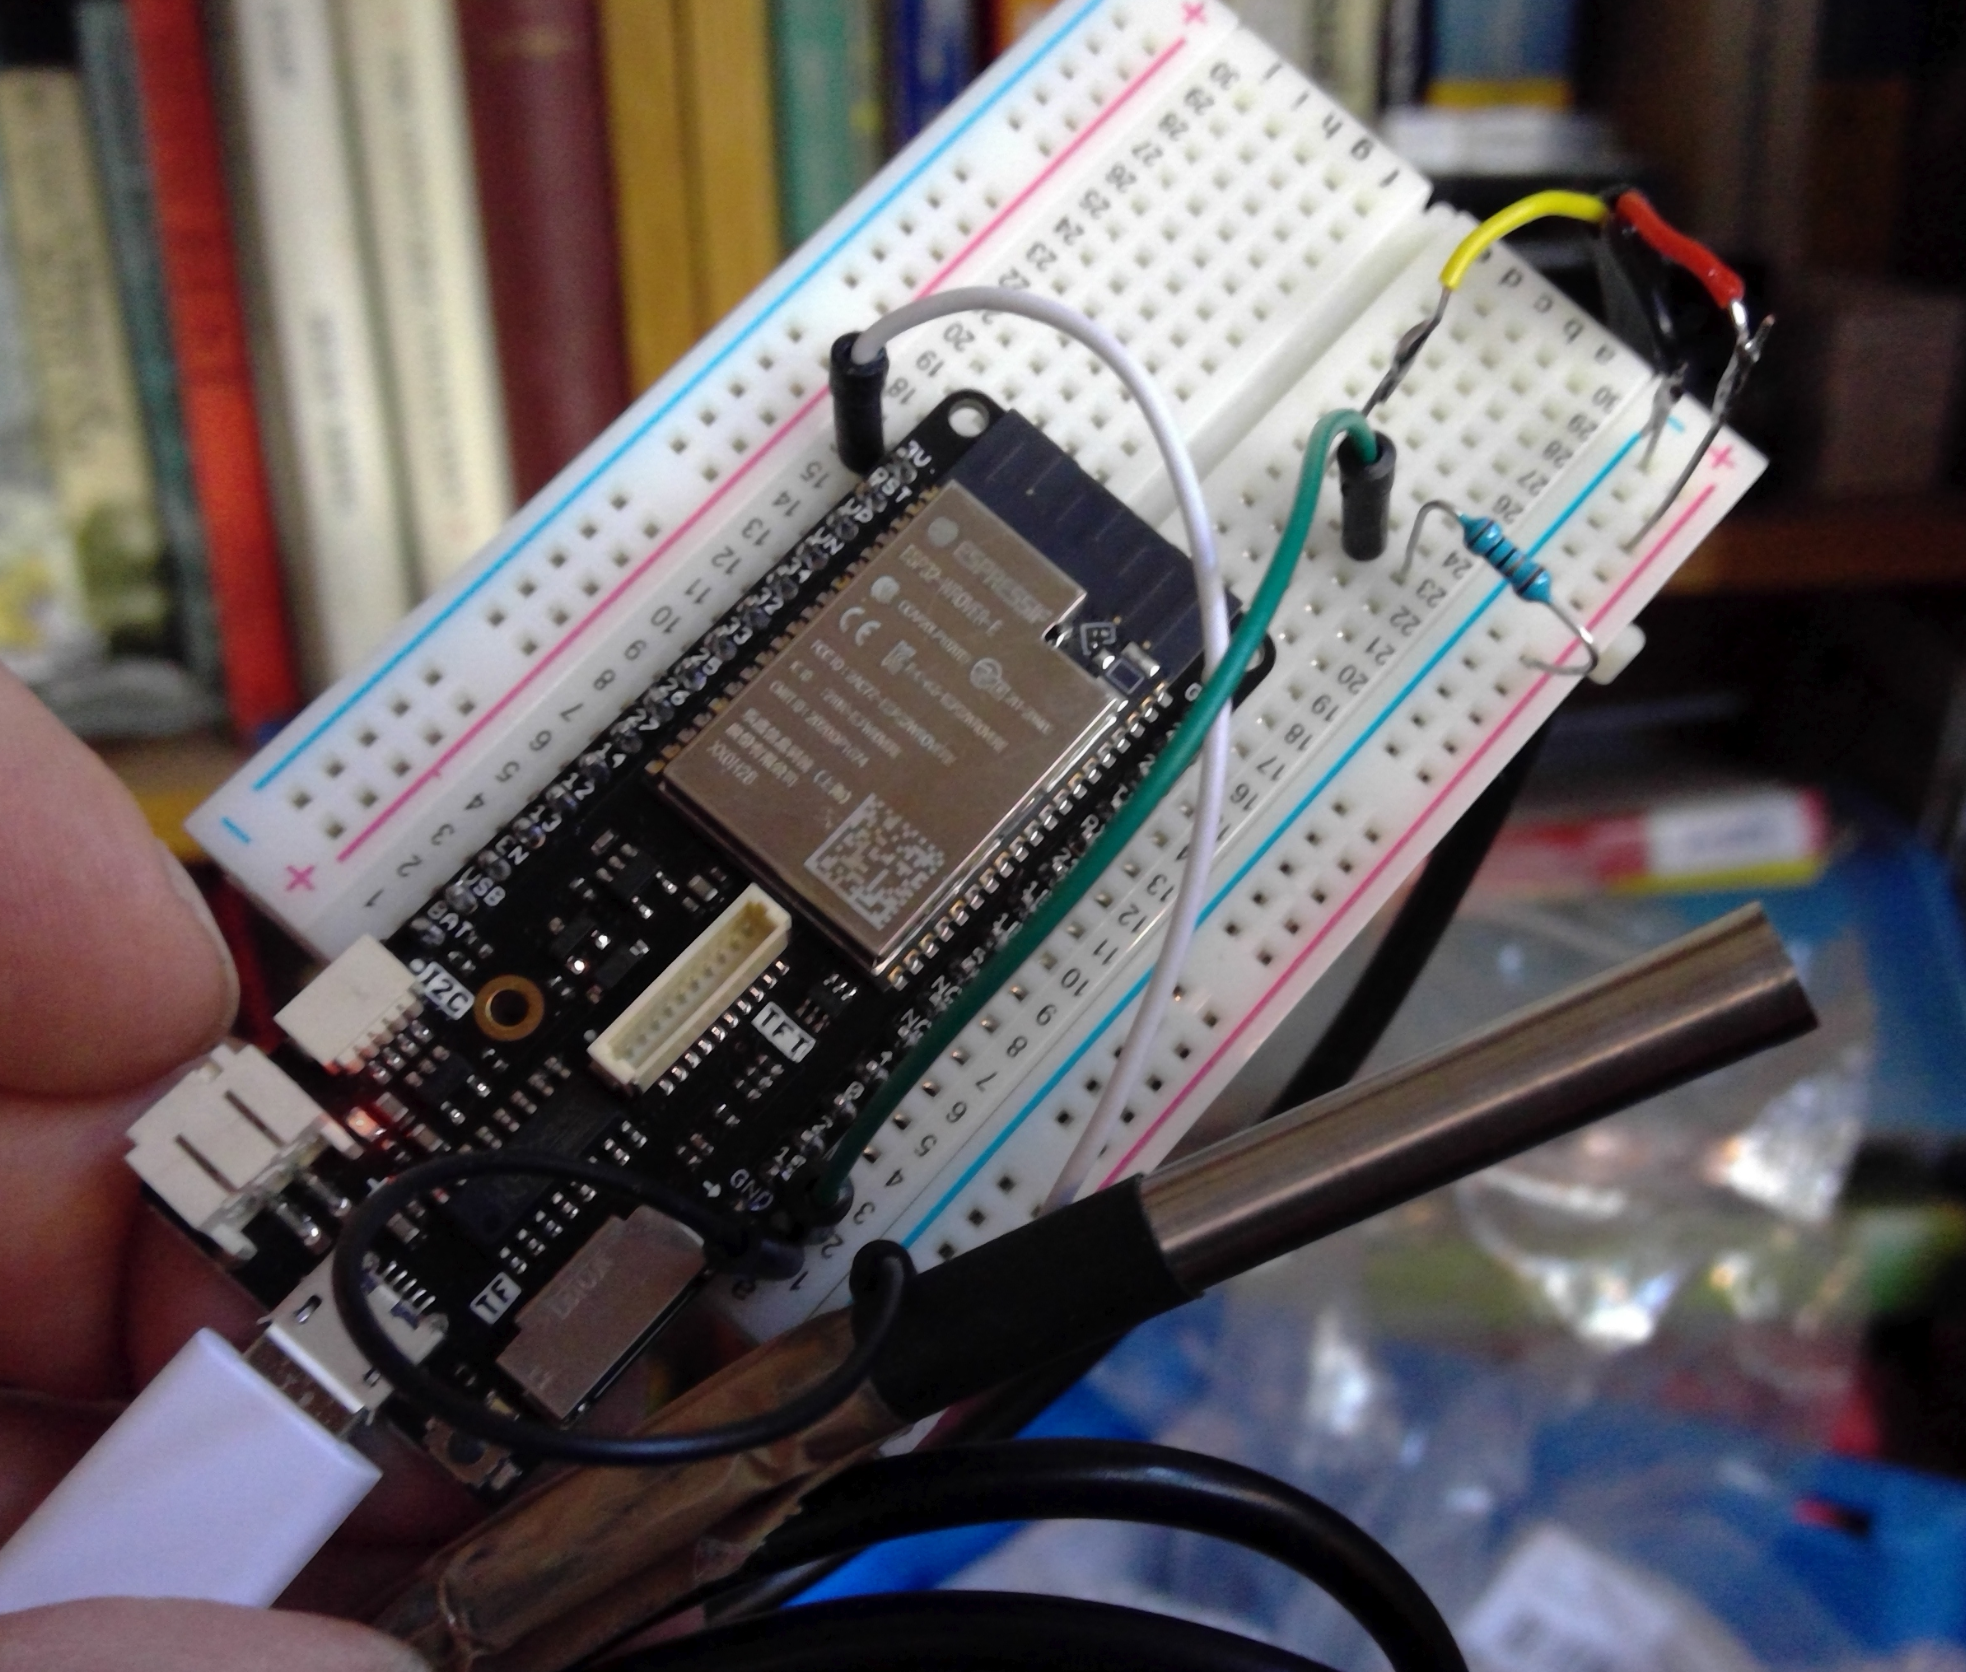
No worries I have a bunch of the same sensors in the house so although I plan different way to do things. I thought it would be fun to pull out the address as a string. I convert the number to a meaningfull name in the code local code, MQTT the reading and store readings into a mysql db using node red.1 point
-
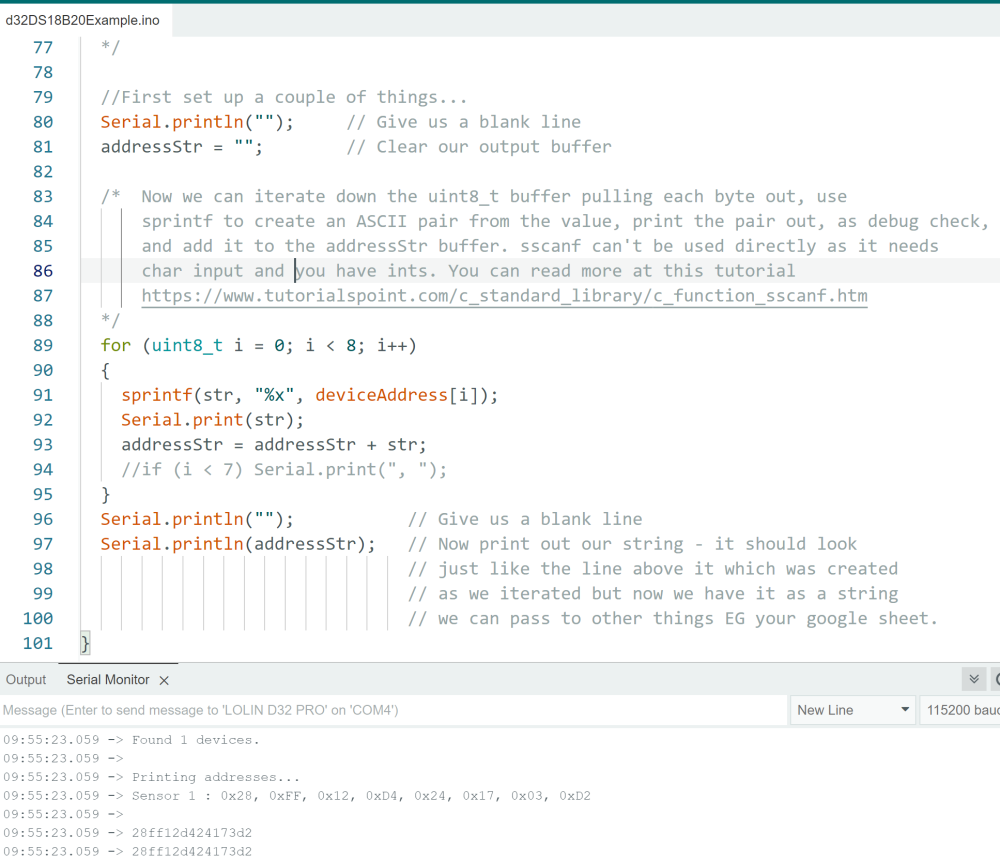
OK - I understand. So below is some example code I built to give you an idea to play with and links to some tutorial stuff. I connected a DS18B20 to an ESP32 board and ran the code below. It explains, very simply, why sscanf can't be used out of the box, you will need to pre process the int8_t buffer before you could use it and if you pre processed it you wouldn't need it - if you get my drift. The tutorials point link in the code is quite good at explaining the syntax for sscanf. In some ways sprintf also needs a bit of work but would be a much more elegant solution in my view. I have tried to explain it all in the code as we go along. My code, with output, full code is below. The bottom line is printed from a string built up by iterating across the int8_t buffer, the line above it by just printing our each byte value as HEX and the line above that is the raw code output from the tutorial mentioned. Hope it makes sense. My setup looks like this, just one DS18B20 Full code: #include <OneWire.h> #include <DallasTemperature.h> // FROM https://lastminuteengineers.com/multiple-ds18b20-esp32-web-server-tutorial/ // Data wire is plugged into port 15 on the ESP32 #define ONE_WIRE_BUS 15 // Setup a oneWire instance to communicate with any OneWire devices OneWire oneWire(ONE_WIRE_BUS); // Pass our oneWire reference to Dallas Temperature. DallasTemperature sensors(&oneWire); // variable to hold device addresses DeviceAddress Thermometer; int deviceCount = 0; char str[20]; // I added this bit - we will use this to create the bytes as hex. String addressStr; // and this - our final string will appear here void setup(void) { // start serial port Serial.begin(115200); // Start up the library sensors.begin(); // locate devices on the bus Serial.println("Locating devices..."); Serial.print("Found "); deviceCount = sensors.getDeviceCount(); Serial.print(deviceCount, DEC); Serial.println(" devices."); Serial.println(""); Serial.println("Printing addresses..."); for (int i = 0; i < deviceCount; i++) { Serial.print("Sensor "); Serial.print(i+1); Serial.print(" : "); sensors.getAddress(Thermometer, i); printAddress(Thermometer); } } void loop(void) { } void printAddress(DeviceAddress deviceAddress) { // This the original code I am playing with. It pulls each int out of the // int8_t buffer and really just uses the clever bits of the Serial.print // function to pop out the hex values. You can do very little from here to // create a string. Howevere the basic process can be used and that is what // I have done below. for (uint8_t i = 0; i < 8; i++) { Serial.print("0x"); if (deviceAddress[i] < 0x10) Serial.print("0"); Serial.print(deviceAddress[i], HEX); if (i < 7) Serial.print(", "); } Serial.println(""); // This is the additional bit: /* Our unit8_t[8] is an eight byte array / buffer each byte of which holds a number that represents the HEX value of the byte address in that position so we will need to handle them one after the other and build up our final string as we go. So we need to iteratively pull all the HEX values out one by one and then build up our string of all the chars. Sprintf with the %x format does this neatly. It will put every hex pair into our str buffer a pair at a time. We will then need to take that pair and pop it into the bigger address buffer so we can print / add it to our data line later. */ //First set up a couple of things... Serial.println(""); // Give us a blank line addressStr = ""; // Clear our output buffer /* Now we can iterate down the uint8_t buffer pulling each byte out, use sprintf to create an ASCII pair from the value, print the pair out, as debug check, and add it to the addressStr buffer. sscanf can't be used directly as it needs char input and you have ints. You can read more at this tutorial https://www.tutorialspoint.com/c_standard_library/c_function_sscanf.htm */ for (uint8_t i = 0; i < 8; i++) { sprintf(str, "%x", deviceAddress[i]); Serial.print(str); addressStr = addressStr + str; //if (i < 7) Serial.print(", "); } Serial.println(""); // Give us a blank line Serial.println(addressStr); // Now print out our string - it should look // just like the line above it which was created // as we iterated but now we have it as a string // we can pass to other things EG your google sheet. }

 1 point
 -
Well done. Looks great.1 point
-
So to recap: we bought an old house with a bit of land at the back. We tried to get permission to knock it down and do a new build passiv house in the backland. The council said no no no, we lost an appeal, then put in ridiculous plans for a massive extension with basement on the existing old house, plus a large stable block on the back land where we wanted the new build. Council said yes yes yes, thats fine, please go ahead.... Having never built anything major before, we hired a 9 ton digger and a small tipper truck and set about digging a hole. The basement would start over 4m back from the existing rear wall of the old house and as long as we graded the excavation where possible and used plenty of sheet pilings, it would work out fine. To get rid of the clay soil, we just spread it out on the land at the back saving quite a bit on grab lorries. We originally planned for a four week hire of the plant, but we ended up taking about six weeks. Prior to digging I made a few test trenches to check the soil and water level. We also found an in depth soil survey from a major development next door. Once we had the hole dug in the right place, and sorted some temporary drainage, we set about levelling and pouring the basement slab. This was designed to be 300mm concrete on top of a tanking membrane, with tons of rebar. We just followed the drawings and building control came a few times to check it all. The waterproofing was overseen at each stage so we could get the warranty as well. We poured the slab in winter of 2022 and had a few cancellations due to frost. In the end we made an insulated temporary roof over the basement and used gas heaters the night before the pour just to be safe. The concrete went in very well, i think it was two loads of waterproof concrete, then we could start on the nudura walls. The hardest part of this section was wiring all the rebar together and getting the 20mm OD L bars in place which connected the slab to the nudura walls. These were doubled up all around the perimeter every 8" and a pig to get in amongst all the rebar mesh. Assembling the nudura walls was very straight forward, once i got my head around the idea of a common seam - where due to the plan measurements, the nudura blocks needed cutting and joining together. We had done the nudura course and the rep was very helpful with all my questions. Once built up, building control came out again and we ordered another three loads of water proof concrete for the walls. Where the walls joined the slab, we used an expanding waterbar and kept it dry until we poured the walls. We hired a concrete pump for the pour and because it was a basement we just used the nudura walkways and scaffolding to allow the pump hose to get round the whole perimeter. I was concerned about blow outs- especially on the first load dropping down into the bottom of the wall so I over did the shuttering on the outside of the nudura - including 220mm x 50mm floor joists screwed all around the perimeter outer edge, plus lots of OSB shuttering at all the weak points. It all worked well and it was a major relief to get the walls filled up.1 point
-
Octopus Energy has sent shockwaves through the UK renewables industry. The company has announced that it will accept solar installations onto its Smart Export Guarantee tariffs without MCS accreditation. This represents a significant development for electricians and homeowners, as they can now sell their excess energy back to the grid at a very competitive rate.1 point
-
Can someone fix the spelling in the title for me.1 point
-
What i found made the job of a vaulted ceiling MUCH easier, is screw a temporary batten to the wall with JUST enough gap to slot the bottom edge of the PB in than that's the bottom edge secured. You only then have to hold the top edge while you get a couple of screws in. For a long (as in >1 board from eaves to ridge) screw another temporary batten over the top edge of the bottom board to similarly slot the bottom edge of the next board in. Start with full size boards, if you must cut, cut them from that, but persevere to get full boards up. 9mm boards won't be any cheaper than 12.5mm and you may have to order them.1 point
-
Thats the way to do it, anticipate the inevitable, make as many changes as possible at a convenient point in time. Alternatively stick your head in the sand and expect MUCH bigger bills, migration like you have never even imagined before, wild fires, flooded cities, societal breakdown and dictatorship. The political effects of climate change are, in many ways, more scary than the physical ones. Oh and re rad size, what about fan convectors? OK you might not want them in a bedroom but in the living areas whats the real issue? Are your fridge, TV or for that matter your kids silent?1 point
-
He probably knows less than you do about plastering Hardwall tough coat Sand and cement are all fine Sand and cement being the densest of the three1 point
-
I've been playing with the Ubakus U-Value calculator again. Adding 3mm of EPS to a solid brick 215mm wall takes the U-Value from 2.54 to 2.05W/m2K and increases the internal surface temperature by about 2⁰. This is about a 20% reduction in conductive heat loss. The elephant in the room however is a very thin 22mm EPS backed plasterboard (12.5+9.5mm) would have reduced the U value to 1.3W/m2K or almost 50% reduction of heat loss. I suspect there is actually a notable improvement in the performance of the wall with this product but it is only because of the very poor starting point. Just goes to show, the first mm of insulation is the most important.1 point
-
You could run the last bit in 150mm pipe at 1:150 if the connection at the sewer end is sufficient diameter.1 point
-
+1 Much easier than visiting lots of bank and building societies web sites and form filling. Been a customer of HL for many years. They have good customer support as well. Either by secure messaging or on the phone.1 point
-
I disagree. The £85k limit is there for a reason. Just to give you an example of a potential scenario: a bank goes bust (RBS, Northern Rock, Lehmans, Kaupthing and others all went bust in the last crisis, and only some of those were saved - complete lottery which get saved and which don’t) and maybe the government chooses to step in but the admin takes ages to reimburse you, maybe a year or so. Meanwhile interest rates have reached 11%, and the reimbursement doesn’t cover interest, just capital, so you lose a chunk of your investment through inflation whilst waiting for the admin on your refund. Unless you have tens of millions to invest, there will be sufficient accounts. Just keep all the details in a spreadsheet and password protect the spreadsheet. UK gilts are your friends. I wouldn’t hold it all in deposit accounts. I would put a small amount in equities (say 7.5%) as well, and some (say 5% in gold). Vanguard do cheap tracker funds that can be chosen to be fairly low risk.1 point
-
I’ve heard Isotex Italy will be offering any customers affected a large discount we have been left with a house half built so yesterday me and my Husband started building ourselves.1 point
-
slim down to a 150 cav, have a look at recticel tongue and groove insulation. superior than celotex sheets.1 point
-
Be aware that UV isn't a true sterilisation method, it acts as a disinfection system but even then it only works reasonably well if the water supply to the UV unit has been filtered to < 5µ. If the supply to the UV unit isn't filtered down to this level then UV treatment won't do much, as bugs will be shielded from UV by the fine particles that haven't been filtered out. A 5µ filter will need pre-filters to take out the larger stuff, or else you'll be replacing filters every couple of weeks. UV treatment also has an annual running cost of around £80 to £100, roughly 50% of that is electricity and 50% the cost of UV tube replacement. To that you need to add the cost of the filtration system expendables, which depends a great deal on how clear the water coming in is. Might be worth considering a backwashable filter vessel 1/3rd filled with Turbidex, as that will filter down to close to 5µ on it's own, and can be backwashed to clean the media, rather than having to replace cartridge filters. Backwashing can be run automatically at night (our main filtration system does this, a backwash every 4 days, at around 02:00). I'd try and avoid over-complicating any rainwater harvesting system if you can, as even a basic system will require a bit of regular looking after and the simpler the system the better, IMHO. If you can restrict rainwater use to non-critical uses, like toilet flushing (and NOT running the washing machine, they don't normally get hot enough to kill any bugs), then you can get away without much in the way of filtering or disinfection. My experience is that any form of water treatment requires maintenance and incurs a significant running cost.1 point
-
Been drinking Lidl version of redbull, called Kong, should keep me up for a while. I always open a tin at Swindon, keeps me alert till past Bristol. Would hate to have an accident there and wake up to @Pocster bringing me grapes. Or gropes in his case.0 points
-
That’s me out then…… I did no calculations but copied our Jeremy’s principles as our houses were similar in size, (sucks finger and holds it up 🤣).0 points
-
Waste of floor space / sense of arrival if an entrance hall. I'm having One.0 points
-
Save your money ( lots to save ) HA , zigbee - then pretty much any light , switch , plug etc you want .0 points
-
Just wait till all the new builders start getting into Part O. Opening can't be lower than 1100mm or will need guarding. Can't be above 1100mm or wont comply as an escape route. Oh, the fun that is going to be had with Building control officers.0 points
-
Surely your distributor should take them back.....if they're saleable?0 points