Leaderboard
Popular Content
Showing content with the highest reputation on 05/01/21 in all areas
-
When they stop DRAX burning wood, I might, just might. take some notice of environmentalists.2 points
-
Yes, just make sure your screws are in the middle (pencil line to follow?). That’s why I don’t like joining sheets on a joist that narrow. Those noggins will be fine,2 points
-
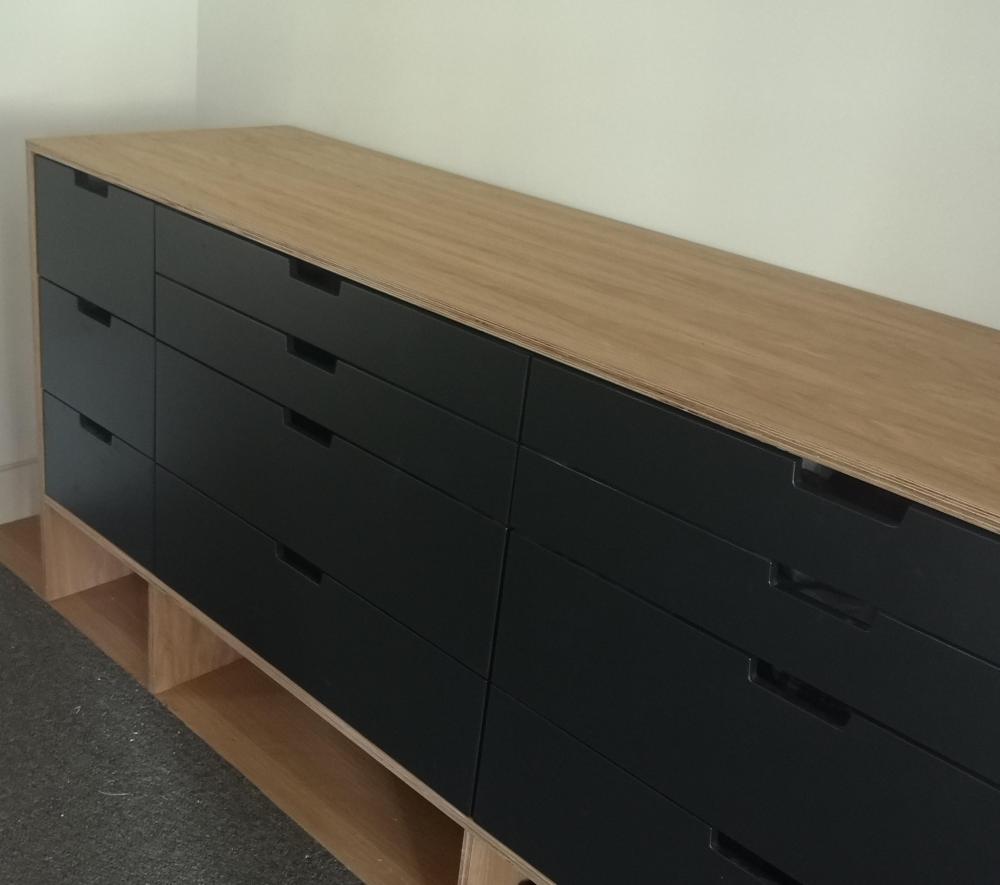
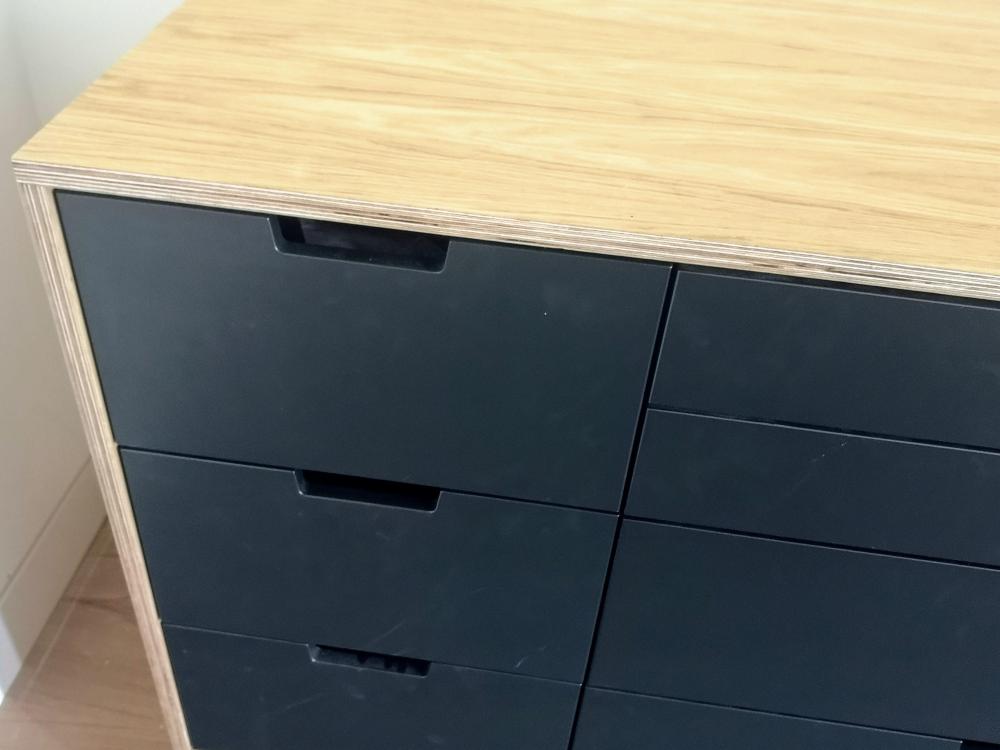
Hi again Here's what I did. (Ignore the dust and threads - I've just finished refitting the carpet) I have to say that even though I got oak faced birch plywood that was specifically stated as being suitable for use with exposed edges, there's a lot of uneven colouring in the ply layers that I wasn't expecting. I'm sure some of it was me getting used to the tracksaw I bought to do the project (darkening due to heat) but I don't think that explains it all The oak veneer looked okay though. It comes in an A side and B side - the B side definitely didn't come up as nicely in a few areas but I was mostly able to position that out of sight.1 point
-
I prefer the original arrangement. As there is a horizontal pipe joining at the bottom of the vertical ( have I got that right?) there would be excessive turbulence when flows collide. Also the vertical is splashing into your big and gently sloping 150 horiz. and could run upstream. Water comes to a stop , solids settle, blockage. Perhaps this could be lessened by a) using large radius connector at A, or first converting the vertical to horiz, before joining, or the vertical drops further and B to A tumbles into the vertical before bending out. ie separate the junctions. there doesn't seem to be space for all this plus rodding points, which would have to be accessible. I suggest 'revert'.1 point
-
Ditto - takes a few hours to be effective as reliant on UFH, so best to run it early and long. Don't forget all people, applicances etc in the house are adding to the heat load.1 point
-
I went with a small Hitachi ASHP (7kW nominal). It just required a dip switch to be set to enable cooling, the controller then recognised the mode and it can be set / programmed same as heating. I also needed to buy a couple of bits ("cooling kit"), essentially condensation control - insulation for the circulator pump and a drip tray with drain pipe. I was told by Hitachi that they do not advertise the mode, something to do with regulatory approvals. In practical terms it is very helpful at reducing the internal temperature, and it helps that the MVHR goes into heat-exchange mode when outside temp is very high thus keeping the cool air in the house. We had to add shading into the mix as our double aspect lounge has too much solar gain. With all 3 measures we were quite comfortable last summer in those weeks when we nudged 30C.1 point
-
I have a Nibe with the cooling add-on. I cool the buffer which is then sent to UFH and MVHR heat exchanger. The UFH is very effective for cooling, in my set-up, the MVHR less so, as you would expect. I have other processes to help cooling so the ASHP/UFH doesn't do it all on its own, which probably helps. First step is to even out the energy in the slab, to move heat from solar gain areas to the rest of the house by just circulating the UFH. Roof vents will also open to dump warm air, if outside temp is lower than internal. I also have external blinds to restrict solar gain if needed. If the "passive" measures are insufficient, then the ASHP starts to cool. I have it stepping in quite quickly so that it is trying to maintain a temperature rather than bring a temp that sailed 10 degrees passed the desired temp. In those circumstances, it is effective.1 point
-
As far as I am aware they are all capable but only some advertise it. My Kingspan unit (Carrier) will but it ain’t got that hot yet!!!!. Read jeremy Harris blog, his has the same unit as me and he reversed engineered his to do it.1 point
-
Can you honestly tell me a BCO is going to count the nails you used ??? I have a reputation for over engineering stuff and I would be very satisfied with that fix, in fact I have done it often, does not need a structural engineer to work it out. Make the “noggin a tight fit between gang nails and fit after the roofing sheet is fitted, 4 off screws along its length down through the ply, job done.1 point
-
Yes that's my beef really. 25mm plywood will be plenty strong enough without edge noggins, but the wisdom is to have the edge noggins so... The sheet join noggins is a different matter.1 point
-
Still have to work out how to cope with the gang nails. I guess I'll jus put the noggins as close to the edge as possible but not on the gang nails.1 point
-
If a condensation risk analysis to BS5250 is O.K. then not required.1 point
-
1 point
-
If you want accurate mapping you need a service locator company, they will come out with plans and do a ground detection mapping, draw lots of lines on the ground and then send you a big invoice. I used to pay £250-300 but that was in 2006.1 point
-
Interesting stepping up to 150. Looks like you have room to bring that 90 connection into the drain within the top third of pipe which is I believe what building regs ask for. Your ridding points would be on the stack in cupboards above1 point
-
I am not a fan of always joining boards on rafters/joists,(even plasterboard) I would instal noggins at 400mm centres and lap some off cuts of ply between the noggins across the ply joins underneath, glue it as well if you want.1 point
-
I think at this stage it's only about where the duct for the cabling starts at the begining of your land nearest the public highway to where it ends at a box on your building.( This point is referred to as where demarcation happens.) Search for: PAS 2016 for info on ducting requirements in your search engine. So in the future when they want to roll out 10G, sorry, 4G or whatever they can draw a cable along the duct from the pavement to your external wall. Ask the building inspector if they only want a schematic of the duct route to demarcation point at the moment. Probably wanted to give you the heads up that you have to get a duct in. Let me know how you get on. Good luck Marvin.1 point
-
The different elements are for different reasons. As AliG pointed out the fibre insulation in not needed to meet good insulation level but more likely sound deadening and yes the fact that no membrane layer is identified is odd. The purpose of the membrane is to stop moisture getting into the plywood sheathing, and using breathable means that moisture can get out. I would check with designer about missing membrane. Surprised there's no vapor barrier on the inside too. I have to coat under my plasterboard with sheet plastic to stop the moisture vapor? Well I'm sure someone will correct me. Good luck Marvin1 point
-
1 point
-
Hi Moonshine. What you have looks like a reinforced masonry retaining wall. I assume you are using dense concrete blocks not aerated. Nice to see them being used, a bit like timber flitch beams which seemed to go out of fashion for a bit, like bell bottom / flared trousers. Yes 325mm ties to allow for construction tolerance so you get your min 50mm embedment. Peter has suggested (I think) using A142 on the flat to create the wall ties. I would maybe give this a swerve as the blockwork is more porous to moisture and air than well compacted concrete. I think this risks corrosion of the A142 in the blockwork courses. The issue here would be that when steel corrodes it expands and can exert a huge expansive force on the masonry which could damage it. This effect can be seen on historic buildings where iron straps, cramps etc have been built into the stonework resulting in disappointment. I'm curious as the cavity fill is quite thick.. I wonder if the wall is fairly high for a reinforced masonry wall or if you have a clay soil that has a low shear strength. By that I mean a clay soil say that is pretty soft thus exerts a fair bit of lateral pressure on the wall. I can see that the ground slopes up from the wall so this tends to add lateral load to the wall too. I would be interested to see the detail of the rebar at the base of the wall and how the base is working. For the curious these types of reinforced walls are quite clever in how they work, it's the simplicity that attracts. To explain a bit of the theory. Imagine you have a reinforced concrete beam spanning between two walls subject to a downwards load. The bottom of the beam is in tension. Concrete is not so good in resisting tension so you add in rebar in the bottom which is good for the tension. The top of the beam is in compression and concrete / masonry is good at resisting compression. Now, if you make the beam deeper the tension and compression forces at the top and bottom edges reduce as you have a longer lever arm between the bottom and top of the beam. A bit like using a longer spanner or car wheel nut brace. Imagine you take said beam and cut an imaginary slice through it just off the middle of the span. In the very top you have a compressive force acting in one direction, a tension force acting in the opposite direction at the bottom of the beam. In the middle of the depth of the beam these opposing forces are at their maximum in the direction of the span. For the very keen these longitudinal forces are often called complimentary shear forces. In summary, they are most onerous in the middle of the beam and reduce to zero as you move towards the top and bottom of the beam. Now a reinforced masonry retaining wall wall works by recognising that these complimentary shear forces reduce as you move towards the inner face of the wall. There comes a point where the concrete has enough bond strength to the block to resist the complimentary shear. You hit a sweet spot where you can get the concrete and the block to work compositely, like a metal deck floor. The wriggly tin resists the tension, it is bonded to the concrete which resists the compression. Again, great to see this kind of reinforced masonry detail. They can be a great addition to your design armoury. For the self builder they can deliver savings, particularly if you have lot's of masonry on the job anyway. Like many retaining walls they are often height /soil sensetive but they can be great given the right conditions and save you money. Moonshine..One key thing is that you need to make sure that you keep the inside of the blocks clean, no chucking the washout from the mixer down the cavity, letting soil fall into it. Also make sure the brickie does not butter up the inside of the cavity as you want the inner face of the blocks as rough and clean as you can to make all work. Keep the blocks moist when pouring the concrete as you don't want them to suck the water out the concrete on a hot summers day which will encourage the concrete to debond from the blocks.1 point
-
I'm afraid it will need planning permission for possibly a number of reasons... Any extension or outbuilding in front of the "principle elevation" needs planning permission. You might also need planning permission if the roof terrace is more than 30cm above ground level where it meets the ground at the back. Walls and fences on the boundary adjacent to the highway also need to be under 1m or planning permission obtained. The planners may also object to the grounds of appearance as it looks like the only one in the road?. All the other houses have open sweeping/sloping front lawns? You will also need permission for a "dropped kerb". This is more about the right to drive over the pavement than actually lowering any kerb. As far as construction goes.. The walls will need to be retaining walls. As these are over 1m high you should get them designed/specified by a structural engineer who can also propose a waterproofing/tanking system to keep it dry inside.1 point
-
For a can't go wrong deal look in Aldi when they have these 140A inverter arcs. I call it my poachers welder. So small I can tuck it under my coat on site. Get a mate to keep watch etc. Saves all that silliness with hot works permits! ? It's not the super, smoothest inverter compared to my bigger, 160A Parweld but it's still good & pretty much a hand tool it's that small. For MIG I've an old Clarke 130A that I keep in good nick like Trigger's Broom. Dug it out last weekend as refurbing a Workmate other wise destined for the scrap heap.1 point
-
Thomas Armstrong are another. I forget where i got my adhesive from, but it was a company through Jewson which is who delivered it all. T/A are based in the north of england, so you may still be in same situation.1 point
-
Hi All, thanks for all advice, had answer from council today in writing no permission required, happy days.1 point
-
will do! haha, no I don't but it is better than nothing! we have stone walls and apparently, it is a bugger to drill and insulate or the tradepeople actually refuse to do it because it is too much efforts. I previously used the red label for one room when I was a student and couldn't afford wall rock - not that it I can now but I'm not looking to keep doing it so thought this time I have to try wall rock! ha ha1 point
-
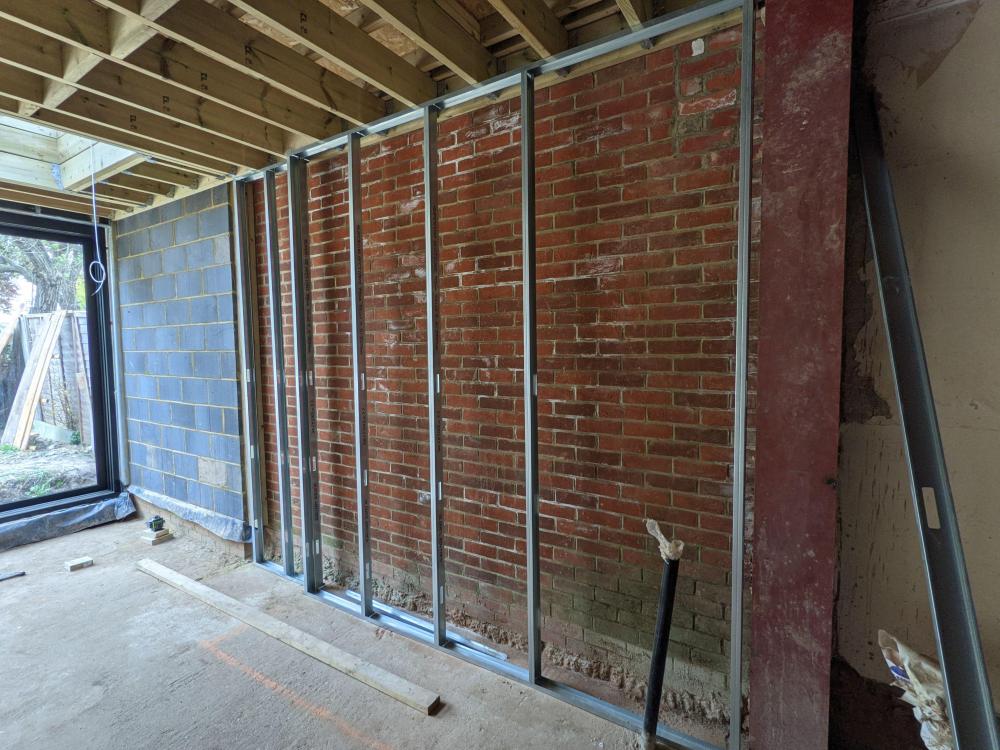
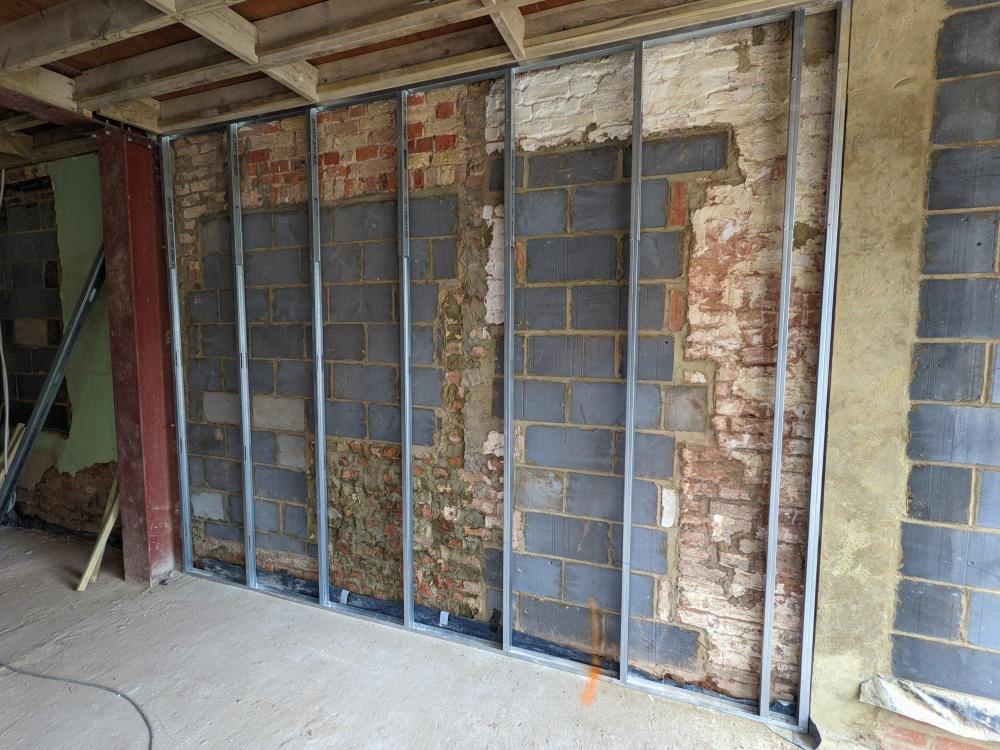
I've gone ahead and put up some metal C studs to bring the existing walls in line with the extension (new cavity walls). One side I've used 50mm C studs and the other 70mm as there was more room (both sizes at 600mm centres). The height of the studs are just under 3m, I had to splice extension on to the 50mm ones (with 600mm overlap) as I could only get my hands on 2.7m lengths of 50mm. The 50mm studs are close the existing wall at the bottom but are about 50mm out at the top because the existing wall has moved over time. The 70mm studs are about 200mm away from the wall, as they have been set to go flush with a steel beam rather than the cavity wall. I've been able to secure the top/bottom tracks to the concrete subfloor and the ceiling joists above. The end studs are quite tricky to secure to the existing building, but I've secured them to the tracks using suitable fixing. The 70mm side will be boarded with 12mm ply and then plasterboard (as it will be holding kitchen units), the 50mm side will have some 12mm ply where the TV will be hung, but the rest plasterboard and then a layer of plasterboard over all of that (so that the ply is covered). I've seen a post where @nod has suggested supporting studs by fixing pieces of track to the wall and to the C stud. I wanted to confirm if that was the best option in this case, and what centres to put these supports for the 50mm & 70mm studs please?1 point
-
Thanks @Nickfromwales. I think the 30kw unit is a bit shallower in terms of how much space it will occupy in our utility room, so if we can make that work that would be a bonus. Controlwise, I was planning on all the thermostats in the house being tado ones. They can be calibrated to 0.1C and I found they worked very well at my last place. I know they rely in part on internet connection, but I think that's less of an issue for me and they mostly have a backup manual override that can be used if ever the internet is down.1 point
-
I've had these is a couple of houses and contrary to what I have found online, you can get rid of them but you need to be consistent over 2/3 years. Cluster flies are also sometimes referred to as field flies which is many ways is more accurate. They spend the summer on the fields and over-winter inside. They give off quite a distinctive smell and it is this smell that let the new ones know where to bed down. Once you break the cycle and get rid of the smell, you're in business. The following is a result of my own research and trial and error and it's worked for me. I don't claim to be an expert, but the following did work. If you have them in at the moment (you probably do, not quite warm enough yet) then you need to get rid of the ones you do have. You can either use a Henry hoover to hoover them up (this will make it stink and eventually clog the whole tube up with fly guts), do not use your main vacuum cleaner for this. I warn you... I bought a load of copy Henry hoover bags of eBay for this purpose but you'll still need to soak the whole tube section in hot soapy water to get it clean - don't bother while it still works and until you've cured the problem. It's not a nice job. Or Use a "Bug Bomb" - I used to buy mine on eBay. I used to put mine on a baking tray (just in case) light it and leave it in the loft. It will kill any insect and doesn't produce enough smoke that you need to tell the fire brigade or anything like that. This is a good system as it gets the whole lot dead in one hit. However, you still have the smell that attracts the others and so you are going to have to hoover them up and get them binned - see the above issue and advice. Then What I did was got concentrated lavender floor cleaner and diluted it into what was still a very strong solution. My issue both times was a loft and so I loaded this in to a pump pressurised garden sprayer and sprayed it between the roof membrane layers and around the soffits and anywhere else I thought they might be getting in. I also soaked the roof trusses etc. I then burnt fistfuls of lavender josticks, particularly from the autumn onwards as the weather cools and they come off the fields. Once the summer was finished I'd use a small bug bomb and hoover up all the bodies. If you keep doing this and are diligent about it you can pretty much cure it in about 2/3 years. The first time I done it resulted in about a 90% reduction from what must have been 100k flies. Basically; bug bomb, hoover the bodies and dispose, and then kill the smell with lavender based products as they don't like lavender. Don't bother trying to seal up the gaps, you're wasting your time. Oh and don't let them freak you out, they are not normal flies, they don't go for rotting flesh and turds. Their eggs are laid in the grass and hatch out of the ground I believe. Anyway, Good luck!1 point
-
Hi Thorfun. I was wondering that at 250mm thick there may be a fair bit of rebar in the slab. I would have a quick chat with your SE to check how they have designed the slab and if it is ok to introduce repeating weak spots by way of the pipes. Practically I would be cautious here with a basement. It's hard enough if you are a contractor to deal with a concrete pour, the risk of a burst shutter, delayed wagons etc. If they have to also negotiate the UF pipework without denting it, get good concrete compaction.. you need room for a poker or tamper between the rebar (essential for keeping water out) this may attract a premium at least. My feeling is to keep it as simple as you can. Do your structural slab, take a break to see if water comes in then do your UF as a screed laid all level later. If you do get water ingress then if you have pipes in the structural slab then this could make it more difficult to fix any leaks. Yes, you have the extra cost of the screed but structural slabs are not that flat so the initial perceived saving may not fit with the time you'll have to spend laying / levelling the floor finishes, or finding the one dent in a UF pipe loop that stops it working.1 point
-
0 points


.jpg.c21f3ac78c9b7efd90cbdcb312744dc5.thumb.jpg.7adcad4c0e384f5ecd7d56b0618df6e5.jpg)


