
Leaderboard


Popular Content
Showing content with the highest reputation on 02/14/19 in all areas
-
Are they cheaper than hypochlorite though? I bought a 5kg drum of hypochlorite about 4 years ago. I still have about 4.9kg of the stuff left. I reckon there will still be some left when I shuffle off this mortal coil, at the rate it gets used for cleaning the patio and paths. 5kg of calcium hypochlorite granules will make approximately 166 litres of normal household concentration bleach. Last time I bought some I paid around £20 for a 5kg drum from a local swimming pool supply company. That works out at about £0.12/litre of concentrated bleach solution, so it's a pretty cheap way to clean stuff.3 points
-
Definitely get your connection quote first, then you know how hard you need to bargain. My case was resolved to my satisfaction in that the necessary work will be done and it hasn't cost me anything, but then there are no poles on my land for the overflying cables (11kV). I already had an existing connection that I moved and eventually buried, but the overflying ones were a separate issue. There was an existing (ancient) wayleave for the wires to overfly the property - these are voluntary agreements given by the landowner and can be withdrawn, so in exchange for the wires being moved further from my garage at no cost to me, I will give them an easement which cannot be withdrawn and is lodged against the title deeds at the Land Registry. One word of caution on times and timing. If you need to negotiate a new agreement with them, it can take a really long time. It can also take a long time to get a new connection. If these wires prevent your developing the land, you need to get onto the electricity issue as soon as possible.2 points
-
Have you tried going cold turkey? (Not this evening as an intimate supper is mandated for valentines day.)2 points
-
Thank you for such an interesting concept Ferdinand and I like your plan a lot. I'd probably end up using the back door as my main entrance as its closest to car parking although I have learnt recently that the host house [for whom I have to provide parking] plans to park on their front garden. It's surprising how when you remove the original proposed build all sorts of ideas come to mind. I'll keep everyone posted on how it goes. Next on my list is caravan research....bring on the summer warmth. ?2 points
-
I did also post that this would probably be OK in a bigger room:2 points
-
It's 3 weeks since my last blog entry and, as usual, things have been moving at a pace. The difference with the most recent round of work, though, it that the building is starting to look like a liveable house rather than a construction site. This is largely due to the glory coats of plaster and paint, but far more than that has been keeping everyone busy. The boarding started in earnest before Christmas and so the plasterers were in bright and early in the new year. We've got through an astonishing amount of board of various types - I thought I'd calculated reasonably well and had a mahooosive delivery of the stuff a while back, but it all seemed to disappear and the building was hungry for more. I bought all the board from Sydenhams as I found their price to be competitive. I've used standard 12.5mm plasterboard on all external walls, 15mm acoustic on all ceilings and internal walls, moisture board for bath/wet rooms, and pink fire board for the garage walls and ceiling. The garage is attached and so building regs require a fire door (FD30, sourced from Enfield Doors, though I've since found cheaper suppliers when looking at other stuff) and fire board throughout the garage, but only a single layer as there is no habitable space above it. I've had a board lifter on hire as it really helps the team position the boards up onto the ceilings without dropping anything on themselves or damaging either themselves or the boards. Here is the board going up on the lounge/dining area towards the kitchen area. The orange frame is the plaster board lifter. The black thing outside the window is my sewage treatment plant tank, which will be installed in a couple of weeks(ish). Looking in the opposite direction towards the lounge area: There have been plenty of plasterboard offcuts and so we have followed @JSHarris's tip of stuffing as much of this into the stud walls before boarding over. Double bubble - increasing the heat retaining ability of the house and no paying expensive disposal fees on waste plasterboard. As well as the boarding and plastering, first fix is underway, getting all the wiring, sockets and switch positions in and running vast amounts of cable through the building for all sorts of stuff. It's not just a case of chucking the cable in, he's done a great job of working out the flow of the building and the people in it, and how the building's circuitry should function best to suit them. It's a pity that it isn't more visual, but suffice it to say that at the last count, something like 2.9km of cable has gone into the building. It's in there somewhere! The room that forms the greater part of the ground floor is the kitchen/dining/lounge area and it's a very large space. From the outset, I've wanted to achieve some form of visual separation of the living area but without putting physical barriers in the way. It seems a waste to have gone to such great effort to create a lovely large space like that to then chop it up and close it in. I had inspiration for the solution from a couple of sources, the first of which is a tiny, crappy image on Pinterest when I was browsing cinema rooms. The second came about from chatting to another BH member, @Dreadnaught and a suggestion someone made to him to vary the heights of the ceiling throughout his proposed build. From this, I decided that I wanted a dropped section, like a frame, on the ceiling above the lounge area, with lighting recessed into the inner lip of the dropped section. Everyone pulled together really well to meet the challenge, and worked out what was needed from the carpentry, boarding, plastering and electrics contingents. The full ceiling was boarded out first, then the studwork frame put over it. The electrics were run through, then the frame was boarded and eventually plastered. Here's the completed framework and the first of the plasterboard going up. They're a cheerful bunch in their work! One thing I haven't skimped on is hire equipment to make the job of the plasterers and others easier. I figure it's a false economy to not get equipment like platforms and board lifters in as it will just cost me extra labour as the guys won't be able to work efficiently and possibly, not as well either. We had scaffold towers upstairs in the bedrooms for plastering and downstairs, we had a really big platform. I wouldn't do it any other way as the quality of the boarding and plastering is second to none. Once the studwork was boarded out, the inner ceiling section was plastered. The inner lip of the frame had an upstand added to it to make it appear more substantial and to hide the rows of LED lights behind them. We're going for a range of lighting intensity here, achieved by increasing amounts of lights, rather than dimmers. There will be 3 rows of LED lights hidden up there and we've used a car headlight analogy for want of better descriptions - the selection is dipped lights, main beam and rally lights. These are the only ceiling lights in this area as we plan to have floor lamps for specific task or reading lighting. Once the inner ceiling was plastered, the framework itself was done the following day. This photo is some way on from that, as you can see. By this stage, the whole of the downstairs main room has been done and recesses formed for the spotlights at the other end of the room. Not too long after this, the kitchen arrived from DIY Kitchens. Lovely quality units and everything is going together well. It did mean, though, that I had to get on with the painting up the kitchen end so that a start could be made on installation. A paragraph or two on painting is appropriate here. I put a brief post into the main decorating section here on BH regarding spray painting, but it deserves repetition. I've planned from the outset to do the painting myself. I'm competent and it's nice to get some hands on involvement in the build. But, and it really is a big one, there is a vast surface area to cover in this house, and the vaulted ceilings upstairs are really quite intimidating for a vertically challenged person such as myself. Mind you, I think a vault of 4.7m would make most people ponder their method of attack. I decided that by far the most effective approach for me was to spray the mist coats to seal the plaster and continue with white for the ceilings. I wasn't sure at that stage whether I would also apply the colour coats by spraying, so adopted a 'wait and see' approach. First off, masking takes ages, even with a relatively empty house, as that spray will get everywhere and anywhere. Once the masking is done and you've familiarised yourself with the sprayer itself, though, the speed of coverage is astonishing. I was able to comfortably do one large room per day - both mist coats and a couple of extra ones on the ceiling to get it opaque and full white. It was messy. Really messy! Especially as when I first got going I had the spray pressure a little too high, the mad angles of the vaulted ceilings meant that my nozzle was never going to be held at a constant 90 degrees to the surface, and it's just a messy process regardless. In addition, there is a vast amount of moisture in the air, particularly as we had plaster drying at the same time. I hired a commercial dehumidifier for a couple of weeks to help with this and it was very effective. I bought all my paint from Brewer's Decorator Centre, who are mainly based along the south coast of England. I opened a trade account with them and got 20% off the entirety of my first order, so I put everything I could think of onto that, including my antinox floor protection mats. Very useful they were, too. I used their contract matt white for the mist coat and ceilings. It's white, but not brilliant white and it's lovely. Very chalky, easy to sand and gives a nice highly matt finish. Also cheap as chips. Here's one of the bedrooms, masked up and sprayed. Here's another bedroom with that ceiling. My scaffold tower came into its own for reaching up to those heights. Then, finally, the kitchen area with its mist coat. The sprayer is the little beastie sitting on the plasterboard. I popped over on a weekend to also put the first colour coat on over at the kitchen area, whilst I could still get in easily before the kitchen started going in. I'm having splashbacks between the wall and base units, hence the odd looking finish level with the paint. These were all the kitchen units as they arrived, prior to painting. Everything was really well packaged and came with the doors on and drawers in. The delivery crew were pleasant and efficient, so all in all, a good experience. Moving away from painting and plastering, the ceiling plan for the lights was marked up on the floor, along with speakers and smoke detectors before the boards went on so that there was no guesswork involved in what was running where. Here's the marking plan: This is what the kitchen units look like at the moment. I made a cock up in ordering, purely out of ignorance, and I'm waiting for a few end deco panels to arrive. These didn't even occur to me as they will go between units and appliances to give a better appearance from face on. It made perfect sense when it was pointed out to me, so things have halted temporarily until those and my worktops arrive shortly. In the meantime, it's looking good: We also now have spotlights in place: Finally, for the curious, this is what karndean flooring looks like. It has been laid upstairs and the downstairs will be finished in a couple of weeks. Upstairs, it was all laid on ply that was feathered in at the edges and downstairs will have a latex feathering coat to level the floor and provide an even base. Next up is more of the same. The final session of boarding and plastering, lots more painting, the end of first fix and moving onto second fix. Outside, we need to get cracking on the rainwater goods, perimeter drain and exterior cladding. The cladding is due to arrive next week, so it will be interesting to see that and figure out the system. I hope to be able to report back on over height doors soon, as well, and my endeavours to find these at a reasonable price, but that's all for now. There's painting to be done.1 point
-
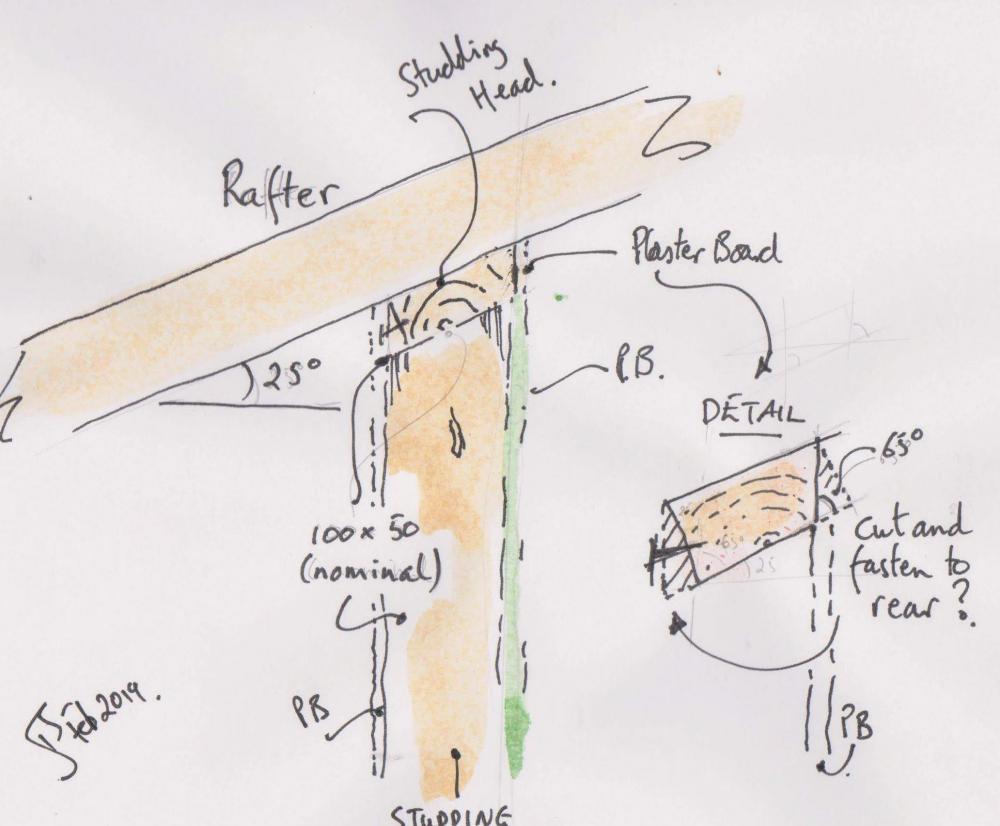
Well , it's not flat and level like normal ones . This one is at 25 degrees. What to do? Have a look... All 100 by 50, but set at 25 degrees. And so that means that the head needs to be chamfered otherwise it'll push the PB out of line ... So I chopped off a small triangle (see detail above) so the face was vertical. To make the back of the studding work for the PB on the other side, should I nail the off-cut to the back of the stud? Or doesn't it matter?
 1 point
 -
Stainless costs a small fortune that's before its worked on, unless you are a fabricator or have a very good friend who would do it for the love then not really a starter imho, (I am a fabricator BTW ?) fiberglass can be fun to work with.1 point
-
That fits exactly with the conversations I had with our DNO about the pole and cables crossing our plot. There was nothing recorded at the Land Registry and the DNO's view was that the original wayleave hadn't been carried over to either us, or the chap we bought the plot from (who wasn't even aware of the big underground cable crossing the plot).1 point
-
Bear With A Small Brain. Told ya di 'I ? .....1 point
-
For the cost - and if you have the space - I would put 6 panels on in 3x2. You can get a dual micro inverter that takes up to 600w, and that would give some baseline load for probably £2.5k all in. Offsetting the cost of the clays too will be significant.1 point
-
Possibly, but it wouldn't be as effective as toxins that specifically target plants, plus it would pose a risk to beneficial organisms in the underlying soil. Unfortunately, persistent weedkillers have all been found to be too harmful to the environment, and I'm not aware of any that can legally be used now.1 point
-
Before you go asking them to remove it I’d get your quote for a connection. We’ve had a lot of dealings last year with SP energy both with the supply to our new build which they wanted an arm and a leg for; there was a pole in our plot which they had no Wayleave for and from which they said we couldn’t get a supply as it was at capacity, they soon saw sense with their quote though when I told them I would be requesting it’s removal and we ended up paying a fifth of what they had originally quoted on the understanding we’d sign a wayleave for it. On the other hand we have two plots a mile up the road from us which we have been marketing and two prospective buyers weren’t happy with the fact that in the corner of one of the plots there were two poles with a transformer on them, I made enquiries about having them removed and was told I could request their removal but would be better getting a connection to the plots first as removing them to another location could make a connection afterwards more expensive if they had to move them further away, sounded reasonable to me however we accepted an offer on both plots from an individual who lived abroad and hadn’t physically seen the plots, whatever happened next I don’t know but somehow he then discovered the poles and asked for us to have them removed, I tried to explain that he would be better to get the connection first then ask for their removal but he then said he had contacted them and it was going to cost50k which he wanted us to pay, in other words he wanted two plots valued at 130k for 80k , when we refused he withdrew his offer. As a footnote to this we recently had cause to visit the plots with another prospective buyer and guess what! Where there had been two poles with a transformer there now was only one solitary pole with only wires coming from it, we don’t know when or how this happened but we’re quite happy with it!1 point
-
Ah right.. The total internal floor area of the house (every room, over all three floors = 388m2 So 388 x 0.3 = 116 l/s So having reworked the calculations to us 75mm pipe throughout and use more pipes to reduce the velocity, the total flow rate / hour= 75. If I understanding this correctly I need to extract an additional 41l/s to get the rate up to 116 l/s?1 point
-
I would call them again and ask them to come up with a plan that allows you to erect the house as approved in a compliant manner. Do you have an electricity connection yet? If not negotiate a reasonable cost for this as part of the deal if they want to leave the pole on your ground. I wouldn’t go in heavy handed at this stage and ask them to remove it completely but you have that in your back pocket if needs be. @vivienz was able to negotiate a similar thing I believe although her case was quite challenging. It generally pays to play nicely at the beginning but ultimately without a wayleave agreement you should have a lot of leverage.1 point
-
Having worked with a fabricator who's TIG work is sh!t hot for over 30 years I think I might! Mate's rates etc... Chequer plate might actually aid in masking any distortion. I'd fold on the 4 sides and only weld there. I'd bed it down on 5 Star grout maybe.1 point
-
If there is no wayleave, start by giving them notice to remove their equipment from your land. They will start negotiating. Is it possible to divert it to run along the boundary just by moving a pole or adding a pole? In SSE land, you are not allowed to build within 6 metres of an existing line.1 point
-
Sorry, I meant 30mm in the sense of Re, i.e. the thickness of the door being L. Should have written "thick" rather than "wide", but my brain was still in Re equation mode, and thinking of the view perpendicular to the direction of air flow.1 point
-
Not in building regs specifically, although they do give a total house ventilation rate, which is 0.3l/s per m² of floor area. IIRC, PHPP normally gives a ventilation rate that's around 0.3 air changes per hour, which is a bit lower than I found to be comfortable (we run ours at just over 0.4 ACH). I think if you aim to be able to run the background ventilation at around 0.4 ACH, with the capacity to be able to boost this to around 1 ACH or more, then you should be around the right ball park. It ends up being a matter of choosing an MVHR from any given range that's the best fit, anyway, and we ended up with a bit more ventilation capacity than needed just because the next model down was really a bit too small.1 point
-
To my mind, peak demand is early evening mostly. So when are they most likely to draw on your betteries? yes early evening. When are YOU most likely to draw on your batteries, well early evening or after dark. But if they have already been discharged, tough you will have to import and pay full price. I would only begin to consider such a scheme of they paid the full retail price for what they "bought" from you.1 point
-
As long as the supply and extract ducts are a reasonably long distance apart I doubt there is much real interaction. The air velocity coming from the terminal(s) is pretty low and will slow down a great deal within a couple of metres from the terminal, so for a room with a cross section of 3.2m x 2.5m, with a single supply terminal running at 8l/s then very roughly the flow velocity a couple of metres or more across the room will probably be down to around 0.001m/s or so. This is slower than sort of typical air movement velocities associated with micro convection within a body of air.1 point
-
It genius for this country but years behind the rest of the world you can buy them in oz pre made to set sizes and custom you fit them first and then board down over it you can also screed in it to create falls. They make them in fibreglass in oz to in oz when you build a new house there are a couple of things you are not allowed to diy, one of them is bathroom waterproofing has to be done by a licensed installation team. It’s normally a fibre reinforced liquid applied to the whole room perimeter.1 point
-
This is why I got fired from NASA. Apparently getting 'quite close' to Mars is not good enough...1 point
-
Reckon mine would be capable if being that bad, as my whole construction is wrong.1 point
-
No benefit of thermalite as they are designed for thermal performance. Mediums are cheap, easy to lay and quick. Make sure you ask them to point both sides too as nothing worse than a blockwork wall full of half filled perps1 point
-
I think it's 76mm2 so 10mm for a regular sized door, less for wider doors.1 point
-
Why would you use thermalite for anything other than external walls for insulation value? Medium density better for fixing to, sound absorption and fine to go off slab. I suppose they are lighter for the poor Brickie!1 point
-
Hello Everyone, This is my first post after lots of browsing & I would really appreciate your help. We have our final designs from our architect and are ready to submit for planning permission. However just before we click go I wanted to see if anyone would be kind enough to share their thoughts. Is there anything I’m missing, a room you wish you’d included in your own build or any learning tips? Just some background: our plot is a knock down rebuild and we are between two bungalows so are a little limited, however both neighbours are onboard with our outer designs. This does limit our overall height and upstairs space but I’m hoping we’ve maximized this to it's full potential. We have two younge boys (3yr & a 9mo) and family that live relatively far away so come to visit requently (hence the extra en-suite). The familyroom/dining room is c.11x5m.. our architect wanted to split this room & go down some small steps into the family room given the room is rather large, but we decided against this for safety reasons with our two children. However I am now concerned if the back of the house is ‘too open plan’ and if there is anything I need to consider? Maybe some interior design tips for this would also be amazing! Thank you so much in advance Floorplan.pdf1 point
-
We have that general arrangement and it's fine. The only minor issue is that it's a long way to the loo in the middle of the night, but that's not the end of the world.1 point
-
That’s the spirit1 point
-
No worries. If it helps all good. Velox does have a tendency to warp slightly in wet weather can become a bit banana shaped which makes alignment a bit harder. So the slower the build the more the difficulty. Don’t get me wrong. Warts and all overall all said and done I do like it and wouldn’t say don’t use it. also had a few boards split through the centre during pour but noticed them and managed to brace them in time. You learn as as you go along and will make mistakes... trouble and strife shared can make it a smoother process for others. gables are difficult though and really do need lots of bracing. I tended to brace using 4x4s every 2 meters and sometimes less.... you can also insert additional timbers between the WSD boards and the bracing screw lock the walls plumb..... takes some trial and error to get it right1 point
-
Out of a matter of interest, why did Building Control screw up? Whoever detailed, or possibly didn't, this aspect of the build screwed up - BC are only there to ensure they are happy with details and designs and that contractors build appropriately to those details and designs. Whoever was responsible for the structural design and detailing of this structural aspect, i.e. your architects SE, or independently appointed SE - remember architects just draw pretty pictures, engineers make buildings possible - or your architect forgot to bring this to the SE's attention.1 point
-
Having got all of the groundwork out of the way, it was time to build the timber frame. We were carrying out a stick build, ie: we purchased the i-beams and glulams and the carpenters cut and assembled everything onsite like a huge jigsaw puzzle. We had looked into using a timber frame manufacturer, but we had a good team of carpenters who had experience of stick building a frame, so it didn't seem to make any sense changing a proven formula. Initial jobs were to get the scaffold up and sole plate down. First i-beams were installed on 3rd Dec and by the end of the day, the main i-beams for both gables were up. The work is not helped by the weather which is cold and wet. You need to be pretty resilient to be work outdoors in this weather, nevertheless good progress is made and by 6th Dec the walls are up and parallam beams and ledgers have been fitted. Big day on Dec 10th as we finally manage to get the electricity switched on. No more generators which should make everyone's life a little easier on site. We now have water and electricity on site and only need to connect to the mains drains at some stage in the future. First floor joists together with the MVHR ducting that needs to pass through these joists is next to be installed and state of play on Dec 12th is as pictured below. The first floor is glued to the joists on December 14th. The view from the top of the scaffold isn't bad either. There is no way the big heavy glulam ridge beam is going to be manually handled up to the top of the roof, so on the 17th Dec a crane is hired to help out with this operation. It is the only time during the build that a crane is required. Everything else has been manually shifted into place. The i-beam roof rafters can now be put into place and on the last day before the teams Christmas break, most of the rafters are in place. Following a couple of weeks break for Christmas, the rafters are quickly finished off and by January 9th the skeleton of the house is in place. Over the next couple of weeks the house is clad with panelvent on the outside and smartply on the inside and then wrapped in membrane so that by the 22nd Jan, the house is looking like this.1 point
-
-- get sizing checked by independant heating engineer-if not right size it will not be as cheap to run as you think and what happens if it dies -who pays to replace it for the rest of the 7 years1 point
-
Leyland High Opacity brilliant white Matt for me every single day. Goes on to new plaster without the grief of watering down and messing around and covers like you'd never believe. 2 coats in the same day and you’d swear it has had 4. This is NOT a finish coat btw, but rather almost a filler primer paint which will need light sanding before applying a quality ( Johnston's etc ) colour / white finish coat. A product like 'Diamond Matt' from Dulux may suit you well for finish coat as its a scrubbable hard wearing top coat that can be cleaned rather than touched up1 point
-
Numpty question I'm sure but here goes: As I understand it a GSHP absorbs heat from the ground into the liquid within the "long" pipe run. The pipe has to be at a certain depth for the ground temperature to be stable. What I wonder is the ground temperature directly under say the 300mm EPS of a passive type house? It should be warmer at a shallower depth? This because of the insulation above trapping the heat. The progression of this thought process is would it be viable to include a ground loop under the footprint of a passive type house.1 point


.jpg.c21f3ac78c9b7efd90cbdcb312744dc5.thumb.jpg.7adcad4c0e384f5ecd7d56b0618df6e5.jpg)


