Jenki
-
Posts
830 -
Joined
-
Last visited
-
Days Won
7
Everything posted by Jenki
-
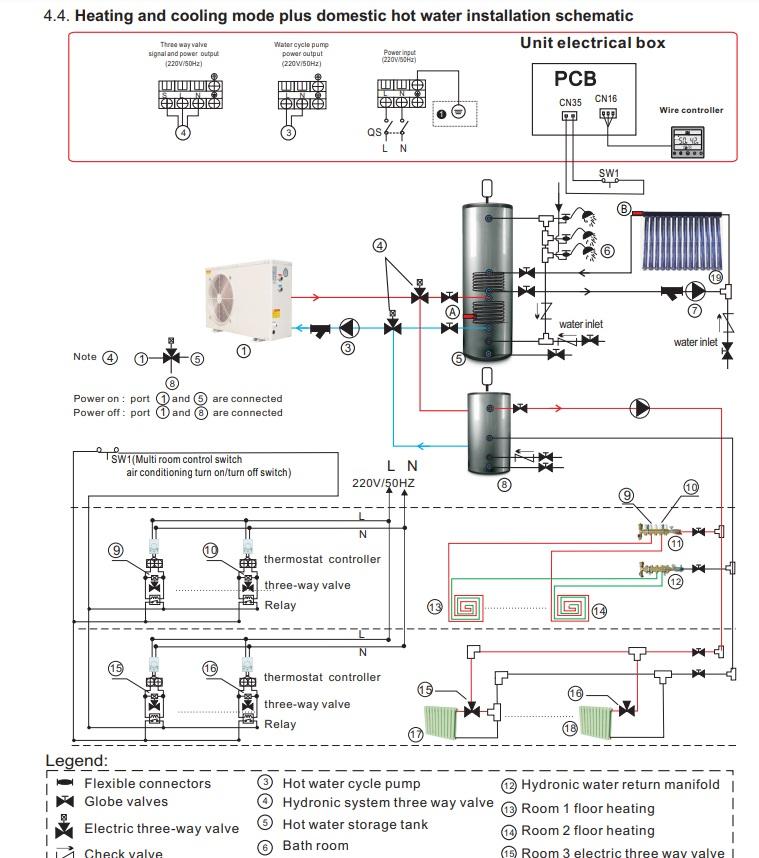
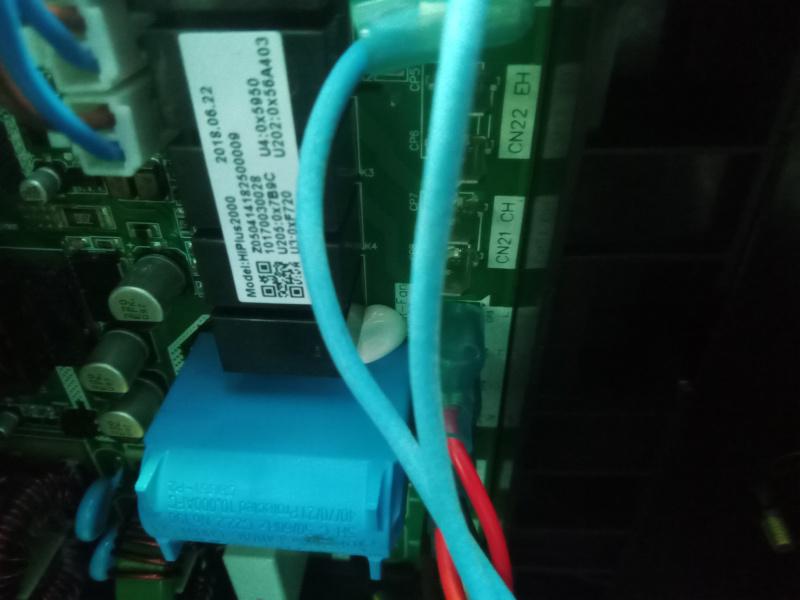
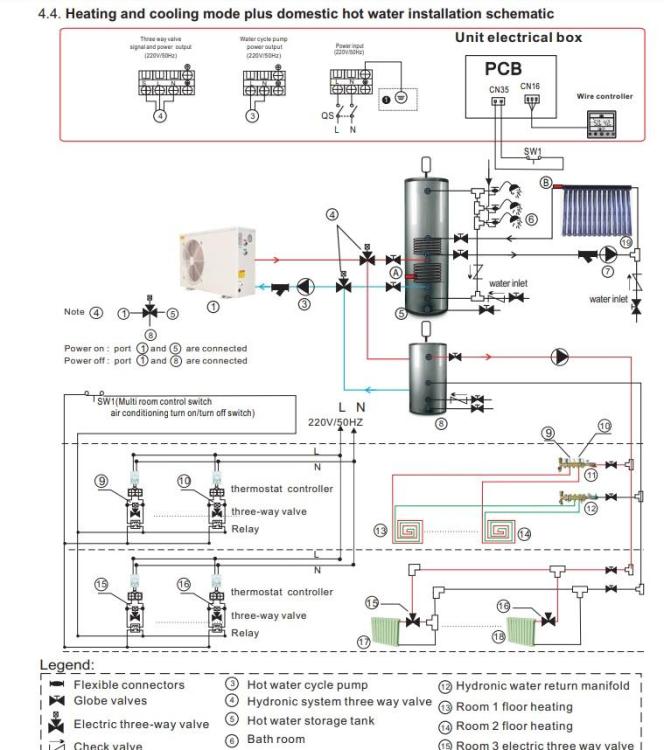
Here's the Manual. the PCB is difficult to photo as its upside down on the top of the unit. I took this one, but not much help. if you read the manual P12, the unit should operate controlling heat & DHW, it is not supposed to be a dumb unit. Its like the manual is for a enhanced unit possibly, but there is no mention of other models.. so if the controller does work in the way it says is will, then I assume it will give an error as there is no tank sensor, E20 Page 18 the wiring diagram on P20 seems to mirror what I have, the attached photo shows CN21 CN22 which are listed as blank, P1 &P2 wires trace to the PCB @ TH6 so possible should be a thermistor for the tank?
-
I was thinking this, but the controller is not dumb, it controls the temperatures, so I don't see how the two could work together. I don't want to wire / plumb it in to experiment, it should do what the manual says
-
Would a volumizer not help in this situation? It sounds to me like the water volume is not enough, and you are getting short cycling? - but what do I know, I can't get mine to work😥
-
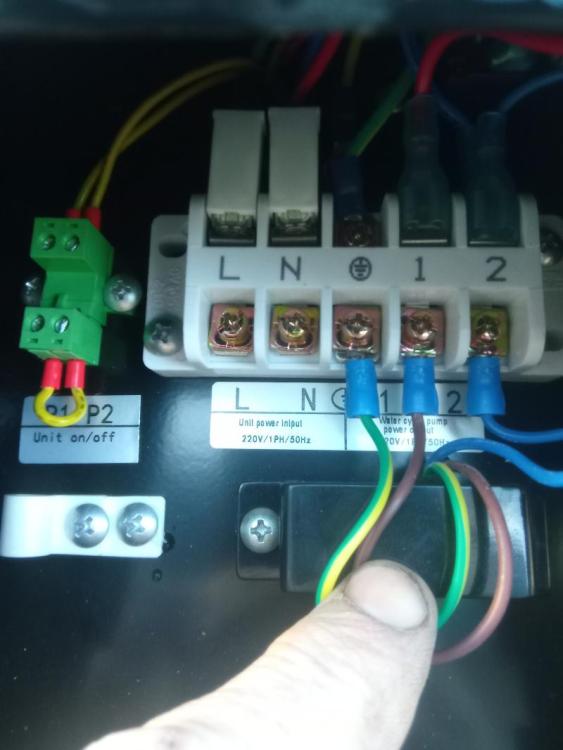
UPDATE: So I bit the bullet on one of these units chatted the to guy who owns the company and got a good deal, £1140 Inc vat delivered to the Highlands, The unit comes with a controller, that is pre wired to the PCB, 4 wires on a detachable lead. the instructions show the connections / setup I'm planning to use. My Setup is a pre plumbed cylinder with tank and buffer. I've connected the buffer on the return to the ASHP. so ASHP - to UFH manifold - TO Buffer - back to ASHP, just using the buffer for volume. The Manual is "Chineslish" so takes a bit of reading, but in general it seems to do as required. The controller can work in DHW and heat / cool mode. and this diagram suggest all is as it should be. There is a section in the manual that explains the importance of the tank probe (A) (I assumed this would be a thermistor) and how to fit, but doesn't mention how this connects to the ASHP. Fast forward to unboxing, the unit is well made, the casing etc isn't thin and flimsy. the powder coating looks decent and is inside as well. and it looks like it should do what it should do, so this is the good bit 🥲. There is the controller and wire, some feet. and that's it. no tank sensor.. Looking at the control panel this is what I get. L,N &E in, LN&E for pump output, but this is connected to the internal pump, so safe to assume this will be energised when the unit is running. there is not any control for AUX pump or 3 way valve as per manual. I ask the questions: 1, where / what type of probe do I need, and where does this connect 2, where do I connect the controls for the Valves as shown in fig4.4 above. After a week the response back from the supplier via the manufacturer is "You don't need a tank sensor, its controlled by the input temp / output temp of the unit." I counter with, The Controller has error codes (E20) and a display for the tank temperature (o1), also how do I control the valve? a bit more back and forth and they say the unit only does 1 temperature, and you can control valves with external relays etc...? now I'm thinking there is some mis-communication and language issues here, as the unit must work?. Eventually they tell me they will get a guy to call me, I think at this point they think this is me being numb, and not knowing what I'm doing. after a further two weeks, I speak with a guy, who does not work for them, and has not fitted them, but is a ASHP fitter of some 20 years, and ultimately comes to the same conclusion as me - it should have a tank probe, and there should be some way of communicating with the unit to differentiate between DHW and heating. Unless anyone here can see what I'm missing, and how to get this unit to work, it looks like I'm going to try and send it back... so now looking for an alternative. -- need to get some heat on the static is already Baltic.🥶
-
@Thorfun word of warning, don't look at the XL joinery book for doors, especially the coffee themed pre finish options. They look amazing but £££
-
Up very North, my options are limited, but there is a Howdens. For the Kitchen I planned ours using DIY kitchens, but they won't deliver here, I could collect from Yorkshire though. I got a price (no worktops ) around 4k. Went to Howdens 7.2k, I sent them details of the diy Kitchens, and in the super sale they price matched. But they have a leaflet on each competitor, and list the differences, reducing the offering to match quality.. one example being that DIY kitchens soft close option is an add on to the draw box, and clip on soft close for hinges. ( I'm told?). Bottom line, you need to haggle big time to get a decent price. We ended up paying 4k for the full kitchen, with an upgrade to the walk in larder. Our concession was the removal of the cutlery draw and bin which I'll get elsewhere. They were a ridiculous price.
-
all Q1I bought 12 acres and had a lot to do, trenches, materiels etc. So I bought a ford 550 backhoe loader with pallet forks. It's been fantastic although leaks oil and only starts with a sniff. But, and this is a big but, trenches are not easy, as you have to reposition a lot, and if your in a tight space i.e. working next to a fence then even more moving. There's times when a 360 would have been so much easier, but in general I'm happy I went this route. But it will be sold soon.
-

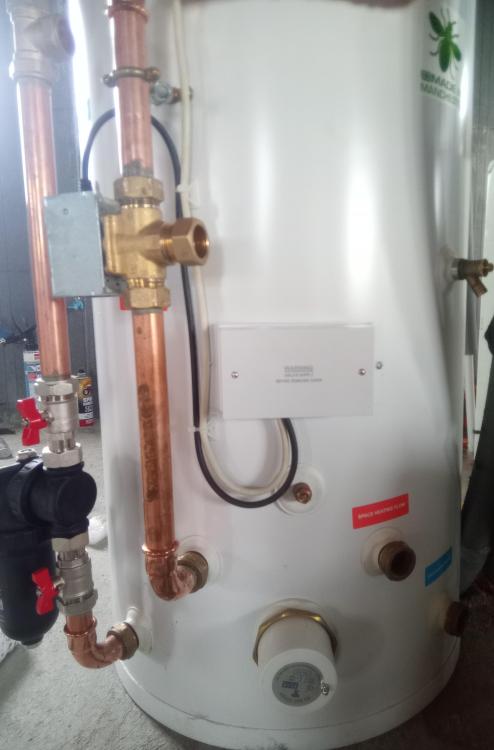
Position of UVC expansion vessel?
Jenki replied to lakelandfolk's topic in Boilers & Hot Water Tanks
That course was worth it's money👍. Nailed it. -
Picked the right weekend to put the gutters up...
Jenki replied to markocosic's topic in General Self Build & DIY Discussion
We had 36mm in 6 hours 2 days ago. I. It's self not massive, but we have about 5 acres drain towards our track. Our pond (part attenuation) rose about 400mm so around 3000l. -
Inflated costs. My 4kw PV, ASHP and cylinder, UFH will /is DIY install and it will cost less than £7k, but self build is horses for course's.👍
-
I was told we were eligible for the grant , but it needed to be MCS installed, which I declined.
-
150mm or 125mm concrete screed over insulation for ufh?
Jenki replied to JayDee's topic in Underfloor Heating
The fibres in our slab were approx 50mm x 2mm x 1 mm. @saveasteading the slab didn't have any large cracks👍, and the plastic rails/expansion joints seemed to work. I've not got around to "fettle" the edges yet. We are water tight now, so this will be a rainy day job. Just trying to get the larch cladding fitted before the weather really changes. ( it was 23deg two days ago, and 7deg @ 7 am this morning.( 8 in the static🥶) -
Recommendations for a lock box
Jenki replied to Adsibob's topic in Networks, AV, Security & Automation
I moved to the highlands, haven't got a key 😂 -
This feels like a good place to add to rather than a new topic. My pre plumbed tank with buffer is 4 port. My UFH loops have approx 30l water, then Around 8m flow and return 28mm pipe. So the buffer is required, plus it gives me an immersion for solar divert. If available / required. I'm thinking of re-piping and blanking two of the ports off and putting the buffer in the return leg to ASHP So my thinking is bottom of three way connected to UFH manifold. Blank this port off. The return from the manifold into the buffer (RH top port- red label). Blank off bottom RH port. Leave ASHP return as is. Any issues with this? However I like the idea of having an additional pump to circulate water in the UFH circuits to even the slab temp out with any solar gain etc. But this wouldn't be possible if I did the above🙈. Decisions, decisions P.s. the buffer is just 4 bosses, no additional dip tubes, baffles, pipes etc inside.
-
RAAC autoclaved concrete, what about mannock blocks?
Jenki replied to CalvinHobbes's topic in Brick & Block
Don't worry 😜 -
My G3 course was £300 in Inverness.
-
I did mine a few months back for the same reason. (Inverness ). You have to renew every 5 years.
-
It's a 3 Weetabix type of day
-
If your saying the fitting supplied won't go over the 102dia then I would buy a pan extension, but still fit the original pipe but cut it as far back as you can. I.e flush or indented into the wall. The supplied pipe will clip to the frame. Heights is just a simple question of working backwards. I find it easier to fit the waste pipe and flush pipe to the WC then sit the WC on the floor upside down, (WC lid on the floor.) Then measure the centres of the pipes from the floor. Then draw a line on the wall at the height of the WC seat..and use the measurements to mark the positions of pipe centres. Easy😉
-
Agree with @nod. At 120sq m it's not much bigger than my build. I had quotes for around 7k plus vat for an insulated raft add concrete and rebar and your well under 20k. Put your drawings out and get some quotes.
-
I'm in early stages of setting this up. I'm connecting to an ESP32 and going to log the data in Google sheets. My intention is to have data so I can understand the new house. Also the possibility of running the UFH pump if required. I'm no expert. The inbuilt WIFi connectivity of the ESP32 had benefits over Pi options for me.
- 1 reply
-
- 1
-

-
My budget couldn't live with the price of those, and that won the argument😂
- 4 comments
-
- 1
-
-
- the windy roost
- highlands
- (and 4 more)
-
Glad it wasn't just me then.
-
Sunday in the Highlands, and the weather has a feel of changing, we've been so fortunate on the build so far, day 105 today, but the last week or so has been wet, windy, sunny, overcast usually everyday. So autumn is on the way. July and August have been busy with the 2 cabins with around 100 nights occupied, that's over 250 people staying, and 30 +dogs 😂. The upshot being we can afford to eat, but the labour for the build has been affected with Mandy continually cleaning and washing. We've got a roof. Again the labour for all this is me and Mandy. The ICF allows the wall plates to be bolted to the core. Getting the trusses, 44kg, onto the roof was going to be by using a borrowed small loadall. We used this to take them off the truck and set them next to the house, but lifting them onto the walls was proving tricky with access and wind. So we resorted to leaning two lengths of 4x2 against the gable end , leaning 1 truss at a time against it and then sliding the truss up the 4x2 onto the wall plates. Then dragging them into place. We had a scaffold erected at 1 end of the house and used this to raise the first truss. Then it was repeat the process. Untill it was done. At either end of the house we used an additional truss to form a timber gable wall, this saved money on the ICF as we are having a cold loft. I drew the gable frame on CAD and created a cut list, then framed the gable out of 8x2 Insitu. I used 4x2 as a sub fascia to support the eaves trays, allowing the use of capit fascia boards keeping a keen eye on the budget🙈 I held off boarding as I had some labour debts to repay to the local farmer, and the wind was up and down. Once we had a clear window The roof and gables were boarded with OSB. At this time I also fitted membrane and battened / counter battened the gables. Black fascia boards, over fascia vents and eaves support trays were installed. The Highland vernacular is for small soffits / no soffit. So working back from the board on board cladding thickness and the battens I should end up with just the return on the fascia showing, about 30mm. I used some 4x1 as the sub soffit that will also act as a fire stop / smoke from entering the loft. Our location, and elevation suggests we can't use enough fixings for the tiles, we opted for Marley Edgemere thin leading edge tiles in anthracite. These were fixed at the eaves, every tile nailed and every tile clipped, more on this with the GSE trays. (Mandy back to real work🤣) I also taped the joints of the membrane with tyvek membrane double sided tape. We tiled the North elevation first as this was straightforward with only two roof vents (for MVHR) These were klober 25000mm2 universal vents as the Edgemere vents only ventilated to 10,000mm2. These are a good vent but it's a struggle with thin leading edge tiles to get them to sit flat. I ended up grinding a little of the back of the adjacent tiles and drilling an additional hole and nail to get them to sit as best as I could. There is a slight kick where the rubber flashing sits under the adjacent tiles but this doesn't affect the rows above, so decided I have to live with it. (Picture from a distance to stop you zooming the vents😂) The south elevation has 10 longi 405w PV panels, so I was using the GSE trays. Incidentally these trays and flashing were 50% more than the panels😔. GSE panels...... The instructions are very in-depth, but to be fair I just struggled with them. They suggest you don't need flashing for the top course as the tiles can sit over the trays, I doubt this works for any flat tiles / slates. Possible for pantiles if your lucky. A few on here @Dave Jones, and @dpmiller (I think) suggested this was the case, and I confirm you need the flashing kit, or use Flexi flashing, but IMO the detailing of the raised sections of the trays ( between panels) would be tricky and ugly. The thin leading edge tiles also caused slight kicking issues on the side flashing as well. So I had to be creative. (maybe this is standard for a proper roofer?) For the bottom flashing I used a 4x1 and timber wedges and used a replacement self adhesive flashing. Annoyingly the width of the trays with the raised section etc and the side flashings made the overall width 6.2M wide, so I had to order another length, and this was held up with Evri for 10days🥲. Fitting the extra battens for the clamps and tray support was painful for my brain, just too much timber. I ended up fitting a row of half trays at a time. Once the trays were fitted we tiled the RH side of the roof upto the GSE tray lateral flashing. This is where I needed to think out of the box, the tiles on there own kicked up into the air a looked terrible. I also had narrow tiles (120mm) cuts to allow for the half bond. These tiles needed the nib on the back of the tile grinding off which in turn meant they had nothing to hang on, and couldn't be nailed as they were on the flashing. So I used a hanging valley clip. To get these to sit flush I had to grind a little slot into the tile face, then to stop the tiles tipping into the flashing, and to give them a second fixing, I ground a groove in the rear of the tile, then once the next row was installed used a c clip to hold it all in place. Picture shows the valley clip and wire to hang the tile. Groove for C clip. C clip in place. This was repeated on all rows, so all tiles have at least two fixings. (Overkill?) The top flashing as I mentioned, had to be ordered and the corner flashings need modifying to ensure they sit flush over the PV panel. I installed two panels, then test fitted the flashing and corner flashing, which needed snipping with tin snips, then the overlapping cut edges pop riveted to reduce the height. This was sealed with lead mate. Once I fitted the flashings, I tiled the remaining roof and top rows. The flashing kit is expensive, but works and looks neat from the ground. Dry ridge installed,l and end caps finishing the roof. Then the panels, these were simple with 8 clamps per panel. Just the gutters to fit and scaffolding can come down. Some more EWI to fit then onto the windows and doors which are sat patiently waiting for us to pull our fingers out.
- 4 comments
-
- 3
-
-
- the windy roost
- highlands
- (and 4 more)
-
If it's going to be exposed I've used egger protect. And it was fantastic. You need to glue all edges, and use egger glue, it has some colour / additive in it, so if you need to claim against defects they can ensure you used the correct glue. It's more expensive but IMO a great product.