


Jenki
-
Posts
832 -
Joined
-
Last visited
-
Days Won
7
Everything posted by Jenki
-
Sunday in the Highlands, and the weather has a feel of changing, we've been so fortunate on the build so far, day 105 today, but the last week or so has been wet, windy, sunny, overcast usually everyday. So autumn is on the way. July and August have been busy with the 2 cabins with around 100 nights occupied, that's over 250 people staying, and 30 +dogs 😂. The upshot being we can afford to eat, but the labour for the build has been affected with Mandy continually cleaning and washing. We've got a roof. Again the labour for all this is me and Mandy. The ICF allows the wall plates to be bolted to the core. Getting the trusses, 44kg, onto the roof was going to be by using a borrowed small loadall. We used this to take them off the truck and set them next to the house, but lifting them onto the walls was proving tricky with access and wind. So we resorted to leaning two lengths of 4x2 against the gable end , leaning 1 truss at a time against it and then sliding the truss up the 4x2 onto the wall plates. Then dragging them into place. We had a scaffold erected at 1 end of the house and used this to raise the first truss. Then it was repeat the process. Untill it was done. At either end of the house we used an additional truss to form a timber gable wall, this saved money on the ICF as we are having a cold loft. I drew the gable frame on CAD and created a cut list, then framed the gable out of 8x2 Insitu. I used 4x2 as a sub fascia to support the eaves trays, allowing the use of capit fascia boards keeping a keen eye on the budget🙈 I held off boarding as I had some labour debts to repay to the local farmer, and the wind was up and down. Once we had a clear window The roof and gables were boarded with OSB. At this time I also fitted membrane and battened / counter battened the gables. Black fascia boards, over fascia vents and eaves support trays were installed. The Highland vernacular is for small soffits / no soffit. So working back from the board on board cladding thickness and the battens I should end up with just the return on the fascia showing, about 30mm. I used some 4x1 as the sub soffit that will also act as a fire stop / smoke from entering the loft. Our location, and elevation suggests we can't use enough fixings for the tiles, we opted for Marley Edgemere thin leading edge tiles in anthracite. These were fixed at the eaves, every tile nailed and every tile clipped, more on this with the GSE trays. (Mandy back to real work🤣) I also taped the joints of the membrane with tyvek membrane double sided tape. We tiled the North elevation first as this was straightforward with only two roof vents (for MVHR) These were klober 25000mm2 universal vents as the Edgemere vents only ventilated to 10,000mm2. These are a good vent but it's a struggle with thin leading edge tiles to get them to sit flat. I ended up grinding a little of the back of the adjacent tiles and drilling an additional hole and nail to get them to sit as best as I could. There is a slight kick where the rubber flashing sits under the adjacent tiles but this doesn't affect the rows above, so decided I have to live with it. (Picture from a distance to stop you zooming the vents😂) The south elevation has 10 longi 405w PV panels, so I was using the GSE trays. Incidentally these trays and flashing were 50% more than the panels😔. GSE panels...... The instructions are very in-depth, but to be fair I just struggled with them. They suggest you don't need flashing for the top course as the tiles can sit over the trays, I doubt this works for any flat tiles / slates. Possible for pantiles if your lucky. A few on here @Dave Jones, and @dpmiller (I think) suggested this was the case, and I confirm you need the flashing kit, or use Flexi flashing, but IMO the detailing of the raised sections of the trays ( between panels) would be tricky and ugly. The thin leading edge tiles also caused slight kicking issues on the side flashing as well. So I had to be creative. (maybe this is standard for a proper roofer?) For the bottom flashing I used a 4x1 and timber wedges and used a replacement self adhesive flashing. Annoyingly the width of the trays with the raised section etc and the side flashings made the overall width 6.2M wide, so I had to order another length, and this was held up with Evri for 10days🥲. Fitting the extra battens for the clamps and tray support was painful for my brain, just too much timber. I ended up fitting a row of half trays at a time. Once the trays were fitted we tiled the RH side of the roof upto the GSE tray lateral flashing. This is where I needed to think out of the box, the tiles on there own kicked up into the air a looked terrible. I also had narrow tiles (120mm) cuts to allow for the half bond. These tiles needed the nib on the back of the tile grinding off which in turn meant they had nothing to hang on, and couldn't be nailed as they were on the flashing. So I used a hanging valley clip. To get these to sit flush I had to grind a little slot into the tile face, then to stop the tiles tipping into the flashing, and to give them a second fixing, I ground a groove in the rear of the tile, then once the next row was installed used a c clip to hold it all in place. Picture shows the valley clip and wire to hang the tile. Groove for C clip. C clip in place. This was repeated on all rows, so all tiles have at least two fixings. (Overkill?) The top flashing as I mentioned, had to be ordered and the corner flashings need modifying to ensure they sit flush over the PV panel. I installed two panels, then test fitted the flashing and corner flashing, which needed snipping with tin snips, then the overlapping cut edges pop riveted to reduce the height. This was sealed with lead mate. Once I fitted the flashings, I tiled the remaining roof and top rows. The flashing kit is expensive, but works and looks neat from the ground. Dry ridge installed,l and end caps finishing the roof. Then the panels, these were simple with 8 clamps per panel. Just the gutters to fit and scaffolding can come down. Some more EWI to fit then onto the windows and doors which are sat patiently waiting for us to pull our fingers out.
- 4 comments
-
- 3
-

-
- the windy roost
- highlands
- (and 4 more)
-
If it's going to be exposed I've used egger protect. And it was fantastic. You need to glue all edges, and use egger glue, it has some colour / additive in it, so if you need to claim against defects they can ensure you used the correct glue. It's more expensive but IMO a great product.
-
I worked on a 80's architect design house several years back, warm air receivers in floors and walls etc. quite futuristic for the time, but the veneer ply walls did date quickly,😂. back to the topic this house had zero external pipes, the rain water came inside and into soil stacks, (A disaster in the waiting in my view) but this was how the soil was vented, via the running outlets, not sure this is acceptable, but it worked.
-
@MikeSharp01 Fantastic, got this working. Much appreciated A++
-
@MikeSharp01. Thanks for the effort👍. Got to do some real work for a day or two. Will report back when I get time to look at this.
-
Thanks @MikeSharp01. This is my problem. I'm sure it does, I just don't understand getting it to work for me, this is why I need to do some more learning rather than cut and paste. Any suggestions on books/ tutorials? Thanks again.
-
Thanks @MikeSharp01 here's the code that is sending info the the google sheet. its just sending the sensor number in the the array at the moment. (i) //Include required libraries //sensors #include <OneWire.h> #include <DallasTemperature.h> // Data wire is plugged TO GPIO 4 #define ONE_WIRE_BUS 4 // Setup a oneWire instance to communicate with any OneWire devices (not just Maxim/Dallas temperature ICs) OneWire oneWire(ONE_WIRE_BUS); // Pass our oneWire reference to Dallas Temperature. DallasTemperature sensors(&oneWire); // Number of temperature devices found int numberOfDevices; // We'll use this variable to store a found device address DeviceAddress tempDeviceAddress; // ======================= OneWire ds(4); //data wire connected to GPIO 4 // ============================= //wifi #include "WiFi.h" #include <HTTPClient.h> #include "time.h" const char* ntpServer = "pool.ntp.org"; const long gmtOffset_sec = 19800; const int daylightOffset_sec = 0; // WiFi credentials const char* ssid = "****"; // change SSID const char* password = "****"; // change password // Google script ID and required credentials String GOOGLE_SCRIPT_ID = "AKfycbyHfficNQ-jJUTHrwKSyQVmlix5tvJdSX6DPkW2nJr52NBWN9rCqp-m7dQYI9AteDO1"; // change Gscript ID int count = 0; char Sensor[16]; void setup() { Serial.begin(9600); // connect to WiFi Serial.println(); Serial.print("Connecting to wifi: "); Serial.println(ssid); Serial.flush(); WiFi.begin(ssid, password); while (WiFi.status() != WL_CONNECTED) { delay(500); Serial.print("."); } // Init and get the time configTime(gmtOffset_sec, daylightOffset_sec, ntpServer); if (WiFi.status() == WL_CONNECTED) { static bool flag = false; // get sensor info // Start up the library sensors.begin(); // Grab a count of devices on the wire numberOfDevices = sensors.getDeviceCount(); // +++++++++++++++++++++ // locate devices on the bus Serial.println("Locating devices..."); Serial.print("Found "); Serial.print(numberOfDevices, DEC); Serial.println(" devices."); Serial.println(""); Serial.println("Printing addresses..."); for (int i = 0; i < numberOfDevices; i++) { Serial.print("Sensor "); Serial.print(i+1); Serial.print(" : "); sensors.getAddress(tempDeviceAddress, i); // printAddress(tempDeviceAddress); } // locate devices on the bus Serial.print("Locating devices..."); Serial.print("Found "); Serial.print(numberOfDevices, DEC); Serial.println(" devices."); char sensorstr; // hold hexsensor name // Loop through each device, print out address // +++++++++++++++++++ I think this should fix, just dont understand the syntax.... //uint8_t i; //int addrv[8]; // sscanf(newAddy, "%x,%x,%x,%x,%x,%x,%x,%x", // &addrv[0], &addrv[1], &addrv[2], &addrv[3], // &addrv[4], &addrv[5], &addrv[6], &addrv[7]); // parse the 8 ascii hex bytes in 8 ints // for(i = 0; i< 8; i++) // { // device[i] = (__typeof__(device[0])) addrv[i]; //fill in device address bytes using a cast //} // +++++++++++++++++++ for(int i=0;i<numberOfDevices; i++){ // Search the wire for address if(sensors.getAddress(tempDeviceAddress, i)){ Serial.print("Found device "); Serial.print(i, DEC); Serial.print(" with address: "); // sensorstr = printAddress(tempDeviceAddress); Serial.println(); } else { Serial.print("Found ghost device at "); Serial.print(i, DEC); Serial.print(" but could not detect address. Check power and cabling"); } } sensors.requestTemperatures(); // Send the command to get temperatures // Loop through each device, print out temperature data for(int i=0;i<numberOfDevices; i++){ // Search the wire for address if(sensors.getAddress(tempDeviceAddress, i)){ float tempC = sensors.getTempC(tempDeviceAddress); // Output the device ID Serial.println(i,DEC); for (uint8_t i = 0; i < 8; i++) // this oprints the hex number to the serial for testing.... { //Serial.print("0x"); if (tempDeviceAddress[i] < 0x10) Serial.print("0"); Serial.print(tempDeviceAddress[i], HEX); // strcat(sensorstr, (tempDeviceAddress[i], HEX)); // Serial.println(">>"); Serial.print(sensorstr); Serial.println(""); Serial.println("<<"); } String urlFinal = "https://script.google.com/macros/s/"+GOOGLE_SCRIPT_ID+"/exec?"+"logger="+(i)+"&sensor="+tempC; Serial.print("POST data to spreadsheet:"); Serial.println(urlFinal); HTTPClient http; http.begin(urlFinal.c_str()); http.setFollowRedirects(HTTPC_STRICT_FOLLOW_REDIRECTS); int httpCode = http.GET(); Serial.print("HTTP Status Code: "); Serial.println(httpCode); //--------------------------------------------------------------------- //getting response from google sheet String payload; // if (httpCode > 0) { // payload = http.getString(); // Serial.println("Payload: "+payload); // } //--------------------------------------------------------------------- http.end(); } } } }
-
So initially I had to install some sensors (time constraints) without getting the address. So I've worked these to a central point, I've used two sensors on each wire for the same location(redundancy). So I firstly want to read each wire and get the two addresses. I can do this on a bread board in the static caravan we are living, but need to do it remotely and the ESP32 WiFi is easy to set up. So I don't have a problem getting readings from the sensors, and even get the address (Hex) to print to the serial monitor. But struggling to get this into the Http string. .....exec?sensor=28C6DE49F6B63C55.
-
Can anyone point me to some useful online guides? I've done some python programming, and messing around with arduino and an ESP32. I've got plans for many little projects measuring temperatures etc and hopefully a solar diverter. Currently cutting and pasting snippets of code to try to get readings from DS18B20. Which I can do, but struggling with the best way to get the hex address in a format where I can send this to an External log. I think SScanf is the solution, but just don't seem to be able to get my head around using it 🙈. My first project is to read my sensors and get the hex address (1 at a time) and want to do this remotely. So I've got the ESP to connect to WiFi, and send data to a Google sheets via http. ( not tested this not connected to my pc- but it is passing temperatures) I'm struggling to the address into a format I can add to the http string. Which leads me to think I need some more background understanding than just cut, paste, compile try to fix errors, and find it doesn't work. So delete that and copy something else. Where should I look? Or are there any good books recommendations? TIA
-
Not yet. My workload is directed at the roof/ gables. I'll get there, but not yet. I've also had to do a bit of paid work🤣
-
It was a Radon barrier. I put it under the strip footing then up and over the a pre hardcore base then drainage and services in a layer of hardcore then insulation. This way I didn't need to seal all the service penetrations for the Radon barrier.
-

When do G3 regulations apply? Buffer tanks?
Jenki replied to OldSpot's topic in Boilers & Hot Water Tanks
@JamesPa, like I said no expert. But the discharge. You need to follow the rules resizing if D1&D2, and distances etc. But if the tun dish is visible then the discharge can go into a stack and not be visible from my very pointed questions during doing my G3. Wouldn't like to comment on your idea. The regs are old and pretty black and white, doesn't seem room for new inventions. -
When do G3 regulations apply? Buffer tanks?
Jenki replied to OldSpot's topic in Boilers & Hot Water Tanks
For me, I did my G3, so I can self install, cheaper than some quotes to sign off.(so no expert) but I would say if the buffer is pressurised, and has an external heat source and or immersion heater, and over I think 15 litres it needs G3. -
No, we've had a grant to improve fencing, but be aware, there is a lot of croft land for sale, that is still controlled by the commission, so you need to 'work' the land. But they are not a full crofts, and thus grants are not available. A full croft needs to be 4.5 ha around 12acres. Anything less it's not classed as a full croft.
-
I looked at every plot of land on the East coast in Caithness, so will probably have seen it, Occumster is small..... biggest issue with all the plots we saw were lack of nearby power, thus restrictive grid connection options. lots of cables, but several plots we were quoted circa 30K for connections
-
HI, Check out some of my blogs #thewindyroost. your journey sounds uncannily similar to mine which we physically started 14 months ago. although we only came from England to Caithness. Stunning part of the world... As @Kelvin says there are lots of cabins / pods /B&B's / campsites etc this is our first year, and its been relatively good so far, July, Aug, Sept are busy then it tapers off. Where in Caithness? EDIT: Sheep - their sole purpose in life is to try to kill themselves - there is no way I'm having sheep on my land... We have 20 Muscovy ducks - started with 6, 8 months ago, and 5 call ducks, 4 chickens
-
I can't comment about the water temp, but our polycarbonate tunnel throughout winter in the North was warmer than ambient temperature. I'll measure it this year, but we had strawberries in April with snow on the ground outside🤷
-
these get mad hot in summer, stay warm in winter. and any length you want. might get you around any planning issues as well
-
Does this quote look OK for a 3 bed mid terrace roof please?
Jenki replied to thnj's topic in Roofing, Tiling & Slating
No idea, as no dimensions, it's a mid terrace so don't know what verge you need?. -
Looking at the state of the tiles, they are crumbling. In my view, this roof and especially the tiles are end of life. No fixing is an option. It's strip , evaluate what if anything can be salvaged and re new.
-
No Solutions - just a few questions. How does the solid brick wall breathe ? The mains wiring is questionable. you will NEED to run vertically as well.
-
Cement tiles look a bit disappointing - what do
Jenki replied to puntloos's topic in Roofing, Tiling & Slating
that photo was similar to lots of my tiles, I was not worried about that. We had a good downpour yesterday / night, and I can report the roof looks so much better and cleaner, its still wet as I speak, so no photo, but if it dries today I'll take a photo. This is definitely one of those areas on a build where you worry, and obsess about the task in hand and minute detail, but another issue will soon be along to take your attention and the roof will normalise and be a non issue. I was interested in the Fortecrete tile, but they just don't supply them this far North. I emailed them and they just said no.😂 -
Cement tiles look a bit disappointing - what do
Jenki replied to puntloos's topic in Roofing, Tiling & Slating
that photo was similar to lots of my tiles, I was not worried about that. We had a good downpour yesterday / night, and I can report the roof looks so much better and cleaner, its still wet as I speak, so no photo, but if it dries today I'll take a photo. This is definitely one of those areas on a build where you worry, and obsess about the task in hand and minute detail, but another issue will soon be along to take your attention and the roof will normalise and be a non issue. -
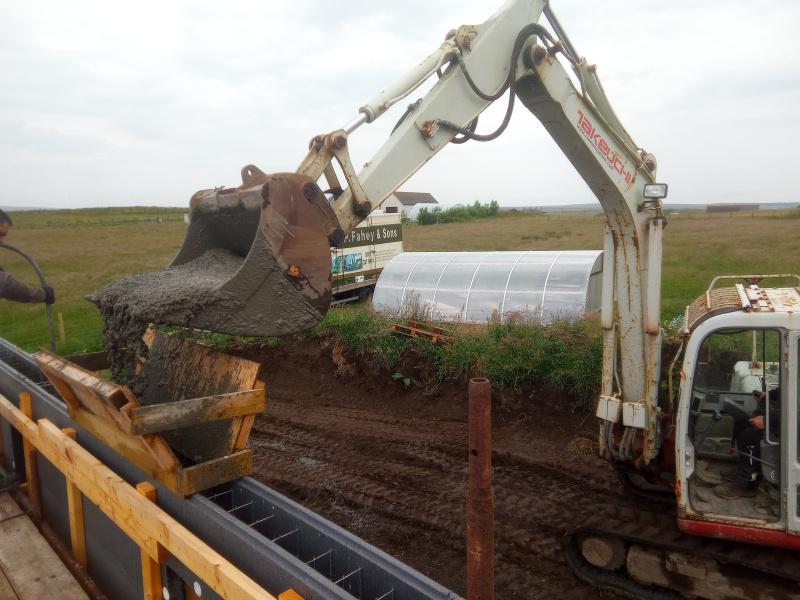
Slightly different than a hopper, but this was our ICF build.
-
Cement tiles look a bit disappointing - what do
Jenki replied to puntloos's topic in Roofing, Tiling & Slating
Your second picture is like water marks, the third picture is more like scratching, I'm just tiling my roof with Marley Edgemere, and have lots of tiles like the third picture, I think I'd have discarded the tiles in the second pic. The scratches will disappear after rain / sun. It does wind me up, you get a pack of 240 tiles, and 20 are broke, chipped and all you get is yes that's wastage🤬 no it's £25 of sh*te I shouldn't have to pay for.