Search the Community
Showing results for tags 'ufh'.
-
New build originally designed around a gas boiler and UFH, flow temp are low as could be, due to 300mm pipe centres. So previous setup was, gas boiler, big buffer, mixer and pump on the manifold. The flow temp out the buffer was consistent, but filled based WC (Weather Compensation) curve. Flow temps varied between 26 and 34 degs (at -9 OAT). The heat pump is installed without a buffer, all UFH loops open, with no actuators, mixer or pump on the manifold, so as simple as it gets. Have a single thermostat, just to give a start permissive for the heating. Couple of observation 1. The min heating temperature of the heat pump is 25 degs, dT is 5.4 degs, so a return temp would be 21.5. 2. After one heat cycle at a low flow temp (26 degs), the floor doesn't cool down enough to allow to ASHP to start up again. So heat pump would not restart. That didn't work 3. At low loads heat pumps cycle, I typically have a 10 to 20 minutes run time and 45 minutes off. The recirculation pumps continues running at all times. If the heating load decreases (OAT, solar gain etc), the heat isn't transferred out the flow as quickly, so the off period of the ASHP increases. 4. To compensate for the on/off run nature of the ASHP, and to get the required heat into the floor, you need to flow at higher temperatures at low loads, than you would expect. 5. So to make up for the on/off nature I increased the flow temp to 29. The flow temp pattern through the floor is typically (8 deg day), heat pump ramps up to set temperature and when it cannot modulate to control dT the heat pump shuts down. The flow temp and return temperature stabilise down to about 24 and flow will slowly cool over over the next 40 minutes, down to about 23 and the heat pump starts. 6. Very small increments in flow temp have an impact on house temp, less than 0.5 degs change in target temp, can be felt in the house. 7. Been tracking the temp on a Shelly H&T today, temperature drift in the house is around 0.2 degs. Have tested the 3 basic modes of operation so far, operation controlled by thermostat, batch charging overnight on cheap rate, and continuous running 24/7 on straight weather compensation. So far leaving it to run all the time seems the cheapest to run and easiest to implement. Have a simple Shelly H&T set up in the hall, to record how temperature moves over time and OAT changes, this will allow fine tuning of the WC curve.
-
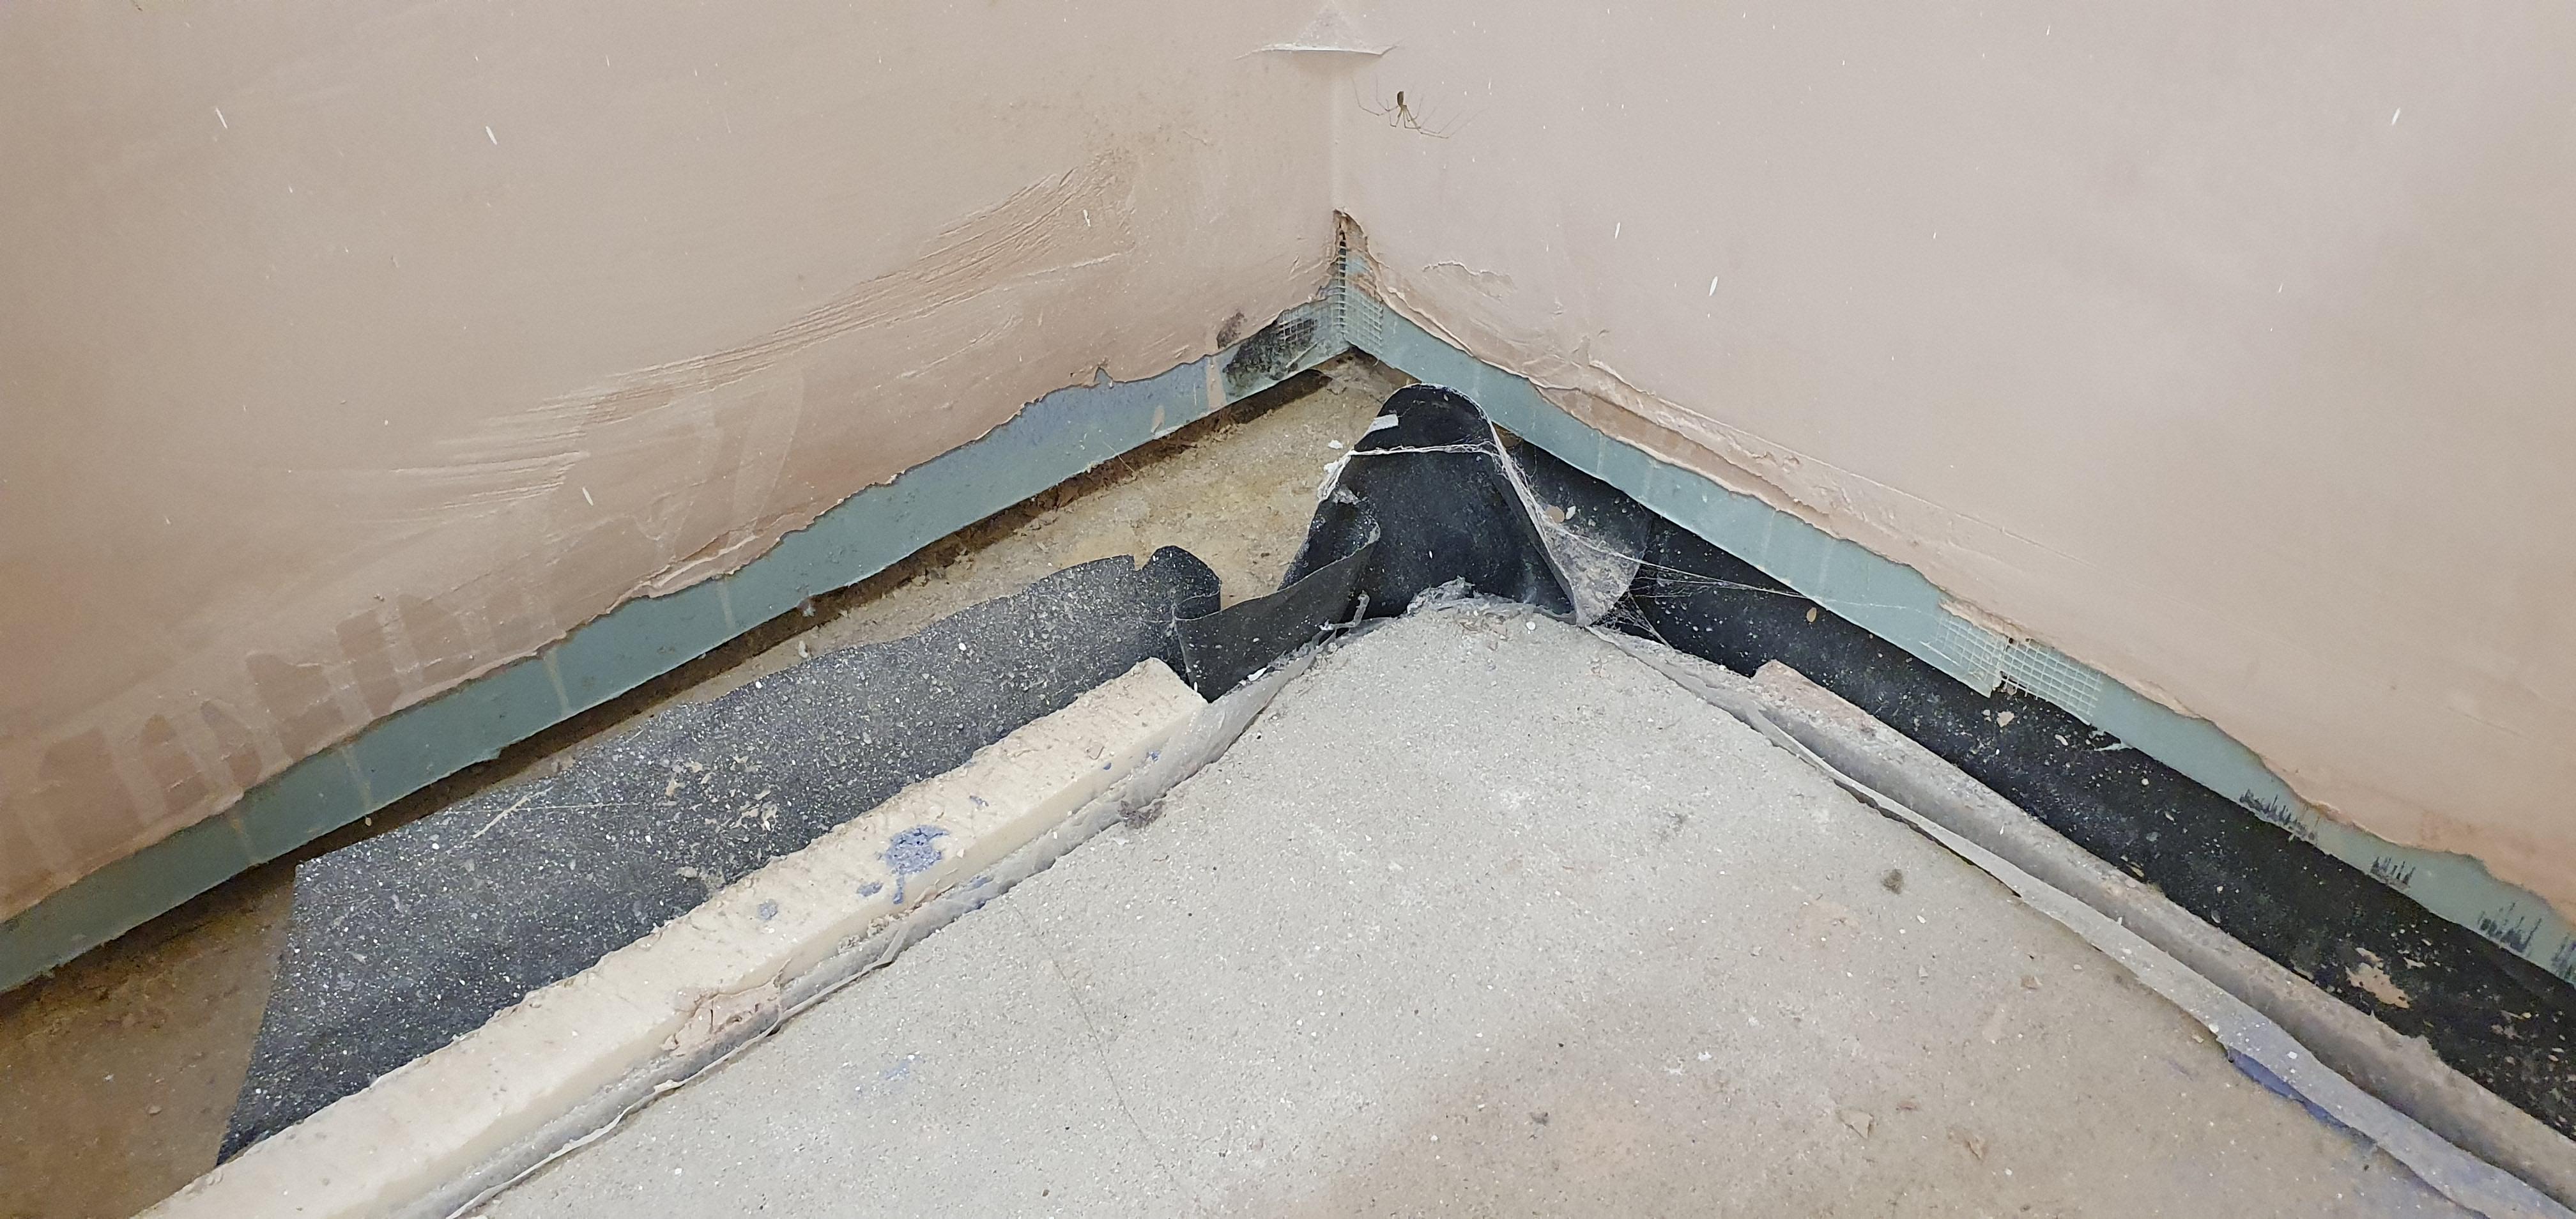
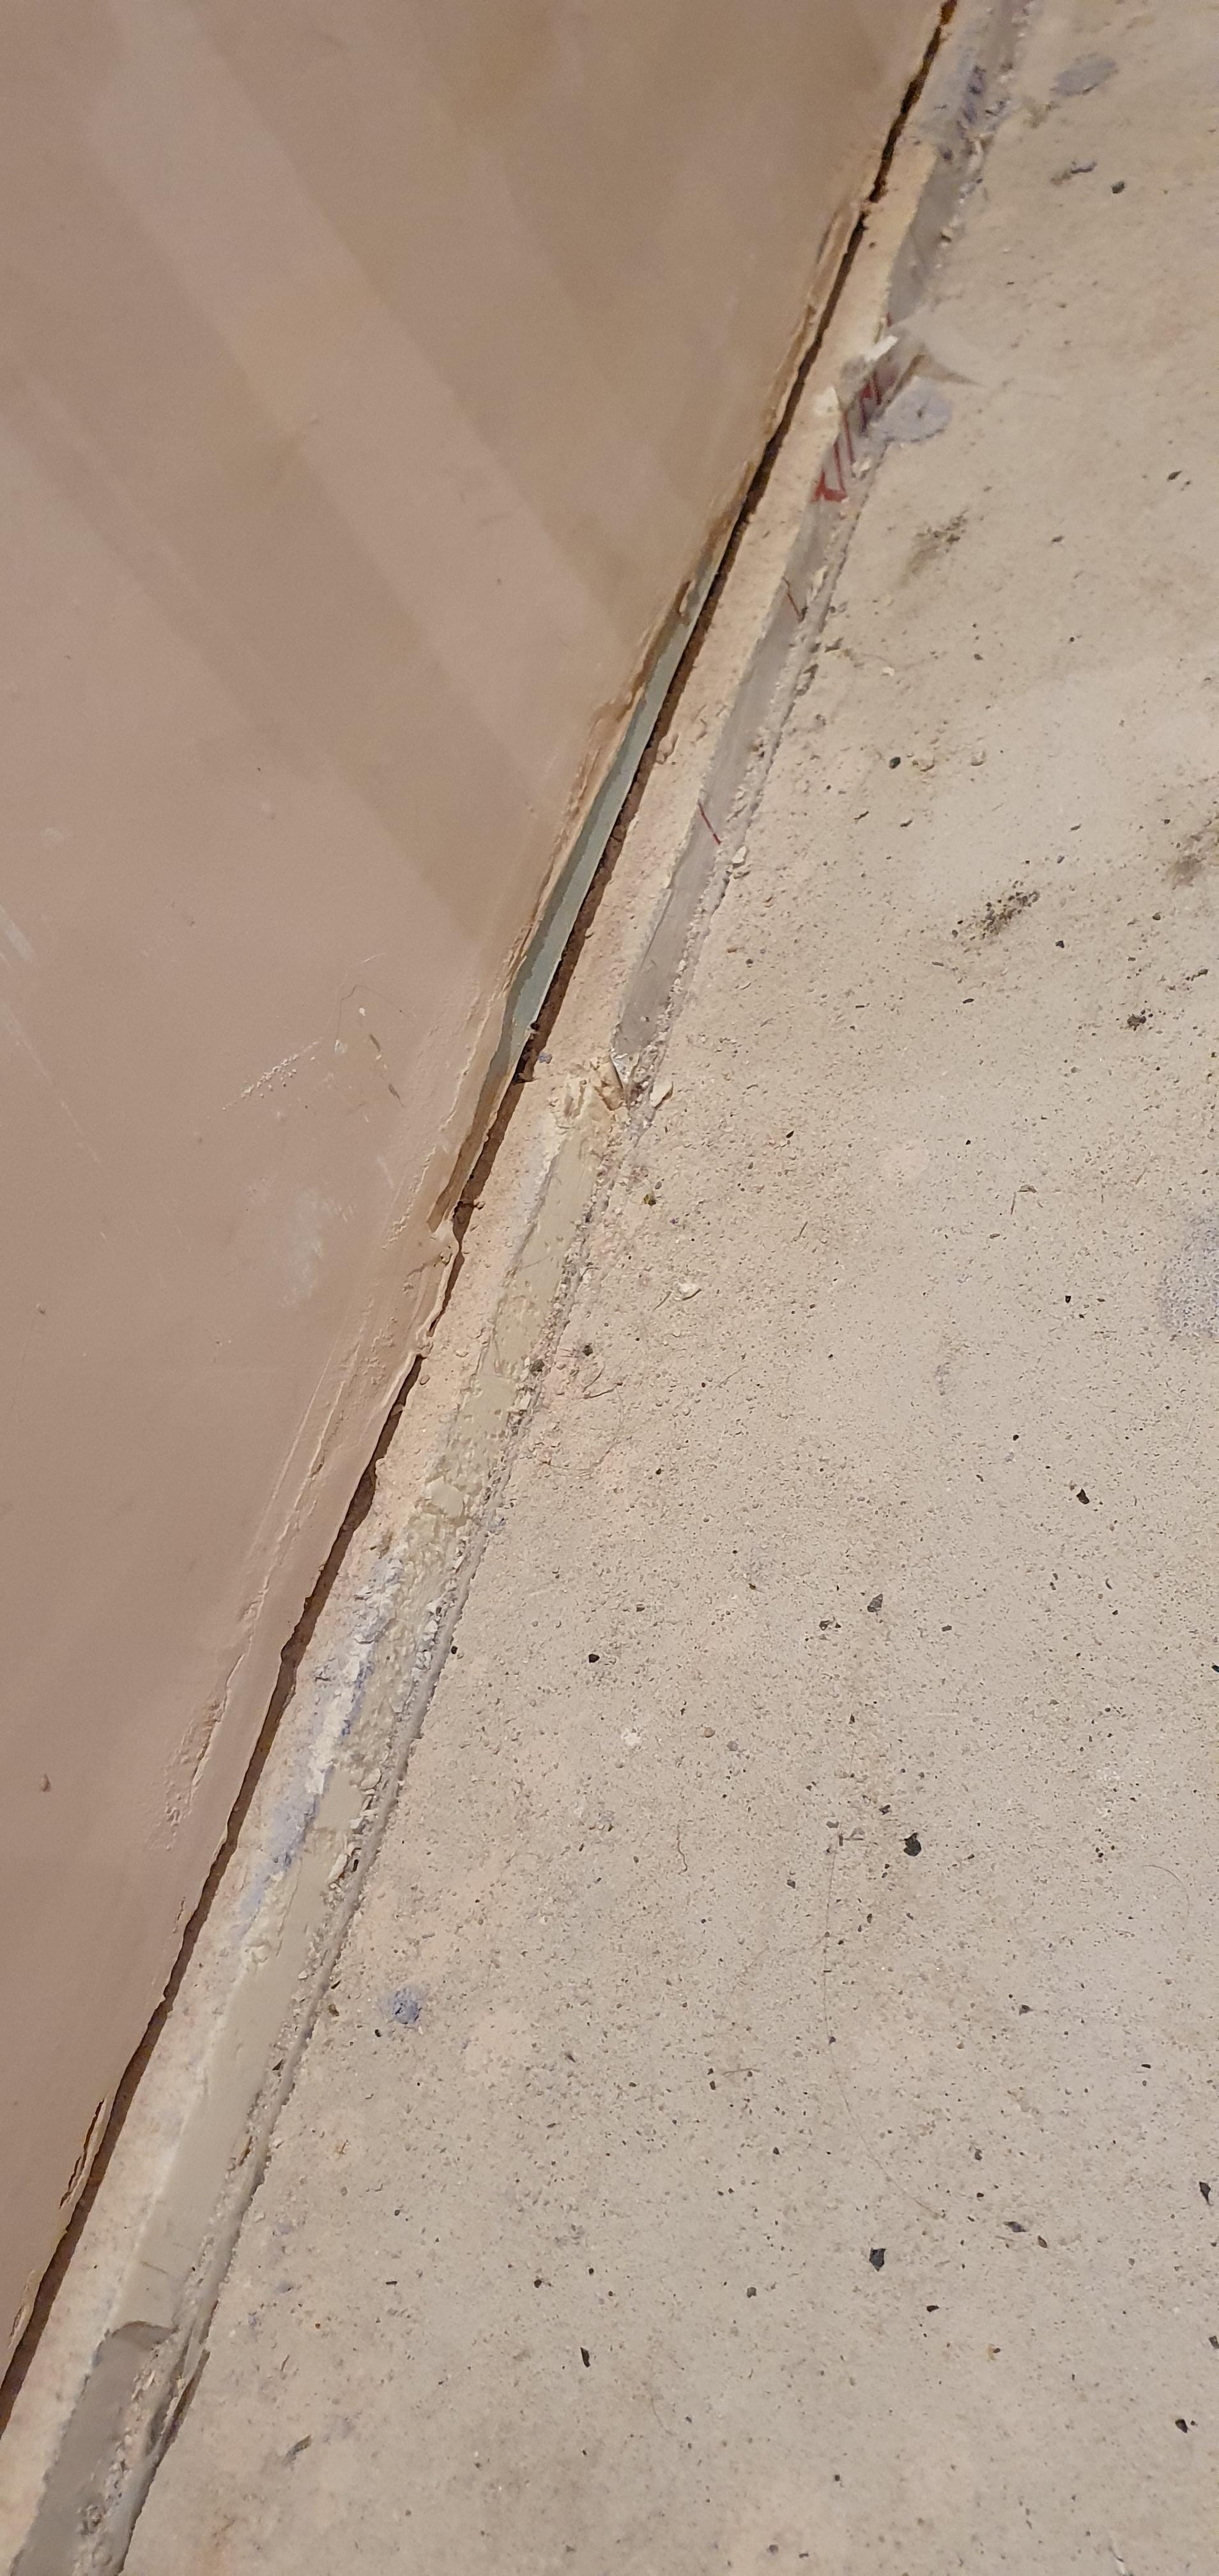
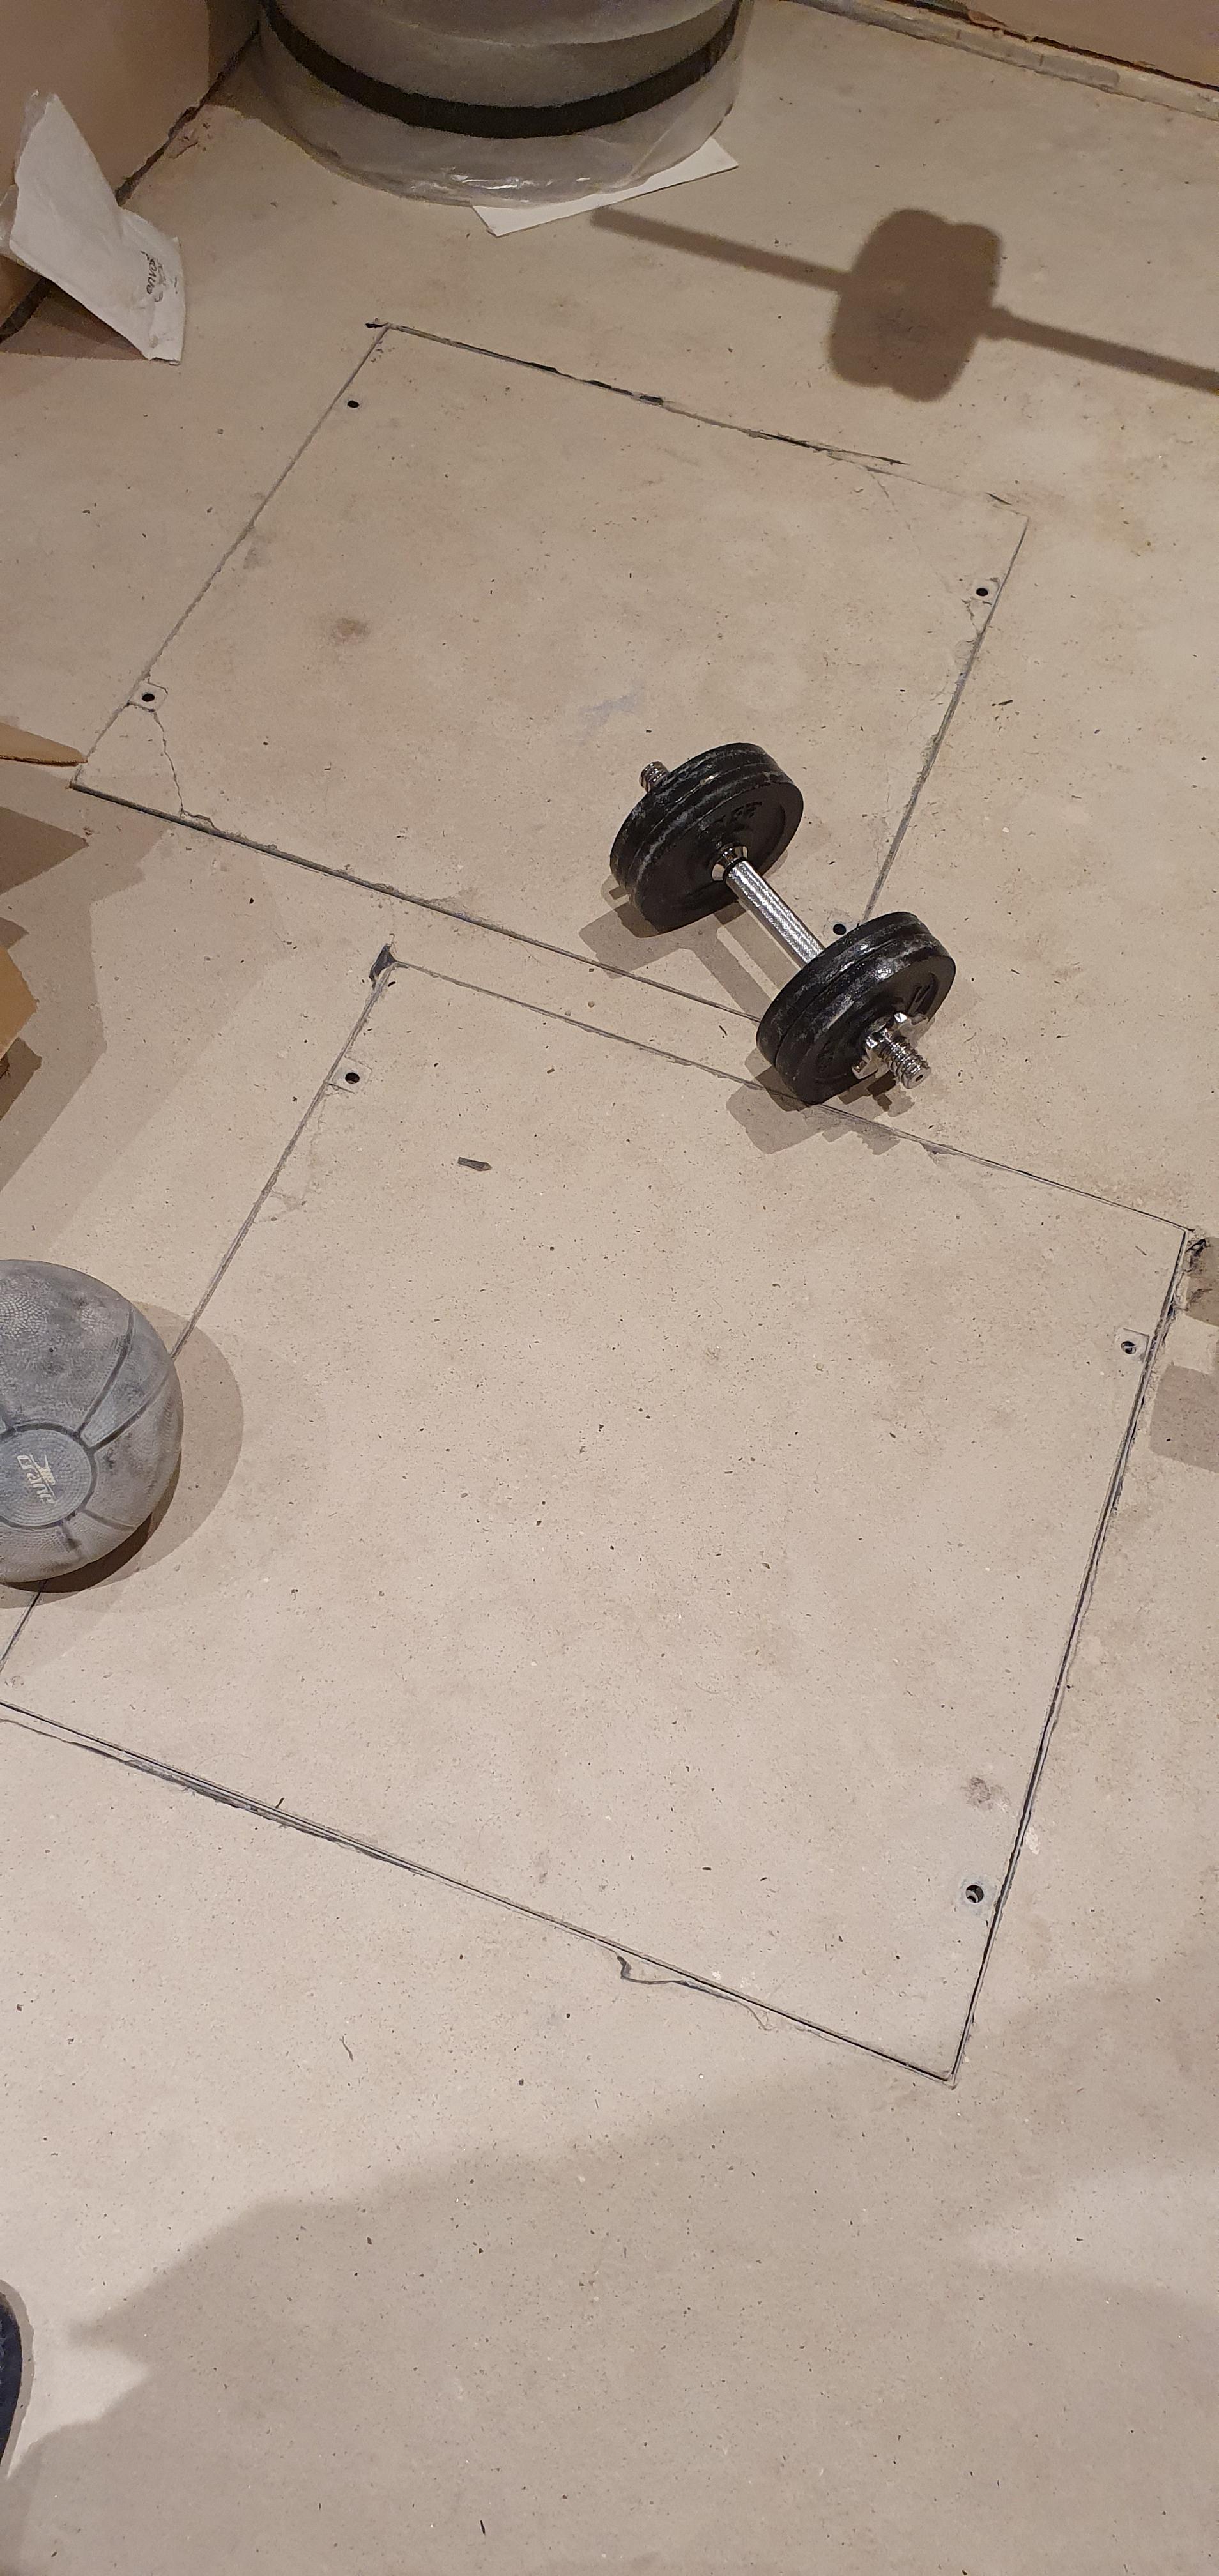
Hi all, we moved into our self build with the basement still not complete and would like to finish it off. As cash is tight, I'm planning to do the work myself, so ideally would be looking at a solution that is possible for the experienced DIYer. The floors are currently rough screed over UFH and I need to decide how to complete the floor, ideally, before taking the project further. The rooms are: 1. A fitness studio. Ideally this would be a spring wood floor but I don't think this would work well with the UFH. My initial thought would be to pour an initial self leveling latex screed and then finish with either laminate or karndean, if funds and experience allow. 2. A den/cinema room. This is also rough screened with the added complexity that there are two large manholes in the room for the basement sump pumps. So I would have to create an access hatch for these,i guess. Again, I think that a laminate initially would privacy be easiest and cheapest here, but open to suggestions. You might see from the photos that the screed doesn't come up to the wall in many places but to insulation boards, and I'm not sure quite how to deal with these. Should the insulation be cut back level with the existing screed, or should I foam any gaps and bring the screed up to the level of the foam? One particular corner has an elevated concrete block, which is a bit of a pain Ideally I'd have a completely level floor for whatever surface goes on to of it. I'd love to hear any suggestions or experiences with something similar. I'm lacking in experience and confidence and don't really want to make an expensive blunder. Many thanks!!


-
Hi My first post here - was pointed in this direction by a friend of mine. After months of research (feels like months) I think I have come to a conclusion on which UFH system and I just needed some support on ensuring I had made a right decision (otherwise my wife and kids will kill me in the middle of winter). Background I am doing a renovation project of the ground floor of my house - 95m2. It is a 1930s semi - whole place is being gutted and an extension going in. The current flooring is timber joists and in a bad condition and has no insulation. So first job will be to rip up the flooring and add 100mm of Kingspan or Celotex in between the joists. Now the complexity of which UFH system to go for. I have boiled down to 2 options: Option1: TorFloor by Omnie - I can use these boards as the structural floor, I am hoping a competent plumber can install this and I can get a 9mm plyboard on top and finish the floor with LVT like Karndean. The height build up is 35mm (22m board, 9mm ply, 4mm Karndean). So the build up is pretty similar to what I have with the existing boards and underlay and carpet Option2: Install a pannelling and screed system (like Nuheat or Profix). With this system I would put some 6mm T&G plywood over the top of the joists, put down the castellanated panels, pipes would go in and screed on top. As I cant put Karndean straight on top of the screed, i would need to finish with 6mm ply and Karndean finish on top. So the build up is 80-85mm (6mm ply, 15-20mm panels depending on system, 50mm screed, 6mm ply, 4mm karndean). It is not clear how much screed I need as some systems are different. I am hoping I have described the above scenarios correctly - I am not a seasoned DIYer so all the research has been mind blowing !!!. In conclusion I am tending to go for the Omnie Torfloor system - number of reasons - floor build up is lower and its £3k cheaper. However what I dont know is the output and difference between a screed system and an overlay system. Any opinions on my conclusions?? Please tell me if I have got this one wrong !! Ideally I need a fairly quick heat up and a fairly good output - kids and mrs moan in the middle of summer of how cold it is !!! Thanks for reading
-
Hi we have a suspended floor. We used Omnie tor2 ufh floorboards with 6mm ply. The tiler used a crack mat and then we had 120cmx60cm porcelain tiles put down. The tiles keep cracking and the tiler said there is too much bounce in the floor. Any ideas how we can fix this bearing in mind we have ufh and although the ply had a pattern on showing where was safe to screw this has now been covered by the crack mat screed. Please help.
-
There are some truly sophisticated UFH setups described here in this community. However, I have taken on board the wisdom of those who say that a passiv style house does not need such wizardry. My thermal blanket is a minimum 250mm on floor, walls and roof and I am tying the UFH pipes to the nominal 6mm mesh in the non-structural 175mm concrete slab. UFH is only on the ground floor and towel rails/shower mats will be electric-heated. (I've gratefully borrowed lots of your implementations!). As Wunda have got multiple thumbs up from you, I asked them to quote for the simplest solution (no actuators) of 1 zone and 5 loops of around 60m each. This is their quote: 1x 6 port manifold - £134.95+vat 1x Wilo pump station - £179.00 1x Isolation valves - £10.00+vat 3x 100m 16mm pert al pert pipe - £177.00+vat 1x Standard hardwire thermostat - £25.00+vat 1x Floor probe - £5.00+vat 1x Pallet Delivery - £30.00+vat Total including vat = £673.14 I'm very pleased with both the price and the speed of their response. I'll fit the kit myself and ask my electrician to wire it in. I'm just wondering if you can see if any bits are missing off the list.
-
Often thought about UFH control. Most systems are controlled on flow temp via a mixing valve, and with with room thermostat(s). Most use a mechanic mixer, some use an electronic mixer. With an electronic mixer, there is normally a temperature of probe on the supply pipe - but could you just look at water return temperature and then modulate the flow into the system via the mixer. So run a set return temp and modulate the flow temp going in. My thoughts are, it may give faster warm up times. It may automatically compensates for how much heat given off by the floor; flow/return dT changes, as floor to room dT changes, shows up in the return temperature moving up or down, so could you have more stable temps? Anyone any thoughts?
-
 Hi All, We are embarking on a self-build and the ASHP was installed yesterday and we are awaiting the commissioning engineer tomorrow to turn on and start heating. I was a little alarmed by the our ASHP supplier planning to just operate the ASHP at its standard operation rather then operating a thermal cycle. From what I have read on line this is important for the concrete screed performance and any floor finishes installed later. I spoke with our tile installer and tile adhesive supplier and they have recommended the following regime which is more or less a 14 day cycle that involves, 5 days of gradual heat increase (2-3C per day) , maintain at expected operating temp for a further 4 days, before a 5 day gradual decrease in temperature. My question is with regard to the expected operating temperature, which I presume is the outflow temperature of the ASHP (45 degree), that the underfloor heating pipework's will be supplying to the screed for these 4 days. My understanding is that the thermostats will be overridden temporarily for the commissioning and the slab will be consistently heated with this 45 degree water - am I correct? If this is so then theoretically will the house be extremely warm for a few days as the slab should come close to the 45 degree temperature?
 -
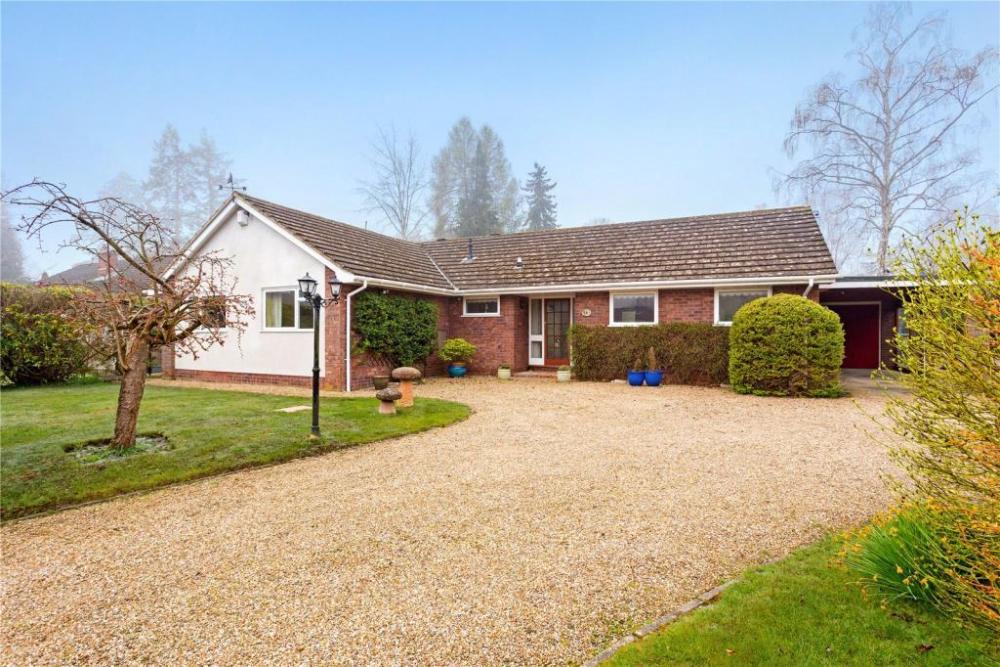
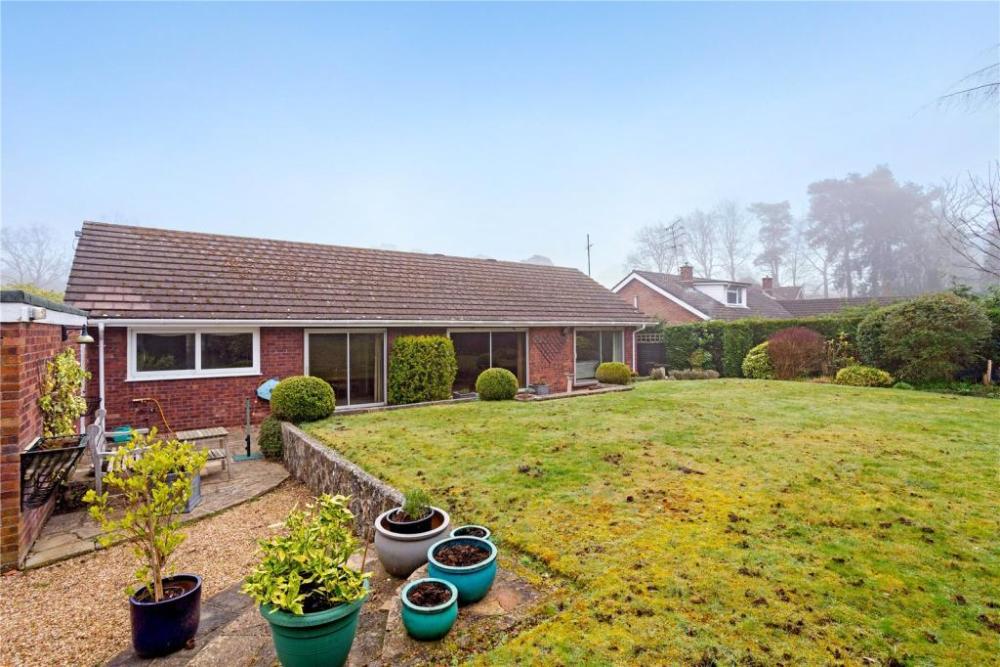
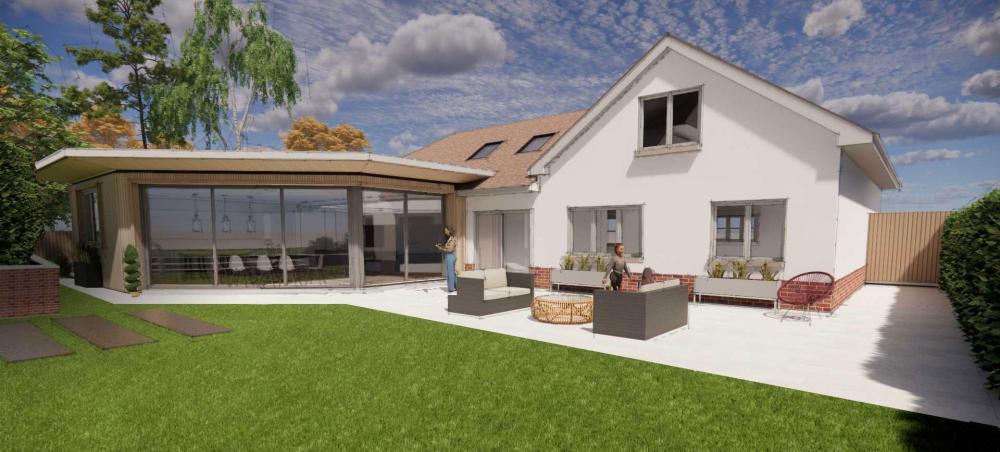
Hi all 👋🏼, I wanted to introduce myself and our project as I anticipate I'll be in hot pursuit of the forums thoughts, opinions and experiences in the forthcoming months. We purchased a 3-bedroom 1970's bungalow in August 2022 but had some planing complications due to a parish council policy that attempted to dictate that "a bungalow must stay a bungalow". 15 months later our planning application was finally granted, albeit with some compromises. Here's a few points on what we're attempting... Replace existing roof (& ceilings) entirely, building up the walls ~80cm, adding a new roof with 1.2m increased ridge height and steeper pitch Upstairs will accomodate two bedrooms, bathroom and "breakout area" overlooking hallway void Large single-storey flat roof side and back extension out to locate 65sqm kitchen/diner Complete re-configuration of downstairs layout Complete replacement of heating system (gas will be cut off entirely) New ASHP (current thinking Valliant Arotherm Plus, one-zone, no buffer) UFH all-round on ground floor (retrofit lo-profile UFH on top of the existing slab (Wunda?), insulated/screeded in new extension). Possibly fan convectors in bed-rooms upstairs Complete rewire I would assume MVHR (current thinking is a radial system installed through new posi-joists, manufacturer TBH but will get BCF to design) New solar panels, and battery (current thinking GivEnergy to unlock Octopus Intelligent Flux) New double-glazing all round (Residence R7 probably) also 2.7m high, ~8m wide sliding doors at rear (either Corteso Cor-vision or Minima) The biggest grey-area for us at the moment is how much to focus on/invest in improving the insulation and air-tightness of the existing exterior walls. I'll raise a separate thread for this in due course. Fortunately we were able to leverage a second mortgage and keep our existing home so we don't intend to live in the place whilst the majority of the work is taking place. The properties are only 0.5 mile apart so I am hoping I'll be able to keep a close eye on the build whilst I work from home. We are also intending to do a little of the work our-selves as possible (i.e. fitting MVHR, UFH, painting & decorating, airtightness membrane?, etc). Thanks for having me and in advance for any advice, Ollie Fleet, Hampshire Plans 24 OD - Amendments Combined.pdf Concept Images Existing Images

-
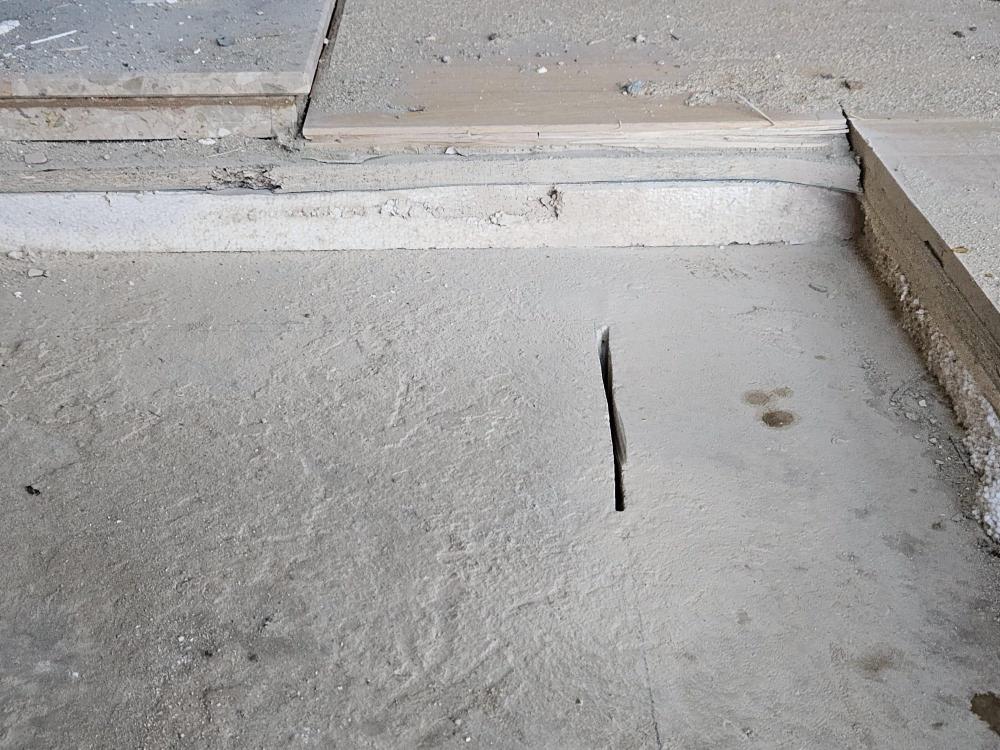
Hi All So I've posted a few topics on the extension I'm having regarding UFH. So far, I've originally specced a Wunda EPS400 SYSTEM covering 52SQM across both the original part of the house and the new extension. This was on the assumption that beneath the current floor (15mm engineered oak), there was a thin ply board on top of the existing slab. The builder has removed the flooring to find there's the following: 20mm plyboard 50MM of polystyrene insulation which sits on the existing slab (picture attached) Approximately 90MM of depth to line up with new extension slab, although this can go to 120MM potentially. There are two options or more if you advise: Remove the rest of it to expose slab, add 50mm celotex xr4000, membrane then Wunda EPS400 Remove existing insulation, install 50mm celotex, membrane then UFH screed. I'm sure there will be better suggestions and thanks for your input in advance. Ultimately the outcome is to have an UFH system which now it seems the existing slab may not need to be dug out due to the level of the new slab which is yet to go in.
-
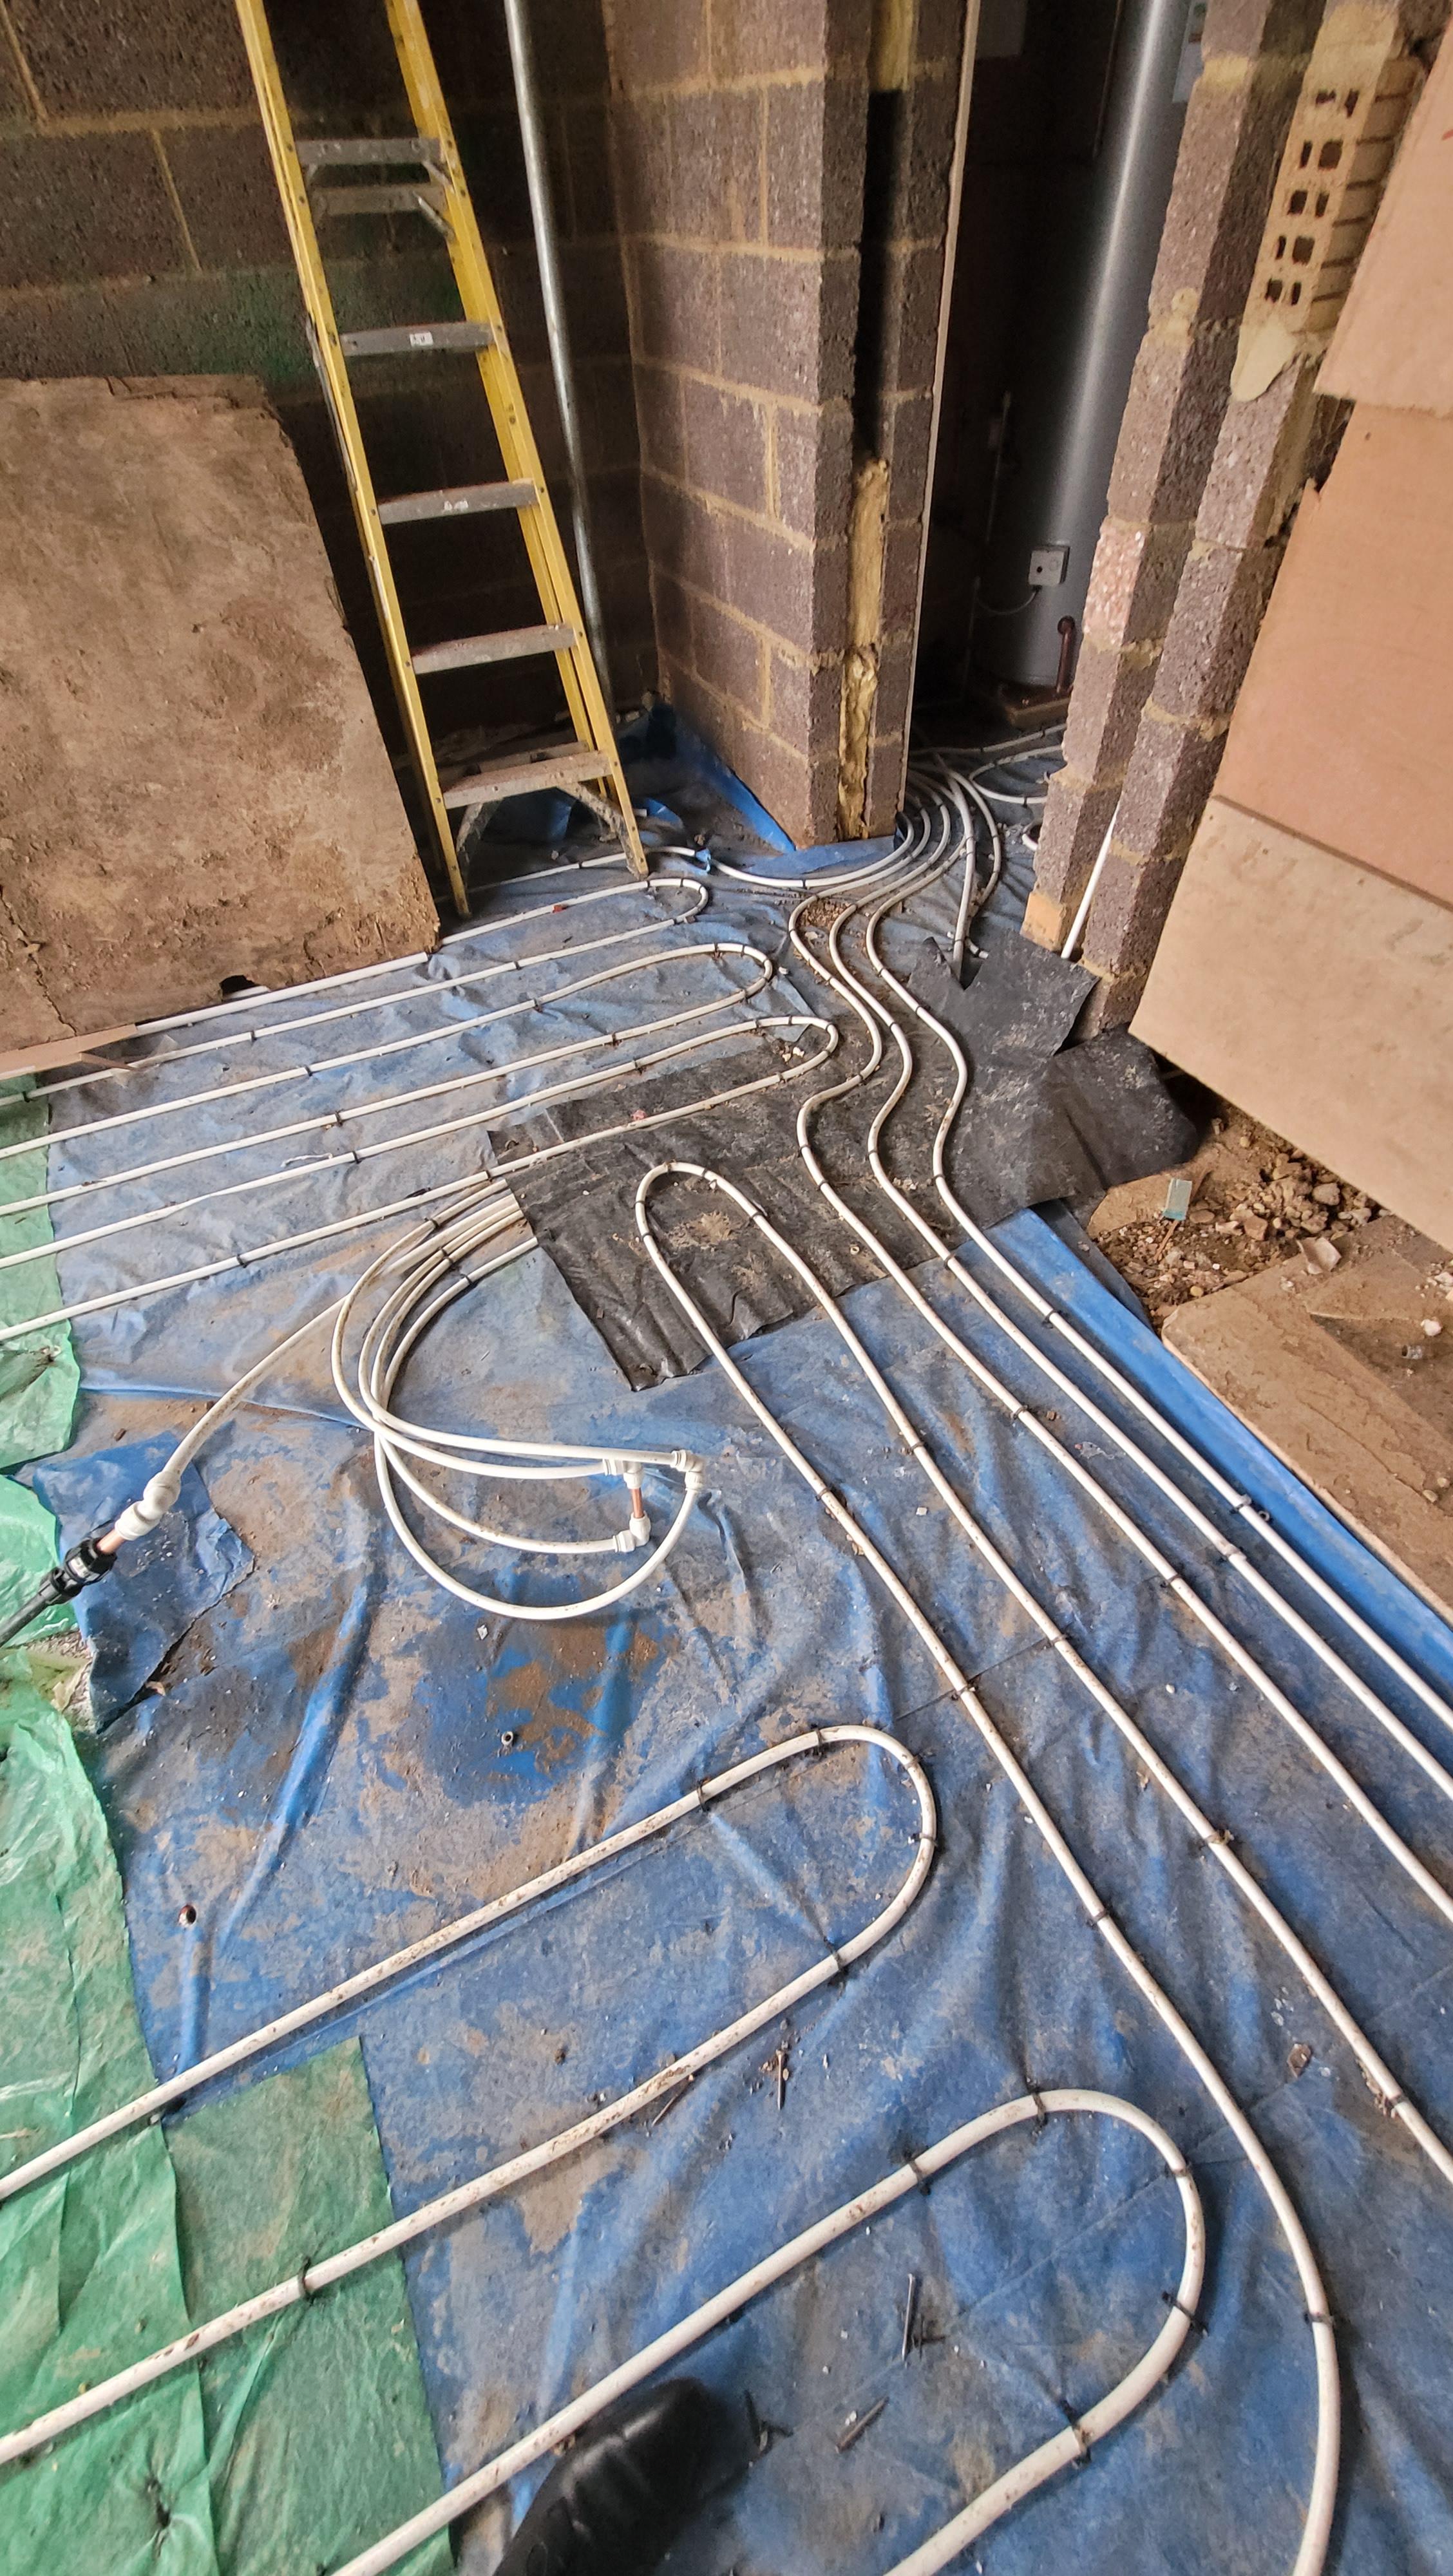
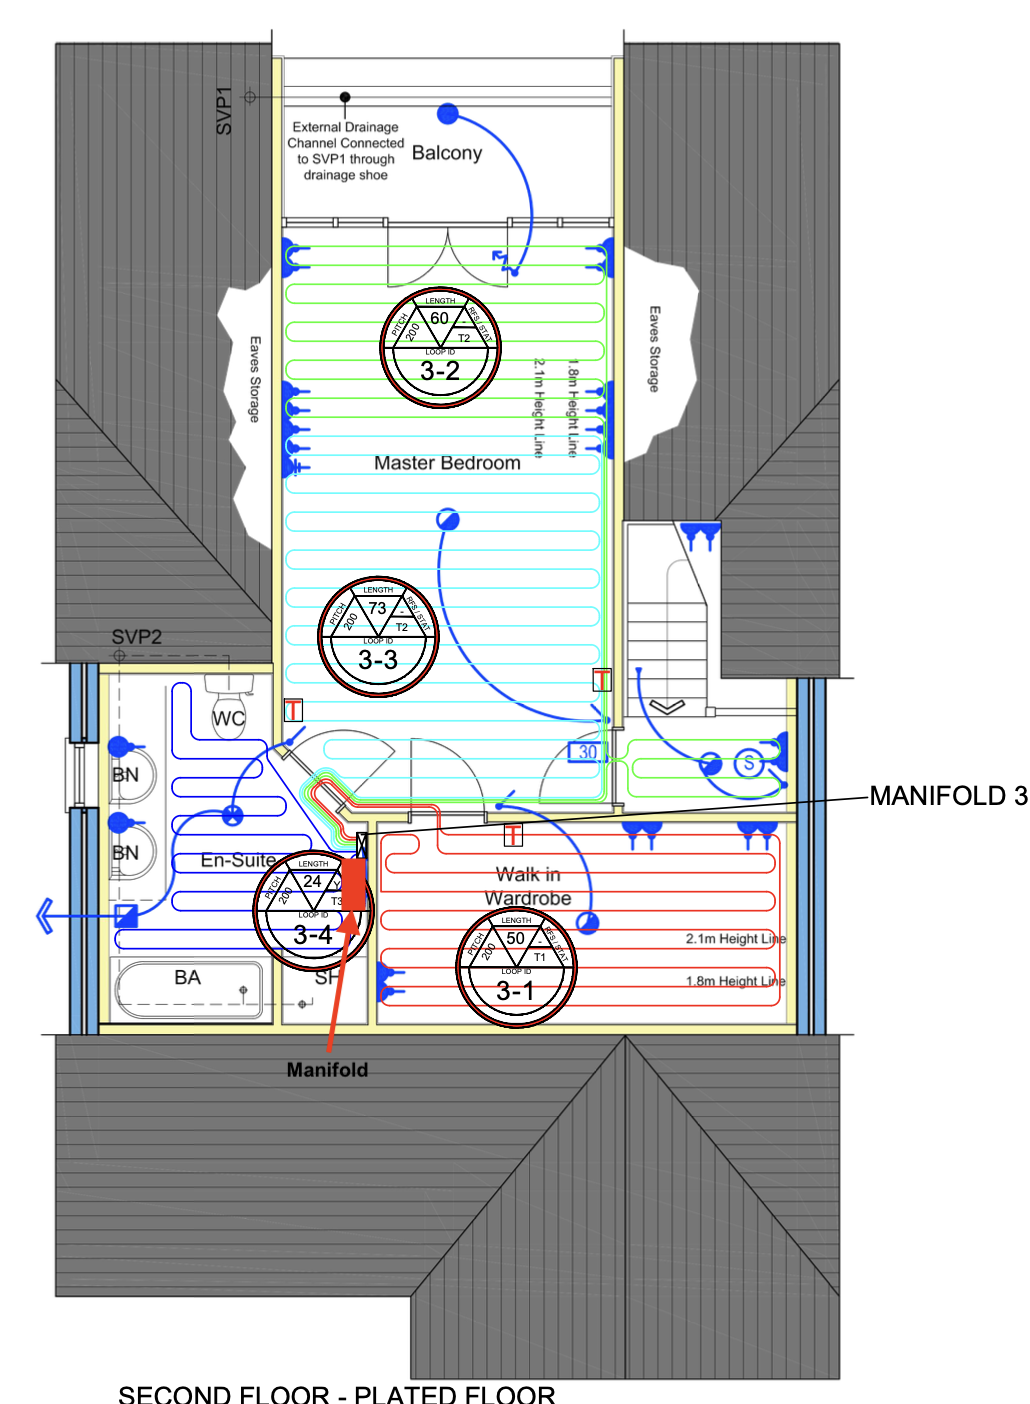
Day 31 of the build. (this is taken from the day we started shuttering the foundations) The weather up North has been spectacular for about 3 weeks, so we (Mandy and I) pushed to prepare and pour the slab before the weather changed, as I'm sure we will get a few weeks of low pressure, wet changeable weather after this spell. Following on from the foundation ICF walls, I'd already loaded around 20ton of 40mm to dust in a pile the slab area. Sat on the sand blinded radon barrier. Job one was to sort the drainage. I'd posted previously about my plan, and some constructive comments suggested changing my planned route, but with the extra length of run to the drain invert level I would have had to increase the floor height even more. So stuck with my original sketch. We ran string lines to mark the main areas, namely WC, SVP in the plant room, shower, WC and Bath, a need ran the drainage to the locations, as the utility backs onto the plant room I didn't add a drain in here as I'll run through the stud and use the SVP. Once the drainage was in place and is tested. We spread out the hardcore and compacted it. I used 10mm crush and run to bed the drainage and cover the pipes, I also ran ducting at this level, bringing in water, power, treatment plant feed plus some future ducts. To get the hardcore level / flat I used 3m lengths of galvanised conduit set on mortar pads all level to each other and used a 4M ally beam to screed the slab. I compacted the first layer then used another screed pass to fill in any deviations and used this as the level for insulation. I used a combination of 200 mm EPS 70 (50mm sheets and 100mm sheets all layed to stagger the joints, and used foam to seal to the ICF. The top layer was 100mm EPS150 this gives a firm hold for the UFH staples, and a firmer feel to the insulation layer. We plan to use a large shower tray and have this level with the floor, so I made this area sunken with two layers of EPS150 and a layer of 50mm PIR. As we were installing the insulation I installed 2 * 100mm ducts for the ASHP in the second layer of insulation these were only 800mm long, and a duct for cables. I also added flex ducts in the insulation for Hot & Cold services to the kitchen, utility, WC,Shower,bath, all these were cut using a hot knife. Lastly I cut some pipe for floor sensors in the kitchen, lounge, bedrooms and bathroom. The underfloor heating consists of three loops around 95M length, planned using Loop cad. The manifold was plumbed , filled and a pressure gauge to ensure no leaks. We have good water pressure so could pressurise to 6 Bar. ( With the heat ☀️ this rose to 9 bar one day). The above picture also shows K Steel screed rails. I used these to break the slab into smaller bays, and mainly will be under stud walls. The slab will for the foreseeable future be our finished floor, so I wanted to introduce expansion joints and force any cracking to these locations🤞. I also used Tibmix metallic dry shake topper on the concrete, the dry shake should help suppress the fibres and also increase the surface hardness. The pour happend on Friday 16th June, the first 5cube arriving at 8.30. we did the kitchen bay first which needed the 7t 360 to move / place the concrete, then, poured the WC / plant room and utility bay. This was an error, I wanted to pour the lounge next so both bays could be finished at the same time, but under the pressure of the pour took advice to do the awkward section next. This resulted in only a 3rd of the lounge bay having concrete, so this was spread out lower so the next load could fill the bay. By the time the second load arrived, the kitchen and utility bay was ready for power floating. The pan worked well and I had some time to start edging the slab, the rebar didn't allow the power float to get to the edge of the slab. By 13.00 all bays were in and leveled, but not floated, but the sun was very hot, and the kitchen bays was getting hard rapidly, I managed to float this but was struggling to to get a perfect finish. To dry shake makes the surface hard and this was apparent, the lounge and bedroom bays floated better, and to the main the dry shake suppressed a lot of the fibres but there are still some visible. The kitchen bay was rock hard by the time I managed to float again, and although it is fairly flat you can see, but not feel, the path of the power float. I used Setseal 6 as an acrylic sealer, which seals the surface and aids the curing process. By the time we finished the floor was rock hard, I mean hard, the idea being that the slab will slowly cure now but will not be affected by rain etc. Time will tell. Due to the temp, and the float not getting to the edge, I will have to carry out some remedial work on the edges of the slab, as by the time I go to troweling these it was too late. Today the slab looks great, it's flat and level, but the perimeter 2 inch will need some polishing, as will a section in the plant room. I'm confident I can get this fixed. Time will tell. The following picture doesn't do the slab surface any justice. It looks rough, but it's glass smooth. So 10.5 cube of fibre reinforced concrete. Power Floated, and this was non stop until 17.30. My chest and fore arms are wrecked from trying to tame the power float. I'm a little disappointed in the edge finish, but looking at it another way, it's way better than if it would have started raining, or the wind that we have today. I'm sure a few hours with a wet diamond polisher will rectify the edges. Maybe another hand would have been good. 🤔. Onwards to the ICF walls... .
- 14 comments
-
- 6
-

-
- the windy roost
- icf
- (and 3 more)
-
Hi all, We had our UFH (75mm screed with engineered wood + ASHP) installed this time last year and turned it on slowly when we first started using it. Now it's coming round to turning it on again, I was wondering if we need to turn it on again slowly each year or is this only needed the very first time? I've tried googling but can only find information about the very first time. For context, I'm on Intelligent Octopus tariff. When it's between 10-15C I was just running the ASHP at 40C for 3 hours overnight and this was enough to keep it warm for the day. Would going straight to 40C for that duration be ok or is that a shock for the slab? I assume the wood wouldn't be an issue as it will take a while to for the slab to warm up before getting through to the wood. Thanks!
-
Hi all, I'm looking at 2 no. housing units - 1 no. 2 story 75m2 on the GF and 55m2 of the FF. UFH on the GF and Low Temp Rads on the FF. The second unit is 200m2 bungalow all UFH. Both have an air to water heat pump. Both Air to Water heat pumps have an inbuilt heating circulating pump and, based on the HP manufacturer recommendations, the built in circulating pump is sufficient in both cases, For these 2 housing units (which are larger than what I normally work on), do you think that the HP integrated circulating pumps are generally sufficient on their own? Thank you,
-
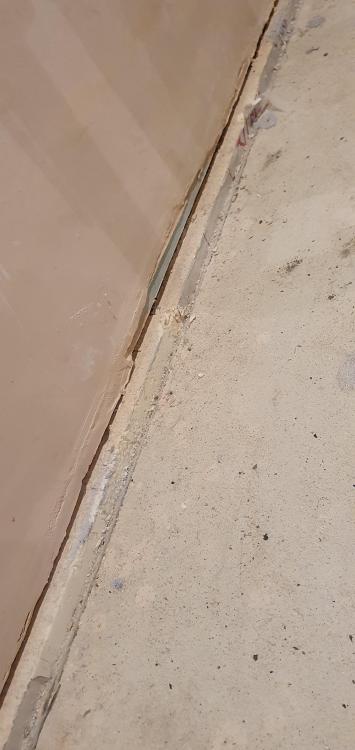
Hi to everyone. I'm in the middle of a project that has me worried about the layout of pipes. 1. The mains water comes out of the ground (island will be on top) and then is to be buried screed 90mm and joined on to a pipe that goes through to the store room whilst going over UFH pipes to the boiler and tank. The tap to turn off the water is located here. Is this normal, okay? Is it safe? 2. The pipe work looks okay, it's separated a little, but the cold runs over pipes and join the store room with a tiny elbow to be covered by screed, is this safe? 3. Do I need a stop tap under the island from where the main water emerges from the ground or is it safe for it to travel in screed and then have a stop tap. I've attached a few pics, really hope you can help in anyway.


-
Hello! Can anyone with a bit more knowledge than me guide me on this? We have a room that will be half tiled, and half floating floor - we are planning on having (water) UFH installed by using those panels that have the pre-channeled grooves into them for the pipes (similar to LoFlo Lite) Currently we have 22mm P5 Chipboard down, across the whole floor. My understanding is that, as per the instructions, if anywhere is to have tiles on top of the UFH, then those boards need to be structurally secured to the ground - as the above .pdf states: The P5 Chipboard won't take any adhesive, and so I imagine that's why the plywood needs to be laid down, so we can glue and screw the UFH panels down. I have two questions: 1. What I don't fully understand is why do we need to secure the UFH Panels down for the tiled area? What difference does it make if we don't? Is it to stop movement/cracking in the tiles? 2. How do I deal with the step from plywood to non plywood area? This transition will be in the same room (it's on open kitchen to living room) and the other side of the room will be a floating floor. I'm just trying to save some money by not having the whole area needing plywood. So if anyone can explain to me why the need of the Ply is there, that would be ace, and if there is any way of doing this with a transition between the two areas? Many thanks!
-
Hello everyone, I wasn't sure whether to post this in the UFH sub forum or here, so feel free to move this if you see fit. I currently have UFH installed through the house, on 3 floors. Ground floor (screed), first and second floors using aluminium spreader plates. The house was renovated 2018. The ground floor works pretty well and I don't really have an issue with the UFH per se, the system itself works as intended (especially after Nick on here fitted a buffer tank a while back). The upstairs floors however are a different matter - the spreader plates are fitted on joists, on top is 22mm wyrock, 2mm underlay and then 14mm engineered wood flooring. Beneath the spreader plates is rock wool. As you can imagine this doesn't it an ideal way to dissipate heat quickly into the rooms, whoever thought encasing the pipes in wood would ever work well (that would be my builder with me giving the gormless nod lol). It just doesn't let enough heat out to warm the bedrooms. I've nursed it through 3 winters and I think I now need to get this sorted one way or another. Here's the attic floor: Each room has its own thermostat and the attic floor being a new addition is pretty well insulated with 200mm celotex in the rafters. The idea I had in mind is to first work on the attic floor, which is devoid of furniture at the moment. I was thinking lift up the wood floor, then the 22mm deck. Remove the pipes and spreader plates. Then run pipes (barrier?) to connect radiators to the 4 port manifold: Before I waste anyone's time - Is this feasible? In an ideal world I'd like to have the radiators connected point to point rather than on a ring - I'm not fussed either way but I would like to retain the ability to heat the floor as one zone independently with it's own thermostat from the rest of the house. I'd also like to connect 5 small/medium size radiators (1 bathroom, 1 wardrobe, 2 bedroom, 1 landing). Having done the heat calcs using an online calculator this looks acceptable to provide enough heat in the winter. First issue I can see is that the manifold mixer valve only goes up to approx 65C - and I can't really oversize the radiators as I don't have that much wall space to hang the radiators on. I may need to replace the manifold with something else? Am I on a hiding to nothing (!) Penny for your collective thoughts, and thanks for your insight valmiki

-
I know the lower U-value I achieve for my ground floor the better but is there a maximum U-value beyond which under floor heating is not advisable?
-
I have a question about what is and isn’t enforceable in the building regulations and subsequent guidance. This covers Under Floor Heating (UFH) and control. Our house (after debate on ebuild) will have one UFH zone (Passive Haus) but has a usable floor area of 419m2 (PHPP figure) and I am looking at the following for Part L1: And the Domestic Heating Compliance Guide: In the Building Regulations it states that Reasonable provision shall be made for the conservation of fuel and power in buildings by:….. Such that it is legally enforceable with the ‘shall’. However in the Domestic Heating Compliance Guide states that Dwellings with a total usable floor area of greater than 150m2 should be provided with at least two space heating zones each having separate on/off timing controls and temperature controls. Also the guide is full of ‘should’! I have worked with contractors (in my previous job) whilst refining a multi billion pound specification (military procurement) and they place a great deal of emphasis on Should and Shall, in that I want a Shall to ensure I get it and they want a Should to ensure that they won’t be held to account if it does not perform up to spec, basically Should cost money. So in the same vein a building inspector cannot insist that my house has two or more UFH zones as, as far as I can see, it is not legally enforceable and only a guideline! I would appreciate you thoughts on my dilemma!
-
Hi all, Just come across these.... Capillary Tube Mats - Radiant Heat for Natural Air Conditioning (beka-klima.de) Not big in the UK but seem to have a presence on the continent particularly Germany. Just wondering if anyone has any experience with them? Cant see anything on here from a quick search? Cheers!
-
Hi, I’m currently refurbing the entire ground floor, converting integral garage to Kitchen and moving the lower flight of stairs. I’d like to install ufh with ceramic tiled floor throughout but only have 65mm from the block and beam surface to current floor level. I’ve seen some tile direct eps boards which look like they will work, but the insulation value is not great so I’m looking into possibilities for insulating the void below the block and beam. Any thoughts on pearlite beads versus blown loose eps versus polyurethane foam injection would be greatly appreciated.
-
 Good Morning. I have upstairs Radiators with Tado valves and downstairs 1 Radiator and a new UFH with just one zone. Recently I got installed an electric valve to the UFH and the smart connection fromTado. Although Tado states that I would need a wiredTado Thermostat for the UFH my electrician wired everything into the Tado Wireless receiver and replaced the Worcester Bosh control. When I now turn on the Tado Radiator valves it works as far as the heating turns on and off when needed, but they always turn on as well the UFH pump and switch, which I would hope would just turn on when requested via the Tado Temperature Sensor for the UFH ( which is now used wireless) I thought it would be possible to have the UFH pump and valve just on when I need the UFH? Could anyone direct me and my electrician in the right way possible? My electrician just sent me this morning the idea that he thinks it could work with a UFH4, a 4 pole relay with 2xNO&2xNC contacts? Thank you for your thoughts. Greetings Manni
 -
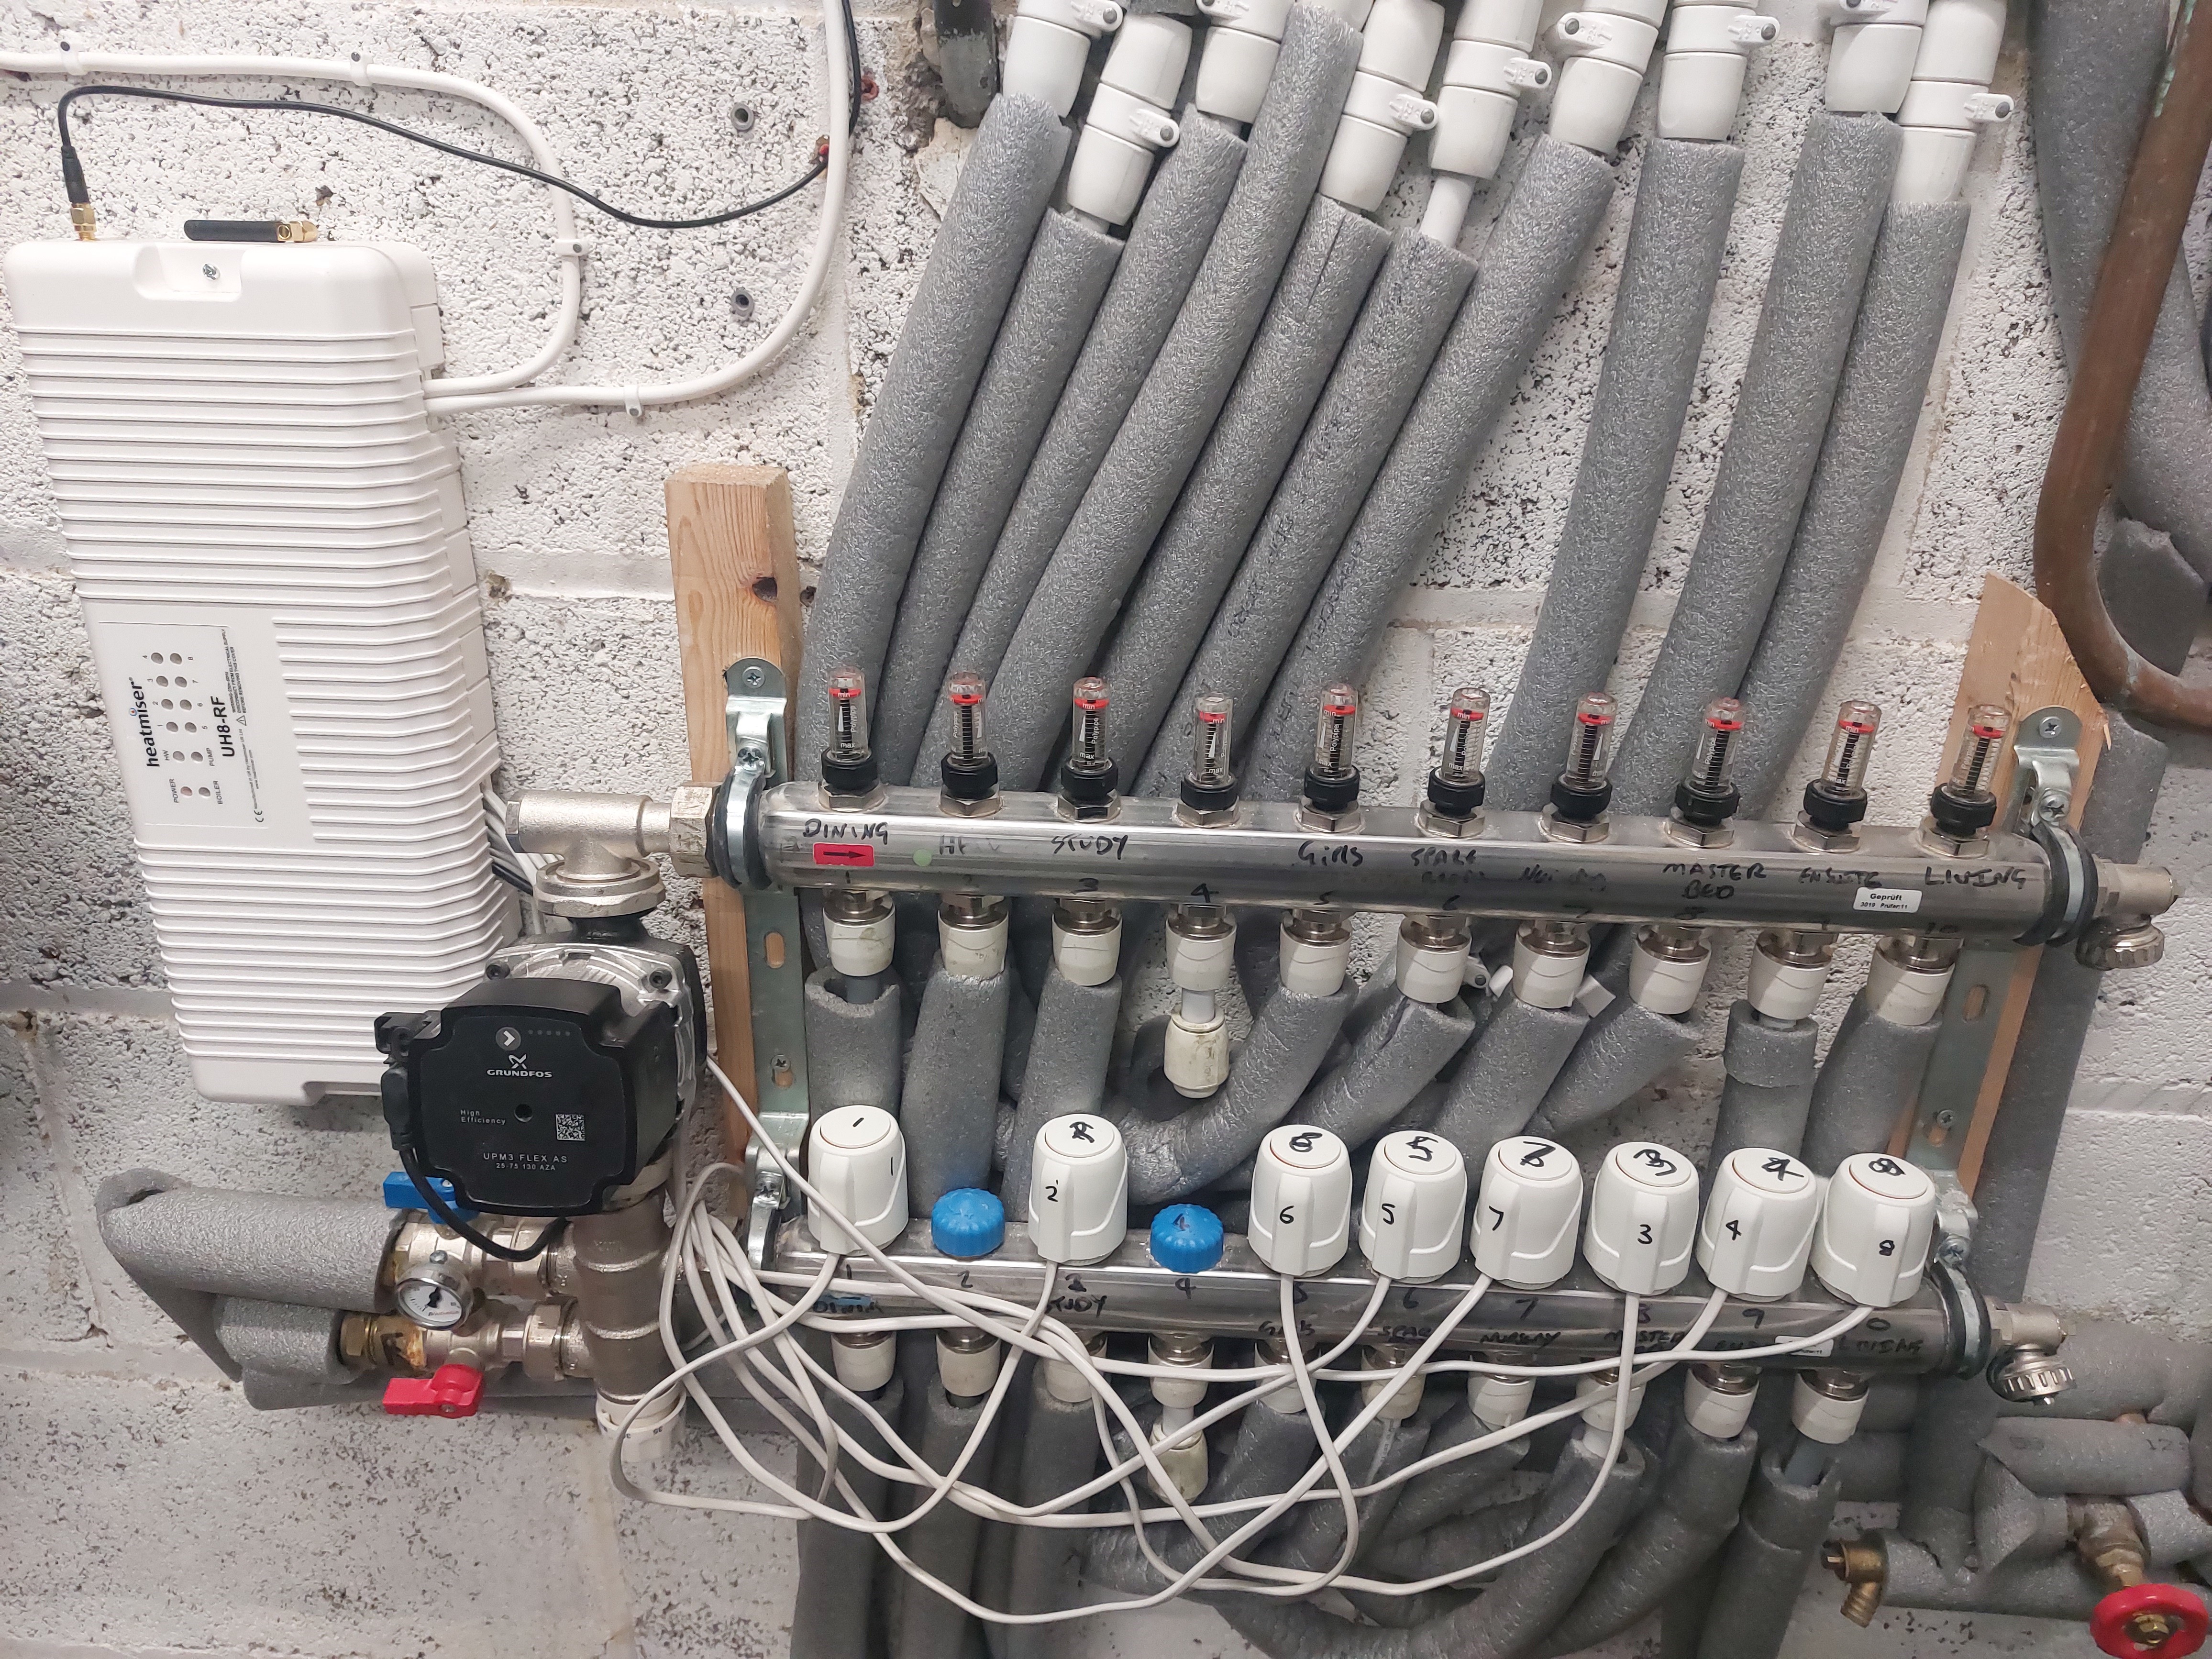
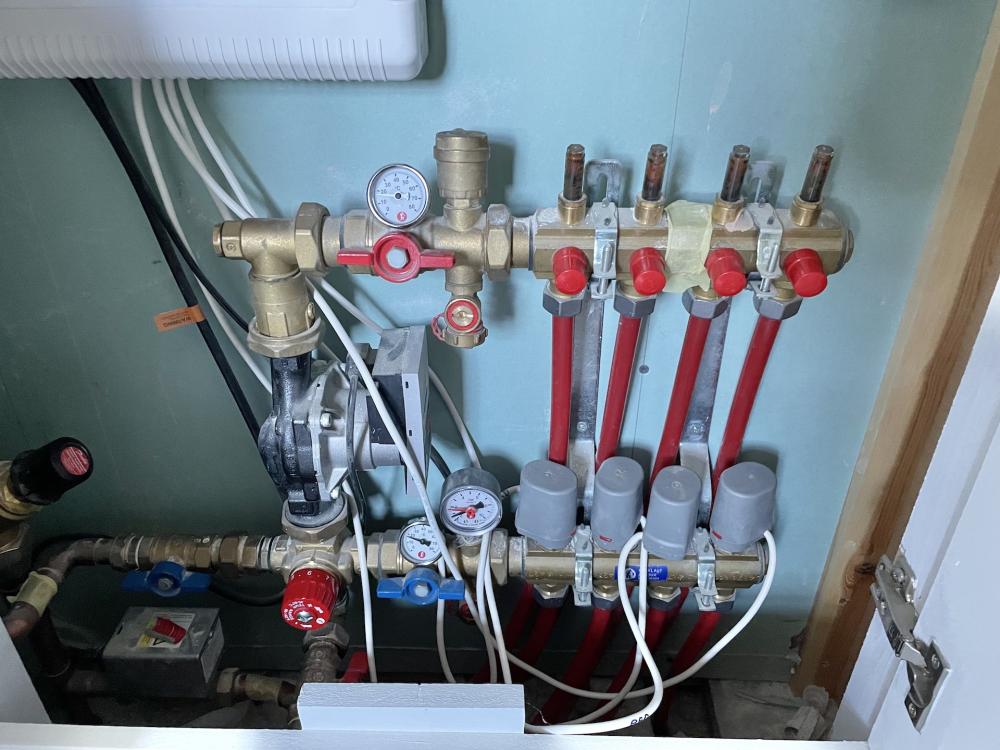
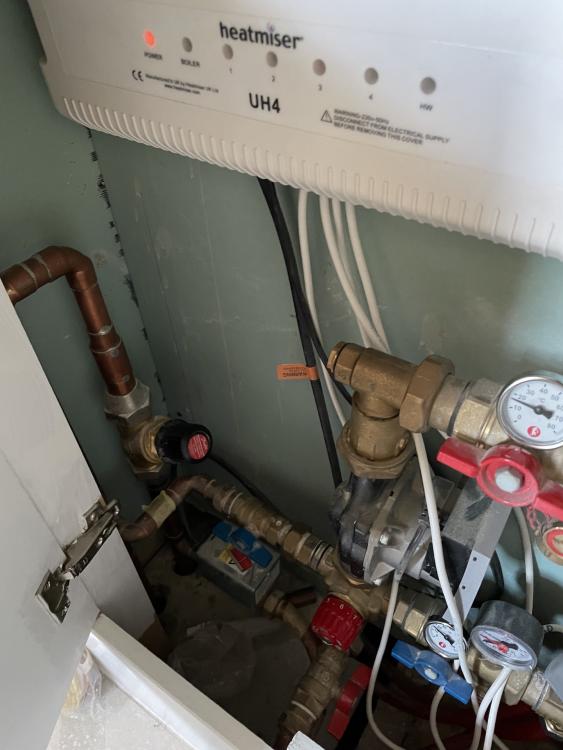
Looking for some help! I am having problems with my underfloor heating only getting lukewarm, even when on for 8-12hrs constantly (see pictures) . It is currently costing £25 to £30 a day and using 150 to 200kw a day to not even be warm and is driving me crazy. I am struggling to get above 16 degrees in some rooms but others i have got up to 19 degrees. I have had heat in the system before. As set out in the background below I have had a Heatmiser system installed and currently having a plumber coming back to try to solve the issue. Any suggestions? Some background I moved into a property just over a year ago. I have underfloor heating in all rooms with one radiator downstairs and one towel rail upstairs. The existing underfloor heating Manifold was upside down and thermostats didnt work very well. Before Christmas last year I had the manifold corrected and a Heatmiser system installed. The system seemed to work although I was spending quite a lot during the winter months. I found that I had less than 100mm of insulation in the loft and assumed that was where I was losing lots of heat. The rest of the property is pretty well insulated, with double glazed windows and doors, insulated cavity walls and now topped up insulation. The system (see picture - system off in picture) 10 port manifold Heatmiser UH8-RF 8 zone Heatmiser Neoair v2 wireless 8 actulators but 9 systems Grundfos pump 2 radiators All rooms underfloor Heatmiser plug boosters - ordered additional ones. Neohub Gen2 Floor is engineered oak through out I have had the boiler at varying temperatures from 60 to 75 degrees Mixing valve - set at 55 degrees Specific problems One of the flowmeters seems stuck - Ordered new one Occasional knocking and clicking sounds Heatmiser thermostats keep going off line Heating switching on during the night Heatmiser thermostats jumping between auto, hold, standby Advised by Heatmiser not to use direct I have borrowed a thermal imaging camera and can see the loops heating up although in most places there is no heat in the floor. Most rooms downstairs have plenty of loops whilst upstairs some rooms are limited. It seems that the system is getting up to a temperature but not full temperature. I would appreciate any advice to get the system to heat up to previous heating levels. Or do I need to install electric radiators??? Mark


-
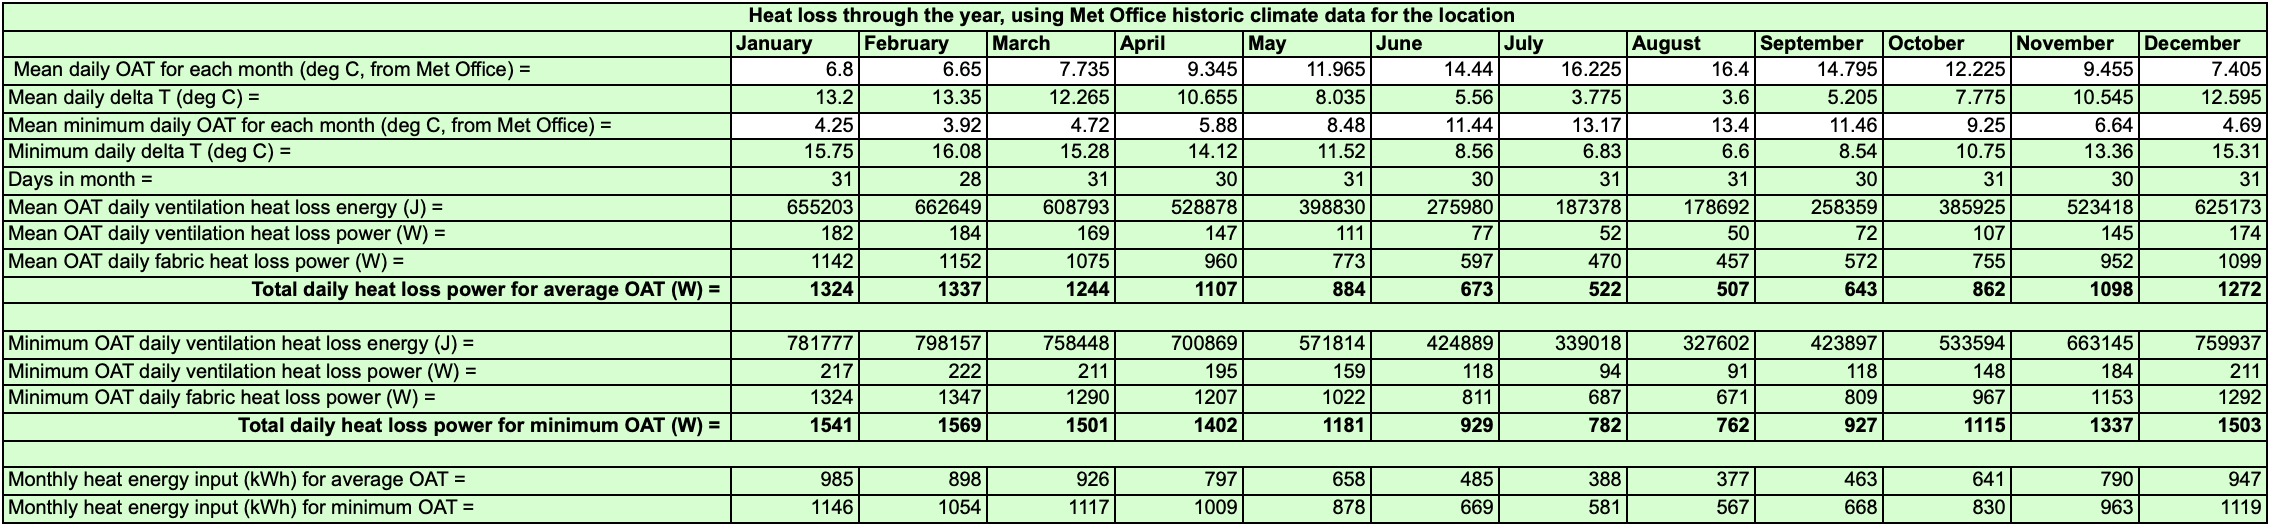
I have used Jeremy's heat loss calc inputing all my U-values, area dimensions and OAT (Cornwall). Background The Build will be ICF, 144m2 internal, ground bearing slab with Celotex on top but no wet screed I'm looking at the fast to heat up dry board UFH systems. Solar PV will heat the DHW ,immersion thermal store, which will heat UFH. And economy 7 or willis heater are options. No air source heat pump, combination of the build being near my listed building and own choice that I don't want one. Wood burner stove for very cold winter months when PV struggles, own grown trees already cut and drying in storage more still growing. I'm home all day most days and quite happy to wear a jumper when a little cold. The quick to warm up systems advertise they can be at desired floor temp in 3 hours and room temp in another 2 hours can any body confirm this for a similar build? Example from one manufacturer is flow temp of 40deg, 50.8 W/m2 and floor temp of 24.9deg. Back to Jeremy's calc I how do I match my W and kWh to the best UFH


-
Morning all, I'm after some advice as to whether it would be worth putting in a wet UFH system in our 1950s house that we are renovating, and if so, your thoughts about fitting LVT on top. The house has an old garden room extension at the back which we are opening up to make a 5.7x5.6m kitchen-dining area. There will be a vaulted roof over the old garden room which approximately half the kitchen-dining space will be under. We are planning to put some insulation into the old garden room as we don't think it has any at the moment. The house is built on suspended joists with approximately 600-700mm of void space under the original house and 250mm under the garden room. The joists are only 100mm deep, spaced 400-450mm apart. We were thinking of battening from underneath, adding 75mm insulation and finishing with 25mm UFH and dry screed mix. We ideally don't want to raise floor levels due to the lower ceiling height in the original part of the house. Finally, the house faces west and gets quite a lot of sunlight in the afternoon. We are also having 3 velux windows, bifold doors and a window looking out to the garden. 1) UFH vs two big radiators. Which would you get in this scenario for our project? We want the space to feel warm when we need it to but don't know what would be more effective. Would we lose lots of heat under the house? 2) If we were to get UFH then how would you finish the flooring to lay LVT? We were thinking of having 22mm chipboard, then 6mm ply, then LVT. Does that seem about right? 3) We'd like a herringbone LVT pattern but were recommended not to go for larger tiles due to the larger gapping that would occur in sunlight. Does anyone have experience of this? Thanks for your advice, I really appreciate it!
-
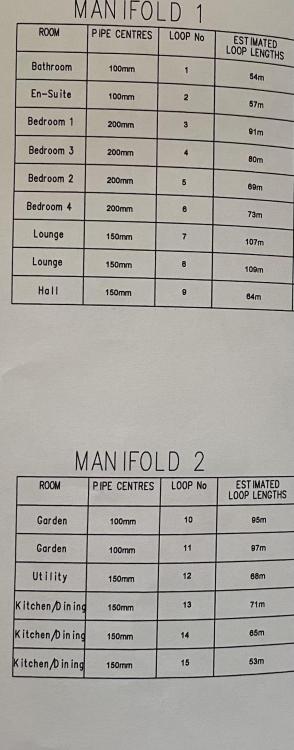
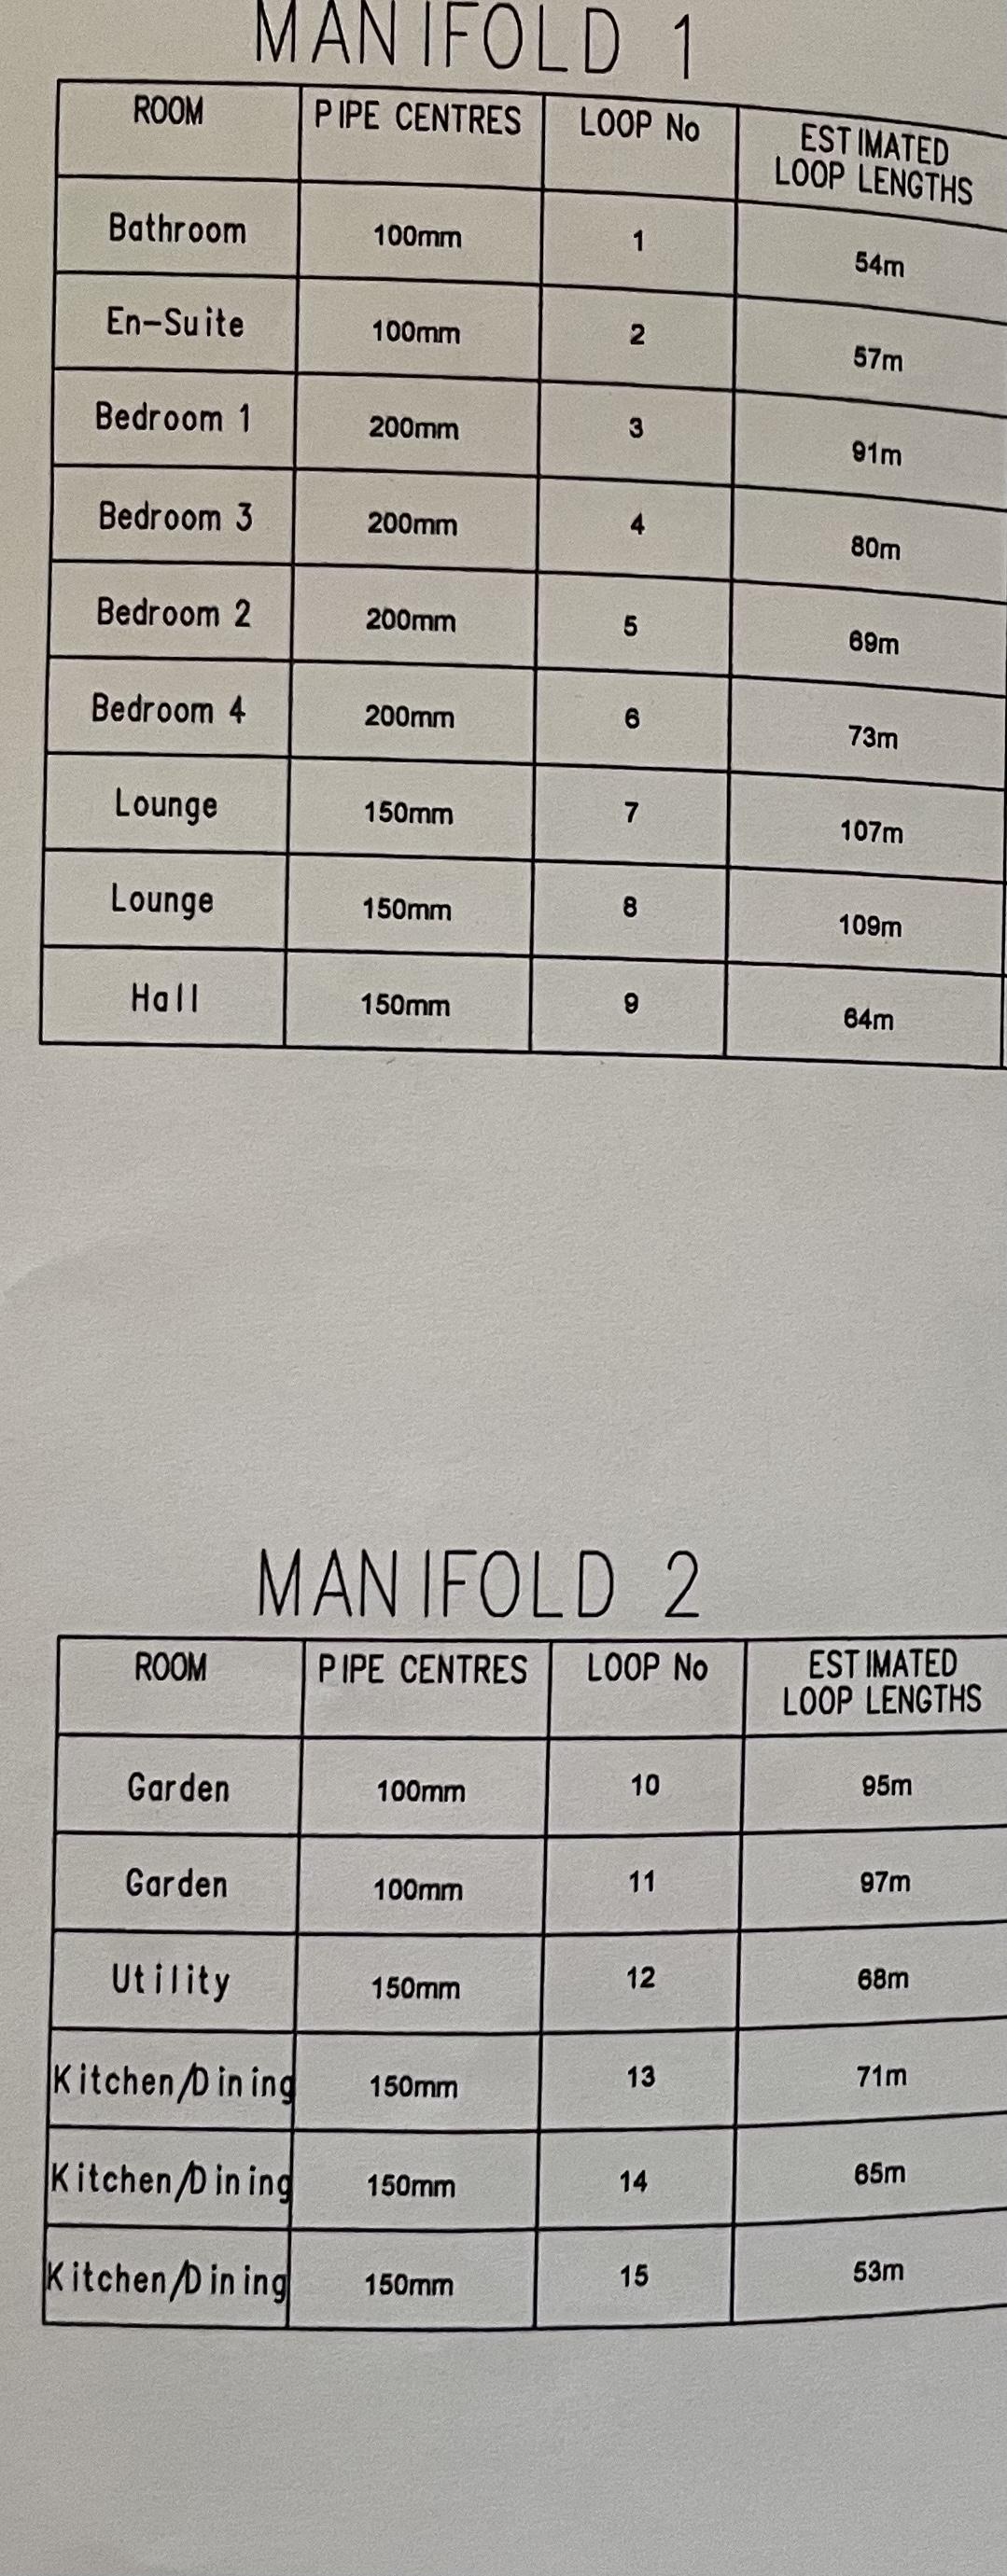
Hi, was wondering if anyone can give me a bit of help understanding the flow rates required to run my UFH. I have the below info left with by the previous owner of the house ( we moved in a few months ago and just trying to get my head round everything ) detailing the loops and the return valve settings. I thought I was the flow meters that you adjust not the return valves? I tried to set the flow meters to match the table but I cannot get those settings. Not sure if it’s a pump issue or if these settings are way off? what should the flow meters be set at? I know that’s a little hard to say as heat output & hear loss calcs would need to be done I presume?

-
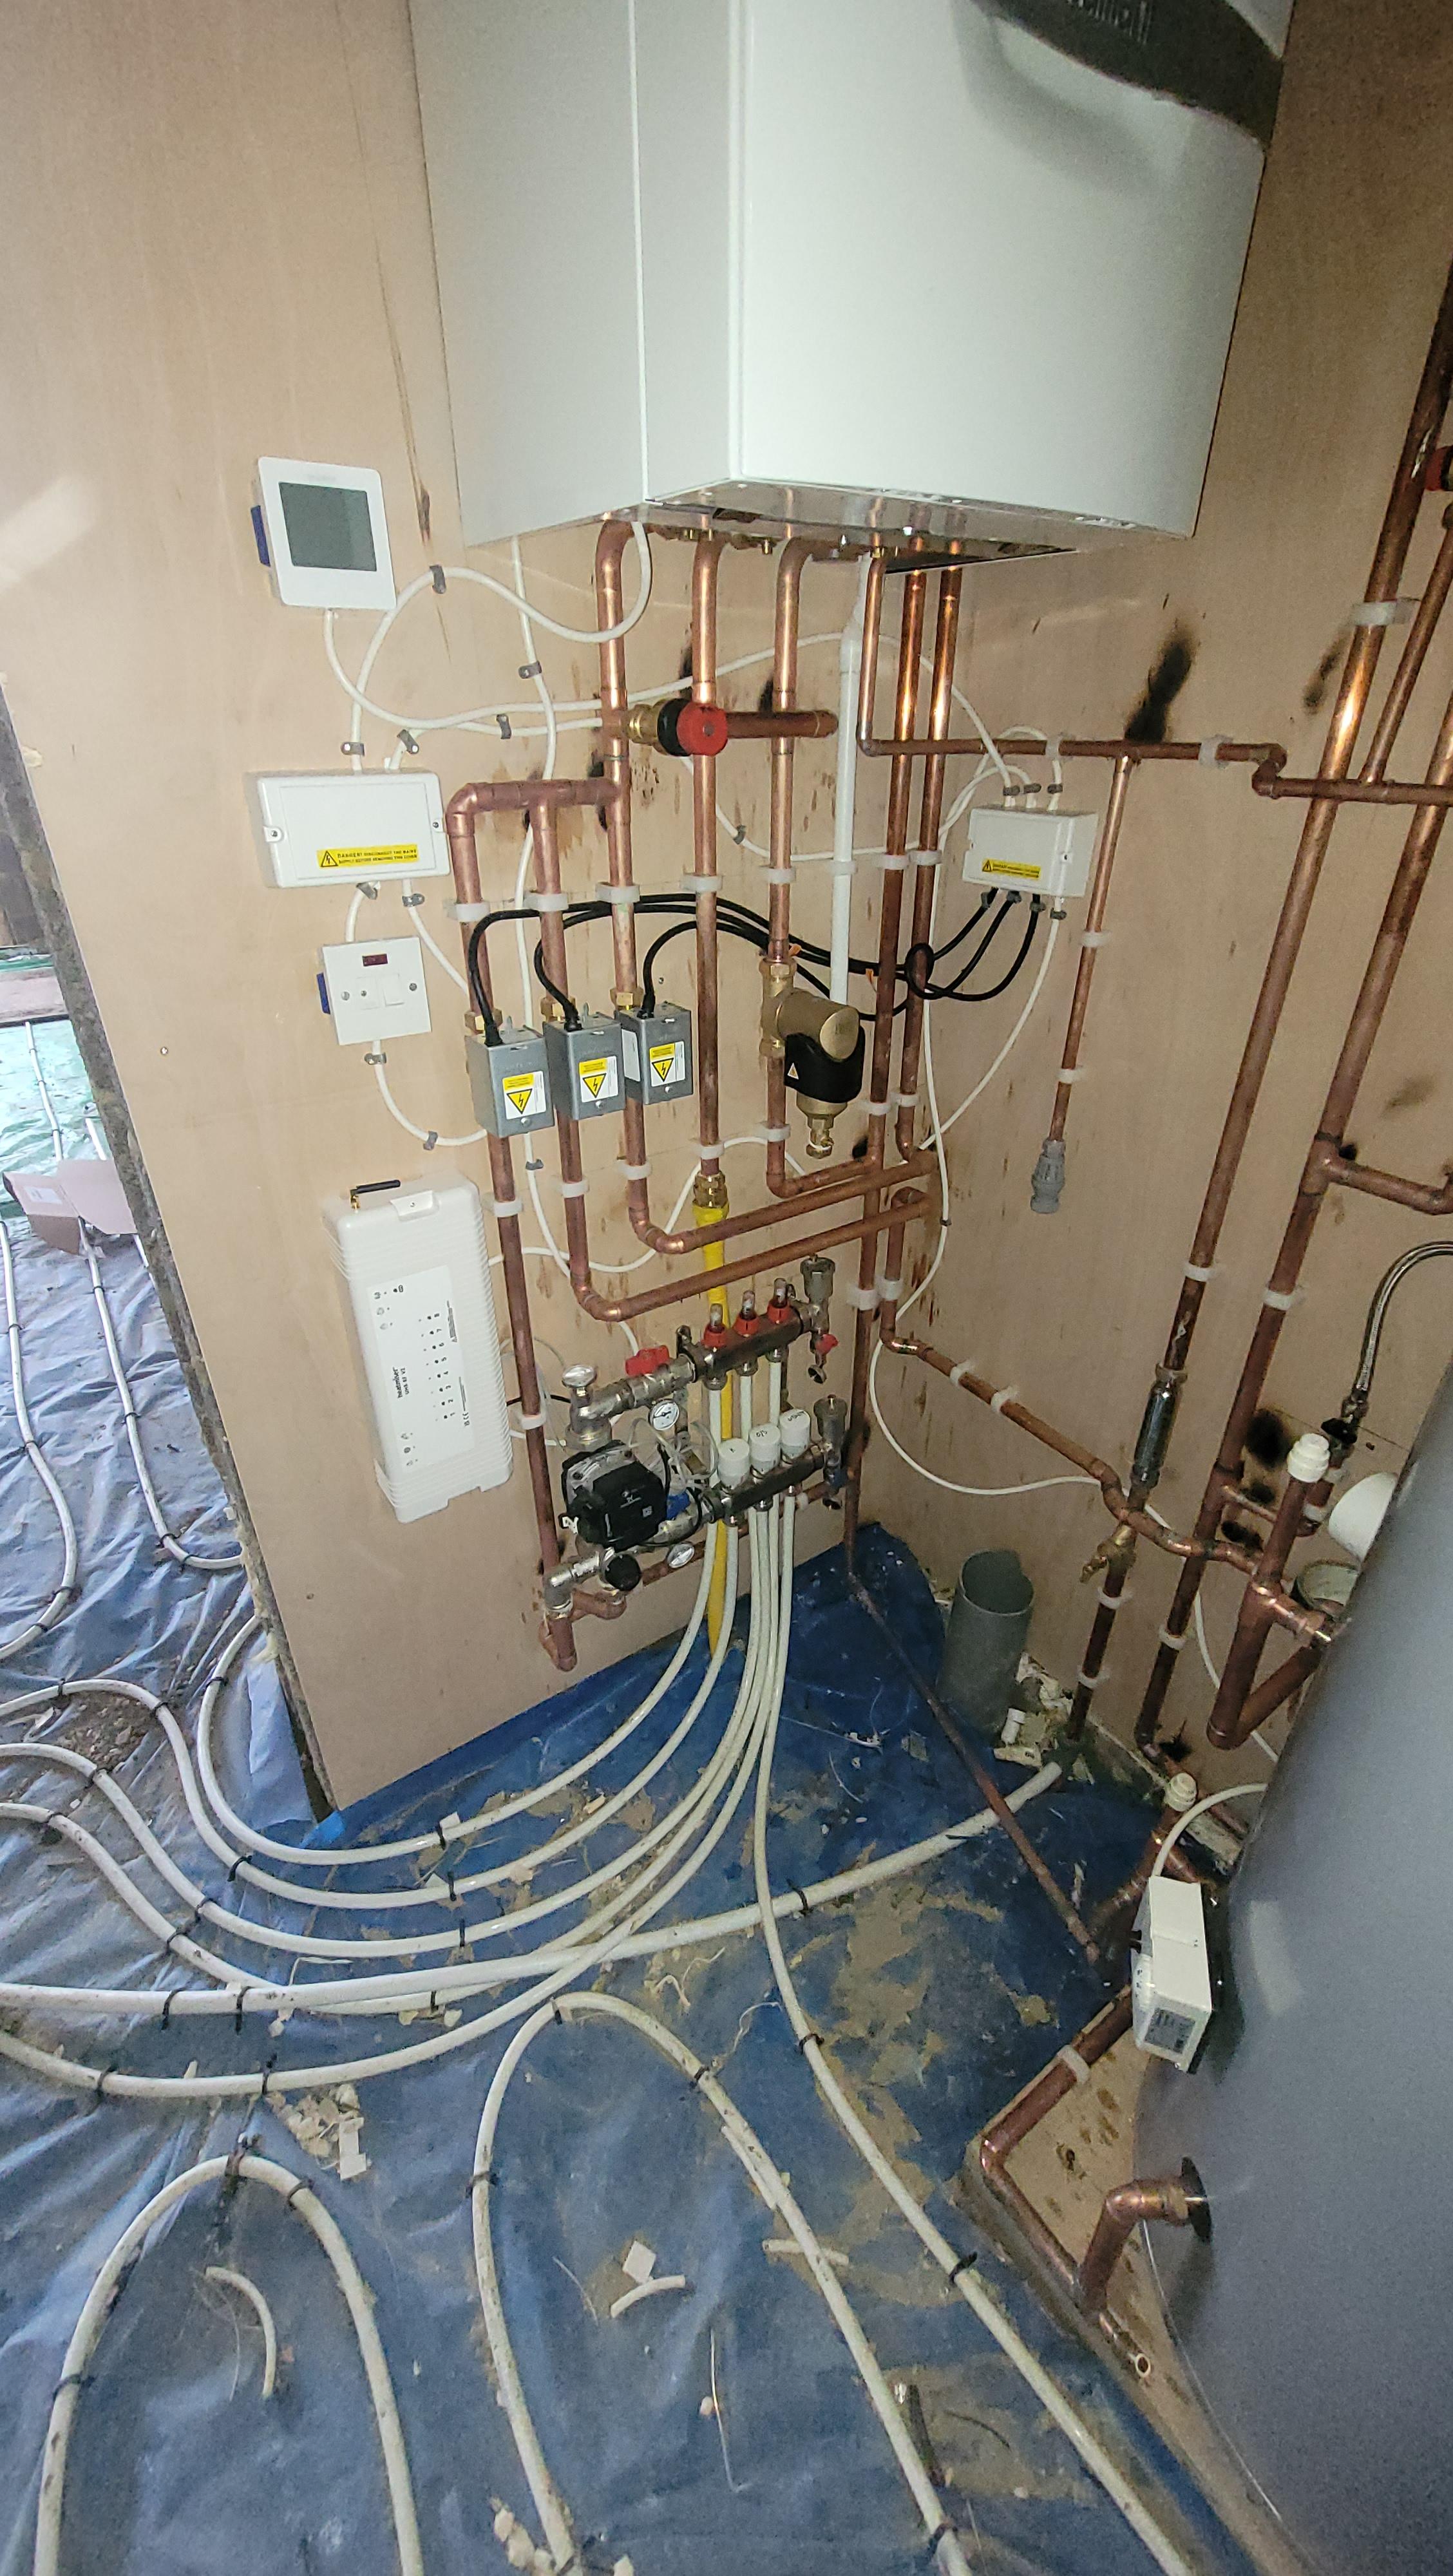
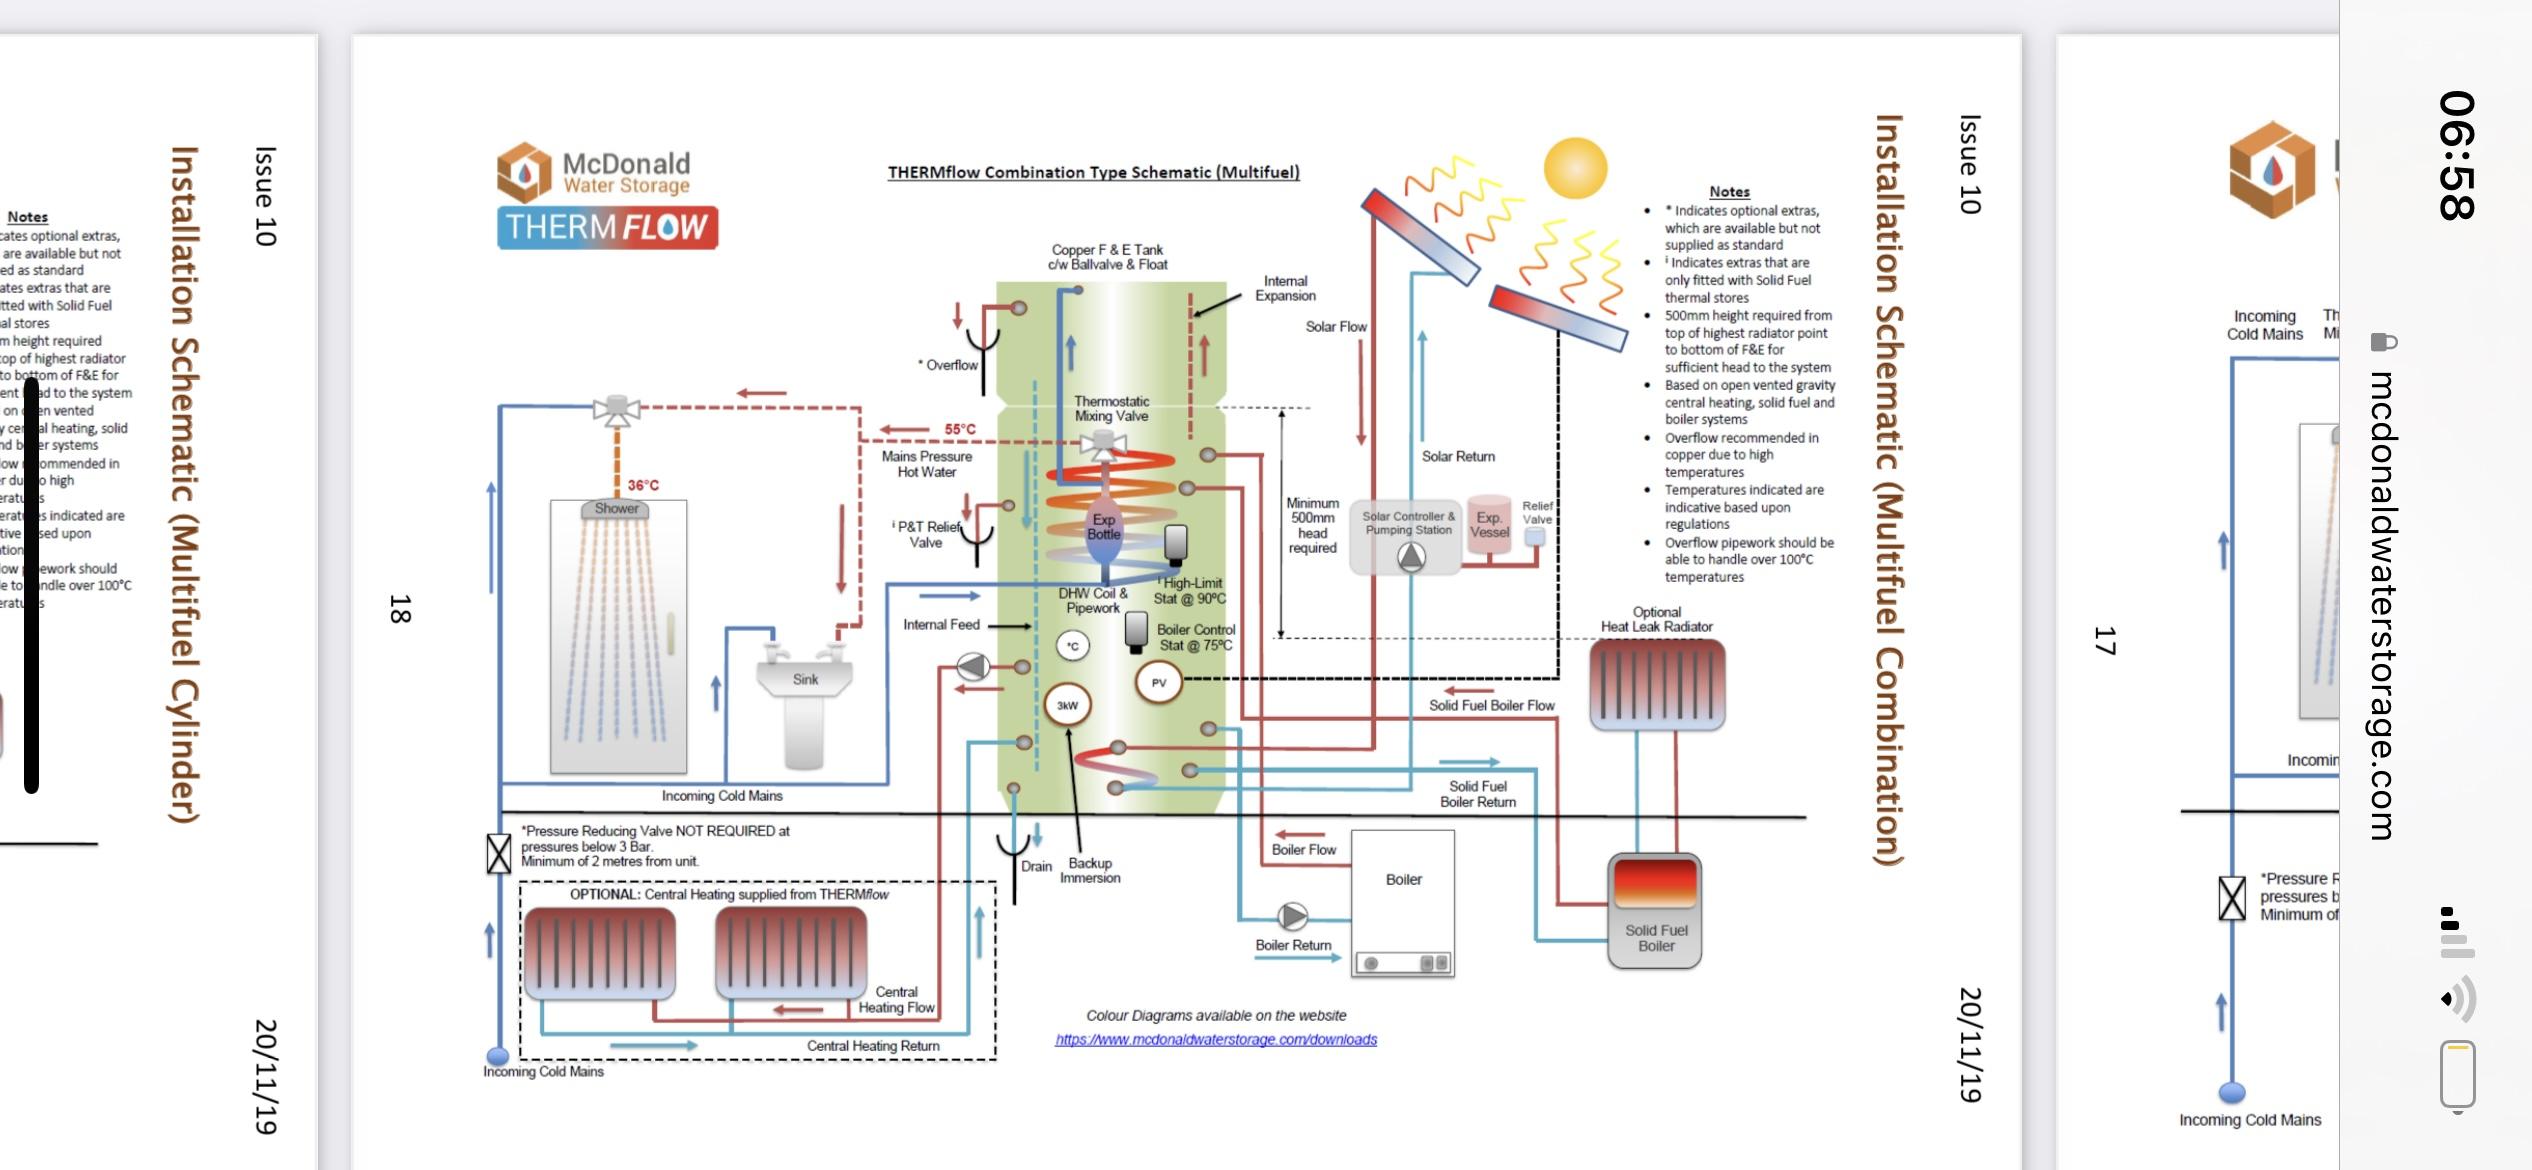
Hello, looking for a bit of advice. I’ve recently moved into a new home and the heating system is completely different to my old house (combi boiler) This house has a thermal storage tank that’s heating by a 18kw Heat only boiler and also has the multi-fuel stove connected to it to provide an additional heat source for the cylinder. Cylinder is kept at 63/64°. I’ve no problem with DHW however if I turn my underfloor heating on (15 loops, ranging in length from 110m to 54m + 3 towel rails for in the bathrooms) my Thermal store cools down to around 30° and seems to stay there, even after an hour of running the heating. I understand that when the heating has been off and the UFH is cold, I’m asking for a big volume of water in all the loops to be heated, however the UFH mixing valve is set to 45°, the water in the tank is showing 30° so my slow to heat UFH system is now even slower due to the temp of the water getting to the manifolds. As mentioned, I have an 18kw Greenstar Ri boiler and a Mcdonalds ThermFlow tank 210L - schematic below of tank and loops for the UFH. 17mm Myson pipe. Is the boiler big enough (output wise) to supply the tank hot water quick enough so I don’t drop below 45° This meaning my UFH manifolds have the correct temp water going to them to start with? Is the tank big enough in capacity to cope with the sudden request to dump the stored hot water into the floor? Combination of both? Am I asking to much of the system and just be prepared to bring each room up to temp slowly? Appreciate your help with this