


Jenki
-
Posts
836 -
Joined
-
Last visited
-
Days Won
7
Everything posted by Jenki
-
Did you get it from the same guy on eBay? Just need to resolve my heat pump woes now.
- 14 comments
-
- 1
-

-
- the windy roost
- icf
- (and 1 more)
-
Update, After some back and forth the fact is this unit is setup for 1 temperature, so ideal for UFH. It doesn't do half the things the manual says it does. It does not have an input for temperature. It does not have any other outputs that can be picked up to use third party controls. It does have an on off option, but not sure what the control panel will actually do. Could I use it at a set temperature e.g. 46 Deg, and heat the DHW and Buffer to this temp, controling with a standard 2 channel programmer.? not sure, but then what efficiencies would this produce. I've still not got confirmation I can return yet, I think I'll have to pay return carriage at least .🥲 So will push for a return and see what unfolds.
-
It's been a while since my last blog, but we've not stopped, the days are shorter and the weather skipped autumn🍂 and dived into winter with a few storms and loads of rain. Our windows are budget friendly triple glazed UPVC, and composite doors. The external EPS was sealed at the cill with EPDM airtight tape, the tape has reinforcement in it and can be moulded, it does crease but creates a water tight junction and sticks like the proverbial to the EPS. We created a cheek reveal with an additional layer of 50mm EPS and sealed the upvc frames against this, I then ran a bead of sealant against the face and edge of the EPS giving two seals. Then when clad a third seal. I used soudal air tight foam and I thinks it's LMA sealant, soudal's airtight solution. The winds gave good opportunity to test for air leaks when had several days of 35mph winds. This proved a good test with a smoke pen. The internal frame was sealed with soudal sf40 which adheres very well to the upvc and timber blocking, when cured it is like rubber. The cladding is larch boards in 2 widths 150mm for the bottom layer and 100mm for the top. We finished the top of the windows with a custom palistol coated drip The bottom of the EPS footing was finished with reclaimed slate. Inside we are having a cold roof. We needed to add 25mm pir under the truss cord to satisfy the tightened regulations in Scotland. We tapped the foil boards with foil tape, and the perimeter boards were pushed to touch the wall plate. Then used airtight foam between the PIR and internal IFC wall creating a seal. Under the PIR I used plastic membrane that I spray glued to the PIR, and this draped down the perimeter walls. The under ceiling was battened and counter battened, this created a service void for the cables and not penetrating the loft. The plastic was jointed with EPDM airtight tape on joins and walls. Cables were put inside Flexi conduit that was cut into grooves in the ICF. (All water pipes were run under the slab.) This picture shows the detail for the airtightness and the service void. MVHR ducts (7 plenums ) were run in the loft, and under 400mm of loft roll. The manifolds are also under the loft insulation. I made these airtight using the same EPDM tape. I made gaskets out of the plastic with a circle cutter and stretched it over the plenums, then air tight tape to seal everything to the plastic/ PIR. The walls also needed some IWI to meet the tighter regs, so decided to go with 25mm PIR. This also added another seal for the plastic airtight layer and walls. The poly steel ICF has these metal plates at 150mm ctrs that allow the cladding battens to be secured externally and the plasterboard internally, we used self tapping drywall screws and insulation discs to hold the PIR in place before installing the plasterboard. Picture for detail below. At this stage we've got a large airtight box. Now it's a case of installing the stud work. I lined the plant room with pre painted 12mm OSB, and the bathroom with 18mm OSB ( a Scottish building regs requirement needing the ability for future hand rails etc) Electrics are simple, a few Ethernet points and sockets and spotlights. One pendant over the dining( and if I get my way, and budget allows pool table). The only penetrations from the loft are a light, PV cables, TV aerial, and 4g antenna cables. These are in conduit and sealed both ends. All other cables run in the ceiling void or stud work. I've put a few sensors in the studwork for future Arduino projects to accompany the in slab sensors. The plant room is compact, and work in progress. The PV is up and running and to date produced just shy of 300KwH in 5 winter weeks With the first fix complete it was time to plasterboard, we got 80 boards delivered Wednesday midday, just as storm Babet hit, it was too windy to bring them in, I tried, I failed so it had to stay outside 😭, covered in plastic, tarpaulins, scaffold boards and the obligatory ratchet straps. 3 days of constant 35mph gusting 50mph gave opportunities to check for airtightness. I managed to install the flush shower tray during this downtime. Once the storm blew though we got the boards inside and cracked on, the open plan lounge, diner, kitchen was boarded first and as soon as it was complete I skimmed the ceiling, 11 boards was too big for me and my tennis elbow, that coupled with not plastering anything for several years. I split the room in two and used several layers of scrim tape to plaster up to, then remove the scrim tape and skim the 2nd part. It worked well, and it's painted and the join is seamless. The next few days we mixed it up skimming in the morning and boarding in the afternoon for the next day. Today is day 182 of the build, this is basically from the cleared site that was down to rock with the pecking already done. Currently the house is fully skimmed, most of the ceilings have been primed and painted white and we started the kitchen install today. All the bathroom is here waiting to be installed, and some appliances are here most arriving this week. This has been pretty much 7 days a week, with only around 12 to 18 days off to earn some money and pay off some labour debts. We're hoping to move in, in 2 weeks with a working bathroom and kitchen 🤞, the static has now reverted to ice box during the night🥶
- 14 comments
-
- 14
-
-
- the windy roost
- icf
- (and 1 more)
-
Sorry, I missed this. Basically the slab is very good, I did put screed bars / expansion joints into the slab and the only cracks follow these lines. around 90% of the slab is flat and smooth. the worst areas were the edges where I couldn't get the power float, and the sun made finishing with a trowel due to drying quickly impossible. There were a few high spots which we have ground with a diamond disc, unfortunately this exposed more of the plastic fibres, the fibres used in out slab are around 50mm long 1mm thick and 2mm wide, so quite chunky things really, and the result of this is that there wont just wear away, and a blow lamps to burn them off is not satisfactory. So decision made - LVT flooring it is..
- 14 comments
-
- 1
-
-
- the windy roost
- icf
- (and 3 more)
-
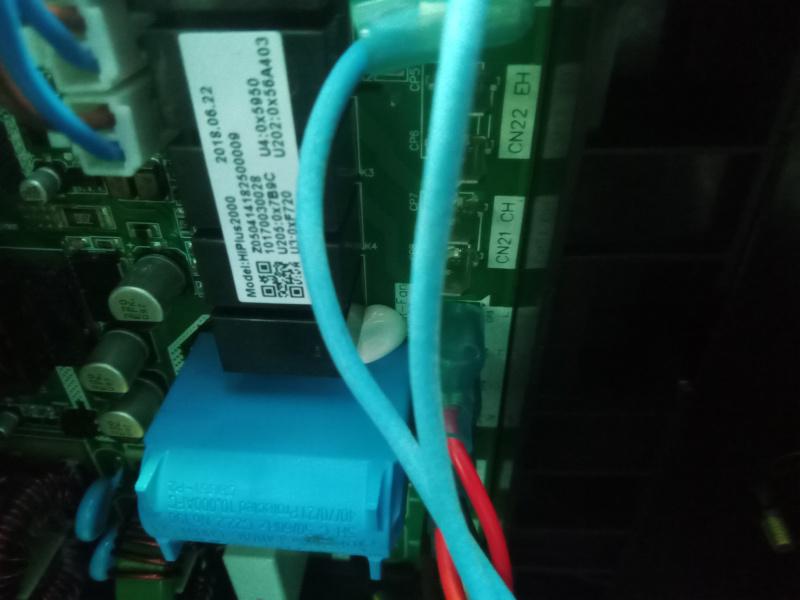
@ProDave mentioned pictures for the pcb. so had another look. its difficult to see as its mounted on part of the frame upside down. there is a large heat sink but to me only one PCB and all the wires go to this. I would have to dismantle a lot of the frame to get a better view of the PCB. /////im thinking its time to cut my loses and fight for a return and buy a more mainstream product, @dpmiller, @ProDave thanks for the info, might put a cable to it tomorrow just to see, but going forward, I'm pushing for a return.
-
It shouldn't be, the controller should control everything.
-
Here's the Manual. the PCB is difficult to photo as its upside down on the top of the unit. I took this one, but not much help. if you read the manual P12, the unit should operate controlling heat & DHW, it is not supposed to be a dumb unit. Its like the manual is for a enhanced unit possibly, but there is no mention of other models.. so if the controller does work in the way it says is will, then I assume it will give an error as there is no tank sensor, E20 Page 18 the wiring diagram on P20 seems to mirror what I have, the attached photo shows CN21 CN22 which are listed as blank, P1 &P2 wires trace to the PCB @ TH6 so possible should be a thermistor for the tank?
-
I was thinking this, but the controller is not dumb, it controls the temperatures, so I don't see how the two could work together. I don't want to wire / plumb it in to experiment, it should do what the manual says
-
Would a volumizer not help in this situation? It sounds to me like the water volume is not enough, and you are getting short cycling? - but what do I know, I can't get mine to work😥
-
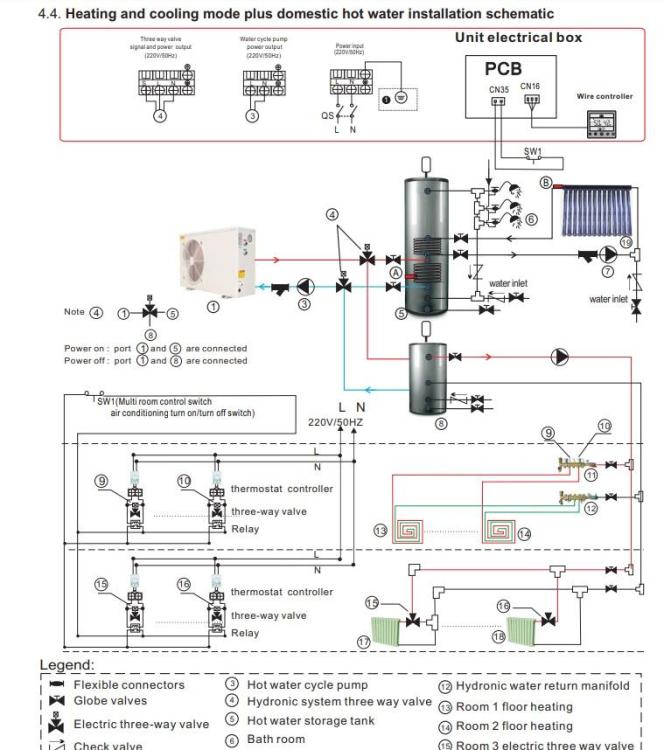
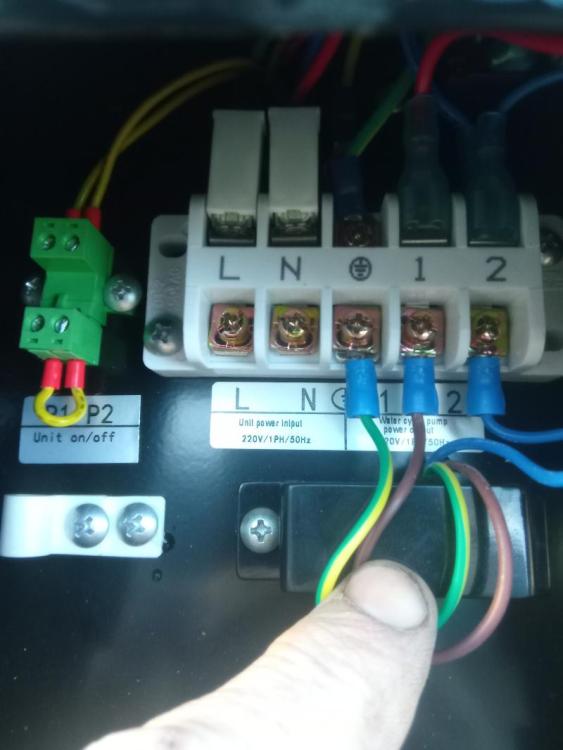
UPDATE: So I bit the bullet on one of these units chatted the to guy who owns the company and got a good deal, £1140 Inc vat delivered to the Highlands, The unit comes with a controller, that is pre wired to the PCB, 4 wires on a detachable lead. the instructions show the connections / setup I'm planning to use. My Setup is a pre plumbed cylinder with tank and buffer. I've connected the buffer on the return to the ASHP. so ASHP - to UFH manifold - TO Buffer - back to ASHP, just using the buffer for volume. The Manual is "Chineslish" so takes a bit of reading, but in general it seems to do as required. The controller can work in DHW and heat / cool mode. and this diagram suggest all is as it should be. There is a section in the manual that explains the importance of the tank probe (A) (I assumed this would be a thermistor) and how to fit, but doesn't mention how this connects to the ASHP. Fast forward to unboxing, the unit is well made, the casing etc isn't thin and flimsy. the powder coating looks decent and is inside as well. and it looks like it should do what it should do, so this is the good bit 🥲. There is the controller and wire, some feet. and that's it. no tank sensor.. Looking at the control panel this is what I get. L,N &E in, LN&E for pump output, but this is connected to the internal pump, so safe to assume this will be energised when the unit is running. there is not any control for AUX pump or 3 way valve as per manual. I ask the questions: 1, where / what type of probe do I need, and where does this connect 2, where do I connect the controls for the Valves as shown in fig4.4 above. After a week the response back from the supplier via the manufacturer is "You don't need a tank sensor, its controlled by the input temp / output temp of the unit." I counter with, The Controller has error codes (E20) and a display for the tank temperature (o1), also how do I control the valve? a bit more back and forth and they say the unit only does 1 temperature, and you can control valves with external relays etc...? now I'm thinking there is some mis-communication and language issues here, as the unit must work?. Eventually they tell me they will get a guy to call me, I think at this point they think this is me being numb, and not knowing what I'm doing. after a further two weeks, I speak with a guy, who does not work for them, and has not fitted them, but is a ASHP fitter of some 20 years, and ultimately comes to the same conclusion as me - it should have a tank probe, and there should be some way of communicating with the unit to differentiate between DHW and heating. Unless anyone here can see what I'm missing, and how to get this unit to work, it looks like I'm going to try and send it back... so now looking for an alternative. -- need to get some heat on the static is already Baltic.🥶
-
@Thorfun word of warning, don't look at the XL joinery book for doors, especially the coffee themed pre finish options. They look amazing but £££
-
Up very North, my options are limited, but there is a Howdens. For the Kitchen I planned ours using DIY kitchens, but they won't deliver here, I could collect from Yorkshire though. I got a price (no worktops ) around 4k. Went to Howdens 7.2k, I sent them details of the diy Kitchens, and in the super sale they price matched. But they have a leaflet on each competitor, and list the differences, reducing the offering to match quality.. one example being that DIY kitchens soft close option is an add on to the draw box, and clip on soft close for hinges. ( I'm told?). Bottom line, you need to haggle big time to get a decent price. We ended up paying 4k for the full kitchen, with an upgrade to the walk in larder. Our concession was the removal of the cutlery draw and bin which I'll get elsewhere. They were a ridiculous price.
-
all Q1I bought 12 acres and had a lot to do, trenches, materiels etc. So I bought a ford 550 backhoe loader with pallet forks. It's been fantastic although leaks oil and only starts with a sniff. But, and this is a big but, trenches are not easy, as you have to reposition a lot, and if your in a tight space i.e. working next to a fence then even more moving. There's times when a 360 would have been so much easier, but in general I'm happy I went this route. But it will be sold soon.
-

Position of UVC expansion vessel?
Jenki replied to lakelandfolk's topic in Boilers & Hot Water Tanks
That course was worth it's money👍. Nailed it. -
Picked the right weekend to put the gutters up...
Jenki replied to markocosic's topic in General Self Build & DIY Discussion
We had 36mm in 6 hours 2 days ago. I. It's self not massive, but we have about 5 acres drain towards our track. Our pond (part attenuation) rose about 400mm so around 3000l. -
Inflated costs. My 4kw PV, ASHP and cylinder, UFH will /is DIY install and it will cost less than £7k, but self build is horses for course's.👍
-
I was told we were eligible for the grant , but it needed to be MCS installed, which I declined.
-
150mm or 125mm concrete screed over insulation for ufh?
Jenki replied to JayDee's topic in Underfloor Heating
The fibres in our slab were approx 50mm x 2mm x 1 mm. @saveasteading the slab didn't have any large cracks👍, and the plastic rails/expansion joints seemed to work. I've not got around to "fettle" the edges yet. We are water tight now, so this will be a rainy day job. Just trying to get the larch cladding fitted before the weather really changes. ( it was 23deg two days ago, and 7deg @ 7 am this morning.( 8 in the static🥶) -
Recommendations for a lock box
Jenki replied to Adsibob's topic in Networks, AV, Security & Automation
I moved to the highlands, haven't got a key 😂 -
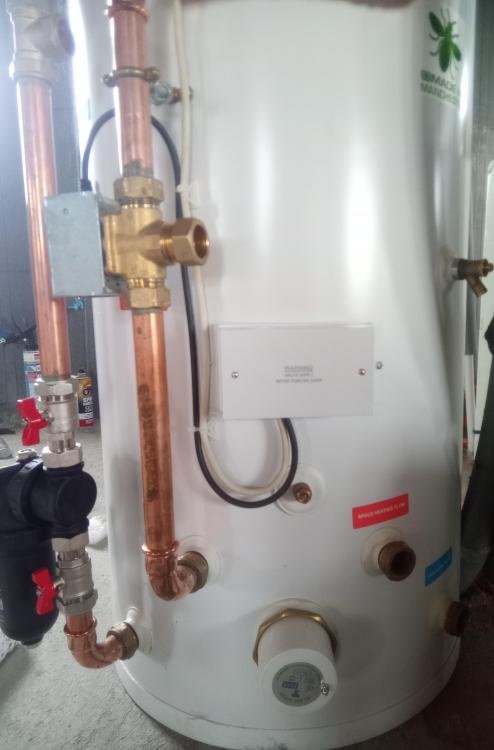
This feels like a good place to add to rather than a new topic. My pre plumbed tank with buffer is 4 port. My UFH loops have approx 30l water, then Around 8m flow and return 28mm pipe. So the buffer is required, plus it gives me an immersion for solar divert. If available / required. I'm thinking of re-piping and blanking two of the ports off and putting the buffer in the return leg to ASHP So my thinking is bottom of three way connected to UFH manifold. Blank this port off. The return from the manifold into the buffer (RH top port- red label). Blank off bottom RH port. Leave ASHP return as is. Any issues with this? However I like the idea of having an additional pump to circulate water in the UFH circuits to even the slab temp out with any solar gain etc. But this wouldn't be possible if I did the above🙈. Decisions, decisions P.s. the buffer is just 4 bosses, no additional dip tubes, baffles, pipes etc inside.
-
RAAC autoclaved concrete, what about mannock blocks?
Jenki replied to CalvinHobbes's topic in Brick & Block
Don't worry 😜 -
My G3 course was £300 in Inverness.
-
I did mine a few months back for the same reason. (Inverness ). You have to renew every 5 years.
-
It's a 3 Weetabix type of day
-
If your saying the fitting supplied won't go over the 102dia then I would buy a pan extension, but still fit the original pipe but cut it as far back as you can. I.e flush or indented into the wall. The supplied pipe will clip to the frame. Heights is just a simple question of working backwards. I find it easier to fit the waste pipe and flush pipe to the WC then sit the WC on the floor upside down, (WC lid on the floor.) Then measure the centres of the pipes from the floor. Then draw a line on the wall at the height of the WC seat..and use the measurements to mark the positions of pipe centres. Easy😉




