Carrerahill
-
Posts
2132 -
Joined
-
Last visited
-
Days Won
10
Everything posted by Carrerahill
-
Timesaver coupling - has anyone ever used one?
Carrerahill replied to Carrerahill's topic in General Plumbing
Yeah, I told the merchant exactly what I needed to do. Whatever way we look at it, it was wrong. Not quite sure, if I could pick the brain of a older plumber I am sure we could fathom it out, the B&Q guy is older and was a plumber, he did comment the pipe I brought in had an oddly thick wall to it. I need to return to the merchants today, to get some 45° elbows and return the Timesaver so I will see if there are any older looking plumbers about and ask them. -
Timesaver coupling - has anyone ever used one?
Carrerahill replied to Carrerahill's topic in General Plumbing
Yes that is the one I used in the end with the seal removed, it looked like this: https://www.screwfix.com/p/mcalpine-dc1-bl-drain-connector-black-110mm/4255V?kpid=4255V&ds_kid=92700030947645247&ds_rl=1241687&ds_rl=1245250&ds_rl=1249404&ds_rl=1245250&ds_rl=1249481&ds_rl=1249799&gclid=CjwKEAjwlujnBRDl2teOp_veulQSJAC5bHgtNgsJa_j73r8AJsmdBOfcqXuYEuyfUda-fOod_FQsAxoCQXzw_wcB&gclsrc=aw.ds The description does say 110mm cast - that is then correct for a true 4" cast iron pipe, but the pipe here is 4inch OD - I wonder, did they mess with imperial pipe sizes? Was it mean to be more like 100mm or something? Anyway, it is in and working now, the 40mm should arrive today and I can connect into a boss I fitted for the basin and bath. -
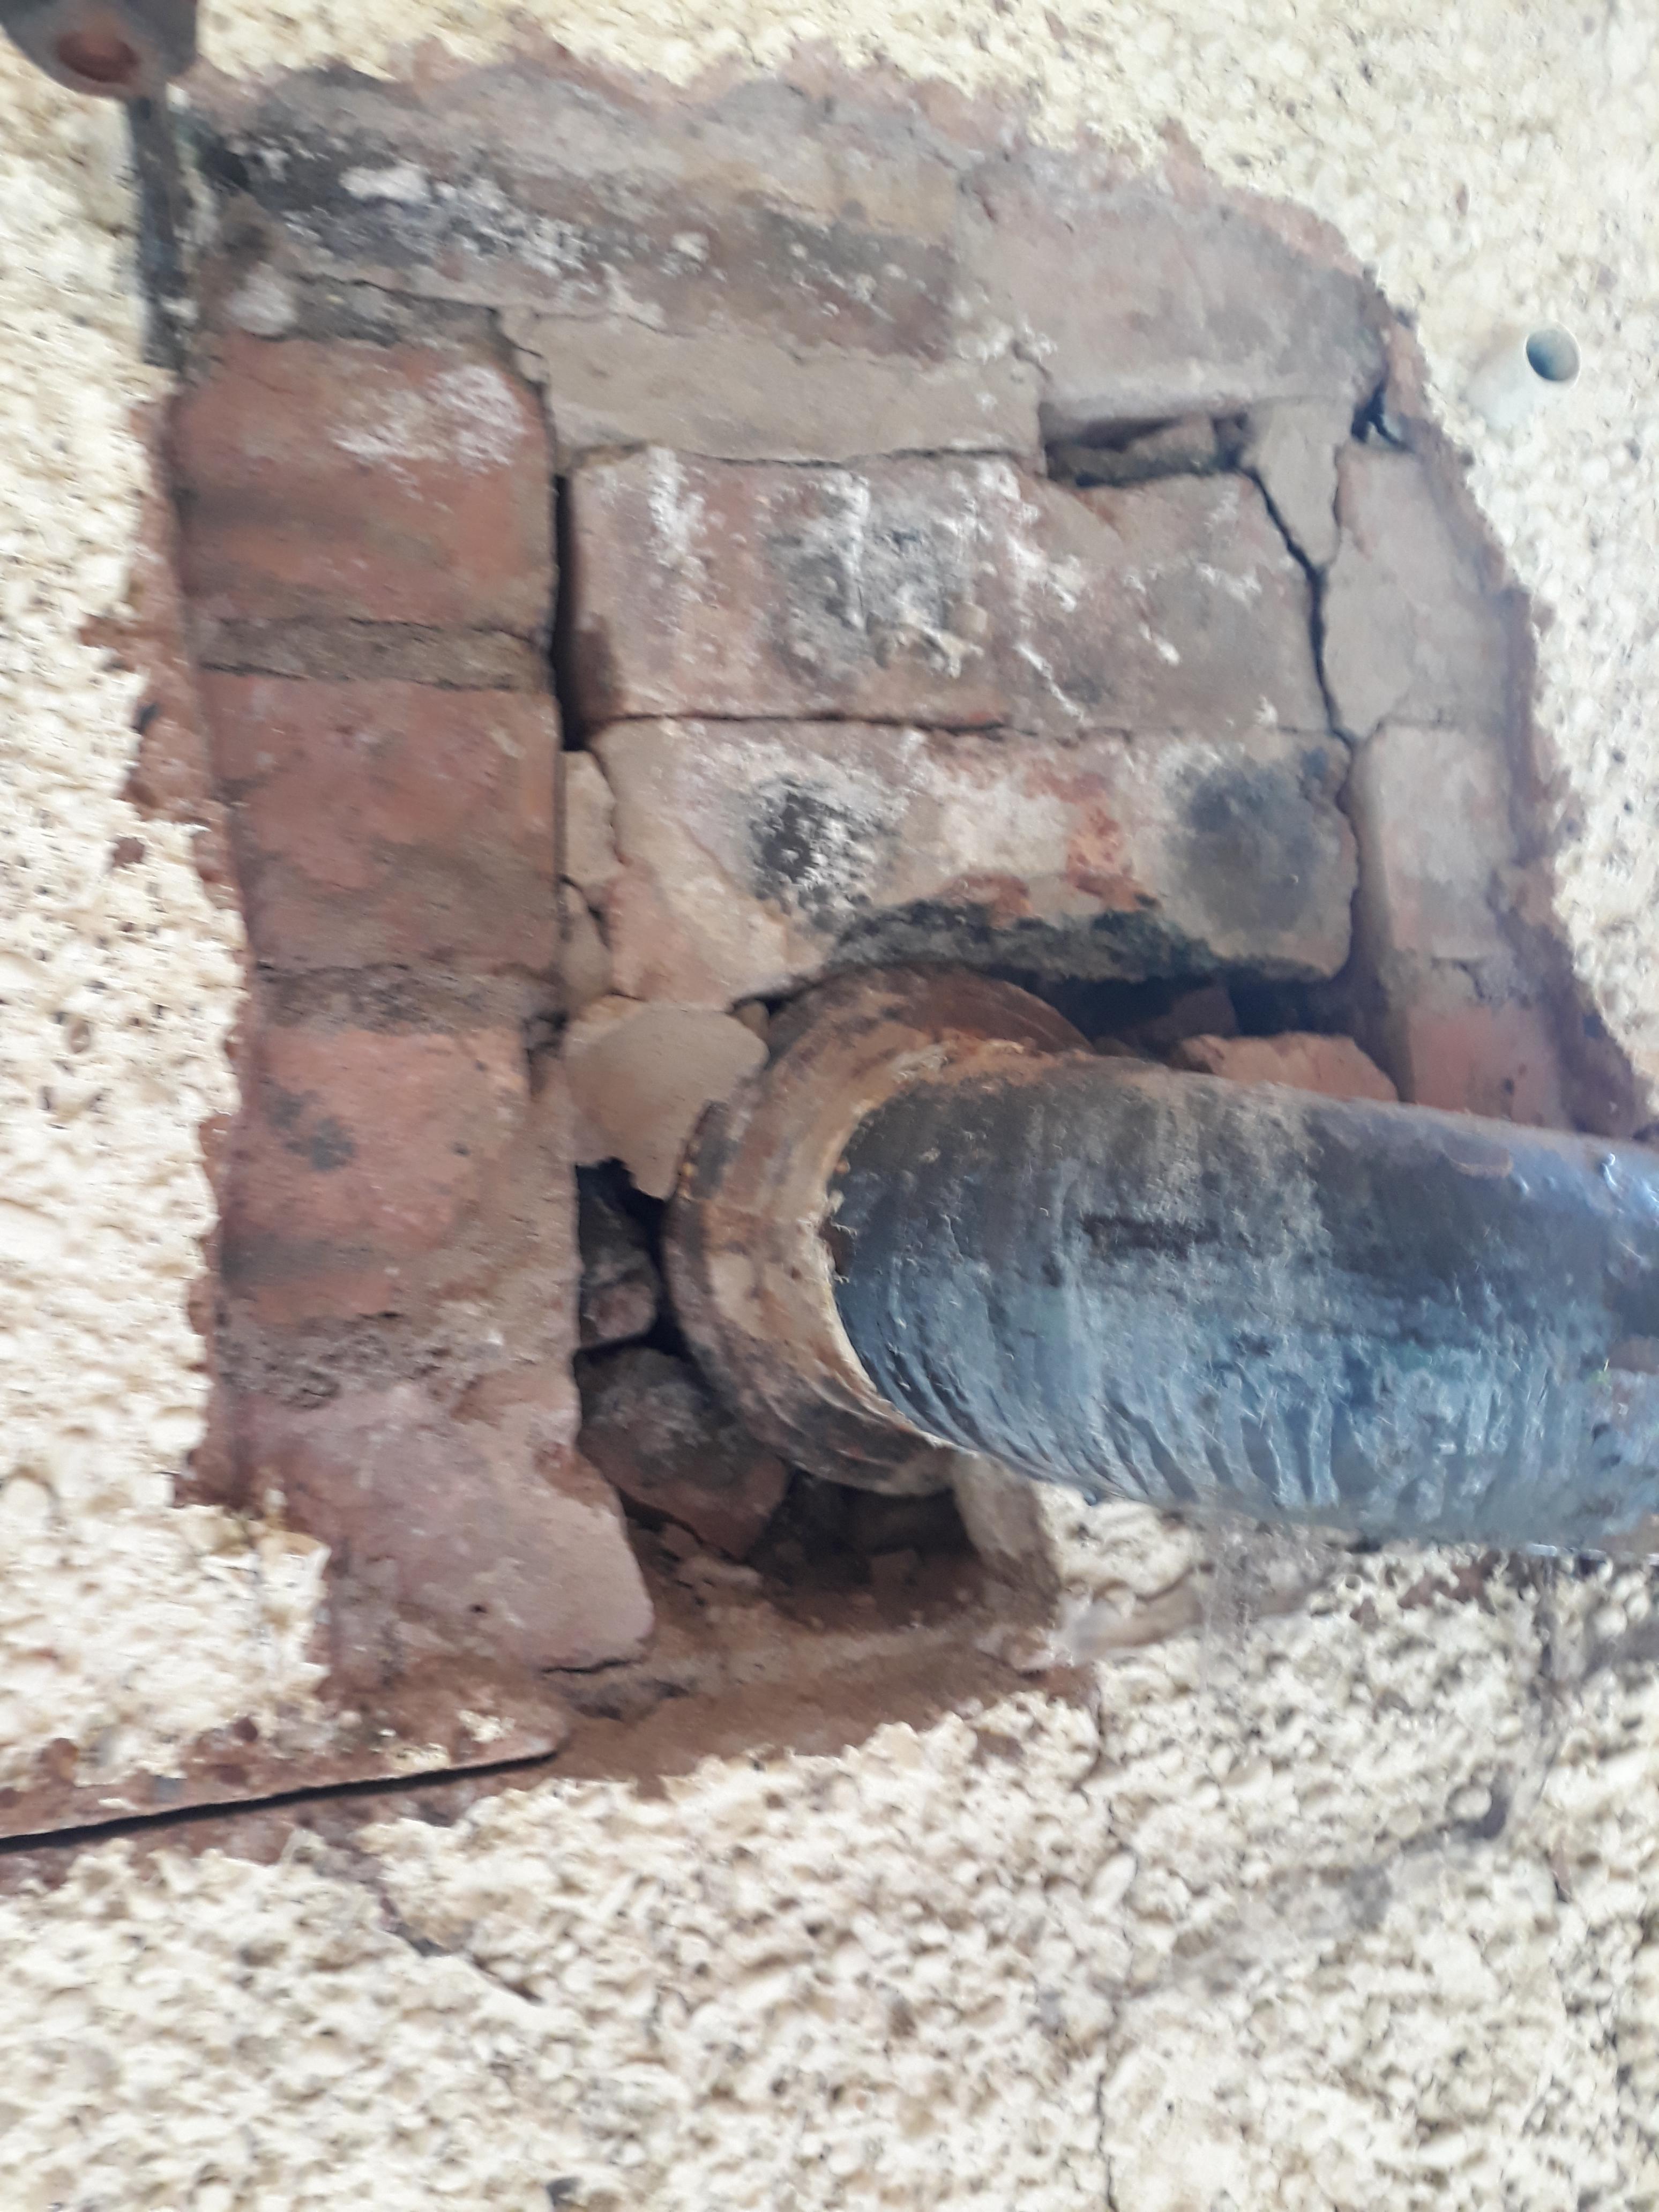
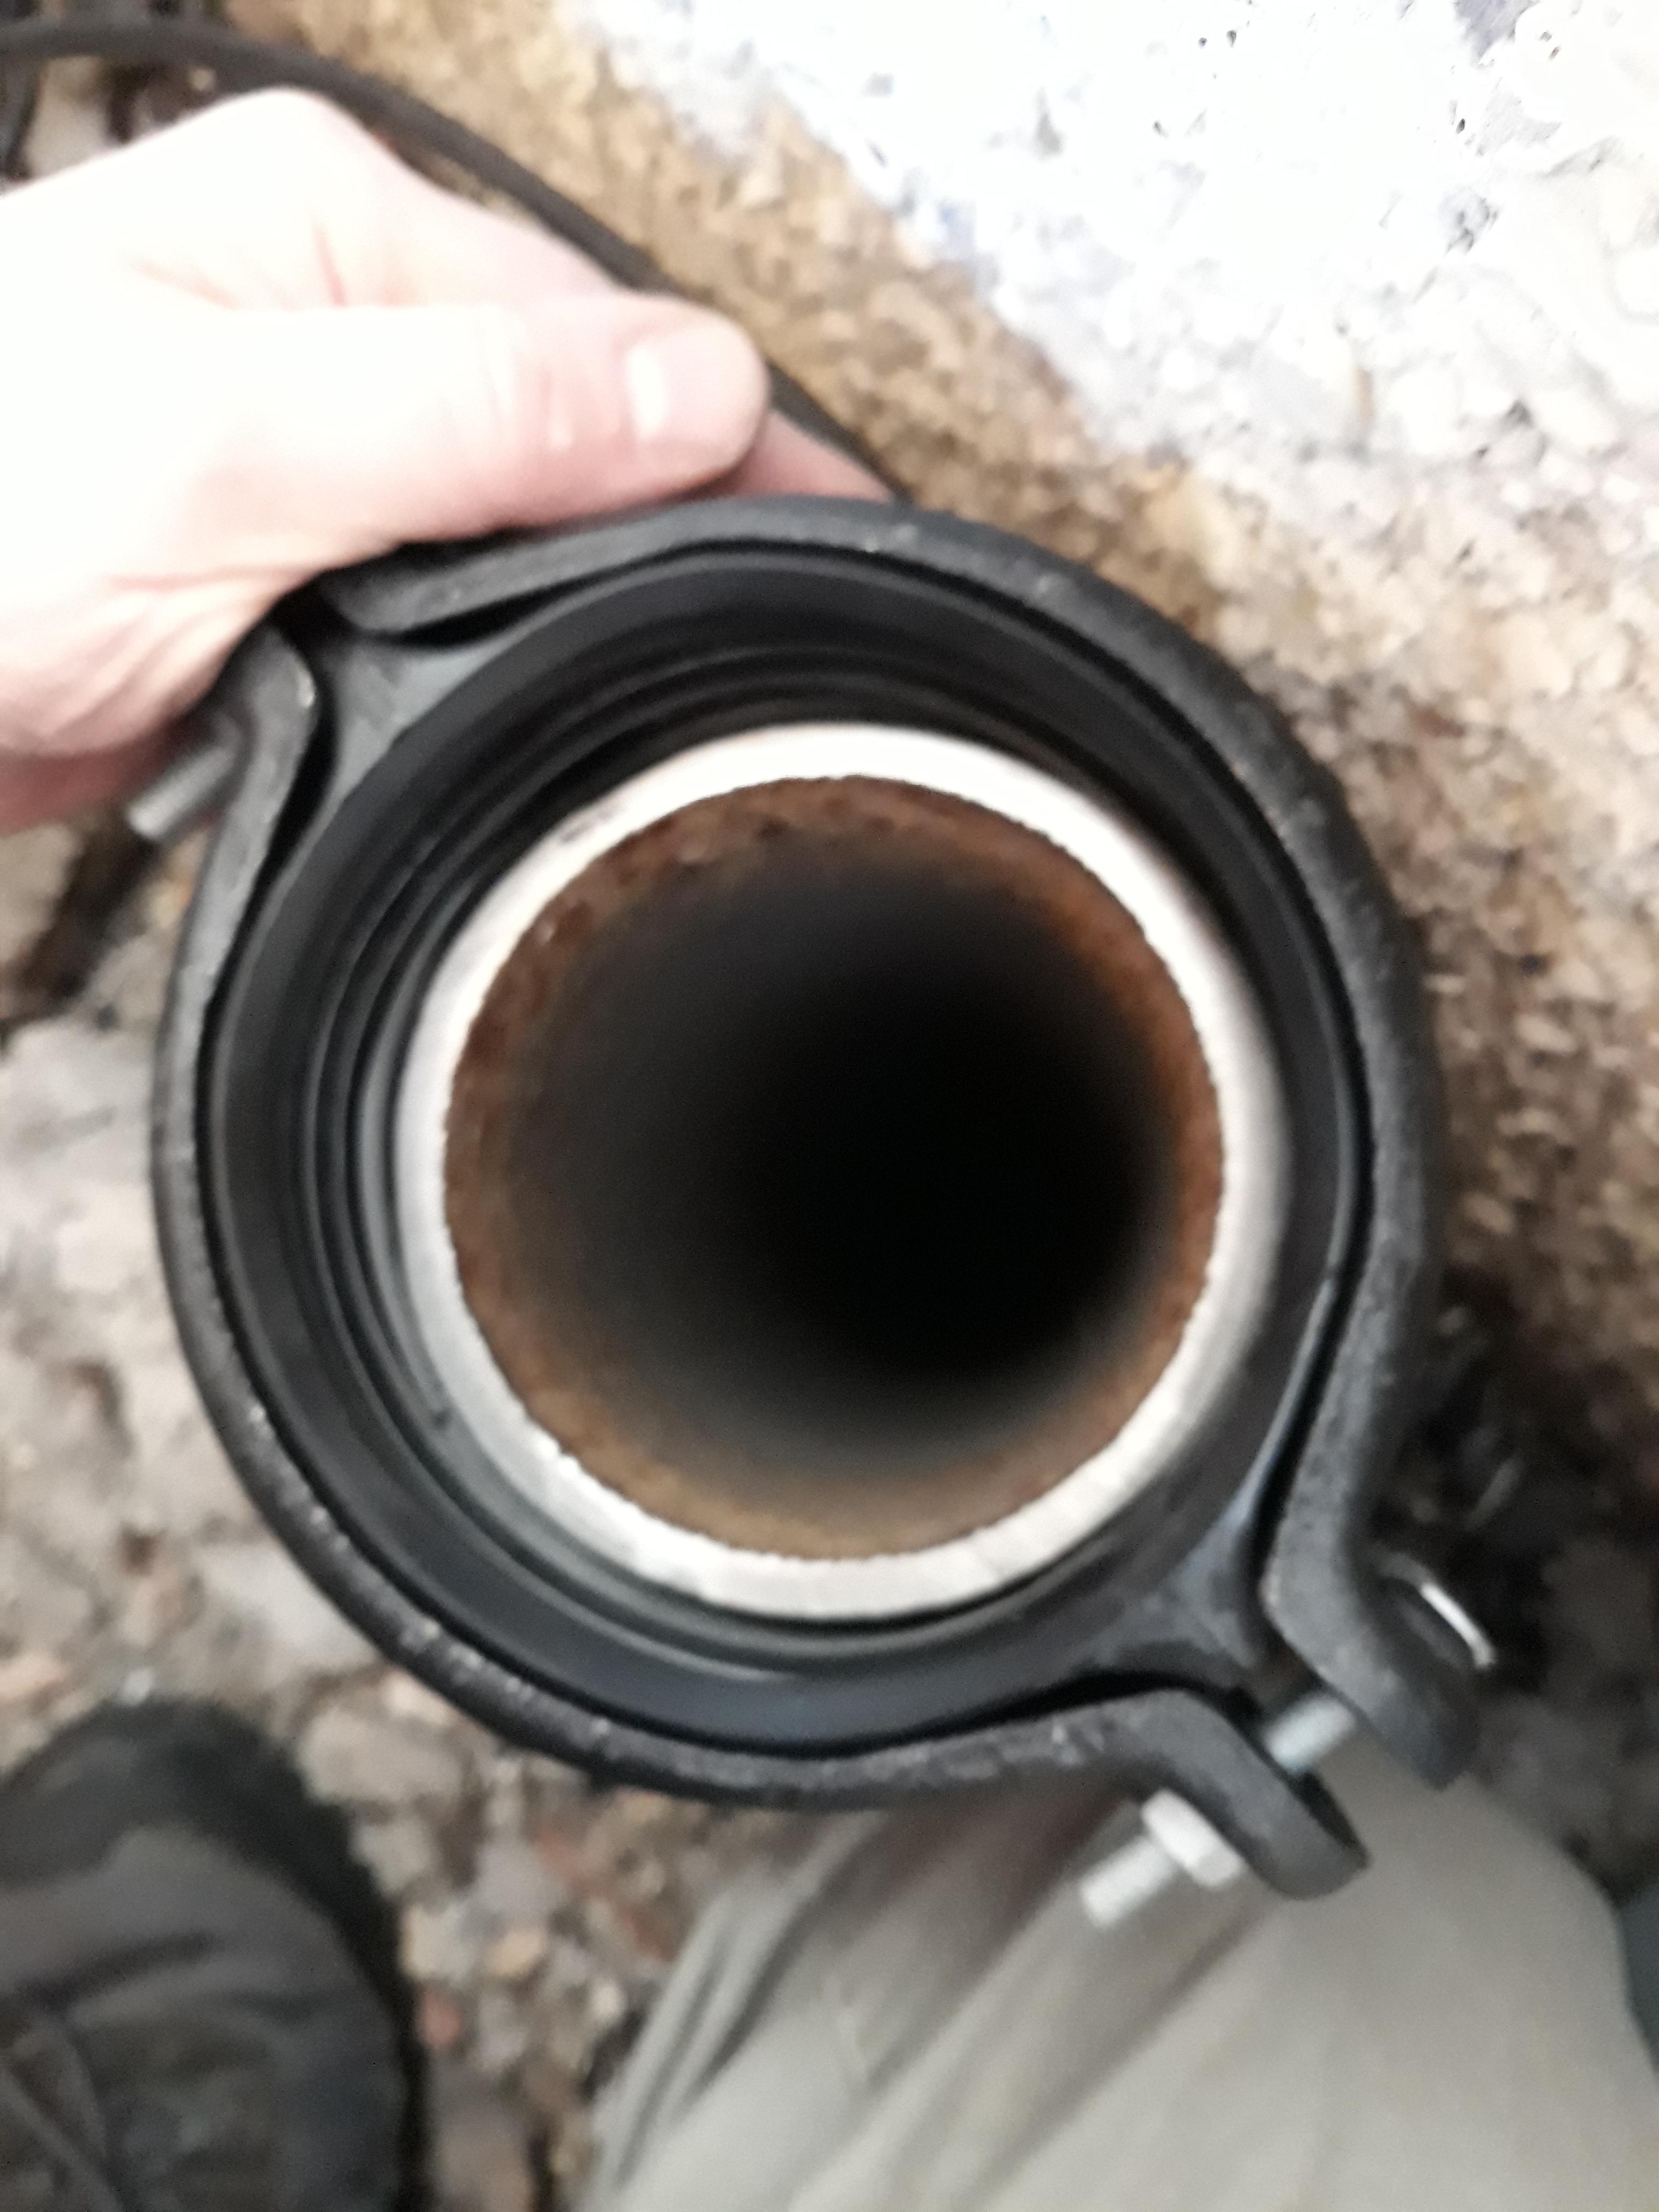
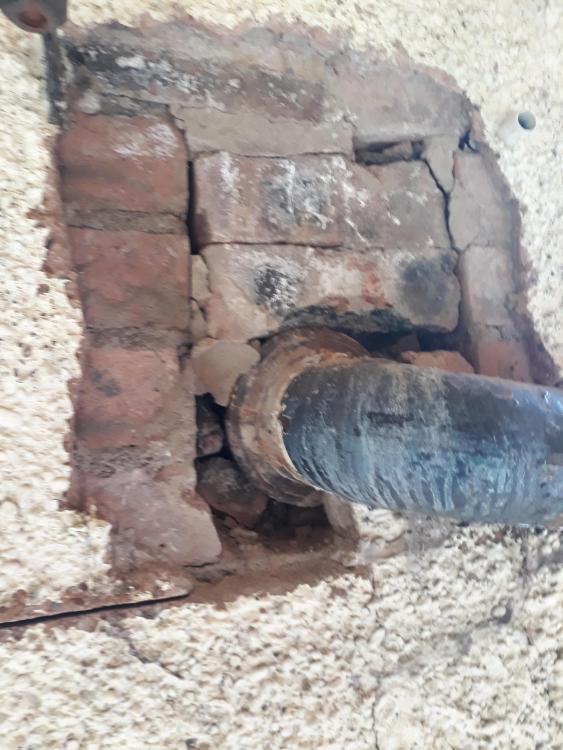
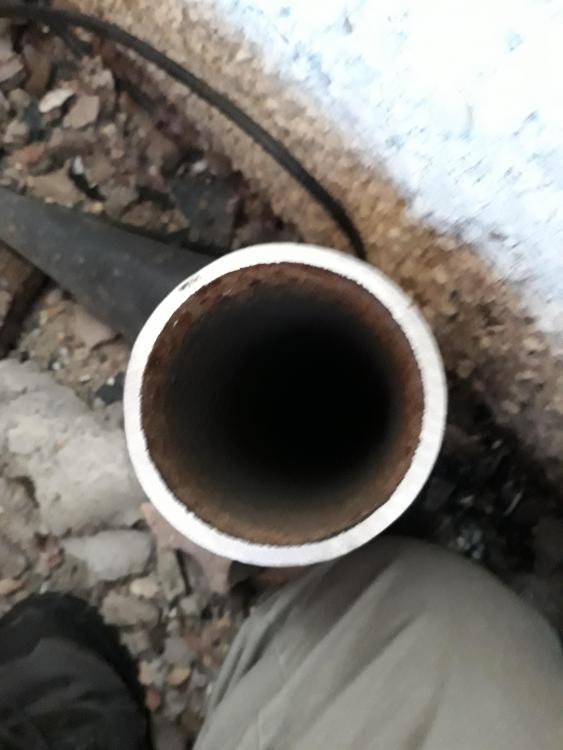
Long story short, but as part of the house extension I needed to renew a cast soil stack and tie in some other basins and showers and things into a new single PVC pipe to create a single drop for all upstairs waste which let's me box the pipe in behind kitchen cabinets in the new kitchen. I had everything sitting there to do the job and as my wife was away last night I decided it was a good day to cut the old stack down and replace it. Everything was going seriously well, when the house was built the brickies must just leave 3 bricks missing in each leaf of the cavity wall so that the plumber can then run in his soil pipe, then it looks like they just stuffed some bricks in the hole and the roughcaster simply roughcast over it all as when I started tapping around with my hammer it just sort of fell in! Which meant I ended up with a cracking space to work in, I was even able to vacuum out the lead cavity tray and clean it all up a bit! So within about 5 minutes of going up the ladder I had the bricks all out and the bricks from the inner leaf out and I could literally see the pan connector. This was going to make it all rather simple! So 9" angle grinder out and the stack is down, with lots of care taken to get a good level cut about 1' from the oversite concrete. Then it was time to fit the Timesaver, for those of you who have never heard or seen one: https://www.wolseley.co.uk/product/saint-gobain-gt01-pipe-coupling-100mm/ This was sold to me (£25) as the bee's knee's, the "boy for the job", "the thing all the plumber use", "I have sold these for 30 years and that's the puppy" - so feeling rather confident I bought that and went to fit it... Errr: Photo is not crystal clear but that is a fairly reasonable air-gap around most of the pipe, doing what I do for a living and hobbies I am used to small tolerances, things that just look right and create good seals - this did not fill me with confidence at all and for the money you sort of expect a neat fit. I Googled and it looks like no one has ever used one and made a YouTube video or forum post. I went to the plumbers merchant and spoke to the owner who rang up a plumber for me, I spoke to him and he said that they do wrinkle up a bit on tightening and don't always look neat - just tighten it down. None of this filled me with confidence either. I decided to give it a go, so with a new piece of PVC pipe on the factory clean cut end I made the joint, sort of difficult as the PVC pipe wanted to slide over the cast (it was almost a perfect fit, not that I would, but it was so tempting to cover the outside of the cast pipe in sealant and just sleeve the PVC pipe over it) so I manged to line it all up, got the centre lip which acts like a stop to sit right on the end of the PVC pipe then lined it all up and tightened down the collars. Looked OK - seal was sitting fairly square under the collars, felt solid. So I went and got the hose. Hose on, water pouring out from the underside of the Timesaver - I knew it, there was no way that thing could work. So I took it all apart and went to B&Q (now 20:15) with a piece of my cast pipe and I got hold of a guy in there who I know was a plumber and very knowledgeable, he was a little perplexed by it all but he, as always, was prepared to find a solution. Now if you Google PVC into Cast Iron, two options are at the top of the page, the spigot type McAlpine connector which pushes into the cast then has a standard PVC coupling on top to take the pipe and the flexible rubber type with two jubilee clips. However, if you look at the McAlpine connector it says 110mm cast iron pipe - my cast iron pipe is exactly 4" OD - or about 102mm. So the push in part with the seal wouldn't even look at the pipe I had! The B&Q guy then pulled the rubber seal off the spigot connector and it slid into the cast pipe absolutely perfectly. So we both agreed that as the spigot was sleeved into the cast by about 60mm on a vertical section of pipe it should work fine, I also added a big bead of silicon round the top of the cast pipe so when the spigot bottomed out it sat down on and made a good seal. So it appears that I have an odd size cast iron pipe, so the Timesaver, flexible connector nor the McAlpine were ever going to fit! I am worried that this is a bodge, I hate things not being correct, but I know in soil and underground drainage things are a bit Heath Robinson looking sometimes. At the end of the day the thing I bought was to do the job I needed, the only difference being the seal that came with it was not used and through a tight fit and bead of silicon I think it will be good. The only issue I see is if there was ever a blockage and the pipe started to back up, in theory it should never leak, in theory it didn't even need the silicon. But, as bad as it is, I am tempted to build some shuttering around it and pour in concrete over the whole joint so that the whole lot is encased. That will make me happier as this is going to be under a suspended timber floor with probably no access. Anyone else come across this sort of thing?

-
Where are you? If you arrange it with them I will collect it and post it to you...
-
So I take it you have been told the landing windows needs to be a means of escape, if not, then as it is not a habitable room does it need to be? If the glazing is over 800mm it need not be toughened, as for escape route, if this is a proposed escape route on a plan as approved or requested by BC then yes it needs to be between 800 and 1100mm above F.F.L - if your rough opening is 790mm then you are going to be more like 850mm by the time you finish with the sill and the frame of the window. If there was any doubt at all, I would simply raise the whole lot 10mm then start and order a window 10mm shorter than originally planned. I would very much doubt BC are going to measure it if it looks right. Is this a new build? Does the landing window open onto a roof? If so then the regs are 600-1100mm.
-
It needs to be Borosilicate or Ceramic glass. Call D&N Glass in Glasgow - I know they advertise it and I have worked with them before.
-
A little confused on SWA sizing for mains supply
Carrerahill replied to scottishjohn's topic in Power Circuits
I love these "electrical engineer architects"... Speak to DNO, if you end up generating so much electricity that you need to export over 100A then this cable is the least of your worries. -
Go to the manufacturers website and if they have BIM objects they will list them under downloads. If a product warrants a BIM object existing for it and the manufacturer offer them (MK, Marley etc. do), then ultimately yes that is how it works. When we do M&E drawings, often ducts, conduit, HVAC units and cable tray, pipes and things like that can be drawn within say a ceiling void accurately so that we can ensure it will all fit! To be honest, it's a bit of a pest. For a house I wouldn't waste my time and I doubt sketchup could cope - we are doing it on Autodesk products like Revit and even then there is the "super-computer" to handle the big drawings like entire floors of office blocks etc.
-
I did PP and BW applications simultaneously for speed - we were certain PP would be fine with it so were happy that changes would not be needed and in the end PP and BC arrived almost the same day. As said in my post just above this one, but written after the post I am now replying to, PP want to know how the thing will look, that includes finishes. Renders and woods and tiles and slates and downpipes etc. So you have PP? If so what does it detail for the buildings finished look? Render is it? So now you just need to pick an acceptable wall construction that is finished in render and apply to BC to for approval
-
PP is what it will look like and the impact it will have on the surrounding area, PP really only concerns themselves with the external appearance - that is PP in a nutshell. Alongside PP you also need your approved construction detail which will be approved by BC - they want to know how you are going to build it right down to the size and type of nail you will use to nail the ceiling joist to the wall plate - I am not kidding! What BC expect is a set of relevant drawings and details showing how you will build your building - you can't just say - "I will build a render finished building" and build it however you choose - it's really there to ensure buildings are built properly and with good thermal values, fire safety etc. It may also impact the rest of your house, in my case I need to add smoke alarms to other rooms and a fire escape window to the old kitchen. So for my extension there is a fairly simple drawing showing the extension and make up of the wall in plan, where windows and doors will go, where pipes, electrical will go, where fire-stops will go, etc. Then there is a standard wall detail which is a written section that basically says: "19mm render on 100mm block with 50mm cavity then reflective breathable membrane onto 12mm OSB on 125x45mm studs @ 600mm centres, insulated between with 100mm PIR then plaster-boarded with foil backed 12.5mm PB." There was also a typical TF wall detail drawn which shows window opening/lintel details etc. So you need to work out a wall construction, then detail it and that is what BC will approve (or not).
-
Quite a few options for you - BC will have their say. On the garage I dug the founds deeper and made some basic shuttering so the found took a step and ran under the soil pipe, then stepped back up on the other side then lintels over the top, to correct the height of the lintel to match the blocks either side we made it up with engineering bricks on top of the lintel (single course) so the 150mm lintel + commons = 1 block. We did a solid row of lintels and grouted over the lot so insets and mice etc. couldn't climb up into the wall. We filled the void with gravel - it was low enough that it had no impact on the floor slab. Google image search shows about 100 ways people have done it. I also like the box it out and pour founds over it method, but you will need to make sure BC are happy there is plenty concrete and probably a bit of rebar.
-
I understand roller shutters are fairly secure - if you damage a lath it will deform and pull out of those above and below it, so you end up having to work away at multiple laths to gain entry, sectional are bigger pieces and can more easily be broken as once you damage a section you have compromised a larger section. You can also get high security roller shutters which are basically just put together with heavier laths. Knowing what I know now I would probably buy all the parts and assemble my own roller door - I can weld which helps to fabricate the channels but there is nothing to them and the rooler door places sell all the bits you need fairly inexpensively.
-
That looks about reasonable, not cheap, but not unfair I don't think - depends how well he does the job right enough, everything properly clipped and terminated etc. that is what can consume time and drive costs up when it costs you £20 just to terminate some SWA properly. The outbuilding and sockets in the caravan seem fine. Most of the cost for the supply to the caravan is going to be the SWA itself at about £5.50 per meter - £192.50. So then say another £100 for the other bits and clips and glands and what not. Call it £300.00 in materials then he is on £278.00 for his work, I assume there is a fair bit of effort in the 35m run? Then he is a couple of hours terminating the cables, installing the board, testing etc. I would think about doing the SWA run myself if that would save money - but you must agree it with him or he may be a pain about it and refuse to sign off a cable run he has not done. Is it in a trench? Also, is the caravan supply for temporary use while you build or is the caravan a permanent install now?
-
I don't think you should rule out block, I have just done my TF for my extension and to be honest, it would have been cheaper to do it in block knowing what my brickie charges and the material cost - I did mine in TF as it let me do it myself (I can lay block but not fast and if it is not perfect I get annoyed and pull it down) - I can carry on inside and the block will go up mid June. Remember with TF you have your sticks in various sizes and sistered up for cripples and lintels and things so you burn through lots of timber, then it's fully sheeted in OSB then you have membrane, then your timber firestops/door-window aperture surrounds, then you have the time it takes to build the TF and the materials to build it (1000's of nails) then rolls of DPC for sill plates and all sorts - tie downs, TF tie's, you name it. For block you are about £20 square meter. That's about £10 in materials (block, sand, cement) and a £1 a block laid.
-
QS Costings versus The Real World Query?
Carrerahill replied to Powerjen's topic in Surveyors & Architects
It depends on how good the QS is and how well they keep their library of information up to date but also who they are reporting to and what their liability would be. When our firm QS things we use a library of costs that are kept up to date monthly. The different engineering disciplines will also feed into the QS library when manufacturer quotes are requested for budgeting information, sometimes the QS will even just get quotes for things that may not be simple to QS particularly a specialist system where no engineer or the QS has any experience. There are lots of lazy QS's out there who will just go "ah call it £20 a point or £50 per m" and don't check real life data. I have QSed a couple of builds for myself using the QS library and I came within about 1% which impressed me! QSing should be bloody accurate, it is their job after all, think of it as an engineering discipline, if electrical or structural stuff was not done properly there could be serious issues, QS's work must be accurate or they are no good in my eyes, like a bad engineer frankly. However, like your comment about overegging, this is also true, but it is also true for structural engineers etc. it's a safety margin. When internal QSing goes on it is accurate, as soon as it is put out to a client it can often increase as a cover - but it depends on the scope of work set out by the client. If there is a chance of the client coming back to complain or start blaming people then protection is built in, prices do change, but the client can ask to see how the prices were calculated and if they disagree one way or another they can alter unit costs which will update the cost - if however the client is looking for an accurate cost and contractually there is no chance of the QS getting it in the neck then they will supply this but the scope of work document will highlight the type of agreement and it must be understood and signed by all parties entering into the contract. A QS ought to have local knowledge to within 100miles of the project location as prices vary across the nation and also should take into consideration market and political fluctuations that may impact imports. If you were a painter and you reckon the job would take about 5 litres of paint - would you quote for 5 litres or 6? I know what I would quote.- 54 replies
-
- 1
-

-
- qs
- quantity surveyor
- (and 1 more)
-
opinions on this workmanship please
Carrerahill replied to lizzie's topic in Bathrooms, Ensuites & Wetrooms
Terrible. From what I can see the tiling looks to be the best thing. The waste pipe behind the floor covering and the little sliver of flooring is bad bad bad - looks like the ceiling is not flat - for the sake of a ripped down batten the ceiling could have been over-boarded level, the tile pieces get bigger over towards the right and would do my head in. Plasterboard is a bit sparse on screws. Floor to tile mating is messy looking with little care for a good intersection of materials. There is clearly a bad case of don'tgiveafeckitis here. I am not sure how many trades were involved but really it looks like there was no schedule or it was compromised and ended up in the wrong order, plumbing/electrical first fix, then framing and boarding, possibly a bit more first fix to core for lighting and vents in ceiling, then paint the ceiling, then install vents and lighting then a careful program between flooring contractor and tiler to work out best way round depending on various details. Then plumber and electric second fix - then someone ought to take responsibility for pulling it all together making sure everything is neat and properly cleaned up. I would complain to whoever it is that is paying out and have them withhold funds. -
Yes, good call. Another thing is their availability. If they are eager to get started or text/email/call to say they can start soon then that often rings alarm bells, are they not busy? Even a excuse like a cancelled job will make me wonder, did they only have 1 other job in the queue. I had a guy who kept texting me saying he had availability this week, or he could do it now and I went right off him - as much as it is a pain, the guys who are difficult to get hold of, take days to show up and then cannot start for weeks/months are usually the best.
-
Everyone says this now and it is rubbish most of the time. Cement used in the UK is made in the UK from UK sourced limestone, clay and mudstone, brick, tiles and block all made in UK from this cement, place is awash with sand and stone quarry's, timber is mainly UK sourced and Scandinavian which so far has been impacted little from Brexit. Fuel costs are the main variable in construction materials, timber another bulky items being worst. Timber is actually very reasonable form source, if you live near a mill do a direct deal and it can be about 1/3 the price - once you start with the wholesalers then each stick that moves by truck gains 10-18% in cost for fuel. Brexit has not actually changed any tariffs or import duties "yet". It has had an impact on certain UK manufacturing for UK supply in that people are sticking to British suppliers more so if post-Brexit things go bad then they are already using UK suppliers - different if non-UK owned business or supplies are mainly for export. I have also been told in manufacturing that UK plastic output has increased, costs have gone down and this impacts British made plastic items from light fittings to uPVC windows. Someone recently nearly doubled supply costs on me and blamed Brexit, when I pointed out their entire supply chain was UK based and that I felt they were just being greedy and that I was not prepared to be lied to and ripped off they soon started to offer me ways to reduce costs. I told them they had shown their true colours and I was off elsewhere, the MD of the firm called and said he would honour the original quote (within about 5 hours of first email) - funny as I was told that the costs were now double and they could not possibly supply me for the same price... I said no thanks. Just contractors jumping on an excuse I think and I call people out on this if they try it, they often panic.
-
Has a single main contractor given you a price for the total build? If so you should almost certainly be able to save a lot of money if you A, approach some others for prices, B hire a PM or PM yourself if you can and have time and then contract in trades as you need. C simply remove large areas from the main contractors scope like painting, full internal fit out (do living area, kitchen, WC and bedroom(s) then leave the rest and do as money permits. You need to look at your costs and work out how it has been costed, most contractors will simply look at it and work out a cost based on size and construction type, so far I have saved 10k's and this was all done through QSing the whole job myself and getting all the trades to quote me individually and then work out and detail things meticulously.
-
It depends on how the walls are shared, how the roof is shared etc. If it is integral in as much as there is a connecting door to the house, but it is essentially a building just attached to the house with a single or couple of shared walls and it's own roof then I think it could be done later, if however it shares a roof or is under a second story etc. then I cannot see how you would do it. Are there any services or anything that go anywhere near the garage that will end up within the garage space? Do you have a drawing of the proposed? Could you not put the garage up in block etc. but don't have the floor poured at this stage, no doors or electrics, maybe just the basic roof frame if connected to the house or even just leave it without roof for now then all you are doing is building the shell ready for it to be completed later, that may save you some money.
-
I'd say get yourself some boxes of 6x40mm, 6x60's, 8x80's, those are good common sizes for most stuff. 8x120mm's are good size to have too, they will make quick work of fastening a 2x4 or similar down. I bought about 1000 of those sizes last month just as general stock, all Fischer stuff. Cost about £30. I must admit I like Fischer resin anchor and studs... but when it comes to back boxes, maybe overkill!
-
What about a variation? An option "3"! Run them all into a single manhole on the main soil pipe (I assume it is not a sewer but indeed your system?).
-
Totally agree Peter. Generally it removed need for a qualified electrician. It also depends on the categorisation of the appliance, it may fall into the category that must be supplied with a pre-fitted plug. I personally think it ought not to need a plug, however, the manufacturer may aim this as a domestic appliance (i.e. it may state it is not suitable for commercial use) therefore it must make domestic provisions. If they didn't put a plug on it then an argument could be made they are claiming it is commercial... it's one of these ones. Part ii - Fitted plug provisions 7 Part II introduces a new requirement that most domestic electrical appliances which operate at a voltage of not less than 200 volts must be supplied fitted with a correctly fused and approved standard plug. As an alternative to fitting a standard plug an appliance may be fitted with a non-UK plug provided that an approved conversion plug is fitted. 8 For the purposes of these Regulations an appliance ordinarily intended for domestic use is taken to mean one that is intended for private use at home. 9 Responsibility for fitting a standard plug or converter plug will fall to the first supplier of the appliance in the UK. 10 The "fitted plug" provisions will not apply to those appliances that are listed at the appendix. Right my windows have just arrived I am going to look at them!
-
If the supply is protected then no you do not need to protect it again locally the whole shebang will be protected. Also, if it was me, I would not spec a socket but a fused spur, remove the plug from the cable and hard-wire it in. For many reasons this is better, however, I will accept your situation may be more suited to having it plugged, but on something like a poo-bubbler, I cannot see why, it's not like you are going to unplug it, shift it a bit, pick up that pound coin you dropped, slide it back and plug it in again. It also removes the possibility of someone unplugging it and plugging in a lawnmower or something.
-
Would 10 Watts (LED) over illuminate an 8'x6' garden shed.
Carrerahill replied to epsilonGreedy's topic in Lighting
800Lm will not give you much light at all. I have run you a quick calc using an 800mm batten. Results show an avg. of 60Lux - to put that into perspective CIBSE would recommend a WC is lit to a minimum of 100lux!! If it was me I would want at least 200lux average in this space, I would say about 2500 Lumens is what you need.