soapstar
-
Posts
218 -
Joined
-
Last visited
soapstar's Achievements
Regular Member (4/5)
8
Reputation
-
House is quite exposed - coastal and detached
-
Built by contractor. The thermostat is actually beside the door, which leads out to the hallway (temperature did not change much in hallway) - the door was left open into this room. This makes me think would this create a 'tunnel' and amplify any draught given the door was not fully open. Perhaps a draught from the stove in living room down hallway making its way into the room? Although for any draught to form there needs to be an escape (window vent perhaps?) Room is not in the roof, ground floor. No immediate temp changes in any adjacent room (hallway, bathroom, other spare bedroom).
-
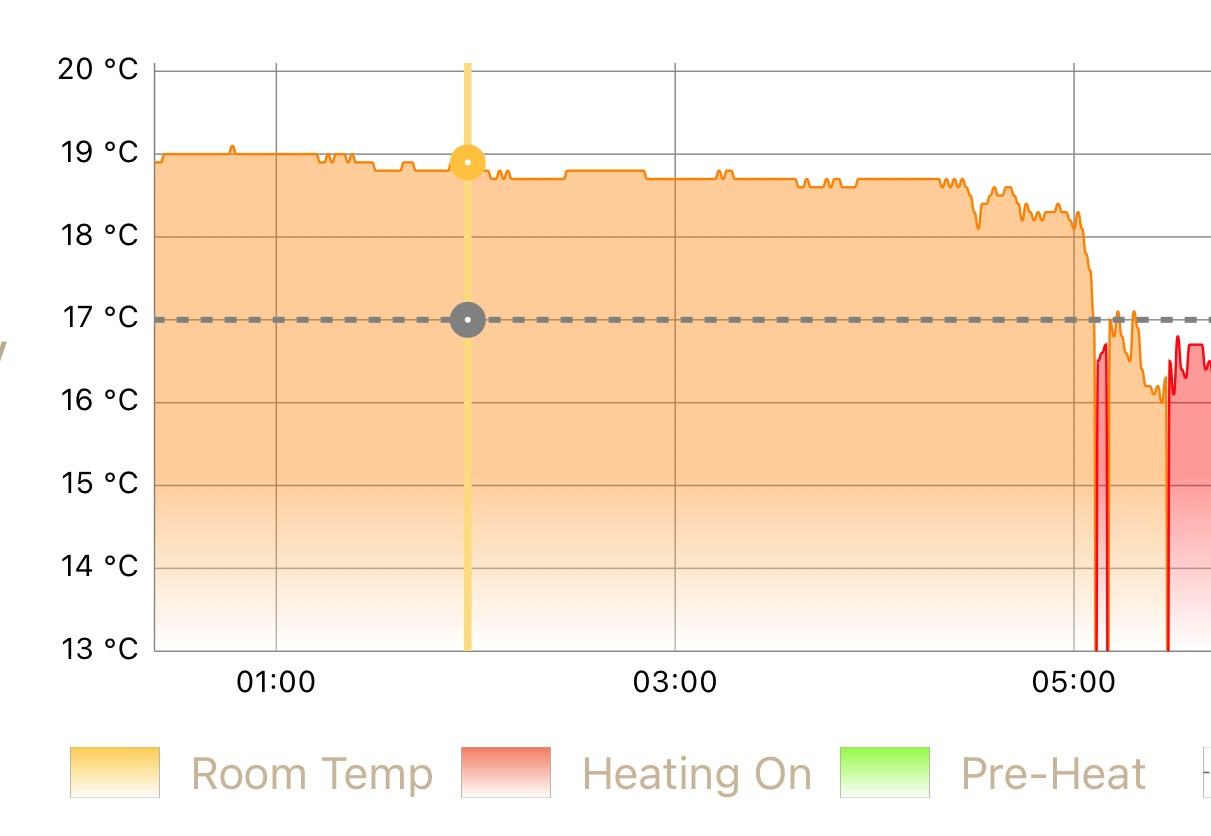
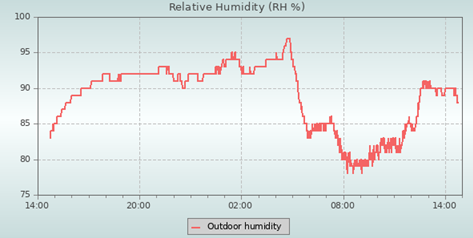
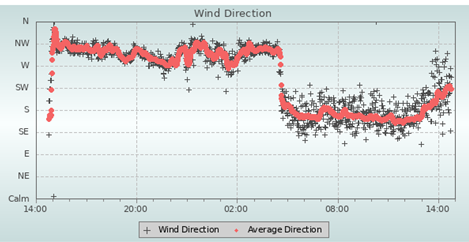
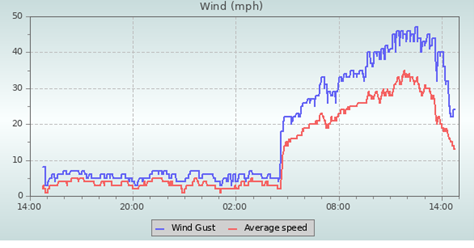
Hi Folks, Upon paying closer attention to our energy usage and ways to save on heating in our new build I cant help but notice the temperature in one of our spare bedrooms drops rapidly when the wind picks up. Is this normal for a new build and comparable to anyone else here? I have attached screenshots of the actual room temp from our heatmiser stat in the room plus data from a very local weather station. You can see exactly the time the wind picks up at 5am the temperature literally plummets around 2 degrees in around 5 minutes. The hallway outside only drops approx 0.3 degrees in the same time span. To me this show a definite flow/draught coming in/out of this room when the wind picks up - or is this normal? Note the room in question is north facing with one north facing window.


-
Started to focus on the external door in the Utility - managed to fit up a thermal door curtain to cover the door at night. Tested this last night and to be honest the temperature did not change very much (perhaps felt less chilly whatever that means!) Need to get on with filling the cavity around the sink waste water pipe next and see if that fixes anything. Our house is controlled via Neostat thermostats..upon doing some reading it is not uncommon for these to be incorrect and require calibrating. Right enough the laser thermometer does seem to be around 1.5 degree warmer than the display, although this is quite dependant on where you take the reading. This has been covered in another thread so wont go into it too much but these thermostats seem to lack proper airflow to allow them to measure the correct temp...although I checked the others in the house and these seem pretty spot on. I may look into re-calibrating the utility thermostat and take it from there...
-
No I believe these are only for close proximity work indoors. I think for outdoors you would ideally be looking at getting a thermal imaging camera. Although price wise these can start from £200 and rising (quickly!)
-
Finally got a laser temperature gun to do a full sweep of the utility and it has opened my eyes to other areas I didn't suspect previously! For one the wall which divides the utility and garage is no colder/warmer than the wall dividing the utility and kitchen (readings taken from inside utility room) - I really suspected the inside garage wall to be far colder... The door between the garage and utility is marginally colder - nothing excessive. Our back external door however is surprisingly cold, approximated 3 degrees colder than the thermostat reading. It would even drop very low towards the bottom of the door and floor, however there is no obvious draughts, the door seems very draught proof (have tested this previously). I have noticed external PVC doors are very cold to the touch. Also another point of concern is the waste water pipe under the sink leading outside, clearly the void which houses the pipe between the utility and outside has not be re-instated as you can see right through to the brickwork (approximately 2 in diameter hole) - Will attempt to seal this with expansion foam around the waste pipe. The readings here are approx. 1-2 degrees lower than room. So it looks like my attention is now diverted to the external utility door, it has a half height window which has no blind so perhaps this might be worth looking into or even a full thermal door curtain and see if this helps... I can foresee this laser temp gun giving me hours of fun around the house
-
@SteamyTea you read my mind...currently considering one of these thermal imaging cameras https://www.amazon.co.uk/Thermal-Imaging-Resolution-Lightning-Connector/dp/B0728C7KND/ref=sr_1_3_sspa?crid=AKPJZJD9RA40&keywords=thermal+imaging+camera&qid=1667207290&qu=eyJxc2MiOiI2LjAxIiwicXNhIjoiNS42NiIsInFzcCI6IjQuODkifQ%3D%3D&sprefix=thermal+imaging+camera%2Caps%2C152&sr=8-3-spons&psc=1 Although what you have linked will do the job I assume...any experience with either? Plus im not sure if I really cant justify the price to the wife of the thermal imaging camera, the cost of it will pay our electric bill for one day
-
I have now spent the weekend partitioning off that area above the utility using thermal wrap, on both the roof trusses and across the partition to fully enclose the area - absolute horrible job This has made zero difference to the temperature in the utility room 😄 The last thing to try as mentioned is to improve the thermal insulation on the wall between the utility and garage. I fitted one of those insulated door curtains to the door and I do believe this made a difference all be it small (this was before doing the loft insulation). Now i need to figure out the best way to achieve this without too much upheaval - Ideally I want to keep the plasterboard intact on the garage side (this will be fire proof anyway). The frame around the door is approx 20mm out from the wall, what is the chances of applying anything which will make a difference which will fit flush with the door frame? I came across 25mm (5mm not a huge deal) insulated boards from b&q here https://www.diy.com/departments/jablite-polystyrene-insulation-board-l-2-4m-w-1-2m-t-50mm/26818_BQ.prd Only issue I would see is fixing these to the existing plasterboard, I really don't want to completely ruin the plasterboard with any sealant as perhaps one day this garage will be converted to a room. Any suggestions would be hugely appreciated...
-
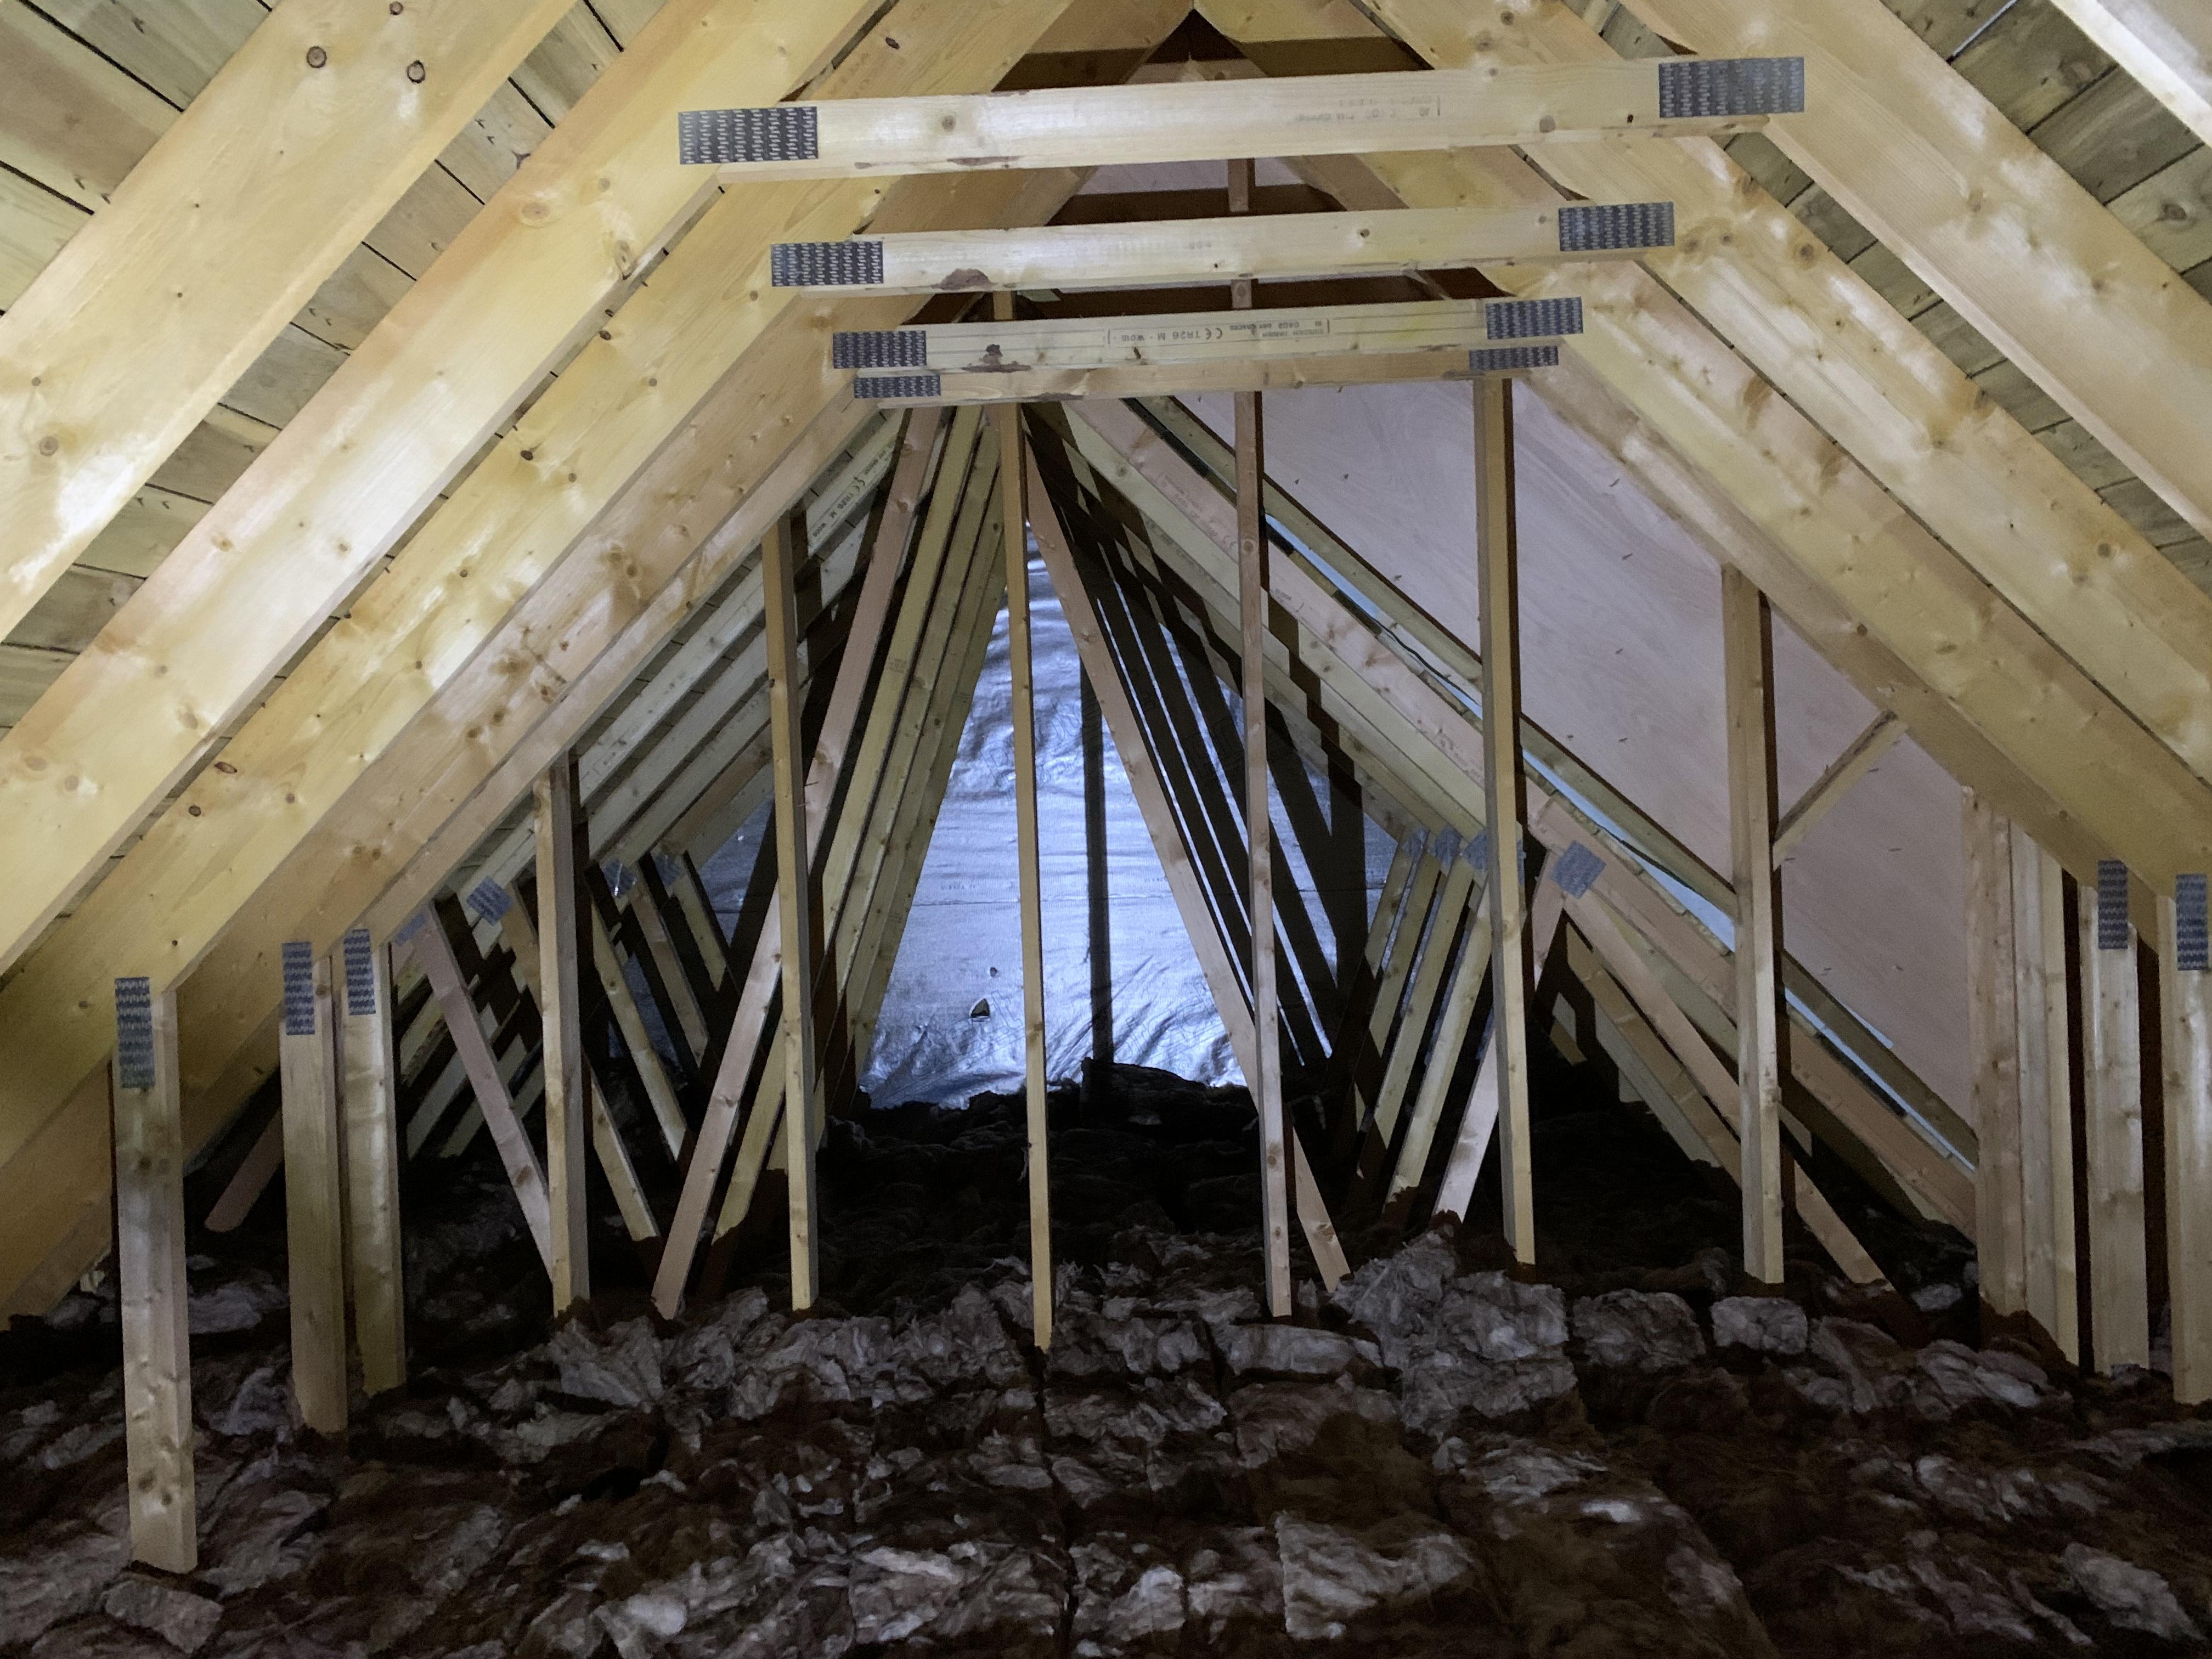
@Radian Thanks everyone for the input much appreciated. To clarify for everyone’s sake the picture has been taken standing in the garage part of the loft, the trusses you see are above the utility. The garage was designed differently in order to allow us to convert the space later as its massive! The hatch is in the garage space. @Dave Jones thanks, I assume you mean the wall downstairs separating the garage and utility? I did consider this however given the garage is finished and plaster boarded it wouldn’t look great unless you can get something which looks like a wall finish - not too fussy to be honest. Regarding the door yes this is certainly draught proof with seal around frame. @Ferdinand This is something I would have to look into regarding the fan. At the moment I took this out the equation by taping up the vent! So would the consensus be to partition off the area above the utility room completely? I would also consider adding insulation such as celotex to the garage wall but as I say would be a little odd and the wife might not be happy
-
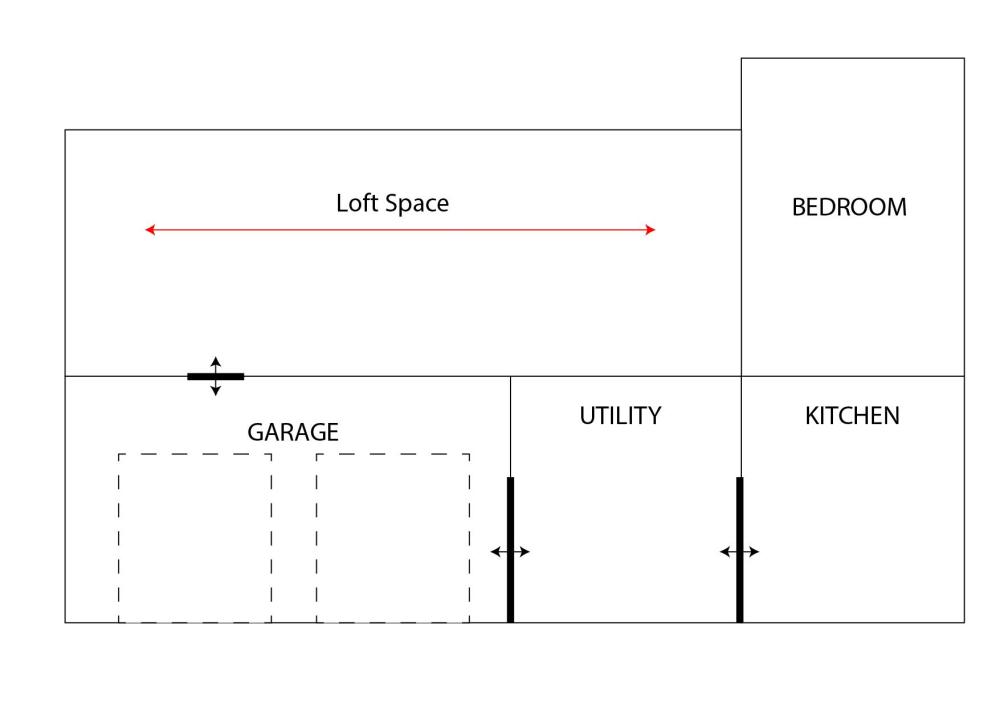
From what I am aware the wall between the utility and garage is to the same standard as say the wall between the utility and kitchen, the only difference being there is added fire proofing plasterboard. we have an extractor fan in the utility - I have temporarily covered the vent up to see if there is any improvements. Still seems to be much and such the same. That’s interesting you have the same issue. I have inspected the roof space above the utility and there is plenty rolls of insulation above both the utility and garage. The door between the garage and utility does indeed have seals, although I further added a brush excluder to the bottom and this was letting in a draught. Around the frame of the door seems pretty tight with no air coming through. Would partitioning the loft above the utility help at all? My thinking being this would contain the heat above the utility and not allow it to spread across above the garage… I have attached an image pointing towards the loft space with sits above the utility room. Regarding partitioning this off it wouldn’t be hard as the framing is all there.

-
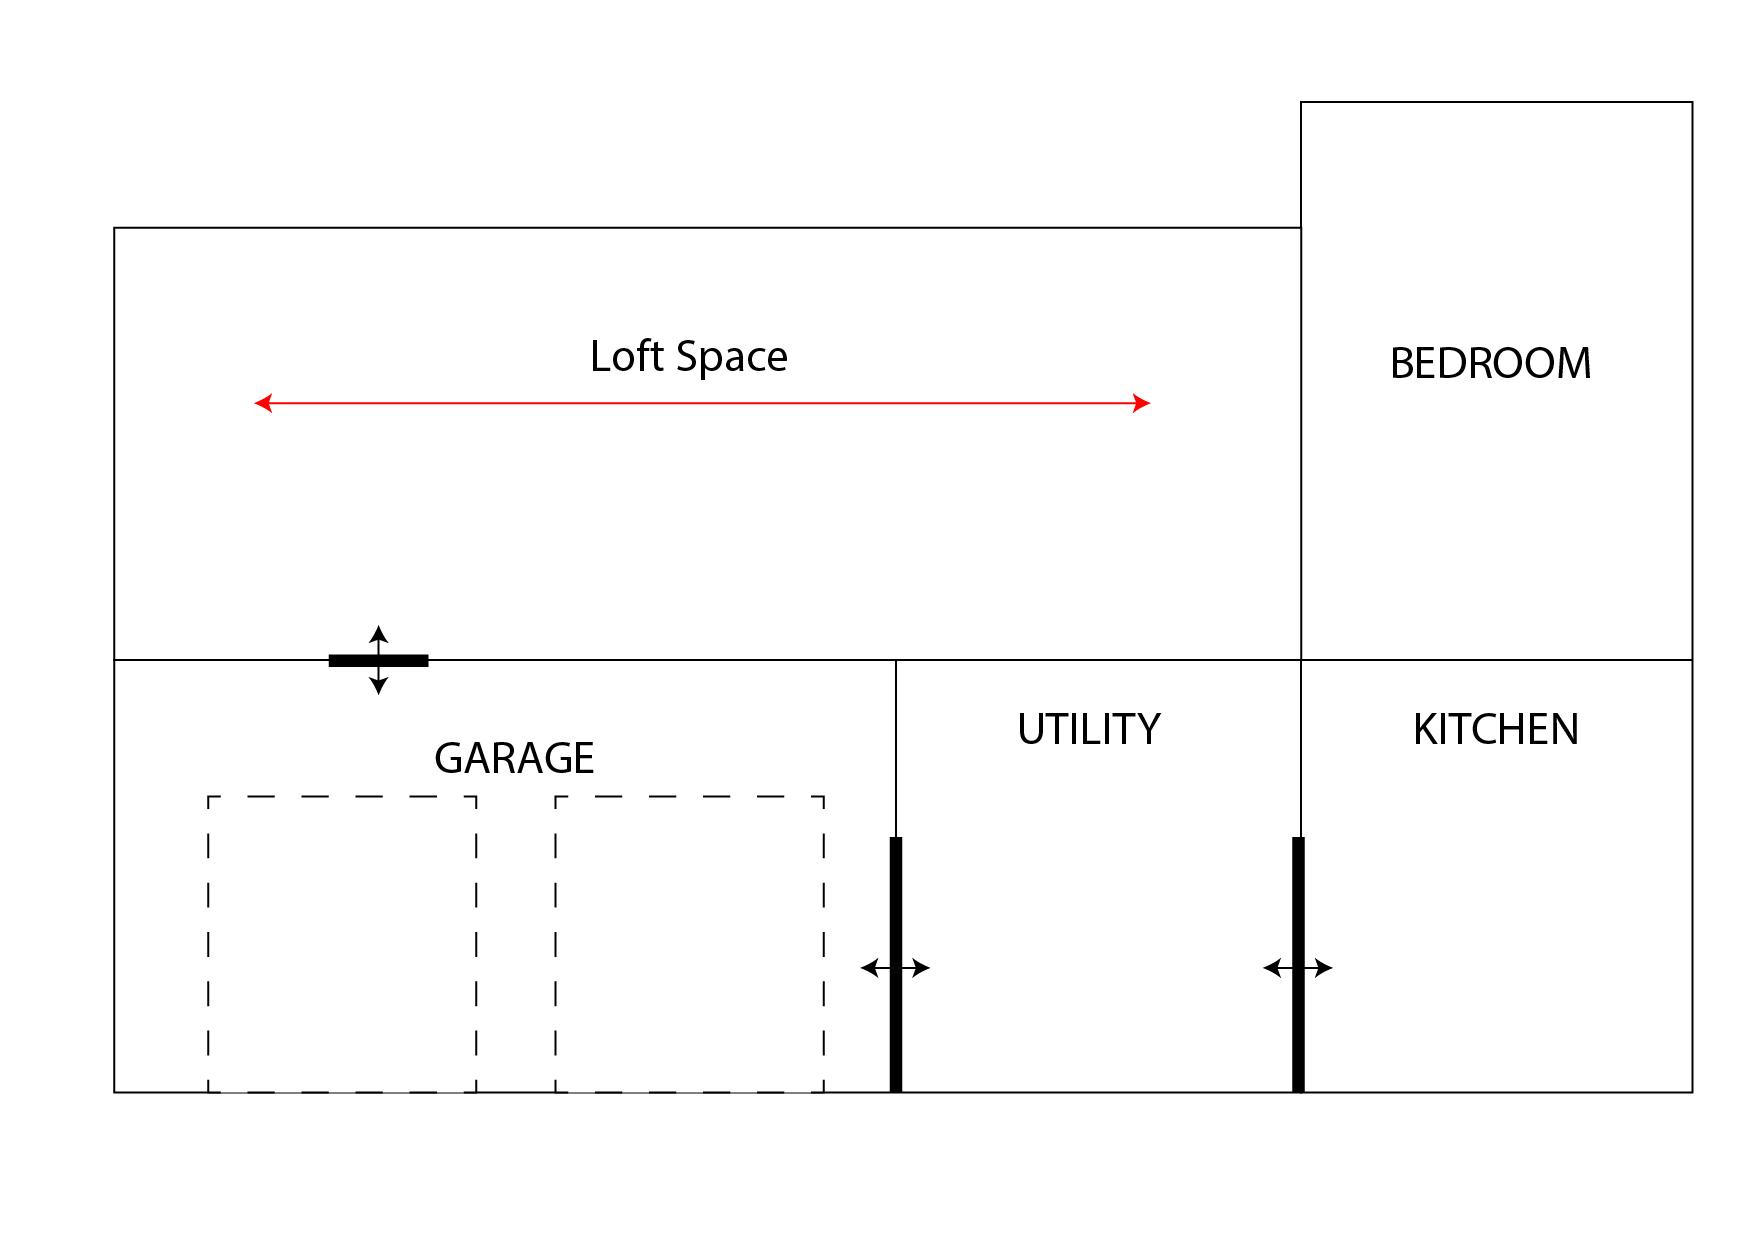
Hey Folks, Been in our new build for little over a year now, very pleased with everything however given we are coming into the colder months again I am trying to understand why our utility room get so cold. I thought I would see if any of you knowledgeable folk can help me to improve the situation or at least explain what could be adding to the problem. The utility room is between the kitchen and double garage, serviced by two doors (fire door on garage side and normal internal door to kitchen). Garage is of timber frame construction as with the rest of the house, and complete with two roller doors. There is quite a large space above the garage accessed via hatch. This loft space expands not only above the garage but also over the utility room - this is where my main concerns are, should this be like this and would it contribute to heat loss in the utility room? The garage will always be colder than the rest of the house, I understand this. All drafts have been taken care of as much as possible with draught excluders on roller doors (these were letting in quite a draught!) and fire door adequately draught proofed. The wall between the garage and utility is also an area I believe might be letting cold seep into the utility, although this was all adequately insulated as with the rest of the house. We are experiencing temperatures in the utility room 3-4 degrees lower than in the Kitchen at the moment. External outside door from utility all seems in order with no draughts etc. I have attached a quick illustration of the layout to help understand the situation better. Any help or suggestions would be appreciated. Thank you.
-
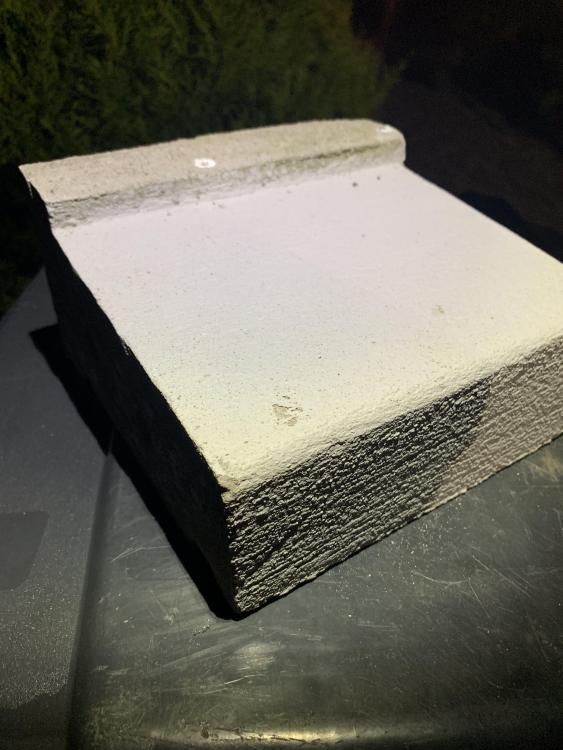
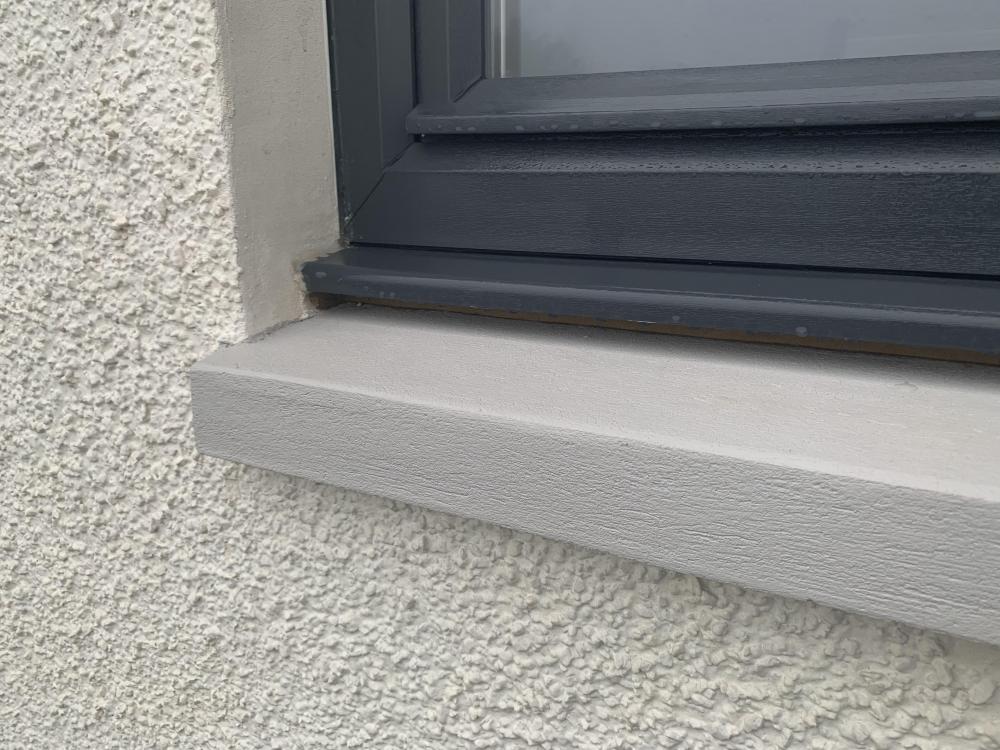
As above here is a photo of the sill, it has a lip at the back which I assume is where the sealant (or whatever it is) is packed against under the pvc sill.
-
@SuperPav thanks for your detailed response much appreciated. I have attached a photograph of a typical window on our house to show the full layout. As @craig mentions the window sits on the concrete sill and is packed underneath. I think the ‘weakest link’ is the gap as shown in the above photo attached previously now I look more into it. I have old cuts of the concrete sills which were us to get a better understanding of the profile. I will try get a photo and post up later.
-
Thank you. I keep hearing the product EverBuild 825 when researching sealing joints/pvc windows etc - Would this be the same? Looking further into sealing windows this morning I now have concerns regarding the outer gap around the pvc window has been sealed with incorrect or inadequate sealant - I know from memory it was from the Soudal range - FixAll Crystal looks familiar, would this be adequate? https://www.soudal.co.uk/pro/products/adhesives/bonding-and-construction-adhesives/fix-all-crystal
-
Excellent thank you for the confirmation, any sort of gap around a window seems suspicious to me. Can you recommend what type of sealant to use? The sealant/mastic/cement stuff which has been used underneath is not rock hard, it seems to be soft like a hard putty. The gap between the bottom of the PVC sill and concrete sill is around 3/4 inch. I have always had my concerns on the fitment of the windows but as ever it slips your mind until the winter comes along! I can get a wider photo later for more context.