Search the Community
Showing results for tags 'fixing'.
Found 7 results
-
Hi, I am planning a project to make a concrete shed into a live-able room. The walls are made of concrete and the roof is made of wood, I plan on insulating the roof but I'm not sure weather I need to insulate the concrete walls or just the concrete will be enough to keep it warm all year round. I've never done a project like this so if anyone has any pointers or ideas that would be great! Thanks!
-
 Just a quick one: does a wall plate (rim joist) have to be a continuous piece of timber? I ask because a visiting rep asked me if I needed the wall plate to be one continuous piece of timber. Maximum uninterrupted run is just under ten meters. Nowhere in the architect's notes does he mention a continuous run of timber for the wall plate. Thanks. Ian
 -
Hi all, Very much a novice with a small project here but this looks like the place to come to get some great advice and experience. We are landscaping our garden and have just finished decking outside the kitchen door area. There is a very ugly block concrete wall directly opposite the door, running down our lovely new decking which is an eyesore but cannot be changed. It is north facing and gets 0 sun exposure all year round so I cannot hide with planting. We looked at timber cladding it but the opposite side of the house will be timber, as is the decking so I thought that might be too much wood. We have decided to go with Corten to cover it as I really like the look once it has 'weathered'. I think it will work well alongside the timber as well. My question is, how to I fix it to the concrete block wall? Ideally I do not want to have to put timber framing up as it will eat into the decking space. Can I just screw/ nail it to the wall? Do I need special screws/ nails for this? I would like them to bend in with the Corten once it has weathered. I have trawled through Google but have only found one vaguely useful video on how to put it up (attached directly onto the concrete (not block) wall with "Hammer-set" Heavy duty nail drive anchors.). These stand out against the rust colour though and i would like to avoid that. Has anyone else done anything similar? Any advice very welcome. Thank you
-
Up to now, I have needed to fix large bits of wood into concrete. And I'm (well, was) happy with that until I found myself reaching for a 10mm SDS bit and Thunderbolts to attach something quite small to the wall. . I'll soon be hanging a range of things into the concrete walls, from electrical back boxes, to shelving to the MHVR box. I'm trying to use just one product - in the same way that Thunderbolts have served me very well for the last year or so. Which single range of fixings would you use to fix stuff into concrete?
-
Reading this thread and all the dire warnings written there sent me scurrying off into Tinternet to look and see what I can find. Well, the only method of fixing them I haven't found was by using bubblegum. There's oodles of guidance and I have read a good deal of it. MiTek say that the fixing method rests with the designer. So I had a little phone chat with two or three companies and they all said that 'we' could discuss how I wanted them to be fixed. And anyone who knows me, knows that that is going to be a one-sided conversation. So, come on BH, help me out here. help make me sound as if I know just a leeeetle bit about metal web joists rather than sound more of a complete plonker than I already am. I know what to avoid: floor bounce - because of @readiescards 's thread (thanks) not installing them back to front (PeterW here ) [What the Hell is back to front on a POSI fgs?] make sure the trimmer is correctly seated (Jamie same thread) make sure the chords of the joists (flange, web ?) are wide enough (Peter Stark same thread) use 400 centers (already knew that - by accident) make sure the bottom chord is supported correctly (PetereW same thread) AlexPHD (same thread ) tightly pack between the bottom chord and the wall (what with Alex?) Peter Starks are hung from the top chord on a ledger plate (Whassat fgs ?) and he uses a strong back (should I consider one?) PeterW's helpfully annotated image of where the problem lies (same thread) @JSHarris seems to argue against hangers (same thread) Try pre-cambering a little bit ( @JSHarris same thread) @CC45 has strengthened his POSIs (same thread) That's a good start.... Do people use hangers because they are easy, and becuase they are easy to use, they don't pay attention to detail (present company excepted)? My spec is for the POSIs to be hung on a wall plate (rim joist) Knowing all of the above, how would you make sure the problem didn't occur in the first place?
-
I am adding 25mm of calotex to the underside of my rafters which have 170mm already in them. I will then be putting up osb and then plasterboard. My question is should i use everbuild pink grip or soudel low expansion foam to initially hold them in place. I imagine i would cut the sheets to size, foam or pink grip the sheet and push it into place, temporarily fix a batten across to hold the sheets in place until its all finished and then remove battens and foam up the gaps, cut back and tape the joints. Its just a matter of what would work best on that initial pushing up into possition. Once the osb is screwed up its not going anywhere. Or should i be using something completely different? Thanks in advance.
-
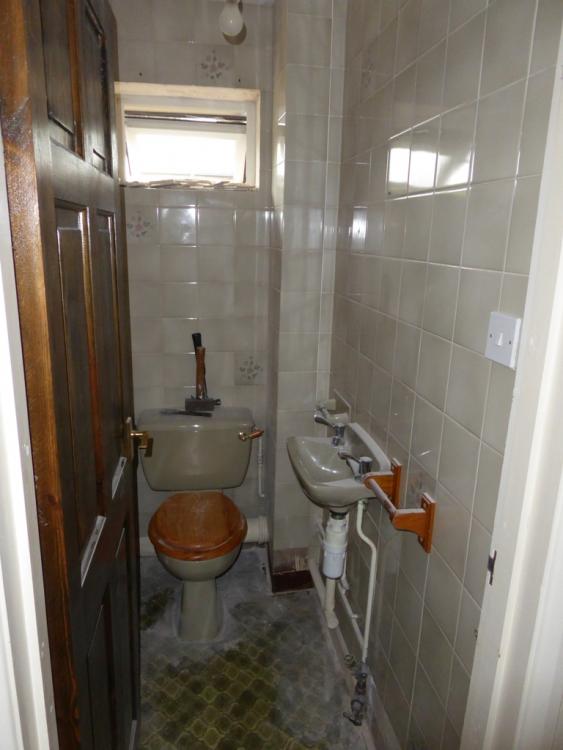
 As some know, I've been pre-occupied this week tarting up the only room in our current house (which is shortly going on the market), that I've not decorated or renovated, the downstairs loo. It's always been grim, but it works and we've just got used to it, so have never done anything about it. It's green. In fact everything in it is green, except the ceiling. Green tiles from floor to ceiling on all the walls, green WC and cistern, green wash basin, green vinyl flooring, even a bonded to the wall green ceramic toilet roll holder. It even had a green loo seat until we changed it. We had a minor disaster a couple of weeks ago, when a load of tiles fell off one wall, it turned out they had been stuck on to an emulsion painted wall................... This meant I had to do something with it, as there was a right old mess left and there seemed no point in trying to patch it up. The decision was made to buy a cheap white fitted WC unit, back to wall pan and a very narrow white basin unit, with a slim white ceramic basin on top (it had to be slim, as this loo is so small it wouldn't come close to passing current building regs). This is what it looked like when I'd picked up all the loose tiles and made a start on the wall behind the door: Lovely, isn't it? That's the main stopcock on the floor at the right, with a stub of black alkathene pipe coming up through the slab and a lovely neat coil of earth bonding wire clamped to it. I think the green colour of the WC, basin and tiles is probably "sage green" or something similar. I've always thought it was hideous, but clearly someone went to a lot of trouble to get the same shades of green everywhere. It's undoubtedly original, from 1982/3 when the house was built, although why on earth they painted the walls and then stuck tiles on them is beyond me. AFAICS, there is only just a thin mist coat of emulsion on the walls, too, and the paint on the skirtings was applied after the tiles were put on, as the top of the skirting is bare wood when the tiles are removed. We've lived in this house for a few years now, even though it was only ever supposed to be temporary, until we found the house we really wanted, as we had to move in a hurry. When the government compulsorily move you around the country (as they do when you get to a certain level) they give you a "generous" five days to find a new house -any longer and they don't pay your removal expenses and legal fees. I've learned over the time we've lived here that the joker that built it had some unusual building practices. For example, when we came to replace the doors and windows, we found that the thin plywood external soffits extended over the top of all the windows and were plastered inside as the top of the window reveals. Another surprise came when I re-did the bathroom shortly after we moved in (that was also floor to ceiling green, like the loo). The loo wasn't screwed to the floor. The screw holes were filled with something like mortar, which I thought at first was just covering the screw heads. It wasn't and so after an hour or so of trying to work out how it was fixed down to the concrete floor, I just smashed it up with a lump hammer. What I found was that the loo had been fixed to the floor with a large lump of concrete. Knowing this, when I came to remove the other loo I had a feeling that it might well be fixed the same way (it was the same colour, so I think was fitted when the house was built, like the one in the bathroom). Knowing this, I decided to just run a masonry drill down the fixing screw holes, and lo and behold there were no screws, So I drilled both out as deeply as I could, to reduce any key to what I was sure would lie underneath, another girt great lump of concrete. I didn't want to smash the loo, as it makes a hell of a mess to clear up, so decided to gently tap around the base with a bolster and lump hammer. To my surprise, after a few minutes the whole thing lifted clear, leaving this delightful lump of concrete stuck to the concrete floor: The next job is to chisel this off the floor, then remove the stuck-down vinyl flooring and crack on with getting the floor tiled, so that I can fit the new loo and washbasin units, with a new stop cock inside the wash basin cabinet and new wall covering. Because this is a budget job, the walls have had the tiles removed, been belt sanded to get them roughly smooth and are being covered with PVC wall panels, in a sort of cream colour. Much cheaper than tiling, and much quicker, and I reckon it will tidy it up enough to sell. I do just love the "lump of concrete to fix the loo" idea. I think I've replaced around 8 or 9 WC pans over the years, and have never yet seen one fixed down like this, yet for this builder/plumber (a local firm, still in business) it seems to have been his normal method.