Gus Potter
-
Posts
2339 -
Joined
-
Last visited
-
Days Won
29
Everything posted by Gus Potter
-
Can a slab be too thick to have UFH pipes in it?
Gus Potter replied to Thorfun's topic in Underfloor Heating
Hi Thorfun. Just a thought.. sorry if I seem to be putting a spanner in the works but the rock level has sparked interest. If you are hitting this material then you could change the game and save a pile of money. It takes a leep of faith if you are a lay person but sandstone is formed under great geological pressures. It can be a very stable platform. Why put a 250mm RC slab on top? I would start by having a look at the excavated level, see how weathered the sandstone is, try and get a handle on the bedding plane and so on. If you are hitting good rock why spend a load on money digging it out just to pour concrete back in? As I'm on a run. Roughly sandstone was formed in warm seas when the UK was south of the equator. As these plates moved north to form the UK they became tilted so the layers are not horizontal. When we deal with rock we look to see (not least) how weathered the rock is, the bedding plane and the size of the fractures between the rock. I would have a design review with your SE.. yes they may well charge you (should not just to have a 15 min chat on the phone) but the potential savings could be very significant and off the back of this you could end up with a good economic UF design. In terms of abrasion of the UF pipes. I have wrestled with this myself and concluded that as the pipes are plastic (elastic) and you pressurise then to 4 -6 -8 bar when pouring then when you run your heating at say 1.0 to 1.5 bar the pipes will not expand as much, even though they become more elastic when you run warm water ( 40 - 60 deg c) through them. Also, as the concrete cures it shrinks away from the pipes. My view is that the two will provide a few mircons clearance between the concrete / rebar, sufficient to mitigate any effects of abrasion. -
Hello George. I have highlighted your last sentence. It's a fascinating subject and as you can see on BH not well understood in structural terms. I have been knocking this about too for while too. You have the goetech side, the soil modulus and how this interacts with reinforced concrete / insulation layer say for a basement. Looking at a lot of the posts on BH and some of the details that are posted it strikes me how often the load path is broken particularly in terms of lateral stability and uplift, be that wind or shear / racking loads causing overturning of panels. Often you see that one design package will be the ICF, someone else designs the other elements and there is no real consideration given to how you connect / interface the elements together to achieve a robust and safe design. Another thing is to develop an approach that is simple to build. Simplicity drives down cost and this helps encourage all who want to build in a sustainable way but have a limited budget. The ICF concept for self build is much more main stream now. Even now in Scotland we have some serious interest in basement construction..underfloor heating is really starting to gain mass market traction too. Would be very interested in your view on this.
-
Can a slab be too thick to have UFH pipes in it?
Gus Potter replied to Thorfun's topic in Underfloor Heating
Hi Thorfun. I was wondering that at 250mm thick there may be a fair bit of rebar in the slab. I would have a quick chat with your SE to check how they have designed the slab and if it is ok to introduce repeating weak spots by way of the pipes. Practically I would be cautious here with a basement. It's hard enough if you are a contractor to deal with a concrete pour, the risk of a burst shutter, delayed wagons etc. If they have to also negotiate the UF pipework without denting it, get good concrete compaction.. you need room for a poker or tamper between the rebar (essential for keeping water out) this may attract a premium at least. My feeling is to keep it as simple as you can. Do your structural slab, take a break to see if water comes in then do your UF as a screed laid all level later. If you do get water ingress then if you have pipes in the structural slab then this could make it more difficult to fix any leaks. Yes, you have the extra cost of the screed but structural slabs are not that flat so the initial perceived saving may not fit with the time you'll have to spend laying / levelling the floor finishes, or finding the one dent in a UF pipe loop that stops it working. -
Evening MP1. I used the Firestone EPDM 1.5mm thick, a little more expensive that the thinner stuff (1.2mm) but a failure here could let water into the warm roof. If this happens it will not get back out easily, the OSB would be particularly vulnerable. Considering what I was spending on the insulation, the labour effort, all the seam tapes and work to dress the second storey cills over the EPDM then I was ok going for the heavier EPDM. If you are going to do this detail you show for the roof then you must make sure you get a good draft blowing through the 50mm air gap and that can be hard to achieve.
-
Mortgage/Insurance on Timber-frame, timber-clad building.
Gus Potter replied to catrionag's topic in Self Build Mortgages
Hiya catrionag. As a word of encouragement.. there are a good few houses in Scotland (mainly in the west side of Scotland) that were built in the 40's - 50's that are fully timber clad, these are often referred to as "non traditional housing". These houses are insurable. You can find these for sale on the internet. The point here is that what you are doing re timber cladding is not new but an improvement on these houses, design wise. More robust fire protection and so on. Scottish BC are more familiar with the timber frame concept, timber cladding etc as we have a longer track record than say BC / English based insurance providers. Have you had a chat with a some local insurance brokers, the independant ones? You are on the East coast , try some at Barrhead, Glasgow, Paisley, Dumbarton way who know more about timber clad properties. They do, as more of these timber clad houses were built in the west rather than the east. In terms of insuring your house in the long term this should not be a barrier. For example the Athletes' Village (Glasgow 2014) development has SIPS panels all signed off by Glasgow City Council. Have a look at some of these for sale on Zoopla. Also remember that the Scottish fire regulations are a different in places from the English regulations. You may get a pleasant surprise if you go to a Scottish based independant broker for the build process, they will no doubt want to quote you for the normal house buildings insurance post completion. In the spirit of BH I don't want give you names..but a lot of the brokers from Motherwell west will give you a few contact pointers even if they can't help you. Oh, and they may also be brokering for a few builders so when it comes round to getting quotes for work it can come in handy re references etc. If you explore this and stay " local brocker " you also can build youself a bit of a support network, yes it may cost few quid more / often less + /- £100.00 but it can pay dividends having someone at the end of the phone rather than dealing with an national network. -
Is this a cold bridge?
Gus Potter replied to Tennentslager's topic in House Extensions & Conservatories
A few thoughts. Structurally in the main room you have concrete slab that floats about on some insultation but at the door you have the slab resting on the underbuilding which is a stiff point. As soon as the slab settles, cures, a lot of load will end up on the solid bit at the doors. Best to let it move independantly. From a buidability view why not maintain the same detail all round as per the left side of the drawing. Then infill with timber /insultation to mitigate the cold bridge. Also doing it this way can cut you a bit of slack when it comes to measuring the doors for manufacture / door / threshold options. This can really save you as trying to set these tight slab levels with a local (Joe Blogs) builder and save as much as you can is brave. Cut yourself a bit of slack with the tolerances. I've have been working on a rear extension with UF that only needs about 5 kW of heat as it's well insulated compared with the rest of the old house.. but I think I have got a combie that will modulate down to about 5- 6 kW so am hoping that I won't need a bufferton mitigate short cycling etc. One of the keys I think is not to over size the boiler. -
Block and beam floor buildup for insulation?
Gus Potter replied to puntloos's topic in Sound Insulation
All looks a bit odd structurally. 150mm beams then 150mm of suspended ceiling then more..up to 400mm.. lots of fixing / labour detail, then service penetrations to consider. For a DIY self builder consider the price a local builder will charge to install all of this. If you have noisy kids.. then they won't be around for ever.. also, if too noisy just stop feeding them, could be much more cost effective. -
Just a thought. Once you get the connection sorted make the pipe diameter 32mm alkathene rather than 25mm which is standard for a shortish run on a single dwelling. The pipe will cost a little more, not much cf the trench etc. Doing this means that if you have a few bends in the pipe you reduce flow loss over the under ground section.. lets you play with the rest of the plumbing.
-
Hi Eplison. Thank you for taking an interest, much appreciated by me. @Cpd good bit of encouragement here in that you can master the basic concept of hand cutting with an axe. If you buy a good quality slate then it makes life easier as a beginner. Slates are not like glass thus the " micro stress cracks" you mention don't propegate over time. Remember that we have been hand "axe" cutting slates this way for hundreds of years with no problem. Once you understand the principles of slating then you are off to a good start. Yes it may take a bit longer if DIY but you can end up with a cracking roof. Using an axe is in my view a bit softer on the slates than these other mechanical devices. You'll soon get the feel of the axe and know when to go gentle, some of the slates will feel bit harder than others as they will have come out of a different bits of the quarry bed. The main thing is to understand how you dress the slates at valleys, verges and chimneys as you use the dressing on the slate to channel water away from the vulnerable flashings and so on. Cutting with a grinder, shears are no match for this as they give you a square unnatural cut. Also, if this is your forever home or if you want to do a sound responsible job then think about how you maintain the roof say in 15 /20 years time. Some of the modern nailing patterns seem very much driven by the "warranty", in other words once ten years has passed everyone is pretty much off the hook warranty wise but you.. a good roof should last for 80- 100 years if properly and easily maintained. Pratically if a slate splits down the middle then if double nailed at the head it tends to stay in place while letting water in. You don't see it from the ground, great news if you are a new house builder. Not so good for you. You often see slates double nailed at the head, some with hooks too. I can tell you that in Scotland we have been doing slate roofs subject to regular 100mph winds for a long time. A single nail at the head, every third row cheek nailed. This method allows you to maintain the roof without damaging the sarking / felt / membrane below as you can get in to turn the slates to access any broken ones. For the curious you may ask how may you compensate for different wind areas. Well if you use a smaller or heavier slate then there is less wind uplift per slate.. I hope this helps Epsilon. It can be very rewarding to do and I think you'll find that using an axe is the way to go. From a professional point of view if I went to site and found someone saw cutting slates for valleys / verges etc then I would stop the job. On balance I would have a go Epsilon as knowing that you have done the roof yourself and made a sound job is a great feeling. Also, if you get the odd slate that cracks you know how to fix it in ten minutes.
-
Slates are a natural material, do it properly and spend some time researching how it is important to cut them so they feather at the edges. How and where you tail a slate at a valley / verge say. Why not buy say twenty slates and a slating axe, I have a left handed one so you can get these too. Once you have done your research and had a play with a few samples then you are well on your way to a good job. Don't use a grinder or other gizmos.. you are inviting trouble.. your roof will not last as long. I have copied below some of a previous post which may help give an over view. Don't bother with a slate cutter. To get you started, buy a slating axe. I have a left handed one.. I use an off cut of a steel I beam over which I dress the slates. You need to grade the slates. The thicker and wider ones go at the bottom near the eaves. I grade second hand slates ( you need to do this with new slate too to make a proper job) into three piles. You can do four but you may lose the will to live. Grading the slates basically helps you keep the roof tight and flat. Have a look at an old slated roof and you will see thicker wider slates at the bottom, thinner narrower ones at the top. When you get to the verge or a valley you need to turn the slate and trim it the other way. What you are doing here is to encourage the water to move back into the roof in the case of a verge.. so it does not drip down the gable walls. In the case of a valley you are trying to stop constant dripping on to the lead valley and making a hole over the years. You try and channel the water down to the gutter so it drips here and this is where you often have a thicker lead piece. You call this "tailing" of the slate. This can't really be done with a machine..it's a craft. In Scotland it rains a lot, much is light rain.. so it drips a lot. In England say you tend to have much more intense rain.. thus the flash flooding but more dry spells and less of that constant dripping. The new home warranty providers and a lot of the slate providers require that all slates are double nailed at the head. Great if your poviding a 10 year warranty, eg if a slate cracks you often don't see it as it does not fall out like a single nailed slate. But a good well maintained roof should last for at least 80 years? For the roof pro's.. repairing a double nailed / every slate roof is hard going? You can fix the slate but the slate ripper causes more damage that is hidden? Yes there are repair type clips and so on but.. A common traditional method of slating in Scotland is to single nail each slate in the main part of the roof. Every third course you cheek nail a row of the slates, these slates now have three nails and stop the ones below from lifting off in the wind. This way when you want to maintain the roof you can get into turn the slates and easily extract the broken one without damaging the felt / membrane underneath. It's worth I think trying to master this skill, it can be very rewarding. I have left this out but make sure you choose the slate nails carefully depending on whether you are near the sea or not. You'll have a bit of wastage until you get the hang of it. Use the trimmings / wastage as decorative material for paths etc? What is worth while doing is investing in a slate holing machine. You turn the slate upside down. The punch makes a concave hole in the top side of the slate and the nail head sits nicely inside so it does not tip up the slate on top..helps get the " tight roof". You can hole the slates by hand but I would suggest getting a feel for cutting / shaping / tailing them first.
-
There is an old saying that if you want to keep a friend then don't do business with them. I work with a few top craftsmen, they work on high end historic stuff to boot 30 + years experience, in fact many of them have forgotton more than I know! What about a watching brief for your Canadian friend. Then you may get the best of both worlds? I've made a few points on BH before about how say the Canadians / Americans do stair cases.. veneers, over cladding etc. It has not really caught on in the UK yet for modern building. Funnily we use a lot of these techniques on historic buildings but seem to not consider this when extending / self building. A bit of input from over the water could give you something special at a good price. What about a remote consultancy role with a "holiday at the end"
-
Thanks TonyT for that tip. On a practical point if you have a really deep bowl sink then I have found that if the units are too low it can be (the sink) uncomfortable to use as you have to bend too much to rwach down to the bottom of the bowl. Now with my pragmatic hat on @Jen B It may be that you can just get some comfy slippers with a thick sole like clogs.. If you have a deep sink bowl and spending time there, go bare foot and the sink will be more ergonomic. There are a good few variables. Also, what about the oven... too low and harder to see into? I would look at it holistically as to what suits you before jumping one way or the other. For me I want a gap between the top of the plinth and the underside of the cabinets as I have run the UF heating at increased spacing under the units on the outside walls, just to give some background heat. We have an island set up , as a late change, so want the heat from the UF to get out from under the Island, keep the feet warm so I want a gap.
-
Architect has done a wonderful scheme but-
Gus Potter replied to DragsterDriver's topic in Surveyors & Architects
Good observations from the sole, much appreciated by me. It does look like the basic Client requirements / needs have not been met..a garage, annex.. that is stuff you thrash out at the first client meeting. -
Daiking. All the best with the digging. Remember that sometimes the journey can just as important as the getting there.
-
Straining at the leash to get started...
Gus Potter replied to Modernista's topic in Introduce Yourself
Hello Modernista. Sounds very interesting. Yes you will have a lot to do to upgrade insulation if that is what you intend. Also, you may have a bit of cold formed steel supporting the roof for example, maybe a steel frame in there. Plenty to explore and get your head around. Look forward to seeing some photos in a couple of months. -
Architect has done a wonderful scheme but-
Gus Potter replied to DragsterDriver's topic in Surveyors & Architects
Sounds like this a communication issue. Seems like you get on well on a personal level. A sit down meeting could sort this out quickly. -
Hello Daiking. Is the deck more than 600mm off the ground level, if so then it becomes a structural deck (in Scotland). If so we need to have a look at the lateral stability and so on. You may or may not need a hand rail, you do if more than 600mm off FGL in Scotland. You may want one anyway even if less than 600mm off FGL. Surprisingly you can end up with quite a lot of load on a deck, party time and folk sometimes put planters etc on them too. For your main beams, say the rim beams around the perimeter you may want to go for double 170 / 195 x 45 timbers. This gives you a stiff edge for attaching handrails to say. Also, if you make the rim beams a little deeper you can hide the hangers if you can see under the deck. The deeper edge beam can also form a bit of a drip and this can be helpful. If you can it's good to draw up a detail showing how the edge beams etc rest / attach to the posts. A good way of doing this is to have the heavy beams resting directly in bearing on the posts, maybe take a check out of them. This way you have a direct bearing contact rather than relying on the shear capacity of any bolts / screws. If the deck is only say 200mm off the ground then you could just support thing on small concrete pads and a few blocks?
-
Are you having a full finish.. by that I mean are they doing a full timber finish or are they just fitting a window into a hole in a kit and leaving it at that? Also, what kind of doors? Are they bifold or sliding / plastic or aluminium? How big are the doors? Some big sliding door glass can take four folk to fit as the glass is heavy and expensive.
-
Much depends on your circumstances and what you have cover wise to fabricate the panels on site for example. I have a job that comprises a 210m sq bungalow to go up this summer just south of Glasgow, warrant all approved etc. The client has a shed next to the new house. The contactor is going to stick build the panels in the shed. I did a set of panel drawings / nailing schedule for the contractor to follow. The economics seem to stack up for the client. The timber frame is 145 x 45 C24 for the external panels. 95 x 45 C24 for the internal panels, some of which are racking (shear) walls so they are sheeted on one side for building stability. The roof is formed in prefabricated timber trusses with some cut roof infill. The ceiling heights are 2.9m and the house is in a windy spot hence the use of the 145 deep C24 timber for the whole structural frame. This C24 throughout is partly to avoid anyone mixing up timber grades accidentally. In Scotland we have been building TF for a good while.. both stick and prefabricated. In recent decades this has become more mainstream in the southern part of the UK. There are many advantages to stick building so don't rule this out as an option to look at. Here are just a few examples: 1/ You can buy the timber on account at a merchants, no kit deposit to fork out for up front or worries about the TF fabricator going bust. 2/ You can just build the panels you really need for structural stability, stand them up and get the roof on. 3/ It's easier to change your mind as you go.. maybe move a non load bearing wall.. it's your frame! 4/ You can shop about for all the insulation, metal fixings and so on. 5/ If the brickie has not got the found true / square then you can often adjust the panels as you make them on site.. that can be a real bonus as it can take a lot of the heat out of a potential nasty argument over who is to blame. 6/ You can be more sure of the quality and accuracy of the nailing and so on as you can examine the panels before the vapour membrane say is stapled on. 7/ If using say local trades folk it gives them a good run of work, in some ways they can come and go in terms of flexibility, wet days make panels, dry days put them up, that can lead to a saving.
-
Hello Moggaman. I take it that by HC you mean a hollowcore slab? You may be familiar with the design of these but if not.. and for all. Small occasional service penetrations (say less than 50mm dia) will normally be ok so long as you keep away from any additional rebar, main slab tendons. Once you go beyond this small opening size you need to look really carefully at what you are doing as you may start to get close to the steel and significantly compromise the shear / bending capacity of the slab. It needs careful thought and detailing. Also, once you start to take chunks out of these slabs you need to check the lifting points are still ok. They are not forgiving if they fall during lifting! It's worth doing some background reading on this, get familiar with the terms and talk to the manufactuer at an early stage.
-
Can you post some photos?..maybe a few floor plans? It will give folk an idea of what you have to work with.
-
Trusses against brick wall
Gus Potter replied to MortarThePoint's topic in Roofing, Tiling & Slating
Hi Mortar, No 47mm is better for the ledger. If you have the wrap over type hanger then you want to make sure that you still get the edge distance on the nails on the top wrap over. Also, if you are using a ledger arrangenment then you want to make the ledger as torsionally stiff as you can (twisting) as this helps spread localised load over more fixings. However, there is no free lunch as the thicker you make the ledger the more torsion you get as the end of the truss is sitting further from the wall. If I was doing this analysis I would look at a 47mm thick ledger to start with. For practical design I would always look at what I'm trying to connect to, age of building, type of masonry, then do a fag packet calculation on the truss reactions, then look at what could work technically (especially the masonry fixings), then look at what is practical and economic for a local contractor / DIY self builder to execute. Much can depend on how straight and plumb the existing walls are for example. -
I'm puting wet UF in our bathroom refurb. As.. I does get cold up here, I don't want a shock in the morning..ideally the bathroom should just be as warm as the bed you just got out of. I can leave a towel on the floor and it will dry.. if it's too hot I can open the window. I think it dries out the shower tray too so it gets less mouldy so don't need to clean it "that way", also it's really good to step into a warm shower tray, I have delicate feet. Practically UF in the bathroom avoids condensation, keeps the water vapour as a gas and you can vent this via a fan or window.. for me it keeps my talc dry which I like to keep on the bottom shelf of my "vanity unit" near the floor. Lastly if you feel that your heating bills are a bit high then you can just turn that UF circiut off.
-
Trusses against brick wall
Gus Potter replied to MortarThePoint's topic in Roofing, Tiling & Slating
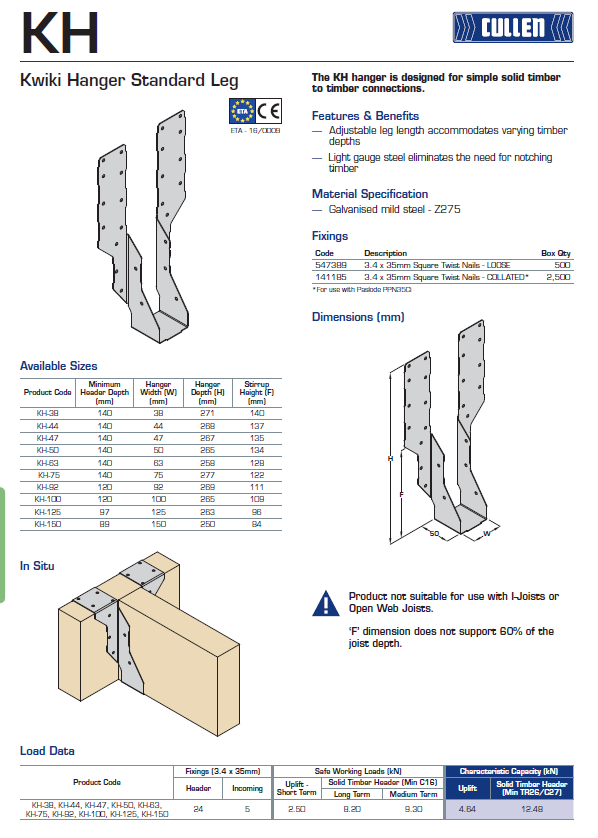
As an after thought. If you look carefully at the stated Cullen hanger capacity it's base on a timber grade of TR26 / C27. Now if you want to go the route of the ledger then the TR26 is the same grade of timber that most truss fabricators use. So when you order your trusses get the fabricator to put some loose TR26 timbers at the length you need on the wagon or go and pick them up early. Now you have got all your ducks in a row. All the materials / timber grades are now compatible with the stated connection capacities. -
Trusses against brick wall
Gus Potter replied to MortarThePoint's topic in Roofing, Tiling & Slating
Hi MortarThePoint. Admire your tenacity. Yes the Cullen KH38 has a characteristic capacity of 12.48 kN, SWL is a bit less..for all make sure you don't get your safety factors mixed up. Also note that the capacity is based on the hanger wrapping over the ledger. Now cutting to the chase. Mortar.. ask the truss designer if they can recommend a fixing for the ledger, the ledger depth etc. I think you may find they run a mile. Now, a resin fixing into a standard brick / 7.0 N block has a SWL tension / shear capacity of about 0.8 -1.0 kN with a fair wind. An expanding anchor.. well most are rated based on being installed in concrete for structural applications. To even get this you need to get really lucky in that your ledger has to hit the sweet spot on the coursing (fixings need to be near the centre of the bricks, blocks) and also you need to make sure that the fixings are not to close to the edge of the timber. You have more chance on winning the lottery! Also take say the Hilti fixing data, many of the declared fixing strengths are based on a EU masonry unit size, not what we have in the UK. If you can have a look again at the loads you need to support. Then look at the interface that transfers the load to the wall. That is often the key weak spot. Once you have investigate this then it may be worth having a look again at the simple stupid horn concept.