


Gus Potter
-
Posts
2383 -
Joined
-
Last visited
-
Days Won
34
Everything posted by Gus Potter
-
Slates are a natural material, do it properly and spend some time researching how it is important to cut them so they feather at the edges. How and where you tail a slate at a valley / verge say. Why not buy say twenty slates and a slating axe, I have a left handed one so you can get these too. Once you have done your research and had a play with a few samples then you are well on your way to a good job. Don't use a grinder or other gizmos.. you are inviting trouble.. your roof will not last as long. I have copied below some of a previous post which may help give an over view. Don't bother with a slate cutter. To get you started, buy a slating axe. I have a left handed one.. I use an off cut of a steel I beam over which I dress the slates. You need to grade the slates. The thicker and wider ones go at the bottom near the eaves. I grade second hand slates ( you need to do this with new slate too to make a proper job) into three piles. You can do four but you may lose the will to live. Grading the slates basically helps you keep the roof tight and flat. Have a look at an old slated roof and you will see thicker wider slates at the bottom, thinner narrower ones at the top. When you get to the verge or a valley you need to turn the slate and trim it the other way. What you are doing here is to encourage the water to move back into the roof in the case of a verge.. so it does not drip down the gable walls. In the case of a valley you are trying to stop constant dripping on to the lead valley and making a hole over the years. You try and channel the water down to the gutter so it drips here and this is where you often have a thicker lead piece. You call this "tailing" of the slate. This can't really be done with a machine..it's a craft. In Scotland it rains a lot, much is light rain.. so it drips a lot. In England say you tend to have much more intense rain.. thus the flash flooding but more dry spells and less of that constant dripping. The new home warranty providers and a lot of the slate providers require that all slates are double nailed at the head. Great if your poviding a 10 year warranty, eg if a slate cracks you often don't see it as it does not fall out like a single nailed slate. But a good well maintained roof should last for at least 80 years? For the roof pro's.. repairing a double nailed / every slate roof is hard going? You can fix the slate but the slate ripper causes more damage that is hidden? Yes there are repair type clips and so on but.. A common traditional method of slating in Scotland is to single nail each slate in the main part of the roof. Every third course you cheek nail a row of the slates, these slates now have three nails and stop the ones below from lifting off in the wind. This way when you want to maintain the roof you can get into turn the slates and easily extract the broken one without damaging the felt / membrane underneath. It's worth I think trying to master this skill, it can be very rewarding. I have left this out but make sure you choose the slate nails carefully depending on whether you are near the sea or not. You'll have a bit of wastage until you get the hang of it. Use the trimmings / wastage as decorative material for paths etc? What is worth while doing is investing in a slate holing machine. You turn the slate upside down. The punch makes a concave hole in the top side of the slate and the nail head sits nicely inside so it does not tip up the slate on top..helps get the " tight roof". You can hole the slates by hand but I would suggest getting a feel for cutting / shaping / tailing them first.
-
There is an old saying that if you want to keep a friend then don't do business with them. I work with a few top craftsmen, they work on high end historic stuff to boot 30 + years experience, in fact many of them have forgotton more than I know! What about a watching brief for your Canadian friend. Then you may get the best of both worlds? I've made a few points on BH before about how say the Canadians / Americans do stair cases.. veneers, over cladding etc. It has not really caught on in the UK yet for modern building. Funnily we use a lot of these techniques on historic buildings but seem to not consider this when extending / self building. A bit of input from over the water could give you something special at a good price. What about a remote consultancy role with a "holiday at the end"
-
Thanks TonyT for that tip. On a practical point if you have a really deep bowl sink then I have found that if the units are too low it can be (the sink) uncomfortable to use as you have to bend too much to rwach down to the bottom of the bowl. Now with my pragmatic hat on @Jen B It may be that you can just get some comfy slippers with a thick sole like clogs.. If you have a deep sink bowl and spending time there, go bare foot and the sink will be more ergonomic. There are a good few variables. Also, what about the oven... too low and harder to see into? I would look at it holistically as to what suits you before jumping one way or the other. For me I want a gap between the top of the plinth and the underside of the cabinets as I have run the UF heating at increased spacing under the units on the outside walls, just to give some background heat. We have an island set up , as a late change, so want the heat from the UF to get out from under the Island, keep the feet warm so I want a gap.
-
Architect has done a wonderful scheme but-
Gus Potter replied to DragsterDriver's topic in Surveyors & Architects
Good observations from the sole, much appreciated by me. It does look like the basic Client requirements / needs have not been met..a garage, annex.. that is stuff you thrash out at the first client meeting. -
Daiking. All the best with the digging. Remember that sometimes the journey can just as important as the getting there.
-
Straining at the leash to get started...
Gus Potter replied to Modernista's topic in Introduce Yourself
Hello Modernista. Sounds very interesting. Yes you will have a lot to do to upgrade insulation if that is what you intend. Also, you may have a bit of cold formed steel supporting the roof for example, maybe a steel frame in there. Plenty to explore and get your head around. Look forward to seeing some photos in a couple of months. -
Architect has done a wonderful scheme but-
Gus Potter replied to DragsterDriver's topic in Surveyors & Architects
Sounds like this a communication issue. Seems like you get on well on a personal level. A sit down meeting could sort this out quickly. -
Hello Daiking. Is the deck more than 600mm off the ground level, if so then it becomes a structural deck (in Scotland). If so we need to have a look at the lateral stability and so on. You may or may not need a hand rail, you do if more than 600mm off FGL in Scotland. You may want one anyway even if less than 600mm off FGL. Surprisingly you can end up with quite a lot of load on a deck, party time and folk sometimes put planters etc on them too. For your main beams, say the rim beams around the perimeter you may want to go for double 170 / 195 x 45 timbers. This gives you a stiff edge for attaching handrails to say. Also, if you make the rim beams a little deeper you can hide the hangers if you can see under the deck. The deeper edge beam can also form a bit of a drip and this can be helpful. If you can it's good to draw up a detail showing how the edge beams etc rest / attach to the posts. A good way of doing this is to have the heavy beams resting directly in bearing on the posts, maybe take a check out of them. This way you have a direct bearing contact rather than relying on the shear capacity of any bolts / screws. If the deck is only say 200mm off the ground then you could just support thing on small concrete pads and a few blocks?
-
Are you having a full finish.. by that I mean are they doing a full timber finish or are they just fitting a window into a hole in a kit and leaving it at that? Also, what kind of doors? Are they bifold or sliding / plastic or aluminium? How big are the doors? Some big sliding door glass can take four folk to fit as the glass is heavy and expensive.
-
Much depends on your circumstances and what you have cover wise to fabricate the panels on site for example. I have a job that comprises a 210m sq bungalow to go up this summer just south of Glasgow, warrant all approved etc. The client has a shed next to the new house. The contactor is going to stick build the panels in the shed. I did a set of panel drawings / nailing schedule for the contractor to follow. The economics seem to stack up for the client. The timber frame is 145 x 45 C24 for the external panels. 95 x 45 C24 for the internal panels, some of which are racking (shear) walls so they are sheeted on one side for building stability. The roof is formed in prefabricated timber trusses with some cut roof infill. The ceiling heights are 2.9m and the house is in a windy spot hence the use of the 145 deep C24 timber for the whole structural frame. This C24 throughout is partly to avoid anyone mixing up timber grades accidentally. In Scotland we have been building TF for a good while.. both stick and prefabricated. In recent decades this has become more mainstream in the southern part of the UK. There are many advantages to stick building so don't rule this out as an option to look at. Here are just a few examples: 1/ You can buy the timber on account at a merchants, no kit deposit to fork out for up front or worries about the TF fabricator going bust. 2/ You can just build the panels you really need for structural stability, stand them up and get the roof on. 3/ It's easier to change your mind as you go.. maybe move a non load bearing wall.. it's your frame! 4/ You can shop about for all the insulation, metal fixings and so on. 5/ If the brickie has not got the found true / square then you can often adjust the panels as you make them on site.. that can be a real bonus as it can take a lot of the heat out of a potential nasty argument over who is to blame. 6/ You can be more sure of the quality and accuracy of the nailing and so on as you can examine the panels before the vapour membrane say is stapled on. 7/ If using say local trades folk it gives them a good run of work, in some ways they can come and go in terms of flexibility, wet days make panels, dry days put them up, that can lead to a saving.
-
Hello Moggaman. I take it that by HC you mean a hollowcore slab? You may be familiar with the design of these but if not.. and for all. Small occasional service penetrations (say less than 50mm dia) will normally be ok so long as you keep away from any additional rebar, main slab tendons. Once you go beyond this small opening size you need to look really carefully at what you are doing as you may start to get close to the steel and significantly compromise the shear / bending capacity of the slab. It needs careful thought and detailing. Also, once you start to take chunks out of these slabs you need to check the lifting points are still ok. They are not forgiving if they fall during lifting! It's worth doing some background reading on this, get familiar with the terms and talk to the manufactuer at an early stage.
-
Can you post some photos?..maybe a few floor plans? It will give folk an idea of what you have to work with.
-
Trusses against brick wall
Gus Potter replied to MortarThePoint's topic in Roofing, Tiling & Slating
Hi Mortar, No 47mm is better for the ledger. If you have the wrap over type hanger then you want to make sure that you still get the edge distance on the nails on the top wrap over. Also, if you are using a ledger arrangenment then you want to make the ledger as torsionally stiff as you can (twisting) as this helps spread localised load over more fixings. However, there is no free lunch as the thicker you make the ledger the more torsion you get as the end of the truss is sitting further from the wall. If I was doing this analysis I would look at a 47mm thick ledger to start with. For practical design I would always look at what I'm trying to connect to, age of building, type of masonry, then do a fag packet calculation on the truss reactions, then look at what could work technically (especially the masonry fixings), then look at what is practical and economic for a local contractor / DIY self builder to execute. Much can depend on how straight and plumb the existing walls are for example. -
I'm puting wet UF in our bathroom refurb. As.. I does get cold up here, I don't want a shock in the morning..ideally the bathroom should just be as warm as the bed you just got out of. I can leave a towel on the floor and it will dry.. if it's too hot I can open the window. I think it dries out the shower tray too so it gets less mouldy so don't need to clean it "that way", also it's really good to step into a warm shower tray, I have delicate feet. Practically UF in the bathroom avoids condensation, keeps the water vapour as a gas and you can vent this via a fan or window.. for me it keeps my talc dry which I like to keep on the bottom shelf of my "vanity unit" near the floor. Lastly if you feel that your heating bills are a bit high then you can just turn that UF circiut off.
-
Trusses against brick wall
Gus Potter replied to MortarThePoint's topic in Roofing, Tiling & Slating
As an after thought. If you look carefully at the stated Cullen hanger capacity it's base on a timber grade of TR26 / C27. Now if you want to go the route of the ledger then the TR26 is the same grade of timber that most truss fabricators use. So when you order your trusses get the fabricator to put some loose TR26 timbers at the length you need on the wagon or go and pick them up early. Now you have got all your ducks in a row. All the materials / timber grades are now compatible with the stated connection capacities. -
Trusses against brick wall
Gus Potter replied to MortarThePoint's topic in Roofing, Tiling & Slating
Hi MortarThePoint. Admire your tenacity. Yes the Cullen KH38 has a characteristic capacity of 12.48 kN, SWL is a bit less..for all make sure you don't get your safety factors mixed up. Also note that the capacity is based on the hanger wrapping over the ledger. Now cutting to the chase. Mortar.. ask the truss designer if they can recommend a fixing for the ledger, the ledger depth etc. I think you may find they run a mile. Now, a resin fixing into a standard brick / 7.0 N block has a SWL tension / shear capacity of about 0.8 -1.0 kN with a fair wind. An expanding anchor.. well most are rated based on being installed in concrete for structural applications. To even get this you need to get really lucky in that your ledger has to hit the sweet spot on the coursing (fixings need to be near the centre of the bricks, blocks) and also you need to make sure that the fixings are not to close to the edge of the timber. You have more chance on winning the lottery! Also take say the Hilti fixing data, many of the declared fixing strengths are based on a EU masonry unit size, not what we have in the UK. If you can have a look again at the loads you need to support. Then look at the interface that transfers the load to the wall. That is often the key weak spot. Once you have investigate this then it may be worth having a look again at the simple stupid horn concept.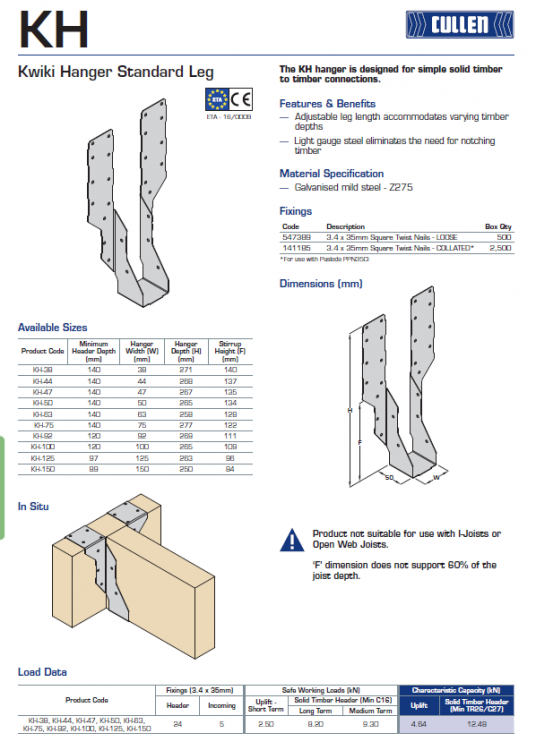
-
Warm Roof to Cold UNVENTILATED Roof Detail Junction
Gus Potter replied to BartW's topic in Roofing, Tiling & Slating
I think there may a be a good bit missing from this detail. How are the sloping rafters supported, how do you stop moisture passing through the warm roof ceiling and into the sloping part? I think this needs much more thought. I have a similar detail on my own house and it took a lot of thought to get it to work. It's also quite labour intensive to construct. I have ended up with a warm flat roof. The sloping roof is full filled, insulated plasterboard to under side with supplementary vapour barrier. They key for me was to adopt a two pronged approach to the sloping roof. On the sloping roof I used timber sarking with a breathable membrane, counter battens, battens and concrete tiles. The soffit is vented and at the top the roof membrane overhangs the sloping roof with a concealed vent to allow the sloping roof to vent, like a mono pitch roof abutment vent. Basically I decoupled the two types of construction so that the warm roof membrane sheds the water onto a sloping abutment roof. If you look at some of the Marley details they will help, just pretend (it is Easter after all) that the abutment wall is your flat roof. Hope this helps. -
Trusses against brick wall
Gus Potter replied to MortarThePoint's topic in Roofing, Tiling & Slating
A few points worth a look. @MortarThePoint For a short cut you can ask the truss fabricator for the reactions at each end of the truss. Or you can go back and check your calcs. If you want you can show them all but it looks like you may not have included a roof access / snow load / wind load in your provisional calculations. Often once the truss manufacturer knows they are getting the order they wil give you the support reactions. Make sure you know if these are factored or unfactored reactions (with or without safety factors) as this is important when selecting a hanger / choosing the right fixing if using a ledger. Often you find with something like this is all is going great until you try and select a hanger / ledger fixing. Many fixings are rated on being installed in uncracked concrete. Blocks are different and aerated concrete blocks are worse. You find that you can't get the shear / tensile capacity of the fixings to support the loads. Also tie straps are meant to be built into the blockwork as it is going up, their rating is based on this. Face fixing straps requires a good look, not least as they bend, rawl plugs don't have the tie capacity that a built in strap has. In summary, ask what kind of blocks do you have and how can you fix, tie to them. You may find that the truss with the horn removes a lot of issues. If you are in any doubt them please consult and SE. -
Volcane ...500 litres is a fair weight if not going on the ground floor or over a load bearing wall. Worth a quick thought if applicable to your plans. Yes, if on say a first floor you can double up joists and so on but you still often need to get the pipework in. PeterW's point also allows you to spread the loads out a bit.
-
Trusses against brick wall
Gus Potter replied to MortarThePoint's topic in Roofing, Tiling & Slating
Thanks Oz07. This can work out as a simple solution. If you are doing it DIY then it can work well. You can chain drill the pockets with an SDS drill, take your time, avoid dropping a lot of fragments down the cavity (if you have a cavity wall) while getting the pockets pretty level. Also, with a horn like this you get a little more play in the trusses. Say the wall you are joining onto is not straight then you can move the trusses a little horizontally so the rafters of the trusses plane nicely. Often you get the horn a little longer then trim on site to suit. With the hanger option you often find that the nails for the hangers (or hangers themselves) clash with the truss nail plates and intuitively we know that if you have too many nails in a bit of timber this is not a good thing. -
Hello ashthekid. You'll get lots of adivise and pointers here. Look at the simple stuff first. Start at the top.. the roof and check gutters, down pipes and all the obvious stuff. If could well be that by opening up you have let the air into the wall, spring is on us and the wall is warming up, hence the fauna. The pointing looks like it requires some attention so that the wall can dry out properly. Just as an aside it looks like the wall on the outside maybe has had a flush of nutriants. Could be you have a lot of birds on the roof and if the gutters have been blocked you have washed fertiliser down the walls. This is a bit of an odd question but are you near a bonded warehouse, bakery as these can be associated with a black fungus.
-
Trusses against brick wall
Gus Potter replied to MortarThePoint's topic in Roofing, Tiling & Slating
Hi MortarThePoint. The ledger option can work well but as Peter points out you get this twisting effect. Often you get stuck with ledgers as you stuggle to get the fixing capacity. Many fixings are rated on, not least, being fixed away from the mortar bed etc. If you have perforated bricks say the capacity of the fixings really drops off. Expanding type anchors don't work well in perforated brick and there is little test data available. I have attached a very quick sketch showing another way of doing this where you extend the bottom chord and pocket the wall. You can add glued hardwood packers to level up. Here you get a good solid bearing on the masonry and by using the dwangs / noggings you can add extra horizontal tying of the trusses into the existing wall. You may need to beef up the bottom chord a little as it is acting in shear rather than bearing.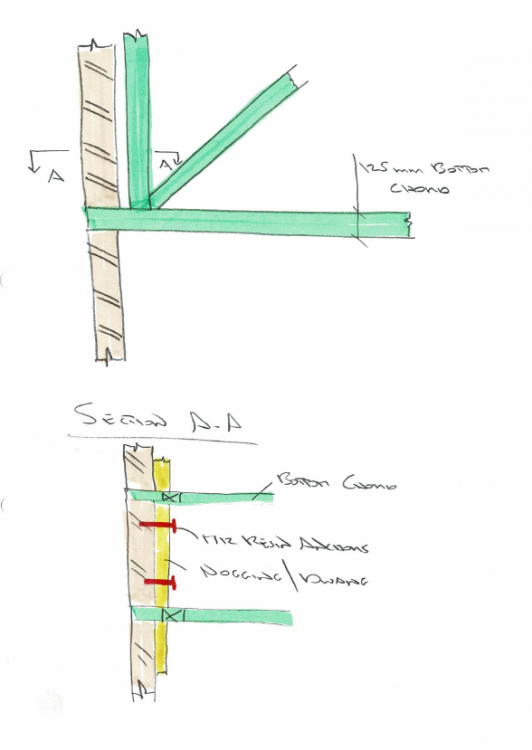
-
Hi dpmiller I'm doing a DIY extension in between the day job. Have done a bit of plastering years ago but I have lots of corners and want to get some detail. I want to have a play with some shaddow gaps. Also, I have a nice set of Aluminium windows and doors, don't want them scratched so want to do it myself, although it will take me longer. I have got some 2.0mm stop beads for the window ingoes. I think I'll set them back about 3.0 - 4.0mm from the window frame then mastic to try an avoid that hard to paint / wall paper bit between the window frame and the plaster / ames taping that tends to shrink away over time. I'm not sure how this will all pan out but I want to experiment. Once you get into this type of work then you can't really go on a sq metre price. I'm aiming to start the plastering next week so will try and post some photos etc. and a time / material log on a DIY basis for comparison.
-
Yes, dp's point is worth exploring. Have a look at your floor levels. Also, lift the carpets etc and look at the old floor boards if still there. If it was a coal store, now removed, you may be able to see how the floor has been patched up where the old coal cellar walls have been removed, all these clues a can help.
-
Temporary Stairs - Cut and Join two Halfs
Gus Potter replied to NewToAllOfThis's topic in General Construction Issues
Well done Conor. Yes get the hand rail on and don't over load them. Let us know how "bouncy" they are once you have used them for a bit. Once you get the hang of it you can do some cracking stairs going the over cladding route.



