


Gus Potter
-
Posts
2387 -
Joined
-
Last visited
-
Days Won
34
Everything posted by Gus Potter
-
Hi Mike2020. @Roundtuit needs credit for this one.. the ten years. In terms of you 50 hours a week I can from experience advise that you may want to consider breaking this down. I have discovered from my own project that; 1/ I'm not 30 years old any more with endless physical energy. 2/ Best to break the day down into physical work and thinking time.. 3/ Have a large lunch and a sleep after, lets the brain work on solutions for the afternoon. Each to their own I suppose, the main thing is to set yourself up so you get a dail (at best) or weekly burst of reward for your efforts and this keeps you motivated for the long haul.
-
Connecting timber lintel to brickwork wall
Gus Potter replied to SillyBilly's topic in Floor Structures
Hi Temp. Just to take a step back. When you are doing the panel drawings for a joiner to work to for a timber frame you look at what off cuts you are going to generate. Now a standard length of timber is 4.8m and you can end up with say a few handy offcuts that you can use. Now although you may have a 3 ply 150 "lintel" on paper it may be that it is not carrying any significant load. If you you are using 145mm studs for the walls then this is an easy way of using the offcuts to build out the thickness of the wall over a doorway / window. The actual width of a C16 timber is 45mm so 3*45 gives 135mm, often the OSB board on the kit is 9.0 or 11.0mm so the joiner just needs to put a ripping on the inside of the lintel and this allows the plaster board to plane through with the 145mm studs ( we cut ourselves a bit of slack on 1.0mm). It's the simple stupid approach but economic practical design. If the 3 ply lintel is carrying some load then rather than trying to find a hanger then you can often support the end of the lintel using a couple of vertical studs and these you fix to the wall. Have a look to see what your 3 ply timbers are doing and look for the simple easy options? -
Quick question.. For domestic houses do we not look at the number of bedrooms first.. then jump to the British Waterways flows and loads guidance and this gives us the flows.. and we use this to design the drains and the water usage. Now I could have a bathroom with two baths, maybe three all in the same room.. but the flows are based on the number of folk that could be in the house and this is dictated by the "normal occupancy" for domestic purpose and this is derived from the number of bedrooms? To be pedantic.. you fit a new kitchen with and island unit. In the island you have a tiny sink for tipping out the gin you can't finish, you have another sink for day to day stuff then in the corner you have one of these massive deep 1960's 700mm deep sinks with a mangle over as you still like to do all you washing by hand and that sink holds the same amount of water as this baby bath. Now the folk that wrote the regs know / hope that it is uncommon that you may be.. so drunk to the extent that you are chucking out your night cap / washing the dishes / and doing a last hand wash all at the same time before you hit the sack. Dan F .. hope this helps.
-
Yes, but you still need a carrier for the plaster. The surveyor is correct, it's just they may have assumed that you know that the lime plaster needs something solid to "stick / bond to"
-
Hi Mike2020. Your project sounds great. On these jobs it's easy to get carried away and do stuff that at the time on an ad hoc basis.. fire fighting!. For example you have moved in, have kids, a day job and need to do things that just have to be done in the interests of family harmony... that is life when you don't have a money / time tree growing in the back garden. Taking pictures is really important. Sometimes on these big old houses (DIY) projects your head goes down and you feel you are not making any progress. At that point you can sit down.. look at the photos of when you started and say.. hey look.. we have done quite a lot and this can lift the spirits and spur you on. Before you buy your dehimidifiers then reflect on where you are.. do you really need them.. have you checked you gutters, down pipes, cut back vegitation next to the outside walls, opened the windows during the day. It's a different mind set.. imagine you are a custodian of the building! You'll often find that once you get a handle on your house you can really appreciate what you have bought. learn to live with it and adapt.. that is the joy of owning a 17th centuary house..
-
Hi Mike2020. I may have pick up your post wrongly.. Have you been told that you can fit the wool boards between the beams and then plaster the ceiling? If so I would avoid. Maybe a starting point is to look at a new house. You have the ceiling beams, below is attached plaster board which acts as a carrier for say a skim coat of gypsum based plaster. On an old house you have the ceiling beams, timber laths (carrier) with a gap between. They used a plaster with horse hair and a bit of stuff from the barber shop. The base coat of plaster (lime based) was forced up between the spaces in the laths.. this gives the key. each lathe carries a bit of the weigh of the plaster and each lathe is nailed to the underside of the ceiling beam. Then the finish coats (lime based) were applied. If you want to use a lime plaster then you need to relicate an old lathe and plaster ceiling either by lathes or by using an expanded metal mesh. The insulation is just intended to keep the place warm.. not to carry the weight of the plaster. This is (lime based plaster on ceilings is expensive) hence my previous post about understanding your house. Hope this helps.
-
Hello Mike2020. Sounds like a cracking project. Have you taken plenty photos so you can look back on your efforts once you have finished? Before you make a decision on how to tackle the ceiling start right at the top of the house.. look to see what you have and write it down. This excercise often crystalizes your thoughts.. imagine you have to expain to someone how your house works. Start with the roof covering.. work down. Ask youself.. how is the roof kept water tight and ventilated.. how does the water vapour get out / in? get a handle on this (if you have not already done so) and this will help drive how you plaster your ceiling. If you don't know the answers then fine.. but now you know what you don't know. It seems pedantic but it forces you to look at the structure holistically.. can be a lot of fun too! This holistic approach is essential when dealing with "old houses" You want to spend your money carefully and target your spend to get the best out of your endevours. If you feel able, post your findings on BH and you'll get loads of ideas and suggestions.. for free!
-
I wish you all the best with your windows. For all. One great thing about BH is that if you give a bit you'll get lots of ideas. Some may not suit (some you may think are .. ? ) you but good design often involves looking at other's designs critically and how they interface with your own home / wall construction... often ruling things out is a great way of reaching an informed decision. Once you get into the 3g (triple glazed) world of windows and aluminium frames with wide wall cavities you have two basic choices. Do we try and transfer the weight of the window to the inner skin or do we look to see if we can use the outer skin to support the weight of the window. Now if you have a wide cavity and aim to use the inner skin to support the window then we need say brackets / a box type liner that are going to resist the cantilevering effect. We need to look very carefully at the fixings and how they will perform long term. In general anything that is cantilevered tends to move a bit more. Windows over time need adjusted / maintained as the glass moves about in the frames and the seals slacken over time. Couple this with cantillevered brackets and you have introduced more potential movement.. and these windows are expensive! If we use the outer skin then we also have potential rotational forces as the outside of the frame only has potentially / commonly a 15.0 - 20.0 mm rest on the outer leaf and.. we have issues about not breaching the water seal on the cill below as you need to fix the cill to the base of the window frame. We need for example to make sure we keep the drain channel at the bottom of the glass clear.. to prevent the sealed units from resting in standing water etc. But if you have a wide cavity then in some cases you can use the outer skin to support the window, you can remove a lot of the cold bridging effects and rotational / cantilever effects.. much will depend on your wall construction but it's worth exploring to see if it suits you or if you can get some mileage out of it. You can see on BH much discussion about bifiold doors and the options regarding top and bottom supported doors.. imagine your window is a bit the same.. do we bottom support it or try and support it up the sides / bottom with some cantilevered structure? To finish.. BH is also about having a home / extension / DIY project that no one else has! Not just on the outside but also under the bonnet.. the guts of the structure. Don't be afraid to post up a sketch, just draw it on A4 paper, take a photo and post it.. you are not entering a drawing competition. No one here will judge you on your drawing skills. Have fun exploring..
-
Any chance of a sketch showing the wall construction, frame thickness and cill detail, will help clarify the 90%? Just draw it on a bit of paper, take a photo and post it?
-
Connecting timber lintel to brickwork wall
Gus Potter replied to SillyBilly's topic in Floor Structures
Hello Sillybilly. If you can post a sketch drawing and maybe a photo you may get some good pointers. -
300 a day is quite a big ask on a DIY build. I would go for around the 250 a day. Then factor in the recent weather! Yes the blocks may be laid out for them but do they have a good working space for the mixer? / is it a premixed mortar? If hand batching on site then where and how you store the sand can impact on productivity. If you have let the sand get soaking wet this slows things down, also, if in bulk bags that have not been covered from the rain and sat on a pallet.. then as you work your way down the bag each batch of sand gets wetter.. each batch has to be carfefully monitored.. takes time. Before you take a view then have a look at the quality of their work. Have they kept say the cavities clean, are any solum / cassette vents all protruding the right amount, are they plumb / level. Have they got their wall ties clean, are the right amount inserted, every course around openings etc. Are the ties embedded properly into each leaf say or neatly nailed to a timber frame. Do and cavity trays you can see look neat and water tight. Are the dpcs looking nice and straight. Do the mortar beds look level and of a consistent thickness, are the walls plumb? Good workmanship takes time to execute. Speed an quality are often not good bedfellows.
-
Excess rain water flooding
Gus Potter replied to CARBr6's topic in General Self Build & DIY Discussion
Try a softer broom. Chase the water to the low point. Rope in a helper with a dust pan, hand brush and pail.. scoop water into pail. Dry the last bit with an old towel. Check your damp proof membrane positions. Now you will have a nice clean surface to lay your cellotex on? -
Great informative thread this as have a particular interest in this type of construction, solid stone walls. It's remarkable how the body / tacit knowledge has built up over the last 30 years and how we are introducing modern materials. and " More curveballs please"... "The analogy fails though if I say I may come back to that one..." For say steading conversions in Scotland a common roof build as a starting point up may be 50 - 60mm of insulated plasterboard (with integral vapour barrier) fixed to underside of rafters, another vapour barrier as a second line of defense (my personal preferance which accounts for perhaps reduced standard of workmanship here and there). Then full fill between the rafters which are normally 18" centres on a typical steading. On top of the rafters you have the timber sarking boards, then a breathable membrane, then the slates. You may need to reslate so may well need to stick with a 1/2 in sarking board to plane though with the existing... and this chucks up all sorts of issues, the slate nail penetration being one. If re slating large area then go for a thicker board (19mm) as this takes the bounce out of the sarking. This makes it easier for the slater to get the roof tight but also easy to maintain in the long term... provided you have not double nailed the head of each slate.. slate the way the slaters do in your area, you can void the guarentee on the slates (if buying new) to a certain extent but at least you can make an informed decision considering ongoing maintenance. Practically if you look at an old roof the nails don't pull out as they often have some corrosion on the underside which binds the nail. If you have PIR with shiny foil tight up to the underside of the sarking the foil gets a regular punching.. not sure if this makes much of a difference. The point is that there is a fair bit to mull over. OSB is a bit vapour permeable but not much and not enough to let a full fill roof breathe in the Scottish climate. However timber sarking is much more forgiving. The 2.0mm gap is a figure that crops up. Some of the design codes are based on past experience and observation rather than pure calculation. One way to demonstrate this is to look at the suite of Eurocodes, many of the codes have a national annex.. which reflects the environmental conditions in the UK. If you look at an old steading roof you'll see that the sarking boards have shrunk, gaps can be 5- 10- 14! mm. Also the boards have warped which encourages air flow under the breathable membrane. Normally the sarking boards that get delivered to site in Scotland are pretty wet. I have fitted them tight before.. no gap, give them a month or two and you'll see that even a board 100mm wide has shrunk to give the 2.0mm gap, once you put some heat in the place the gaps widen further. Certain parts of Scotland can get pretty cold -18 to -24 deg for several days. Putting a good thickness of insulated plasterboard on the underside of the rafter can reduce the risk of "ghosting" .. where you get some local surface condensation which shows up as darker lines on the ceiling. If in a kitchen then cooking fats can condense more easily here. Although the ceiling may not be "wet" these marks don't go away.
-
Onoff.. You are a star! .. what lovely hands. Are they yours? and the flints look great by the way. My view is that cement is not an option. All cements shrink.. flints have a very smooth impermeable surface and you won't get a flexible bond if you use a mix with any cement content. Plenty info about lime mortars from other poster already. One great thing is that if you use non hydraulic lime you can do a foot or so every few days.. just have fun! Just put a cover over it to keep the rain off. You may build say a foot every few days, but if it's not looking right you can take it off, clean the flints and have another go. Harder to do if using a cement based mortar. I real life you just need to get on with it, stand back and see how you go! even if you have a template once you get a foot or so up it will all go to pot.
-
The vulnerable points are where the drain cock is, drafts under where you may have a bit of suspended floor. Please don't fill it (UF) with antifreeze as at some point when you service the heating this will end up in the ground / sewer or local stream. If it gets that cold your other water pipes will burst long before the UF pipes which are insulated by screed?
-
Craig.. thanks for your post.. every day is a school day re first floor windows. Being Scottish based most of the burglers are too incapacitated to reach the first floor! it's the Buckfast effect. For all Uk wide just make sure you have covered the regs regarding fire escape, it's easy to get caught out here in the excitement of you new home.
-
For all the above all sounds a bit technical but if you are a self builder and want to get your head round the structure start with a card board box. Tape up all the sides and tape onto the top the sloping sides or your flat roof. Stick the box to the top of the table just like it is sitting on you foundations. Next push it from side to side and put a bit of weight on the roof. Observe.. get the kids involved. Now start to cut out your windows and repeat. Observe.. Then cut out say dormers or add a floor.. it's like say that game Jenga! You can then start to understand what is going to happen to your house. This will then let you communicate with the Architect and SE and enable you to ask some searching questions! It is then up to them to respond.. you have captured the high ground from the start! Make them expain! Spot on Tony with your appreciation that unless you resolve all the forces things will move. In a structure all the forces need to be in balance. George the ridge beam... I chucked that bit in at the end of my long rambling post for the very keen and as a bit of "last resort stuff" in the spirit of BH and.. I was on a roll.. typing away like mad you see...technically feasible but to prove it calculation wise you need several sheets of paper a lot of pencil lead! @saveasteading Having read some of your posts you know a fair bit about industrial building design and building say B&Q sheds. You'll know (as a contractor) that the wriggly tin roofs provide diaphragm action.. so they don't deflect at the wall head as much as the SE says they will from their basic model in the office... same applies on a smaller scale with a steading roof with timber sarking. @saveasteading save points out rightly that sarking has series of boards with gaps between to ventilate the roof. OSB does too! just the gaps are further apart...OSB needs a 3.0mm gap that is why the size of the sheet delivered (1197mm ) on say the nominal width is not 1200mm metric size. With a fair wind (very fair wind) you can make this fly.. if you have a long rafter and not daft holes for velux. That is one reason (one other is that they are heavy and thick) why these old steading roofs are still sound and the walls are not spreading after 100 years plus. Also, the old nails had a bit more poke to them, near the sea.. story for another day. For all. The above all sounds a bit technical but if you are a self builder and want to get a feel for things structural wise then start with a cardboard box (also could be your ICF basement). Tape up all the sides and tape onto the top the sloping sides or your flat roof. Stick the box to the top of the table just like it is sitting on you foundations. Next push it from side to side and put a bit of weight on the roof. Observe.. get the kids involved. Now start to cut out your windows and repeat. Observe.. Then cut out say dormers or add a floor.. it's like say that game Jenga! You can then start to understand what is going to happen to your house. This will them let / help you communicate with the Architect and SE and ask them to explain what you have observed playing about.. I may not sound too convincing here but the cardboard box thing is a great way of learning by observation. We actually use this concept to train SE's about more complex theory for example shear centre behavoir.. we make a cee section beam (as opposed to an I shaped beam) out of cardboard load it up and watch what happens.. then we learn the mathematics behind what we have observed. @saveasteading Don't give up on the solid timber sarking just yet to restrain your old stone wall heads !
-
Internal stud at 600cc when the roof trusses are 400cc
Gus Potter replied to saveasteading's topic in General Joinery
This as "reasonably practicable" crops up from time to time and is mentioned in the Scottish regs for conversions. A few decades ago we just used to line out these steadings in Scotland with 50 x 50 timber with brackets back to the stone walls, a bit of 50mm cellotex between and off we went. Now I suppose I'm a bit more cautious. The insulation requirements are more onerous, we have less drafts and now we worry about dew points and so on as we are insulating these places to death. These days I want to know bit more before hanging my coat on a peg. I have mentioned Scotland as the climate is much different and challenging for a designer. Saveasteading has posted some photos of a cracking old steading that could be frankly stunning. Hopefully more to come. Looks like there could be the odd structural issue but nothing drastic. For me steading conversions in 2021 are a different animal from the ones I did 30 years ago.. @saveasteading maybe this is the time for a review of what you have. There comes a time in a project on say a steading conversion when you need to make some decisions on how you approach the design in detail, you start getting bogged down in the regulations, insulation for example.. as far as reasonably practicable...maybe it's time for a wholesale review of where you are at. You invest so much time on just getting the plot that for a while you can take your eye off the ball. To make your case for "as far as reasonably practicable" I would start with the founds and the ground under. You almost have to tell a story.. just like I'm doing here in some ways. The soil and water table. Is the soil say clay, that can transmit moisture or is it gravel. Say you have gravel /sand soils. Is the gravel / sand igneous, if so the porosity of each particle will be very low. In other words. I could have a pail of glass marbles. Each marble is water tight. Put water in the bottom of the pail and it won't get to the top. But add to the marbles some clays, silts, organic material and the water can rise a little. This is called permability. Describe the soil, behavoir and work up. Say you have demonstrated that ground water / significant moisture can't get near the floor level and that you have a gravel soil that does not promote frost (ice) crystal grouth. That solves the damp proofing and frost protection issue. For all..yes you can have a foundation formation level less than 450mm below finished ground level. The next thing to would be to ask.. how do we heat the place? Are we going for underfloor heating? We need to comply with the regs. To do so we are having a slab with perimeter insulation?, it is all air tight?. Now we have a stone wall just behind the insulation above the floor level envelop that is freezing cold. You invite trouble in the long term as it's an often unventilated space and is right in the cold spot? That leads to water vapour that can't get out and manifests as condensation..often called "rising damp" I have chucked a spanner in the works here to demonstrate a point. It's all about understanding how an old structure works, what happens when you insulate it, understand how modern approaches of say insulated slabs for underfloor heating work. Appreciate where too much insulation could actually cause a problem. Once you get a handle on this and get your head around it you'll probably find that BC just love you! and you'll just not sail through the warrant process but also know you really understand what you are doing. Take a step back here, work from the ground up and be sure of your ground (excuse the pun) Understand the consequences of where you place insulation and why you are doing so. Do this and you will be able to satisfy the "as far as reasonable practicable" requirement. That in actual fact should be the least of your worries. You need to satisfy yourself that you are right! In summary I would want to review / look at what you have. Take a holistic view, yes you can often only do this if you have time on your side. Barn conversions suffer from the lack of width, a few extra inches can make a world of difference. -
Patio drainage without soakaway?
Gus Potter replied to ashthekid's topic in Landscaping, Decking & Patios
Can you post a sketch cross section? Try and show where you think the ground water level is. Don't skimp on the detail if you want good feedback. -
Good points Adsibob about attaching too much responsibility / control over materials and workmanship to the BCO. I think that a lot of folk on BH place too much reliance on the BCO's. It's not that they don't have competance.. it's just not their job to look after your self build (hold your hand) and the day to nuances. @Adsibob"I can also say that even the best professionals make mistakes, and good teams consist of members that will spot other’s mistakes. My SE is good, occasionally a bit slow/lazy but on the whole has helped us do things I didn’t think were possible. He did however make a mistake in one of the beam designs. Luckily, my builder is very experienced and spotted the mistake before he ordered all of the beams. Who is going to spot your SE’s mistakes? Who is going to spot your mistakes? If you think it’s the BCO, then you are, to an extent, elevating your BCO to that of a project manager or site foreman, with a level of expertise that I don’t think they have. " I'll leave it at that as cannot add anything further of value to your well articulated post.
-
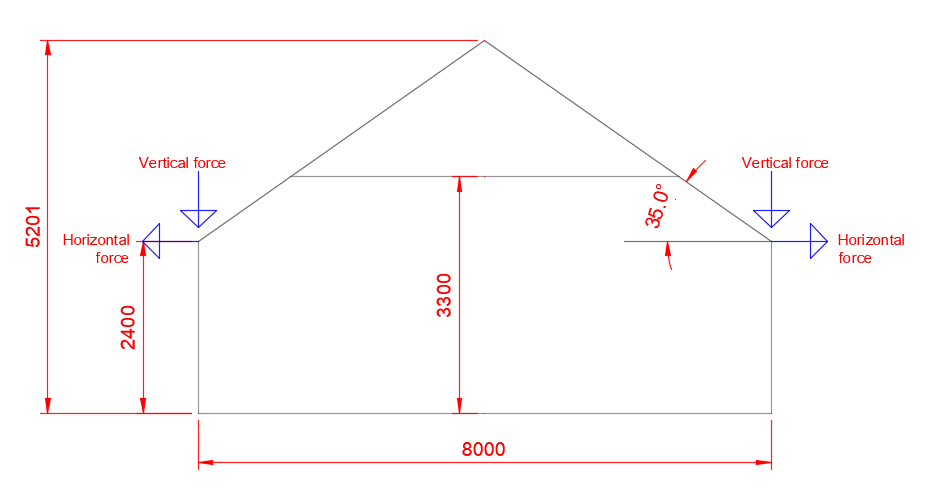
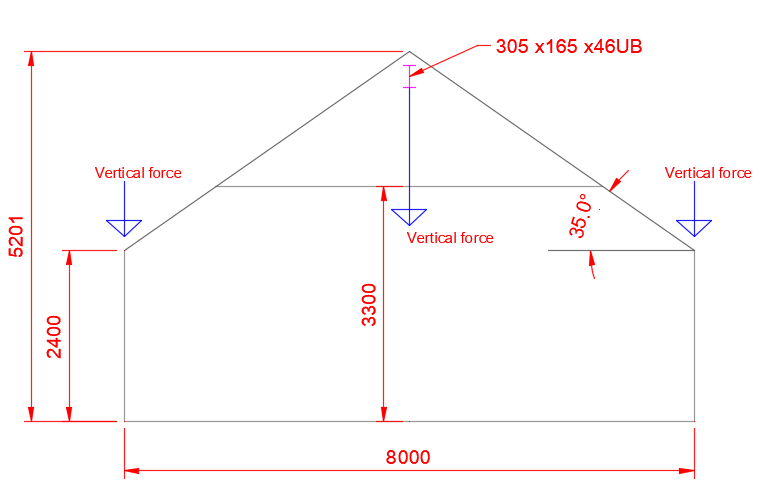
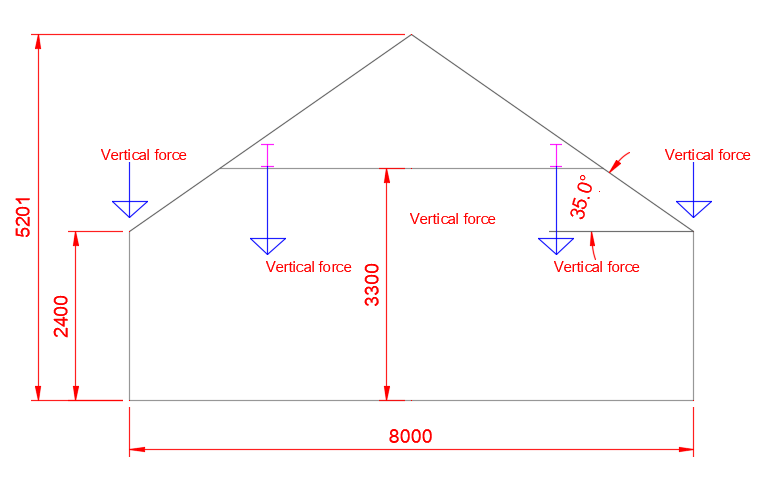
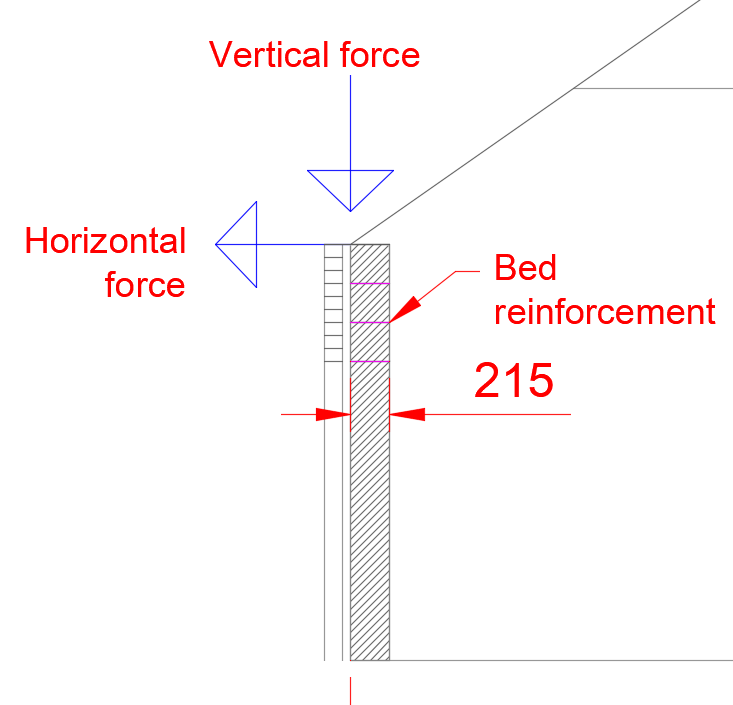
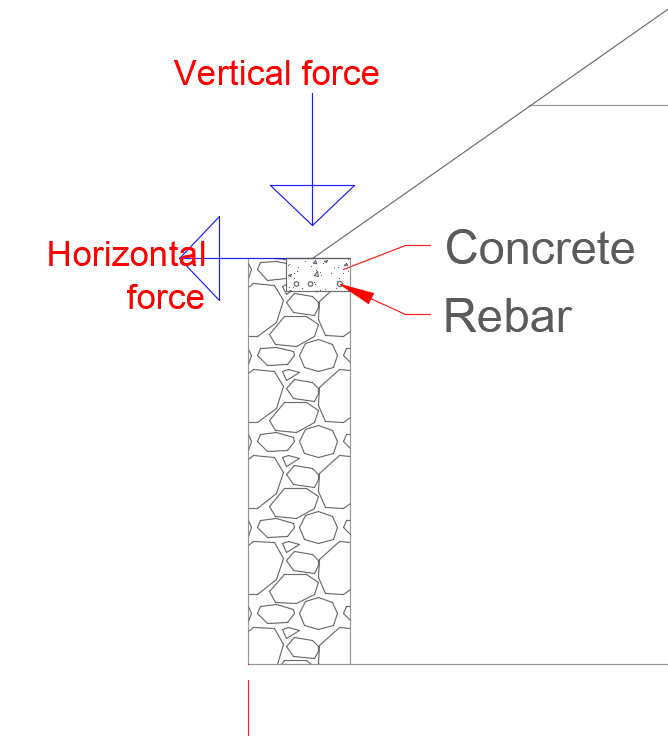
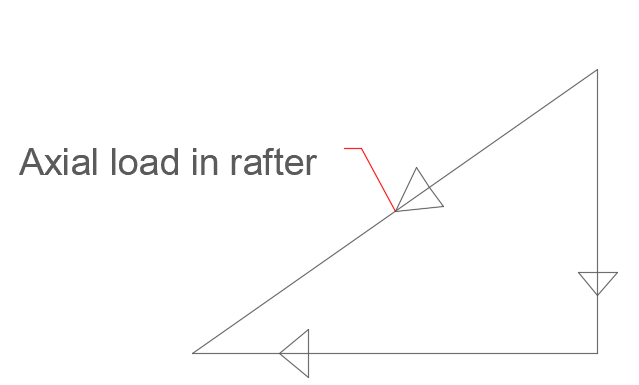
Hello JackofAll. Firstly all the best with your project and a tantalising question.. if you are that frame of mind. Hope the following is of some use to BH members. As a bit of background and as you haveJackofAll identified. Vaulted ceilings can introduce a sideways force into the head of the wall as the bottom part of the roof acts like a bit of a cantilever and bends like fury not just downwards but also moves sideways.. Masonry walls are good at carrying vertical loads but less able to resist horizontal loading particularly when the load is applied to the top via say a raised tie roof truss. JackofAll. To get the best out of BH post some drawings. But for now say you want to create an open plan space 6.0m long (call this the side elevation) with the trusses (a wooden roof) spanning 8.0m onto the 6.0m long walls. In other words the 6.0m long walls are 8.0 apart. I have picked a good size of room (but a bit of an odd shape) for ease of discussion. Let's also say that the 6.0m wall (side elevation) is 2.4m high and has no openings. The above is a stick diagram of one truss. And in the spirit of BH one of the things we are interested in is how much will it cost and what are the options. To cut a long storey short first look at how to mitigate the horizontal loading on the wall head. Say you have some decent gable walls tying into the side elevation walls and that these gable walls will support a beam at ridge level or somewhere along the gable length. Let's look at the economics of putting in say a steel universal beam(UB). Well all other things being equal I would say.. the room is 6.0m long.. 6000mm. My first stab at a sizing steel beam depth for a standard roof may be 6000 / 20 = 300mm.. draw a 305 x 146 x 46 kg per metre weight. It's got a nice wide flange for connecting timber to. May work but deflection, how much it bends by may be an issue but it's a start. I think that the beam is optomistic in depth (may need to increase the size) but.. it's for demo purposes at the moment. Maybe span / 15 would be a safe place to start.. 6000 / 15 = 400mm say a 406 x 178 x 60 UB.. ugly though! if you can't hide it. The beam is just a cut steel, say shot blasted and primed with a zinc rich primer. Say you are a first time builder buying a beam like this. Beam weight 60 kg x 6.0m = 360 kg @ 2K per tonne = £ 720 delivered.. prices will vary but compared with building much heavier walls and the loss of say floor space it's a drop in the bucket. And if that does not suit the mood music or the forces are a bit big then what about this.. Now it may be that putting in steels as above may just not be acceptable visually and we need the walls to resist the horizontal loading. Here it gets a bit more complex. As an aside a cavity width up to 300mm when using say the BS design codes say does not have that much effect on the strength of the walls. Even using block on the flat does help a bit but not as much as you would hope and.. it's a lot of money to spend building an extra thickness of wall just to resist the horizontal loading. Also, you can lose floor space which is expensive when you come to value a property. For all.. the above techniques can be used to convert your attic too! Sticking to the thread. Suppose we can't have any steels as Architecturally it just not acceptable. I deviate but it helps to explain a point. @saveasteading Saveasteading for example has posted a photo or two of a conversion that has solid stone walls. These massive walls can resist quite a lot of sideways load as they are so heavy.. it takes quite a lot to tip them over and this extra spare capacity can be used to resist the horizontal loading from the trusses in certain cases. That is why when you are doing a barn conversion that has solid stone walls you may wonder why is the old roof not spreading?.. it's because the walls are say 2 foot thick and very heavy. But modern construction is a different animal. We just can't afford to build walls 2 foot thick just to resist horizontal loading from the roof. Now lets turn to a modern cavity wall. Say the roof is supported by the inner leaf, could also be the outer leaf. We have a horizontal load from the roof. Now to resist this we could turn one of the leaves of the wall into a reinforced beam that spans horizontally between the gables.. along the top of the side elevation wall, by introducing say bed reinforcement. Looks great on paper but the brickies are not that keen on it and will charge you more. For the novice self builder it's hard to argue with a brickie, they are often grumpy. Also even with a 215 thick block on the flat the beam is too shallow.. only 215mm thick less the cover to the bed reinforcement.. it's hard to make something like this fly. Also, as soon as you start to form openings in the walls, put in lintels it all starts to get a bit complicated, often stops working in practice, you really need to control the quality of workmanship.. more money. Below is a sketch, in effect you are turning the top courses of masonry into a reinforced beam spanning gable to gable which resists the sideways loads from the roof. Turning back to / as an aside for the barn converters on BH @saveasteading Sometimes you can do this if you are faced with a choice between conservation and preservation. Solid stone walls can be a bit weak / weathered. You be may faced with a choice; conserve or preserve. Sometimes on balance you may conclude that the best route is to cast a perimeter concrete beam on the inside of the wall, you could also do this in a modern context but it is not cost effective. Lastly but not least JackofAll. There is another trick that you can look at if you just can't bear the thought of steels, glulam beams performing the functions shown in the above. For an overview. You'll see in the diagrams above I have indicated horizontal and vertical forces.. but we have a sloping rafter. There are a number of things going on in the rafter in terms of forces. For another day, but one major / dominant force is compression of the rafter (call this axial load) this is the compression load along the length of the short bit of rafter ( there is also a bending force and another force but ignore that for now) between the ceiling tie and the wall head. What I have done is to split this load into two forces.. horizontal and vertical. Now ignore the vertical and horizontal lines, imagine you are looking up from the gutter to the ridge, up the slope of the roof. Also imagine that the rafters are clad with a good thick well nailed sarking board or say an 18mm OSB / ply board. What you are looking at is a big deep beam from gutter to ridge that spans from gable to gable. Provided this beam is fixed to the gables then you don't load the side elevation walls horizontally so you can have a standard cavity wall. It takes a leap of faith and you need to detail the gable properly. This all works fine in principle provided you don't then go putting in massive skylights, velux in the roof.. we know if you cut holes in the web of a beam it weakens it. Small apertures carefully positioned.. fine.. be sensible. In Scotland they use sarking boards which help turn the roof into a deep beam in the plane of the roof as this helps for example stiffen the roof against the wind. Old steadings / barn roofs use the same principle. The sarking / bracing helps to turn the roof into a big beam in the plane of the rafter and this stiffens it all up and reduces the horizontal loading on the side elevation walls. What I describe is nothing new, these old builders have been doing this for hundreds of years. The key is to appreciate how you can construct roofs to shift the loads to where they can be easily dealt with. JackofAll. Hopefully you can take some of the info above and adapt it for your project. All the best.
-
fix sliding door header directly to steels?
Gus Potter replied to Tom's topic in General Self Build & DIY Discussion
Hello Tom. It would not be my first choice of option. You also mention the word cantilever! .. and that indicates that close examination is required. The starting point is to look at what the steel is holding up. How much dead weight is there that does not change and how much variable load could be applied to the steel (call this live load) as it is the live load that will cause the steel to move up and down... deflect. Sometimes a steel also has to resist wind uplift.. it can bend upwards too.. not often, but it can happen occasionaly depending on building geometry. The most probematic case is where the steel bends downwards and jambs the doors. Personally I would like to see some gap.. say 10 - 15mm to allow for a bit of play and to give the steel somewhere to go. Looking ahead if you do get a problem with the doors sticking you want to be sure that you could tweek the frame at a later date... if it's fixed hard to the steel this closes off some of your options when maintaining the doors. Just as an aside and for all. If you have a goal post frame..a column at each side and a header beam then if the connection is between the header beam and the column inner flange you can sometimes get bolt slip and this causes the header beam to drop a fraction. Clearly if the header beam is connected so that the beam rests on top of the columns this is not an issue for downwards loading. For a lot of steelwork we don't use what are called tension controlled bolts or High Strength Friction Grip bolts (HSFG) as it adds to the cost. These bolts are designed / intended to prevent slip amongst other things. We normally use Ordinary bolts in a hole with a +2.0mm hole in the steel. Thus if you are using a 16mm diameter bolt it goes in an 18mm hole. Now it may seem tight when you put it in but occasionally you may get a phone call saying "we have just heard a bang" is our building falling down? Sometimes it just means the steel has dropped a little and come to rest. But these high end doors are a bit sensitive and that may be enough to cause a problem. leave a gap and if the steels drop up to 1.0 mm after a hot summers day then the gap should head off sticky door issues at the pass. The other thing is that when it snows or you maybe get wind pressure on the roof forcing it downwards the steel moves up and down... it's just doing it's thing. Fix the doors to the steel and they too will have to follow this movement. Introduce a bit of "give" and it's one less stress that the doors frames need to cope with. Apparently less stress leads to a longer life! I would go for a gap between the steel and the top of the door frame even if you have bifolds which often need to be fitted tight top to bottom as it allows you to maintain in the long term. Say you have bifolds and one leaf fails, burst frame joint say. It may be that to get it all to work properly you need to adjust the door head a little.. fixed hard to the steel then what do you do next? Hope this helps you slumber. -
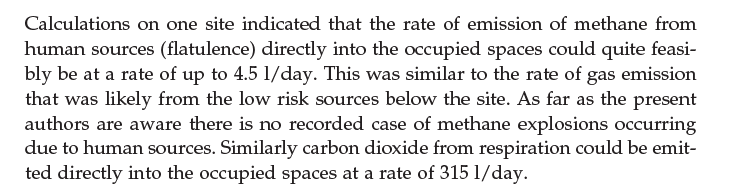
Zoot.. And a bit of MVHR for all.. Are you going to be living in this place on your own? Apparently an average human produces about 4oz of feaces a day... say 5oz following a big say curry so that's about 200 -250 grammes..or 5* 50 grammes at ten minute intervals if you have cooked it yourself and not washed your hands.. never taken the time to verify by testing myself but have a reference book that covers similar, same book also has an esimate of how much "human gas" is prevelant in and average family house per person. As it's Build Hub and in the interests of community knowledge I have copied below a paragraph from the Ground Gas Hand Book with ISBN reference for the really curious / sad. Yes this is something that you have to take into account when gas monitoring in some cases. For BH folk that were wondering about how much CO2 builds up when using MVHR systems here is a reference figure! 2009 Not sure what you are going to use the cottage for but if you expect to use it as a regular home (much worse if you want to rent it out as a holiday home) with more than one or two person occupancy then don't spend too much time money on the tank lid.. the soakaway and so on is going to give you the issues... and you'll probably need to get a new modern tank. Would be keen to hear what your doing to the rest of the cottage. All the best and have fun with your project. Oh technical note.. if you have the council coming round and saying they are checking for methane from mine workings then you need to look carefully to make sure they have allowed for the level of occupancy before they condem your house. It may or may not be relevant to you having to move out or not if you are border line.

-
Velux sun tunnel noisy in rain etc?
Gus Potter replied to Dan1983's topic in Skylights & Roof Windows
Good to hear you are making progress. Go for the light, don't like the sound then use a pillow! Much more expensive to retro fit and the disruption it causes to the tile work. My gut feeling is that you won't regret it.. oh and the romance of the rain / hail/ nasty weather when tucked up in bed (Barbara Cartland (9 July 1901 – 21 May 2000 ) I think. -
Bang on Peter. To dry it out in best way if you are short on time is to use a dehumidfier at night when the place is locked up, during the day get the wind blowing through it. Try to avoid drying the timber too fast as it will contort. Some will dry too much and some hardly at all. Fresh air is your friend!



