Dudda
-
Posts
487 -
Joined
-
Last visited
-
Days Won
1
Everything posted by Dudda
-
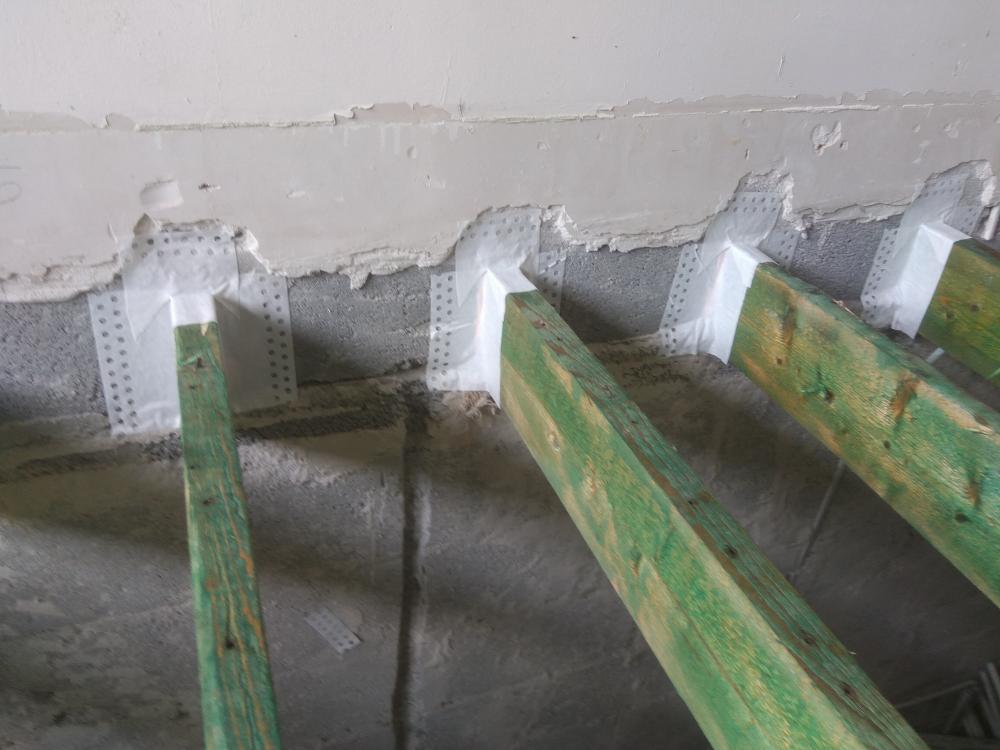
That's right. The last step I'd suggest is putting in some acoustic mastic sealant (or similar - could be tape) between the floorboards and the wall. The timber floor will expand and contract at different rates to the blockwork and (presuming these are first floor joists) you'll want to keep the noise transfer down. While the gap might be covered by skirting to correct it visually it's not a great seal for reducing noise transfer. You don't want to hear a TV downstairs when trying to sleep.
-
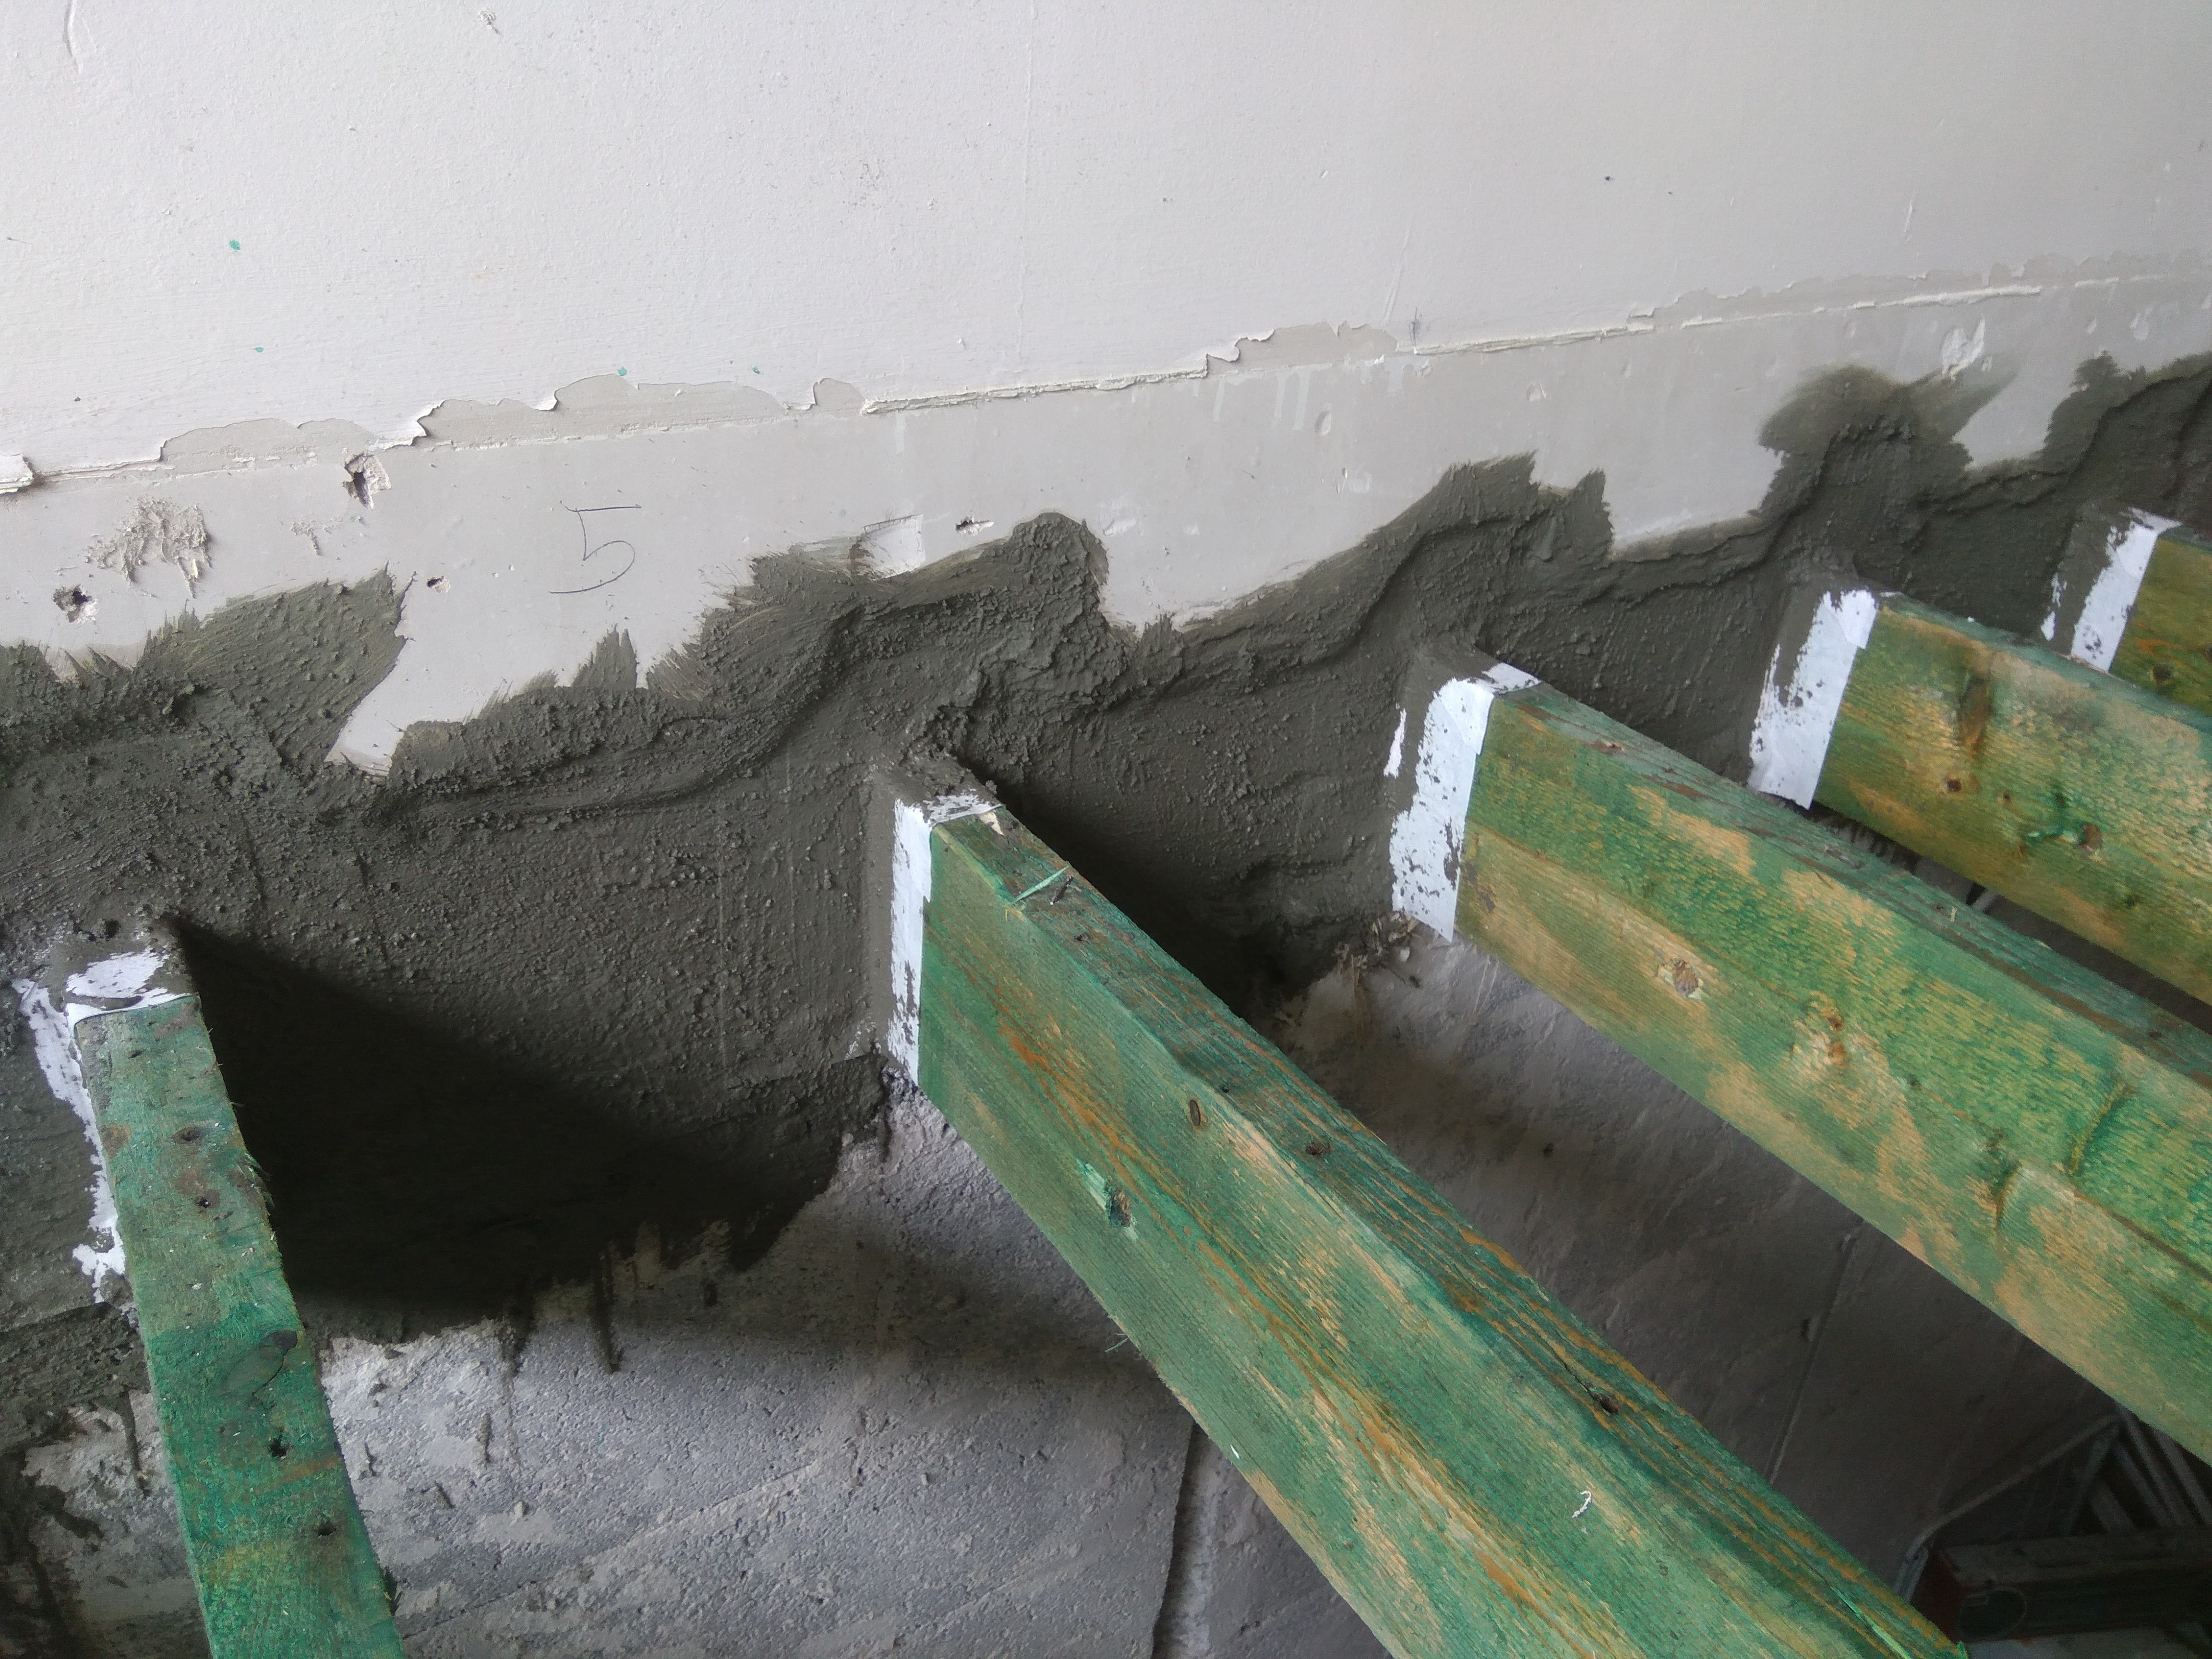
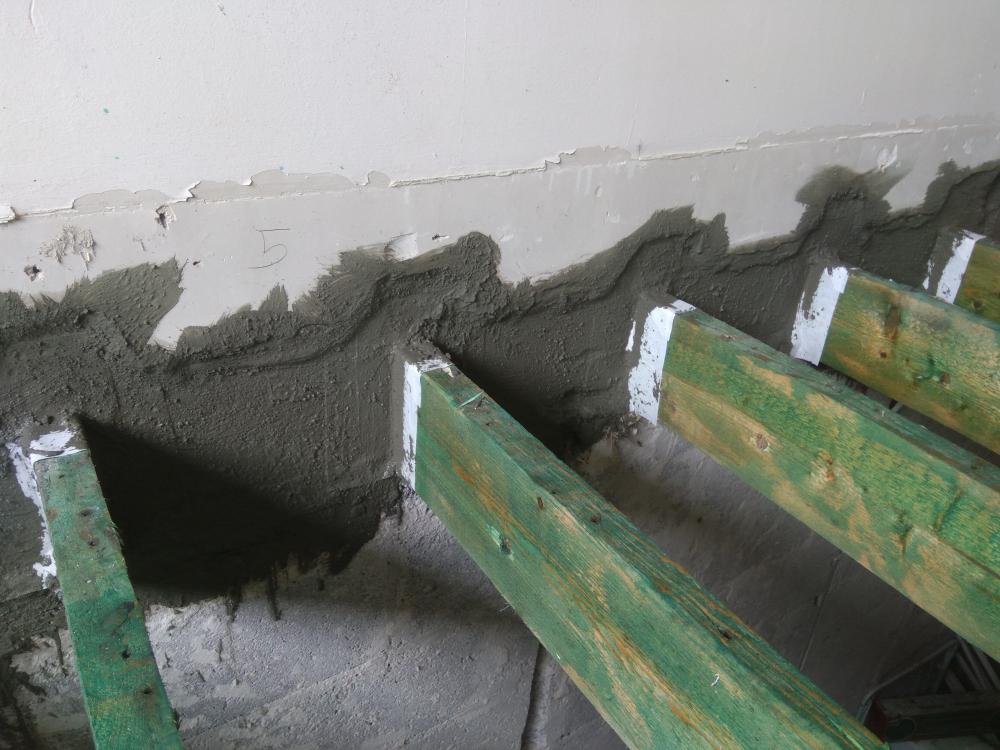
I know it's a refurb job in my case but the same principles apply. Step 1 is tape around any joints or joists. Step 2 is use a very wet sand and cement mix and apply like it's a very thick paint with a sweeping brush or similar. It can be messy as it's wet and can go everywhere. It will only be 2-3 mm thick but that's all it needs to be.
-

Bath Surround / Boxing In, and concealed pipework
Dudda replied to Onoff's topic in Bathrooms, Ensuites & Wetrooms
Get rid of all the steel angles in the concrete (both mild and stainless). Even if you make Swiss cheese out of it it's still a weak point and will crack or it will expand at different rates to the concrete due to the underfloor heating or loads of instant hot water and crack that way. Steel mesh, beams, etc need 50mm min cover. You won't get that in 70mm depth. You want one piece of concrete poured in one go and the fibres are enough to reinforce it. Its not a huge area. Make an inverted form guide you can rest on top as your creating the falls if you want them mm perfect. You can make that out of the steel angles you have if you want. I think this is extreme but you like things mm perfect and creating additional work. -
Bath Surround / Boxing In, and concealed pipework
Dudda replied to Onoff's topic in Bathrooms, Ensuites & Wetrooms
Not sure what the steel angles are for. Are they to help you create the falls? Anyway they will most likely form the role of crack inducers as they'll have so little cover. The no.4 mix looks good as you'll need it strong. Whats the thinnest part of pour? -
You mentioned a planning consultant but have you an architect or who is designing this house? Reason I ask as an architect that's not where I'd put the garage although I haven't seen the site and only know as much as that aerial view. Edit: 100 post. Mini milestone for me
-
On the ground floor switch G.05 internal bathroom and PL/CB. You really should be trying to get a window on all bathrooms to provide natural light and ventilation and the PL/CB is still close enough to the entrance. Stairs and entrance might have to slide a meter to the east which is doable.
-
I’d be afraid a half inch sand cement screed would just crack and break off. It’s too thin. Then the issue with the levelling compound is if the floor is damp that won’t last either. If the floor isn’t damp and doesn’t have a door with water getting in (ie where rain is coming in onto to the floor like some outbuildings) then this, while more expensive, is probably the best option. Another option if the existing floor is fairly good concrete would be to hire a large grinder and just grind down the existing floor making it flat. This would be the strongest most durable finish but my only concern with this is you’re floor might be so rough it could take a long time to grind flat and smooth.
-
The membrane on top of the insulation is also useful to stop any concrete seeping between the gaps where the sheets of insulation are butt jointed or tape becomes loose if you've taped the joints. This concrete that seeps down creates a thermal bridge which can create a cold spot and also at it's the wetter part of the concrete that will seep down it can allow the concrete to dry out unevenly and even hairline crack. Not a huge issue with a regular floor but important for polished concrete floors. It's just an additional layer of protection usually 1000g plastic so not expensive.
-
You'll need to put an end cap on the hot flexible tail which isn't connected up to a hot water system or you can have cold water coming out it under the sink. Found this out the hard way!
-
Discount Offers of the Week
Dudda replied to Ferdinand's topic in General Self Build & DIY Discussion
Bit overkill for a bathroom? -
I'd go RAL 7011. It looks more considered and isn't as harsh as the black but is still dark enough. I went with RAL 7016 in PVC to match my windows which cost me 20% more than black as it isn't standard and was harder to get. Black is a standard colour and will look standard and the contrast you mention isn't a good contrast. A contrast of natural timber cladding turning grey or the natural stone against the crisp RAL 7011 windows is an example of a good contrast.
-
Hey Elliot. I'm an architect in the Republic of Ireland and was onto Andrew about installing the first SunAmp down south in my own house. Project is delayed a bit so will now be early next year before it's ordered. One concern is the 15mm feed from SunAmp. Another member here, can't remember who, has put two SunAmp's in parallel to increase flow. Any thoughts on this or any plans for a 22mm SunAmp which would support more showers, etc?
-
UFH pipe literally sandwiched between mesh...a problem?
Dudda replied to mvincentd's topic in Underfloor Heating
Have you any crack induced joints or movements joints in that slab? With a large polished concrete slab you can go two ways. Have it very thick with loads of steel everywhere and try to stop any cracking or movement. The other way is to have crack induced joints every few meters which is what's usually done but with that huge slab half buried the SE might be trying to avoid that in which case I'd be reluctant to remove any steel. -
No... BS: 8103-3 says 600mm centres for 18mm OSB 3 T&G. Chipboard; then yes you need thicker but not OSB. The bending, tensile, compressive and shear strength of OSB 3 are stronger than chipboard as can be seen in BS EN 12369-1. If you're worried go for thicker but 18mm OSB is fine in a domestic situation.
-
Ya, you can use adhesive and screws to fix it to the OSB. I've OSB everywhere upstairs so it was easy for me to continue it into the WC. This is the one I'm looking at in Ireland. Only €72 total which is about £63 for peace of mind. https://www.tiles.ie/tile-backer-board-cement-backer-board So you'll need a good bit more even without under the tray and bath but it's the best and strongest job you can do. As it's cement board it will be more durable than ply in damp conditions. Chipboard would probably be ok but I don't know if I'd risk it. Ply will be good enough and cement board will be better again. It's another one of those cost decisions everyone has to make daily.
-
Aquapanel is by Kauf and just an example of a cement board. Any cement board will do and they usually come in 6mm thickness for floors and 12.5mm thickness for walls. I think @Onoff is using something similar in his famous bathroom on the walls and I intend to use them in the next few weeks. They aren't cheap but if its for a bathroom you usually only need a few square meters and you don't want any movement which could crack tiles. My shower tray is due for delivery on Tuesday and I'll need 5 cement boards at about €14 each to cover the whole WC floor. Have the OSB down but not the last sheet beside where the tray will go.
-
Who suggested 18mm T&G chipboard? I suggest 18mm OSB as it's thinner, will span 600mm and cheaper than ply.
-
18 T&G OSB and 6mm Aquaboard = 24mm. Very close in depth to the 22mm tray. Tank this and then you've a great base for the tiles.
-
Need quick to learn CAD software recommendation
Dudda replied to Ferdinand's topic in New House & Self Build Design
I'm thinking if you're going to spend say 8-10 hours on this over the weekend would it not be worth downloading AutoCAD and using the free 30 day trial? As said above people tend to go back to the first drawing programme they learn and find it difficult to change so why not start with one which would be good to continue with. I spent the last 20 years on AutoCAD (can't believe it's that long until I counted it in my head) and have found the transition to 3D BIM software over the last two years slow. Alternatively if you take the sketch you want and the pdf background you'll find sites you can upload it to and have people draft it up for you. It could be £50 well spent and save you the whole weekend. -
The time has come to fit the wet room tray.
Dudda replied to MikeSharp01's topic in Bathrooms, Ensuites & Wetrooms
It's an AKW SureForm shower tray. I could pretend I knew from looking at it but I zoomed into the sticker on the image Instructions are here: https://www.akw-ltd.co.uk/wp-content/uploads/2016/06/14-021-019-SureForm-Installation-Instructions.pdf I'd go for the sand and cement mix to bring it up a bit and put some in behind the honeycomb structure as you said. -
I think I’m going to give this a try in a month when I’ve all the airtight stuff finished (which probably means two months as everything is taking twice as long as I plan). I’m not really interested in recording the figure or trying to get the pressure correct as I don’t have a U tube manometer or anemometer and don’t want to spend money on this just find the main leaks before I pay for a full blowdoor test. Semi related. Do you have to do an official registered blowdoor test on a new build in the UK? You do here in Ireland for the last number of years but the target isn't currently high although they plan on reducing it soon.
-
Why do you need the 3G glass thinner? Is it not thinner frames you should look for which are a lot easier to find?
-
What area is the house as that depends a lot on cost and how well is it insulated will determine how much pipe you need? A medium or poor insulated house will need more pipes and they'll be closer together (100mm or 150mm) while a super insulated house can have the pipes further apart (eg 200mm). Putting in the UFH myself was one of the easiest parts I've done. You need to spend the first hour working out where things will go and planning it to make it easy (eg mark out kitchen units). You can put down the pipe yourself and get a plumber later to connect up the manifold and system making less work. You don't have to do it all yourself. If you go to a company like Wunda (which I used) they'll design the layout for you but most companies supplying the underfloor heating will design a layout I think. It's not much work when you use a programme (LoopCAD I think it's called and you can probably use the free trial). Post the design here the software or company proposes and the members here will suggest further improvements to the design they've got from experience.
-
Discount Offers of the Week
Dudda replied to Ferdinand's topic in General Self Build & DIY Discussion
I do get a fair bit of the Lidl DIY stuff and usually like most of it but I got a laser level there before and it had a very very weak beam. Wasn't this one so not sure what this is like. -
Congratulations. Keep it damp to avoid it drying out too fast and developing surface cracks. Just a note on pressurising the underfloor heating pipes. Where it’s fixed to steel mesh with cable ties or similar it’s fine but if you’ve underfloor heating in a thin screed which is put in near the end rather than the start of the project and it’s clipped down with the plastic staples which are just pushed into insulation than it can come up with concrete pumps or wheel barrows going over it. It’s not the pipe that fails but the plastic staples that come loose in the insulation. In this case the additional weight of the water in the pipes help keep it down and stop the pipes floating to the top of a thin screed. If the pipes are full of air instead of heavier water they can float to the top of a screed.