
Leaderboard


Popular Content
Showing content with the highest reputation since 06/27/26 in Posts
-
We're first timers in our sixties, renovating a 200 year old Gloucestershire property as our last home. It's very basic (no central heating, damp) with a stone centre, brick semi-added pre 1860 and s 20th C. extension at each end. Removing the plaster and some ceiling my wife has revealed questionable [cough] building techniques which explain some of the cracks and a patched up Inglenook which we plan to restore. Early days but we have a builder and architect for a garden room style extension. We have lots of ideas and plenty of time, but of course not enough money :-) If you've done anything like this by all means tell us we're barmy, it just say hi. Met a couple this morning and got chatting about this, and they recommended this forum highly. I'm learning so much useful stuff from others offline and online. For others I can recommend Mastodon (a non commercial social network - no ads or algorithm getting in the way). Posting questions there has been a great help.6 points
-
Hi everyone - I'm Tim Newbie selfbuilder here, in the early stages of planning our self-build project in South Wales (But currently living in Bristol). Looking to build a family home to passive house principles, and avoid any Grand-designs style crises during the process! Excited to be part of this forum, which is a great source of info! I look forward to picking your collective brain more as we make our design choices and progress with the project.4 points
-
4 points
-
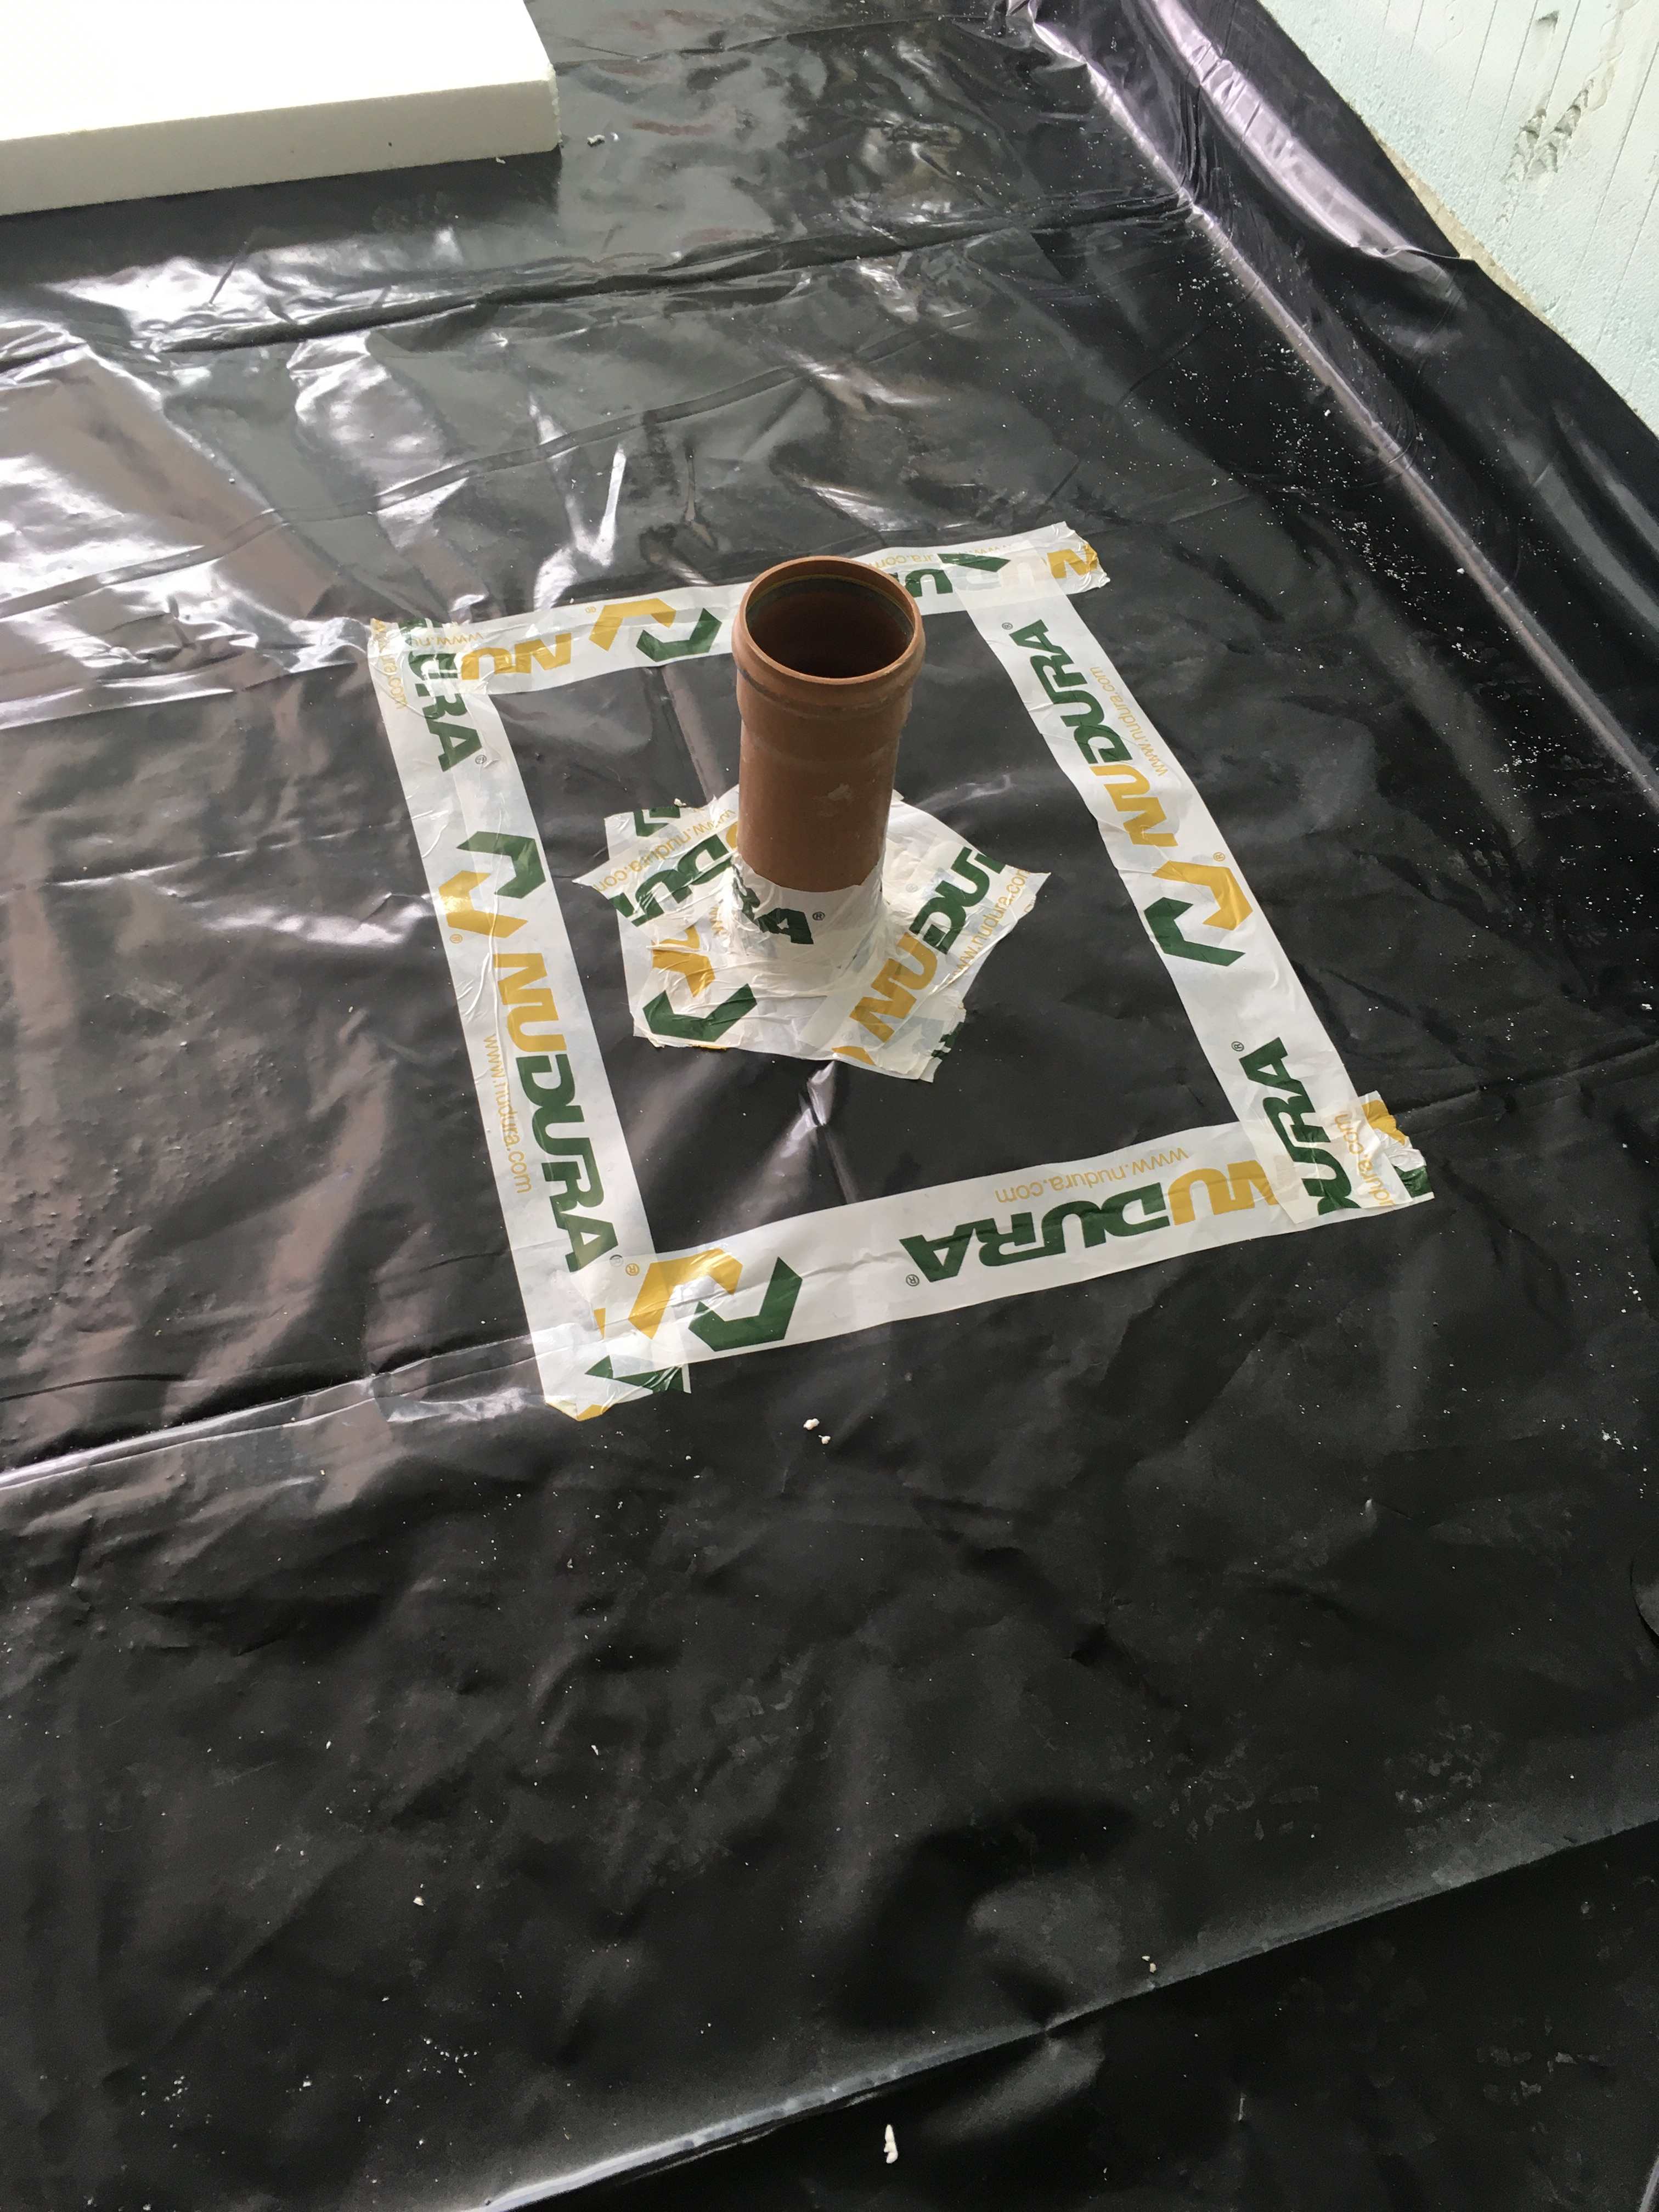
Stop trying to reinvent this job. sealing around the service pipes is easy. you do not try and cut a hole in the membrane and seal that to the pipe. cut a 300mm hole in the membrane, poke it over the pipe, then cut a 600 mm square of extra membrane, cut a 120 mm hole in the centre, poke it over the pipe and tape it up, then tape your patch down to the main sheet. easy, each pipe penetration will take 15 mins max. why buy two membranes to do one job. if your finish concrete is rough the pir insulation won’t give a monkeys it will just deform to the shape of the slab when it has 15 tonne of screed on top of it.4 points
-
Lift the 5a one as much as possible, then same for the socket to see if you can hide this. Plasterer was shite, decorator equally as guilty. Just unbelievable that this incredibly low standard of work could have escaped the 80’s and still be so prevalent today in 2026. I bet neither of those two tossers houses look like this. Utterly embarrassingly low standards from these people. The ‘fix’ is to remove the outlets, PVA the openings, apply EasiFill and allow to dry fully, then sand and paint, then, repeat if necessary, and paint. If you have a PM then send the bill to them.3 points
-
I was recommended a screed company, I was told they are absolutely shit hot, I met the main man and he knew what he was talking about, I asked about screed curl at the edges and covering the screed to slow down evaporation. he said it wasn’t necessary. so I did some more reading and asked a few questions. they did the screed, an hour after they had gone I hosed it down with a very fine mist spray, I then covered it in polythene and also covered all the windows to stop the sunlight coming in. the result is I have the flattest most level screed I’ve ever seen. you need to satisfy yourself how it should be done, and any short comings in your opinion you need to make up. buy the polythene and install it yourself or do you due diligence and insist on a curing agent. if you think they are good why do they not want to cover it ?
 3 points
 -
Flanagaj, I think maybe you are trying to be a builder without being a builder. I write with sod all experience except my own troubled extension. We ended up having to ditch a bad builder and then decided (as we had a dry shell by then and good alternate builders were not available for 18months plus) to continue by bringing in trades to get to completion. It is not an easy process because unlike a proper builder... 1/ You do not have a little black book with several good contractors for each and every trade - people you know from experience are capable and you can work with. 2/ You do not have any real clout with trades because for them you are a one off customer - a few £k's or £10k's of business - builders will be known sources of regular business 3/ Some trades people may be wary of a novice builder, or sometimes take advantage. 4/ You lack deep knowledge and experience of your own - of trade specifics, trade tendencies, what to watch for, how to specify a job These things do make it difficult. Finding good trades can be a lengthy process where the only proof is in eating the pudding. These things affect timeline enormously, you can never call in a favour from someone, no one will ever call you looking for work, you are potentially the job that gets delayed in favour of others. For your slab specifics, do you have a concrete mix specification defined that is what they are going to meet. My SE sepcified the mix for us. And where you don't have a contract only a price/purchase order/invoice then I would suggest always emailing to ensure you have something in writing which defines your requirements. In case of dispute at least you then have something more than verbal conversations and a price. You can even then write down what the contractor has told you verbally about the job, answers to your queries, etc. But try and get someone you can talk to, I've always been able to talk to my SE or Architect or the QS that dealt with closing my original builder contract, to get bits of advice or a site visit.3 points
-
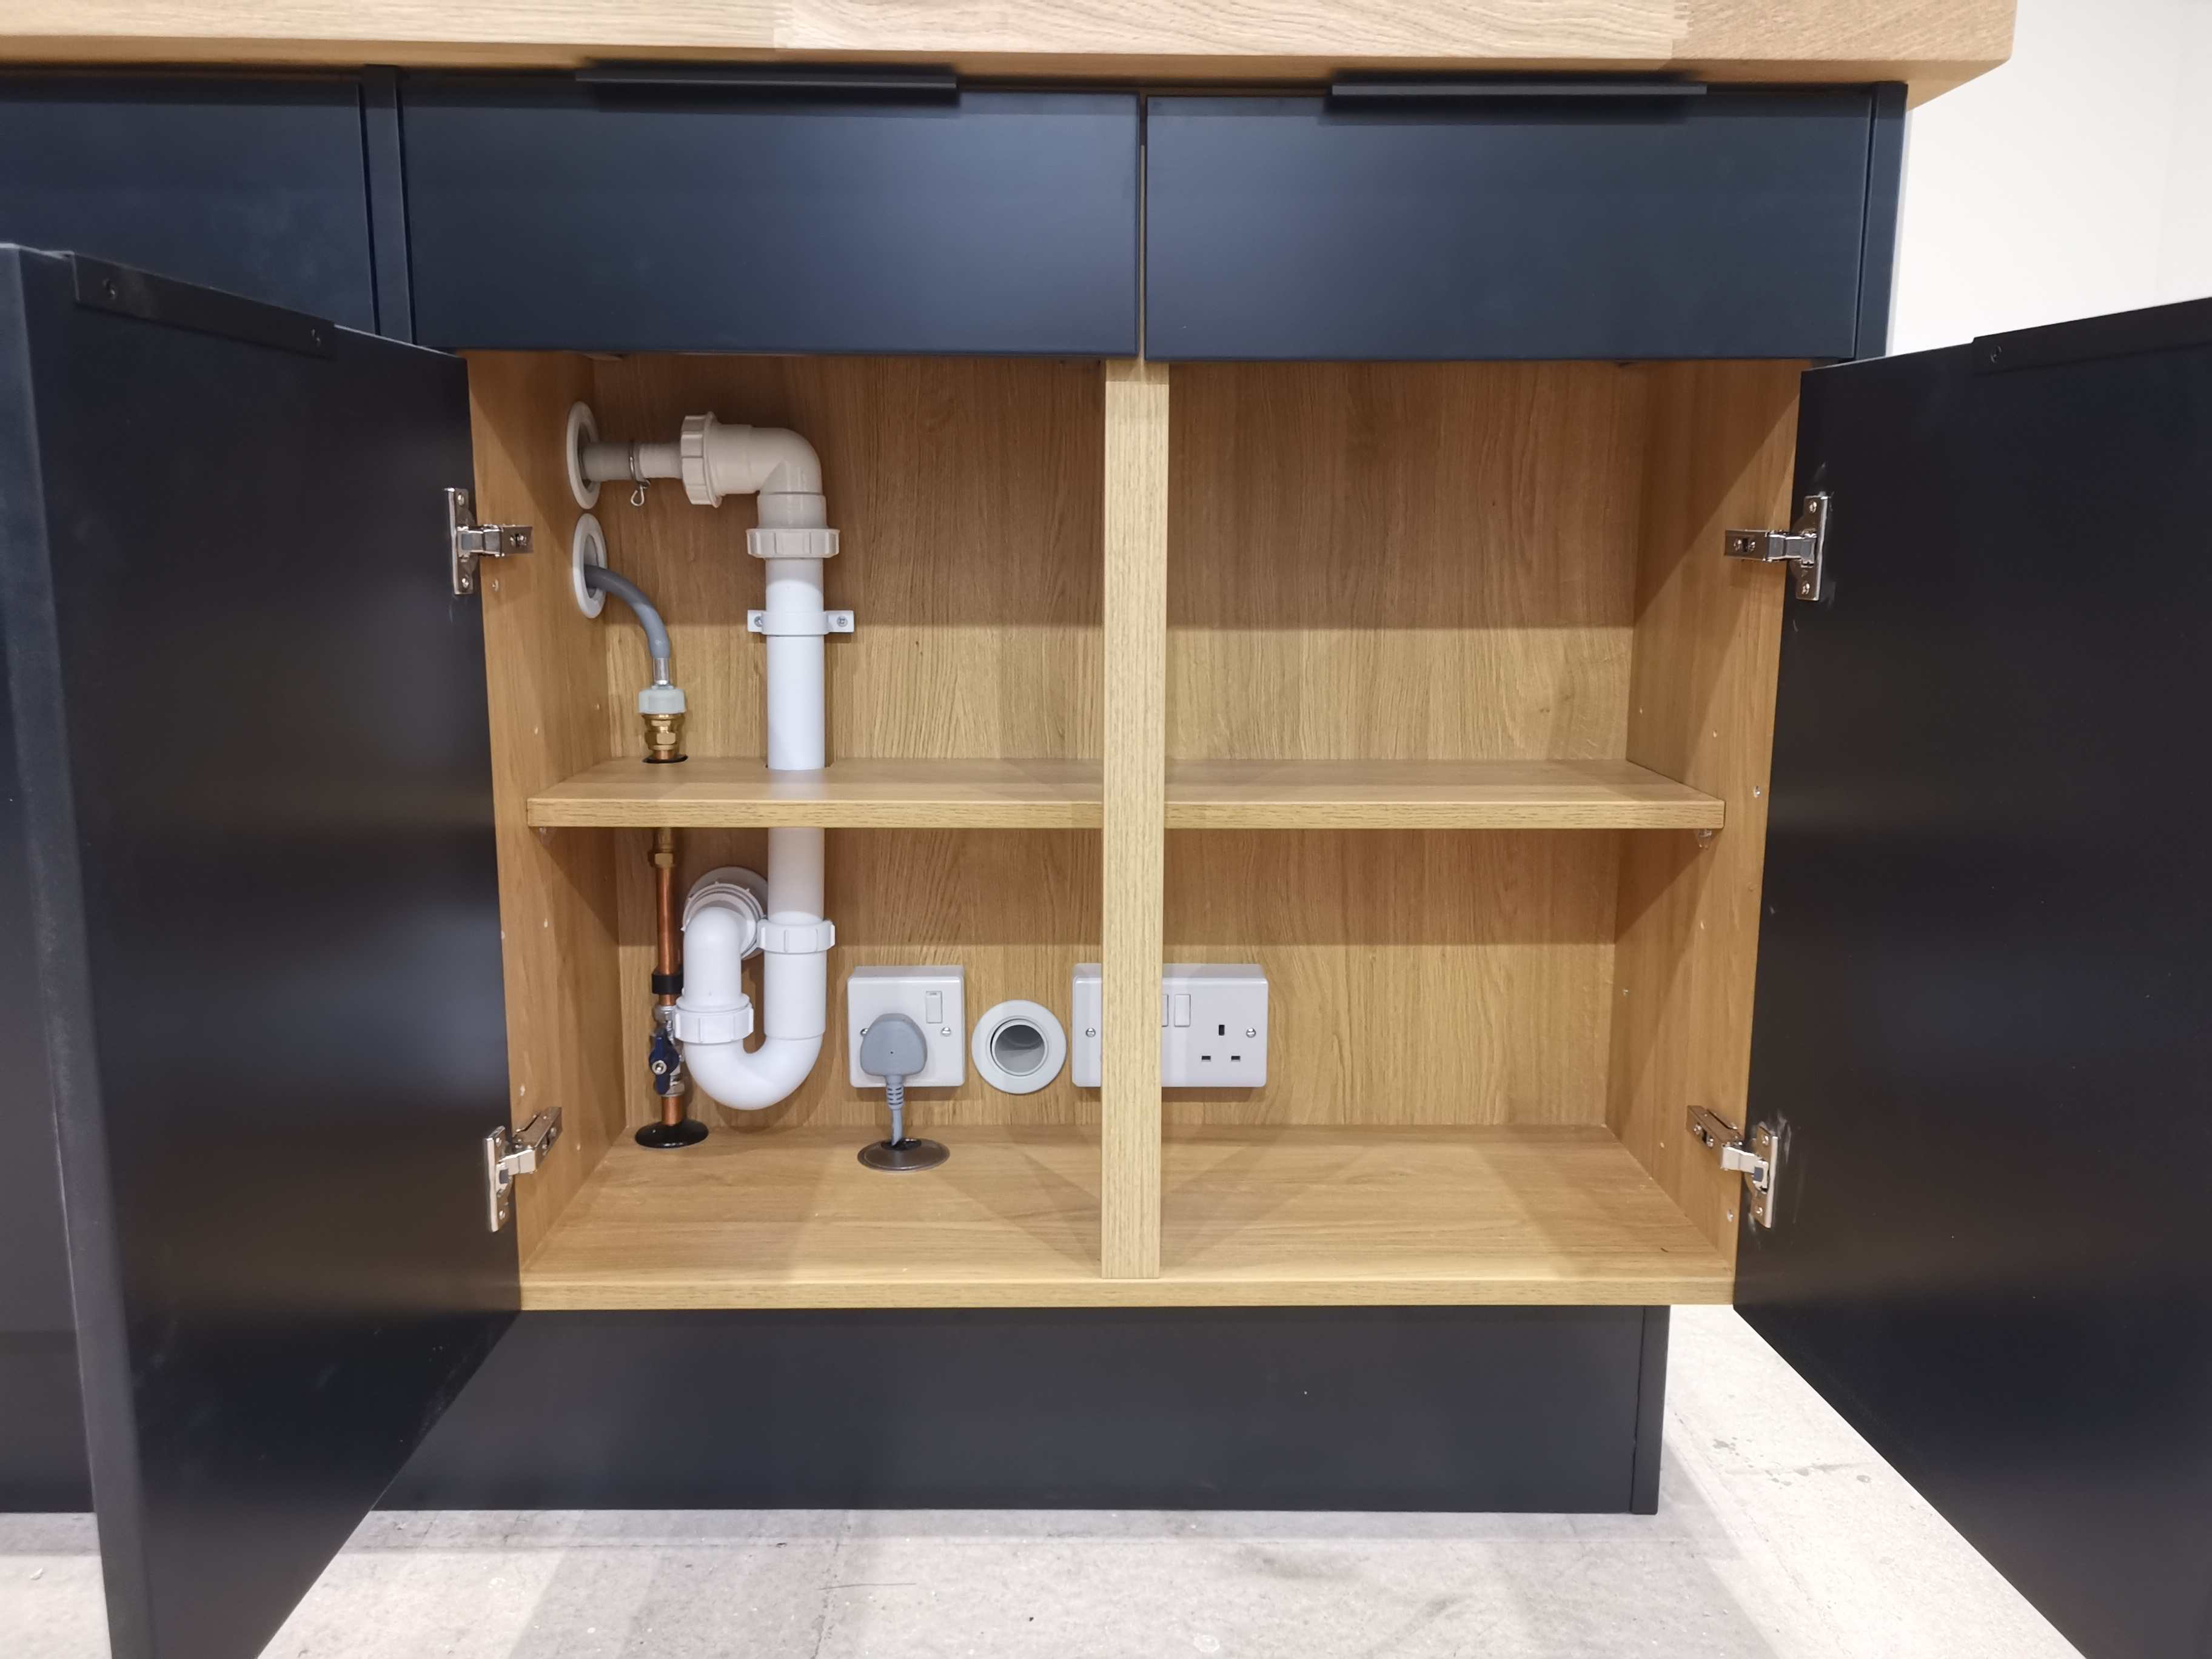
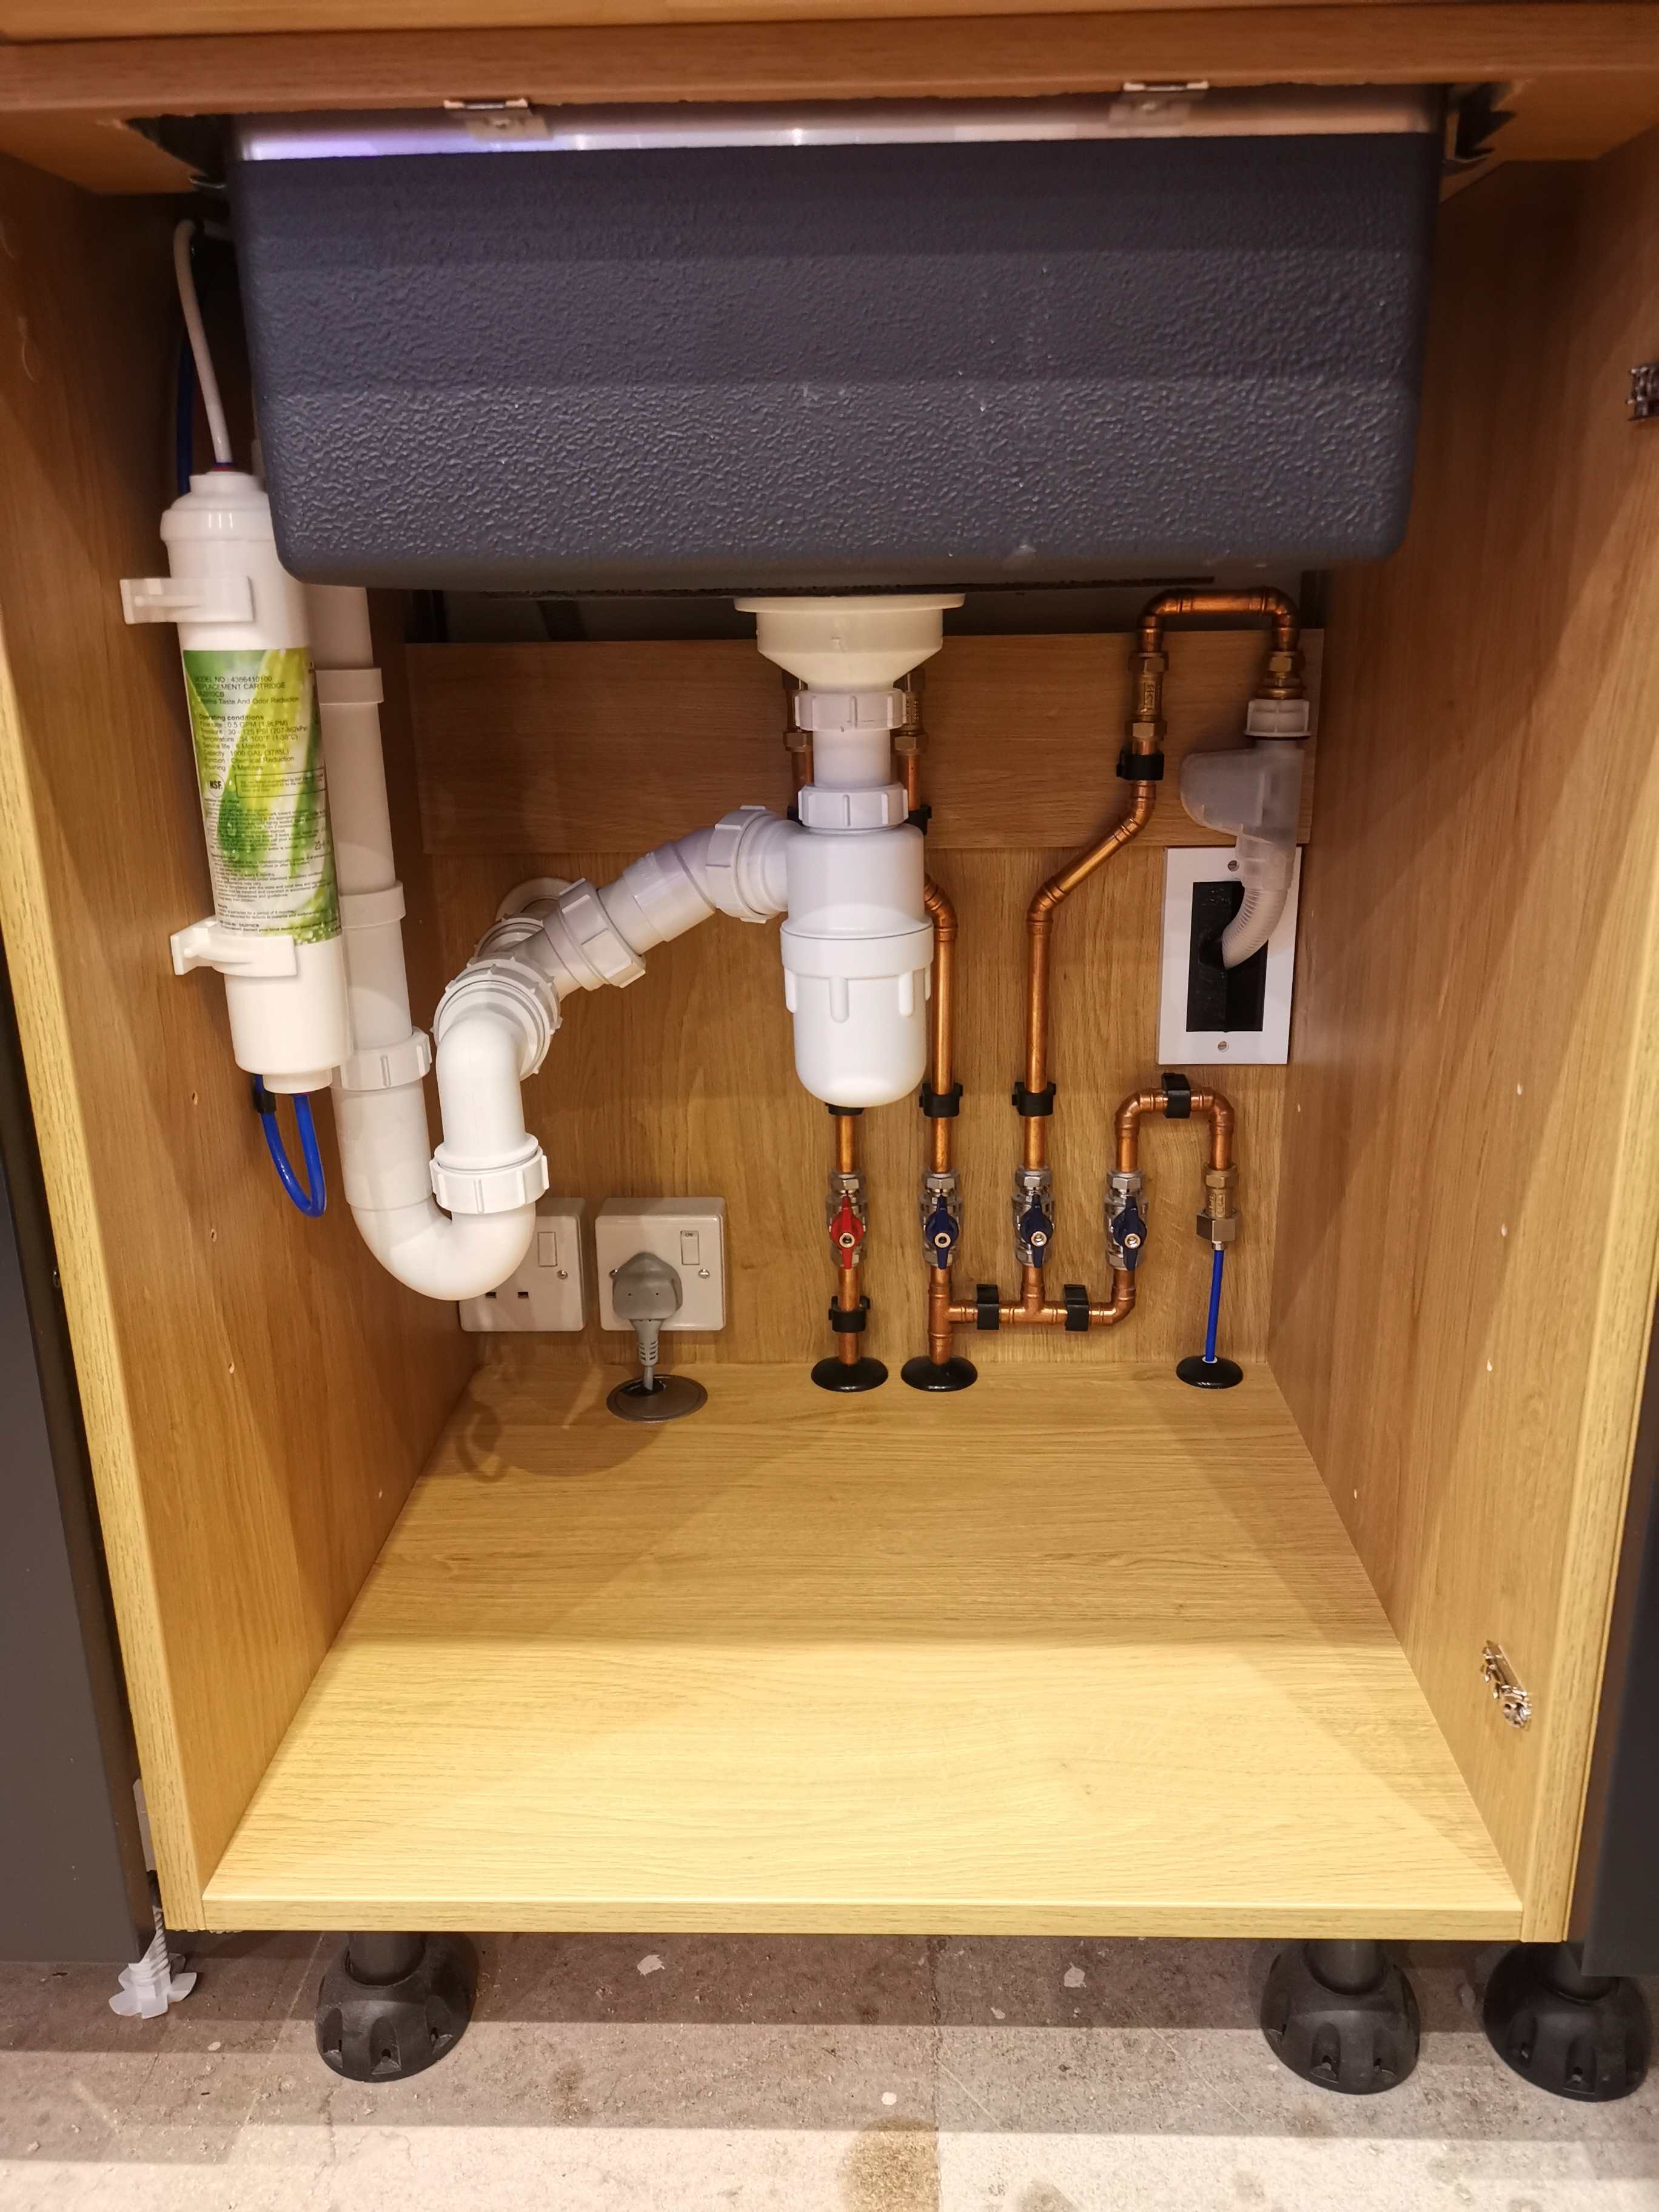
Why can't everything just be moved under the sink? Don't think I've ever seen any plumbing, water or waste behind the actual machines. Yes you lose the cupboard space, but so be it. My machines have a recessed section at the bottom so pipes can travel past it without interfering with the space. For what it's worth I did that in 2 places on the opposite sides of the room in my gaff, no regrets.

 3 points
 -
To add, if you do just decide to DIY something and there is an underlying structural issue that then reappears later, you may be invalidating the NHBC insurance (or at least giving them a lot of ammunition for an argument) and exposing yourself to much higher costs down the line.3 points
-
To break his arguments down by section 1. He makes the mistake that declining N.Sea production is a choice - it isn't the rate of decline is slightly modifiable but not to any significant degree. We are arguing over the green line or the red line. He also makes the mistake that our high gas and electricity prices are due to us deliberately running down our production. Aside from my point above, they are high due to the high price of gas and the international price of gas is not changed by the UK output. The price is set by the international markets and those are (nominally)supply and demand. Even at best, our output is too small to change the international price. It should be noted that the rise in electricity prices and gas prices was very closely correlated in 2022 because a much larger proportion of our electricity came from gas. In 2026 the rise was much less direct because less of our electricity comes from gas. He talks about the supply chains for renewables being dirty and having emissions. This is a variation of the landman rant (and the "EV's will never pay back the carbon used in making the battery" argument before that). Study after study shows wind turbines, solar panels and EVs are all net negative for carbon well within their lifetime. It also ignores the carbon and pollution from fossil fuel extraction as a comparison. 2. He talks about "what happens is the gas prices fall?" Well, they will eventually for a while,until the next crisis. Then they will fall again until the next crisis and so on. So far we have had 2 massive "once in a lifetime" shocks in the current decade -that we are only half way through... Does anyone want to bet Trump doesn't do something stupid I'm the next 2 and a bit years. What would happen to oil prices if the world's largest oil producer suffered massive political instability? Say a the kind caused when a leader who loses an election tries to cling to power using a paramilitary police force or even elements of the armed forces.... Who wants to say that is fantasy land? 3. He seems to get mixed up on the cost of capacity. With renewables capacity is a more statistical figure than gas plants etc. With ccgt plant the peak cavity is easy. Just an engineering question -"that plant, at full chat, will produce 2GW of electricity." With renewables there is a theoretical capacity - what if everything was perfect, but that's only a few % of the time. A better question would be "what is the 95% available capacity" ie the level it can produce 95% (or whatever arbitrary figure you want) of the time. So my 11kwp solar array has a 95% figure closer to 1kw (during daylight obviously). Essentially we will have to dump a load of capital into building these assets. Once e have built them they will provide cheap energy for decades. Or we could kee the capital and dole it out to buy oil and gas as we need it. That's our choice. Right enough for now....
 3 points
 -
It is worth pointing out that we started the transition to low carbon generation nearly 2 decades ago. Apart from some very small scale wind farms, hobby PV and a bit of hydro, we had virtually nothing. Since the we have added 55 GWp if wind and solar. Now the name plate capacity if RE cannot be compared directly with thermal generation, but it contributed close to 40% of our generation. It also contributed to our pumped storage as well. I have not looked at storage capacity in a while, but must be close to 1 GWh now. I cannot see any reason why we should not hit 90% low carbon generation by 2040, except if there is not the political will to do so. I think the political will is there, we tend to hear the naysayers more because they are the vocal minority, the majority says nothing. I am going to repeat what I said about cost. Wind and PV are the cheapest forms of, and it is coming in bold , NEW generation. It is not competing with the same contracts as legacy generation.3 points
-
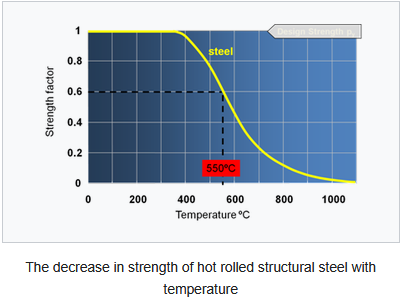
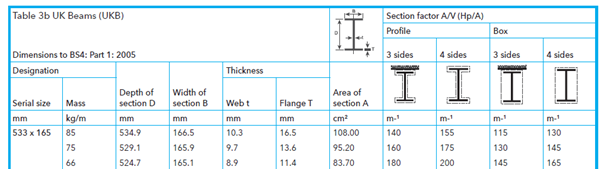
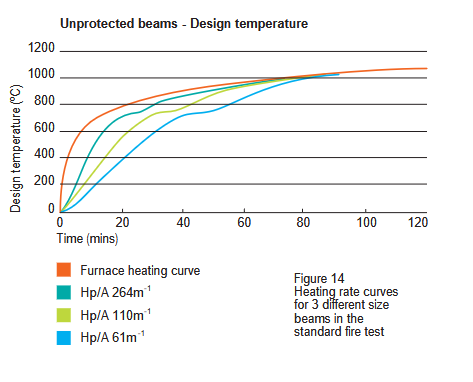
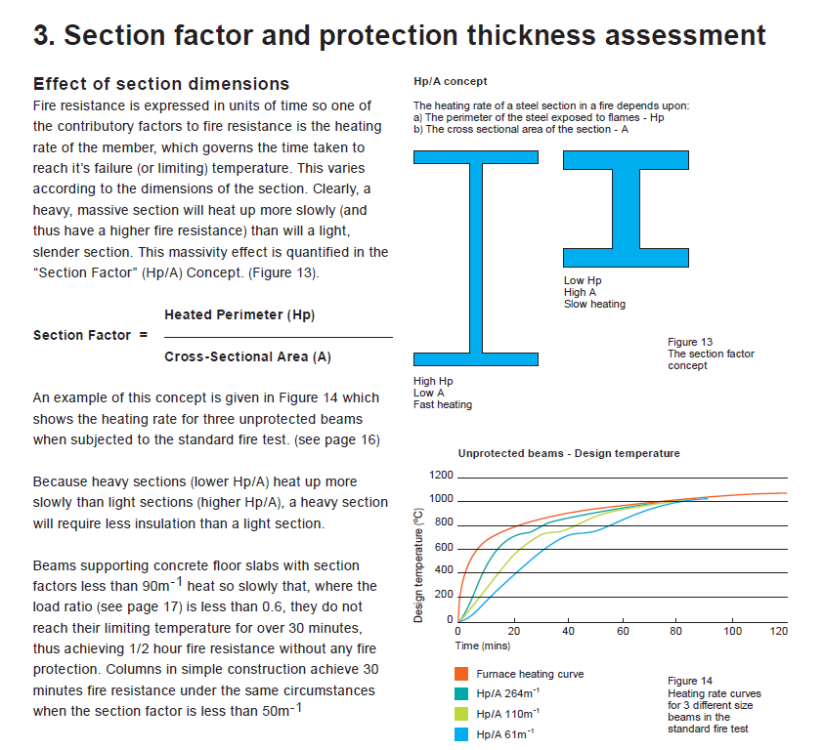
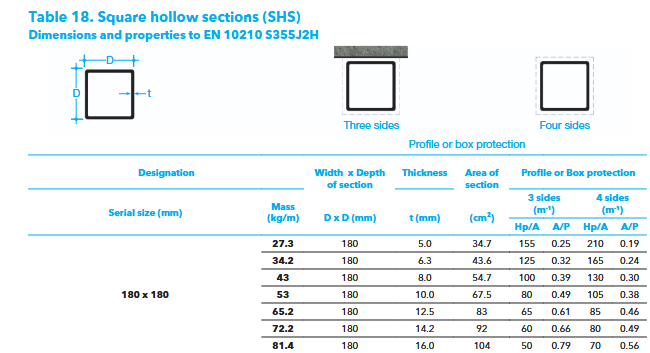
It depends! But here is a rough outline of how we go about designing steel fire protection. The following is in the context of the self builder, not multi storey, multiple occupancy structures. Ok, the process / theory is.. roughly this. The starting point is to understand how steel behaves when it gets hot. Someone ask me / others a while back.. why does my oven not start to melt / distort when I cook a pizza hot? The above is what we call a fire curve (SCI, Steel Construction Institute data ). There are different fire curves. They vary depending on fire loading (how much and what types of stuff can contribute to a fire, how "intense and rapid" the heat delivery) but the above is one we would refer to in a typical domestic self build. You can see that up to about 350 Celsius the steel maintains much of its strength, which is why your oven does not "melt" and fall to bits. After that the steel strength starts to plummet. When we fire protect steels as @saveasteading says This is correct. All we are doing it to stop the steel from getting hot enough, then soften too much, and thus not carry the loads on it for the time required by the building regulations for example. Now we can either select a geometry of steel member and make it very heavy such that there is so much mass of steel that it does not get heated quickly enough to soften to the point of failure. In lay terms. If we had a solid round bar of steel say 150mm in diameter it has a large cross section area compared with the exposed surface. This is what we call the heated perimeter / cross section area ratio (Hp/A), the Euro codes have slightly different way of presenting but they mean the same. They are presented using the ratio Area / Volume, A/V. But if we have the same cross section area of steel and weight in an I shape (a universal beam) it has a much larger surface area and thus will heat up much more quickly and thus lose strength more quickly. Now we ain't going to be using solid 150mm diameter steels. What we could look to do is is insulate the steel. This could be by way of fire proof plasterboard or intumescent paint. But also we could build the steel into a masonry wall and maybe have only one side exposed to the fire on the inside of say a garage. Or we could have the steel built into a floor that in itself insulates some of the exposed faces of the steel. Below is a screen shot of a table that shows how we need to consider the exposed sides. They key here is that the lower the section factor the slower the steel will heat up. The section factor changes depending on how many sides of the steel are exposed. But to go back to what @Great_scot_selfbuild asked., which was how heavy does a steel need to be so it does not need fire protection? The info below is taken from Corus literature 2003 as an easy generic example. The bottom line (Hp 61m^-1) is of interest to us here in a domestic self build. Using a design temperature of 550 deg you can see that the bottom blue line hangs in there, all other things being equal for 30 min. So let go back now and find a steel section with a section factor of lower than 61 m^-1 to try and get a handle on how big a column needs to be for example. A 203 x 203 x 86kg/m is a candidate if it has three sides protection (section factor 60), but that is a heavy steel. You also need to handle this safely on site. Ok let's see how a box section compares. Ok we can get down to 60 for three sides exposed protection.. not much difference. But if we reduce the sides exposed the numbers get a lot better. I've not shown them here. That main remaining key bit is what we call the load ratio mentioned above as 0.6 ratio. When we design a beam / columns or pretty much any structural member in your house we design for the normal expected loads. The self weight, permanent loads and the imposed ( live loads, people, book shelves etc) but in a fire we recognise that the floors, roof etc are probably not going to be fully loaded with people for example during a fire, the permanent / self weight load is still there. So we can make a reduction in the load if a fire occurs. Its based on probability and the loads that could be reasonably expected in the case of a fire. We call this an accidental load case and the safety factors get reduced for example. If we designed everything for the worst case buildings would be too expensive to build! The load ratio is the load (stress generated) during a fire compared with the ultimate capacity of the member. Often we design beams to be restrained by say a timber floor.. but if this has burnt away we can't count that. To conclude: The above I hope, gives you all a bit of insight into what we need to do / think about to design steels for fire. The take away is that sometimes it works using a heavy steel to avoid the expense of fire protection. The design can become much more complex if bolted / welded connections need to be taken into account. This kind of design consideration is a bit complex if you've not done it before, it's not common bedtime reading! It can be a tricky subject once you get into detail, something that many Architect's, BC officers are also not too familiar with. But it's a fundamental part of producing a safe design. My objective in writing is to try and help BH folk gain a bit more knowledge so you can ask and phrase any questions you have to your designers from a lay person perspective. You make a good point. Yes steels expand in a fire and will change shape and distort the surrounding structure, to the point it often has to be later demolished. The objective is that the building hangs in there so it does not fall on the fire brigade, set light or fall onto a neighbouring building not least.


 3 points
 -
Sorry I don't mean I am personally hoping the English and Welsh get these wind farms and pylons in the numbers we have been "given" in Scotland. What I am saying is while for so long England in particular has banned them, they have instead been built up here so the good folk of England who largely make the rules, have not seen the blot on the landscape that they are, and if the good folk of England don't see them, they obviously think they are good.3 points
-
To an extent, outside of a very small number, none of us, no matter how well read are able to be experts on any particular topic, so we have to take our views from those who we see as experts. I have not read all of the source material, conducted my own experiments or submitted my theories to scientific challenge so any assertion I make is potentially a call to authority. The same is true for the other side of the argument. All any of us can do is weigh the situation in front of us, which seems to be following a common playbook. First - deny. Next, obfuscate - its not anthropogonic etc. Finally, fatalism - we cant do anything anyway. Some things are clear however: It is hot. Much hotter than when I was young, and hotter every year. There is a physical mechanism for this heat being caused by C02 emissions Modelling and predictions of the C02 effect are matching reality If it is C02 and if we don't do anything we are in for a very bad time If it isn't C02, and we reach net zero, we are in for a pretty good time still It does make me laugh (cry) when people blame renewables for high prices. The UK spent at least £75 billion on supporting energy prices just during 2022-23 due to gas prices. It is also the case that renewables knock out the most expensive conventional electricity generators, so the wholesale price of electricity is reduced by renewables, which gives the impression of a subsidy but the reality is the reverse - https://www.ucl.ac.uk/news/2025/oct/wind-power-delivers-ps104-billion-net-benefit-uk-consumers I do get frustrated with people who just raise problems like there will never be a solution. The nature of progress is you don't always have all the answers, if you never started a journey unless you knew how it could be done then nothing new would ever be invented. It is also a demonstrable fact that renewables are more suitable from a security perspective. More distributed generation, less reliance on critical things like pipelines, LNG facilities and so on - we're literally right in the middle of 2 wars that are being defined by attacks on energy infrastructure. Really?3 points
-
I am quite happy to do a design for you…..please let me know if I can help…..3 points
-
I would have done a design for free!3 points
-
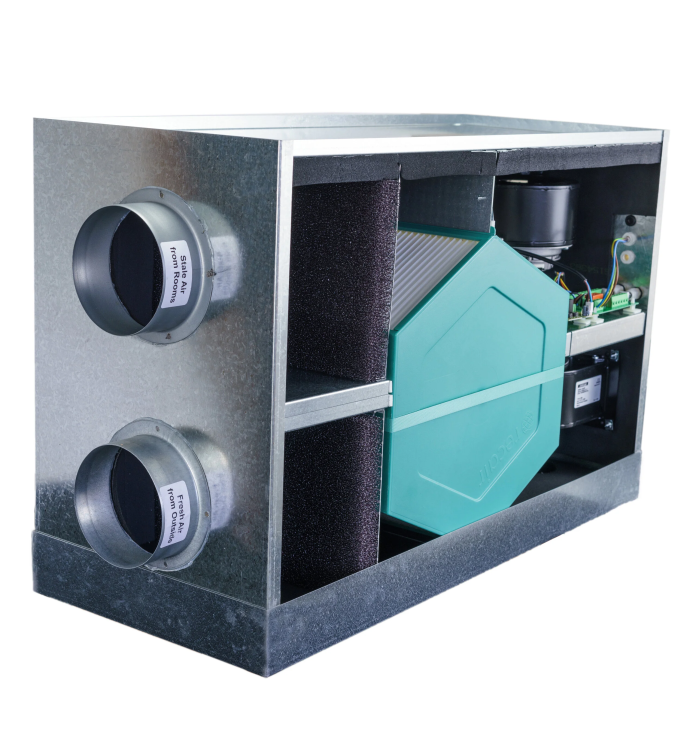
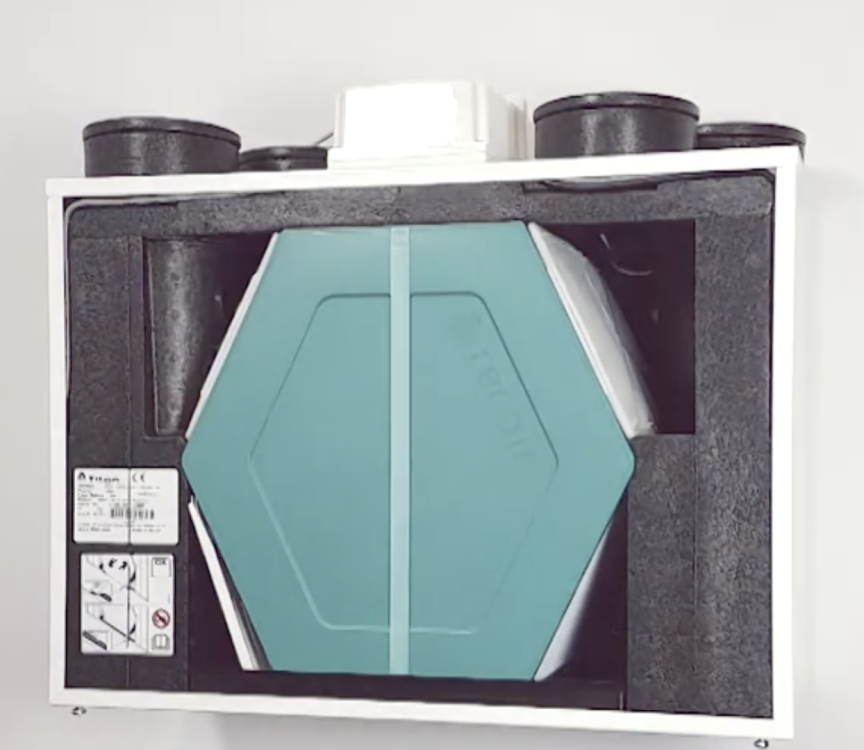
I was interested also, so I had an internet search. Compared to one of my units (Titon HRV), see images below. Heat exchanger size on the Rega is very small. Insulation between air streams almost none. Casing insulation almost none. Just about as basic as you can get - maybe and most likely poor performance as a result. Fan motors on Rega mounted in the steelwork, Titon mounted within the insulation, giving better noise attenuation and vibration dampening. Electronins away from where any water could collect etc etc Rega unit Titon HRV unit
 3 points
 -
Depends what you’re doing, of course. But, we tend to use (for a timber frame build) 3 x sets of bought in sawhorses with sheets of 18 or 25mm ply on top. No vice, maybe the occasional clamp. We’re largely cutting sheets of ply and C24 at this point. Not much use for an mft yet. A tool strongbox for somewhat nickable tools, some wire shelves for non-nickable tools and supplies (these are both undercover now) and a 20ft container for less used tools, fixings etc.3 points
-
Just looked back at our gas and electricity bills in 2023, we had £89 Direct Debit for gas and £180 for electric. Since then I have added more solar and a battery. Plus we now get export payments. Plus got rid of boiler and installed an ASHP. Battery and additional solar cost me around £7500. Fully installed. But current DD is a total of £52. Instead of paying normal rates for electricity I pay 10p per kWh, can only do this because I have a battery. So in simple terms I am saving £214 monthly, or £2568 per year. Nice round 3 years pay back on the additional solar and battery. And an added bonus, this month via Axle VPP, have earned an additional £20 directly from having a battery. So taking this into account in the the above, now pay back becomes 2.7 years.3 points
-
The impact we can have on our own lives, especially as self builders is pretty big. Some of the first things that come to mind are 1. Designing in good passive means to heat protection. Lots of insulation with good decrement delay. Limiting glazing, espically in bedroom's. Appropriate shading. 2. Active colding, even a fused spur and a short 70mm duct will allow an A2A unit to be installed at a later date. 3. If opting for batteries get a change over switch to cope with power outages. 4. A store of water, even a rainwater butt will allow toilet flushing if the mains is cut off. 5. Raising the floor level well above current food level. 6. Shuttering for windows is something t.o would like to have e done. Maybe PVC rollers but even a stack of appropriately sized OSB sheets stacked in the garage would offer a a lot more protection than glass windows from extreme weather.3 points
-
Not to the detriment of the functionality A lot of "cheap" designs have fresh supply vents almost immediately above doorways of bedrooms etc, and near zero air flows across the room. If you need to have a long run, and want quiet operation, you simply double up on the ducts. This is something sewn into the heart of the build fabric, with near zero chance of 'putting it right' retrospectively. It will also be on 24/7/365 for the rest of your life there, so maybe not somewhere to cut all of the meat off the bone Buy a good quality Brink unit from Air-Haus.co.uk, oversize it(!), and make sure to install proper attenuators on the supply and extract ports for super-quiet operational sound in the rooms.3 points
-
It's easy. You can certify it yourself with an anerometer and a spreadsheet. I think there is an MVHR design sheet floating around the forum somewhere. Tl;Dr, make sure your duct runs are as short as possible and your diameters are as big as possible.3 points
-
Nonsense argument. 🤦♂️. ”Disabled visitable”, “Disabled adaptable”, or “Disabled persons home”? Do you expect a wheelchair bound visitor to your home to be able to reach your oven isolator? A disabled persons home would be built around their own, stated, specific needs, such as @Benpointer. Apologies for terminology, I’m never sure if I should be saying “less-abled” or other. If the home owner is 5’ tall, the electrician should suggest things to suit their stature, much as this week I have asked my (non 5’ tall) clients if they’d like to accept my suggestion that we raise the vanity units by 30mm to suit their ‘tallness’. If you told said 5-foot nothing lady she doesn’t need wall units in her kitchen because she’ll never be able to reach them, I’d expect her to punch you in the bollocks, without bending down, and then go get a step stool out for you to sit on until the pain subsided. .3 points
-
Now you need the will to live these days. I don't do this regularly (primarily as an SE) but for one reason or another I end up representing Clients that are making a claim on their warranty. I've done this for the last 15 years or so. I spent some 20 years as a building Contractor before that, cutting my teeth and learning how devious folk can be at times. In some ways I'm a poacher come game keeper. It's not part of my core business, I do it as it's good for my soul and I don't like to see domestic Clients getting taken advantage of. That said, over the last 15 years I've recovered on behalf of Clients a few million quid. The amount of money is less important, for me it's about justice and holding folk to account. What I've noticed in the last few years is that some of the warranty providers are more and more sub contracting out to Claims handling services. 25 years ago lots of the warranty providers withdrew from the market. At one point there was the NHBC and Zurich pretty much. Now we have lots of new entrants.. and it seems to me that there is a bit of a race to the bottom. The terms and conditions are a bit of a minefield for the unwary. There is a common case where they initially come over all friendly but then tell the Client they need to employ an SE like me at their own expense to provide a report. This happens even if the Client has provided photographs that clearly show there is a problem. It has come to my attention that they (Claims handling services) are ramping up the; deny, defend and delay tactics.. always been the case but recently I've noticed that they are cherry picking part of my SE reports and trying to fob the Client off. Even to the extent that they will quote part of a paragraph of my report.. which totally changes the context. Often young folk just can't afford this so they throw in the towel. It's a disgrace. Now this may be a genuine lack of understanding .. or a deliberate intent to defraud the Client. I'm happy for them to dig themselves a hole as often when doing a warranty Claim I'll turn it into an HSE (safety) issue. This makes folk personally liable and risks the HSE getting involved.. a big black mark if you are a warranty provider. My question is. Are folk finding Claims handling services helpful or not when you think you have a case for making a Claim.3 points
-
Nope. Needs a building control application first, with support from an architect or architectural technician (the latter will be cheaper and simpler). Then, you reach out to a few 5-6 reputable local builders for estimates / quotes etc and come back here with the results for us to see who's good / bad / ugly. ONLY use a builder who will take you to other jobs, let you meet other customers, and avoid the cheapest quotes!3 points
-
Skips: I hate them. Specially this one: after ten years at this game, the last one (maybe) And I love them (other peoples). The day before they are picked up, I dream about them. Sad Bastard ======================================== Monument to ten years toil You hold the decade carved from sleep, Heavy tax of muscles, laughter, cash, and tears. Buried in your belly, dark and deep, Miscut rafters from the early days, Hardened mortar from a novice phase, (I know how to mix mortar now) Are stacked like layers of a lifetime spent. Each rusted panel of your hollow frame Has watched us age, yet stayed the exact same, (apart from the rusty bits) A silent witness to a spine well-bent. Ten winters bit our hands upon this ground, Ten summers scorched the dust into our skin, While every spare pound that our pockets found (well some of it was found down the back of someone else's sofa) Was swallowed by the walls we stood within. Now blueprints yield to final, finished stone, ( well cladding aksherly) And you receive the scraps of what has grown, ( to be fair some of it was rotten) The final clearing of a warrior’s field. Go ride the lorry down the tarmac track, Take all our toil, don't look back, For out of waste, a home is finally sealed. Still not signed off. Stuff it. Ain't gonna sell it anyway Little Miss Muffit. ( her from the LPA) Now other peoples skips - I just love em.3 points
-
potentially use a 2 gang socket extension to bring out the metal work form the backbox that you use to fill into and upto, then remove when all filler is dried. ML Accessories | 2G16EXT | 2G 16mm Galvanised Steel Skeleton Extension Box | Superlec Direct2 points
-
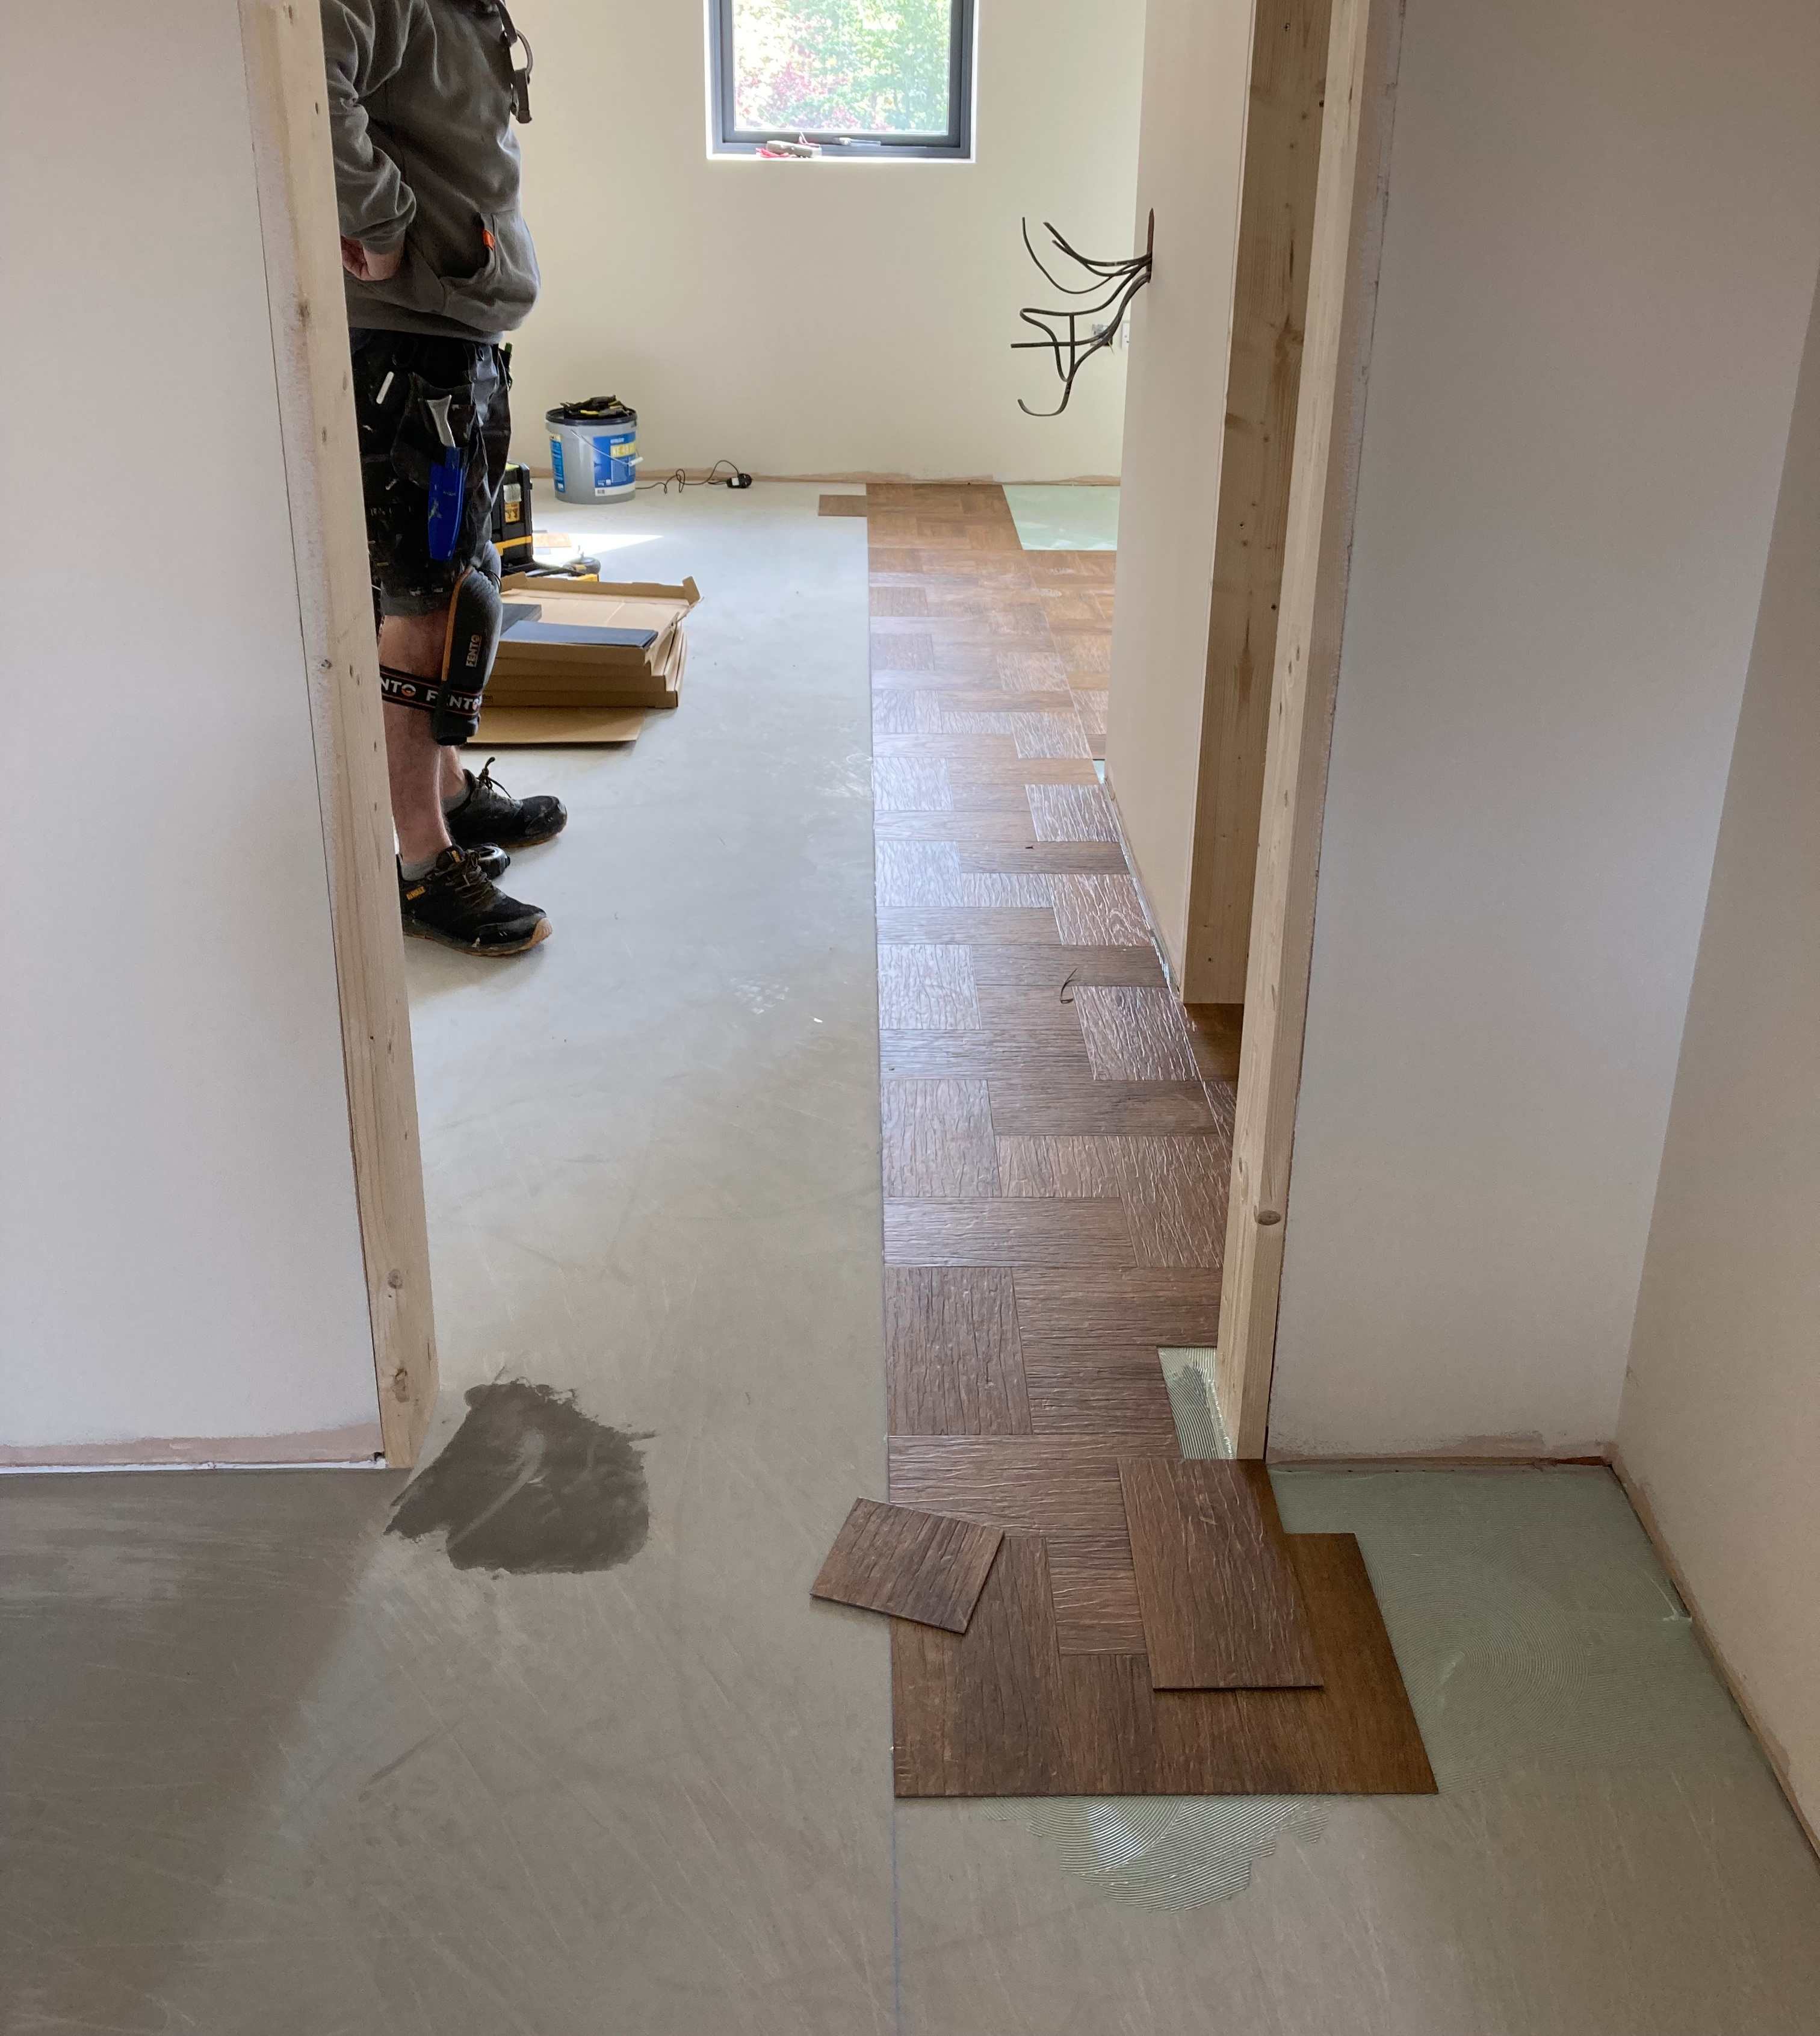
Amtico Spacia are the cheaper brand and the planks repeat more often than its more expensive sister-offerings You are also hampered by the laying pattern you have chosen. (IMO) Straight patterns show up repeats and duplicates more obviously. This is one of the reasons we chose a herringone laying pattern for our Amtico Spacia. Over time and especially as you fill your room with rugs and other furniture the repeat highlights will become less noticeable Regards Tet2 points
-
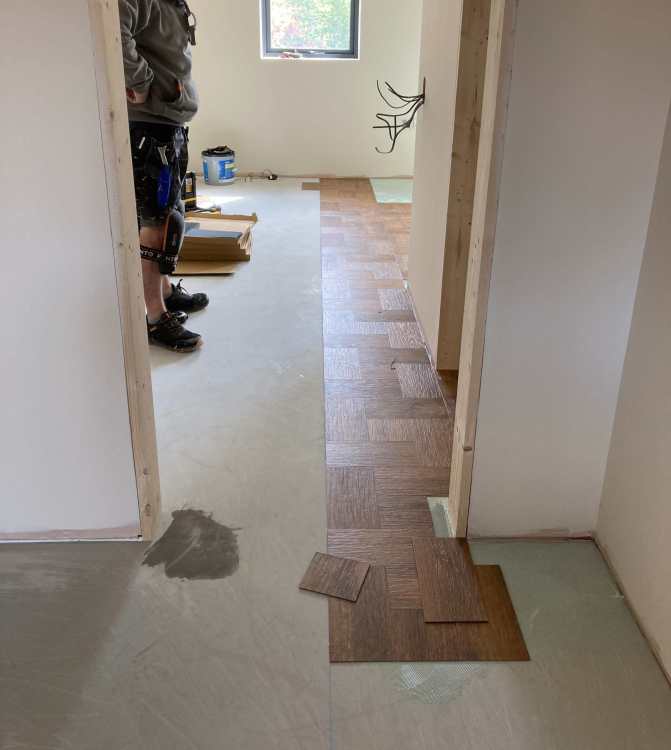
Our Amtico supplier/fitter provided the information when asked Our choice is both heavily patterned and embossed with a wood grain pattern. The format is 5 tiles (individual)in a 450mm square, so although there are repeats they are way less visible than they could be. Even then a couple of tiles were removed and repositioned during the process. At the end if the day they are not wood, and were bought with long term practicality considerations as well as aesthetics. Photo shows the initial laying out process (after the floor had ply and leveller) If you are really unhappy is it too late to change design now? Better that than live regretting it for the next ? years
 2 points
 -
Glass set down into CT1, excess evident. Excess wiped away when wet, with lots and lots of baby wipes. Apart from the rising internal corner and the internals of the niche, all of this ensuite was a near zero silicone finish. All observing minimal grout at junctions, clear CT1’d with anything excess removed, and still looks 👌 (imo). You can just about see where the colour matched silicone diminishes on purpose before meeting the floor tile, so the change isn’t so obvious.
 2 points
 -
No. Insulate the room, and ventilate it, but “throw a blanket over the battery”?!?!?!? NO!2 points
-
Update: I did finally get around to addressing this condition. I asked AI to provide some information. Fek! It gave me a very specific 6 section Template to fill in that is tailored exactly to the East Herts requirements. Told me what to write, where, and how to fill the forms in. I cannot believe the Planning departments level of detail required but i am even more disbelieving of the level of what AI can & did give me. Very impressed.2 points
-
Depends what you're measuring/comparing. Personally I'm comparing cost, performance, flexibility of system, ease of install. If performance is your main comparator, then all on this list below can achieve performance beyond PassivHaus (I believe), although maybe not all are PH Certified, and some will require specific super structure construction to fully avoid cold bridging. If you want a full package, Design, Supply and Install, then it's difficult to avoid the premium price that Insulated Rafts attract in the UK and most of packaged options in the list above will be similarly priced and that price will suggest that an insulated raft is more expensive than a traditional foundation system. It is better performing so most accept the additional cost. If your focus is very much on cost as well as performance, then there are two areas of an insulated raft system that can be targeted. Self install allows you to avoid paying a premium for the labour, concrete and steel. It's difficult to avoid a small premium for the EPS as I don't believe there's any EPS Suppliers in the UK that will sell the bespoke forms direct to a retail customer. They all appear to be locked into whichever system uses their product. ie. Springvale EPS for AFT foundations. You can also target the cost with an "optimised" raft, ie. one that is Engineered for the actual super structure that will be built upon it and not over-engineered with 250mm thick concrete and 3 layers of mesh when it's not required, as you end up spending twice as much on concrete and three times as much on steel as you need to. AFT prefer you to self-install and their rafts were optimised for reduced concrete and steel. They also have different options for different ground conditions, performance and different timber/ICF/masonry super-structure construction, so are/were no one trick pony. It was a while ago that I sourced my raft, and at the time only Tanner's system offered the same cost opportunities, although he didn't offer as many tailored solutions for non-Larsen truss construction. MBC's rafts are optimised and good performing when combined with their Larsen truss structure, but I found them inflexible and only available as a package at a premium price, so the customer doesn't benefit from the cost optimised design.2 points
-
UK production of oil and gas I have - can you tell me how many are in operation today? 2 - one in china that took just over 11 years to build and floating one in russia that also took 10 years to build. And there are 6 or so under construction with intended in service dates sometime before 2030. Ideally we would have gone ahead with the various reactors we had planned back in the early 00's and have several up and running by now, but we seem to be very bad at nuclear construction in the UK. I'm not convinced we will get any better in the timeline we need. We have 2 under construction (hinkley C and sizewell C) with a combined capacity of around 6.5 GW coming online in 2030 and late 2030's. But that only covers the loss from the 5 existing plants shutting down before 2030, and as they are AGR's they are going to be difficult to life extend - not impossible, they will be about 40 years old at planned shutdown and the design has been extended to 50 years at other sites. Without a time machine, nuclear isn't going to dig us out of the hole. Except when they don't keep prices down. Several years ago our gas and elec prices rocketed because a politician 1,500 miles way decided the country next door was his. Our gas and oil prices recently shot up because a politician 3,000 miles away got mad at a country 3,000miles the other way and started flinging bombs about and suddenly, ships with oil bound for us turned round in the ocean and headed to china and the far east because they outbid us. Environmental issues aside, oil and gas are very shaky foundations. We struggled in ww2 for oil. We struggled in the 70's for oil. This isn't going to get better but they don't - they offer (in effect) fixed price deals for capacity. Those prices are lower than a new build gas plant can offer (and that was before the higher gas prices). And whilst there may be a security issue with inverters made in china, in the sense they could be controlled from abroad - and there are strong arguments that the uk or at least europe should be making it's own inverters or at least the software running them - the fact the panels are made in china is irrelevant. Once you have bought them they are yours, they are dumb bits of silicon and glass that create a voltage when illuminated. That's it. Once you have bought them they will last for 25 years or so, churning out power every day. A barrel of oil, on the other hand, can be used one. Then you have to buy a new one. You realise we have wind turbines, right? They tend to do well in the winter. And if the sun doesnt shine and the wind doesn't blow - what will we do? Burn gas in CCGT plants exactly as we do now. The difference is we will be burning gas for a month or two a year rather than all year round. The future energy mix will have nuclear, wind, solar (etc) lots of battery capacity and a good chunk of CCGT plants with gas storage for the times when we need them.2 points
-
I will get to procedural vegetation honest. Had a sphere to drive over terrain working i.e. physics remap as you move so effectively infinite also. But the sphere bugged me. Trying to procedurally generate something decent was always poor - like the original face attempt. So, bought a rigged and animated model to use! But also I got excited about procedurally generated creatures so invented creature lab! - some quite funny!, needing work of course. But AMAZING!


 2 points
 -
2 points
-
Every windfarm is cleared (or not) by MOD. Much overstated, see any research on the topic. Not specific to wind. They are going regardless. North sea is a declining basin and fewer fields are cost competitive. Oil can be sold regardless of whether it is used in the UK - see Norway! Blade factories in Hull & IoW. Vestas Nacelle factory coming to Scotland Monopile fabrication facility on Teeside JDR Cables at Hartlepool, multiple Prysmian cable factories We probably make as much of wind farms as we do oil and gas facilities. Piper alpha?2 points
-
Welcome. @Nickfromwales comes from down the coast in Wales.2 points
-
You need a stove covered in soapstone and a low capacity to slow everything down. After the first year lighting ours twice and melting, we tried the second time the following year. But now only add one small log at a time, turn the air down to lowest setting to still get a clean burn. Now that log lasts maybe 1 to 2 hours, the heat spreads across the whole house, 2 logs on the coldest day is more than enough. NO it leads to depressurisation of the house. You cannot install a WBS in a house with MVHR safety, unless it has primary and secondary air from outside. It is something the OP needs to think about and plan for. Where will they put the air duct, took us an age to find the correct stove2 points
-
That's the problem, isn't it? I keep on having to hold back as every time I have an idea I'm far too tempted to create it, and then get sucked in! The landscape looks nice!2 points
-
I have 9 supply and 6 extract of 90mm Ubbink, which is what those pictured above seem to be. My MVHR unit is in the loft. To get from the loft to the ground floor ceiling i had a double stud wall designed into the Potton kit with a 100mm gap. This allowed me to hide the vertical drops neatly. Potton said ' oh thats a good idea'. Manipulating the ducts 90 degrees to get them into the Posi joists at the ground floor ceiling was the hardest bit. And remembering to lay them in the correct order such that they weren't needing to cross each other as they distributed away to the ground floor rooms. The trick is ,you need to try to get the twists out as you go because its a total bastard to think ' i'll sort that once its in'. Ask me how i know. Only other real issue was trying to remember and calculate what end pieces and joins you might need to clip it all together. Waiting for the little bits that you forgot to order is painful. I have to say the Ubbink ducting is brilliant. If you ever played with Lego as a kid you will appreciate the way it just works and clicks together 'just so'.2 points
-
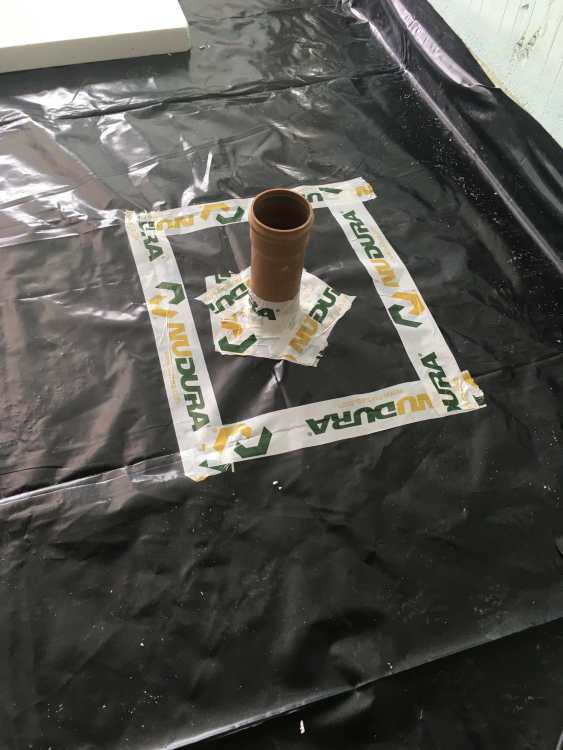
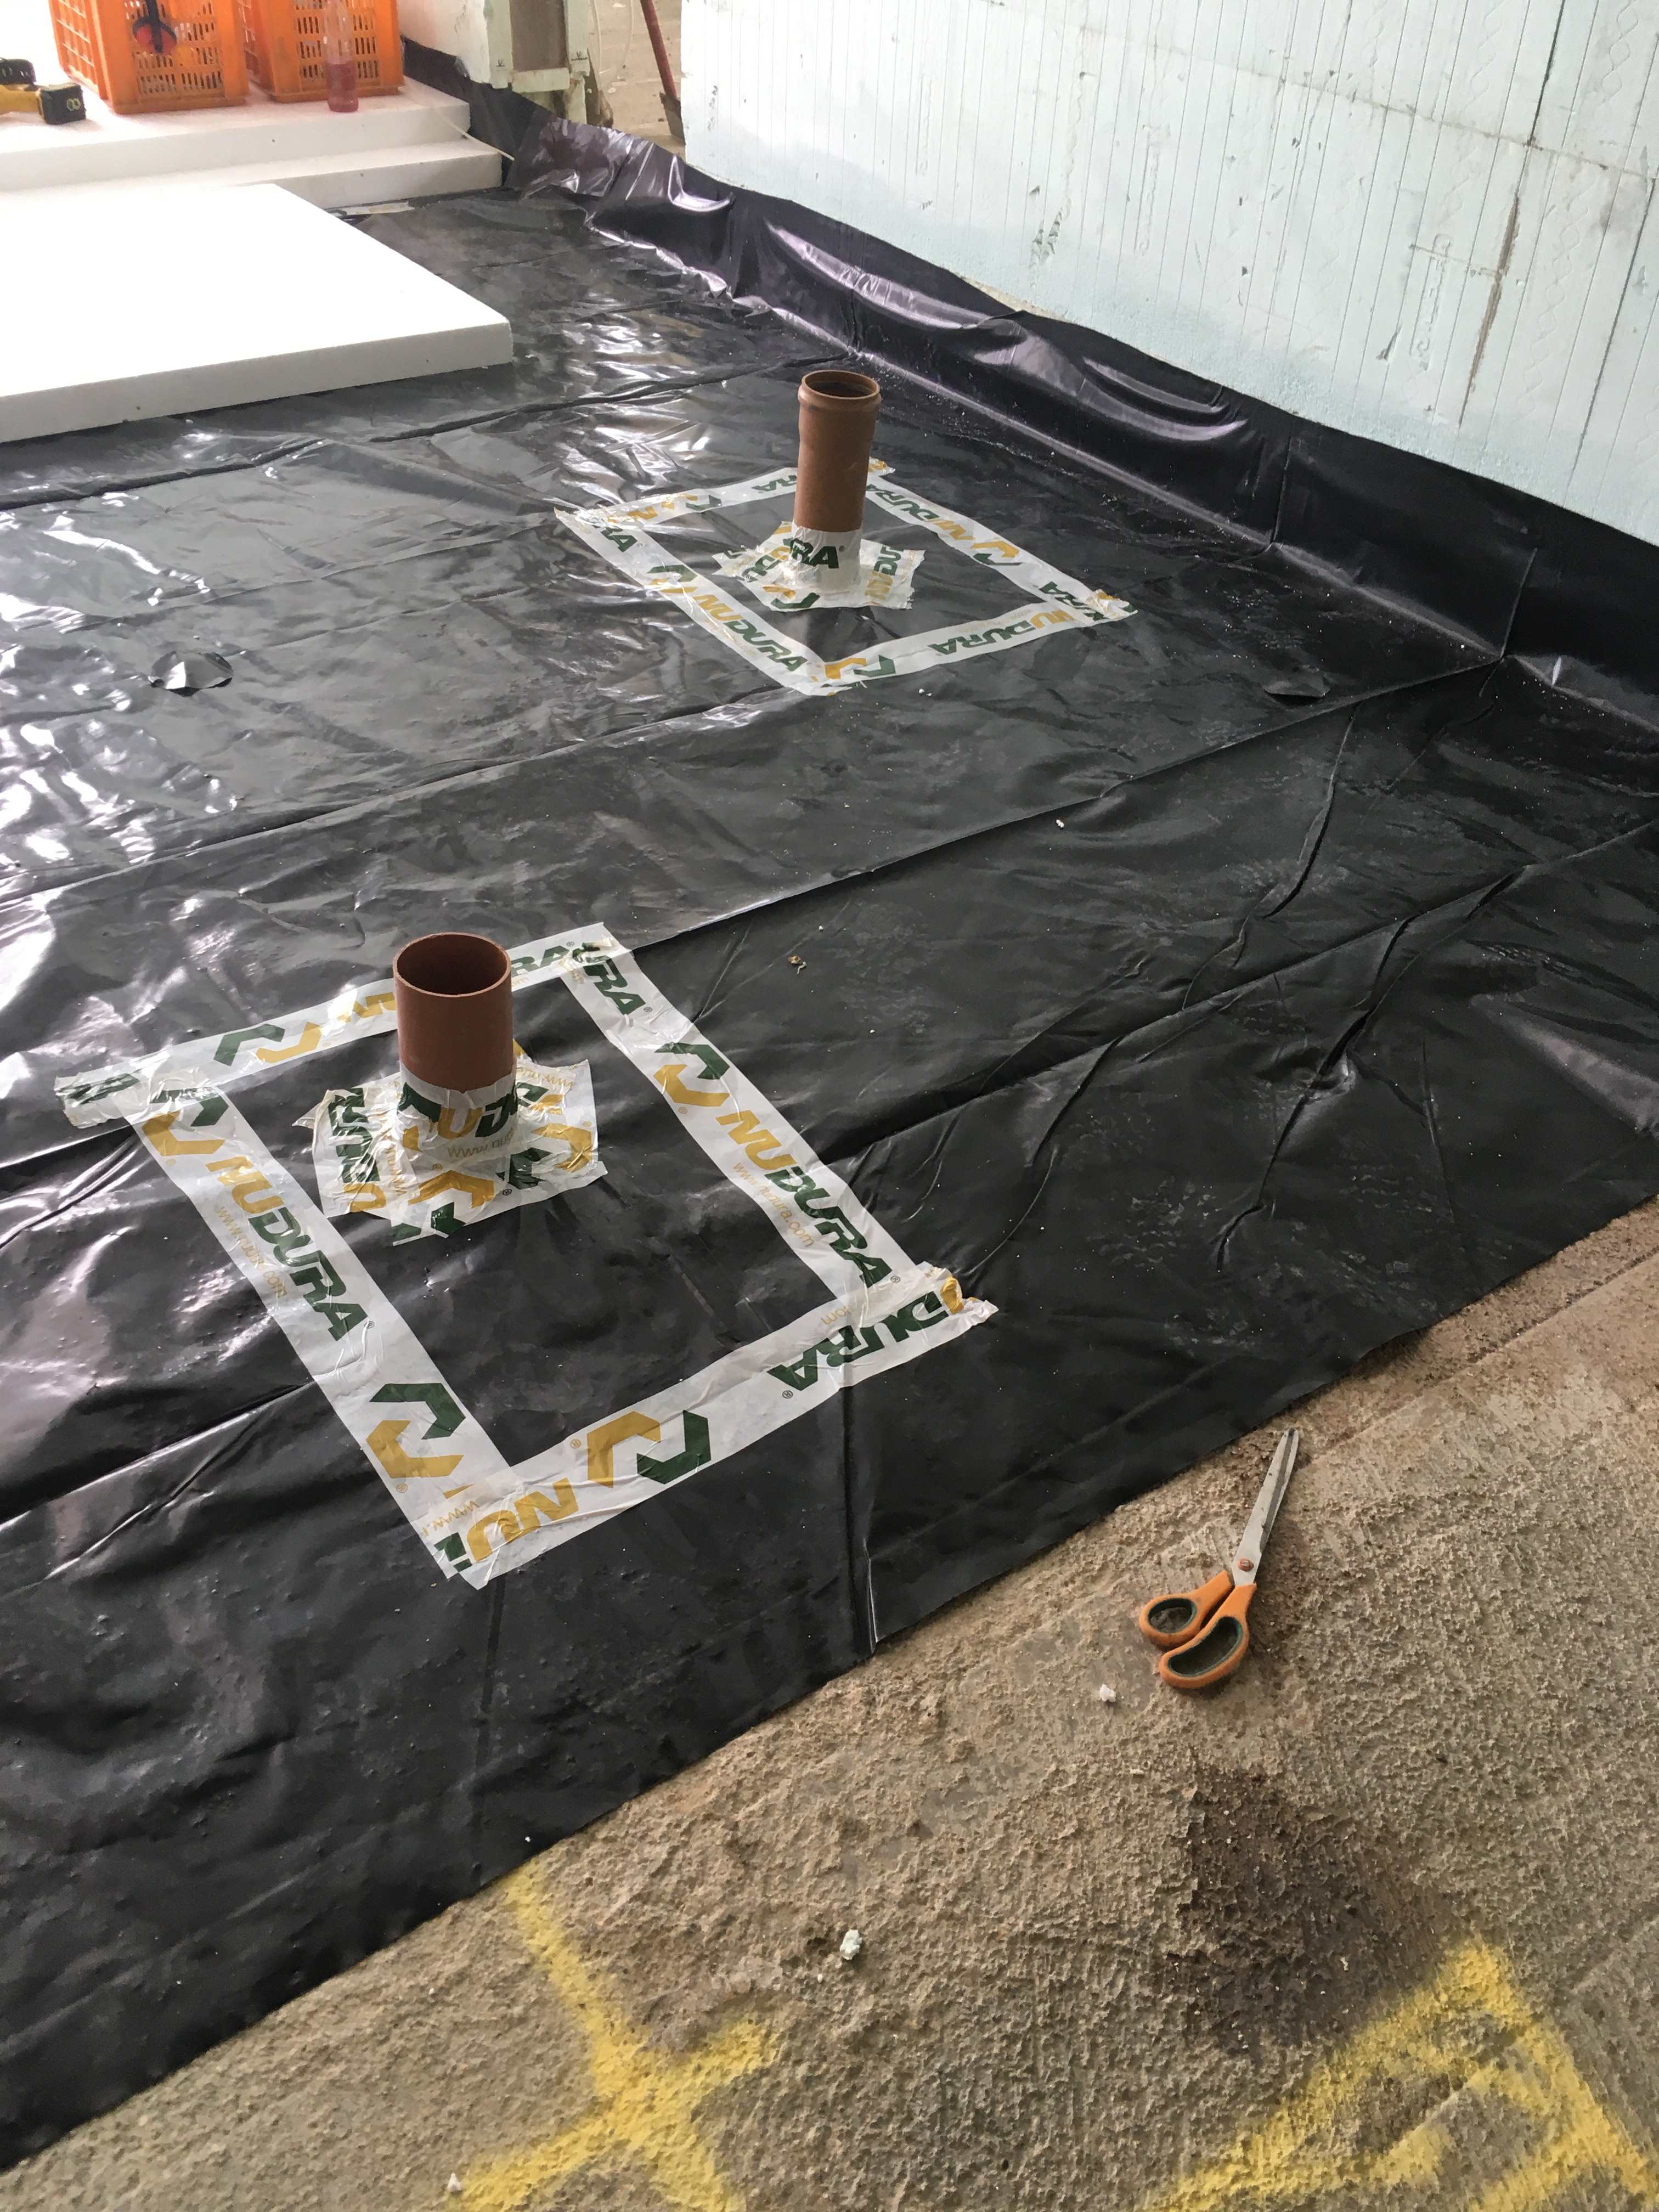
Get some neoprene insulation material 100mm wide, wrap this around the soil pipes at screed level. 2 wraps around will leave you with a void around the pipe so when the screed is in and dry you will either have a bit of wiggle room on the pipe, or you have the ability to pull the neoprene out which leaves a void that a pipe coupling will fit into. as for sealing them you will be putting your dpm on top of the beam n block so you seal the pipes to that.
 2 points
 -
Long lengths of solid metal duct around 125mm dia maybe some of it bigger. Noise attenuation between every room. Great if you don't want to hide it away such as an industrial look. Pretty pants otherwise without loads of pre-build planning to accommodate.2 points
-
Many thanks for this thread. It's been really useful, cheers.2 points
-
That’s mostly just down to using good quality thermostatic showers vs ‘manual’ mixers. Decent ones will work with quite erratic flows and temps, so I always advise my clients to spend some money on such daily drivers.2 points
-
Can you post a drawing of what you are going to build. The figures you present seem high at first glance. But I often do these types of design, they can be very time consuming, although small, and thus the fee cost is higher in proportion to the floor area. To put this into context. I have a potential Client that needs a modest new build and the design fees are similar to your over all fee. An interesting number is £120/hr for site visits. Now the 120 rate is fine if for time spent on site as there is travelling and then inevitably writing emails etc when back in the office. But if it is also booked at £ 120/ hr for travelling and then writing emails when you get back to the office then that is different. Do that and don't be afraid to ask questions.2 points
-
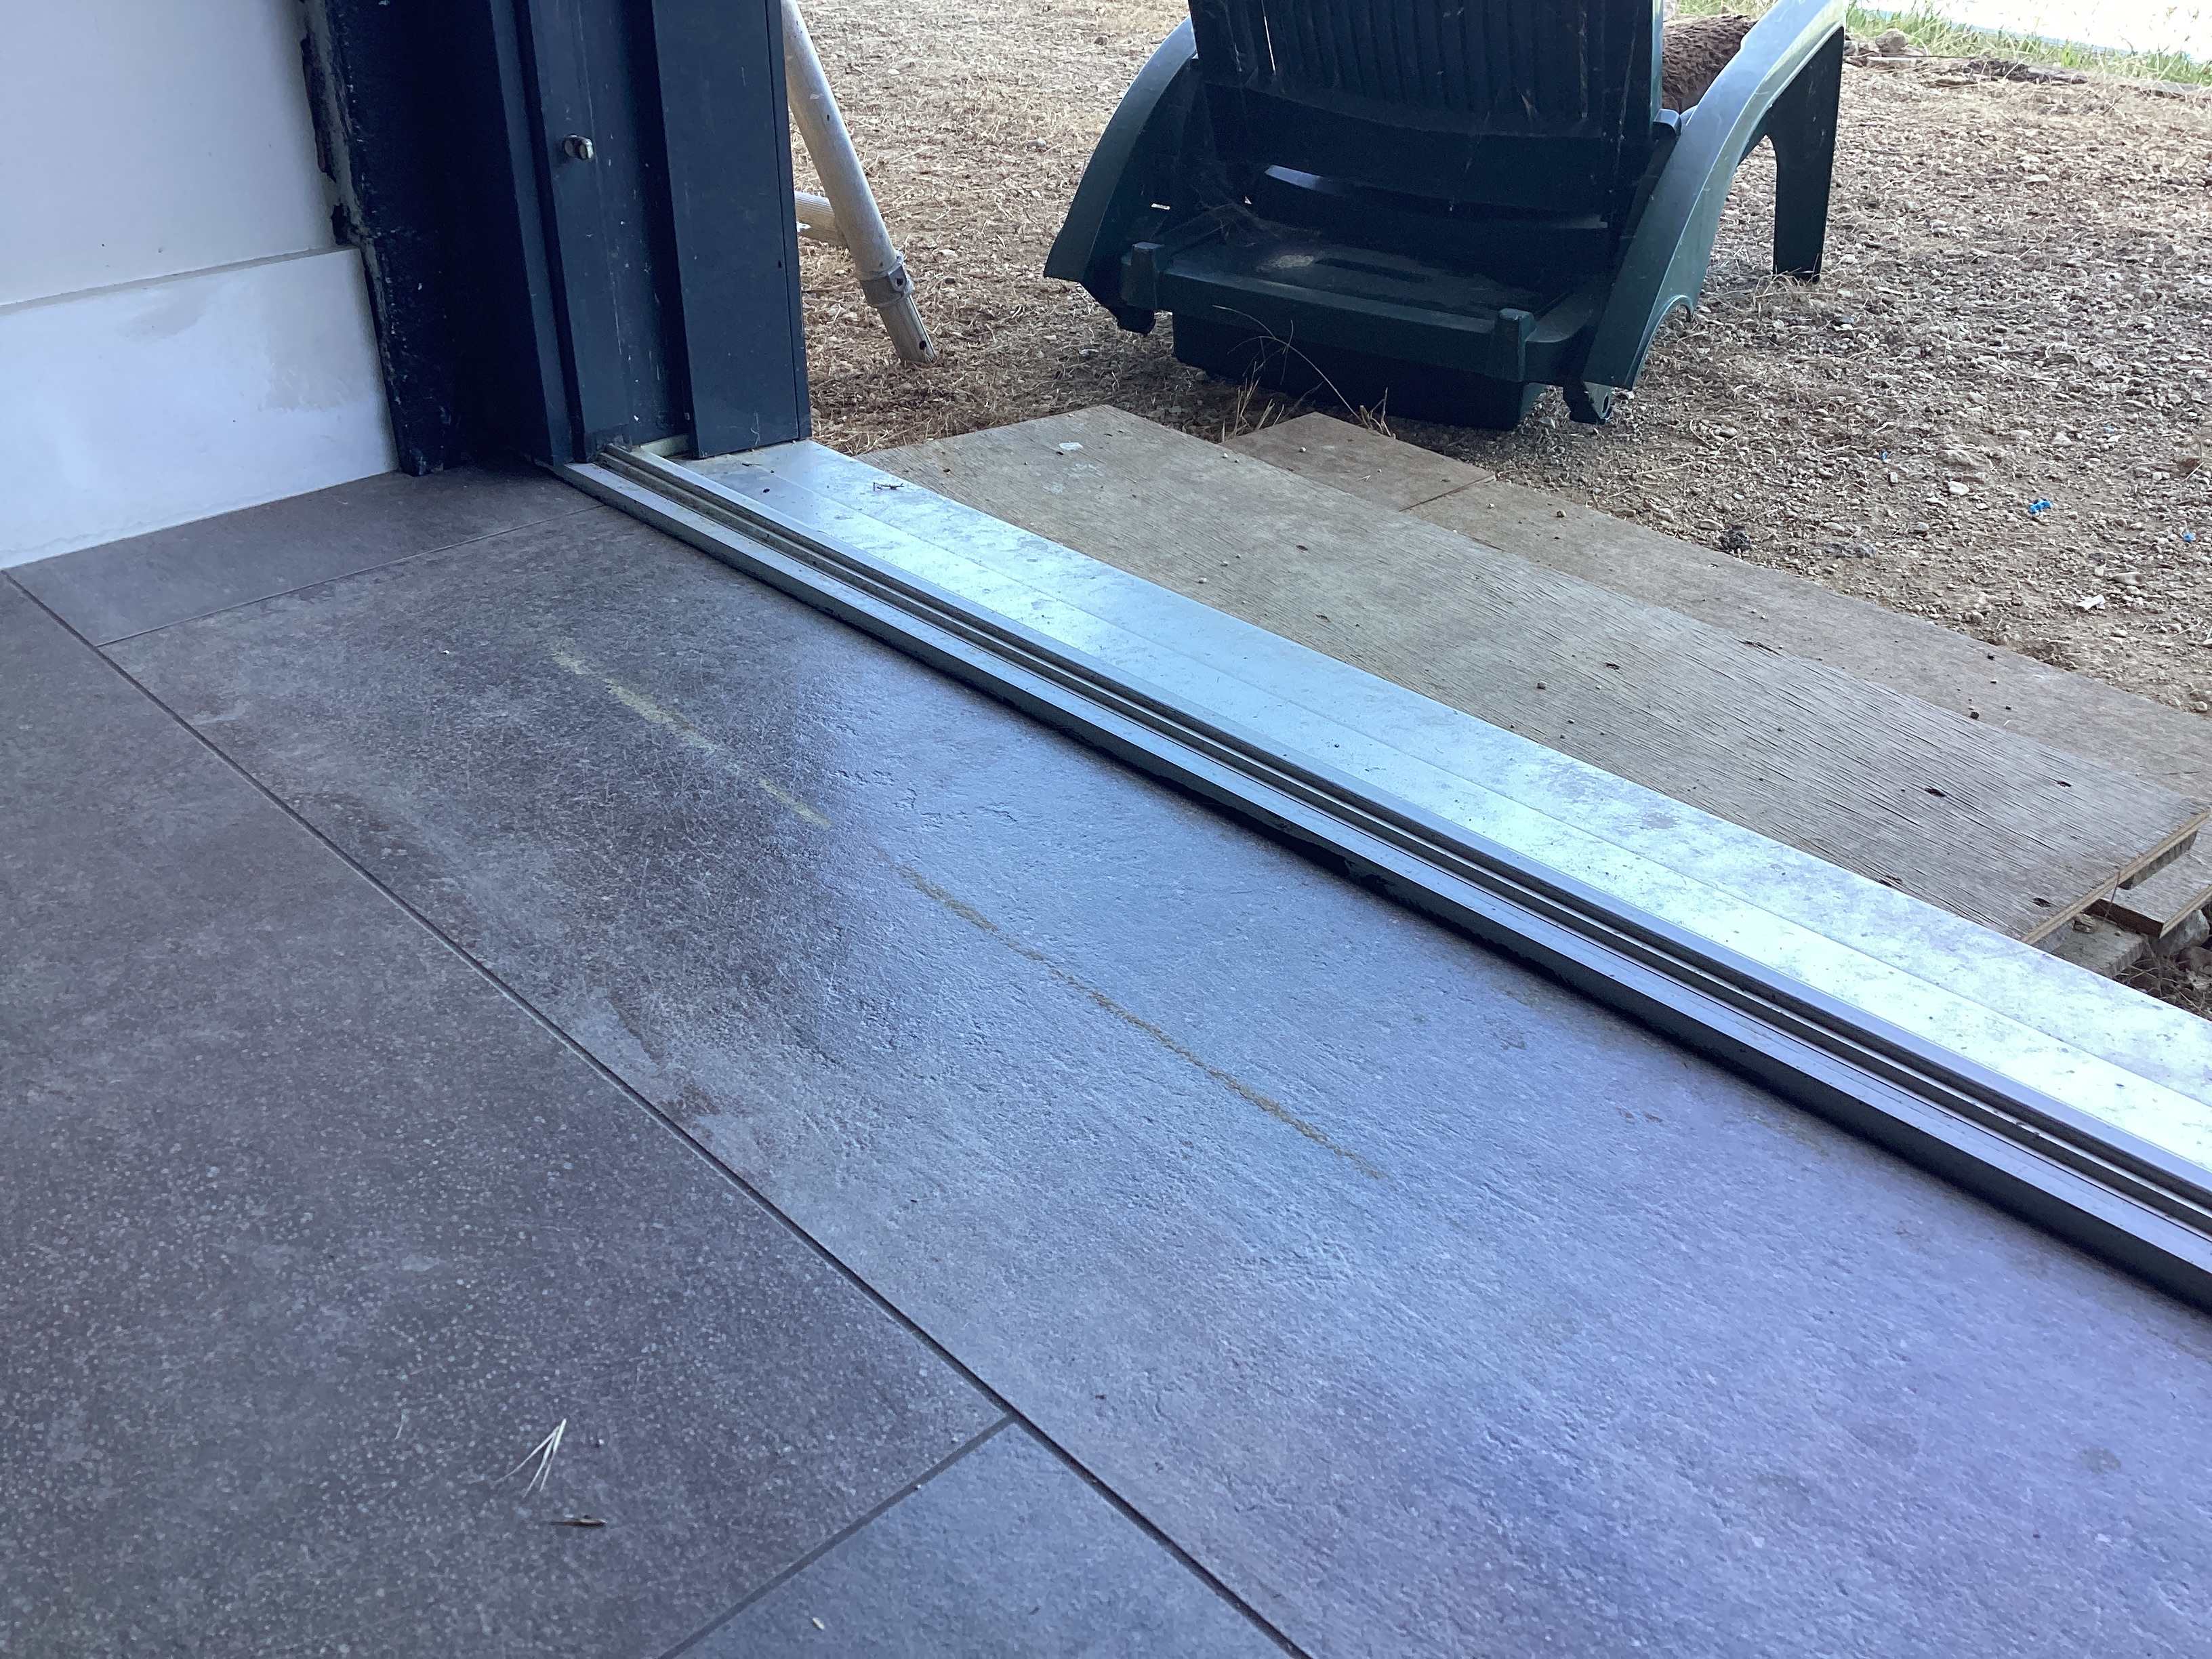
Lay the floor flat and level, ramping it up at the door will look like dog shit, you will see it, you will notice it on the skirting around that reveal. 10-12mm step up is absolutely fine at that cill area.
 2 points
 -
No, but others have. Here you go something to read se-ta-efficient-east-west-orientated-pv-systems-wi.pdf2 points
-
If you have the top hats then use them they work. the problem is these things get designed on a computer by a bloke who wouldn’t know what end of a trowel to hold. on site you very rarely get perfect conditions as you have found out with the pipe collar being exactly where you need to seal it. so you will probably find you chuck a couple of top hats away and just use more tape. Hardly heath robinson this one, it’s just done, finished move on get the concrete on top and it will become a distant memory.
 2 points
 -
I prefer to keep things simple and assume a heat pump will cost about the same as gas as long as you can achieve a COP or 3 or better. Yes with TOU tariffs you can do better but that means running your heating at the cheap times not "when you want" which will work with a well insulated house and an UFH slab with a bit of mass. But no use pedalling that off peak usage option to someone retro fitting an ASHP to a mediocre house that does need the ASHP on at times when you need heating. If you do insist on a competition of "look how cheap mine is to run" then all you do is build up a lot more disappointed convertees when they can't time shift the usage in their mediocre house. So keep those ideas here for those with good houses, not for the mass market without.2 points


This leaderboard is set to London/GMT+01:00