
Leaderboard


Popular Content
Showing content with the highest reputation on 06/14/20 in all areas
-
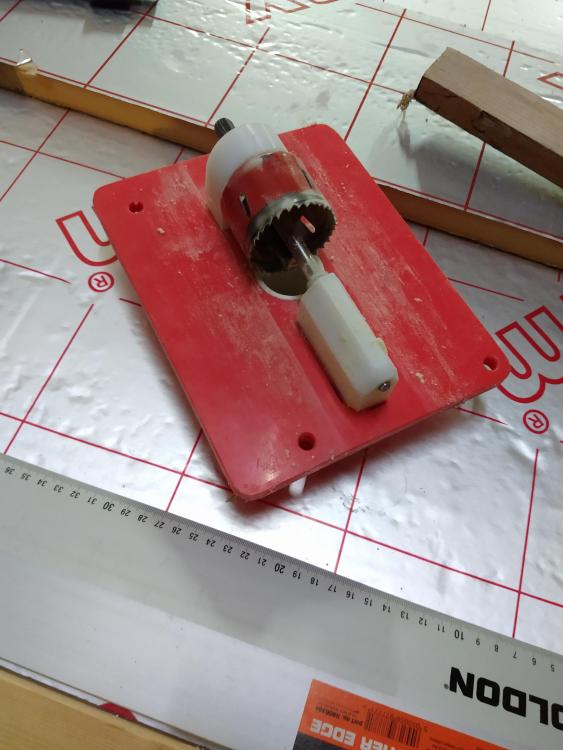
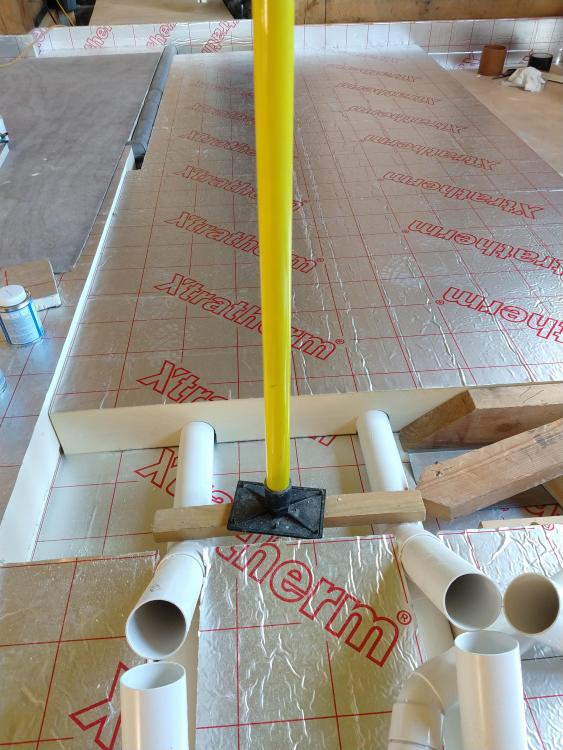
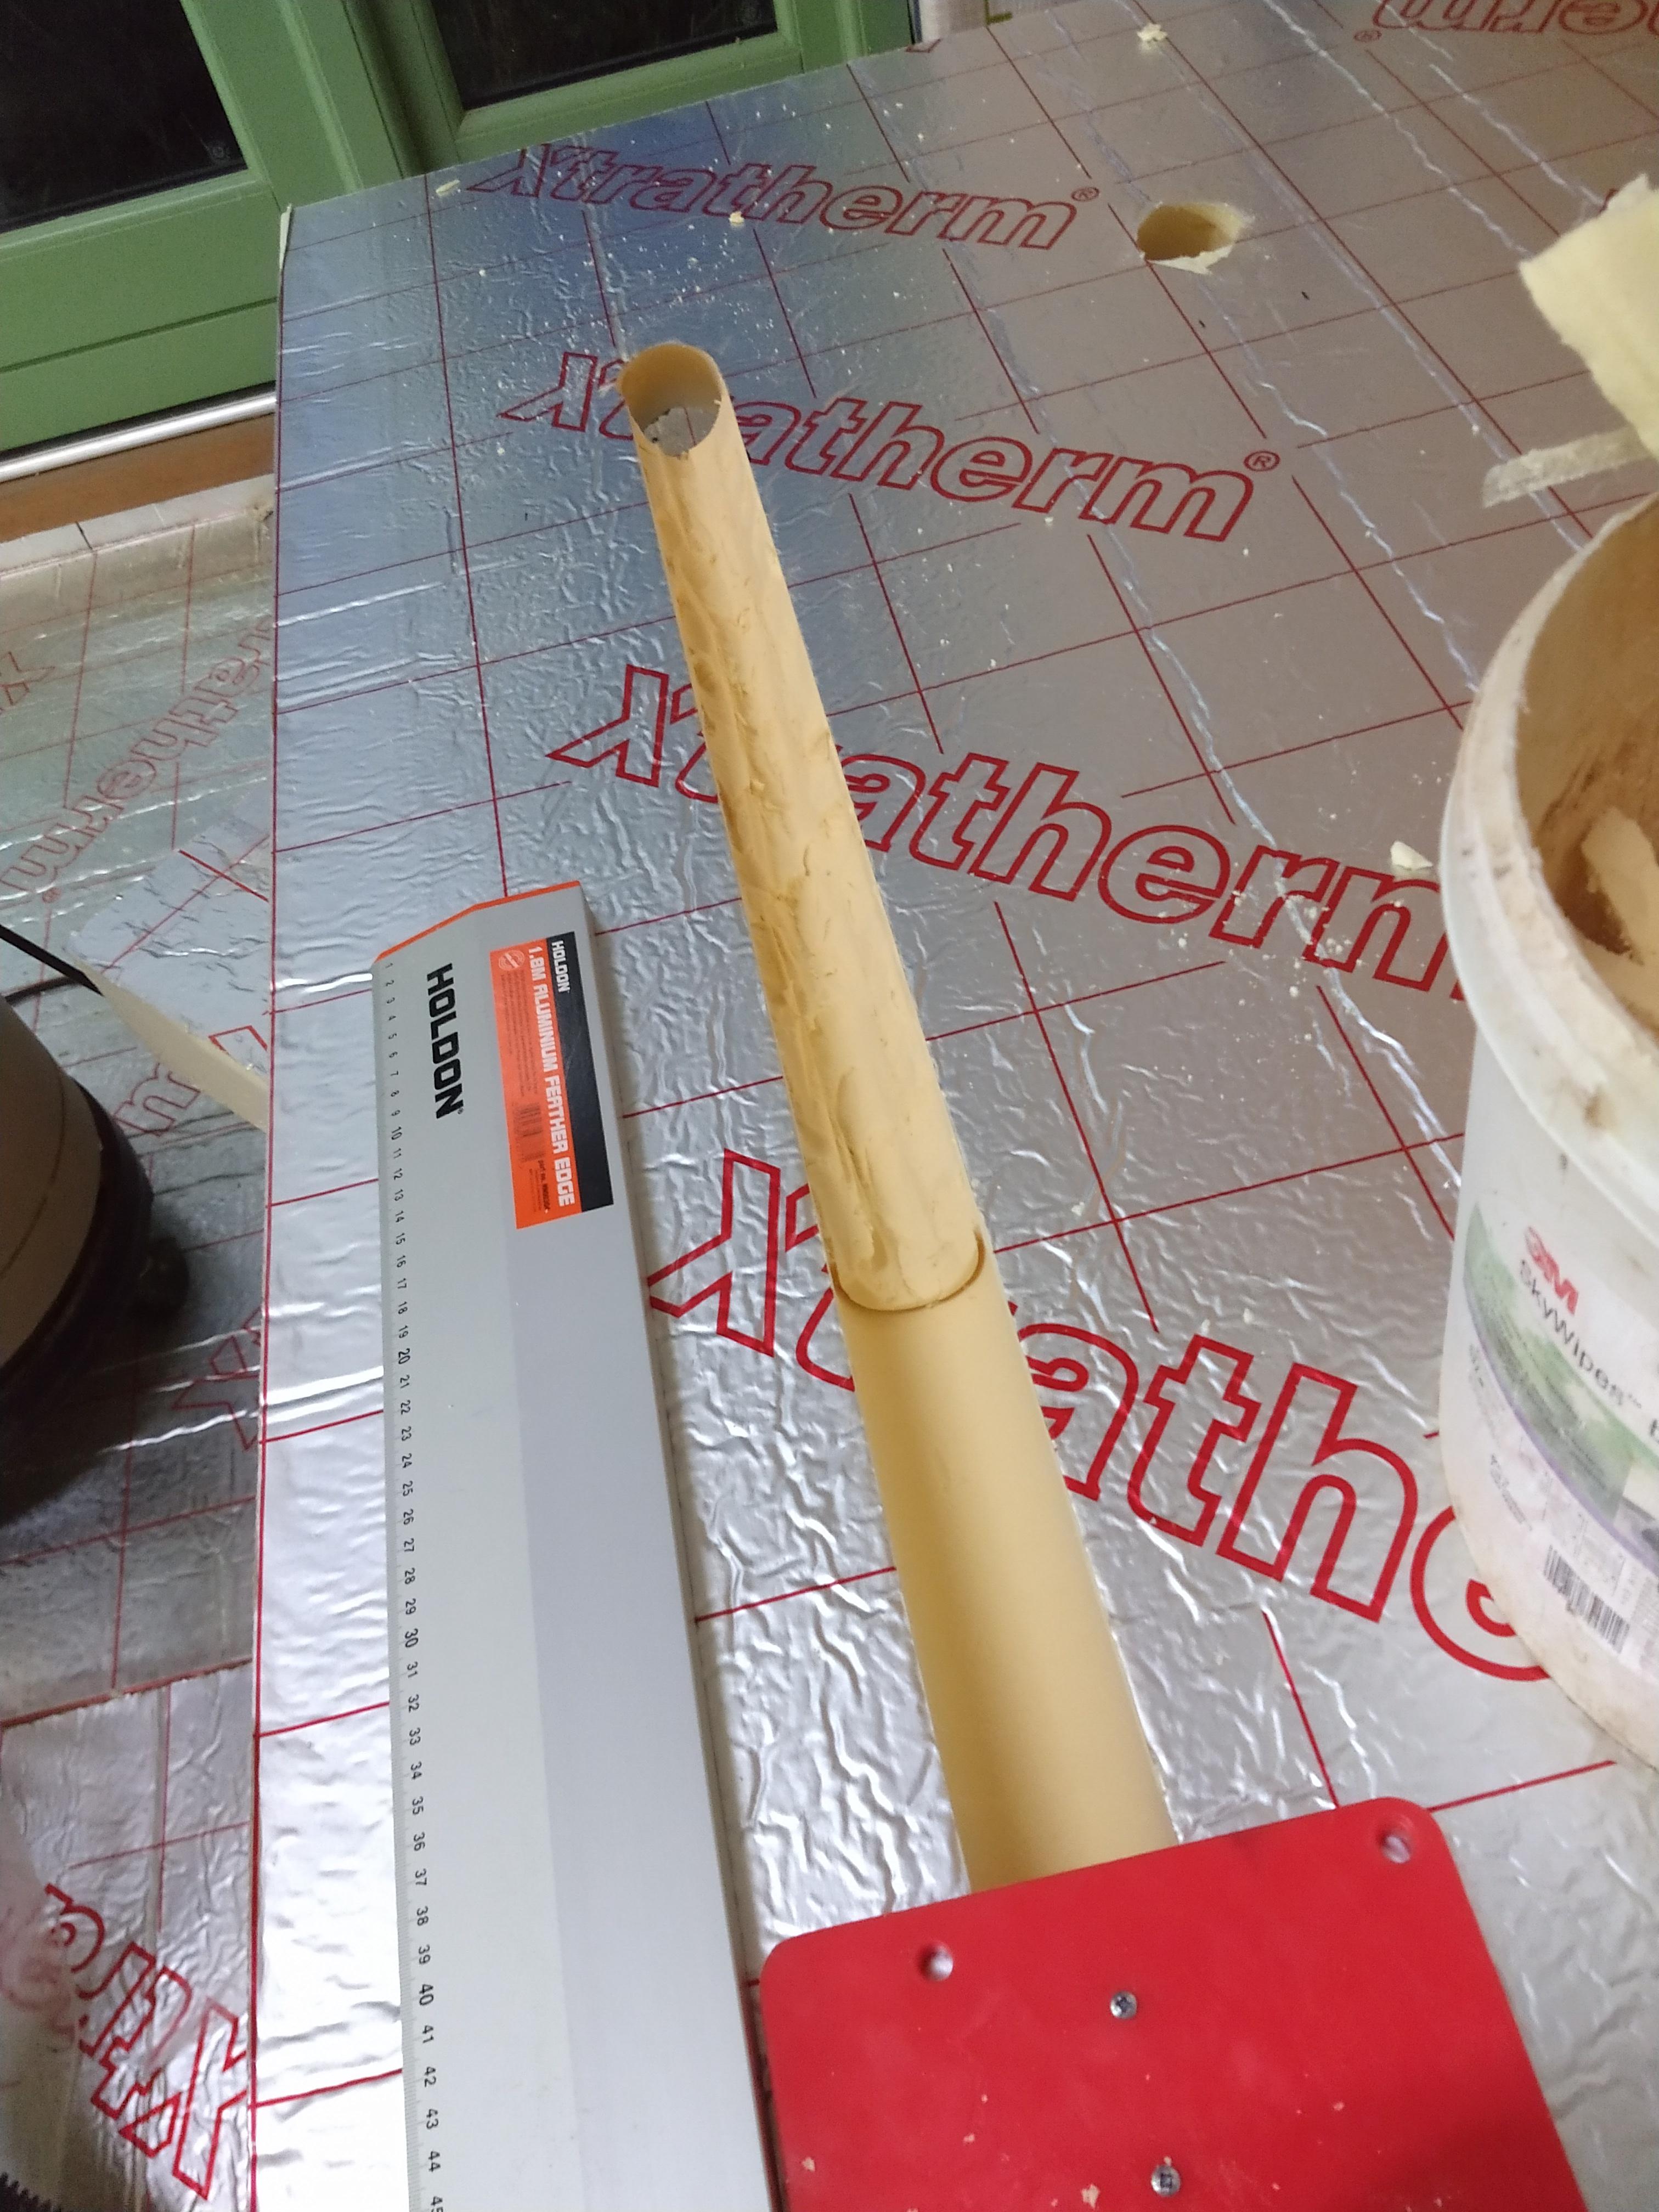
As the title suggests, I work in engineering and it's a bit of a curse sometimes. I decided to run some 50mm solvent waste pipe as ducts to where our kitchen island will be, for passing services at a later date. These are in the thickness of the insulation under the screed. Anyone who's tried to cut channels in PIR will tell you how rubbish it ends up. I still wanted as best as I could, full support for the screed and no voids or big areas of expanding foam which I'd have needed if I stopped and started the boards either side of the pipe Here's how it ended up. Pretty pleased with that. And here's how I did it I rough cut the channels, then clamped a straight edge as a guide fence. Then run the home made hole saw sledge down it using a long 1/4” extension and universal joint as a driveshaft as the drill wouldn't pass down the slot. Note also the dust port for vacuum extraction which was essential to stop it all clogging up. Also found running the holesaw backwards made it grab less which is a trick I'll use again when holsawing PIR Time to build tool was probably 3hrs and the tidy up operation was 5mins per slot. At this rate I'll be competing with @Onoff in OCD stakes

 4 points
 -
Phew, today we said goodbye to our house and moved out and said Hello to our new house, approximately 8 minutes down the road - about 6 miles away to a caravan site. With Covid we were able to negotiate a 4 month deal (we weren't due here til 1 July but our existing knackered flat roof started to leak so negotiated coming early). It's luxury compared to our living arrangements for the past 2 years. We aren't eating, working and sleeping in the same room, have instant hot water, heating and can shower without a bucket under the pipe! We will still be on site pretty much every day and we still have our garden to maintain so will be keeping a close eye on things...3 points
-
Got the very welcome news this week that we have been granted full planning permission on our Part Q barn - so we'll be able to demolish/rebuild rather than "convert" and have to deal with all the faff that that entails. Had a zoom meeting with the architect a few days ago so it seems like the wheels are very (very) slightly beginning to turn on this jugganaut. Looking forward to putting some of the last 2+ years of reading on this site in to actual practice! First decision to make: what level of involvement am I planning? This will dictate to what degree of detail the architect produced the drawings. I'm thinking main contractor to water-tight stage, and then I'll sub-contract myself the rest of it. Planning an ICF build with insulated slab/raft. Any pitfalls with this approach?2 points
-
During the year of waiting for the planning refusal, we (or more accurately Peter) has been busy in the gardens, getting things sorted. The kitchen garden is coming along nicely. The trees and bushes have settled down and it looks like we are in for a bumper crop this year. We have 6 IBCs that will be filled over the winter to use in the drier months. We have an additional 2 IBCs by the house which will collect the initial rainfall, before it is pumped to where we need it in the kitchen garden. The connectors to link the IBCs are on order and should arrive next week. The fencing is failing but replacing it properly is eye-wateringly expensive. The hammering you can hear in the background is Peter fixing the best bits of wood he can find, replacing the completely rotten bits. IMG_1904[1].MOV1 point
-
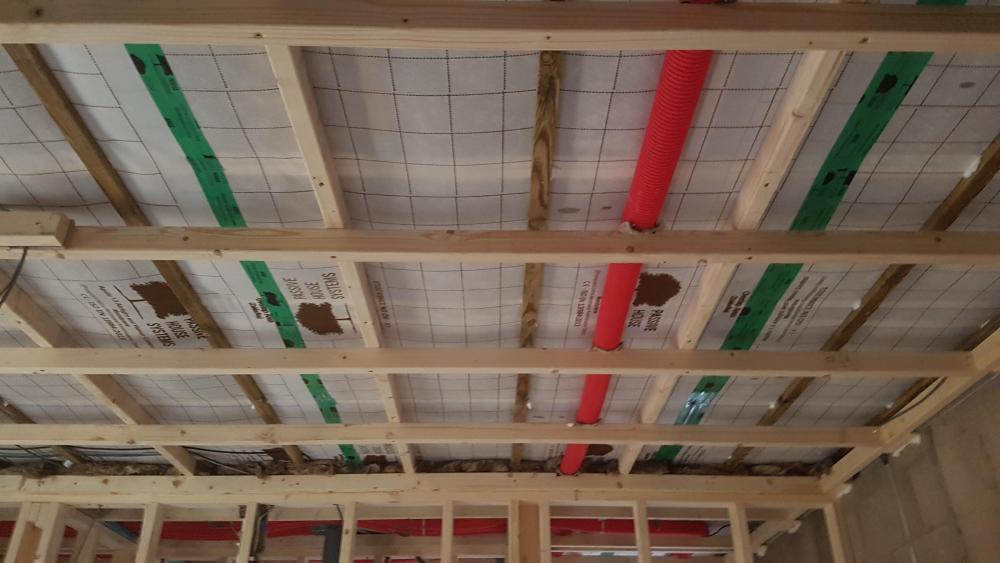
Membrane is taped and linked down to parge coated blockwork. Only 3 penetrations in membrane all taped around1 point
-
Here's my hybrid. After much procrastination I went with the membrane as opposed to OSB. created a void below trusses for services.
 1 point
 -
I have the Portek version of that from Arbortech and I can redo a chain in about 15 minutes. Its also useful as I make modified ripping chains so I can alter it to a 5 degree angle rather than 30 degree. Only thing to remember is they either need to be bench or vice mounted - mine is on a 70mm ally angle offcut that just clamps into my vice. If I am sharpening outdoors then its an Oregon file and a bar clamp hammered into a piece of timber...!1 point
-
If you cut your chainsaw file in half, It's easy to sharpen your chain by putting the file in a battery drill just be sure to maintain the correct angle on the chain teeth.1 point
-
There is a particular easy method to avoid having to sharpen your saw. Stop blunting it. This is easy to say, but really it is easy to do. Dont cut old shitty wood. If sombody offers you a load of old floorboards that you can cut for starter sticks, say no, tell them to take it away and burn it themselves. Dont cut the floor. If you are cutting logs get a large log to use as a saw bench, cut on top of that not the floor. Dont cut the dirt, floor if cutting down an old stump, bend your knees so you use the saw parallel to the ground, look at the tip and don’t let it contact the dirt. You should be able to cut clean timber for 8-10 hours straight without needing to sharpen.1 point
-
They are crap unless you buy the full matching bar and chain with the clamp. The eBay ones are plain dangerous !!! Drilling bars is not something I would do - they are not designed to be drilled..! Should be hardened steel. The only reason the Oregon PowerSharp system works is they redesigned the chain chisel shape and it has a top dressed blade, not a curved blade. It is a totally different beast, and using one on a normal chain usually results in a lot of sparks and not a lot else.1 point
-
That’s a good point.1 point
-
In airtightness terms I like to have a full air barrier above the plasterboard, so poly sheet first then plasterboard etc cant see how air tightness could possibly work with plates first?1 point
-
https://www.google.co.uk/search?q=how+dies+a+sewing+machine+work&ie=UTF-8&oe=UTF-8&hl=en-gb&client=safari#kpvalbx=_1P7lXo3_H6-f1fAP8rCf4A4621 point
-
Hope so! At least if it's wet the builder can tackle the inside....1 point
-
Side comment: during the current pandemic the recommendation is to turn off recirculating ventilation systems and any using rotary heat exchangers, due to a minute risk of a virus being transferred from the extract to the inlet feed via the rotor. Normal heat exchangers (including enthalpy exchangers) are fine. These rules are all for large commercial buildings, fairly irrelevant for a single home but I found it interesting anyway.1 point
-
No real issue with going to 110 m if it keeps it to a single loop per zone - also helps where you have changes in emissivity of the floor surface to try and retain these within a single loop (ie carpet vs tiles) so would be worth checking if you can get Bed2 onto a single zone. Would also allow running just the bathrooms in the spring/autumn if needed.1 point
-
Buy a roll of 10mm you'll use it on the house build1 point
-
If you happen to have one of those soldering irons that heat up "instantly" you, can replace the bit with a length of piano wire formed into a loop with shoulders. Run that down the PIR for nice neat u channels.1 point
-
Well done, onwards and upwards now you can crack on ?.1 point
-
Stud walls up tight to the ceiling trusses and the headers sprag nailed through both sides of each side of the ceiling joist. 50x25 counter battens to suit your boards then first fix electrics. Then board the ceilings then the walls. Only time I’ve seen foam used was when the there were top hats fitted and they wanted an additional stud wall and it was used to fill the void.1 point
-
I presume you mean barely enough volume, but there's also the limit on flow rate. If you have more than 2 showers in the house, it's advisable to have >1 Sunamp paralleled up I believe.1 point
-
Have you got all the permissions, soil surveys, asbestos surveys, water surveys etc? Are there neighbours around who may demand a Party Wall agreement? These all cost alot in Surrey (we're in Spelthorne). Have you got site insurance and warranty? Again, these each take a grand or so off your budget. We found skips to be very expensive in our area, particularly on a narrow plot (when scaffolding is up we cannot have a skip on site so have to rely on wait-and-load every 3-4 weeks and it just drains the budget (hopefully scaffolding will be down next week). You'd need to have a small contingency budget - practice shows you can never predict 100% of costs, no matter how careful you are. Anything from bad weather to a nasty neighbour can cause issues. If you are semi-rural, check you have no bats or crested newts around - this would be a disaster and drain funds before you even start. Demolition-wise, our bungalow raised to ground in 3 days by a team of 4ppl without any machinery, with some bits still salvageable, so it is doable.1 point
-
Just introducing myself. 75 year old life long do it yourself fanatic. You name it, I have done it. Only failure was and is plastering. Mainly joined because I have problem with water softener and on googling it I found a discussion on this site. Hopefully I can be of help to members as I have gained some knowledge over the years. Thank you for letting me join.1 point
-
Yes. I would also show them the valuation as 22% is quite a chunk. Just remember they may decide to take it off the market for a year or two.1 point
-
Hi Harry, I'm embarking into self build journey and the plot I'm looking to complete had been down-valued by almost 22% by lender's surveyor, owing to Covid situation. Not sure what would happen next. I'm yet to talk to my mortgage advisor and seller, however want to seek inputs on, if I could call this out as a reason to negotiate the buying price? What happens if the buyer is not reducing the price and the lender is not happy with sellers cost? Any first hand advice would be highly beneficial. Thanks V1 point
-
Result! So it was blocked enough with loose stuff that no smell was coming back up?1 point
-
Using Helifix allows for flexing down the joint, but I would tooth the new stone into the original fabric to avoid an unsightly joint running down. Best wishes- Steve.1 point
-
Hi there, I do not know if you are sorted yet, but this is the way we would do this for EH, national Trust. Just google Helifix. Its a twisted Stainless Steel band about 5-8mm wide and about 1mm thick in lengths of about 3-4 metres. Just cut to length. You drill holes in seperate stones, or same stones to form loops, say 300mm in length. each end is fastened with Polyester paste pushed into the holes.Also, Helifix can be left as just tails to be set into your mortar. Clean the holes out first by pushing some Helifix into the holes and then twisting and withdrawing to pull the dust out. Blowing down a thin tube can work to, or using a thin brush on wire used for pipe cleaning. When you put each end of the Helifix into the glued up holes, plunging it in and out a few times ensures everything will be bonding together. Helifix is available in various sections. You can buy the Polyester from Harbro supplies, county Durham, you need tins of Clear Vertical and you will be supplied with a catalyst with it. The glue actually looks like axle grease! ? Anyway, if your still stuck, let me know- Steve.
 1 point
 -
I built an extension 7 years ago The base had been a large conservatory 25 mil insulation The customer was on a tight budget and wanted to retain the base We full filled the cavity and put and loaded the roof joists with kingsman BC suggested we use the 18 layer multi foil on the underside of the joists If you are intending 50 mil screed you will have to use liquid screed or reduce the floor insulation further to allow for 75 mil semi dry screed1 point
-
Building regs don't take account of the higher floor heat loss when UFH is installed, but perhaps they should, as warming the floor always increases the heat loss, so needs more insulation to counter this.1 point
-
100mm PIR should achieve a U value of around 0.15 according to the Kingspan calculator (See link below - there are others available) I believe that the recommended values for a domestic extension floor in England are a U value of 0.22, new build is 0.11 - this will need confirming I did have the same floor make up, 100mm concrete, 100mm PIR, 75mm sand cement screed, however I have now changed this to 100mm concrete, 120mm PIR and 55mm liquid screed as I am also having UFH. Kingspan calculator: https://www.uvalue-calculator.co.uk/calculator/floors/ground floor/solid concrete - insulation below screed/1/100/1 point
-
drilling the stone work to attach what ever type you use will be the bad part of the job will depend how rough and uneven the stone work is and if really lumpy may be simpler just to drill for each tie fixing as you go ? just another buggering about job as you get with old buildings all the time1 point
-
I have just got one. They do seem to work. Always before I have sharpened tooth by tooth with a file attacking the inside of each tooth. These work by grinding off a bit of the outside of the teeth and do indeed seem to work. Note they expect your bar to have two holes in the end of it. Mine only had one, so I had to drill a second hole.0 points
-
Wish I only spent days mulling things like this over, it's usually weeks.....?0 points
-
That’s really nice. I would have just used the tip of my chainsaw ??0 points
-
Tbh they very likely ditched the wc there back in the day as if having no extraction it would have been a bit unpleasant for adjacent room users.0 points


This leaderboard is set to London/GMT+01:00