
Leaderboard


Popular Content
Showing content with the highest reputation on 05/03/20 in all areas
-
I would say the biggest design benefit with a room in roof design, is to design the roof as a warm vaulted roof hung from a ridge beam. This makes the entire internal space part of the heated envelope of the house and it really really easy to detail properly and make it air tight and ensure the insulation works. The biggest issue I keep on seeing (like the house I mentioned above) is those that still build a room in roof design with attic trusses, and then try and insulate only the actual room spaces. You end up with cold eaves spaces that must be ventilated and a very fiddly detail to insulate the room space properly. In fact I don't think I have ever seen that type of roof construction insulated and sealed in a manner that I would be happy with.3 points
-
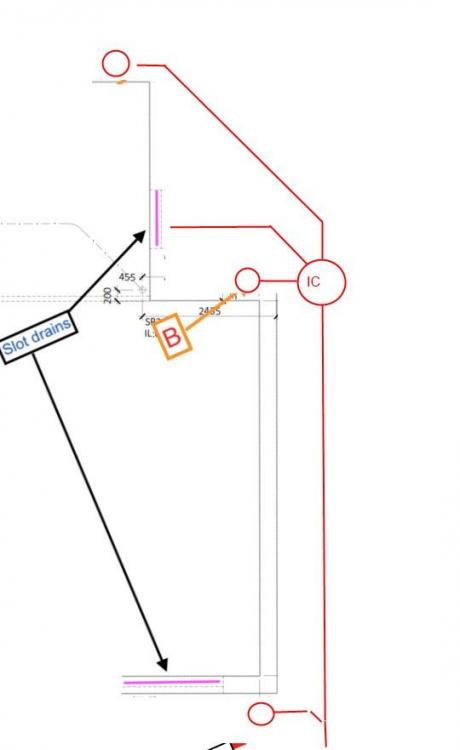
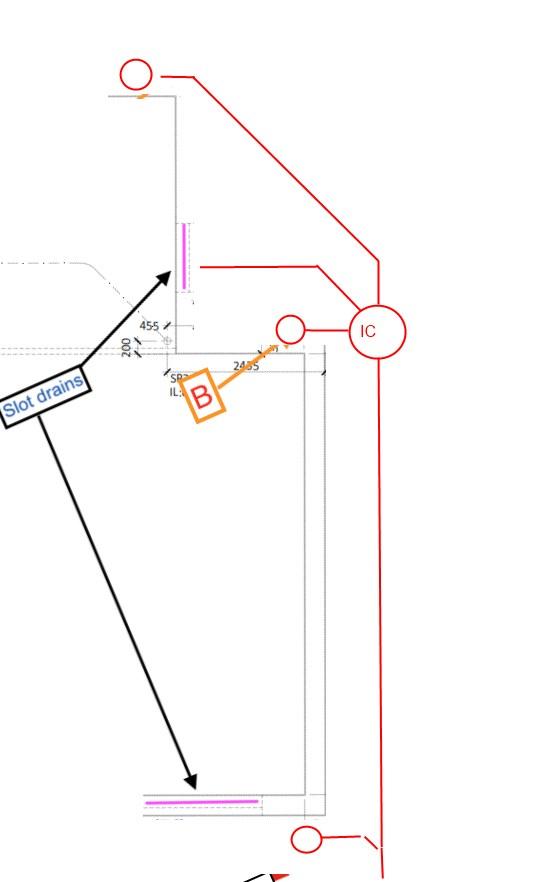
@Russdl Have you considered putting an inspection chamber near B? Perhaps overkill.
 2 points
 -
Ok so 6x10 is pretty small so let’s go from there. To strip the roof retaining the tiles will be about £1500 assuming you’ve got scaffold already. New Collar trusses at 400 centres (26 of them) would be no more than £100 each. Fitting would be about £1000 all in once you factor in a new wall plate. Re-roof should be about £35/sqm inc breather membrane and battens, measured flat. £2500 So that is about £7,500 to re-roof it. Using a collar truss means you only need to use PIR in the sloping cheeks, the rest can be cheap loft roll. I wouldn’t go more than 2600mm with the collar (ie 500mm higher than now) as otherwise it will start to feel like a church and be a bugger to keep warm. 120mm PIR in the cheeks, 400mm fibre on the flat sections, vapour membrane and then board and skim. You could also “fake” the beams with an overlay on every other rafter with something like a rough sawn oak 4x2 to give you a rustic feel but that’s up to you. Floors - straight over the top (assuming it’s “flat” with 25mm of EPS75 polystyrene, DPC then 100mm of PIR. 22mm Caberdeck laid as a floating floor glued at all joints. Walls - bin the sheep’s wool as it’s appalling for uValue and is for people who can afford to lose space, you can’t. Get the builder to site build some 140mm thick stud walls, line the backs with 9mm OSB and then lift into place, leave a 25mm gap to the bricks. Fill them with 140mm Frametherm 35, Vapour barrier then board and skim. Internal walls - build them off a double sole plate of 6x2 sat on DPC on the floor so you have a solid base, shot fired steel brackets either side if you want it really solid. Will they allow you any conservation roof lights or similar ..?2 points
-
I agree about cost, it doesn't have to cost more to make a house more energy efficient. We had an open day at our build, when a lot of architects (about ten, all told) came for a look around. One of them was very interested in the build cost, and I gave him all of our costs. His comment was that he thought our basic, insulated, airtight and watertight, shell cost about 10% less than he'd have anticipated for a one-off build. That's born out by our costs ending up around the average for a self-build, for a house that needs very little heating. It's really as much about attention to detail with the design and construction as it is to do with using more expensive insulation. A great deal of the reduced energy use comes from designing out air permeability and thermal bridges.2 points
-
I won costs on my appeal because I uncovered, via an FOI request, a strong smell off dark arts by the planning officer and a ward councillor. The costs were awarded against the LPA for unreasonable behaviour and failing to follow case law but also the actions of the LPA unrelated to costs can also be taken into account, which in my case I am sure they were.1 point
-
No, it was only to be called into commitee in the event that the recommendation was to be for approval, but as the recommendation was for refusal it did not go to commitee so I could not put my case to the open forum. Stitched both ways!1 point
-
Good job that I'm no longer a Parish Councillor then, wouldn't want to be considered a twat . . . As @joe90 says, Parish Councillors have very little authority, especially with regard to planning. The opinion of the whole Parish Council only carries the same weight as one neighbour objection, and the PC can't do more than comment during the consultation stage. It always seemed to me that any comment from the PC was given a stiff ignoring by the planners. Pretty much the only thing the PC could do was as @joe90 says, add some local observations. In our case, they were more often supportive, rather than negative.1 point
-
You've lost me. Far too a highbrow analogy.1 point
-
good stuff. I am not sure If you can send it to committee yourself, or if you need to get a councillor to call it in. One trick. I think if it gets to committee you only get to speak if there is also an objector, so if someone objects but pulls out at the last minute, you use your opportunity. The solution is to have a friend object then put forward an argument based on non-relevant matters, which means you get a guarantEed hearing. Pity you can’t do a Potemkin extension out of cardboard or wood under PD.1 point
-
Yes. A 180l tank with an indirect coil and a PV element hooked up to an Eddi diverter. Had there been the space without knocking quite a few things around I'd have gone for a larger tank. That being said I have only been in trouble for a bath running cold once. We've used it in a few ways and am slowly refining what the lasting solutions will be. The following will be too interventionist for many and for me too in the longer term but right now I'm experimenting. First: Electrically heated only, after had made the wondrous decision that hot water and no heating was a suitable time to move back into a building site. No smart meter and thus no cheap rate at this point so, rather than heating a full tank, by checking the hot water contents indicator you could see if you had enough for the next draw. I do not recommend living this way but then we also had an 8m2 hole in the back of the house at the time so.. Second: Electrically heated overnight on Octopus Go tariff, typically to 100%. Set to maintain min 20 max 40% via the indirect coil through the expensive electric part of the day if we got down this far. Upped this to 50% after a few 'complaints'. The ability to select which sources should be used at which times is useful here. So if I see the tank is at 30% and want more for a longer shower I can press the button to select the desired percentage (in increments of 10). It will then trigger the heat source I have said should be used for that time period. Thirdly: Baby 2 imminent and thus hot water not being immediately available wasn't a player, Solution: Look at the weather forecast for the next day and either set it to charge to 100% overnight on the cheap rate or let the sun do its thing or a mixture of the two. Fortunately March and April this year were atypical British weather months so all well. Clearly it doesn't have the heat loss characteristics of the Sunamp but it does let you know where you stand with hot water availability and has a host of available measurements and options. Happy to answer any questions (if I know the answers) but please accept my apologies for any delay as a newborn is running the show.1 point
-
Started a bit of plasterboarding in the posh shed
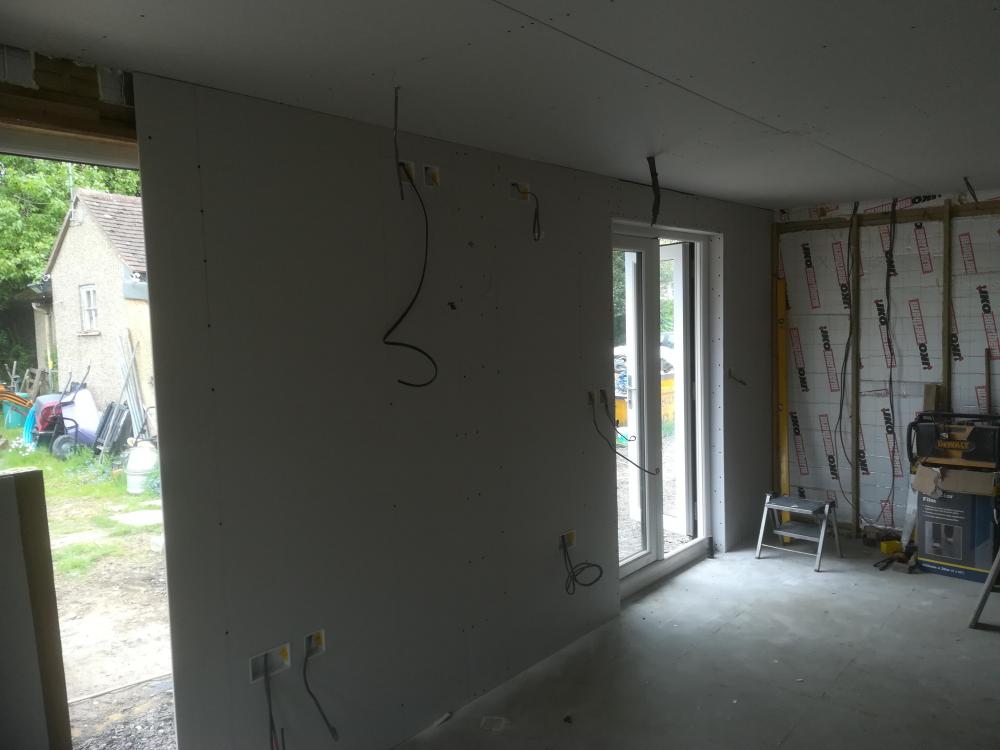 1 point
 -
@Russdl I did what you have proposed using 90 degree bends. I started at the highest point, the equivalent of your A, and ran the 110mm pipe next to the slab foundations, in what looks like a french drain, sloping down to the the end which for me was easy because I dump the roof drainage onto the road so don't need a soakaway. There are not many leaves to worry about in my case but if necessary I can disconnect the base of a downpipe and hose out the obstruction. I connected the downpipes directly into the 110mm pipe using a T connector and an adapter. The soil pipe is a little way out from the wall and so using bends at the end of the downpipe I could angle the bends one way or the other to pick up the T connector near the corner.1 point
-
Another mistake I made, attaching the UFH pipe to the top of the mesh. When you use 50mm mesh spacers and add 8mm mesh onto that you end up with just 34mm of cover in a 100mm slab. Something I didn't factor in - A292 is 8mm diameter, but it overlaps in a criss cross so actually takes up 16mm. Then when you chuck in the laps where mesh has to overlap, suddenly you only have 18mm of cover to the mesh. Put a 16mm UFH pipe there and you're buggered. These are are the sorts of things no one tells you to be careful with so you dont realise until too late. I spotted this issue as I was doing the mesh but it was too late in the game to change the plan. I considered running the UFH pipe through and under the mesh but that would have been way too problematic. So I ran it over the mesh avoiding laps where possible. Even so (and this is where it is relevant to your comment about running a rule over the edge - I thought this too), the concrete guys were concerned there wasnt enough cover so poured the slab 10mm higher than the upstand all the way across (it didn't really pour over the edge like you would think!). I got them to remove the bit over the upstand so I could then foam 10mm of insulation back in giving me my upstand back. A major pita, not difficult but just an unwanted job. This created another problem, where they had removed the concrete over the upstand it was jagged due to the stones in the concrete, I had to mix up some load bearing grout up and go around the edge pouring it in to give me a clean finish again. It worked, but there was a lot of unnecessary work created due to the way I put it all together. In hindsight, fixing the pipes to the insulation under the mesh would have saved a lot of work. With my job, I organised the boom pump and concrete and powerfloat, the guys came in and did the work. They were busy from about 8am till 12pm then nothing to do until the concrete cured enough. They started power floating at about 14:30 and finished about 20:00.1 point
-
My situation was very similar, Please don’t think they will have “common sense!”, ours had none. We were replacing an existing (nearly derelict) bungalow, first telephone call to the planners informed me we could extend by 10% (didn’t mention permitted development) or go up a floor So I drew up plans for our cottage slightly larger than the old bungalow . We wanted to use another entrance that had been put in many years previously (written permission from council) which was safer to exit (don’t talk to me about highways either!!!. Long story short 4 planning applications later (fir something we did not want but ground floor was so the plan was by the time we got to first floor we would win an appeal (which I did it myself, not difficult) and won hands down. Council told us we did not have permission to use new entrance (even though I sent them a copy of their permission), Told us we did not own land to create a splay, yes we did but splay existed . ( I won’t go on with a long list) Frankly I would not pay (some) planners in washers. Cost me a lot of money, cost me two years. Don’t be afraid to go to appeal, I hope your planning consultant is better than mine (hopeless). Appeal even told the planners they were not abiding by their own policies!!!,!!! End of rant.1 point
-
Don’t ..?? Straight run from A to B, with a 45 bend before you get to B What are you doing to keep leaves and crud out of the soak away system ..?? I’ve used these then into a P trap, then into the run with a T fitting.1 point
-
What is your wall make up currently, it would be good to get an idea on how to get some insulation in there, I would definitely talk to the council regarding lifting the roof higher 300 mm will make a tremendous difference. A budget would be handy, I do believe you mentioned it is fairly small, but that is cool need to know how to get the best bang for your buck, it would be horrible doing all this work to end up with something you don’t really like.1 point
-
On my to try list next time I'm on the IoW. (It's not the same trying it on the mainland).1 point
-
sorry but I could not disagree more. As per others above, yes you buy a bit more insulation (which In the overall cost is minimal) and better quality windows (mine are not triple glazed but good quality double glazed with minimal thermal difference from triple). The big gain is attention to detail, no good having insulation with gaps that negate its values. Also good planning, making use of solar gain, small North facing windows. My build came in around the “normal “ figure but like others I did a lot of the work myself (this is a self build forum ! ). I think the additional theoretical figure comes from the assumption that you have to bolt on “green bling”.1 point
-
On anagrams, I just discovered the Goddard's Brewery story about their Duck's Folly beer, and Lloyds of London. https://goddardsbrewery.com/behind-the-scenes/history/1 point
-
I dispute that "good" has to be "expensive" I am well on the way to completing our near passive house standard new build for £1000 per square metre, which by any measure is the lower end of building costs that you can achieve. Yes that low cost has been achieved by me doing a lot of the work but I don't believe material costs are that significant. Yes we have spent more on insulation because there is more of it, and yes we paid for good triple glazed windows. Those are probably the only tangible "extra" costs. The MVHR system was a cheap (but good) unit bought from ebay. The heat pump was another ebay bargain and since you need some form of heating, I doubt you would have got anything else, e.g a conventional boiler any cheaper. The main thing that differentiates a good house (in energy terms) from a poor one, is attention to detail, to make sure the insulation is fitted properly and the building is made air tight and most importantly no air path to bypass your insulation. That latter point was brought home to me earlier this year when I completed the wiring on a budget self build. I was staggered at just how badly it was put together, particularly the room in roof upper floor. Plenty of insulation went into the building, but it was so appallingly fitted that most of it is completely useless with air paths bypassing much of the insulation.1 point
-
Mine is going to be 1 meter from trees1 point
-
I suggested a spare duct "just in case" It is trivial to install one at build time, a HUGE job if you find you need one later. In my case the electricity meter is remote and when you come to fitting a solar PV diverter, you need a connection from the meter to the solar PV diverter. I used a wired connection using a length of 6 pair armoured BT phone cable (just because I had it) but you can also now buy solar PV diverters that uses a wireless connection. But I would still install a spare duct just in case because it is so easy and cheap to do at build time.1 point
-
@Tony Kan insulated raft can easily be done pretty much solo. Areas where a bit of help is good are setting your profiles out - using a tape measure solo is a long and tricky process, much easier with two. The concrete - I had 3 blokes turn up to do mine, after watching them I am glad I didn't try it myself. The finish wasnt laser flat but flat enough that laying floor finishes should be fine. I had a mix of A393 and A292 mesh in mine. Thankfully the widest A393 strip was 600mm so I could move it myself - a full sheet is 70kg, not too heavy but the shear size makes it extremely difficult to move solo. A292 is about 40kg so even full sheets can be moved solo (it does get snagged etc but doable). If you can use an insulated raft rather than piles it should be doable. Piles I have no experience of, but if you have a good set of drawings showing how all the steel ties together I'm not sure why you couldn't tackle it. Cutting steel and placing it is easy - just keep checking the drawing. Another mistake i made between layers was to plough on to the top layer assuming A393 was top and bottom in the thickened strips - it was actually A292, by the time i paused to check I'd cut all my A292!! A lot of unnecessary work created having to lap and tie them all back together. I just used a 9" grinder to cut the steel and a potato stack tie twist to do the ties. Dont follow this approach, there are thousands of ties and it takes ages, hire one if those hand held tie twist machines, I wish I had - it can be used to tie the UFH pipe too. I should add some pics of finished slab to the other thread, my house is going up at the minute though so very busy! Good luck with whatever you decide, contractors are a PITA and I've had the same difficulties you are facing, you'll get there in the end.1 point
-
It is to do with voltage. The inverter will supply at slightly higher voltage than the grid. Then, because nature hates things being unbalanced, the electrons go looking for a load to reduce there energy state. The first load they find will do, if it is big enough. This is one reason that voltage drop is important. You don't want your cables heating up.1 point
-
What work needs to be done to the roof to bring it up to regs? Looks like there is no membrane under the lower part one side. If there is a few bits to rectify you may find that new raised collar trusses would not be that expensive. You could do just the half over the kitchen/dining area. Or go for fully vaulted in that area and raised collar trusses in the bedroom. I think without doing something you take away the appeal of a barn; most people will expect a bit of a feature and spending a few £k here will make all the difference. I take it there is no option to lower the floors?1 point
-
This is hard to answer really depending on you. How will you move the mesh? what type of piles? If you have continuous augered piles how will you break the tops down? are you laying the concrete? how will you get the concrete to all areas of the slab? what is the finish on the concrete? if You are supposed to have a 20mm layer of sand is you excavated area that good or will you need something else to get the levels right. It is all very doable on your own except laying the concrete, you will need lots of help for this, moving the sheets will be very awkward on your own they are very heavy. I work on my own every day and just plod on but I have an excavator for moving heavy stuff and would call on 4-5 other blokes when I need to pour the slabs. You will need a good bunch of tools and don’t underestimate how hard work it will be.1 point
-
I would still talk to building control, even if it did heave a little it would all still stay together, it’s not habitable!1 point
-
Squaredeal do the Hardie cement board stuff https://www.squaredealupvcshop.co.uk/product/smooth/1 point
-
That truss roof came as a kit. Take it apart carefully and sell on.1 point
-
6m x 10m surely?1 point
-
To be frank, I would now be going back to planning to get something larger than the existing building, arguing you should be able to enlarge it by at least PD limits. And then be looking at a rebuild which has the VAT benefits and will get you the building you really want. I am sure you can re use a lot like re use the roof tiles, the cladding etc.1 point
-
I’ve recently been involved something similar and convinced the client to run the new wall perpendicular with his rear wall as opposed to parallel with the neighbours’ garage wall, as attached.
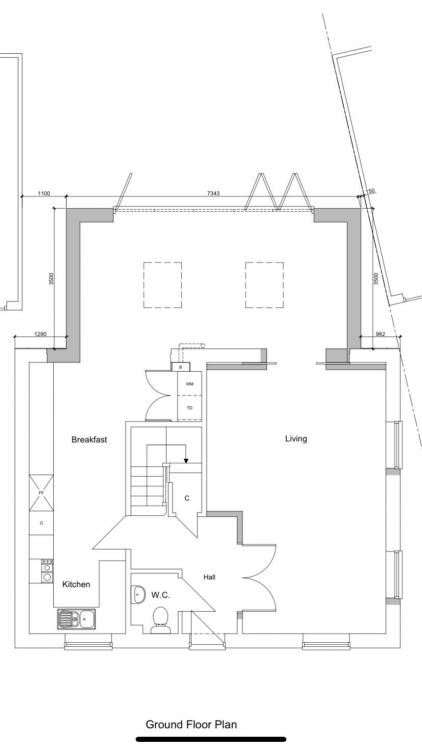 1 point
 -
What do you gain at the widest point? 900mm? - less if you take into account the fabric of the wall. You need to work out if it is worth the additional headaches and costs associated not to mention all the difficulties it creates, you will need to order more carpet for the diagonal end only to bin a large piece, or you will need to cut every piece of laminate/wood floor at an angle which means you then need to cut it straight to then use the off-cut at the opposite end for the next run, so more waste there. As for the roof, you will nor be able to use a standard verge detail and a gutter would look stupid to try and catch the rain water so really you would need to just to a angled wet-verge or something. The only way I would contemplate it would be to have a hipped roof at that end, but that adds extra work and cost. I think I'd just leave it as it is frankly. I would be thinking about more windows.1 point
-
Sorry I can't tell you much about the internals as it is completely encased. I bought the cylinder 3 years ago and paid £757 plus VAT for the 250 litre size. If I remember correctly there was very little difference in price between the OSO and the other more popular makes which were all B and C rated. Almost forgot, I also got a £100 cashback from OSO as they were running some type of sales promotion at that time. Running it with a solar PV I-Boost at the moment.1 point
-
Just off the M4 heading in to Wootton Bassett.0 points
-
Sure I’ve had a pint in there0 points
-
Reminds me of a pub down south. Sally Pussey Inn. I think there were a few alternative names for it.0 points


This leaderboard is set to London/GMT+01:00