
Leaderboard


Popular Content
Showing content with the highest reputation on 04/23/20 in all areas
-
I've spoken with the bricklayer and BCO and they have both agreed to construct it from the example you gave above. Thanks very much.2 points
-
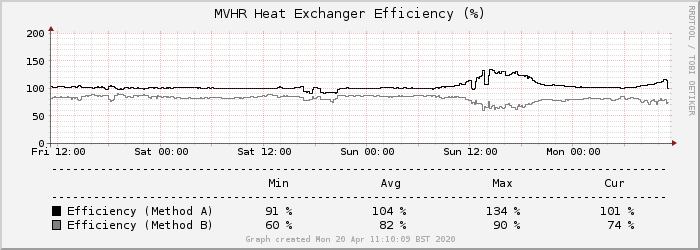
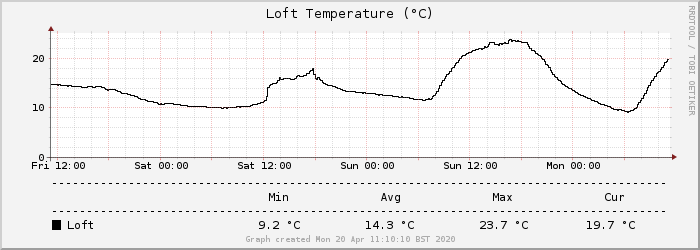
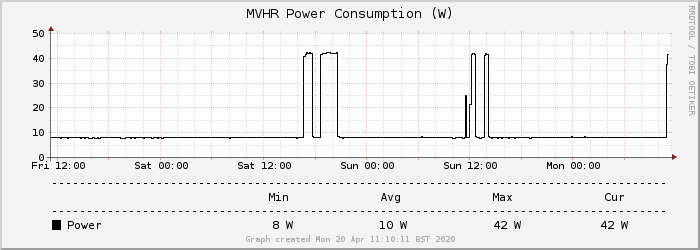
A few months back I promised (to @SteamyTea I think) to share further details about a side-project involving monitoring and controlling our MVHR unit with a Raspberry Pi. I was hoping to mature it to beyond beta stage before presenting it but, frankly, it'll probably always be in some unfinished state of development as between my extension and nearly-3yr old daughter I don't find much time for 'playing around' (as my wife calls this sort of thing). So, I thought I'd just share what I've got now in case it's of interest of use to others. As background, our MVHR unit is a Titon HRV 1.25Q HMB Plus Eco which I believe is towards the lower end of the range but I got it cheap (£350) on eBay (an interesting story involving a development of 50-odd houses all fitted with the wrong model MVHR!). As a seemingly basic model it comes with potentiometer-controlled fans speeds and boost timer, absolute humidity detection for boost, automatic summer bypass and provision for switched boost inputs. It uses a Recair heat exchanger which, being their party, could well be common with a lot of other manufacturer's units. There's no fancy screen or controls, although Titon do make such a device but I'm not sure it works with our model. Furthermore, it's something like £150 and my Northern genes made me think I could do better with a Raspberry Pi for a lot less than that! I'd like to show a detailed schematic showing all the component parts but as I don't have one I'll just list them: - Raspberry Pi Zero W (a cut-down, low power, version of the Pi with WiFi) running Raspbian as the OS with lighttpd (web server), rrdtool (stats gathering and graph creation), a couple of 3rd party tools installed for reading the sensors and a couple of scripts (attached) pulling it all together - Shelly 1 smart relay connected to the MVHR boost input (the Pi could handle this but the Shelly has been in for a while, hardwired to boost switches in the kitchen and outside the bathrooms, and has been left in for now as it works without issue) (Incidentally, the MVHR unit itself is powered through a Shelly 1PM smart relay which is connected to my smoke alarms such that if there's a fire the MVHR is switched off and I am sent an SMS to alert me of the fact, but all that is separate to this Pi stuff described here) - Four DS18B20 1-wire temperature sensors taped inside the MVHR ports to measure supply, extract, intake and exhaust. A fifth is dangling in the loft space as, being outside the thermal envelope, I've always been curious what the temperatures are actually like up there - One AM2302 humidity sensor (unfortunately not 1-wire and so requires different software to read and its own connection to the Pi's I/O port) As things currently stand, the attached script (capturetemps.sh) reads all the sensors every 5 minutes (trigger by cron) and records their values, and various calculated ones too, to an RRD round-robin database using rrdtool. I've always been a fan of graphs - not entirely sure why - and so via creategraphs.sh (and rrdtool again) it also produces some charts for whatever time periods are required, examples of which are shown below. Speaking of time periods, it currently stores - and produces graphs from - readings at 5 minute intervals for 3 months, 30 minute averages for 6 months and hourly averages for 5 years in a 12MB database. First off, system temperatures are recorded for all the ports which has been very reassuring in terms of the actually knowing this MVHR malarky actually does what it purports to do in terms of providing a supply of air at a temperature near to that being extracted (sometimes higher!) despite what's going on outside: These temperature readings are also used to calculate the efficiency of the heat exchanger which again appear to show it broadly working as advertised: The two calculation methods are as described by Paul Heat Recovery, the second of which (Method B) aims to factor in heat losses (or indeed gain) through the unit itself and hence be more accurate. I also measure and graph instantaneous power consumption (figures obtained from the Shelly 1PM 'smoke alarm' relay I mentioned that the MVHR is powered through): The system isn't yet fully installed (10 vents out of 12 done), balanced or properly configured and so the trickle (~8W) and boost (~42W) figures shouldn't be taken as necessarily relevant although that said we've been pleased with the performance at the current settings and so wouldn't be surprised if they don't change too much. This graph (not this actual one as it hasn't happened for a few days) also reveals when the summer bypass kicks in as it jumps the line up by ~5W. There's also the loft temperature graph which doesn't serve much purpose other than curiosity, and use up the fifth-of-a-pack-of-five sensors I bought: Speaking of curiosity, the novelty of looking at graphs will wear off one day I'm sure but one important reading I am logging is the humidity in the extract duct: This one has been particularly interesting, and indeed useful, given that the large 'spikes' correspond with taking showers and so are easy for the script to detect (it currently looks for a >5% rise in any five minute period) and request a 30-min boost via the Shelly smart relay. It hasn't missed a shower yet, and I am confident it'll work well for cooking as previous experiments show it being quite easy to pick up simmering pans. The script also looks out for an absolute value also being breached but it's only been running for a few weeks and so I really need to see a full four seasons, particularly when windows are closed in winter with washing drying indoors, to determine what sort of value would be suitable for that. Given the freedom and flexibility of the script it could even self-adjust over the year if need be? That's pretty much it! It's been good fun, a worthwhile learning curve and I think it'll have some utility too. My next step is for the Pi to take control of the summer bypass as the thresholds for operation cannot be adjusted on my unit - confirmed by Titon as being active when the extract temperature (dirty room air) is >22°C and intake (fresh outside air) >15°C, but not if the intake air temperature is greater than the extract as the heat exchanger serves to cool the incoming air slightly in such a situation. I think I'd like it to kick in sooner as 22°C is a bit warm for my liking on still summer nights where even the thought of 'cool' air being pumped in could have psychological benefits even if it won't actually cool the house down much given the volumes involved. Longer term I might even use the Pi to control the fan speeds too (reading the datasheets for them show they accept a 0-10v speed control input) but that might be overkill as I'm sure in time I'll be more than happy with just having fixed speed trickle and boost modes. If I can expand on anything I'd be more than happy to do so. And if there's any 'real programmers in the house please forgive my scripts as whilst I'm aware there's something called 'programming style' I'm not following anything other than what works for me as an untrained tinkerer! capturetemps.sh.txt creategraphs.sh.txt

 1 point
 -
A quality cordless impact driver and drill.1 point
-
Sorry I can't tell you much about the internals as it is completely encased. I bought the cylinder 3 years ago and paid £757 plus VAT for the 250 litre size. If I remember correctly there was very little difference in price between the OSO and the other more popular makes which were all B and C rated. Almost forgot, I also got a £100 cashback from OSO as they were running some type of sales promotion at that time. Running it with a solar PV I-Boost at the moment.1 point
-
Something else to think about is foundation design, will you be able to get a foundation right up against their garage and if you can your wall will not be central on the foundation it will be set to the far edge this can sometimes complicate a foundation design.1 point
-
Have you looked at OSO Delta Coil. This claims to be the only A - rated HW cylinder available in the UK. I went for the 250 litre version. Although I have no detailed measurements, it appears to lose approx 1 degree overnight. https://osohotwater.co.uk/product/delta-coil/1 point
-
Some companies will spray a double thickness insulation layer on, if you request it. I had a thermal store double sprayed to increase the insulation level, but the company wouldn't/couldn't change the energy rating.1 point
-
They don't exist... well, hot water ones don't ! If you want A rated then Sunamp is your only option1 point
-
agree with @ProDave but would also add a flush eaves, i presuming a gable wall on the boundary1 point
-
yep you can get 1.5 degrees of misalignment in a joint either side of centre, so taking the tangent on a 3m pipe (or effectively 2880mm when inserted into a socket) then you get 75.4mm angular deflection in any plane. So an 8002mm, minus 240mm would be 203.23mm movement ......1 point
-
Happy night tonight...... might have a bit of giggle water .... Thanks @PeterW
 1 point
 -
@PeterWWill provide a definitive answer to your main question. I want to comment on the orientation of your toilet IC, it should be rotated 45 degrees clockwise so the solids follow the main channel through the IC and the shower enters a minor branch.1 point
-
I've drawn everything out so it's a bit clearer what external components I've used: ...and a screenshot of the GUI interface that the Shelly relays provide for app control over the LAN or Internet:

.thumb.png.b251ca716bb7bcdc276c3d31eb330a5c.png) 1 point
1 point -
All soldered up and tested. The jury's out. Need to try with good batteries. I'll assemble the chainsaw with the blade etc tomorrow and try it: Short video:1 point
-
Easier to just nog id of thought1 point
-
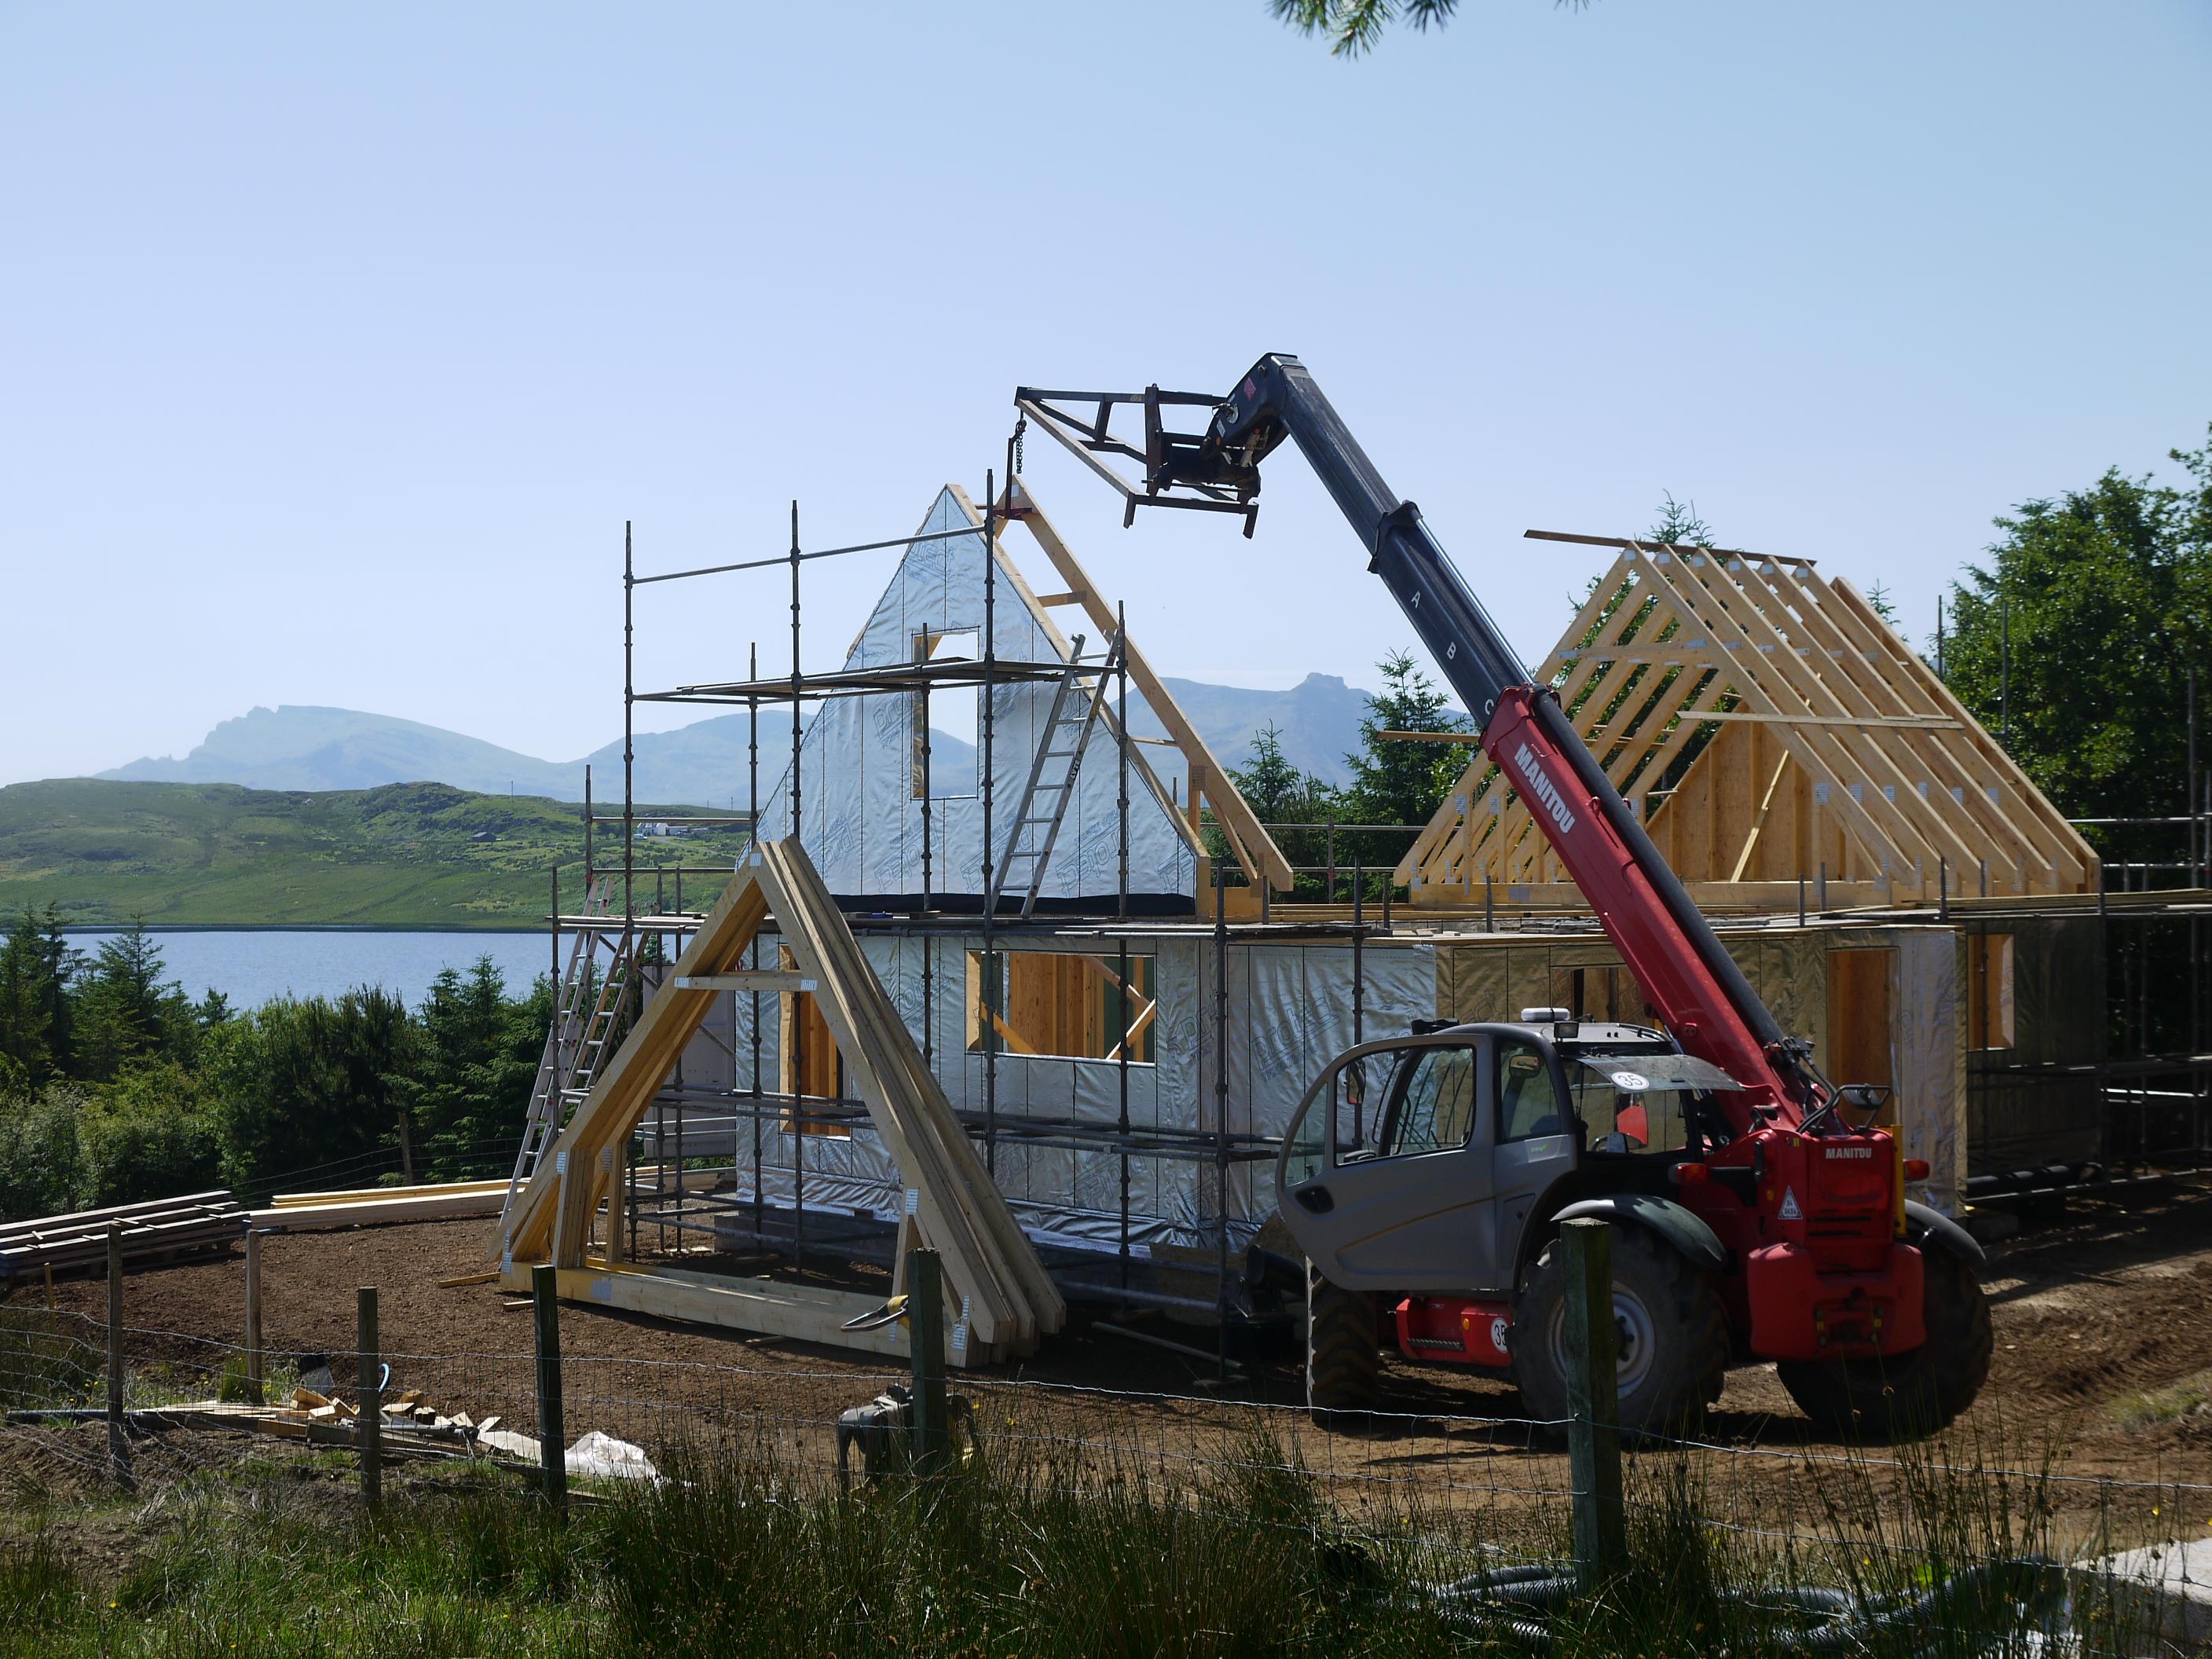
We hired a telehandler with truss jib as a crane would be expensive. Managed to get this one for a couple of weeks to do the heavy lifting for loads of jobs. It was around £500 for two weeks. I think the cost of a crane hire for single day could be that.
 1 point
 -
Following on from the plastering work we did a quick stock take. Our plan was to be back on our narrow boat for the summer but with the current problems that was out of the question. We didn’t have materials to start flooring or fit bathrooms or kitchen and there was little hope of getting them. After a bit of head scratching and phoning around we found we could get fencing material and paint. We also had a few other jobs on the list that we could tackle, commissioning the water harvesting system, second fix electrics. We decided that the fence should be at the top of the list. Our plot has been behind Heras site fencing for a year now and although we’ve kept the site tidy it still was not that pleasant an outlook for the neighbours. We’re not far from the coast and strong winds are the norm so over engineering the fence makes sense so we don’t get a long term maintenance problem. Some while back we erected a green oak fence with the expectation that it would last a good thirty years. That proved a false expectation with the post rotting out after 15 years. We replaced the post with galvanized steel, but it was a lesson hard learnt and a problem we would avoid this time round. Initial thoughts were to use galvanized post and larch stringers, my Larch is expensive! After a bit of searching around Pat found a fencing product by an English company Marano who make aluminium fencing and had a nice contemporary product called Breeze. It’s an aluminium product and didn’t cost a fortune, and as it’s name suggest is designed for windy locations. The only down side was that it is not the best from a privacy point of view. On the subject of wind we also had a pane of glass broken. It happened overnight and we think it must have been broken by flying debris as it’s on the first floor with no access. Annoying but no big deal we thought. The glass that got broken is in a door supplied by Velfac. Contacted Velfac to ask about re-glazing only to be told it was not an option and the door would need to be replaced. Unlikely we thought and contacted the Velfac specialist fitting company who has fitted our windows, they agreed and said they would come back with an estimate for re-glazing the door. After a week they got back to me and rather apologetically confirmed re-glazing was not an option...so repair was an eye watering £1200. I’ll add a thread in the glazing section of the forum with more information so at least others will be forewarned. Back to fencing, at the front of the property we needed something cheap and cheerful to smarten the site up pending some art work fencing courtesy of one of our daughters who is an artist blacksmith. We decided to go with park fencing really low cost but looks surprisingly contemporary. I guess it’s cheap because it normally gets put in by the mile. Fencing complete, attention was turned to commissioning the Kinspan water harvesting system. Pretty strait forward, wire in sensors, pump, and connect water pipes. Half a days work, year right! All went really well, followed the initialisation instructions, tank set up OK, gauge reading set, pump pressure test...RCD trips. Meter across pump, sure enough earth and live not separate. The tank is just over a year old and the pump is a Grundfos SB3, quick look on their site confirmed a two year warranty. Contacted Kingspan to ask for new pump only to be told their warranty is one year from delivery, never mind installation. We’ll send out and engineer to look at the problem, OK how much is that £350 and how much is a pump £350...OK I’ll take care of it myself. The pump it turns out is not the simplest thing to dismantle, the parts PDF line drawing is not the best so It’s been put on the back burner. After a bit of searching and some good technical assistance from Anglian pumps, a new Divertron 1200x pump ordered £235. Still painful as it was not on the budget and had not done a single days work. With the plastering done we also wanted to get a mist coat applied and now we had more time get a finish coat as well. With a lot of area to cover, spraying looked a good option as I already had a HVLP setup. It turned out not to develop enough pressure for the emulsion, time to get an airless sprayer. Being a single use project I decided to see what was on Ebay and found a Wagner 418 sprayer being sold after use on another single project, looked clean and genuine, result I thought. Sprayer arrived and setup with paint to experiment and get to know how to use it. Not easily as it turned out, the spray was tailing badly, this is a solid central strip with a gap either side then a thin line, not what you need. Read the manual, googled it and it looked like it was down to low pressure. The 418 has no pressure adjustment, and the manual said it was down to cleaning out the inlet valve and paint filter. Lots of cleaning, no result, more research, cleaned outlet valve. Tried new nozzle, tried another gun and so on. Several frustrating days later opted to return it and buy a new one. Thank goodness this worked brilliantly and we were soon painting. Allowing for a 50/50 mist coat mixture we should have had plenty of paint. Half a day later, half the rooms done and all the paint gone. Fortunately the local Toolstation had stock. Another half day and it was done. All I can say is airless sprayers are brilliant, but boy do they have a drink problem. For the top coat we are using a really tough mat latex paint that you can scrub. This of course was special order and ordered before we knew about the sprayers drink problem. Needless to say the 45lt disappeared in half a day. It did cover the majority of the house, and we just have two bedrooms left to finish. The finish is very pleasing.1 point
-
Have you tried Glasgow Brickyard in Blochairn? They have a brick matching service.1 point
-
I agree with this wholeheartedly with what @Declan52 said. I have been building little walls and structures fairly successfully for 20-25 years, and last year when we kicked off the building works with the garage I approached a brickie and got him to work - he worked FT for a firm so did it for me on weekends on his own (my whole build has been like this - he was good, very good so I was happy for it to take significantly longer) so the deal was I would labour for him. I told him just to order me about and I would get on with it. Most of the time my setup time only took an hour or so with a top up every couple of hours so not too bad. On day one I was clearly versed on how to best setup block and brick for the brickie and how to make a really nice mortar by the mixer load more or less by eye. Not rocket science but how he wanted the site setup made a lot of sense to a pro doing a large structure and meant he only had to move a foot or two to grab block and lay it. The mortar was also laid out on boards spread along the wall - I have always used a bucket or barrow and end up moving it along with me which actually just costs time and hassle. Then the actual brick/block laying, I watched him lay 1000's of blocks and when doing lintels and things I helped. I learnt so much just by watching, little tricks to lift a block up above your head and place it in square and level by basically balancing an edge on your thumbnail and holding the other end with your hand - daft things like that. About a week after he left I needed to build a small wall maybe 5 blocks high, I kid you not, I was so impressed with my work I didn't want to have it dry dashed and was sad to see it all covered up. It was the straightest, most level block work I have ever done and I can attribute the vast improvement to watching and learning on the job and that was only over about a 12 months period when he has been on and off our site. I would honestly happily build a garage now - the cost would be the time for me, it would take me much much longer. Imagine what you could learn doing it constantly.1 point
-
I had another USB issue that if you put the PC to sleep, it would wake up if you just pressed a key or wiggled the mouse. There was another setting to stop it waking up on USB activity or something. @Jeremy Harris trying to get a pc to run without a keyboard reminds me of the old "No keyboard detected, press F1 to continue" error message.0 points


.thumb.jpg.bac90f3bbf6868cf2118d010d936c99d.jpg)


.png.4fc2f6cbd0ee43abb4ff0bade3f54709.png)


This leaderboard is set to London/GMT+01:00