Leaderboard


Popular Content
Showing content with the highest reputation on 01/23/25 in all areas
-
The "emergency use only" 50 litre Heatrae Sadia arrived today. Looks like it will be dead easy to install, as it's not heavy and will be an easy one-person lift up on to the wall above the services room door, especially as it has an easy to use "hook on" wall bracket. Yesterday an "eco" shower head arrived from Victoria Plumb. Pleasantly surprised by the performance of this, TBH. It's rated at only 7 litres/minute but subjectively it feels a lot better than that. My wife (highly critical of feeble showers) said she prefers it to the 10.5 litres/minute one we've been using for years. Be interesting to see the energy the SA uses tonight to recharge, after a couple of showers with the "eco" shower head. The last two nights it has taken near enough exactly the same time to charge, 1 hour 10 minutes, so about 3.3kWh*. If the shower water usage has been reduced by around 30%, I'd expect the recharge time to reduce. This small water heater holds water at its max temperature of 70°C (mixed down to about 50° for DHW and then mixed down again to ~38°C at the shower) to supply well over 80 litres, so more than enough for ten minutes of shower time with the new head. I'm planning to us it as out primary hot water system for a day or two once it's installed and commissioned, mostly as an experiment. Although such a low volume hot water system flies in the face of everything that is commonly stated as being essential for a reasonable level of convenience, I'm really keen to push the boundaries a bit and see just how little we could get away with, without too much inconvenience. Although the unit I have has a standard 3kW immersion, the Eddi has the option of being able to set a lower power limit. For those with battery systems this can be useful, as it can keep peak load within the inverter rating (ours is rated at 3.6kW max, in reality it manages a bit closer to 3.7kW). One advantage we have is that our hot water often tops up overnight, during the off-peak slot, so the water heater won't have lost much heat between its thermostat having turned it off and the first shower (usually around 07:00). This does mean the efficiency hit from storing hot water (which was the main reason for me opting for a SA back in 2016) won't be a major issue. * That 3.3kWh is actually significantly lower than the charge that went in to our old SA UniQ 9kWh unit over the past few months. I have no idea if this is in any way relevant to the failure, but, even though I don't have a lot of data they do seem to indicate that the new Thermino is using less energy. Nothing else has changed, it's plumbed to the same pipes and run from the same Eddi, with no changes to any settings, yet it seems clear there is a very slight reduction in energy use, perhaps around 10%.2 points
-
Good direction to question but I installed one into the upstairs of my old house and gained experience for my build but also much better quality of air in my bedroom at night which would reach 3-4,000 ppm of CO2 at night without it. I lived beside a busy road so not always possible to open a window (or it was too cold). I'd wake up gasping. Never had a bad night sleep with it installed. I value a good nights rest so it was worth the investment for that reason for me. Hence doing it in new house too!2 points
-
If you are hoping for an air test of 0.6 I very much doubt you have anything other than MVHR. One characteristic of an air tight house, is you can open one window or one door and you will get very little draught. It is only when you open 2 at the same time a howling gale goes through. Contrast that to out previous house. You opened the front door on a windy day and internal doors would blow shut or open as the howling gale entered through the door and rushed towards any of the extract fans in bathrooms, kitchen or utility, the cat flap, or the window trickle vents, or up the chimney via the stove that took it's air from the room, or out through the vent built into the hearth. I am convinced mvhr and eliminating all those deliberate big holes in a building would work wonders even in a house that is not particularly air tight.2 points
-
Hopefully no one opens a window when you move in Then you will really loose your shit 😂😂2 points
-
Is the "poor" score really an issue? Are you hoping for passive house certification. I too got a poor score of 1.4 without being able to pinpoint where the leak(s) were. But the end result is still a very low energy house and an as build SAP score of A94 so not entirely shabby.2 points
-
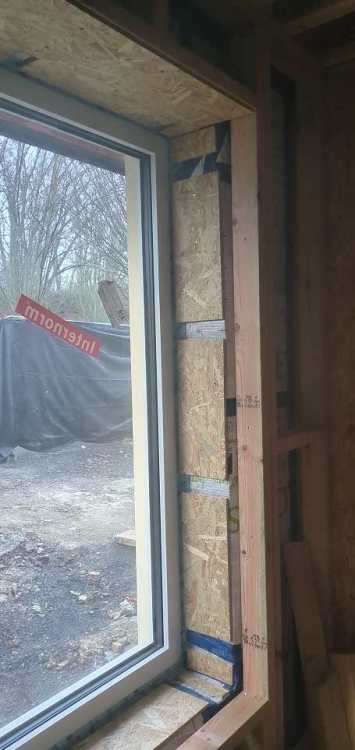
Got a 1.56 on the blower door test. Disappointed as was aiming for 0.6. I did the membrane and tape (no one else to blame) but nearly all the windows and doors had issues from the smoke test. I used OSB with wood screws around the window straps to provide a level base for the plasterboard in the reveals. My guess is this is where the smoke was able to get through (the screw penetrations). I assumed the Intello Plus would have been able to seal around the screw but I have my doubts now. I can apply a liquid seal around the OSB and the screw head to help or remove and seal the hole with tape and figure our the plasterboard approach later. The plasterboard will also need to screw through the OSB so could make this worse. Any advice? Thanks!
 1 point
 -
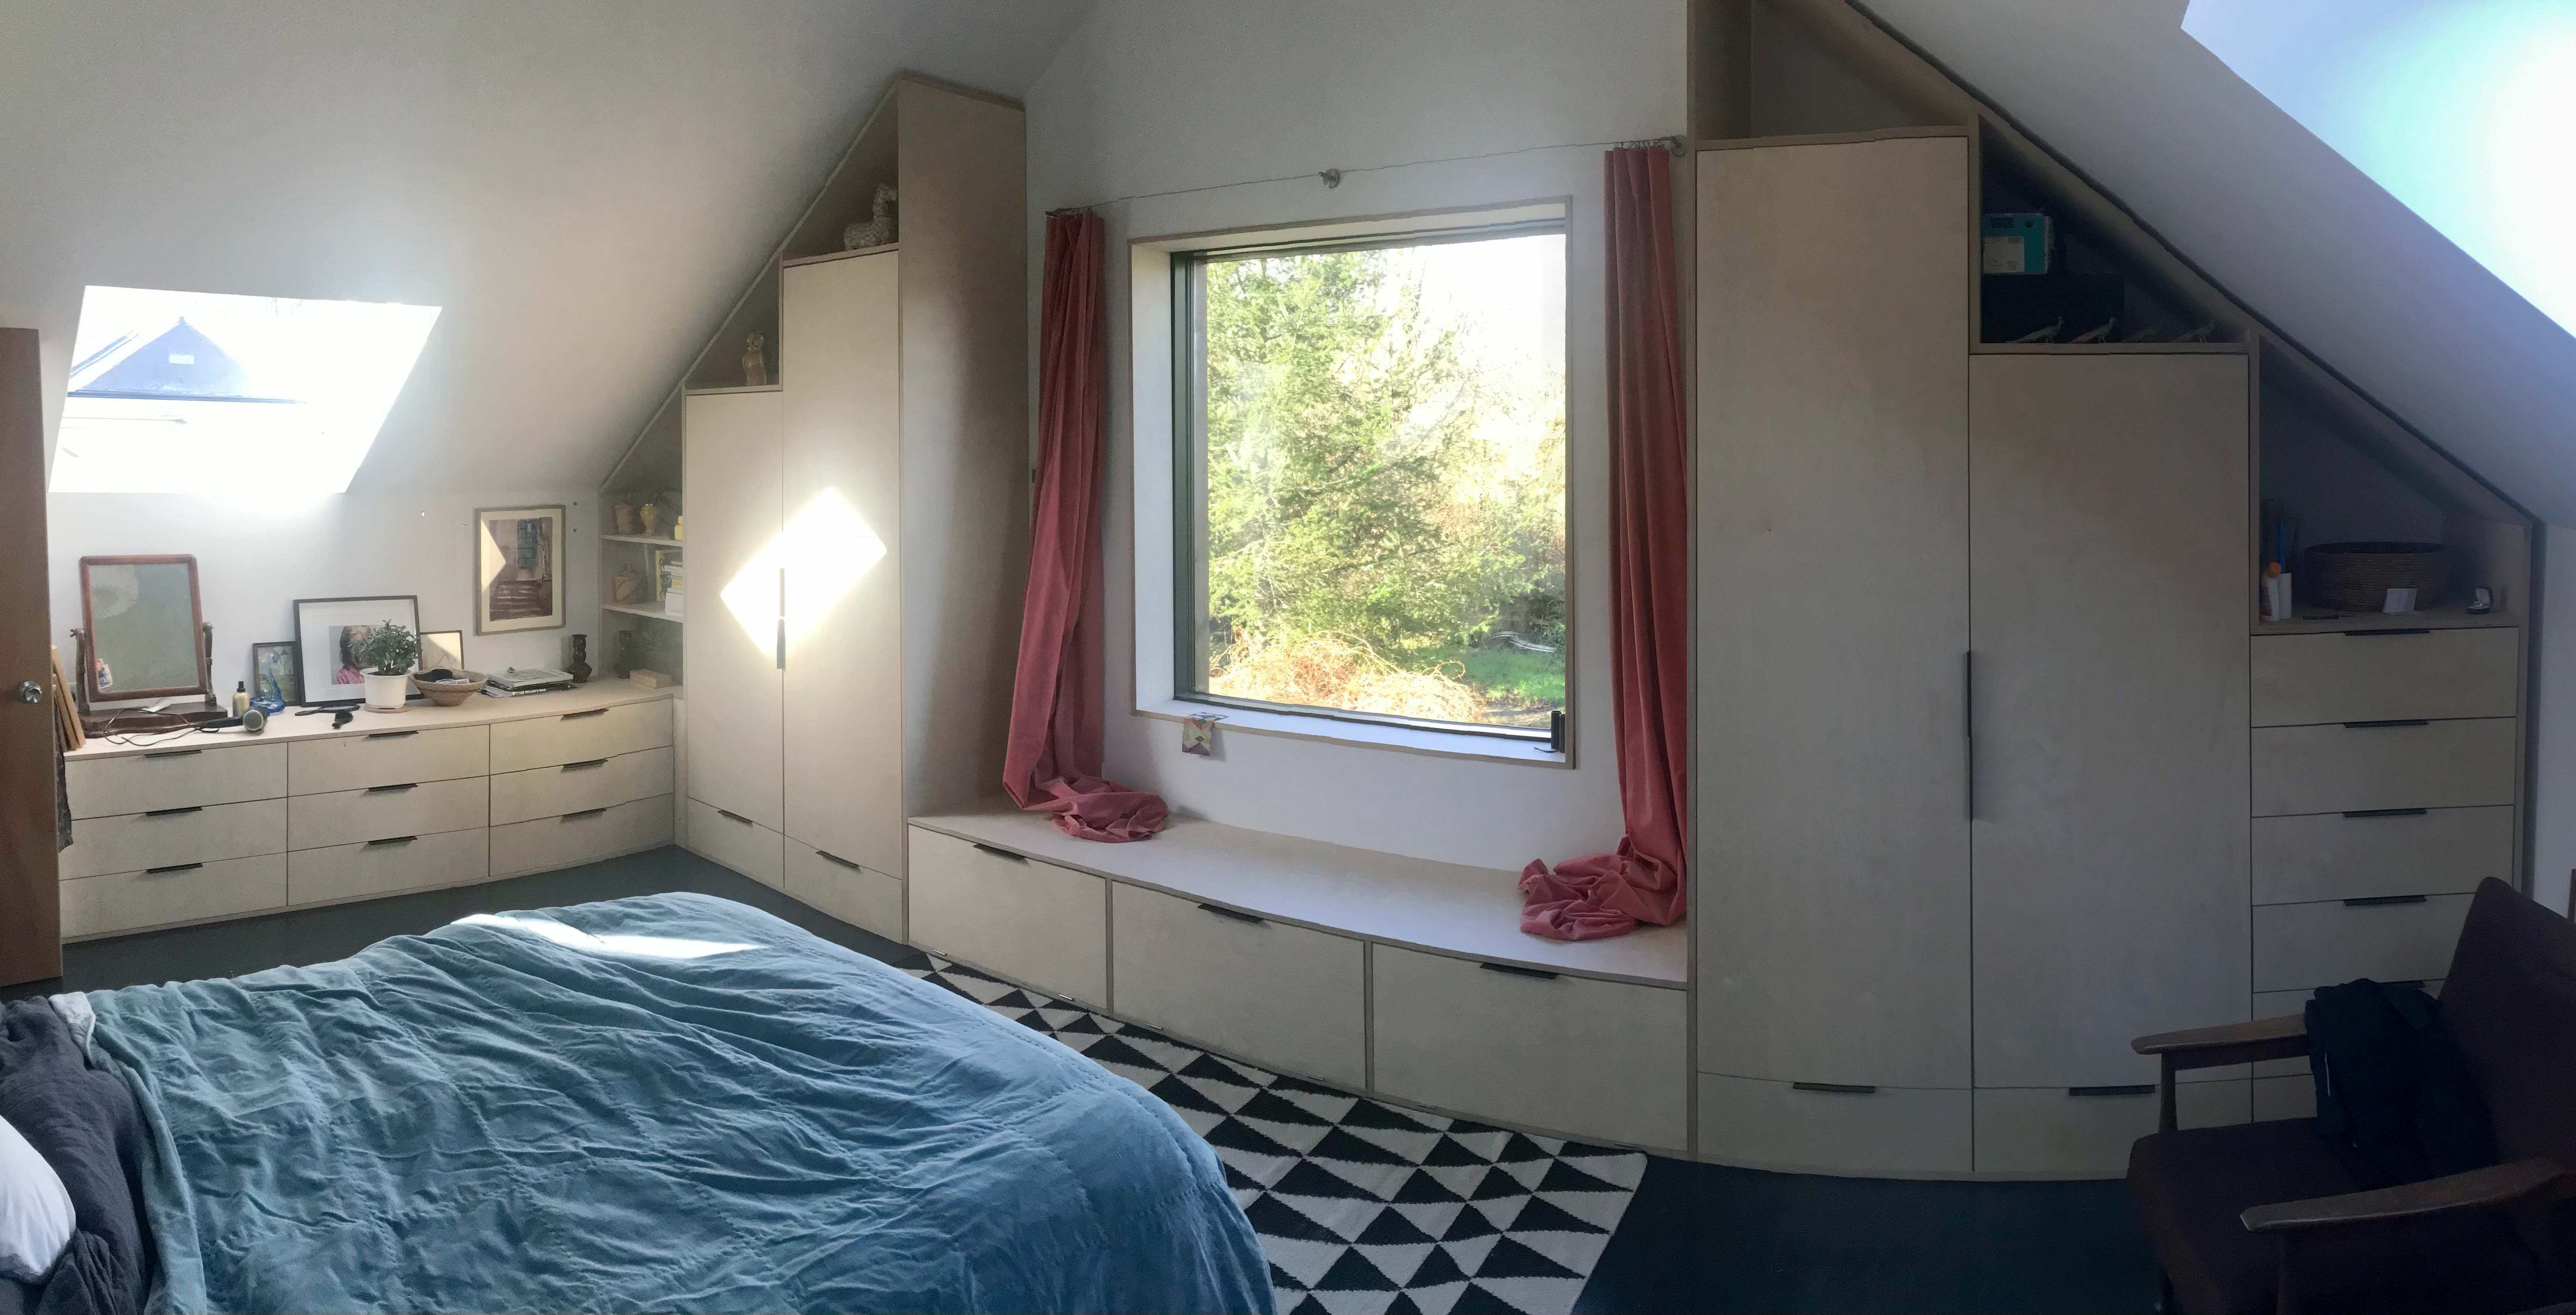
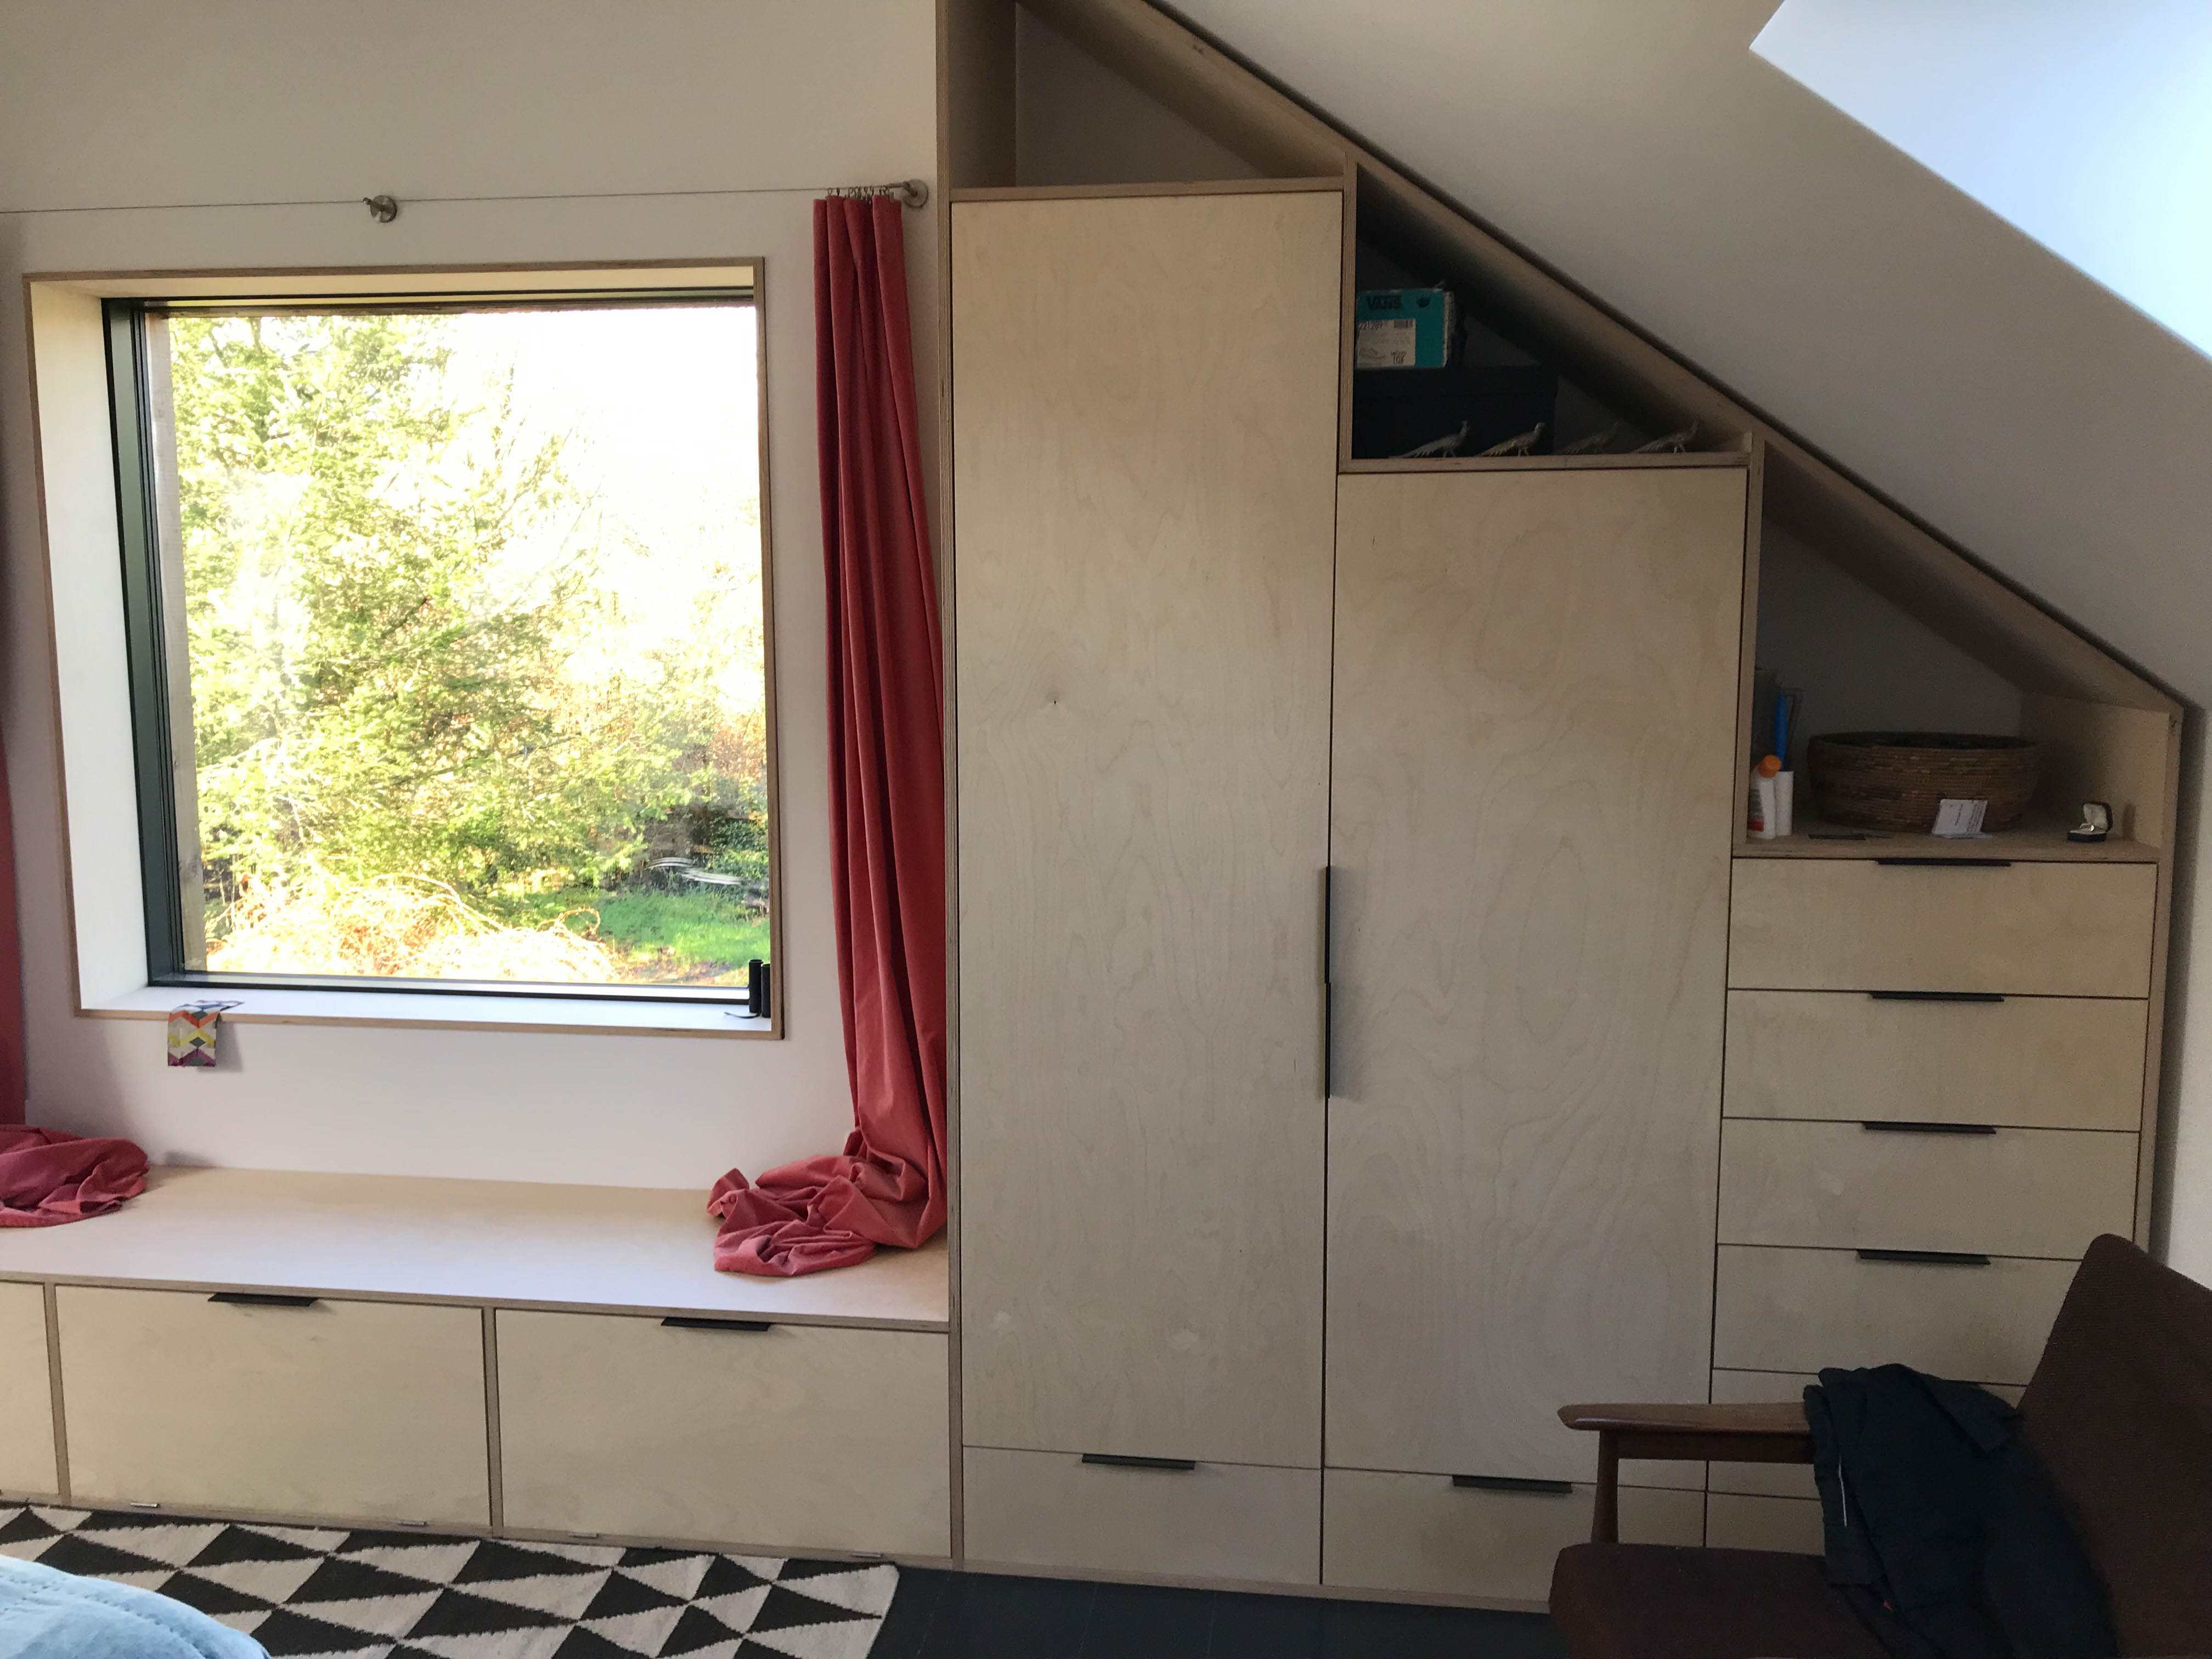
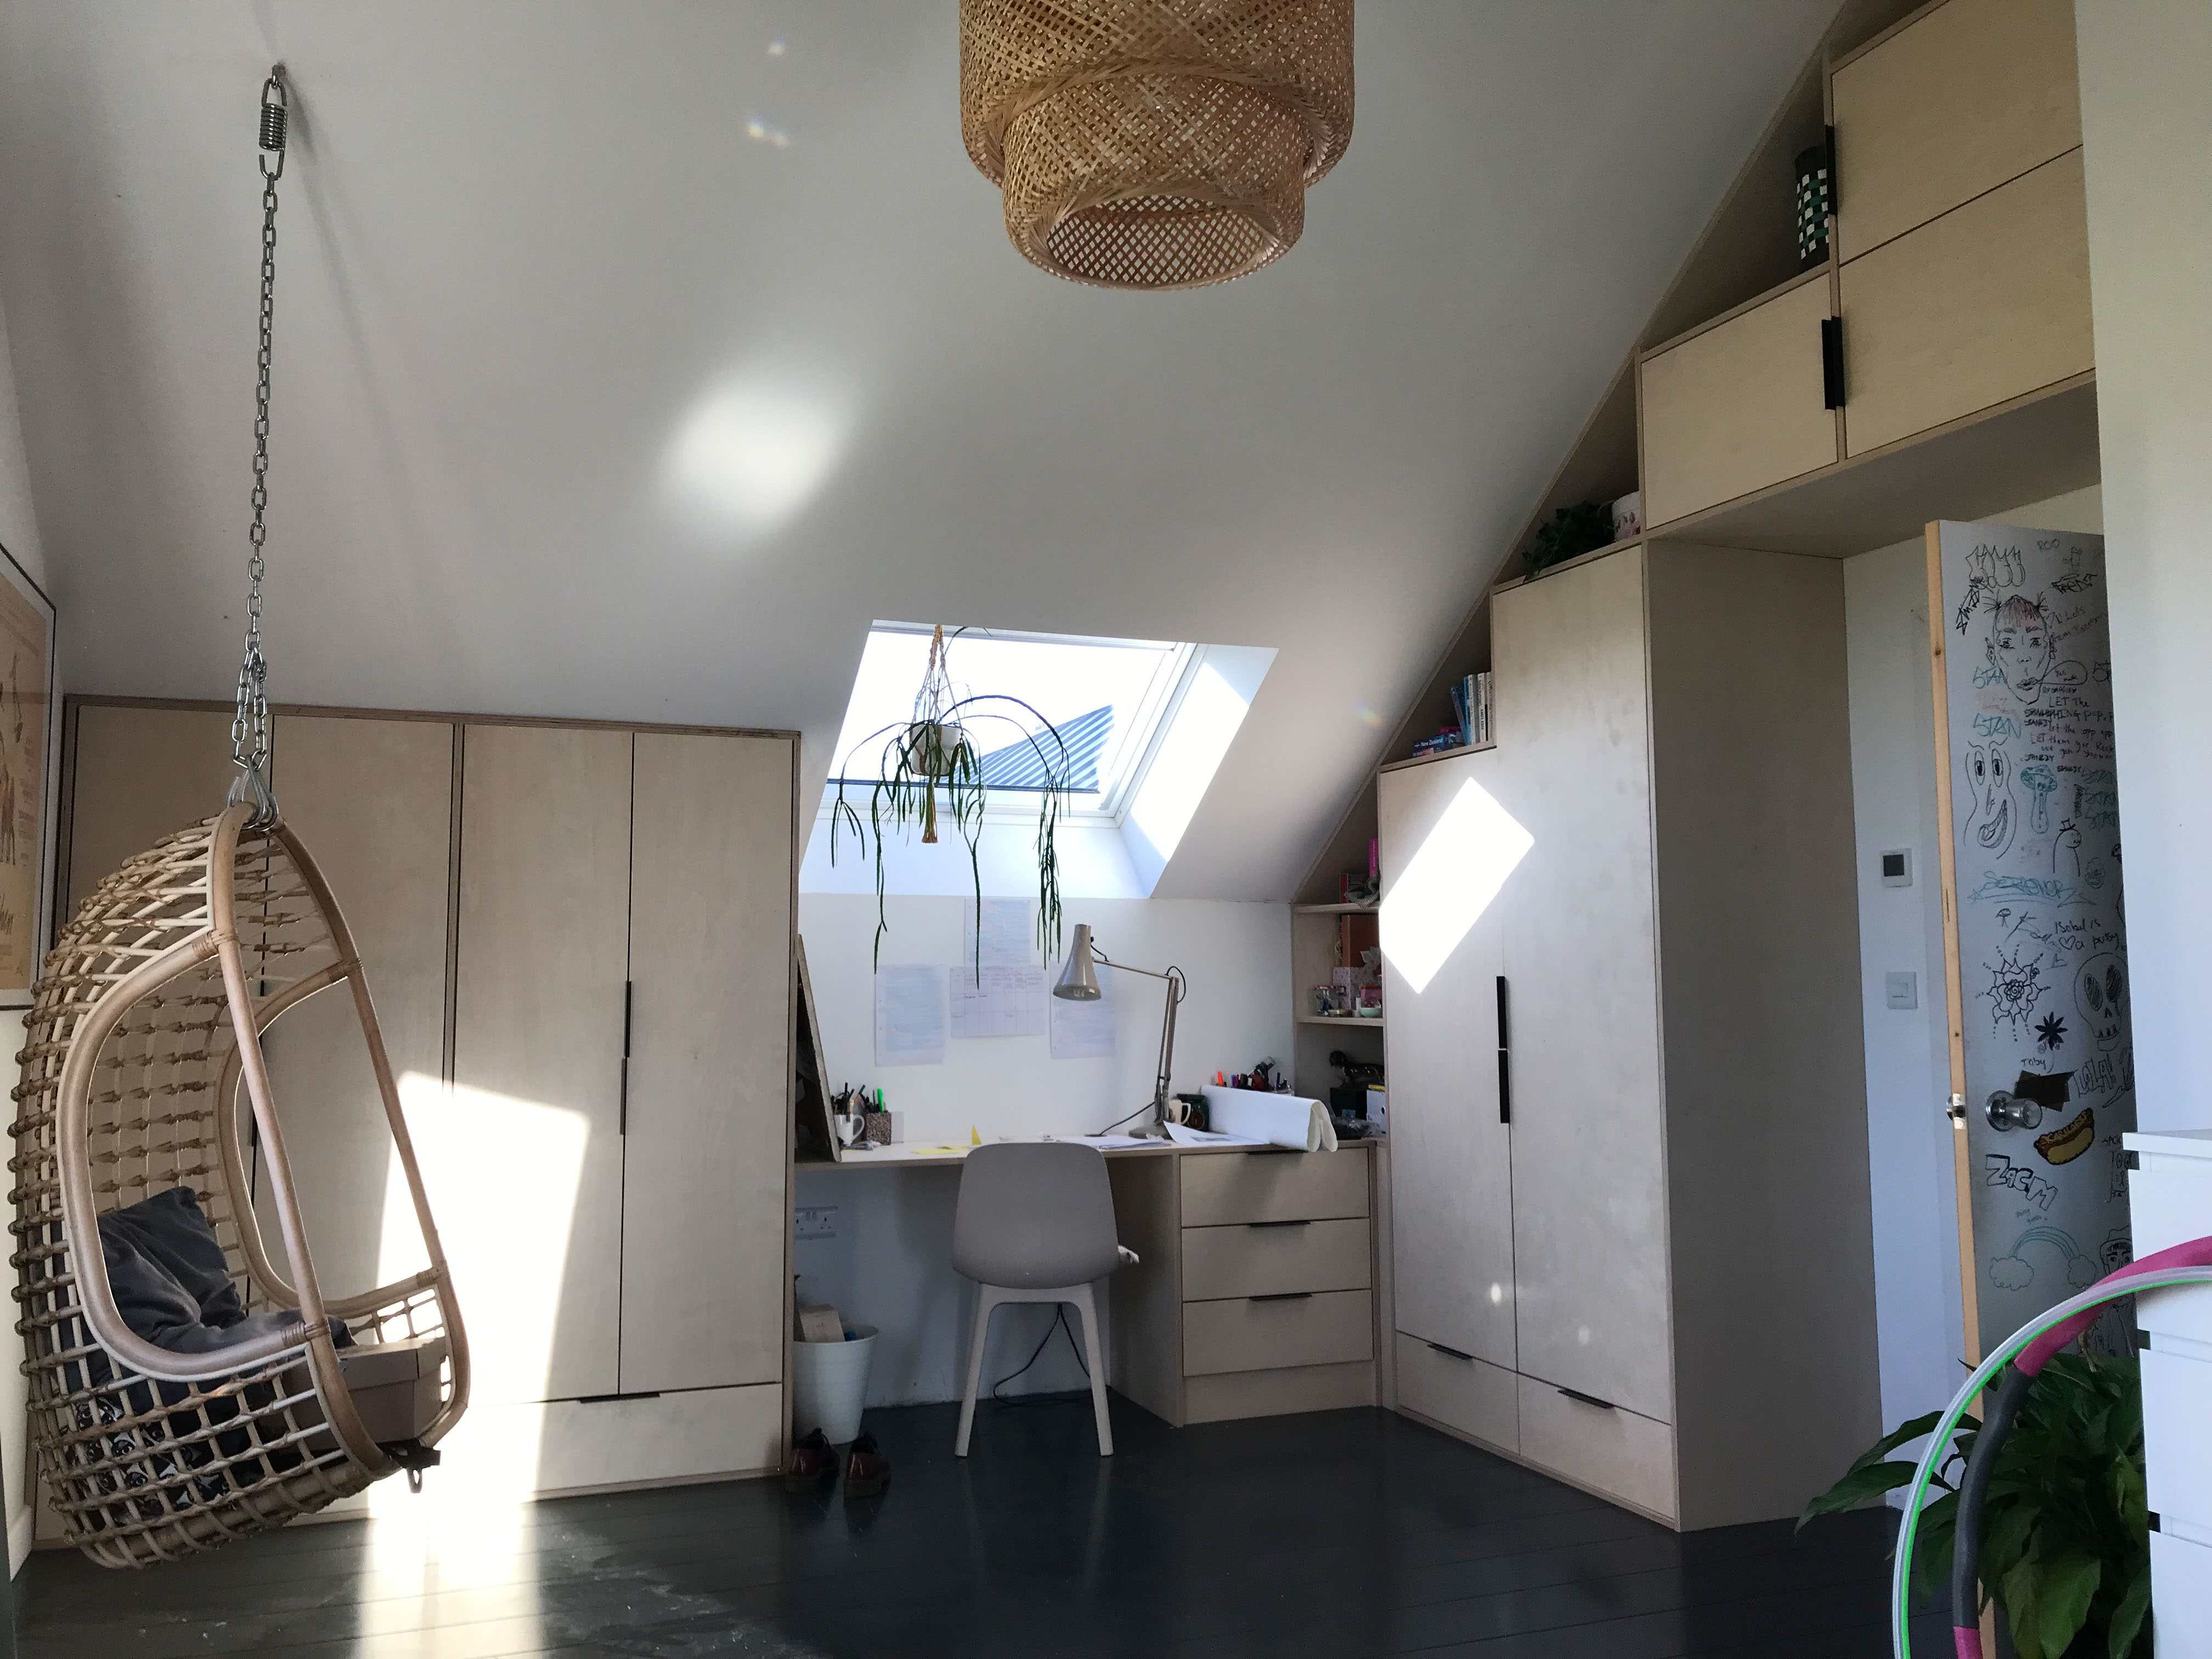
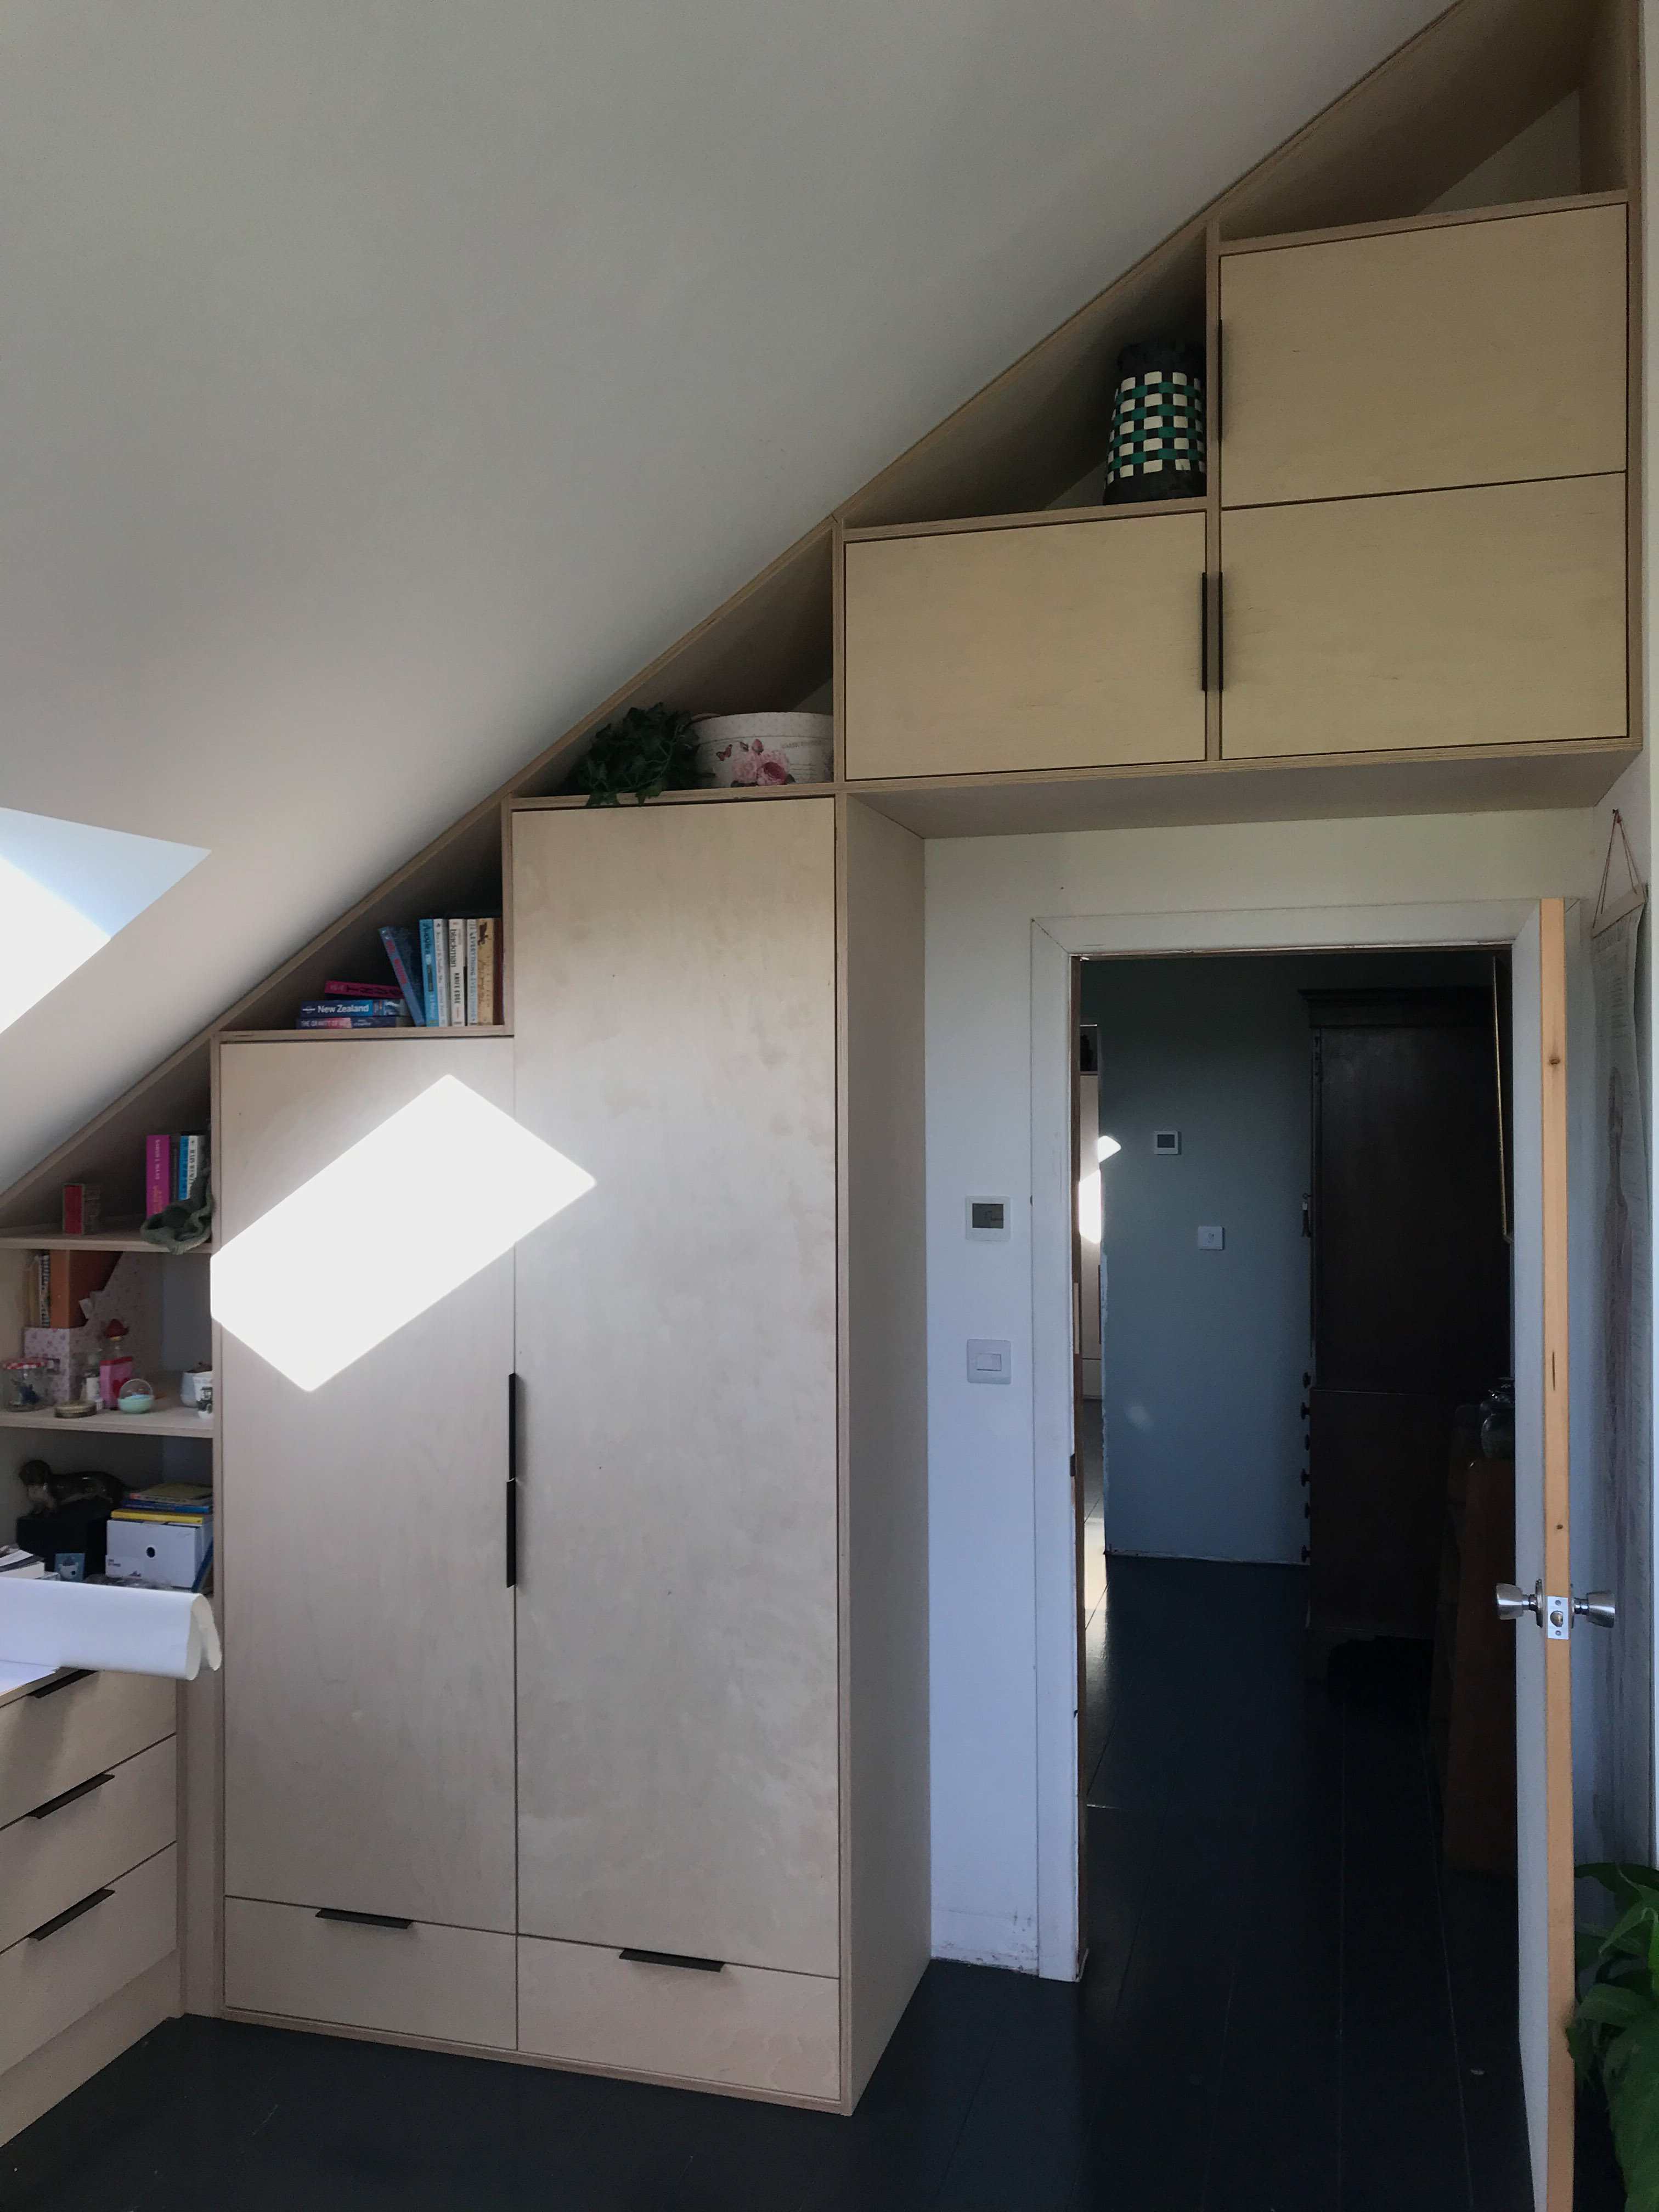
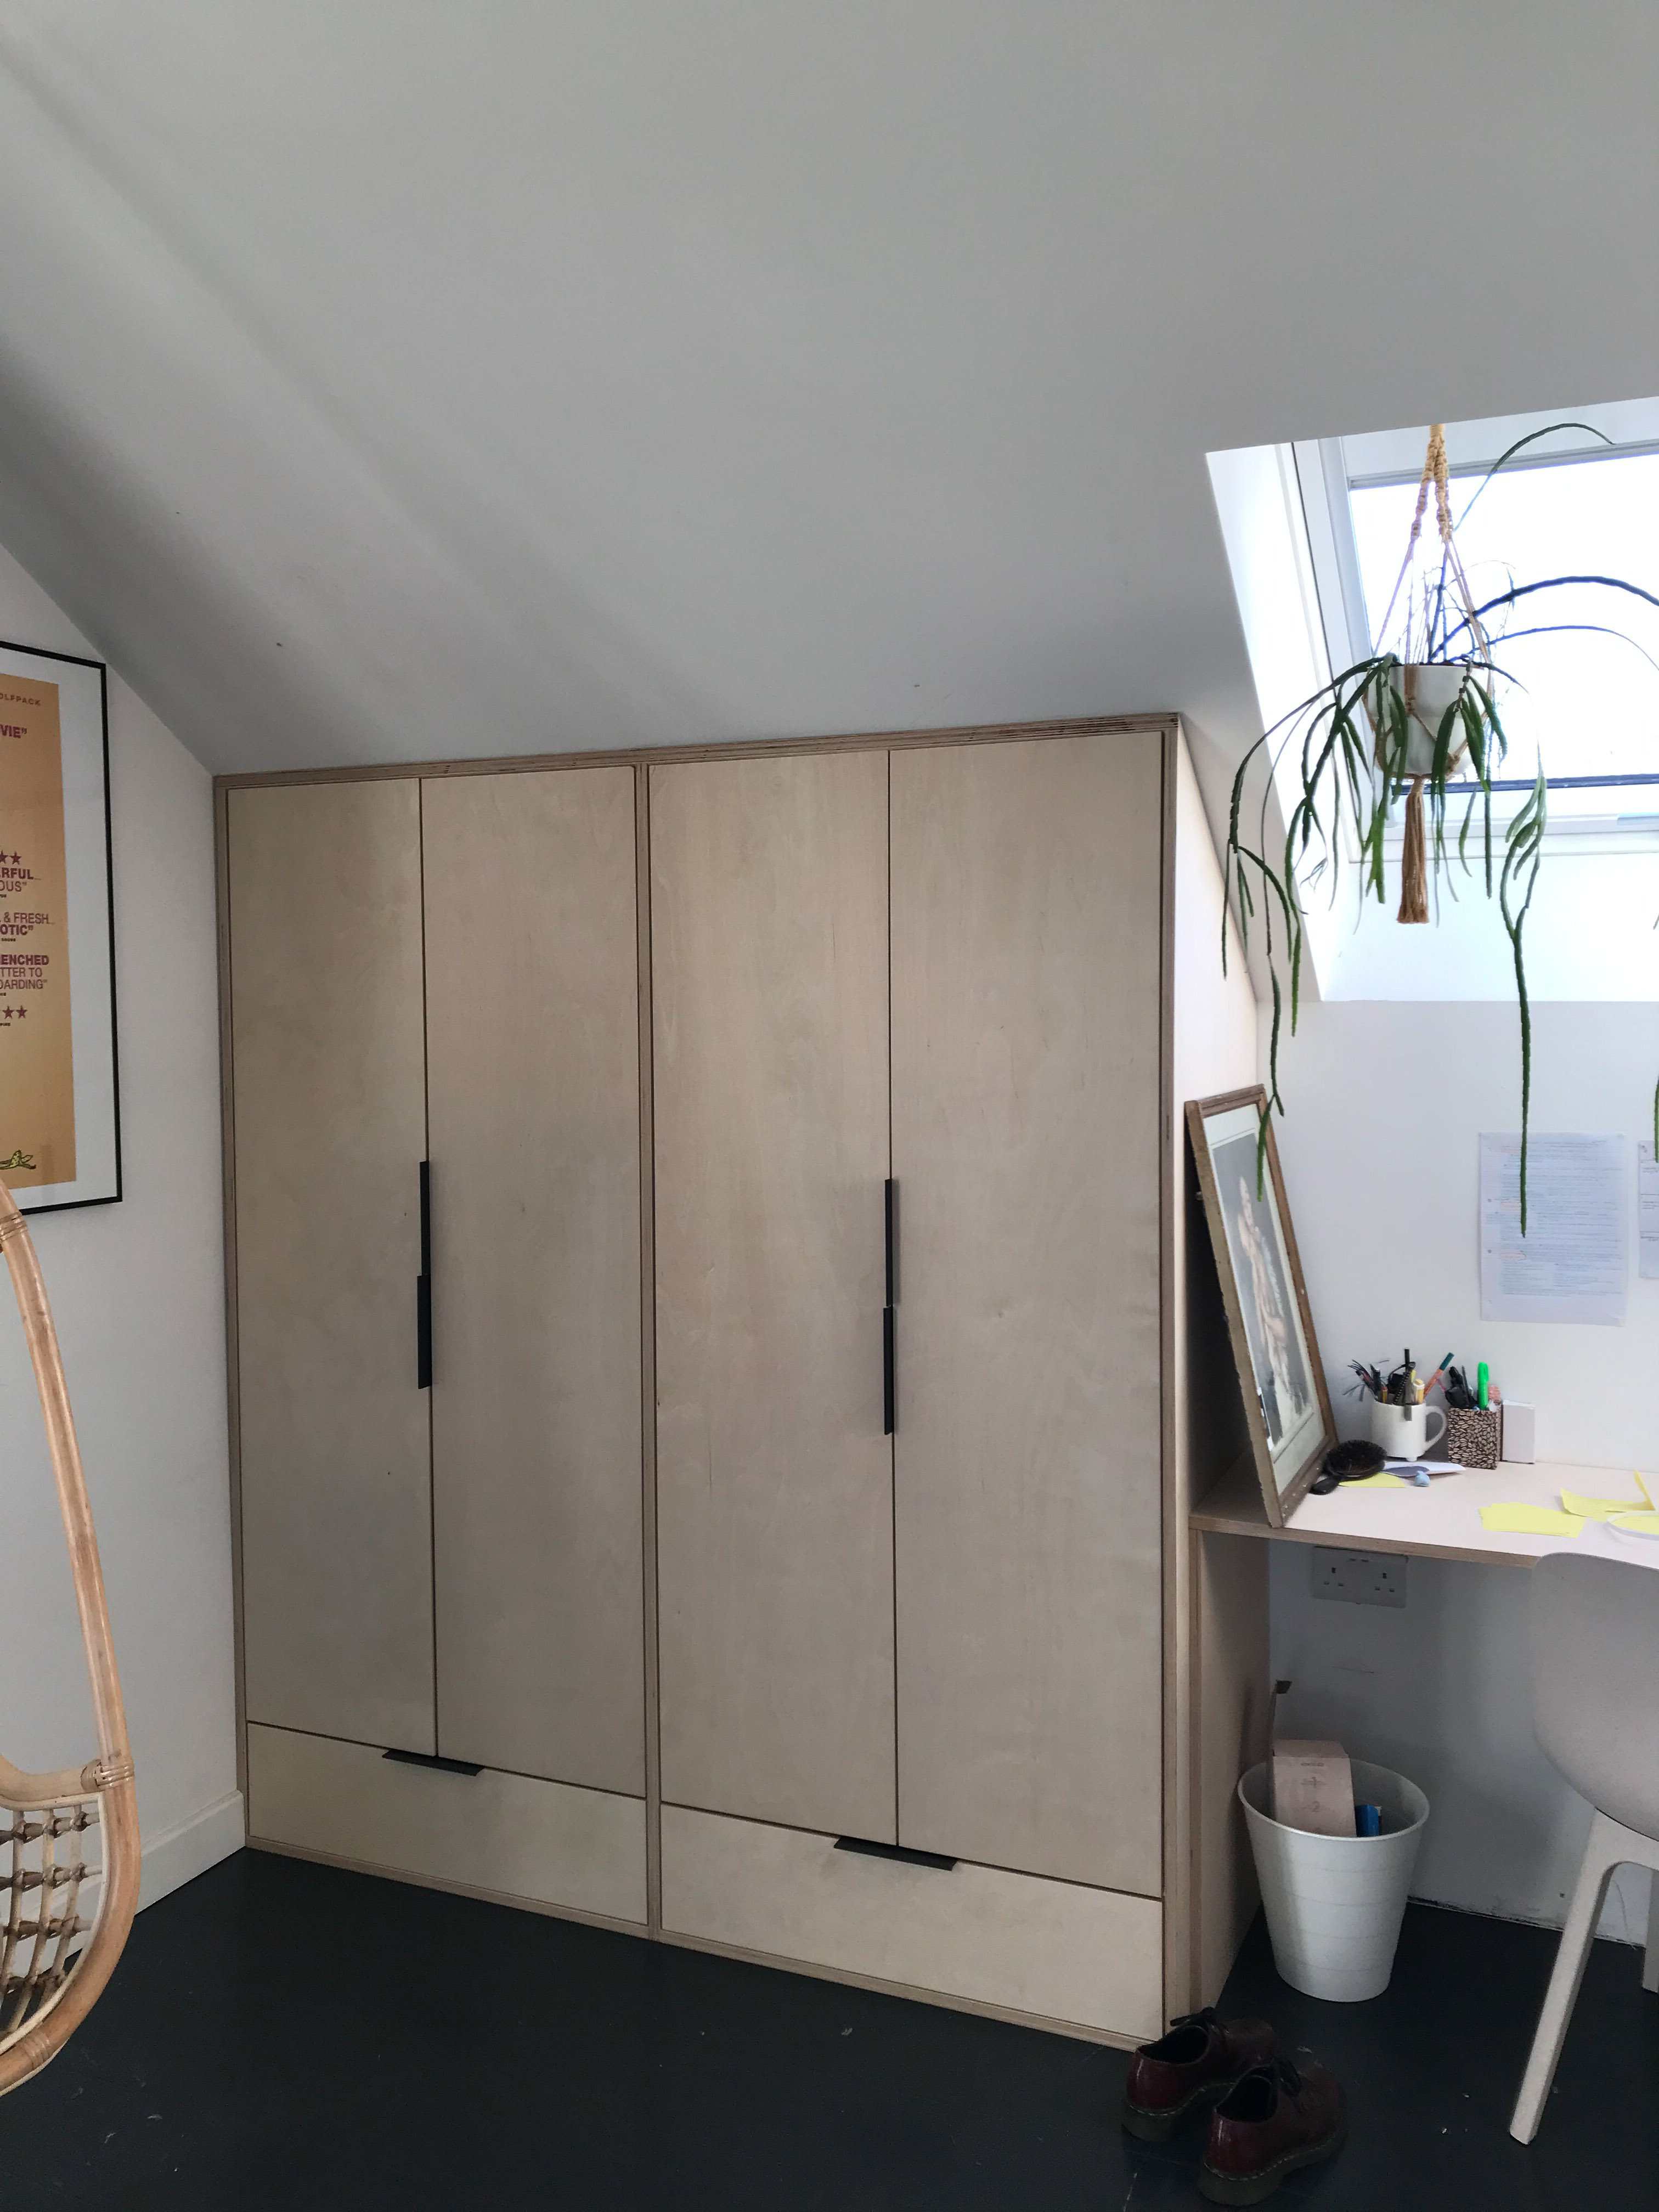
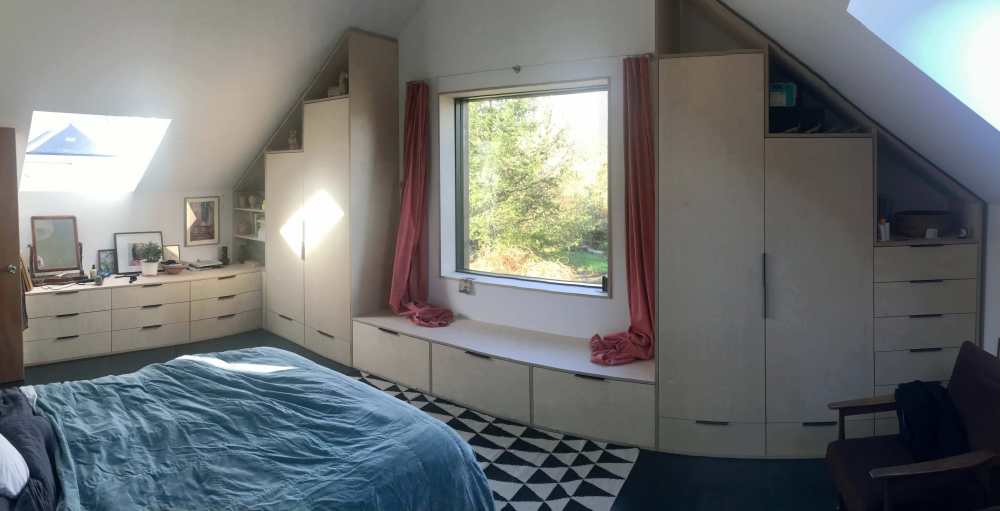
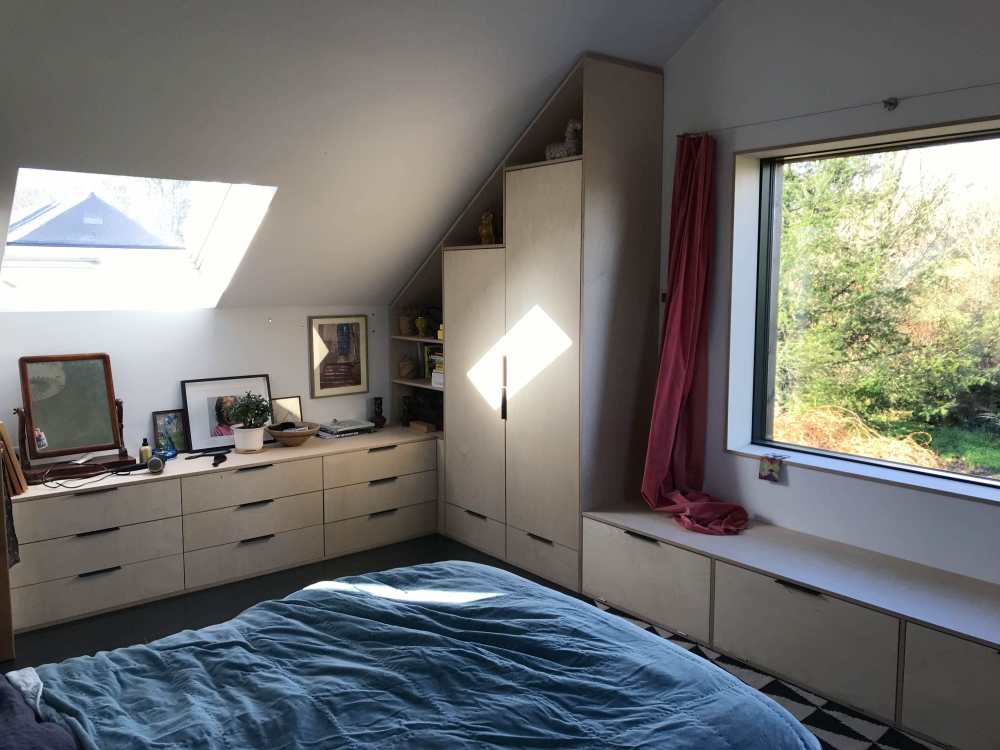
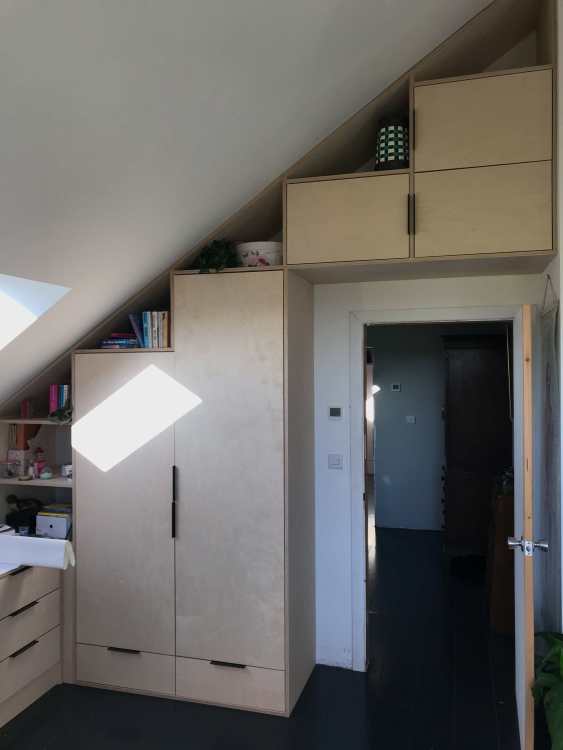
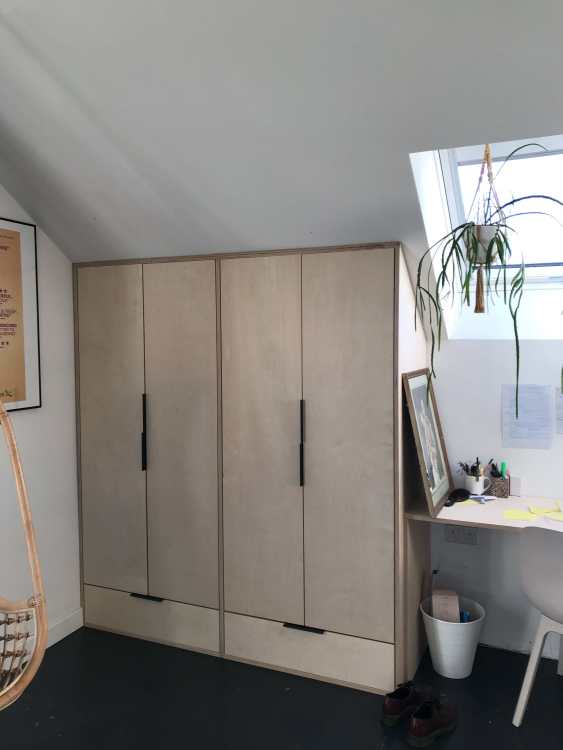
Thought I would just update this thread with a few photos. It was a bit of a journey for me compared to the main build as the detail is exacting down to how sharp is that 2H. Starts from the original measurements (used a laser measure), drawings in SketchUp, produce cut list for https://sydenhamsplywood.co.uk previously Avon Plywood. Spec was 22mm Birch "artisan" grade. Then the invisible fixings which I used, for the first time, a Peanut 2 Mini jig and a few pocket hole fixings. I did use Ikea Pax frames and drawers inside the plywood surrounds and fronts. I learnt a lot, did the other bedroom and now have plywood floor to ceiling pantry, coat and boot and utility cupboards! Also window surround. Very fortunate to have the time and space and do appreciate the skill and cost of the professionals. Total cost £4.6K in materials. Curtains / blinds, window cushion to follow which I will not be making.


 1 point
 -
Agree, not everything we buy needs to have a return on investment in cash terms.1 point
-
Of all the 'eco' things we did in our last house (amajor renovation) - triple-glazing, MVHR, ASHP, UFH, PV, Solar HW, masses of insulation... Of all those things, MVHR was number 1 on the list for our forthcoming self-build. Not for payback but for comfort.1 point
-
I’ve a friend that’s recently finished there third and last self build He to employed an iddiot builder Who had wrongly assumed that the third floor wasn’t habitable Fire doors wasn’t needed After a few conversations with BC they where will to except a fireproof paint on the GF doors Entirely up to BC Check with BC before Hawking the casings out It will be a pig of a job and May not be acceptable1 point
-
Shoots and sores, tried a replacement second hand controller, same issue of loosing setting on power off. Purchased a replacement capacitor and power cycled and settings retained. Capacitor was 2 quid, paid a guy £35 to desolder / resolder the new one - need to develop that skill myself.1 point
-
MVHR is going in for sure. Have both pipes installed but closed with plastic bags and duct tape. I have an office fan to keep me cool in the summer in my rental so plan to join this to one of the ducts using intello & duct tape (!) and pressurize the house with it. I've just ordered a smoke pen with a small wick I can light / extinguish to pinpoint exactly where the leaks are. The tester did say the plasterboard would help and to seal around the floor as it will be a few mm off the concrete but there are going to be electrical backboxes etc / holes in this so it's not a perfect layer and I won't be air sealing those. It will help though! Building Regs over here is below 7 is a pass!! They only have to test 1 in 10 houses in a development though so the rest have gales blowing through them , meant to be "A" rated too!! The tester said one guy got a result of 0.24 and the final test was 0.28, he went nuts, demanded to find out why!! I'd be happy with any improvement but taking the time now to figure this out works for me! Thanks all!! Great advice and anecdotes as always!1 point
-
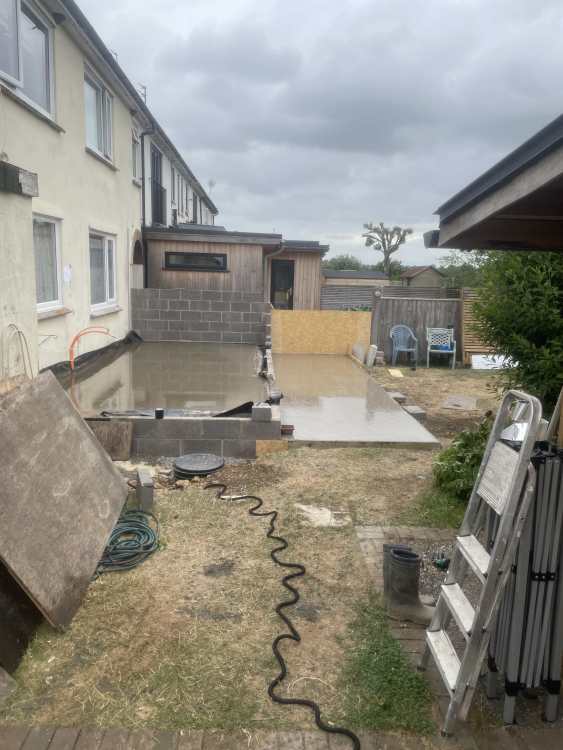
It’s was just ‘concrete’ off the truck, laid by my builders (father and son team) with me on hand labouring. 120mm if memory serves. Pipes at 150 centers. click down lvt with the integrated foam backing - not glued.1 point
-
1.56 is ok and multiple times better than a commercial new house (they do one up for a test and ignore the others and give them all the pass score). It is not the screws. it will be at corners and ends of boards. Plasterboard will help, not make it worse. You could put some mastic under the boards near these corners etc. You have fans in the wc and kitchen...a 110mm hole direct to outside. We all do. But they suck the air from draghy windows/ under doors which you have nearly sealed. Relax.1 point
-
That really depends on the slump you ask for, when requesting the concrete. We used a structural grade concrete (forget which) but quite high slump with fibre reinforced. But we have the structural ground bearing slab below the insulation. We did ours prior to walls going up, very exposed site. Disadvantages, in cold weather if ice foams on the slab, because it's very well insulated, it stays covered in ice for days. If you have water in UFH pipes you also need antifreeze. Due to the slab size 192m² there were a few dips and high spots, ground down high areas, self leveling on low spots. Damage during build none1 point
-
Pur planning is now recommend for approval- the planning officer confirmed it today after I involved the local councillors named on the application, it was discussed by the planning committee and this is the result.1 point
-
What's this mythical screed you talk of, we used readymix straight off the truck 😀 Tiny bit of self leveller at a transition where we knocked through and LVT straight over the top.
 1 point
 -
My go-to supplier for plastic these days, but I think OP wants something more fancy (european style PH windows)1 point
-
From photos that is obviously just a preliminary test. So as not your final test, (as the plasterboard and second fix not complete), you have plenty of time to get things fixed to your liking.1 point
-
Was thinking of getting a fan / smoke setup for exactly this. Will have a look around this evening before the storm hits and figure out a rig to let me do further testing before spending anything more on this. Cheers!1 point
-
again i agree! all my service cavity battens are screwed through our Intello Plus and so there are a lot of screw penetrations.1 point
-
I would be surprised if it was screw penetrations. To allow yourself some investigation time can you rig up your own blower door? I used some OSB, some cardboard, an old desk fan and lots of duct tape. This won't get you a reading but will allow you to spend as long as you like going round with something that makes smoke, e.g. Joss sticks, to investigate where the leaks are.1 point
-
+1. 1.56 isn't poor! just compared to some on here and i guess it's poor if aiming for 0.6ACH but it's all relative. we got a score of 1ACH and it was my target so i was happy. i probably could've done more but life's too short for me to worry about the small-ish difference it would've made getting it down further.1 point
-
1. currently Internorm windows/doors to be removed. 2. Damage be repaired. 3. New windows/doors put in.1 point
-
Yip, just flat out at the moment. I can recommend an installation team but for a refurbishment they will be travelling, with overnight accommodation etc. being required. I can recommend teams for new builds easily but most are not wanting to touch refurbishments these days.1 point
-
I'm pleased with my windows from Modern UPVC Windows, but I self installed. They do provide installation now however: https://www.modernupvcwindows.co.uk/1 point
-
@LaChab if you render the reveals, how will you prevent water going down the sides of the window cill. from the cills we purchased I thought they went in first and the render came down onto the cill.1 point
-
+1 for Norrsken here, great job and great service.1 point
-
@craig about these days?1 point
-
Can you clarify, are you needing a fitter to remove all the already installed units and then install the replacements (and for the new team to first of all survey and place an order for the replacements)? Please give as much detail as you can1 point
-
for me the best tool for dot and dab was to use metal framing. 🤣 for some reason i don't want to attempt dot and dab and would rather spend the money and time metal framing. yes, i am an idiot i know.1 point
-
Have you asked the BCO to attend to get input from them? In certain adverse conditions they will allow a deviation from “written law” and allow you to then demonstrate that it functions well / is reliable in operation, and then sign you off. What is in the bible is often difficult to achieve (to the letter) in real life and in every situation, especially if it’s a retro-fit / alteration. Speak to them and get their input on what will / won’t be acceptable.1 point
-
A bucket trowel is my weapon of choice, plus also a gauger for smaller areas that require a bit of control.

 1 point
 -
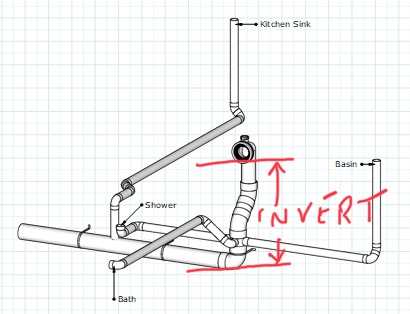
Hi. If the invert, the lowest point of the outlet of the WC and the lowest point of the horizontal foul pipe discharging to the sewers is less than 1300mm then you won’t have any issue whatsoever. The only way water gets sucked out of traps is by the flush water etc dropping a full storey of a building, vertically, and then there is a vacuum created behind it due to velocity. That’s when you need an air admittance valve above it to compensate for / neutralise the vacuum. Looking at your pic you have less than 1000mm invert(?) so the flushed water will simply not be travelling fast enough or for long enough a drop to create any vacuum. The only problem I see is with the pipe rising to a kitchen sink which will defo need an air admittance valve at its highest point (and where it is accessible), and I would do that run in 50mm pipe and fit a 50mm AAV vs 40mm (due to food waste & solids etc). Be sure to use bends not elbows on that pipework run too, so that run can be retrospectively ‘rodded’ with ease if a blockage ever occurs. Is that run more than 3000mm?
 1 point
 -
@Mike You're right, it does look a bit of a potential problem.Leaving the render until after the windows are fitted would be a real pain though. I checked with Internorm, and they were ok with doing the render first, so I didn't think much more about it! I'll bring it up with the surveyor when they come to measure up.1 point
-
Thanks dude, that looks like the stuff i saw as well. I think i have a solution then.1 point
-
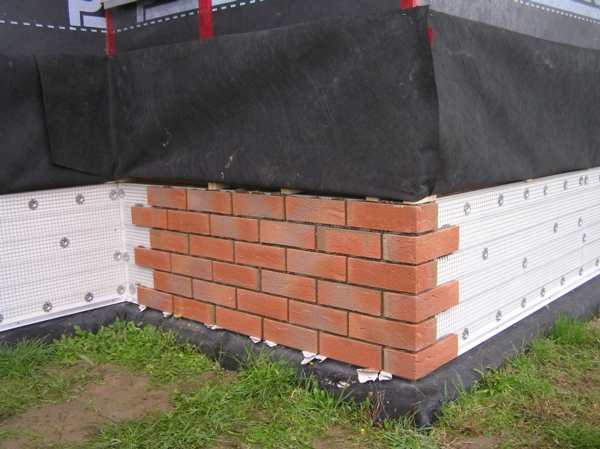
I used Bluclad board for my brick slip clad plinth.
 1 point
 -
10 - 4, rubber duck1 point
-
It's really about having something to very quickly fall back on, Nick. Not being able to shower for the best part of a week was a real nuisance when the SA failed, so having something relatively affordable that can just be switched on to give us some hot water would be handy. TBH if the SA does ever fail again then it will get replaced with a slimline UVC, but that's a lot of work, as it means relocating the hot and cold water distribution manifolds, relocating the UV water treatment and filter, and probably relocating the 100 litre pressure vessel, in order to get enough space. It's doable, but probably two or three days work, on top of whatever delay there might be in getting someone in to do it. That latter problem is one of the main reasons for the backup. When I was ringing around the two people that were slightly interested made it clear they wouldn't be able to look at it for around 3 to 4 weeks. This little 50 litre water heater isn't going to be the answer long term, but it is something that can be fitted quickly, with very little disruption (might have to have the water off for half an hour, tops) and can just sit there ready to be turned on and give us a couple of short showers a day (I hope!) if the worst happens. It wouldn't interfere with the later installation of a slimline UVC in future, either, as it'll be high up on the wall above a door, so might be worth keeping if we did change to a UVC, if only to give us hot water if the immersion were to pop its clogs. I'll freely admit to being a bit keen on having backups, but our experience so far has shown they are a blessing. Our well pump failed about 5 years ago and having a backup pump, all wired and plumbed to a roll of MDPE, complete with a waterproof plug, was great. Took about half an hour to haul the old pump out, lower the new one in, make off one 25mm MDPE union and plug the mains in and we were back up and running. Needless to say there is now another spare pump hooked up and ready to go in the back of the garage! We even (by accident) have backup heating. The MVHR has an A2A heat pump, not very powerful, it draws about 400W, but when there was a power cut a couple of years ago it was great. We didn't have enough spare battery power to run the main ASHP, but there was enough to run the small one in the MVHR and it did a surprisingly good job at keeping the house warm.1 point
-
Just don't forget to check if you do have a long cold snap as letting this freeze and backup will be a total PITA.1 point
-
To add to the above. If you zone your property, that is have thermostats in many rooms with different time controls, asking for different rooms to be heated at different times, you will drive yourself into having a buffer. Why? To protect the heat source, could equally apply to boiler or heat pump. Reason for this is to stop short cycling and give the heat source suitable circulation route. Plus for a heat pump suitable capacity to allow defrosting by providing a minimum required volume.1 point
-
Explanations as requested: Buffer tank is 50-200l tank between heat pump and emitter. Flow and return from heat pump go to buffer tank, flow and return go from buffer tank to emitter (so 4 connections in total - hence 4 port). It provides 'hydronic separation' (basically separating the system into two circuits). Generally regarded (by those who have actually thought about it from a customer point of view) as a bad idea in 95% of domestic installations. However all too frequently fitted or insisted upon by installers because it reduces the likelihood of certain types of call out (by masking the underlying problem). 3 port buffer tank is a variant with only 3 connections, possibly better than 4 port but still undesirable. LLH (low loss header) is effectively a buffer tank reduced to a piece of pipe typically 1 m long, again with 4 connections. It performs essentially the same function. Both of these require you to have a second water pump and, if not correctly set up/controlled, can incur an efficiency penalty of ~15%. Avoid. Heat exchanger also provides hydronic separation but the two lots of water dont meet, instead they exchange heat by passing both the water from/to the heat pump and the water from/to the emitters over a series of metal plates. Nothing like as bad as a buffer tank, but still possible to mess up and again you need an extra water pump. Avoid. In addition to the efficiency penalty the above can cause, they also complicate diagnosis of certain type of fault. I should stress that I am not an installer, plumber, or heat pump engineer, just an enthusiastic amateur who has been studying this stuff for more than 2 years. On another internet forum the editor runs the occasional webcast. One of the more recent ones was about buffer tanks, and he invited installers advocating for and against them to take part. None of those advocating against accepted the invitation which made the webcast a bit one sided. That says pretty much all you need to know unless you seek a detailed explanation of the pitfalls! A volumiser is physically another tank but it has only 2 connections and is fitted either in the flow from the heat pump or the return to the heat pump. No extra water pump is required as you haven't separated the system into two circuits. Its sole function is to increase the volume of water in the system which helps with defrost and cycling (modes that heat pumps have to go through from time to time). No real downside apart from the relatively small extra cost and space and may be necessary. No reason to object if your installer wants to fit one. I am aware that in posting this I risk getting a torrent of abuse from buffer tank advocates! In case it got missed in what was a busy phase of this thread, can I just repeat what I and several others have said. Neither a heat pump nor a boiler can supply two flow temperatures simultaneously so the way this illusion is achieved is by supplying at the higher flow temp and mixing down. If you combine UFH and radiators this means that your heat pump needs to output at the higher temperature generally demanded by radiators. This means that, unless you also design the rads to operate at a similarly low temp (very difficult) you lose one of the key advantages of UFH, namely it operates at a low flow temp where heat pumps are particularly efficient. Avoid if you possibly can!1 point
-
Yes but leave it for now and see if it does indeed freeze just keep a beady eye on it.1 point
-
Well a door head is about 2.0m so use that as an idea of the headroom you'll get. I recall seeing such a loft conversion years ago. It was for the owners children so they offset leack of headroom for much needed floorspace.1 point
-
Rightly so, I built most of my (airtight) house except door and window fitting (Internorm), electrics and skimming. The fitting was very poor, I just wanted them off site and spent many hours finishing the fine details using some foam and lots of tape. They only used compriband. Not quite sure how far inbound of the frame towards the reveals lies the responsibilities of window fitters ? Don't trust them much.1 point
-
I think its here, just check to be sure. LINK1 point
-
We're getting a quote from Craig 👍 Internorm & Norrsken are probably our two top contenders at the moment, but they're pricey. I think the Internorm seals seem 'better' than Norrsken, insofar as there are more of them, but we'd ideally prefer outward opening which Internorm don't do. Nordan is currently number three, but is notably cheaper. Some of our fixed windows are quite large and a few manufacturers can't do them in one piece. For aesthetic reasons, we also really want our main lift & slide to be three panel but a few of the suppliers can only do two or four, or a two with a fixed side panel which doesn't look right. This really is proving quite tricky!1 point
-
I'd have preferred to see a middle ground where a small wood burner was still allowed to provide backup heating in remote areas at risk of power cuts. You could achieve similar redundancy by mandating substantial battery storage, but that gets pricey. I'd like to think that a house built to proper levels of airtightness and insulation, with a correctly specced and installed heat pump, will be so warm and comfortable that most people would quickly get over the novelty of lighting their stove anyway.1 point