Leaderboard
Popular Content
Showing content with the highest reputation on 10/04/24 in all areas
-
Luckily we have a fairly good one at my workplace and I've got permission to borrow it this winter - seems a bit pointless to look at much at this time of year - you really want to use one when the house is up to temp and it's cold outside to show the biggest leakages (IMO - happy to be shown to be wrong)2 points
-
No need to worry about urban popularity. Once painted, most people wouldn't easily see the difference, if the plastering is done well. You won't get the glass-smooth finish of gypsum, but lime can still be finished smooth. Clay-based paint is a more durable alternative to lime-based, proving a good quality matt surface, and I'll be using it here on my current project in very urban France, alongside the linseed oil paint on the windows. So no need to worry about urban popularity. I'd be much more concerned about the structural stability of the wall. Stick to the way it's been done for centuries, rather than looking for questionable high-tech solutions.1 point
-
Perhaps something like this.. https://ocldirect.co.uk/natural-stone-grey-tumbled-block-paving-200-x-100mm-per-m2 £52 x 40 = £2080 But don't underestimate the cost of mortar for pointing.1 point
-
1 point
-
Just a point on the maths. 20/50^1.3 is not the same as (20/50)^1.3 Which is it, I suspect the latter.1 point
-
Some ideas: - Get rid of OSB between joists and firring strips. As above, you can screw the firings at right angles directly into the joists. - Put the VCL on the top side under the PIR. It's much easier to do a good job. Something like Alutrix will immediately give you a waterproof covering. I think there is a rule of thumb that you can then put 1/3rd of the top deck insulation below the VCL. You could use 100mm sheepswool/rockwool or something. - Will the PIR compress under the force from the pedestals? Perhaps you want another layer of OSB under the membrane? - I think it is costs more, but you can get tapered PIR which could replace your firrings and give you some extra thickness.1 point
-
A thermal is of no use during the construction process. You need the place finished, with the heating on and use it on a cold evening or morning when there is not too much moisture content in the air. You will have to go through the whole display menu ie. white hot, black hot, ultra marine etc to try and work out what's going on in different areas of the build as they all portray different image's and intensity.1 point
-
Put your firrings on top your joists before you lay the deck.1 point
-
Hi, I moved to central France in 2012. I installed two arrays of solar panels manufactured by a company called FranceWatts totaling 10.5Kw. I had two SMA Sunny boy inverters a TL4000 and a TL5000. I also installed battery backup with a sunny island 6.0H and i build automatic transfer switch myself. I recently lost a 6Kw array due to storms, however the insurance paid for a new installation, which i gladly let some professionals do. This will enable me to sell surplus electric to EDF, which i could not do before with a DIY setup. Unfortunately i have had to accept a SOLIS S-GR1P6K inverter, this i am having trouble integrating with the SMA sunny portal. Hence my joining the forum. My background is ICT consultancy, and mechanical engineering. I now spend all my time maintaining our home.1 point
-
Silicone grease if it's likely to get wet. A spray of ACF-50 if it's indirect, atmospheric corrosion.1 point
-
I used silicone gel and tape. But only just installed them so time will tell. Mine are behind the timber cladding so won’t get wet as such. I expect they will still fail due to moisture however. My original plan was to bring the Reolink cable into the house through a duct to avoid this but the cables aren’t long enough.1 point
-
If that is ALL the insulation you are fitting on a (assumed) un insulated floor, then the electric UFH will be very ineffective and very expensive to heat as a huge proportion of the electricity used will just be heating the under floor space. Most people consider a minimum of 100mm thick PIR type insulation to be required. And in any event electric UFH is probably the most expensive way to heat a room, and no means to repair a fault in the heating mat if one occurs.1 point
-
I have just watched the episode. Incredible job you both have done! It looks amazing. Happy new home.1 point
-
Note the wires don't need stripping before inserting as the crimps include simple insulation displacement. So you just need enough flex to strip off an inch of the outer jacket But my suggestion is also partially tongue in cheek, it's the cheap and quick potentially weatherproof fix (the gel is like vaseline in keeping water out) but clearly a bodge. Almost most of the BT copper wore telephone system runs on them...1 point
-
What’s great was finding that local builder guy to help you. He came across brilliantly well. Like you the thing I found hard in our build was not knowing what I didn’t know so you easily get caught out with stuff. Plus all of the energy sapping time wasting balls ups done by others that you are left to resolve. The worst one of those for us was the ducting for the electrical cable from the kiosk to the house. Groundsworker didn’t use a coupler to join the two bits of duct together and just used tape. This split apart when the trench was backfilled. When I came to feed the SWA cable through it got stuck. Unfortunately this was all behind our retaining wall so under several hundred kg of gravel that I had to dig out by hand trying to find what the problem was. Complete waste of two days to resolve something that should have been a few hours work max.1 point
-
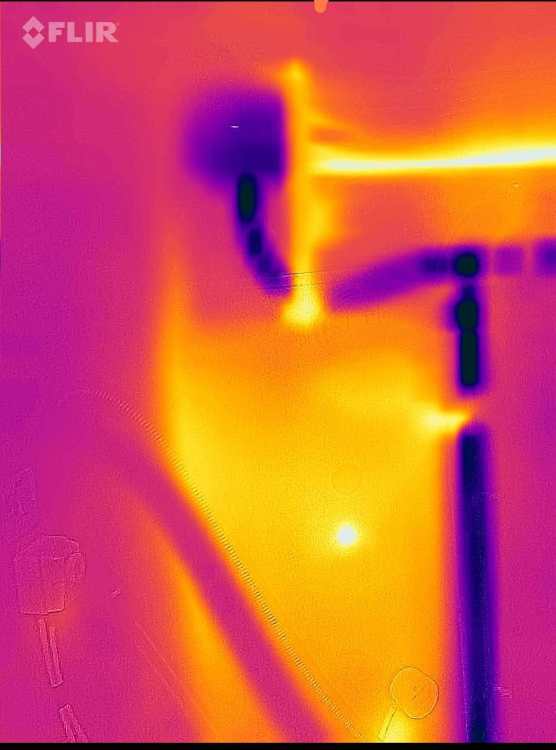
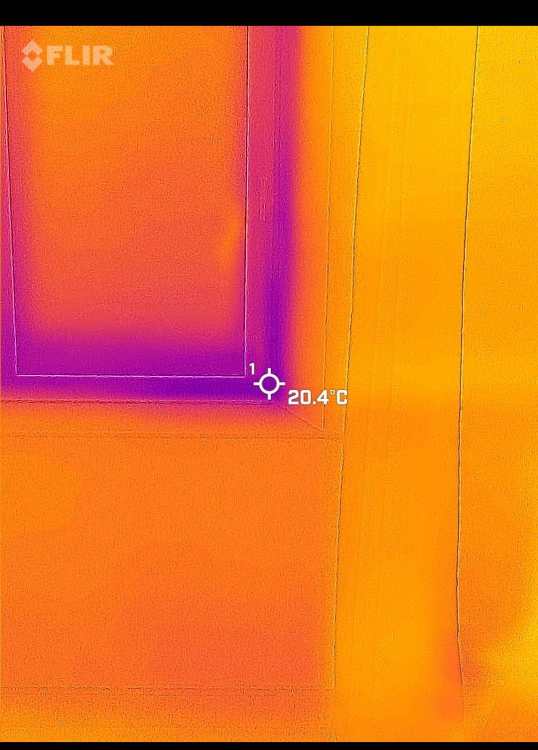
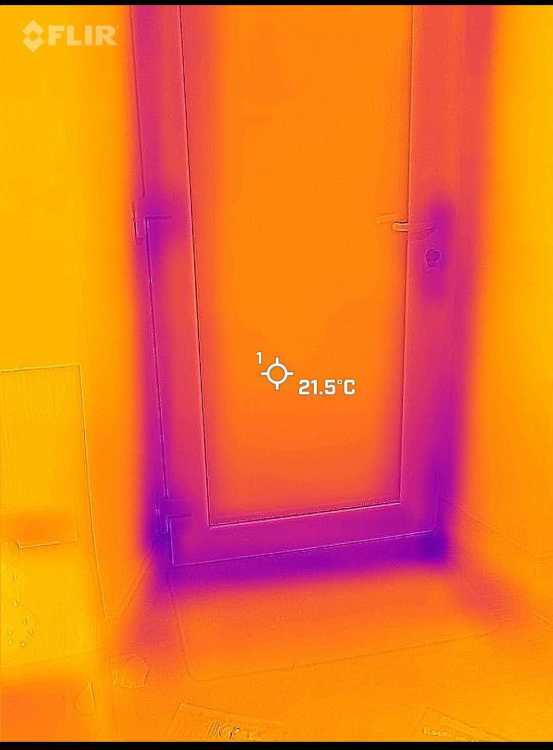
Bought the USB C Flir for android. The resolution isn't mega but its good enough for DIY. Think it was about £150. Here's a pic of the UVC with the hot tap running. You can see the hotspots of the pipe going to the bathroom and the blanking plug. The dark blue line on the right is the cold inlet with the expansion vessel top left. The diagonal line is the vacuum cleaner! One of our windows from the inside. Our front door from the inside. It does a hybrid photo if you have lightning so appears better than it is resolution wise. You can see the thermal bridging at the locks, hinges and thresholds.1 point
-
((actual delta t)/(delta t at which the rad is specified (ie 50)) to the power 1.3 So if a radiator emits 1kW at delta T 50, then the power output at delta T 20 will be 20/50^1.3 *1000 = 300W. The inverse ratio (50/20)^1.3 = 3.3 is called the oversize factor. This can conveniently be used to work out the dt50 rating required for a particular output at the design dt. So if my room needs 400W and the oversize factor is 3.3 then I need to look for a radiator rated at 1320W.1 point
-
Thank you very much. We're glad you enjoyed the episode. As you can anticipate, there was so much that got removed from the final cut. It's an 18 month build schedule which needs to fit into 47 mins, even then that's not taking into account the last segment of the 'reveal'. Guess our comment of how we found social media and self-build forums wasn't worthy enough!1 point
-
I throw a rope over the ridge, secured to something reliable, thence secured to my ancient and rusty scaffold tower. I’ve got climbing kit but that’s not what I mean. A cheap poly rope with loop knots every few feet help enormously and prevent the tower teetering if it’s prone to that.1 point
-
Making the building more airtight + adding MVHR is undoubtedly the best option. It doesn't have to involve throwing lots of money at it, but does require a well implemented plan. Post some sketches of the roof junction and you'll probably get some suggestions of how to do that. Though there are probably already be other threads on the topic that will give you ideas too.1 point
-
Soakers wouldn't normally be used with profiled tiles; the lead is dressed into the tile valleys as expected. The side flashing would normally wrap round the front a little more, but from your internal picture the leak is more generalised than that. The roofing felt should have been turned up behind the flashing but, you can't see if that was done. Also you can't see the depth to which the lead is turned into the brick joints (it should be at least 25mm), or what's going on with the back gutter behind the chimney, or on top. It is certainly possible that the porosity of the bricks and / or mortar joints that haven't been fully filled result in driving rain soaking the brickwork and bypassing the flashing. The builder could have added a horizontal lead damp proof course level with the top of the flashing to to reduce the effect, though it's not often done. As @DannyT says, a vapour-permiable brick sealer would be an option to avoid rebuilding it (again), though a second best option on new work. I'd let the roofers investigate further - it's their work and their responsibility to get it right.1 point
-
So would I after say 3 months once the insulation has compressed / suffered from creep.. then you lose the friction that intialally makes it seem solid. Also if using timber battens the timber shrinks and that too further reduces the friction resistance. After that you are relying on the bending capacity of the fixing alone..1 point
-
This is disaster looking for somwhere to happen. Probably in your living room. Cob walls really, really dont like being wet. Plenty in devon and cornwall that have collapsed for this reason. If you do any of the things you have suggested, where do you think the moisture will go? Or put another way, if you washed your clothes, took them out of the washing machine, put them in a plastic back and hung it on the washing line, what do you think will happen? Ill give you the answer. They will stay wet. This is exactly what you are proposing to do, with the inevitable outcome. I gave you your only viable solution. It remains the only sensible one, especially with a cob wall.1 point
-
He said cladding was 11 kg a metre, add in 3m of roof batten. call it 15-18kg all in, divide by 9 fixings. under 2kg per fixing.1 point
-
If you think about it each screw only has about 2-3 kg hanging from it.1 point
-
Here’s the data sheet https://app.nextpim.de/Cloud/6118eacef55a4834b44c3623/a3ba70a2-990d-432c-fb8c-08d79e6bb09c/Product_data_sheet_Blue-Power_Systemschraube_EN_06_2023.pdf like I said mine are 280mm through 180mm insulation and I’m happy with them. The tech team at eurotec said I could use 600mm spacing for the screws but it was easier for me to use 500mm so even stronger1 point
-
I’m doing same but through 180mm of insulation so am using these in 280mm https://timberfixings.com/7-4-x-280mm-TX40-Blue-Power-Timber-to-Masonry-Screws-Box-of-100-p141878564 they are expensive but specially designed for the job They do shorter lengths1 point
-
Why would anyone choose a woodcrete ICF systems when ANY part of the structure is below ground? I have ‘experienced’ both Isotex and Velox, and compared to an EPS system they would have to come with free supply and fit for me to entertain ever using them. Sorry. Make a better choice and reap the benefits, is my 2 cents.1 point
-
1 point
-
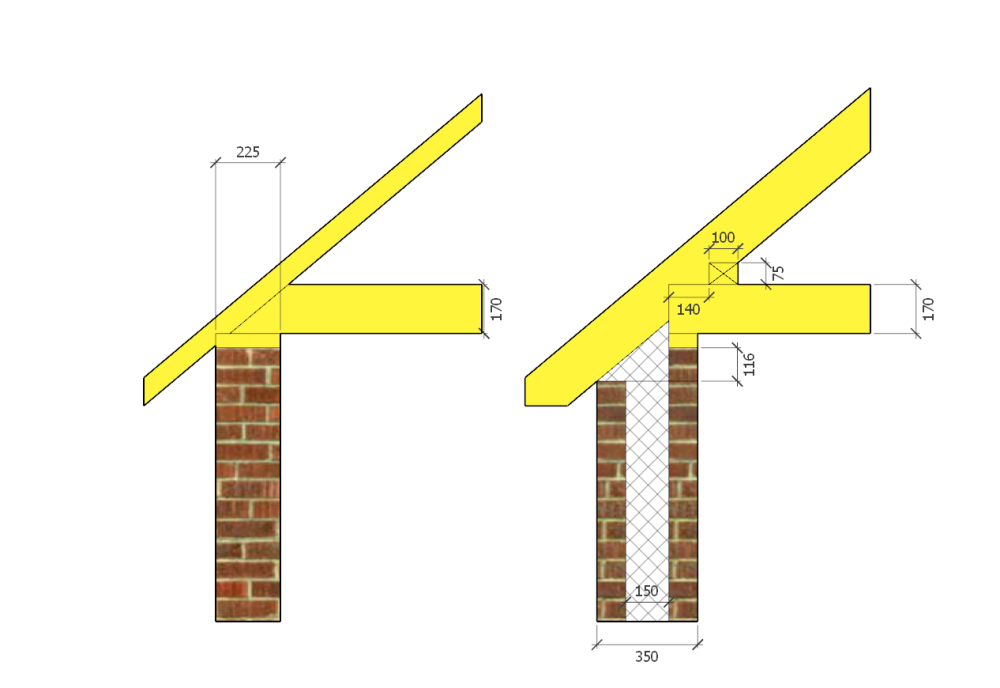
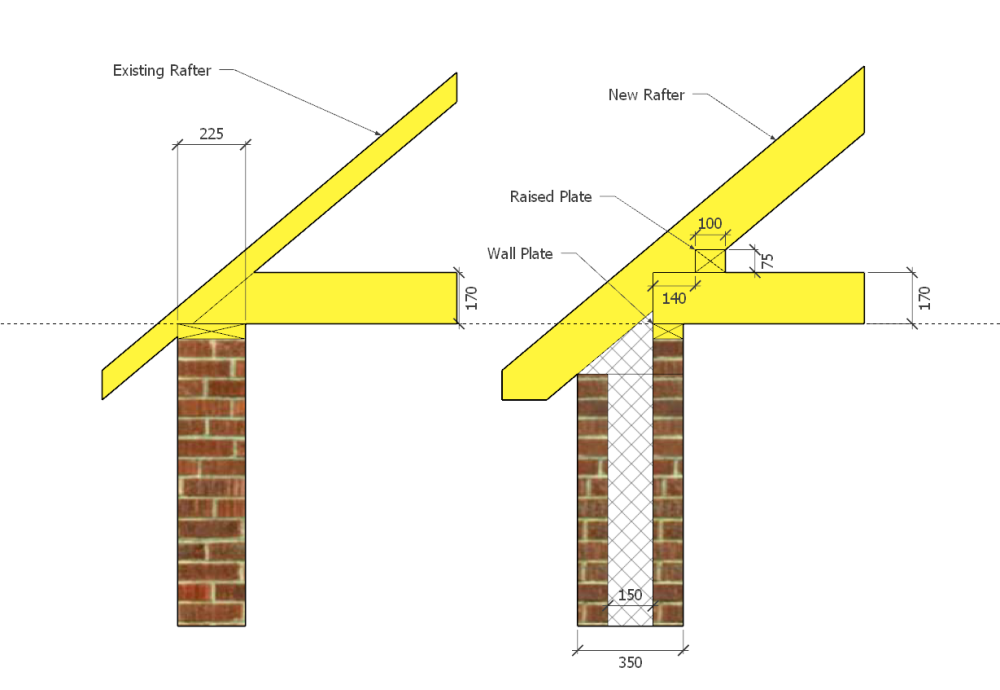
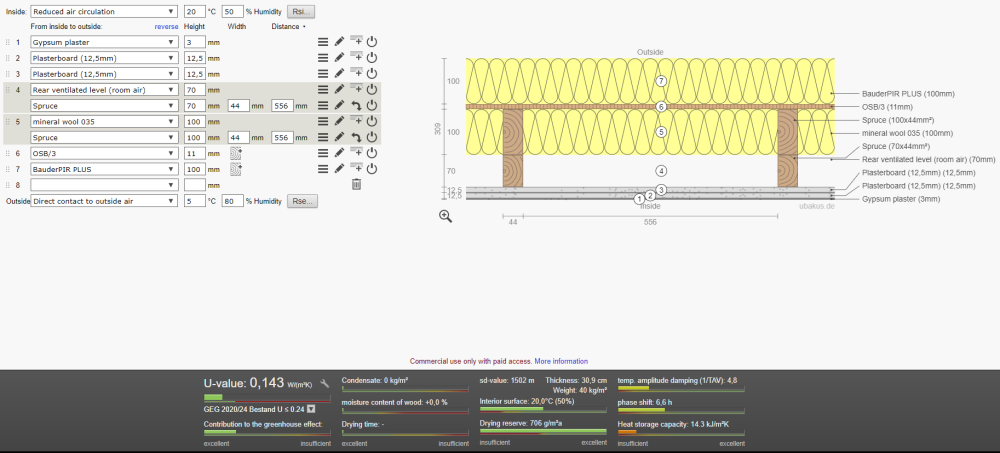
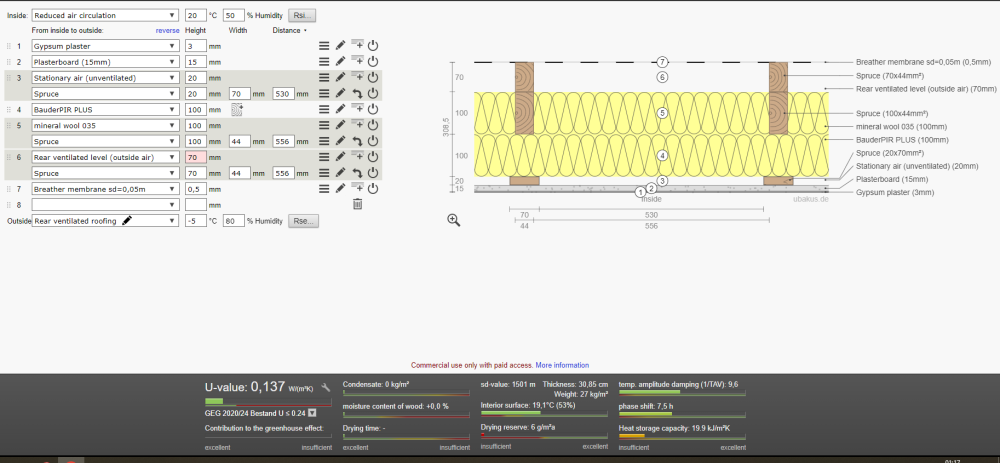
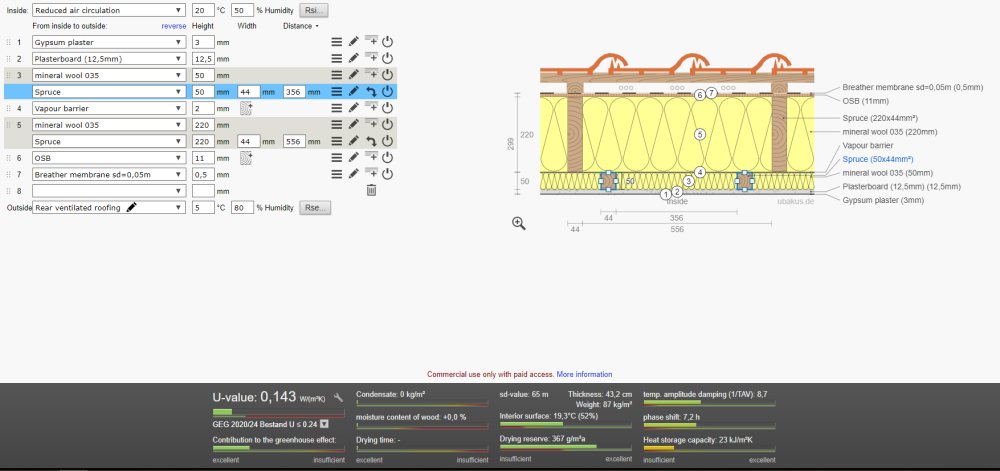
There we go. Build the inner leaf to the same height as the old wall, Add a new wall plate just for the joists. Then add a second wall plate for the new rafters on top of the joists. This would be my preferred buildup. A hybird warm roof but everyone here seems to be terrified of them. You'd need raise the level of the old roof too. Here's a version with mineral wool between the rafters. Better than PIR in many ways. 100mm PIR below as it's good value at that depth. Or a full fill mineral wool with ventiation above the membrane.1 point
-
MCS is a scam. What are they contributing - because it certainly aint high standards. I just installed my own PV and battery storage, done a hell of a lot better than most MCS installs I see. Had to pay Octopus £250 to get export payments, but still a big saving compared to getting MCS registered. NICEIC is enough of a ball ache.1 point
-
For a self managed project, I don't think it does, although to be honest, I don't think CDM was written with self builders in mind. Nevertheless, you need to think about who's in charge when you have more than one trade on site? Who's going to prepare the Construction Phase Plan? CDM 2015 is intended to clarify that where there is more than one contractor, there should be a single PC taking responsibility for those things. HSE have a web page regarding CDM for self builders which points to the Self Build Portal. For self managed projects, it stops short of saying that the client should appoint themselves as PC, but it does say that the client has to comply with all the matters in Part 4 of the regs. Consider the situation where the timber frame company is erecting the frame with a tele handler and at the same time an electrician comes on site to install a temporary power supply. You can expect the frame company to be responsible that their own people are not at risk from the movement of the tele handler (reg 27 in Part 4), but not for the electrician. The client has to coordinate that. Maybe as a self managing self builder one doesn't appoint oneself as PC, but the duties are effectively the same.1 point
-
Not going to be far out as you only need to heat at the coldest, and generally wettest, times of the year. As for going with radiators, how much area can you fit, can you easily fit larger radiators (maybe a total of 60% of the floor surface area as you don't totally pipe out all the floor area). How about plinth/fancoil units, they can give a quick boost and some are pretty quiet. Easy and cheap solution is below, it is only Canadians that make it law to take your shoes off indoors.0 points
-
Replying to Roger440- thanks for your reply. If this were a Cornish country cottage (or Welsh) that is exactly what I would do and actually did to my daughters cottage in Wales. People looking to buy such a property in such locations expect that kind of finish. However in more urban places such finishes are not so popular. I 100% agree with the analysis of wet washing etc and the need to avoid trapping the moisture hence my search for a solution which achieves an acceptable finish which will have a reasonable life span. I should say the damp is exactly that, it is not running water, so should be containable. The "go to" renders are apparently applied to membranes which have a textured internal surface which allows to air to circulate behind the render but my logic is that unless the membrane is open at the top and bottom the air will not actually circulate. The open bottom is easily hidden behind a skirting board but keeping the top edge open with an aesthetically pleasing appearance is more difficult. My own home is stone built and butts into a hillside. Here about 30 years ago I used battens and foil backed plasterboard with insulation between the battens. There is no trace of damp on that wall. I could do exactly the same thing in the property in question but the geometry in the current setting is not so friendly so the "membrane solution" would be easier IF IT WILL WORK or if there is a more modern solution (my solution was OK 30 years ago) where experience is held by forum members. Hence my questions.0 points
-
I have no experience of this particular camera. What i can say is that it took me a while to understand the images produced (Bosch GTC ) . You might see a cool spot: OK. But is that spot cool enough to make any difference to the overall 'picture' ?. Put another way, is it worth making any effort to remediate the difference? That means looking at whether the camera you buy allows you to choose the temperature range - and to (re)set the graduation of temperatures shown in the image. Will the camera allow you to search for a wide range of temperature difference - or merely a narrow temperature difference? Yes, I submitted to the tempation of scanning the results of a fart - there is a marked temperature difference. Dog farts are the hottest overall. Hamsters fart continuously.0 points


