Leaderboard


Popular Content
Showing content with the highest reputation on 02/20/24 in all areas
-
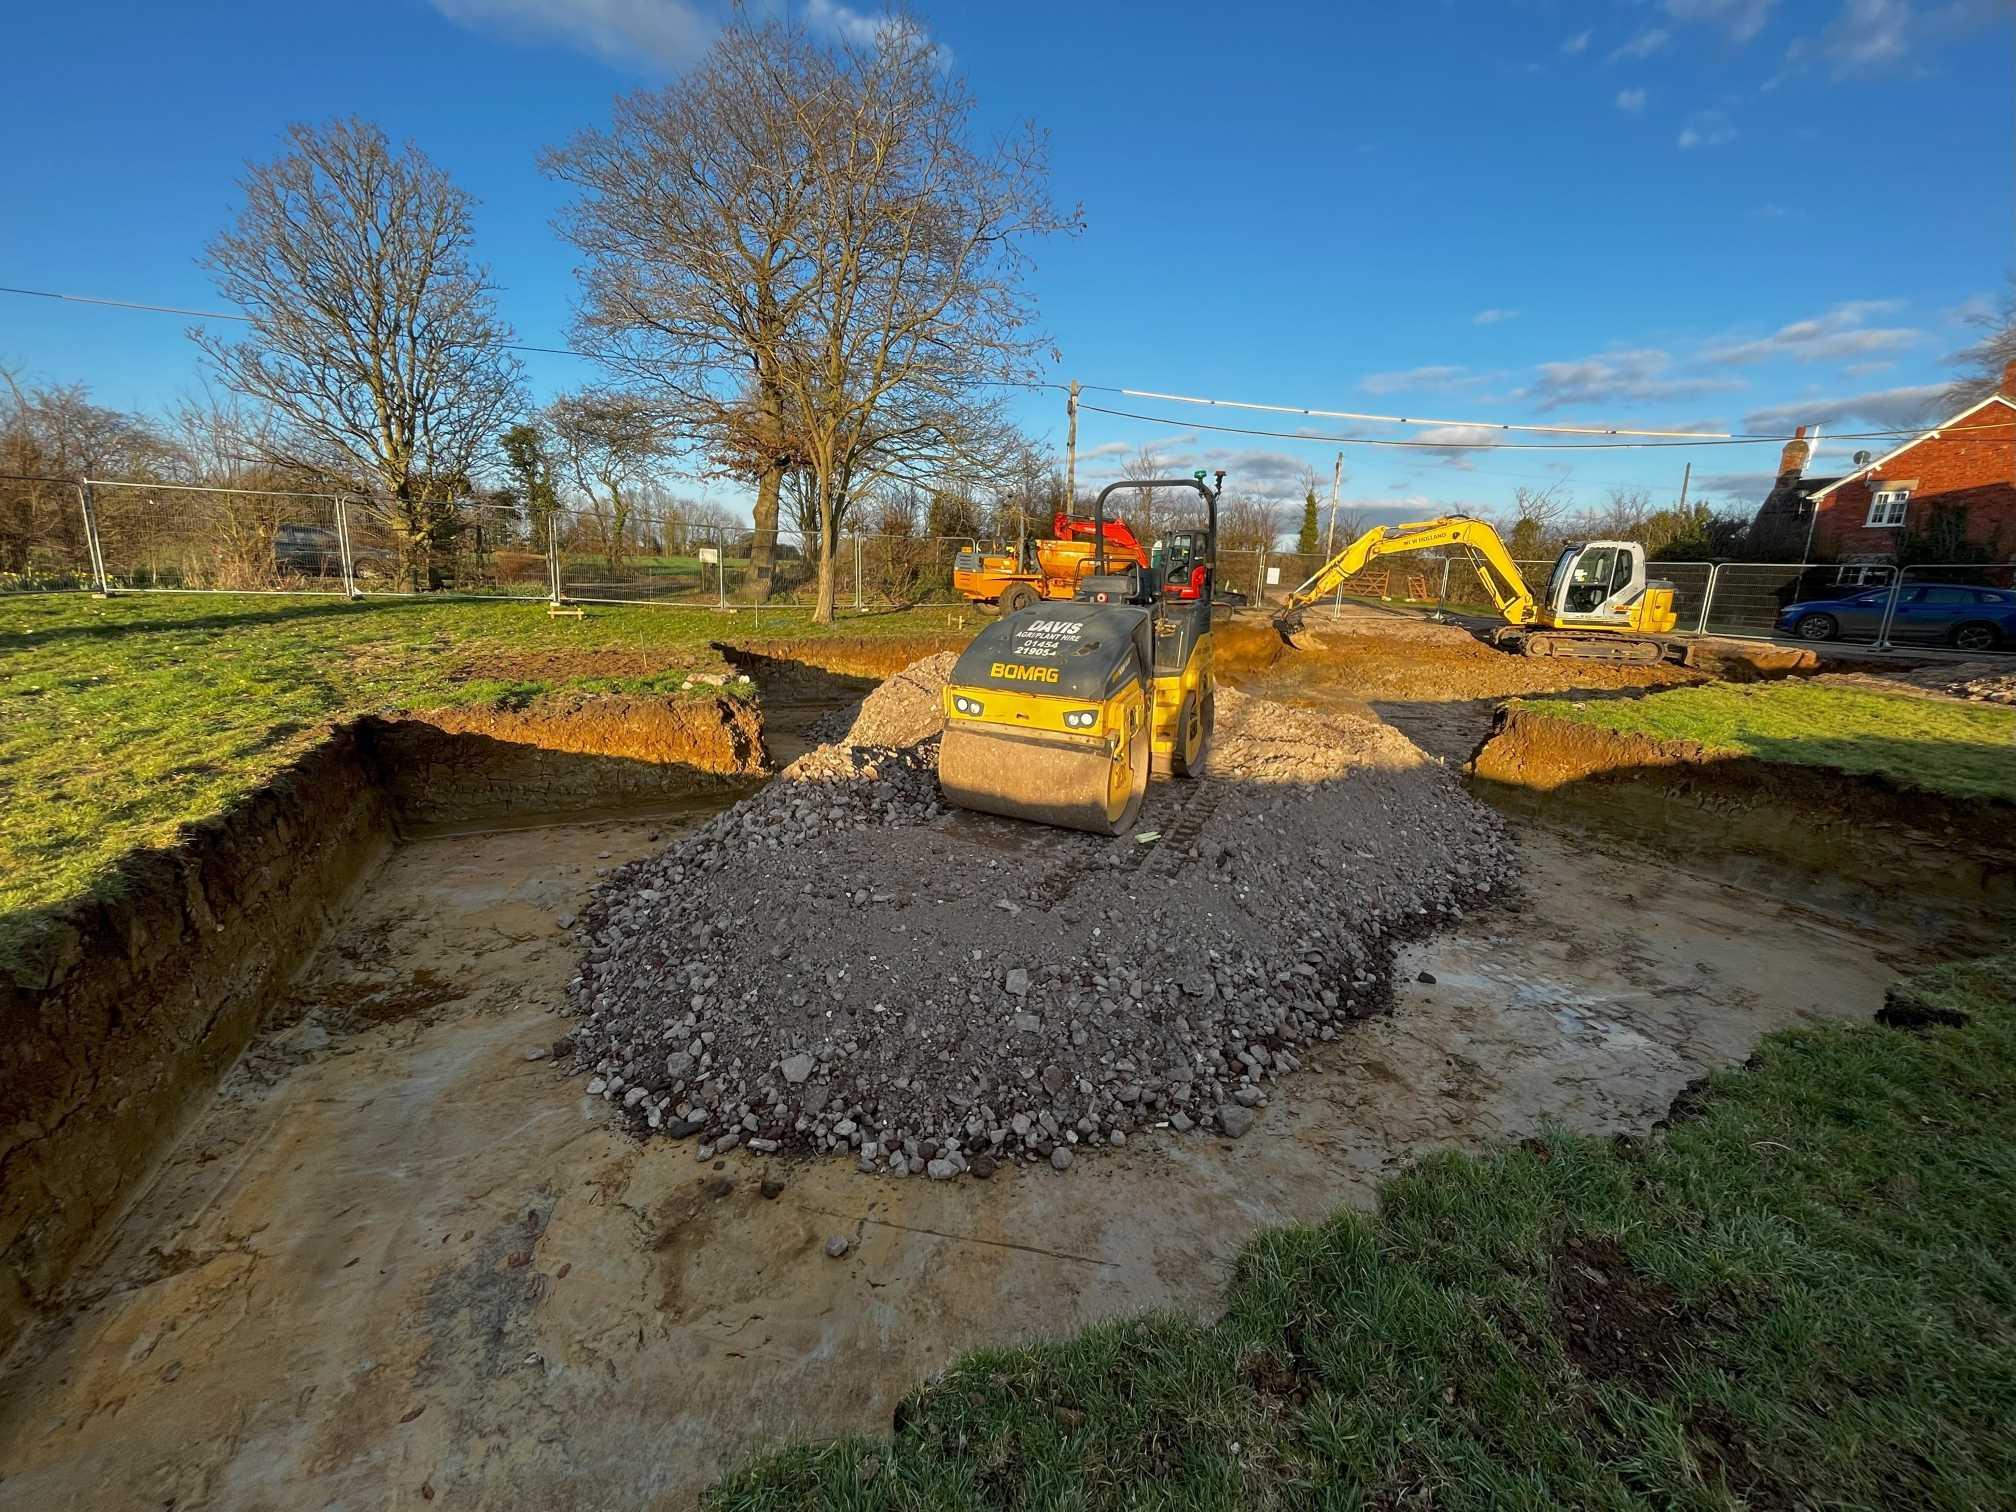
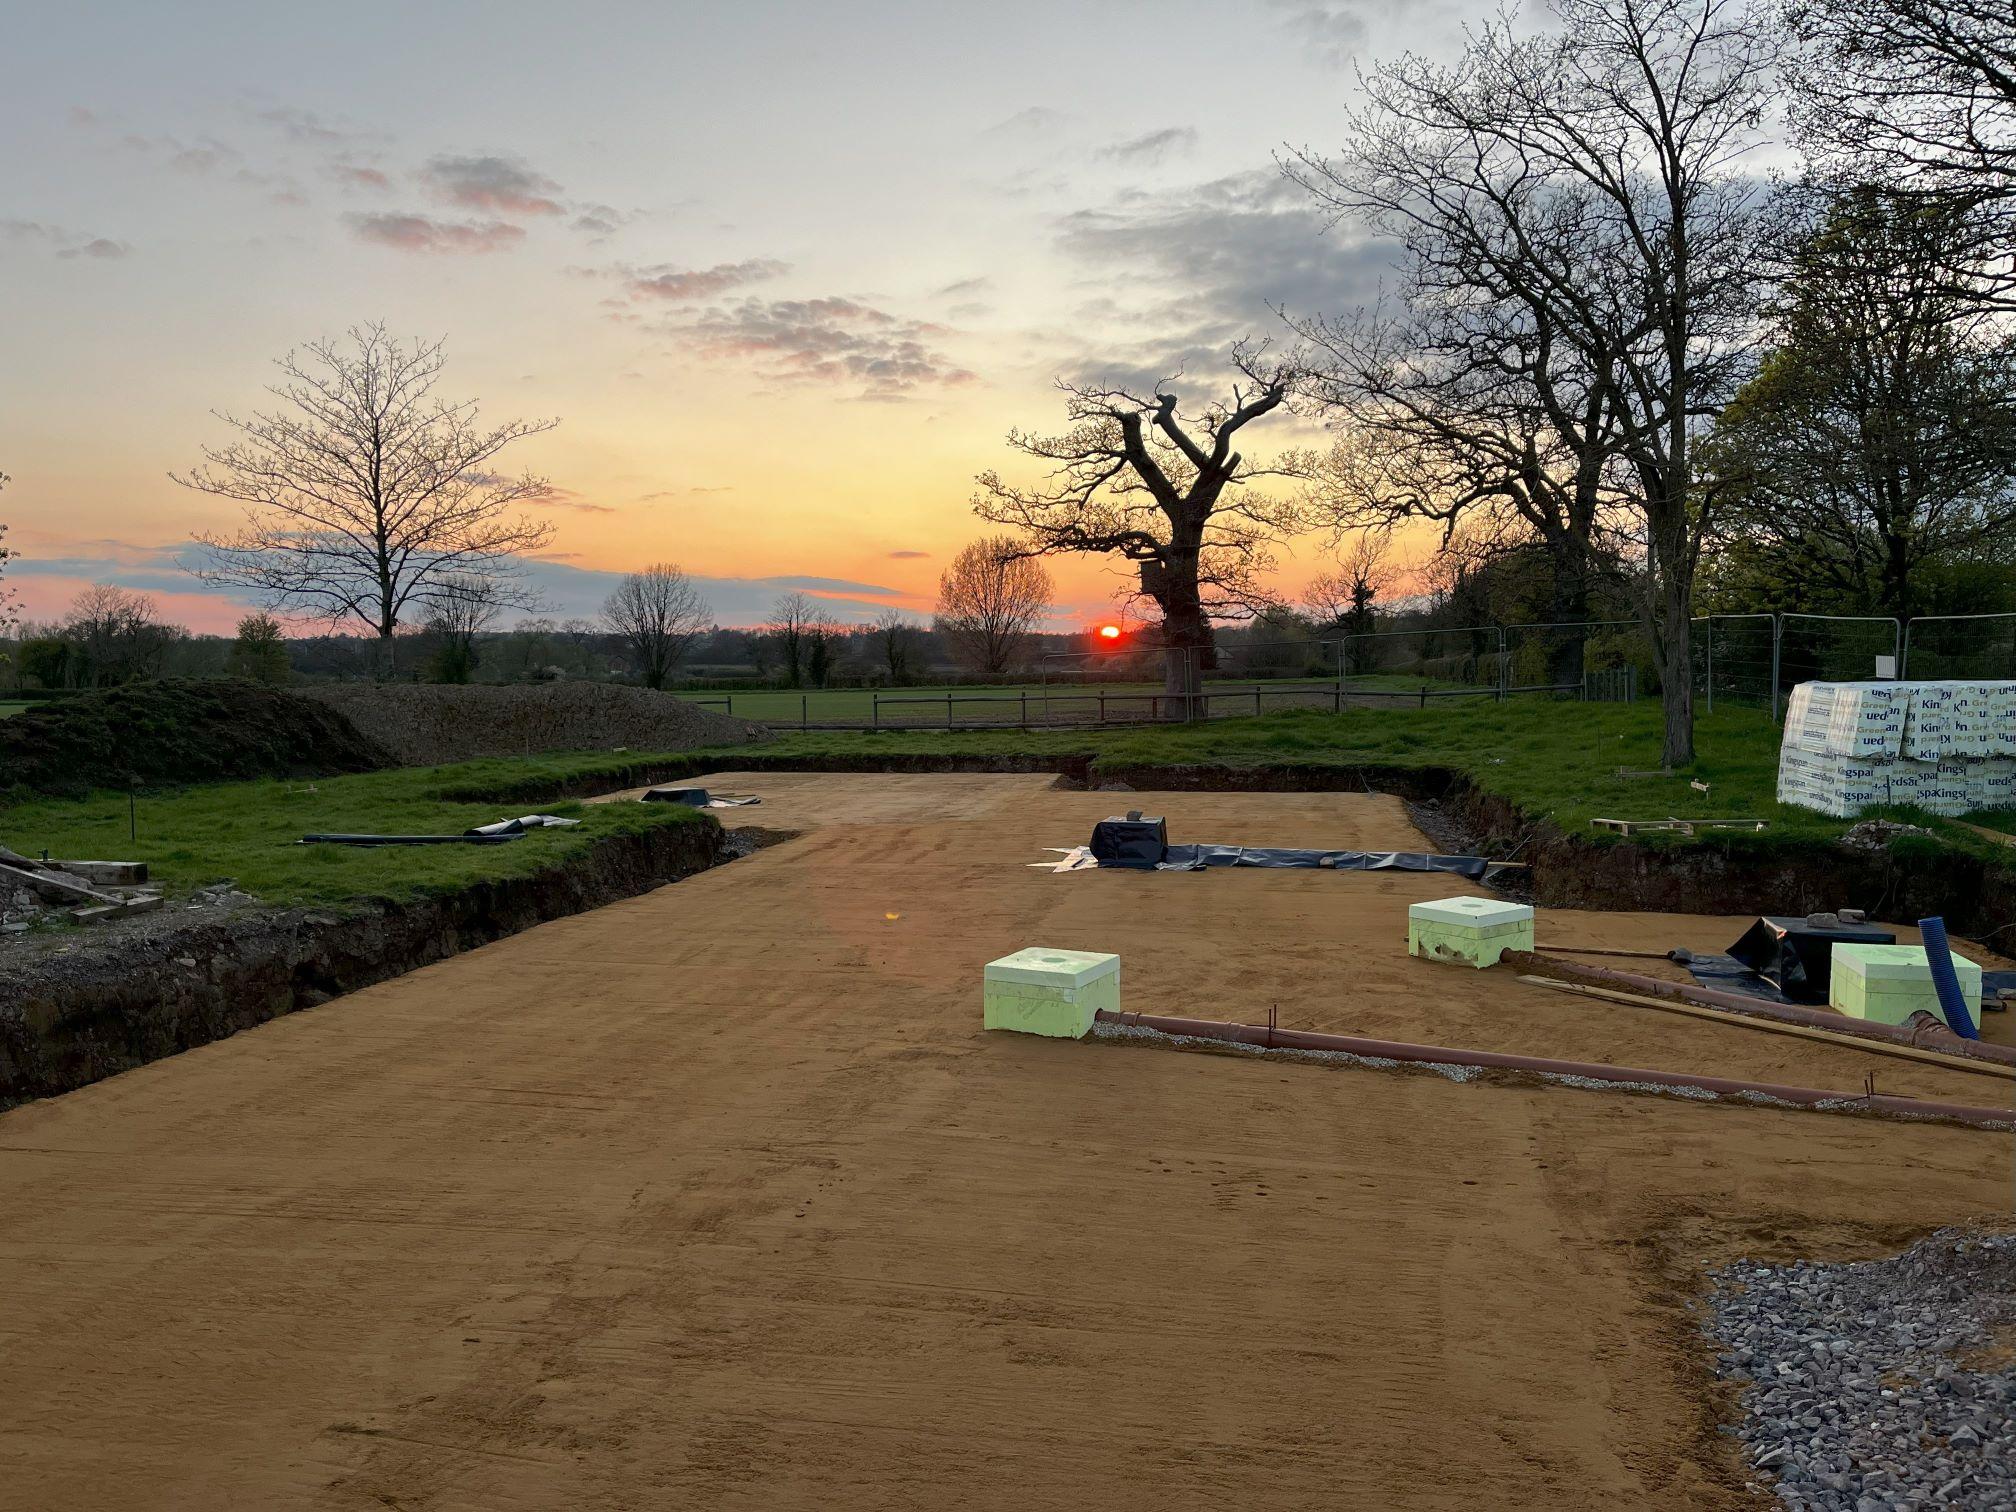
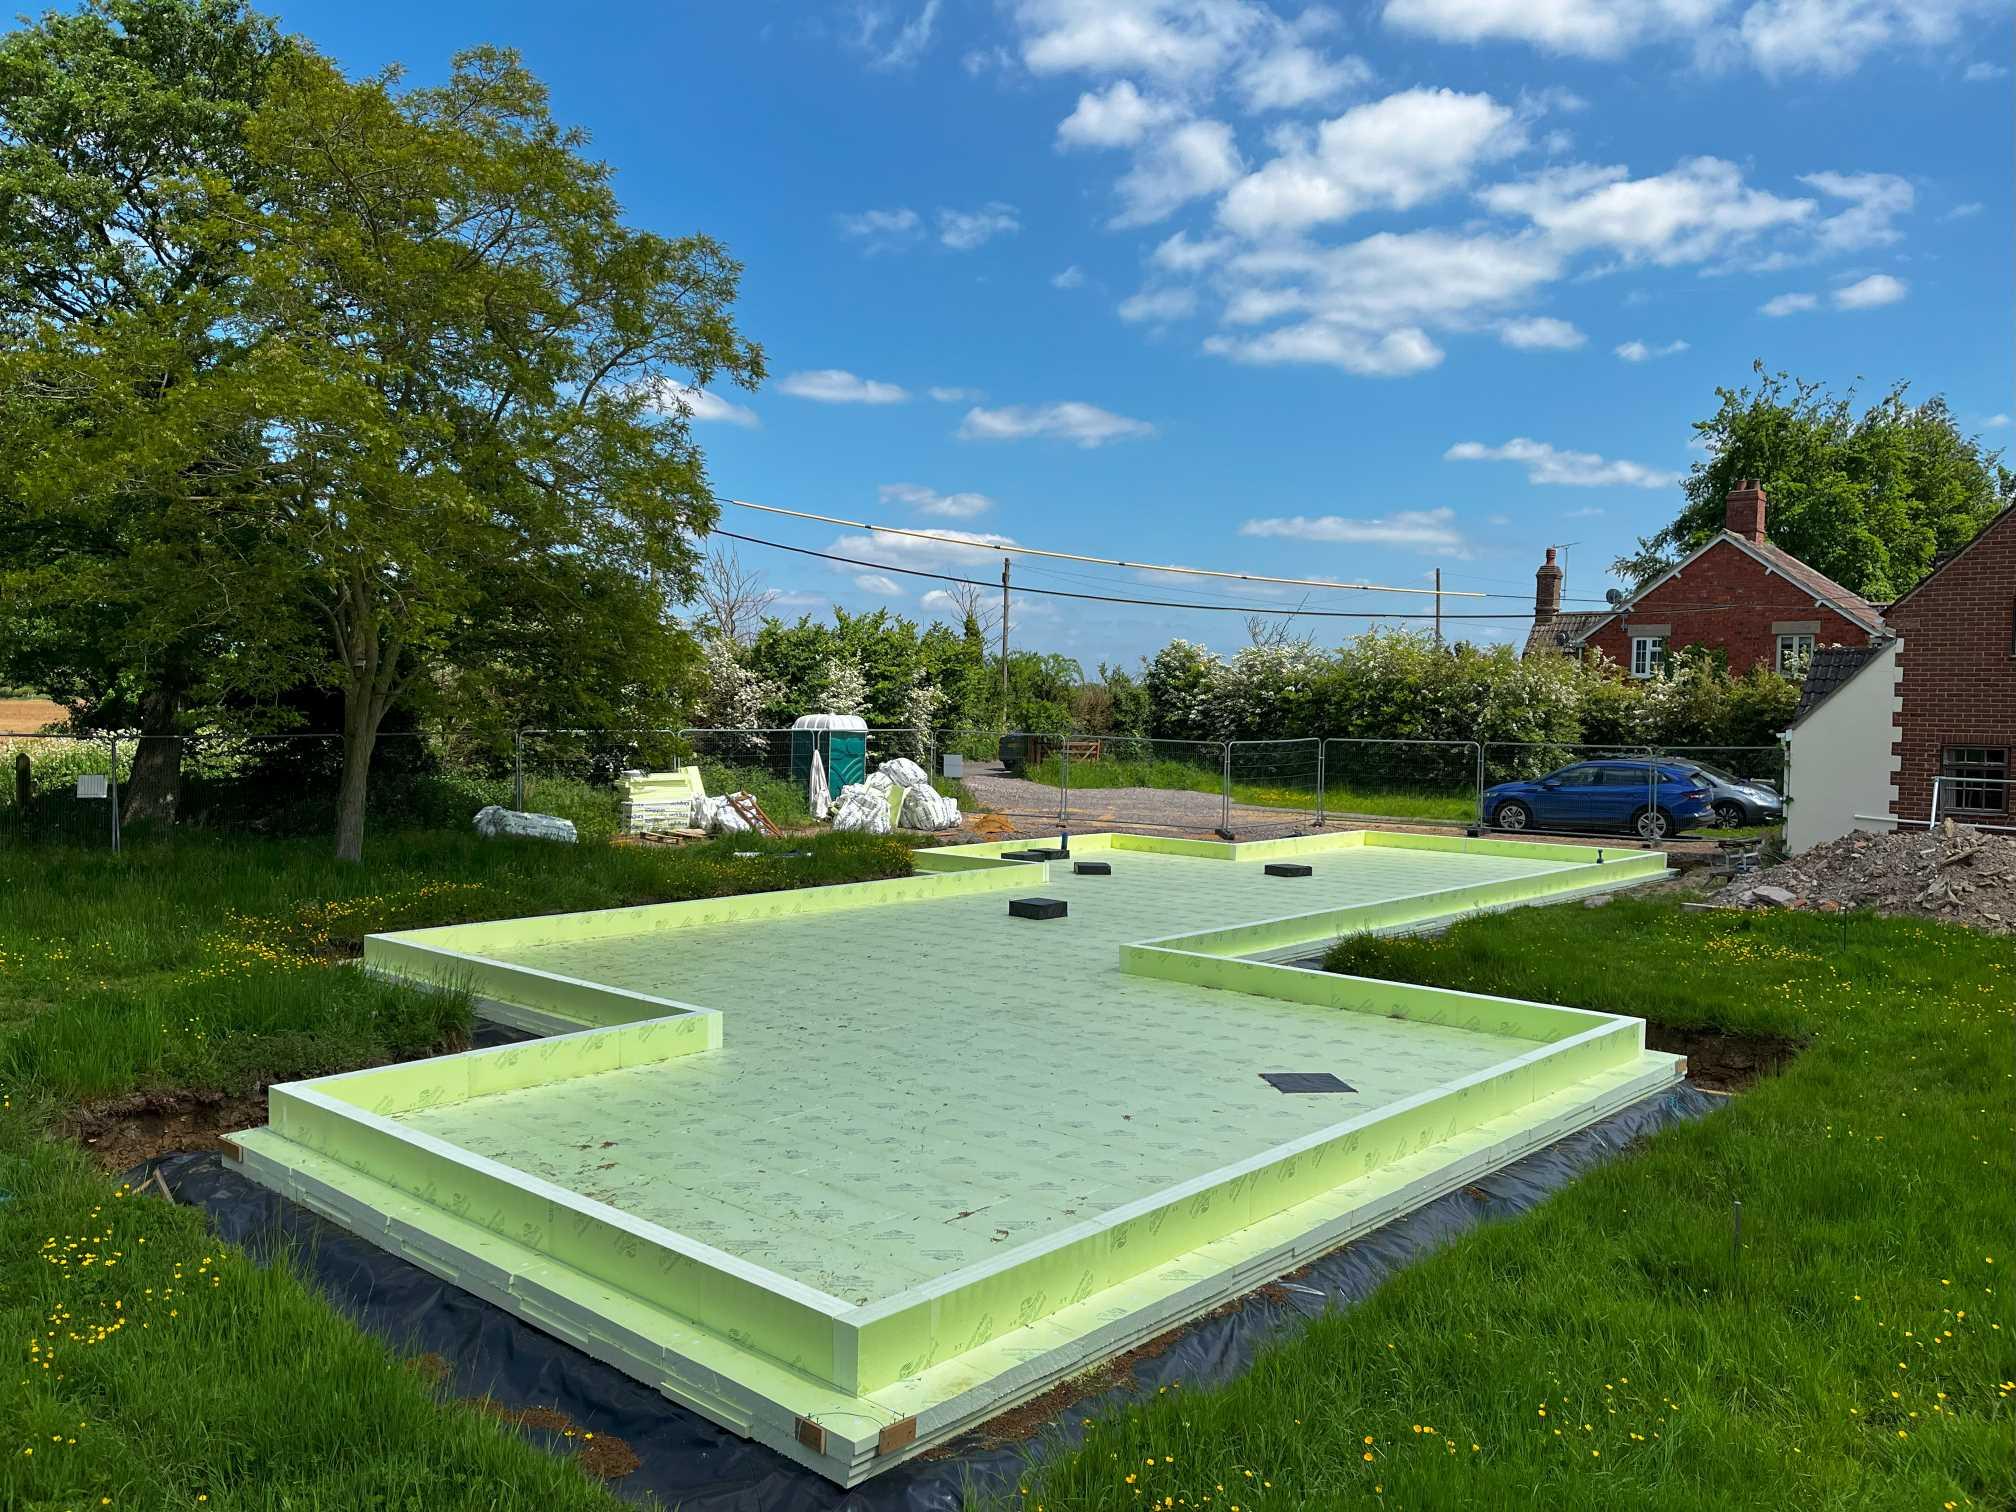
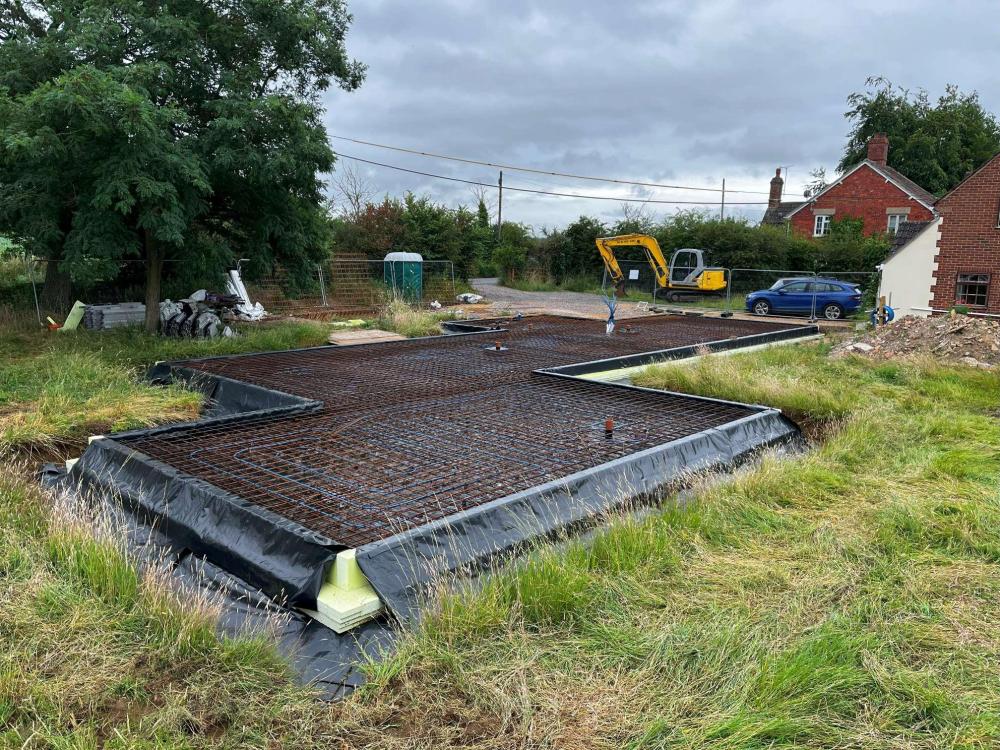
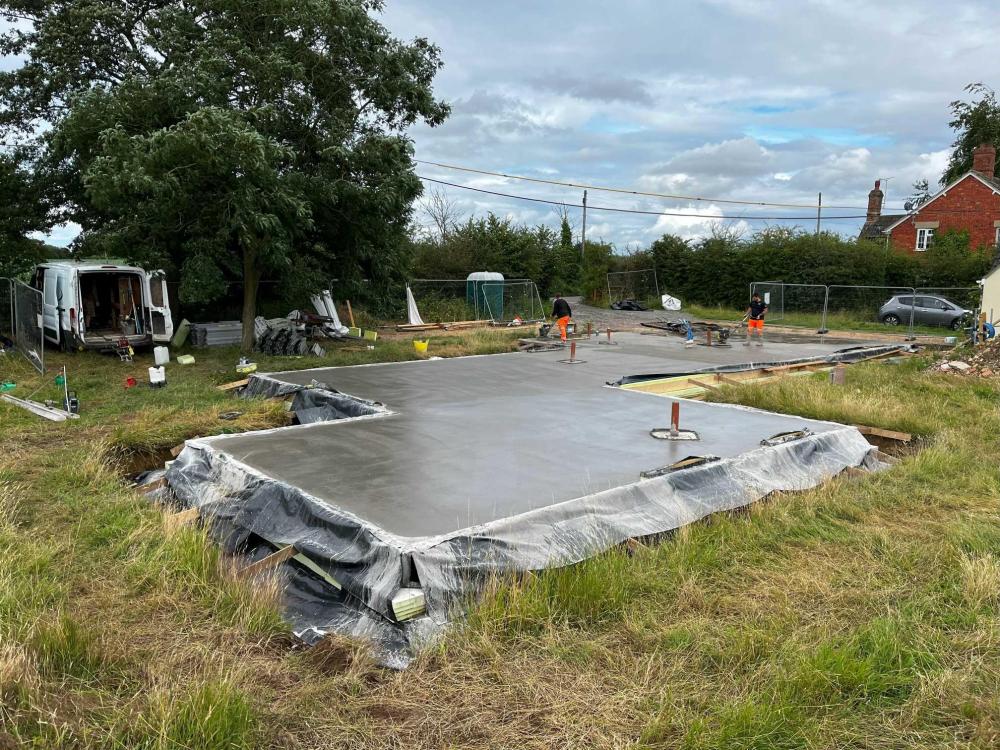
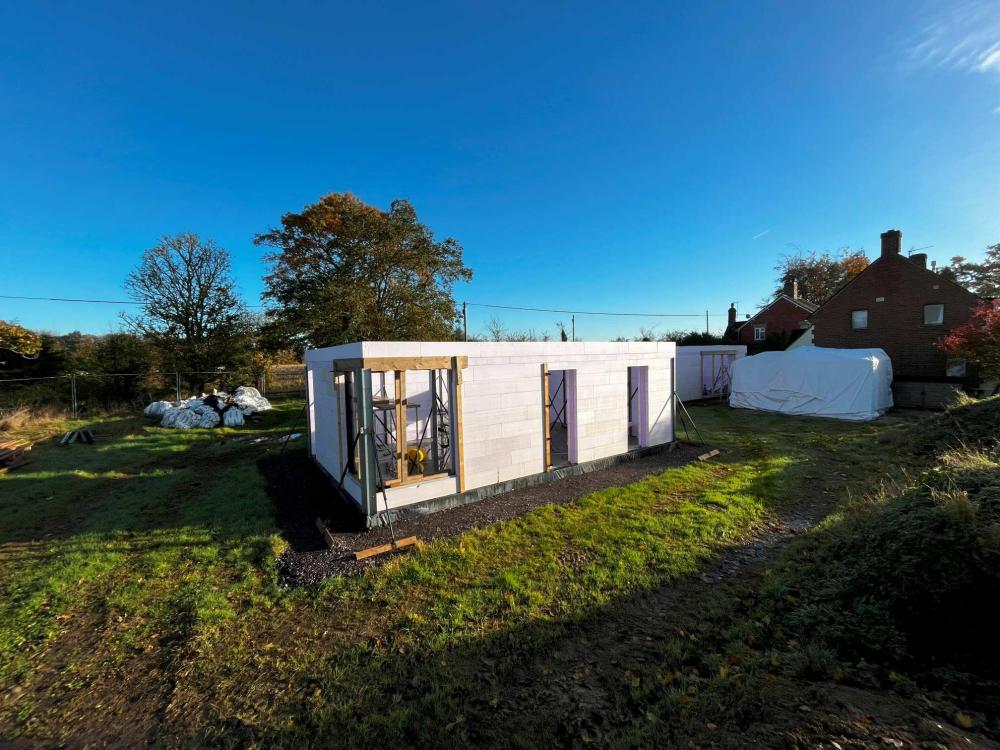
Hi, I wrote an introduction post on here back in 2021 and shared some floorplans for our planned new build in North Wiltshire. As it's been a while, I thought I'd re-introduce myself and do an update post. In early 2023 we broke ground. Since then we built the insulated raft foundation (Greenraft) and the ground floor walls in Polarwall ICF. It's slow going as I'm doing almost all the work myself. We've had a fair few issues, the biggest were our first wall supplier (Isotex) going bust after we’d paid them, and I had to fire our combined engineer/architectural technicians (probably worth a post in itself – but long story short, I can't recommend Build Collective). I’m hoping to ask around the forums for some help/advice on a few things in the coming weeks. In the meantime, enjoy some progress photos! The dig and backfilling, with roller. Sand layer with insulated drainage pop-ups Greenraft insulation for insulated slab foundation. 200mm insulation and 300mm concrete slab Mesh, rebar and underfloor heating Concrete pour And today, with ground floor walls up - ready for the pour


 3 points
 -
Just to clarify the Melcloud app doesn't calculate COP. Its shows an estimate of power consumed and heat generated on a bar chart that you can estimate COP from but its not particularly useful, as there is no data other than the bars and its an estimate. Where the app is useful is seeing what the flow and return temperatures are doing for the last 24 hours so you can see how its cycling on and off. You can use it to turn the ASHP on and off remotely and change room temperature if you are using the main controller to control temperature. You can also set a schedule for heating and hot water and change from fixed flow to weather compensation modes but you can't change the flow temperature specifically.2 points
-
We successfully claimed our extraction hob. No questions.1 point
-
I have the tank stat set to 60 Deg - I only heat HW for ~20 mins and it gets to ~48 to 52 in that time - as a result the Tank Stat is never satisfied (unless it's Mrs M's Bath night in which case I heat it to 60 (legionaires cycle same day) and then it's satisfied After she's run a bath it's not so when the CH ends it calls for HW for 1 min and the valve returns to rest1 point
-
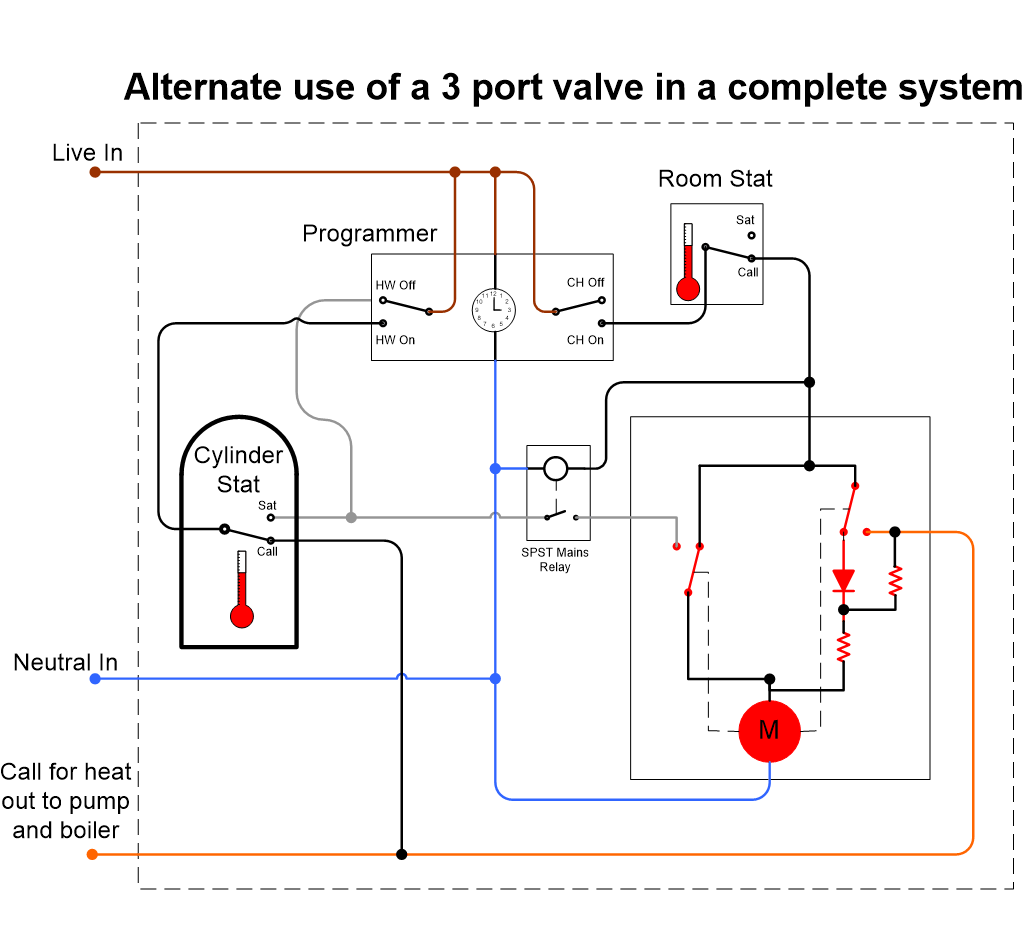
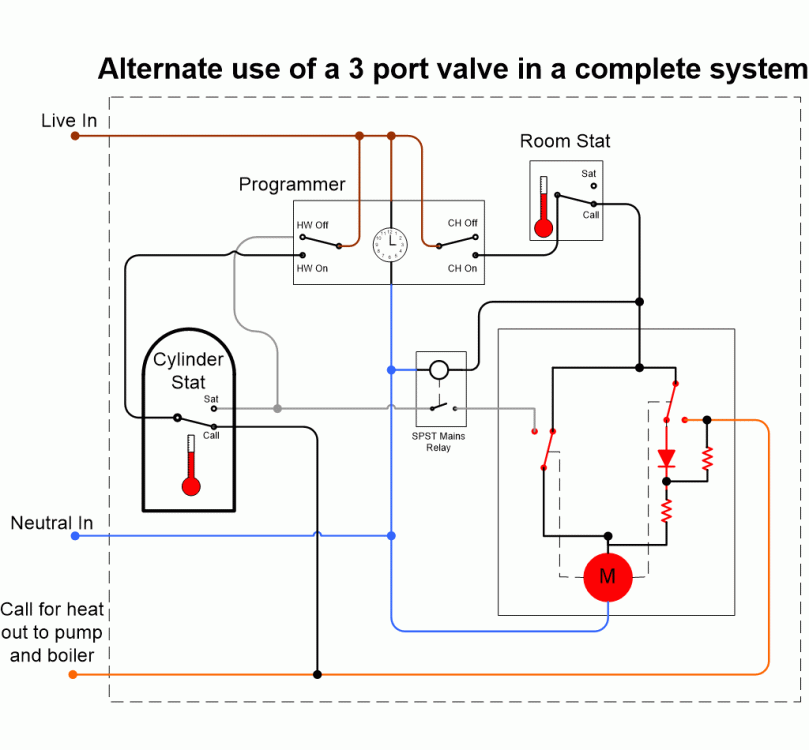
That's interesting, some would like if the MPV allways returned to a unpowered default position of HW, especially overnight, some may think that this can be accomplishied by programming the HW (last) on for a few minutes but this will only work if the cylinder stat is also calling, otherwise the valve will stay powered up in CH as "its last port of call". I attach a modified schematic for anyone who's interested in making the MPV allways return to the unpowered HW position.
 1 point
 -
Loops are fine, they allow for max flow. Assuming an unvented cylinder, you need to be careful to avoid back pressure from any mixer taps, so you'd want; 1) a PRV on the mains coming in, before the cold manifold 2) a NRV on the supply to your hot water manifold1 point
-
Thank you all again for your replies. @RoundtuitThey are UPVC doors. You've all hit the nail on the head and you have all been incredibly helpful and I appreciate it. I will go back to the builders and now I have a better understanding of the problem, I can't be fobbed off and I can tell them exactly what we want. Many thanks, Rob1 point
-
I'm running our ASHP off one of the Tuya MCBs and it reports nicely to SmartLife. Seems as accurate as the cheapo din-rail meter it replaced, and runs cooler too.1 point
-
Just googled this…..Type N Mortar Mix It is considered to be a general-purpose mix, useful for above grade, exterior, and interior load-bearing installations. It is also the preferred mortar mix for soft stone masonry (such as limestone). Type N is the mortar most often used by homeowners and is the best choice for general application.1 point
-
Had another look while having lunch @Mulberry View i have seen your set up before but had forgotten, getting bloody old I’m afraid. the zink fixes down with a clip, this clip has a raw plug looking thing that punches through the insulation, it is hollow like a drinking straw but with a washer at the bottom, once you have pushed it through the insulation you drop a screw down the straw, it hits the washer at the bottom and you screw it into the plywood. so I defo think your drawing is fine. the only thing stopping you adding more insulation would be if the manufacturers make this clip/ straw thing in different lengths, or do you add a longer screw. a question for the roof manufacturer. all looks good to me know. just got to get a continuous vcl from the walls to the one on the roof.1 point
-
I’m curious about this fix down detail so I did a google search it looks like a standard detail what you have there, look on VM zinc. so I’m presuming there’s a clever fixing that goes through the insulation into the plywood underneath. if this is the case I think everything is ok, I’m only familiar with a system that fits to a solid substrate. so it’s better I don’t continue second guessing your buildup, without the full knowledge of what system your using. look on the manufacturer website I think you are ok.1 point
-
What I’m not seeing in your drawing @Mulberry View is how the standing seam is fixed down. every time I’ve seen it it’s fitted with a clip or bracket screwed down to the wooden substrate. your drawing to me looks like you have the kingspan insulation and then a separation membrane then the zinc. how’s this zink fixed down.1 point
-
The normal for an unvented cylinder is cold goes to UVC, and is then taken to cold consumers at the same pressure as the cylinder from an output at the pressure control valve. My UVC was a retrofit, so the incomer into house has a PRV, it goes to the UVC, but I have a manifold for cold services just teed off after the incoming PRV. The white top pipe going to cylinder.
 1 point
 -
Thanks MarkC - Much appreciated. I'll get cracking next week and post any interesting updates. Thanks1 point
-
I'm in Edinburgh! We are looking to have an EV charger put in. I was going to get the Zappi installed but what I would really like would be to install a two-way charger to future proof things just in case we do get a car in the future that is capable of essentially being used as a home battery. Interestingly, myenergi are hinting that they may release such a charger at some point in the future - https://support.myenergi.com/hc/en-gb/articles/15196766224273-What-is-Vehicle-To-Grid-V2G-Can-we-do-it Your car has a battery with about twice the capacity of for example a Tesla powerwall but for about half the price. Is it worth buying just to station permanently in the drive as a battery for the house? What I don't understand however is whether it would be compatible with our three-phase connection and whether we would need any further kit other than the specialist charger which seems to be currently unavailable and quite expensive?1 point
-
I believe the standard blocks are 0.22. the new blocks are 100mm insulation inside and outside. talking to nudura it seems the new blocks have been made for the European market, they are not sold in Canada where I believe it’s slightly colder than here. IMHO you do not need to do anything with your block walls, that item on your list is done, tick it off and forget it it’s finished. you do however have some details to sort out joining your roof to your walls, this is the area to spend your time. I would build some mock ups of your roof buildup, and see how it all connects. im unsure how your roof sheets fit down if you don’t have a second plywood layer. 120mm of pir is not enough, I would also say I believe your roof will be noisy, we have standing seam with 200mm of rockwool between the joists, then 75mm of pir under the joists, then a batten with 25mm of rock wool sound slab then 15mm blue plasterboard. the rain is definitely noisy, is it unpleasant ? Not really, is it silent ? Definitely not.1 point
-
ended up buying this https://www.toolstation.com/toupret-wood-repair-filler/p10260 and it seems to have done the job. screws holding nicely.1 point
-
Only talking to automotive batteries, and modern chemistry only. The leaf battery was launched about 15 ish years ago? Mobile phones are also probably killed off with aggressive use and fast charging! They are a totally different chemistry as well.1 point
-
For what it's worth battery technology is my speciality, and premature degradation doesn't exist on modern battery types. Automotive stuff (other then random hardware failures) is lasting significantly longer then most expected. Fast charging /fast discharging very regularly can have an issue long term but v2g type tech is tickling the battery, which would probably be the difference if it lasting 250k miles vs 300k miles! Ie beyond cars usable life.1 point
-
That is very nice! Love the galvanised guttering too. I'll keep this image to hand.1 point
-
That's exactly my thinking, I don't see how water can drain anywhere unless there are front drainage holes, but I don't see any in the pictures. @RobertW why don't you get the builders back to sort their dodgy job out?1 point
-
Ha Scottish...it was the architect who named it. Alternative would be boot room? It's basically the room where we take off shoes and hang jackets...1 point
-
@AppleDown how’s it going you’re welcome to ask anything else. I submitted my own spreadsheet and I’m happy to say LABC we’re apply with it.1 point
-
I’m afraid I consider it a solution to a problem that shouldn’t exist if the job was detailed correctly in the first place and the work carried out accordingly. if your doing a re- furb or trying to fix others work then that’s fine, but building something from scratch there’s no excuse for poor details.1 point
-
It'd be a bit stronger but not massively. It'd be a thicker J bead too so maybe harder to screw into the correct place. The sketches I did use your actual profile. You can see how tight it is. .1 point
-
By and large all electrical heaters are 100% efficient. That is, they produce the same amount of heat energy as electrical energy consumed. That's just life (and physics). There's a bunch of bogus advertising around atm: world beating efficiency using new technology etc sometimes suffixed with they don't want you to know this etc etc etc. Now you might feel different and have a different 'comfort rating' from different appliances and technologies. For instance blow heaters heat the air up and circulate it quickly, but they also create a bit of a breeze which feels a bit cooling. Temperature gradients across a room and draughts from leaky windows etc will make it feel chillier than it might be if you just looked at the thermometer. Suggest any heater that she feels comfortable and safe with. Maybe a storage heater if she has economy 7. You may a good results also from addressing the obvious draughts. Yes, 'air con units that heat up' i.e. heat pumps use different technology and can have an efficiency of 3-4x - look for SCOP i.e. average efficiency and/or COP i.e. max efficiency. They generally whirr a bit of course.1 point
-
Possibly the pump stops and starts on the valve microswitch? so pump doesn't stop until valve is fully closed. You could just be hearing the high velocity water going through an ever smaller opening in the valve?1 point
-
Reliance is a very well known valve/pneumatic type company they where bought out by John guest. it’s good gear.1 point
-
Yeah, when our heating shuts off it makes a similar noise, and probably last for 30 seconds or so then abruptly stops! DHW doesn't make the noise. Have to admit it took me a couple of months of getting used to the noises and quirks or ASHP operation... But after 6 months it's working well, doing its thing and even a week of minus several degrees it did its job well!1 point
-
Lime experts who will give advise. https://www.mikewye.co.uk1 point
-
mortar should also be as strong and durable as possible (while still softer than the masonry). So I'd make local enquiry.1 point
-
To use stones, the principle is to minimise the volume of mortar. Have a collection of stone sizes to hand. Infill a void at the back with rammed-in mortar, then press in the biggest stone, or stones, that will fit. Repeat until at the surface. This provides more strength and reduces porosity. Granite uses harder lime than sandstone. Stipple the finished lime surface with a brush, to give it more surface area for evaporation. I knew none of this 2 years ago: it's findable with a lot of searching. @Gus Potter is right about the landowner's intention. However this has been built with skill and the 3 skin construction has advantages too: it's still there after 150 years or so. NB the foundations will be 400mm deep probably....leave them alone.1 point
-
I very recently had a price of £2200 for my Potton 200 sq metre project in North Herts. They did say that they would stay and keep spraying until we got the airtight figure we needed/wanted. I think i will be taking them up on this offer.1 point
-
I would replace the pump Around £100 and like wiring a plug1 point
-
This is the largest purchase you'll make so you need to consider the worst case - if you couldn't extend then is the house still suitable for you? And would you still be happy with your offer price? How about you or the owner puts in a planning application and you make your offer conditional on it's approval? In about 8 weeks, as the rest of the sale process continues, you'll have certainty. A house you definitely can't extend is clearly worth less. It's unlikely you'll get the condition removed, the extension looks reasonable to me but planners may feel differently.1 point
-
We’ve got a Miele. No complaints. Fan is noisy on boost but does what it was designed to do effectively. On one occasion it identified two small pans as one large one and automatically turned both cooking zones on instead of just the one zone I wanted. I found out the painful way that the empty pan on the rear zone was getting very very hot. Very easy to clean, no protrusions. All the grease filter bits go in the dishwasher, charcoal filter gets recharged in the oven. Whatever you go for (if you want to keep it looking good) get a hob protector from Lakeland - ours still looks mint.1 point
-
Ok, So the BCO officer came out - Builders were not on site. I asked about the soil pipe - he gave two options as follows. 1 - Wrap the pipe with 100mm insulation and then pour foundations - but to add mesh to the area above the pipe to strengthen the foundations 2 - Shutter the area, pour foundations and use lintels above - fill around pipe with pea shingle I then suggested option 3 as suggested above from Joe90 to sleeve the pipe with a bigger pipe, he said hmmm you could do that, but that he would prefer us to shutter the area and fill with pea shingle as the pipe would be close to the top of the foundations. So we went with option 2 - we poured the foundations to about 30mm under the pipe - used cut sections of a 3 x 2 concrete paving slab to shutter off either side of the pipe then filled the foundations - the slabs have remained in place - once set we filled around the pipe with pea shingle and used a lintel above. Thanks all for your advice. Wozza.1 point
-
For the double fireplace opening problem ….here’s a creative solution. Large piece of what appears to be wall art / canvas on the chimney breast, however it’s actually constructed from an acoustically filled frame finished on the back in same colour as the wall. Hinged at the bottom so it flips down and covers and seals the gap. Could even replicate the art in the actual chimney beast, so you don’t have a big gap. or not hinged but made in a way with a lip that hides a rubber seal, so it can literally friction for / plug the fireplace gap with it. You could have one either side to create an airtight gap, because obviously the fireplace couldn’t be used if covered with certain materials. if you have tvs there could use same idea just hang the wall art/acoustic panel on another wall when not used. do I win a prize ?0 points