Leaderboard


Popular Content
Showing content with the highest reputation on 05/23/23 in all areas
-
Boys, boys ...... here it is...... and joy of joy the instructions are in English! Legible, readable, well written English - wiv pictures, proper pictures taken by a photgrapher.... one with a camera and lighting system. Godda be grateful these days Thanks @Conor Less need for a pillar drill now.....
 3 points
 -
I suppose I mean that Self-Building makes the need to Plan For Failure very clear. Maybe not planning in a formal sense, but this thread shows the power of just asking others for an opinion (or plan) . I went from a state of 'Shit how am I going to do this ?' to -now- quiet confidence that I'll get it done resonably well. Just because the risk has been shared a bit.3 points
-
Actually- I thought about what you posted . It is success through failure . The biggest obstacle in life is yourself . Contrary to what others may believe from my posts I punish myself far more for errors or when something isn’t “ quite good enough “ ( but in fairness is better than most trades ) . It’s an attitude that one must take through life . Trying , failing, taking risk , failing ; sometimes success ! Must go and talk to my shrink now .3 points
-
Yes @joe90, I'll try both methods on the Piggery before I do it for real on the house. To Infinity and Beyond !
 2 points
 -
Other than not retro fitting a smaller system than is alresdy fitted, thats all pretty vague 3 paragraphs!2 points
-
Or want to hear more like.2 points
-
Having fitted several hundred kitchens for my sins, i always cut out the plasterboard and glue and screw ply back to the wall. 18mm usually brings me roughly flush with the plasterboard. You can seal around these if you need to re airtightness etc. Any thing else is a bit of a bodge. Ok if they are tall units, sitting on the floor, but not wall cabs. You start loading those cabs with a load of tins..... Over time your cabs will move down the wall. The first inch of your screw regardless how long is unsupported. Not a good idea.2 points
-
It’s a better unit as it allows cables to be glanded into the enclosure. Plus 1 for that product2 points
-
Whilst you can learn as you go along It’s not ideal for your Architect to do the same As you will be paying him The design will need to take your specific build into account Might be worth shopping around2 points
-
The weight of the frame is negligable in this scenario. Make sure you plasterboard and system achieves your fire requirements. Make sure speakers have a fire rating so they dont compromise the ceiling.1 point
-
3 x 3 hr sessions results in about 3 hrs of actual work. Each time its 1 hrs of faffing, finding tools, swear, thinking and then 1 hr of packing and cleaning up.1 point
-
The insulation alone will give you an R value of 9.0909m2K/W (U of 0.11W/m2K). You could do a perimeter/area calc to estimater the 'base case' U value of the un-insulated floor. Add the reciprocal of that to the R value for the 200 PIR and you have a reasonable estimate of the complete 'structure and insulation' U value.1 point
-
Will be loads of different ones, only done to piss you off.1 point
-
The best way is to stop reading the forum, grab the cordless SDS and crack on. 😁1 point
-
For that job spec, hire one.....1 point
-
However, the accuracy of the holes is required on the outside! Does it matter if it deflects a little inside? From the outside will give you 200mm of making sure it’s horizontal 🤷♂️ plus if you use a decent SDS drill bit I find they don’t wander much at all.1 point
-
I’ve tried that a few times . Try to be super accurate with measurements on both sides . How far out could I be ? A few mm ?. Nah ; (expletive deleted)ing miles !1 point
-
I suspect you are right with this....cement board it will prob need to be - I will use the Instastik stuff we using to stick some EPS to flat roof I think,1 point
-
and It doesn't matter. Every thread generates a reaction in the original author's mind. And it's up to the thread originator (OP) to evaluate the responses. Even 'wrong' contributions -provided they are relevant- could well be useful . It's irrelevance that sometimes grates.1 point
-
...and of course, immediately after post I find Approved Document L, section 61 point
-
@pocster is the man to do the correctional procedure there. What a summer.1 point
-
You should be looking at about 10% (of construction cost + VAT) total professional and finance fees for a typical build.1 point
-
Some to start with Services, connection / installation Site Insurance - inc public liability /employer liability. SE SAP / EPC GI Warrantee [if not provided by main contractor - all our quotes excluded it] Architect. BC Planning Uplift on the contractor's low PC Sums, Stuff for new house:- Carpets, Flooring, Blinds, Curtains, bathroom cabinets. Fancy Light fittings, new furniture etc etc Take away meals.1 point
-
Self building is as much a test of character as anything else. We can't control everything , so we have to keep up the pressure on ourselves to perform well. An impossible standard for others to match. So in attempting to work with others, disappointment is built-in to our job. Normal therefore. So we can plan for it. That's the theory anyway 😔1 point
-
I am (expletive deleted)ing brilliant. Last night I fell asleep watching this. Tim Hunkin is looking old, but still dresses the same. Not watched this one yet, about drilling holes.1 point
-
That was the right thing to do. It may add some time now, but the beam may be in place for 100 years.1 point
-
They are derived from the standard list of loads on the previous pages. They look about right for loading on a domestic beam.1 point
-
That would be fine.1 point
-
You buy an oversize lintel and cut it down to the required length1 point
-
Thermal and acoustic insulation is a job that's very easy to get away cutting corners on and understandably so given it's monotonous and can be awkward and itchy so it's definitely one for the self-builder to do rather than a contractor. Don't pay for someone to do a job worse than you would have done yourself.1 point
-
Broadly speaking, if cable is clipped direct on the surface it can go anywhere you like. SWA is rated for UV light so can be used externally without any problems.1 point
-
I remember When I first started tiling ALL the tiles had lugs on them No need for spacers1 point
-
Pity they built their house in someones back garden.1 point
-
Years ago you could buy edge tiles which had a rounded edge for this. I guess they are no longer made?1 point
-
Oddly enough all our white edge strips are still white after 25 years. Personally I like metal edging on dark tiles and white on light tiles.1 point
-
It’s funny how something apparently relatively simple requires some over thinking . That’s not a criticism! . I can mull a ‘simple’ problem for hours /days/weeks/years . Then what tends to happen is either it was easier than I thought or I (expletive deleted) it up .1 point
-
I want @nod to do my dot n dab.1 point
-
The pump in the heat pump will do that, when you plumb the buffer as a 2 port. Having two pumps in the primary circuit you actually start getting into hydraulic issues, as the pump in the heat pump wants to modulate to manage Diff Temp, the other pump makes the control of the two pumps very erratic. If you have pumps on the UFH manifolds these will pull water through the mixing valve, the hydraulic sepereration is then across the mixing valve. The biggest difference between a 4 port buffer and 2 port is the hydraulic sepereration. A 4 port gives you a primary circuit - ASHP to buffer and secondary - buffer to rest of heating system. You need a pump in each circuit. Piping as a 2 port does not give hydraulic sepereration the buffer just becomes heating volume. The ASHP to heating system is all primary circuit. I just have my whole UFH system either on or off, no actuators on the manifold. A single thermostat which, either has the ASHP on or off. All run off the circulation pump in the heat pump, also have no buffer.1 point
-
Glad you have found BH, you'll learn loads here (I do), get the benefit of all sorts of different views and if you stick at it.. will allow you to make informed decisons that suits you best and save money along the way @greenqueen"In your opinion what foundation type is best for sandstone rock and sandy soil" The design process goes a bit like this. Rock / sand .. lets start from experience by looking at strip founds and then work up in levels of complexity = cost. Sandstone = good start. Now lets look at the type of sand, where the water table is and where it may be in the future, how thick the sand layer is and if the site is sloping. Breaking this down. The type of sand is important. Are all the grains of sand roughly the same size (poorly graded) if so they can act a bit like a pile of marbles so the bearing capacity is less or.. is the sand well graded where there are small particles of sand and big ones that all interact, have a larger area of surface contact and thus have a greater bearing capacity. When the sand particles are submersed in water (where the water table is and where it may be in the future) it reduces the effective density of each particle of sand by about half (Archimedes) thus as the bearing capacity of the sand relies mostly on intergranular friction we need to know about the water table. We also need to know about the water table is as when we dig a hole it may flood. You can dewater but one big risk is that you suck out the fine particles and make things worse Also you may have so much water that you can't easily pour concrete. If you have a high and mobile water table this may lead you to look at the raft option early on as you keep it out the water table. Of course if the water table is really high then you need to remember that EPS etc floats! If the site is sloping then ideally we want to found the building on the same soil strata, not half on the rock and half on the sand as this leads to differential settlement which can "break the back" of a house. To conclude this part. I think you need to get a handle on the ground and that will help you focus on the viable options that suit you. Post your ground investigation results if you wish for some feedback. @greenqueen " If we are going to build with a combi oak and sips frame, how does/does this affect the foundation type? " As other have said .. sips is structural @Alan Ambrose so why do two load bearing structures? I think oak frames are brilliant. You mention that you may not want to use them everywhere. But if it was me I would want to have them on full show, no point in hiding any part of them. Yes they do move about a bit when seasoning and later during summer and winter. Funnily they tend to shrink in the winter as we put the heating on and can lower the humidity levels.. a bit counter intuitive? But in reality the movement is not that much different from a timber frame house, probably less so. In summary I would price on standard stuff: strip founds, look at suspended floors or a simple 100- 125mm thick ground bearing insulated slab then add in your extras to mitigate thermal bridging ect to bring the house up to the thermal performance you are seeking. Go for the simple stupid first that local builders can handle.. you'll get more sensible quotes this way. That gives you a benchmark.. then it lets you test each of the bells and whistles options. To try and price this up as a novice I would start on say a standard masonry cavity wall construction or a timber frame for the whole house. Then add in the oak frame as an extra over. Sounds odd but depending on the type of oak frame you go for; acting as a true arch or more portalised (which puts horizontal thrust into the founds of the ground floor or floor slab if a raft) then the hidden extras ( foundation detailng and mitigating cold bridging etc) will be covered by adopting the extra over approach. Later you can start to shave of cost by good design and detailing. Have a look at these.. great idea which works. Turning now to some technical aspects of raft foundations and EPS. This is not "new technology" we have been designing insulated rafts for ages. In the UK they crop up a lot on cold stores and in the USA.. well there is not a lot they don't know about this, and they have to also have deal with permafrost in the northern regions. Be glad we live where we do in the UK! @IanR and @saveasteading You are both correct.. to be difficult I'll add my own interpretation.. all in the best taste.. but I'm going to try and simplify / expand for BH folk.. but may make matters worse.. ! There are many different types of rafts and @George can probably add to my list and chip in. I'll give this a go describing the common types, there are many and they all work in a different ways. 1/ A true raft. This is say a 250 - 350mm thick flat slab that is wrapped in EPS with a two / three story domestic building on top, point loads or intermediate load bearing walls from the second storey and roof load coming down in the middle. By making the slab this thick we reduce the density of rebar which lowers the cost as rebar costs more than increasing the thickness of the concrete. Also by making the slab thick we reduce the punching shear stress that comes from the point loads say from columns to create a big open plan space on the ground floor. In summary you would lay the EPS, turn it up the sides, lay in some rebar and pour the concrete. If doing a basement you probably need starter bars and some stuff to sort out the corners and stop the water coming in. Main thing is that the thick slab reduces the rebar congestion which suits local builders.. keep it simple stupid. An important part is also think about slab shrinkage.. story for another day / later. BH folk.. don't get caught out by trying for the thinnest slab you can as the rebar cost etc can go up drastically and you invite other problems. 2/ A semi flexible raft.. still a flat slab as above. You see this cropping up on BH where the EPS extends beyond the inner load bearing leaf to say the outer wall. Now if you assume the load bearing wall is the inner leaf and the load from that spreads out at 45 degrees the EPS contributes a lot more to supporting the big structural load from the inner leaf. But you often find that the EPS can get over the line. Two main reasons are this: When you look up the EPS spec it gives you a compressive strength of say 200- 300 kPa at 10% compression just say for the sake of arguement. That means that the EPS needs to sink by 20- 30mm before you get your 200- 300 kPa resistance. Now 20- 30mm movement is not going to be acceptable, especially when the ground under may also be sinking. What we do is to say let's limit the amount of load that the EPS can take. I'm not going to tell you this range of values as this is commercially sensitive. If you search about other designers they are not going to give away these values until you cough up a design fee, also you need to know about the ground and the chosen / proposed insulation. To design the semi flexible raft we work out what the EPS can carry and then use the concrete slab to carry the rest of the load. This extra load gets shed back into the slab which acts roughly as a cantilever. But for that to happen we need to design the slab to act like a big reinforced concrete slab. But if you turn the slab into a reinforced concrete slab you have to comply with the design codes that relate to that... and that is very difficult if not inpracticable on a 100 mm thick slab. It can sometimes work on paper until you need detail the rebar anchorage and deal with rebar congestion etc. 3/ The edge thickened raft. Here we have a concrete slab that is attached to what looks like a strip foundation. As above the same principles apply.. the strip found can only carry so much load so we shed the load back into the slab and often reinforce that as the top of the slab is in tension. The edge thickening is often used where we may have point loads from columns. The edge thickening acts as a concrete beam which spreads the load over a longer distance around the slab edge then the remiander back up into the slab. I have to give up here on the various descriptions and way of doing all of this. Suffice to say you there are often loads of different options.. But to add to the complexity we need to consider how big your slab is and how much it will shrink and crack and where can we put movement joints?. When you edge thicken a slab it basically gets anchored at the edges. As the concrete cures it shrinks. A true flat sab can slide a bit but an edge thickened slab is bound into the ground at the edges and thus we often need more steel to resist the shrinkage cracking. Well to finish. Probably the ground conditions are the thing to get your head around, it can be a lot of fun researching your local area, talking to the neighbours, did they build an extension what happened? That basic stuff can save you thousands! And when you move in you already know your neighbours.. that is a good start?1 point
-
Yes, it's installed now - but we've chosen to activate only the pre-heating, not the cooling. The heat-pump installer contacted Mitsubishi technical support, which advised us against using cooling - the heat pump would have been forced to switch between cooling and heating functions too frequently. So, in the end, we went with a heating-only heat pump. Not sure how much the VMI unit is supposed to dehumidify. Of course it does filter air (a good idea in the Paris area!).1 point
-
18mm will always sag - even with an aluminium angle front - it just sags at the back, but not the front. 36mm kitchen top will sag less Almost Finished @Paene Finitur, almost ?1 point
-
middle leg, set back.1 point
-
We have a 10 degree monopitch warm roof (not the garage). It's steel. There is no noise at all inside. It is very well insulated and there is a void between the roof and the ceilings. BTW you'll need oversized gutters/downpipes.
 1 point
 -
Thats a decent gang0 points
-
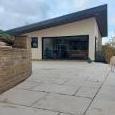
FFS, was it drawn by a toddler. Other stuff here https://www.belfasttelegraph.co.uk/life/house-home/ambitious-family-home-named-nis-building-of-the-year-2023/726998870.html The flower pots are wonky.0 points
-
The problem with @nod is that i think he is a blinking Northerner. Not that i am against them. My wife is One. Just that he ain't coming down to sunny Hertfordshire on the promise of a packet of Hob Nobs is he ?0 points
-
Just drill a tad over halfway, from the correct point both sides, it invariably lines up.0 points
-
I need to add another 'type' Just met an old geezer in his van. The conversation went like this .... Red van pulls up outside our place while I'm taking a delivery: the lorry is blocking the road so the van has to stop. Driver: (65 + , overalls, dusty driving cab, loads of half empty coffee cups on the dash, 3 days stubble where he consistently misses while shaving, invoices everywhere like confetti). Never met or even seen him before. Window winds down slowly (by hand) "Av yer had yer 'ip dun yet ?" I grin "Which one you on about ?" "Wa?" "I've just had my second one popped in .... end of March" "Me 'n all: in Kendal (hospital) wi' Mr Stewart" (The Worlds Best Orthopedic Surgeon) [....] "Aye lad, ah jus need me prostrate dun now 'an ah'll bee reet". Roars off using the van's clutch as an accelerator. I'm holding on to my withers laughing, and trying not to wet myself. Type? Lovely Old Tradesman Geezer0 points
-
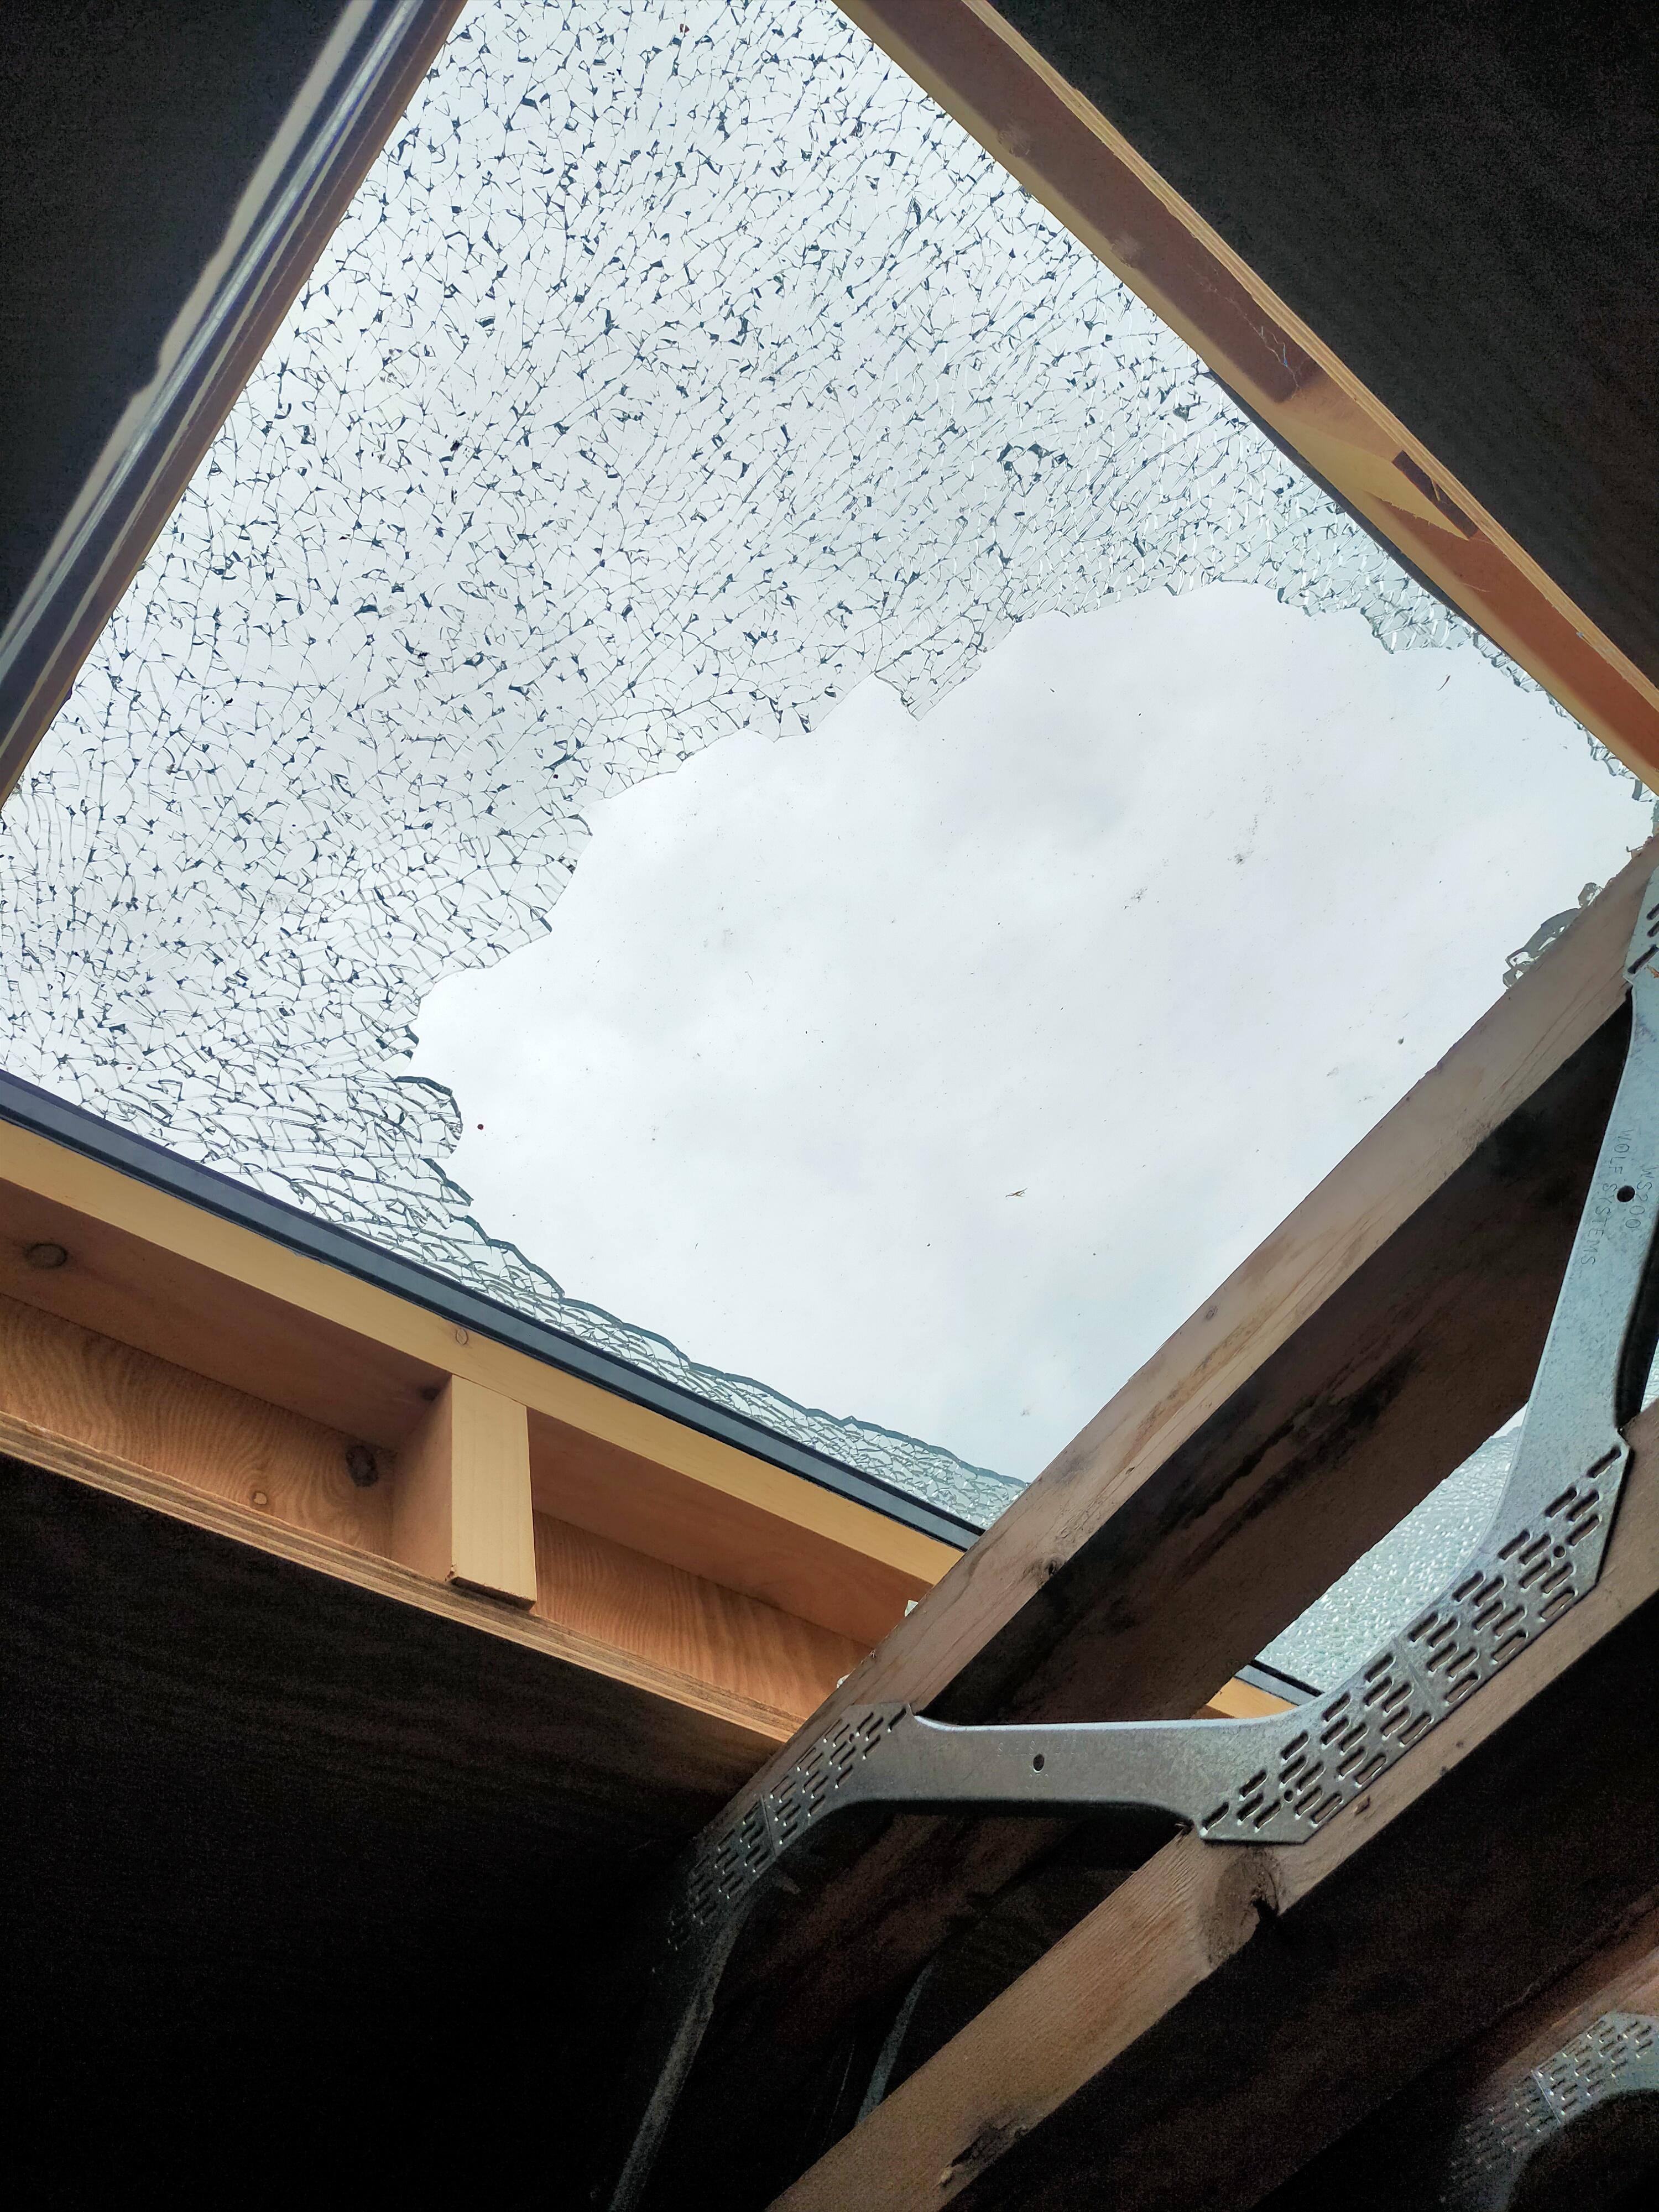
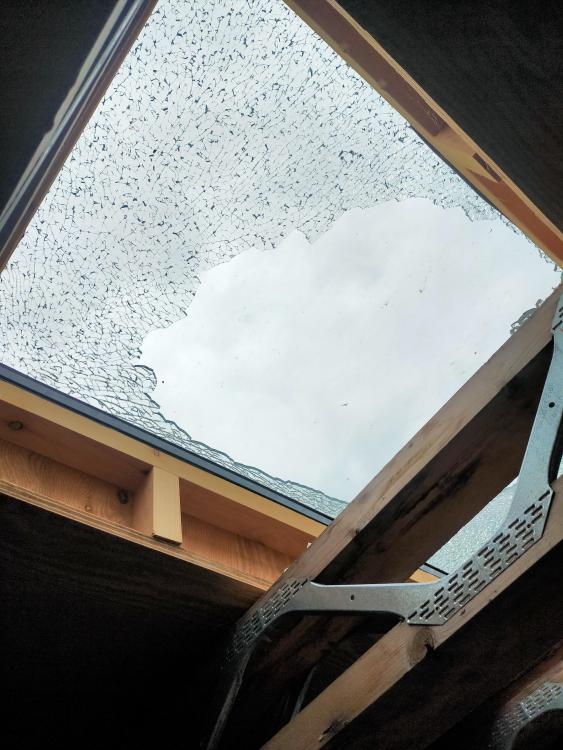
Anyone experienced this before?! I bought double glazed skylights from a local supplier and installed them myself around Xmas time. They rest on a standard timber upstand, are not screwed in place but do have two continuous beads of mastic around the top of the upstand. This morning I discovered that the inner glazing panel of one of the skylights had shattered. The outer panel is fine, which rules out impact from outside, and nobody was in the building yesterday, ruling out impact from below. On Saturday I used a hole cutter to create a vent in a vertical surface about three metres away from the skylight in question. That might have sent a vibration through the roof structure and cracked the glass perhaps. Timber does of course expand and contract, but timber upstands are standard practice and mine are perfectly ordinary. Any ideas on how I can go about replacing the unit? If I have to force it up and off I'm concerned I will damage the upstand.
 0 points