Leaderboard


Popular Content
Showing content with the highest reputation on 04/15/23 in all areas
-
It is, however, a little daunting to start off knowing your chosen "old boy" isn't going to aim for airtight / well insulated as his first option, and a lot are old dogs who just don't need to learn any new tricks because for every door that closes, another 2 open atm. The builder would need to be passionate, and would need to be open to having reasons given and consequences understood, should, for eg, their quality of workmanship behind the scenes not be at the same par as what was on show at the end. The builders I worked with on a job in Leicester were very receptive of me 'educating' them about where airtightness membranes / associated products etc went, and how to maximise on the execution of those works. End result was excellent. I had one builder sneaking behind my back to actually try and talk a client out of putting insulation under a heated summer-room screeded floor, saying it was a complete waste of money. Client stuck with me, and we put 200mm of PIR under it. Massive benefits, and they only had to use the UFH for the absolute worst part of the year.2 points
-
There might be reason to change them for something that looks nicer, BUT there are lots of BUT's Anyone that tells you their electric heater is more efficient than another one is telling LIES. They are all 100% eficcient, no more, no less, you put 1kW of electricity in, you get 1kW of heat out no more no less, the posh snake oil ones will be just the same. The other but, is yours have old fashioned nice simple controls, if they break they can be fixed, they are easy to understand and easy for you to set them to operate how you want. Modern replacements will have electronic controls thanks to an EU directive that we still seem to be abiding by even though we don't have to, so even if they are storage heaters, they will decide when to charge, whether to use peak or off peak electricity, not you. And that is more to go wrong, harder and more expensive to fix. Your choice, but please don't be scammed into buying something you have been assured will be "more efifcient"2 points
-
It is only my opinion, but I think it would utterly destroy that house, looks wise for one, and piss your neighbour off, particularly your immediate attached neighbour. You are right that it will then be a moisture trap, so you'd be using or introducing trickle vents to all windows ( and then have to use them routinely ) to manage the new problem. That added ventilation heat loss will massively outweigh the EWI benefits, and this should only really be considered if you're going the whole 9 yards, inside and out, eg to EnerPHit standards. Don't get me started on the chimneys, and how much heat is disappearing up there all winter.....2 points
-
Running some quick costs on this. ( All from insulation4less) Take 3 examples. All the same U value. Decrement delay ( for heat protection) is worst with all PIR at 7 hrs and best with full fill rock silk at 10hrs. The cost of tape, screws , 50mmx50mm timbers and 100x25mm timbers are the same in all cases. Celotex 120mm £20.38/m2 Celotex 75mm £13.12/m2 FM330 foam £/1m2 Total £34.50/m2 Rocksilk 37 batts 2 x 60mm £13.44/m2 Celotex 100mm £15.27 Total £28.71/m2 Full fill Rocksilk 180mm £20.16 Celotex 75mm £13.12 Total £33.28/m2 BUT Fitting dense mineral wool batts is a pleasure, minimal itchiness and doesn't disintegrate like loft roll. Cut them with a sharp knife and they push right in. Almost zero wastage. PIR is tricky to cut straight unless you use a table saw or similar and the dust is not pleasant. When you have 4 x 560mm spaces between the rafters you will end up with about a 160mm piece to play with from every board. Wastage will be higher undoubtedly.2 points
-
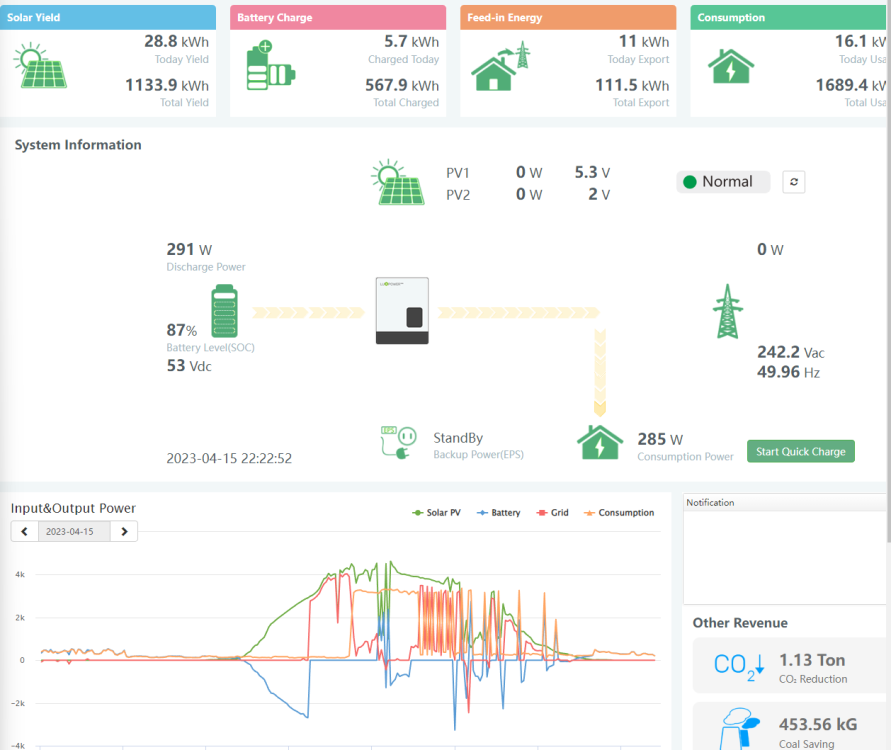
All, thanks for the responses. My conclusion is that, without doing anything fundamental, I can't do much except for setting the thermometer to the max for the immersion (not gas). It was turned almost all the way before, but now it certainly is hotter (it would be too hot without a mixer) and when I turned the immersion on today it stayed on for longer than it ever has before so that's am improvement. It still seems slightly odd that, after a shower at 2pm, the immersion only flicked on briefly many times. I guess the thermoneter is in a place where the water is still hot, and it certainly is! I probably got over 11Kwh into the water today. Also, 28.8 Kwh today - woot!
 1 point
 -
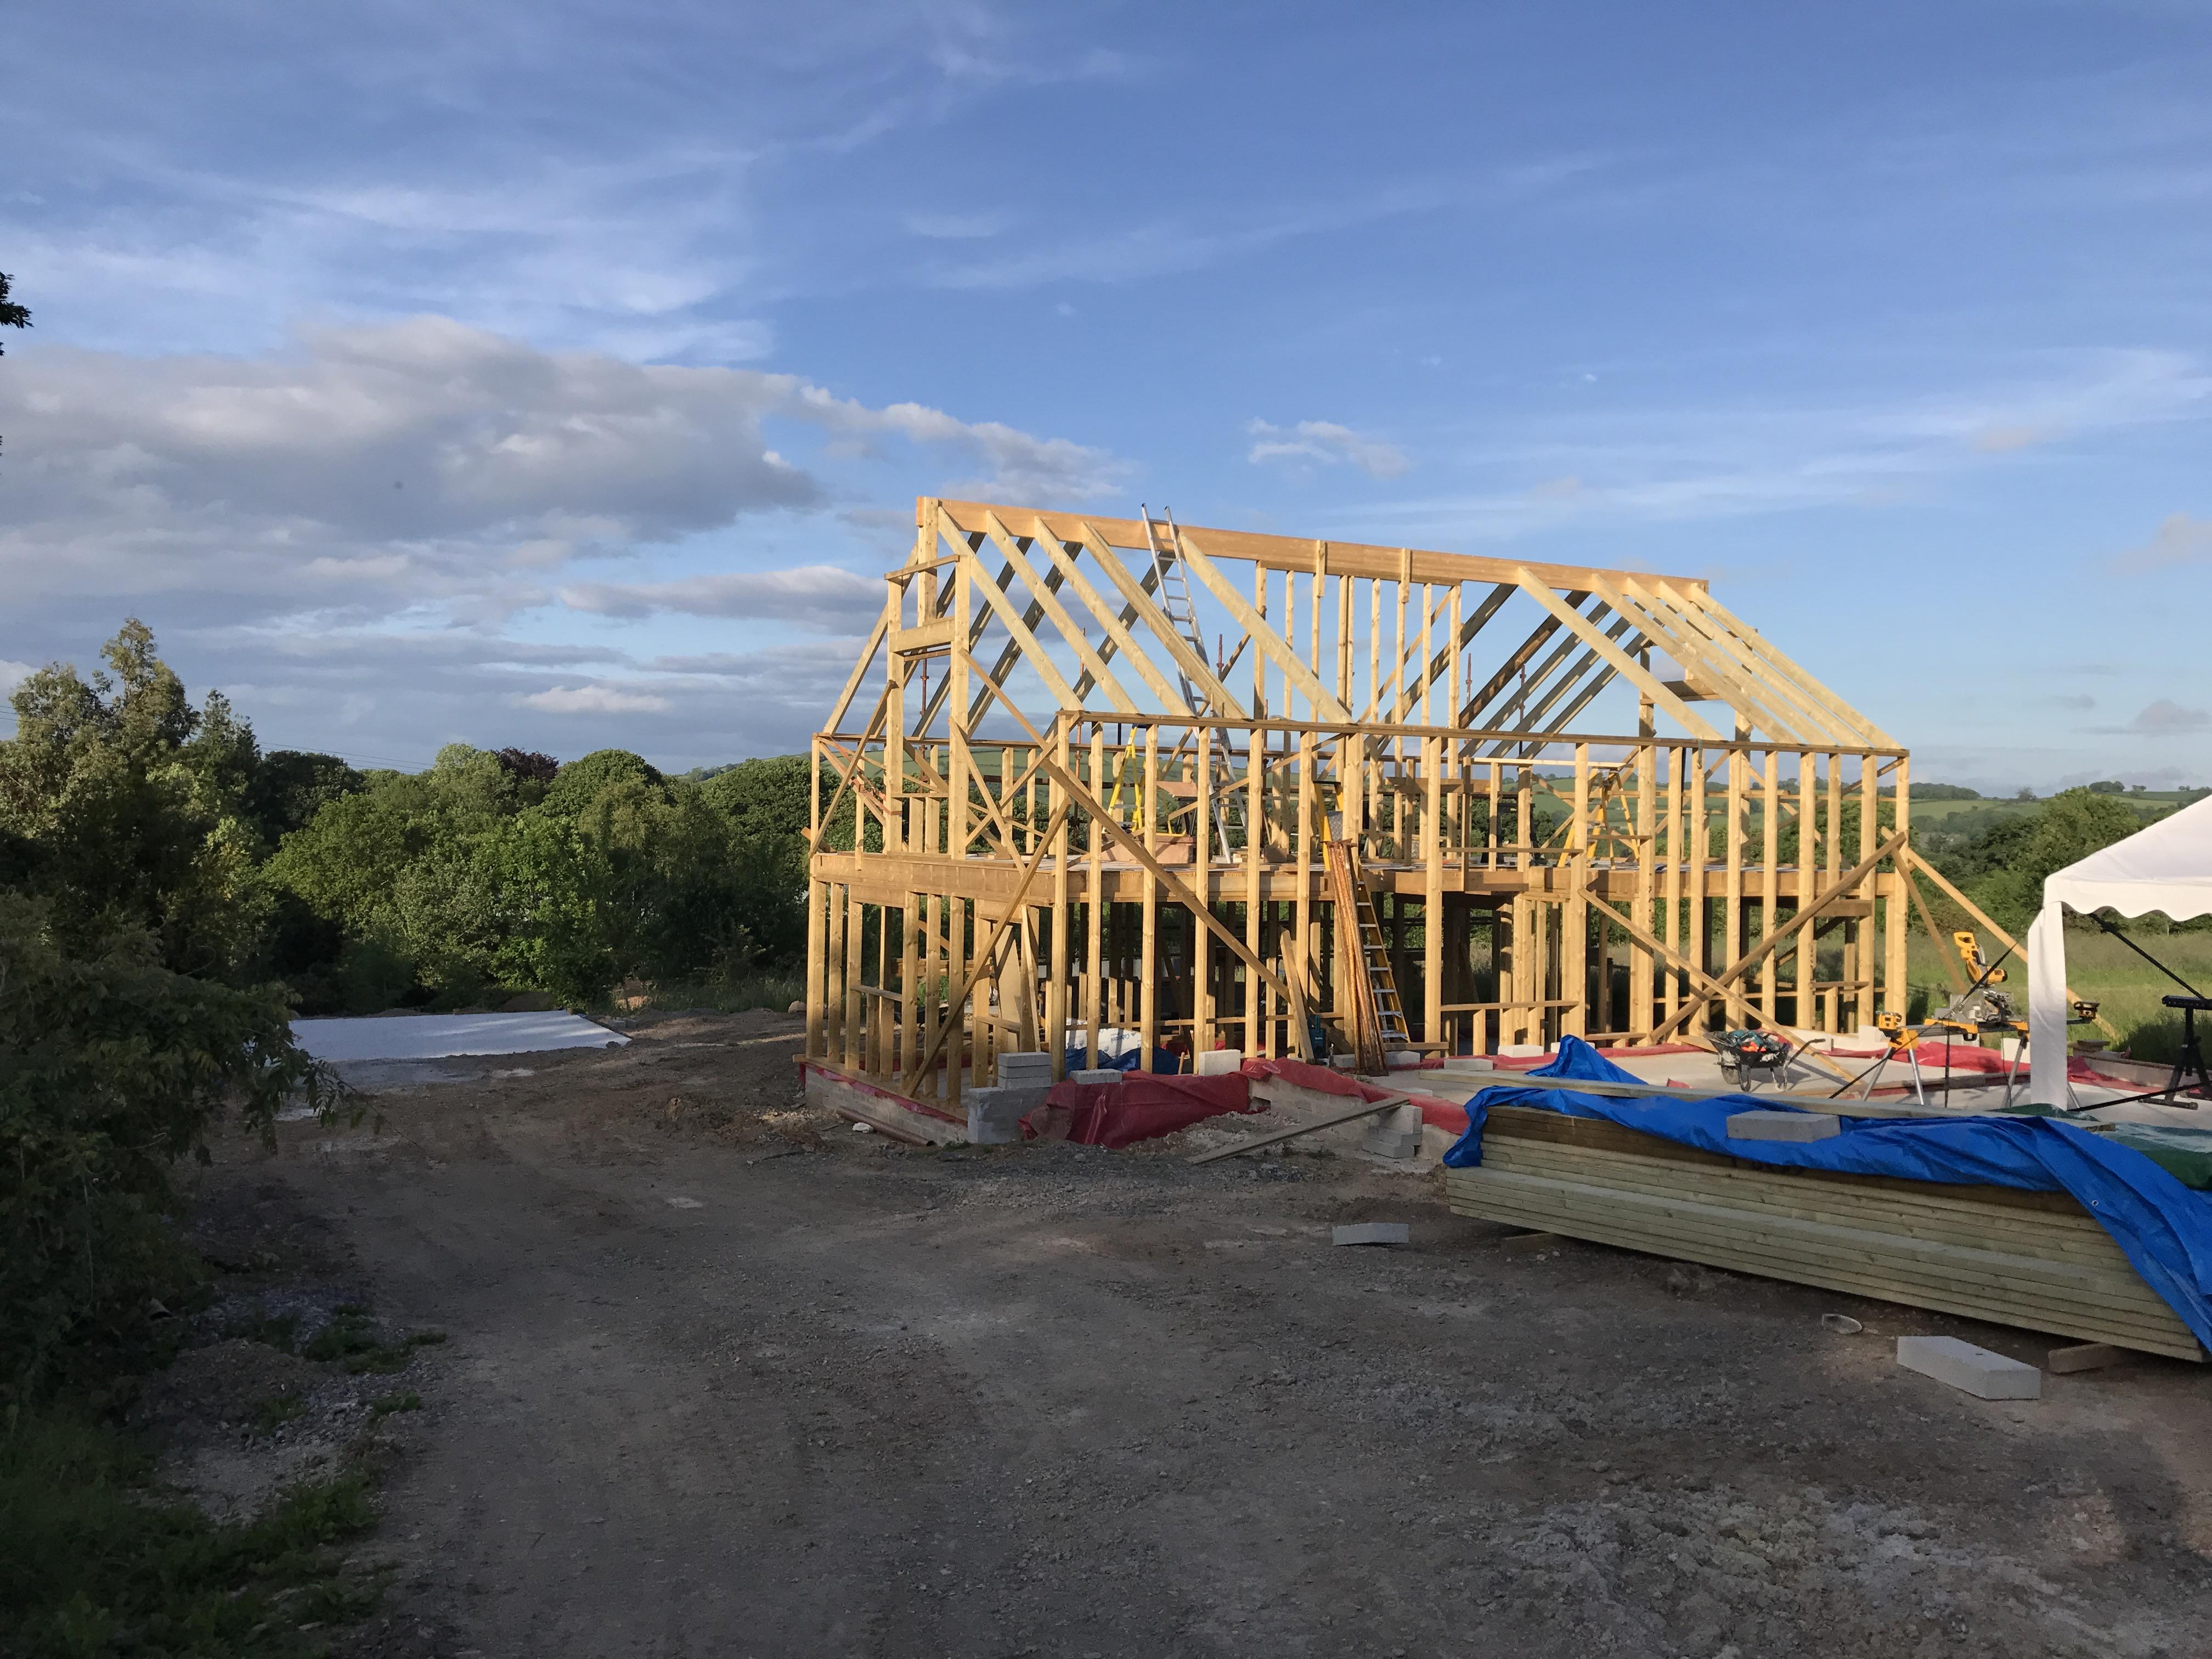
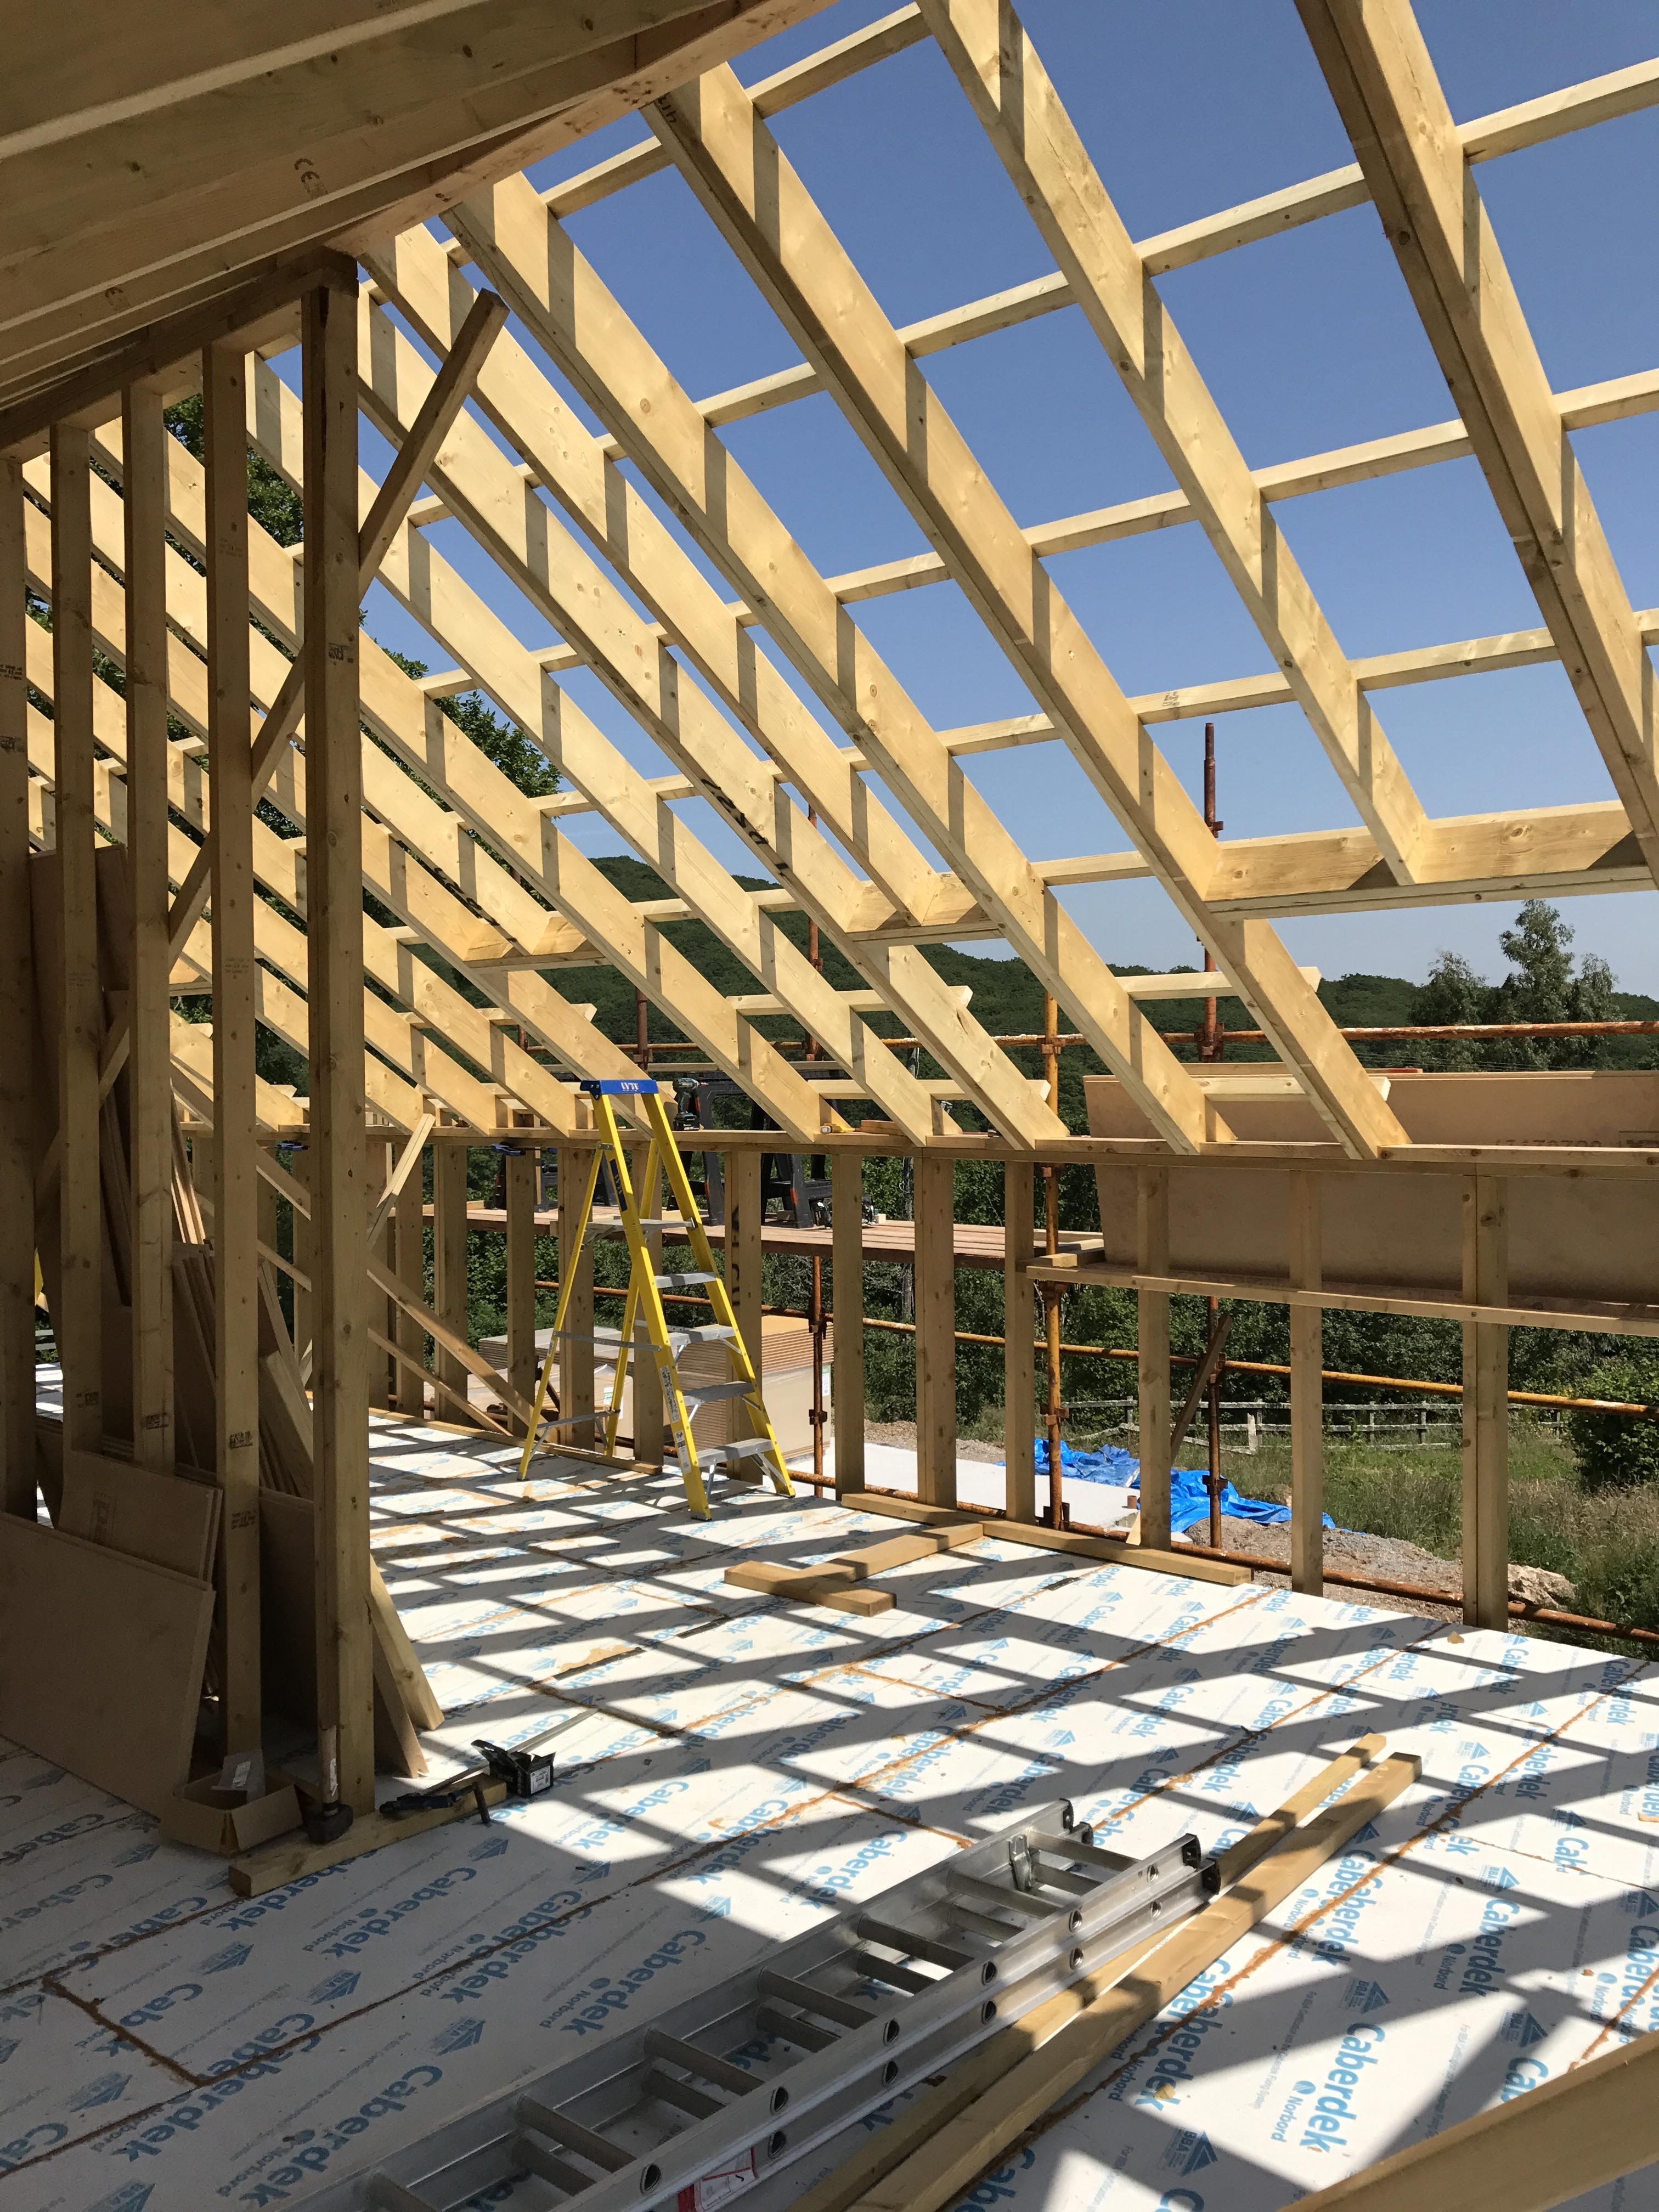
Frame's in. I have a new found hatred for soil pipes.1 point
-
Possibly, yes. But having said he was experienced and then later in the conversation exposing the fact that he actually was not i think i am justified in letting the gentleman pass.1 point
-
As one who five years ago didn't need a handrail. I now need wheels or sticks to get around. Don't dismiss a handrail because today you and yours do not need it! Make it a clean feature and you all win.1 point
-
Very interesting section on your findings with the use of the particulate sensor, I think I have just found a new project to add to our MVHR system. Our MVHR (Domus HRXD) has been in just over a full year now, through two winters. I have a little issue with it's operation around temps below -1 and that the controller is a bag of poo The clock needs to be reset every time there is even a minor power failure. I have set the controller to a background mode so if my added on system or more likely me myself fails then the other half can use the original system and not my toys as she calls them. I am a fan of the d1 mini micro controller, node-red, mqtt and the Raspberry Pi. So my system is built around these. The bathrooms and kitchen have d1's with humidity, temp, PIR and light sensors. There is a d1 in the MVHR control box that has a temp sensor in each of the four MHRV pipes (as well as temp sensors on all underfloor heating returns. It also looks after the co2 sensor that is in the room extract pipe. This same d1 also switches the MVHR fan speeds and inhibit function. The control comes from a Pi3 running mqtt and node red. mqtt is the message hub for all the sensors while node-red provides all the control functions. For example, boosting the MVHR if the humidity exceeds a limit in any room, introduces a mild timed boost should a bathroom be used for a period but humidity remains the same, reminds us if the small bathroom light has been left on. Switches the MVHR to bypass mode dependent on the outside temperature, the internal temperature, time of year and time of day. The co2 monitor allows the MVHR to run at half the supposed level required. Should the co2 go over 400 it goes to a "normal" rate and boost if over 1000. Eight people in the building will push it to 400 and above. For something else to keep it busy it posts data to a database on another pi. Things like, what fan speed and how long to calculate running cost along with the various temps to calculate savings. Not to mention it's use in control and monitor of the shed heating and ventilation.... all OTT but a good bit of fun... now, must order one of those particulate monitors. Can't wait to tell the wife exactly how many particulates are getting up her nose and are causing her sneezing... I can see lots of brownie points for that one... not.1 point
-
I have no experience of Scotland but in England it was still OK in 1990 (+) to use 'teeming and ladeling' with Bldg Regs, so you were allowed to get away with not insulating the floor if you (allegedly?) bumped up the wall insulation. I worked for a hsg ass'n at the time and although we used to build our owmn we were outbid on one site and ended up buying the pair of spec-built semis which were built on it. I soon got in the habit of taking off my jacket and one pullover before going in because the house was always at 25+ degrees. Why? Because they were always trying to get warm feet. Never did, really; just sweated from the knees up. Re the suggestion of floating floor the problem is that it puts your stair out of compliance with Bldg Regs unless you have the space to make the bottom stair a 'landing' (can't remember the dimensions)1 point
-
I just went dMEV, with presence sensor. No-one in the garden room, ventilation is off. Someone in room for 90 seconds or more, fans runs for the time the person is there and an additional 30 mins. Simple cost effective, ventilates only when required. No heat recovery but hay ho. Plus points, only ventilated when needed. Fan not running 24/7 No or little ventilation heat loss when ventilation isn't needed. Very low electric consumption. Cons When someone is in room vent fan is running, with no heat recovery1 point
-
An obvious question but why have you waited so long to do this?1 point
-
This! You can find heaters that look better or take up less space, but they're not going to be more efficient.1 point
-
I don't have the EPC software, and a air-change value isn't mentioned in the report, so can't elaborate on what's included in that. However the Fiabishop spreadsheet gives air change options for 4 building standards (5, 3, 1.5, or 0.6 air changes / hour), or a custom figure, in addition to the controlled ventilation of the MVHR system. It also allows you to compare 2 different MVHR units*, or one MVHR unit against regular mechanical ventilation (i.e. kitchen & bathroom extractors). It also allows you to input the m² area, m³ volume, location, expected occupancy, lengths and insulation of the main air supply and extract ducts, whether or not you're using hygrostatic controls, whether or not you intend turning it off in summer (and open and close the windows instead), takes into account the local climate, wind sheltering, orientation, the use (or not) of earth warming tubes (puits Canadian / Provençal, with or without pre-heaters), and a few other factors. The figures I gave above are for 0.6ACH, comparing the Zehender unit with regular mechanical ventilation. *The spreadsheet is pre-loaded with data for 32 MVHR units from 12 manufacturers, with the option to add more entries yourself. So, comparing the Zehnder unit to a Brink Renovent Exellent 300, it forecasts that my energy bills would be €8/year higher.1 point
-
I applied to both electric and water separately (no gas and didn’t need sewer) and told them I wanted to co ordinate the digs. They make you pay up front in case there’s a problem and you need two trenches, but all being well, once you have paid, the two companies will speak to each other and sort the days out and the road closures etc. You then get a rebate after it’s done and dusted.1 point
-
Yikes. A piece of string question.... Ultimately you are aiming to have your foundation on a layer that doesn't move with changes in moisture or temperature. Or at least moves a minimal amount and evenly. Any soil with lots of organic matter is a No No. Likewise any soil that will swell and shrink because it will get wet and dry repeatedly. Tree roots can have the same effect. Then there's frost, deeper is better but it depends on the local conditions. I've heard 600mm below ground but I have no idea where. What kind of soil have you got? Have you got the spade out and dug a trial hole? . Say 300*300 and 600 deep. Do this and post some pics.1 point
-
Which is exactly what you want to aim for. Charge the slab during off-peak via ASHP ( CoP of 3-4 ) and then slow release the heat throughout the gaps of peak-rate electricity. Nice smooth hysteresis and super-low flow temps, as discussed above.1 point
-
2 piles of dogshit, then, instead of one.1 point
-
Not wishing to hijack the thread of this post but could this be why you are still looking for a builder? Our builder was the same view as the one you dismissed. He had no idea what an ASHP was when it arrived but has built many houses in the area. That is why we choose to leave the heating and plumbng to those expert in that field - bit like Doctors I suppose - A generic term covering a host of specialities!1 point
-
Not when we built. Most were ok with being paid in stages in arrears with 5% retained for snagging. Our builder did ask if I could help with cash flow once and I agreed to buy the windows myself.1 point
-
Stainless steel pan scourers foamed in will stop them.1 point
-
make a liner either out of 2 normal ones joined together or use a sheet of mdf and make your own to size.1 point
-
your going to have the same issue as the other guy here trying to do the same thing. you somehow have to get a continuous dpm below the insulation lapped into the inside skin. somehow need to keep those blocks dry after covering them with insulation.1 point
-
Night storage heaters have zero value. However for gardeners with a greenhouse, my tip of the week is this. Salvage the thermal bricks and use them as plant supports. They absorb heat during thd day and release it in the evening, keeping the plants warmer. Yesterday at about 5pm, they were about 5° warmer than normal masonry. The principle may apply to other circumstances too. Excuse being slightly off topic. On topic again. I have known very clever people be conned into buying these exprnsive new heaters for the wrong reason. I checked out the adverts and they imply better efficiency through being scientific, but the actual explanation is quick acting, with timers so they are on only when needed.1 point
-
Read the Haynes Period House Manual, it explains the principles and pitfalls of insulating period properties. In my view you would seriously devalue the house, and possibly your neighbour's too, with external wall insulation.1 point
-
Thanks all. Will discuss with new SE. Have an immediate problem with sale of old house though, easements rejected by buyer to water & broadband . We'll get there in the end but may have to re-advertize all over again. At least that gives time to submit fresh planning application!1 point
-
As noted in my post, this particular apartment is in France. What I'd forgotten is that UK EPCs are still based on a hypothetical predicted fuel cost; in France they are based on primary energy use (kWh/m²/year) & CO2 emissions (kg CO2/m²/year) - the lowest of the two scores determines the rating. I guess the UK may eventually catch up. My French EPC is calculated on a saving of 2,000kWh when using MVHR - too round to be unit-specific. However, the free Fiabishop.com MVHR calculation spreadsheet (in French only) does calculate based on specific models. It forecasts that my Zehnder unit will use approximately 148 kWh to run for the year, and cut space heating by 1,687 kWh, and overall saving of 1,539 kWh. Assuming gas heating, at the current UK average rates of 10.3p/kWh for gas, and 34p/kWh for electricity, that's a saving of £124/year (or £523 with electric space heating).1 point
-
I think you have a mixture of Economy 7/10 storage heaters ( filled with heavy thermal bricks ) and lighter panel heaters ( heavy ones sit on the floor obvs ). Search eBay / other to compare what these are selling for, but courier / transport costs will be a big issue for the storage heaters. Typically these go in the skip with me, due to the problem of getting someone to collect, even if offered up for free. https://www.ebay.co.uk/itm/145028123702?hash=item21c4598c36:g:9uUAAOSwEspkMyXP&amdata=enc%3AAQAIAAAA4PtASZ4K3hdTX83c1pJc%2BTnpAk4atJHW5UHhKATkA1B%2FYG6lGgh6D5UChFNeVmkc25AbyE9foUnZB9ySSwVk67M4h%2Fl7K9Fs2L2NIJ%2BDqvdgs7ulgXbP8%2FOfHhOCRdUvYZe63AAN71mOUmtSeljwNmgak5ncdKS9fWSOwun%2BZFgslzQG9B9AxPuvdMv16xvu7TEVvJr5%2FmN%2Fz6oVGDyPGhAne%2FqknpoApxIEAmD3EMyJPhKu%2BqTGZJxeSOOJ7PrWjQsnr4uDIT3Y5oLSZdmsnyrN7kOjWSnqKjao6lwoZ%2FUy|tkp%3ABk9SR_jM6cjwYQ1 point
-
Be sure they accept payment end of each month, and need no deposit or advance payments... Good builders will have large credit allowances at their merchants so don't even pay up front themselves!1 point
-
That is very good ground for construction. That should be plenty of info. Relax.1 point
-
The footprint of the bedroom block is 12 metres x 7 metres, we put 2 bedrooms and and 2 bathrooms upstairs. I will send some finished external photos later. have a quick look here


 1 point
 -
I think these have a pretty big hysterisis so not the best with high mass heating systems. If you are set on Valiant product, I would check out what comes with the unit it's self, that may be ok on its own. Thick floors keep it as simple as you can.1 point
-
I bear good news. Hornbeam are low water demand trees. At 7m you only need 1.1m depth of foundations. Your SE should have known this. Or perhaps they based the design on simplicity rather than materials required. Foundations can be stepped. Now is the time to brief your new SE with whether you prefer the screw method or conventional. Guessing £2k to £3k difference but I have not analysed it. More difference if you can use foundations at 1.1 ish for a lot of it.1 point
-
Just a thought.. have not really examined all the detail but.. what about this line of thought.. You have a confined site, trees, it is in a bit of a hole, probable ground water and neighbours close by that could be "touchy". Good news is you have refusal at 2.6 m so lets say that is where we have something we can work off. But we need to know more about the ground water.. and how fast it will flow will you do trench fill. Could we do a test and use a sump pump? I would explore doing a trench fill 1.0 - 1.4 m in from the boundary. You look at the stand up time of the excavation, you are working in a safer zone (further away from the boundary and loads beyond the boundary / unexpected things that are more difficult to control) as not to close to the boundary so if things start to move you have more time to recover as opposed to getting complex by working right on the boundary. Also for example it takes you further away from the trees, primary roots etc and you have a "soft zone" to run all services around the outside. What you then do is cantilever your structural slab out to the boundary / where it needs to go and put the superstructure on the edge of the cantilever. We do this a lot when we are fitting a commercial building into a gap site. I have no objection to using screw piles myself but they are not so good at carrying sideways.. wind loads.. a good circular pile has more lateral bearing area against the soil. But I would alway look at the simple stupid first even if just to rule out.. like trench fill and a cantilever slab. Is this worth exploring for you?1 point
-
Hello all. A bit of technical stuff and a few tips on self building an insulated Kore (say) slab. Yes spot on. For a bit of fun here is an bit more of an explanation as to why and what is more important (in my view) for insulated raft design and construction on self builds. Roughly the plate load test involves a stiff metal plate, usually 300, 450 or 600mm square, a jack and a strain gauge and a load gauge (ring). The plate goes on the ground, and you jack against something heavy. You can create a big cradle weighed with kentledge.. expensive for smaller stuff or you can use a 16 tonne excavator to provide the kentledge. Excavator is the easy way as you drive it about.. if you have the room. You start to jack measure the amount the plate sinks by at what load, plot a graph etc and from that you derive what is called the CBR ratio (California Bearing Ratio) based as a percentage value. The CBR value is a number that is often desired for highway design. In a domestic context we may want to know this if say we are building a few houses and the shared access is to be adopted by the Highways agency or for some reason the fire brigade have a particular requirement for access during a fire.. they need to know the access will not sink under the weight of a turn table ladder.. you would have to have an exceptional site for this.. but just to mention anyway. Another time you may need to know the CBR ratio is if you are doing piling, need a heavy rig and need to design a piling matt for the rig to safely get in and do the job. The piling Contractor will do due dilligance and often ask for this number especially if they are designing the mat. If you find you get stuck on this there is the option of proof rolling. Here we may run a roller with a dead axle weight of 5 tonnes over the ground.. if it moves about like pastry then we know it is not promising. Now a key thing about the CBR (plate) test is that it only gathers good information down to 300 to 600mm, much depends on the size of the plate and the ground you are testing. The pressure / stress the plate exerts on the ground is roughly the shape of a slightly extended (droopy) light bulb (incandescent). Lastly it is possible using some rules of thumb, charts to roughly convert the CBR value to a value that is roughly equivalent to how elastic a material is called the modulus of elasticity and this is good as we now have units that are compatible with our hard core, slab insulation and concrete slab above.. not quite but closer. But on an insulated raft we are probaly using an insulation 300mm thick on 150 - 300 mm of well compacted hardcore. These spread the load a lot so the underlying formation ground is much more evenly loaded. The CBR value is now not really that useful any more to us on BH. What is useful is the value the SE puts on the soil they see in the hole as this gives them the allowable (presumed) bearing capacity of the ground. Often you see a value of 100 - 120 kN/m^2 in decent clay soils. That value equates to you being able to put about ten tonnes per square metre on the ground with the expectation you might get some 15 -25mm settlement in a clay soil. Houses are designed to move about a bit. Now if we know the allowable bearing capacity of the underlying soil, know we are using good well compacted hardcore, know what kind of insulation thickness we need and roughly what kind of concrete slab is going on top we can then design all these layers for the loads. What 99% of the time drives the design (Kore etc) is the slab loadings (slab point loadings / spread out loads) and how these interact with the insulation directly below. This is the critical bit as it drives slab thickness, amount of rebar required and the complexity of the slab / rebar and that is one place where money can be lost. The SE then iterates the design to get the most economic slab by balancing rebar, concrete thickness, concrete strength, concrete shirinkage (movement joints, water bars if applicable) and the underlying layers of insulation etc. OK. Things some you can look / think about when doing an insulated slab to set you on your way for a good job. 1/ When you excavate out the ground to the level that you are going to start from.. called the formation level look after the virgin ground surface, be quick to get a covering layer on it if say clay or friable chalk to stop it softening in the rain / frost or drying out too much. remember that value of 100 kN/m^2 .. if you soften the top 50 -150mm that bit it will move later. The last time that soil may have seen daylight could be some 100k years ago so treat it gently. 2/ Lay your hardcore in thin layers 100 -150mm thick and get a good whacker. Take extra care at corners.. try and get the compaction even.. no soft spots but also no really hard spots. Hard spots can break the back of a foundation.. strip foundations can suffer in particular if you have say a big boulder that does not move. What you are trying to go is to create a platform that moves up and down in an even way. Rafts are less succeptible but never the less. 3/ Often you need to run drains under and that involves excavating a trench and back filling. The objective here is to try and backfill so the filling is about as squashy as the ground next to it. If you were to say backfill with a lean mix 10N concrete you create a really hard spot on a line that invites a floor slab to crack, if you chuck disturbed clay back in that has got wet you'll now have a nice soft line under the slab. Hope this helps someone.1 point
-
We used RIAS Scottish Conditions of Appointment of an Architect - Small Project Version ASP/2018 you'll find a copy online the English version will probably be the same. We went through the Schedule of Services and took a pick and mix approach to what was on on offer from the stages below. Although it was classed as a full service approach I would have said the architect took the lead for Stages 1 and 2 then it was over to the Architectural technician for the rest. There is a load of Additional Services that can be added to the below if required. We then agreed a fixed fee and off we went. This all really paid for itself when the builder went in breach of contract then tits up. Preparing the Design Work Stage 1.0 – Preparation of the Brief 1.1 Ascertain Client Requirements 1.2 Obtain Site information from Client 1.3 Advise Client of his/her duties under CDM regulations 1.4 Visit Site and carry out preliminary appraisal 1.5 Identify Project and Construction Budgets 1.6 Develop outline brief 1.7 Agree Preliminary timetable Work Stage 2.0 – Initial Design 2.1 Prepare initial design proposal 2.2 Provide indicative guidance on cost and timetable Work Stage 3.0 – To Planning Consent Application 3.1 Consult with Local Authorities and Utilities as required 3.2 Progress Stage 2.1 design 3.3 Prepare application for Planning Permission 3.4 Submit application for Planning permission 3.5 Advise on procurement methods 3.6 Report on timetable, agree revisions Work Stage 4.0 – To Building Warrant Application 4.1 Progress Stage 3.2 design 4.2 Co-ordinate work of other consultants 4.3 Report on timetable, agree revisions 4.4 Prepare Warrant Application 4.5 Submit Warrant Application Preparing the build Work Stage 5.0 – Construction Documentation 5.1 Advise on and agree form of Building Contract, including Contract Administrator 5.2 Prepare drawings, schedules and specifications sufficient for tender 5.3 Co-ordinate information from other consultants, specialist designers and contractors 5.4 Prepare Description of Work Work Stage 6.0 – Tender Administration 6.1 Compile list of Contractors, if applicable 6.2 Assemble tender documentation including Bills of Quantity or Schedules of Rates etc. prepared by others 6.3 Issue tenders to contractors for pricing 6.4 Take delivery of, and report on tenders 6.5 Advise on appointment of contractor 6.6 Agree frequency and scope of site inspections Progressing the build Work Stage 7.0 – Contract Administration 7.1 Administer the Contract 7.2 Attend Progress Meetings on site 7.3 Inspect the works as necessary to administer the Contract, review progress and quality in terms of the building contract 7.4 Issue instructions to the contractor for variations to the contract when approved by the client 7.5 Report on Stages 7.1, 7.2, 7.3 and 7.4 7.6 Advise client of when works are practically complete for handover Work Stage 8.0 – Post Completion Work 8.1 Advise Contractor of any defects 8.2 Administer the contract to final account1 point
-
Drawings please if you have them and I'll try to do a sketch. Include any height restrictions too. A cut roof is probably better for a warm loft but not always. You can have a WARM LOFT with 1. A COLD ROOF. ( Insulation between and below rafter. ) 2. A HYBIRD ROOF. (insulation between and below rafters. ) 3 A WARM ROOF ( insulation only below the rafters)1 point
-
When you sit on it the forces push the bottom of the frame down and backwards. The top of the frame gets pulled away from the wall. So i braced the bottom 2x4 against the wall with some timber running front to back. Just screwed the frame down into the 2x4 with coach screws I think. We had a bit more space in the cavity than you. At the top we have timber fixed to the block wall with quite a few fasteners. Then "bolts" made from studding act as stand offs for the frame. These bolts were put through recessed holes in the timber before it was fixed to the wall. Then we used nuts to set the distance from the wall to back of frame and more to secure the frame. So 4 nuts on each "bolt" if that makes sense. Either side of the frame we have vertical 2x4 With screws through the frame into that. This 2x4 had to be notched to clear our 110 pipe which runs left right.1 point
-
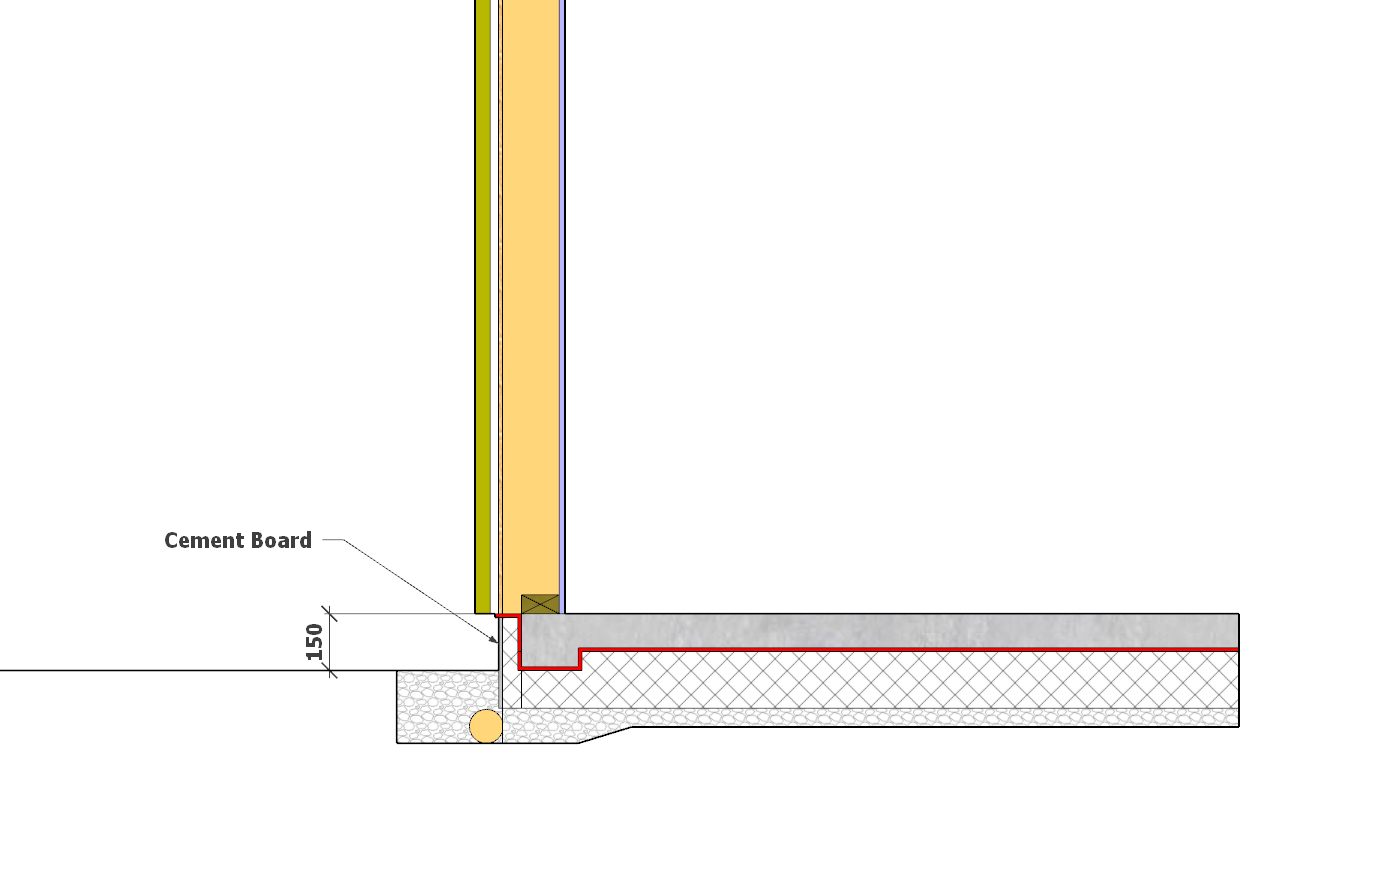
This might be easier to build. Note the 50mm insulation outside the concrete, the 50x100mm wall plate supporting 150mm studs to give a much better junction thermally. Something like EPS 100 should be fine for a garden room. I've thickened the slab 50mm at the edge for some strength but it's educated guesswork really. Some reinforcing mesh would make it much stronger too.
 1 point
 -
I still think it is wise to use a vacuum pump. Otherwise you would dilute the gas with the air in the pipe? Also chance of adding moisture at the same time. Or am I missing something ? I only installed the heat pumps about 2 months ago and I used the vacuum pump. Not got any data yet on the electriQ models yet.1 point
-
I fitted a Telefunken in the blog @Radian linked. I've also fitted 2 9000 BTU electriQ in some cabins I built. The latter have had little use yet but are much better than Telefunken. I bought the vacuum pump for around £90.1 point
-
Thanks Russell. https://www.uvalue-calculator.co.uk/calculator/pitched roof/insulation between and over rafters/unventilated/no sarking board/125mm/400mm/120/ I came across the above calculator on Kingspan’s website and it calculates the U-value depending on insulation thickness and a few other factors. If I select… - Pitched roof - Insulation between and over rafters (for some reason above rafters alone isn’t an option) - Unventilated - No sarking board - 125mm rafter depth - 400mm centres 120mm insulation (60mm between and 60mm on top) I get a U-value of 0.16W/m2.K According to the document below, that’s good enough to comply with building regs. https://www.kingspan.com/gb/en-gb/products/insulation-boards/insulation-technical-hub/approved-document-l-england1 point
-
Just a heads up... Recently finished a second bathroom in our house and turned on the isolation valves for the shower. At first it appeared to work well but after a few mins the water ran cold. Its done that several times and it's not an issue with the boiler and tank running out of capacity. I need to confirm this as the cause but I have a horrible feeling our plumber didn't install any one way valves. So at an unused shower it looks like water is flowing from the cold feed through the shower mixer and back to down the hot pipe, then to the shower in use. If that turns out to be the problem it's going to be "interesting" getting access to the pipes to install four one way valves as both rooms have stone tiles. I also think all four pipes are 22mm copper and run super close together in a stud wall so getting 22mm compression fittings in might prove a nightmare. Oh joy of joys.0 points
-
I was going to post a photo of my hole ; but thought best not …0 points
-
If you buy from appliances direct. You need to tell them who you are using. They give you a list in your area to select from. Just select one. And when it arrives call them to install 😉0 points