
Leaderboard


Popular Content
Showing content with the highest reputation on 03/11/20 in all areas
-
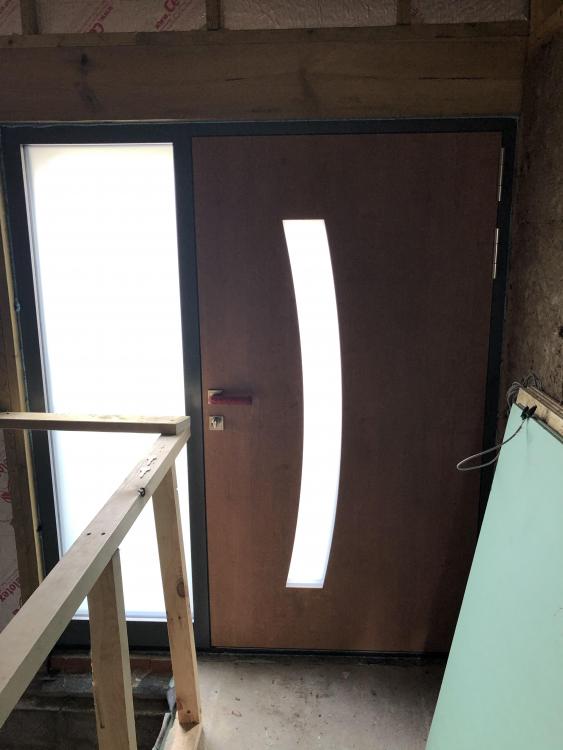
Front door looks the absolute b*llocks !
 4 points
 -
Cutting square is the key imo. A bfo table saw with dust extraction is good.2 points
-
When the door is open, there is a control panel in the internal face that closes into the wall. Bit of a faff but you add a new user and then add each finger one at a time by swiping down 3 times per finger and you get a confirmation that it's been successful. You can add from 1 to 8 fingers per person and I believe 99 people Easy to delete people also. Fingerprints survive over a power cut as they're written into non volatile memory. Everything is contained in the door and all you need to add is power - ours came with a long multi core cable and a DV converter. During plastering, the cable got severed but we got a replacement and managed to get it all hooked up again. There is definitely provision to patch it into a home automation system but as we don't have one, not an option for us. Also the newer version has wifi and bluetooth I think to enable remote opening, not something I'm keen on from a security perspective so don't miss it.2 points
-
Three single-phase variants of this new R290 ASHP have now been MCS-certified and can be found in MCS database. The 12KW version seems to have pretty impressive SCOP values: 3.5@55C and 4.9@35C. Not sure why 65C values aren't included here, I've requested more technical details. Maybe I should reconsider Sunamp, now there is a monobloc ASHP can than happily charge a 58PCM Sunamp without requiring compatability testing or a backup heater. I do want to check COP and flow rates at 65C first though.. @joth@oranjeboom Also, Sunamp have all but confirmed that there is no PCM48 version that will be avialable in the next 6mths, but to expect an annoncment regarding PCM43. I'm not sure PCM43 is really suitable for DHW though, flow rate must be closer to 40C max + pipe losses != a very hot shower. Also 25% less dense than PCM58 I assume.2 points
-
Worktop Express have a nice range.1 point
-
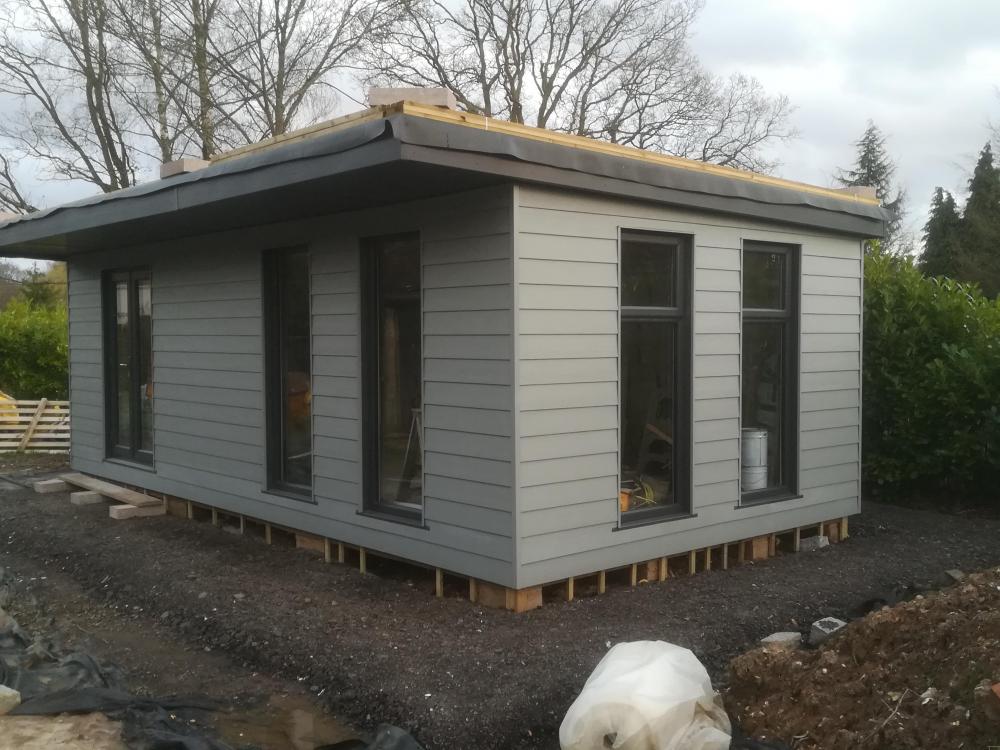
Finally got the sloping top bits of my cladding cut and fitted. Still got to stick the roof down, and do the skirt around the bottom, which I think I will do in black. Top half of my house will be clad the same, so pleased to have had the chance to practice on the posh shed
 1 point
 -
Yep, I pulled that trick on Teresa May last year1 point
-
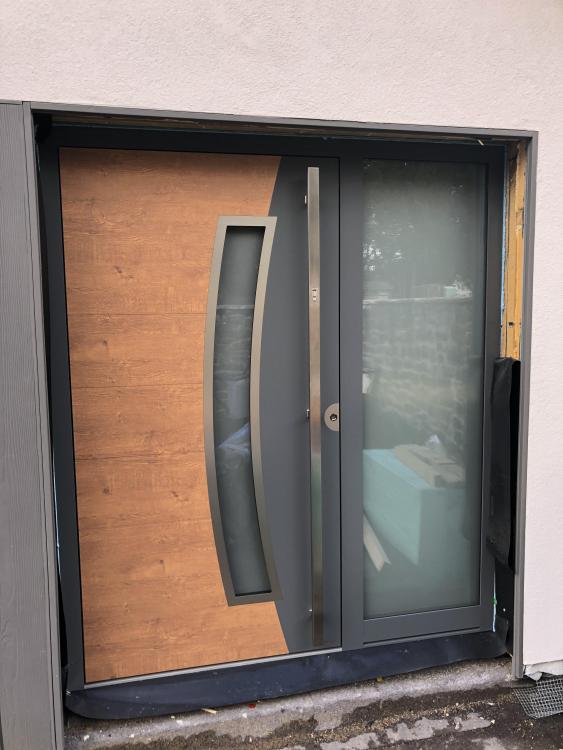
That sounds good. Our Internorm front door was £5500 and that was nine years ago without any fancy gubbins.1 point
-
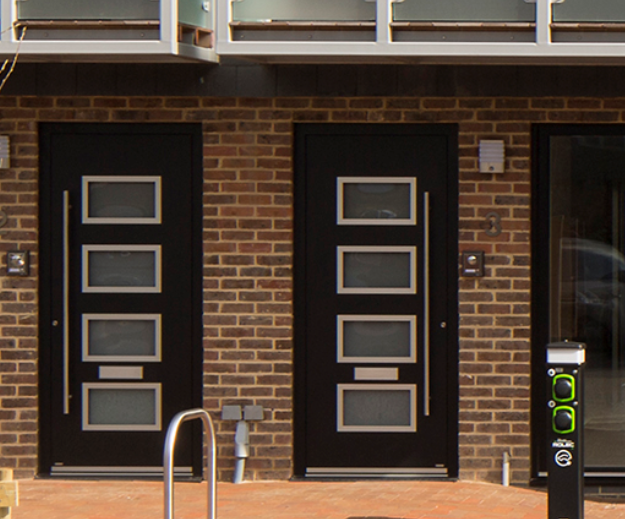
I had 8 RK Doors fitted in a development. £3,600 each including fitting. They had motorised locks and were a special design to match the planning drawings. Quite expensive but they seem decent quality. There is no snib, so if the door shuts behind you and you don't have a key, you are stuffed.
 1 point
 -
Ditto. Worth every penny. Everyone, but everyone who comes to the house comments on our doorway. The BCO really loved it too. A generous door seems to help set the tone of a house somehow....1 point
-
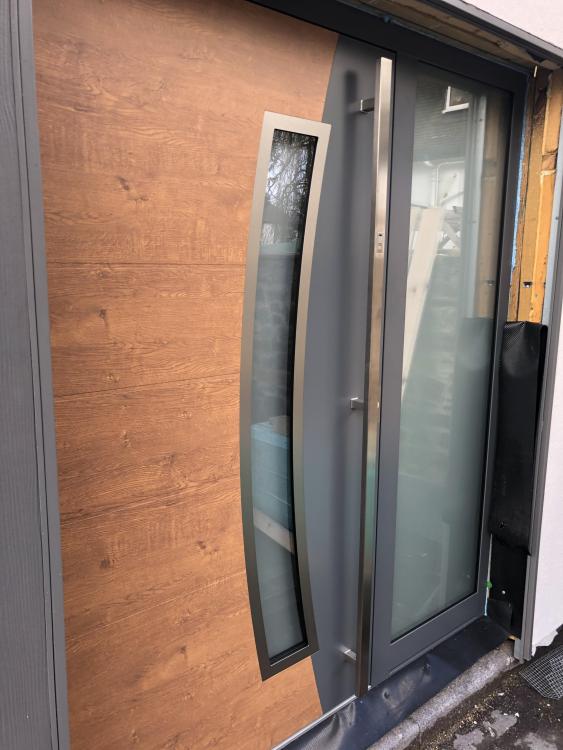
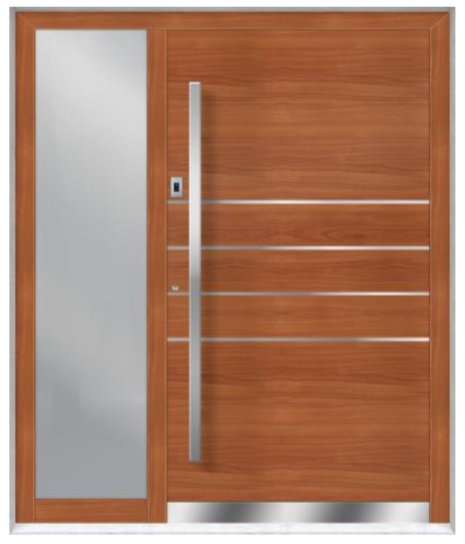
My RK door was quite expensive - about £5k and £500 to install, but we had the scanner and fancy 180o hinges as an upgrade so they added about £1k extra. It fills a 1650mm opening and the door itself is about 900mm wide. I did cock up the order though as I intended the door to be wider (1100mm) with less glass on the side but it looks fine. Also the wall construction next to the door somewhat impedes the door opening to about 100% but the concealed hinges look nice anyway It's U value is 0.67W/m2K and it's passive standard, lots of seals etc.
 1 point
 -
Can’t remember u value without checking . About 7k ? But we have as you finger print scanner , electronic unlock and customised front and back . All glazing triple glazed - that’s a fairly large panel to the right . RK doors are the jam of jams ! The ‘style’ choices were also more expensive than some of the simpler designs .1 point
-
@pocster is yours a RK door too? Mind sharing U-value and aprx cost? It looks lovely1 point
-
Very nice!1 point
-
That's a good sized tank, but the timber size sounds normal for that span, even if the load is more than normal (1.5kN/m²); personally I wouldn't be worried. And yes, the joists would flex if there were to be a problem - so without a ceiling beneath not such a big issue.1 point
-
Ok that answers my question. On site.1 point
-
@Moonshine Check that you are using Accredited Construction Details (to do with thermal bridges). They will make a big difference to your SAP score.1 point
-
Most here started out not knowing much. This place is a bit like a self-build university, where we all learn from each other.1 point
-
Thanks - I'd not necessarily been going to tie the skins together, there are existing wall ties just inside the cavity so I'd think so long as the new vertical half-brick section is secured to the outer skin it's unlikely to go anywhere?1 point
-
and you have definitely got all your CIL paperwork sorted (pre-commencement conditions discharged, CIL exemption claim form 7, Notice of commencement date Form 6 etc)? Get any of that wrong and you loose the CIL exemption if you start work. A fair bit of the missing data is more to do with Planning than Building Regs (eg the position of the house on the site and dimensions of the house are Planning issues not Building Regs issues). Unfortunately its up to you (the builder) to ensure the house is in the right place. There is also a difference between Building Regs drawings (which are to show how your house complies with Building Regulations) and Construction Drawings (which tell a builder how to build it). The above subset would be on a setting out or foundation plan. Typically you would start by getting a site survey done. This would be like a site plan with height data points on a 10m grid. Someone (you, your architect, or SE) would then add details of your house and founds to it together with two or more reference points (Control Stations). These reference points should be marked on the site by hammering in two posts that remain for the duration of the build (you can also set them out before the site survey and ask them to be shown on it). They should be somewhere out of the way such as in diagonally opposite corners of the plot, ideally on or near a height marker points. The posts should have height reference datum lines on them. They serve as reference points for the people setting out the house in the correct position on the site. Get these wrong and you end up building the house in wrong spot. The drawing should be dimensioned from the reference posts so the location of everything on the list can be read off and marked out on site. Drainage invert levels tell the ground workers how deep to set manholes, rest bends and the pipes between them. I can't remember if these are normally referenced to FFL or a site datum height. They probably need a cross sectional drawing of the foundations. This (these) will show: a) Foundation depth and thickness. They need to know how many courses of brick/block below FFL/DPC there will be. That way they know how much concrete to put in the trenches. Too much and you can't fit a whole number of brick courses between the top of the concrete and the desired height of the FFL/DPC. There are standard combinations for cavity walls but I'd have to look it up. Its something like two courses of blocks on the inner leaf are same height as 6 courses of bricks on the outer leaf. b) the width and minimum depth of the foundation trenches. The width may depend on the load bearing properties of the soil. This is usually determined by an SE who may need you to commission a soil condition report first (sometimes combined with a soil percolation test for soakaways). The depth of the founds may also depend on the soil type and proximity to trees and species. On some types of clay you need the sides of the foundation trenches lined with compressible boards before pouring concrete. How much of all this you actually need can depend on the project, site and soil type.1 point
-
Thanks so much Ferdinand for your advice !1 point
-
thanks Peter. only another 200 yards or so to go! a nice job for sunny weather!1 point
-
Probably best to try and find a Part P electrician who would be OK with you doing all the grunt work. There needs to be a degree of personal trust by whoever agrees to work like this, as the regs cover everything, including where cables are run, how they are secured (including the need for fire resistant cable clips or other securing methods now), how they are mechanically protected where they need to be, de-rating when cables are run in insulation or locations other than clipped direct, etc, plus the person signing off the installation will be signing to say that all the cable runs etc (some of which may be hidden from later inspection) are compliant, so they'd be taking your word that the runs are all OK. Alternatively, you can opt to do the whole installation and then get building control to do the inspection and test. The only snag I found when I tried to do this was that our local building control didn't have anyone who was competent to undertake third party inspection and test. They are supposed to, but they told me that none of the Part P accreditation bodies were happy with granting this type of accreditation (makes sense, they very much want to protect their closed shop cartel business).1 point
-
Had a mouse die in my old cottage that I only used sporadically, it died within the Built in insulation of a big cooker....... every time you put the oven on it was apocalyptic..... cooker had to go much to my disappointment.1 point
-
Managed to cut and fit a noggin in between the metal joists and to screw the clip to that. Really pleased because having bent and crooked hands actually helped! It's an ill wind and all that ... Just because I can, I'll fit some builders band tomorrow when it arrives. ?
 1 point
 -
I've still not got round to it yet! Had the window fitter here the other day, to take all the specs down and he is going to speak to his supplier, but looking to go with Modus profile, and Pilkington glass to achieve 0.8Uw. Standard Eurocell (Logik 70) is a horrid profile! I've got one of these, last double glazed window we put in, never again! 75mm is the thickness of the window units (not the sill), so the standard profiles tend to be 70mm and accept up to 36mm triple, 75mm gets you up to 44mm triple which is the sweet spot, and then Liniar do a 90mm which I think gives 56mm triple, or quad, but the gap in triple would likely be too wide to make it worth its while. There is also Rehau Geneo if you can get it, another 75mm profile, this one is quite different though, its actually a GRP Fibreglass profile, coated in PVC as a top coating, making it very strong and thermally efficient. Will post some pics when they are in, probably won't be til May/June time when its a bit warmer and less windy.1 point
-
Thought you didn't like push fit?0 points
-
I await your arrival ! Cucumber ready ! You dirty bastard !0 points
-
Just for you I measured mine. Upstairs 35" to the top of the sink. Downstairs 36" to the top of the sink. Both sinks about 5" depth. If you are concerned afterwards you can just take off the kitten heels. Ferdinand0 points
-
Yes they were. Not terrible amounts of rust but enough to be noticeable and only on the handles. Letterplates, glass surrounds and escutcheons were fine. We have loads of exterior stainless steel elsewhere on the project and none of that has been a problem. RK blamed lack of maintenance on the part of the owners an cited the presence of cobwebs as evidence. Their MD did them no favours with customer service. Here is a close up of a handle which I removed to clean up:
 0 points
 -
For a sink the more important distance is to the bottom of the sink, as that is where your handses are? More importantly perhaps for SWMBO, who is usually shorter, and would not appreciate needing a beer crate to stand on in the new bathroom.0 points
-
Thanks! We've really cut corners with the main door, selecting the same internorm patio style door as we are using for the kitchen side door. Our front door is not visible from the street (on side of house, perpendicular to the road) and will eventually be covered by an external porch, so really seemed a waste of money getting a statement door. But seeing yours gives me serious doubts as this is exact look I originally had in mind!0 points
-
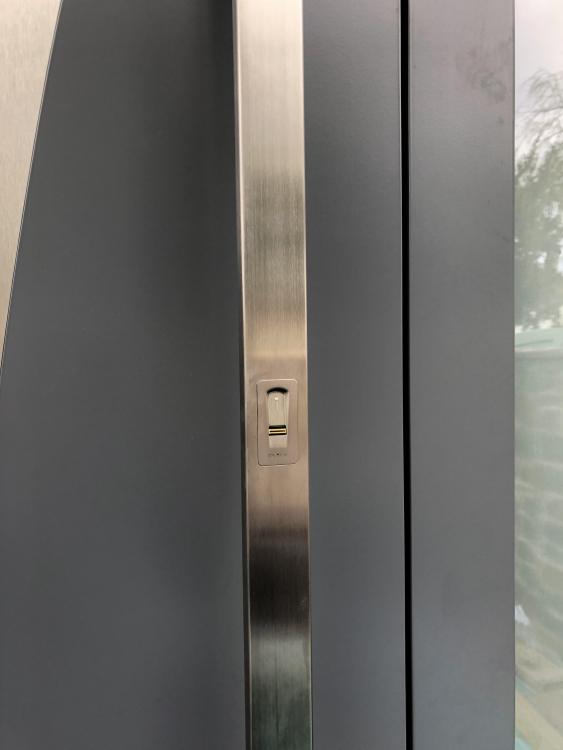
If it is that'd be a bummer for me. After a day on the concrete or smashing holes in a wall, my phone steadfastly refuses to accept my fingerprint. Yes @pocster that is a really nice door. There's nothing more welcoming than a really well proportioned door. Looks to me as if you're as scared of losing the keys as we are ...
 0 points
 -
Is that a finger print reader? Must have set you back a few bob!0 points
-
Looks good. You will be raided by a slimline Banana Burglar.0 points
-
Might try and get planning and build another house over it0 points
-
Shouldn’t this forum be called, professionalbuildhub.org.uk. It may keep numb skulls like myself away, seems like you all have a pretty good idea on all the tasks when I’m still scratching my head ?0 points
-
Pssst! Anyone wanna buy a roll of red and black 2.5 T&E? Got up to 10mm. Just ignore that the sheath on some is disintegrating. Cheaper than a roll of loo paper! ?0 points
-
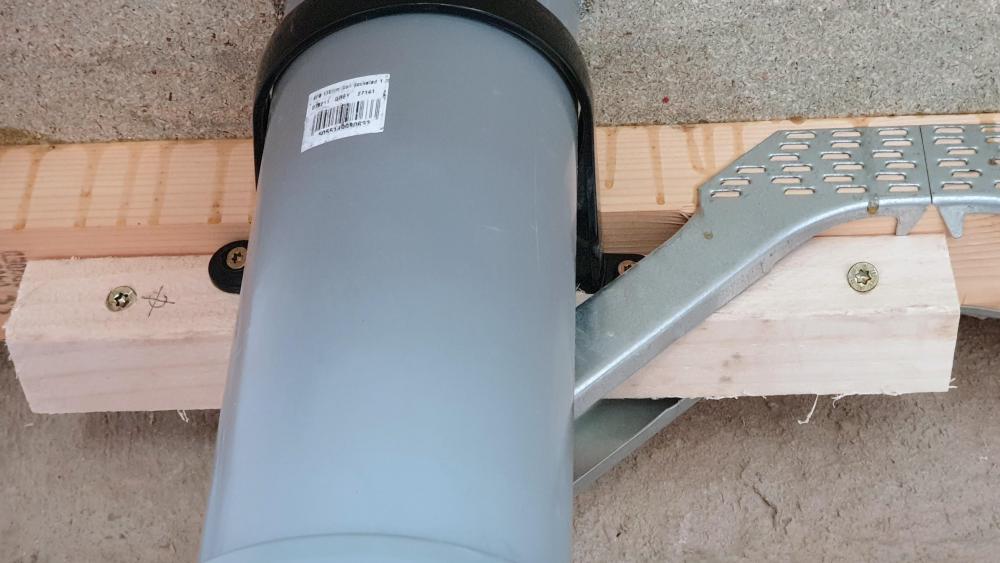
I can always build a concrete block housing over that short run of black pipe to protect it .0 points
-
Might you mean a Rest Bend? 87.5 degrees.... me being an expert and all that ?
 0 points
 -
What do you do with the leaves?0 points
-
Um. They are dead so they can't smell ... unless they have a ghost. (Gets coat and leaves)0 points


