Leaderboard


Popular Content
Showing content with the highest reputation on 01/07/20 in all areas
-
After various delays, the time has come to get some heat into the house, and as there have been a few on BH that have gone down the route of Willis, thought I would give it a go as well. Hopefully others will find the blog entry also. Background: Renovated (3G passiv-rated windows, 120mm EPS EWI, 400mm loft insul, MVHR - not tested air leakiness yet) / extended (175mm SIPs) south facing detached house, East Kent 156sqm of wet UFH in 100mm concrete (with circa 300-375mm EPS insulation) 130L in UFH Wunda 12 port manifold (The heating valve on the manifold operates in the range of 30-70oC) Wunda wired room thermostats for each room (but probably won't use for this temporary setup now) 12Kw eDual for DHW (not to be included as part of Willis setup) 12Kw Sunamp for DHW/UFH (not to be included as part of Willis setup) 3.8Kw PV (potentially have further DIY grid implemented later on) Not looking to cater for worst case low temps as at these times will just plug in some extra heaters: I originally ordered 2x 12Kw heat batteries for DHW and UFH. Total reliance on the PV in summer and then off-peak grid in the winter. An all electric approach initially without ASHP. Not keen to spend £8-10k on an MCS installed heat pump to get back an estimated / possible £8-10k. Installers seem very vague on the RHI returns and if I have read correctly, I will have to be metered in order to qualify in any case (as have not lived in the property previously). Since the house will be far above buildreg stds (but below PH level), I simply won't be using the amount of expected input that the installers calculate - hence I won't be getting back the cost of the ASHP supply and fit install. So most likely won't go down the MCS route, and if I were to install an ASHP, it would be a cheapy from fleabay. Having excluded using an ASHP, I learnt that Sunamp were testing various units late 2019. But typically with Sunamp, after continued confusion on their part as to what ASHPs they may have tested/not tested/will be testing soon, I've made the decision that I can't want any longer on their input. So for now I will leave the ASHP option until later on and perhaps consider a propane unit (e.g. Vaillant ) when they come online on a non-RHI basis if I can get a decent install cost. Willis Heater approach So therefore looking to heat the UFH with 2x 3Kw willis heaters in order to progress with the internal house work. Thought I'd add some info on here as a lot of people like myself aren't familiar what they are. They originated out of Ireland and still much in use over there. They're essentially external immersion coils and instead of sitting inside a tank are simple external electric units - AKA "Willis jacket", "standard sleeved immersion heater"," inline electric heater". Googling should get you something like this: Item Weight 1.15 Kg Product Dimensions 30 x 9 x 9 cm I have tried to get plumbers interested in rigging this up, but they're either not interested or have told me it's not possible/don;t know what a willis heater is. I've managed to plumb in all the Hep2o in the house, so hopefully this won't be too much of a bodge. @TerryE has kindly discussed his set up which is pretty impressive with his DS18B20s set into the walls etc. I'm no programmer and my javscript is mainly simple web stuff and wanting to get heat into the place ASAP, I just want a KISS approach for now. Perhaps later I will think about having some of it programmed using Terry's Node Red option which makes for interesting possibilities. Get a feel for Terry's approach here: But as I've said, I'm after a bog standard dummies approach to this - seriously KISS: So rather than wiring up room thermostats to the wiring centre, I will for now simply use the Willis inbuilt thermostat and set that to gradual increasing temps from 10oC up to a max of 25oC. A gradual heat increase seems safer in my mind. My only concern is if the Willis thermostat fails and carries on beyond 25oC - up to max temp. Obviously I will have the manifold mixing/blending valve that should restrict temp flow into the UFH also, but is there a further failsafe to consider? Dummies layout. Eventual Sunamp units (for DHW) will be located on left of manifold so having to locate Willis heaters to right and expansion vessel top right: FYI: The immersions need to be turned the other way (so colder water enters the side) Parts list: 15mm copper pipe. The Willis heaters are 15mm so I presume plumbing them into the manifold with 15mm would be okay? 15mm plastic pipe for cold return should suffice I presume? Bottle vents - automatically release any trapped air (like this one). Do I need any and if so where do I place them? Willis heater (ebay has the cheapest) Expansion vessel - 8litres sufficient for total UFH volume of 130L? (like this one) 20A DP switch outlet (for each willis) from a 16A MCB (like this one) . Probably one for each willis Immersion timer (like this one) to be added possibly when I change over to E7 low tarriff rates Will get an electrician to wire it all in for me! Be grateful for comments, suggestions and any answers to above questions! FYI: I'm no way the first person to install a Willis, so here's a list of other users on BH that have gone the Willis way and will know more than I do: @dpmiller: photo / details here @TerryE @vivienz @CC45 @chrisb here @Gav_P - here (Any pics?) Willis instructions: schematic4 points
-
https://www.pandasecurity.com/en/homeusers/solutions/free-antivirus/2 points
-
I believe that it's best to fit the Willis heaters so that the immersion is at the bottom, rather than the top, so as to avoid getting an air pocket adjacent to the element that cannot be bled out. Alternatively, they can probably be mounted on their sides, with the side pipe poking upwards. I'm no expert, mind, it just seems more logical, and potentially a bit safer (in terms of avoiding overheating the small bit of element in the air pocket) if they are arranged like this. It may be that the MIs say different, and MIs always trump any other advice.2 points
-
They should have been zero rated. You can't reclaim VAT on labour, only goods (to which eligibility rules apply). Any labour for the new build, including service connections, is at 0%, so you will need to go back to the service provider and reclaim it from them.2 points
-
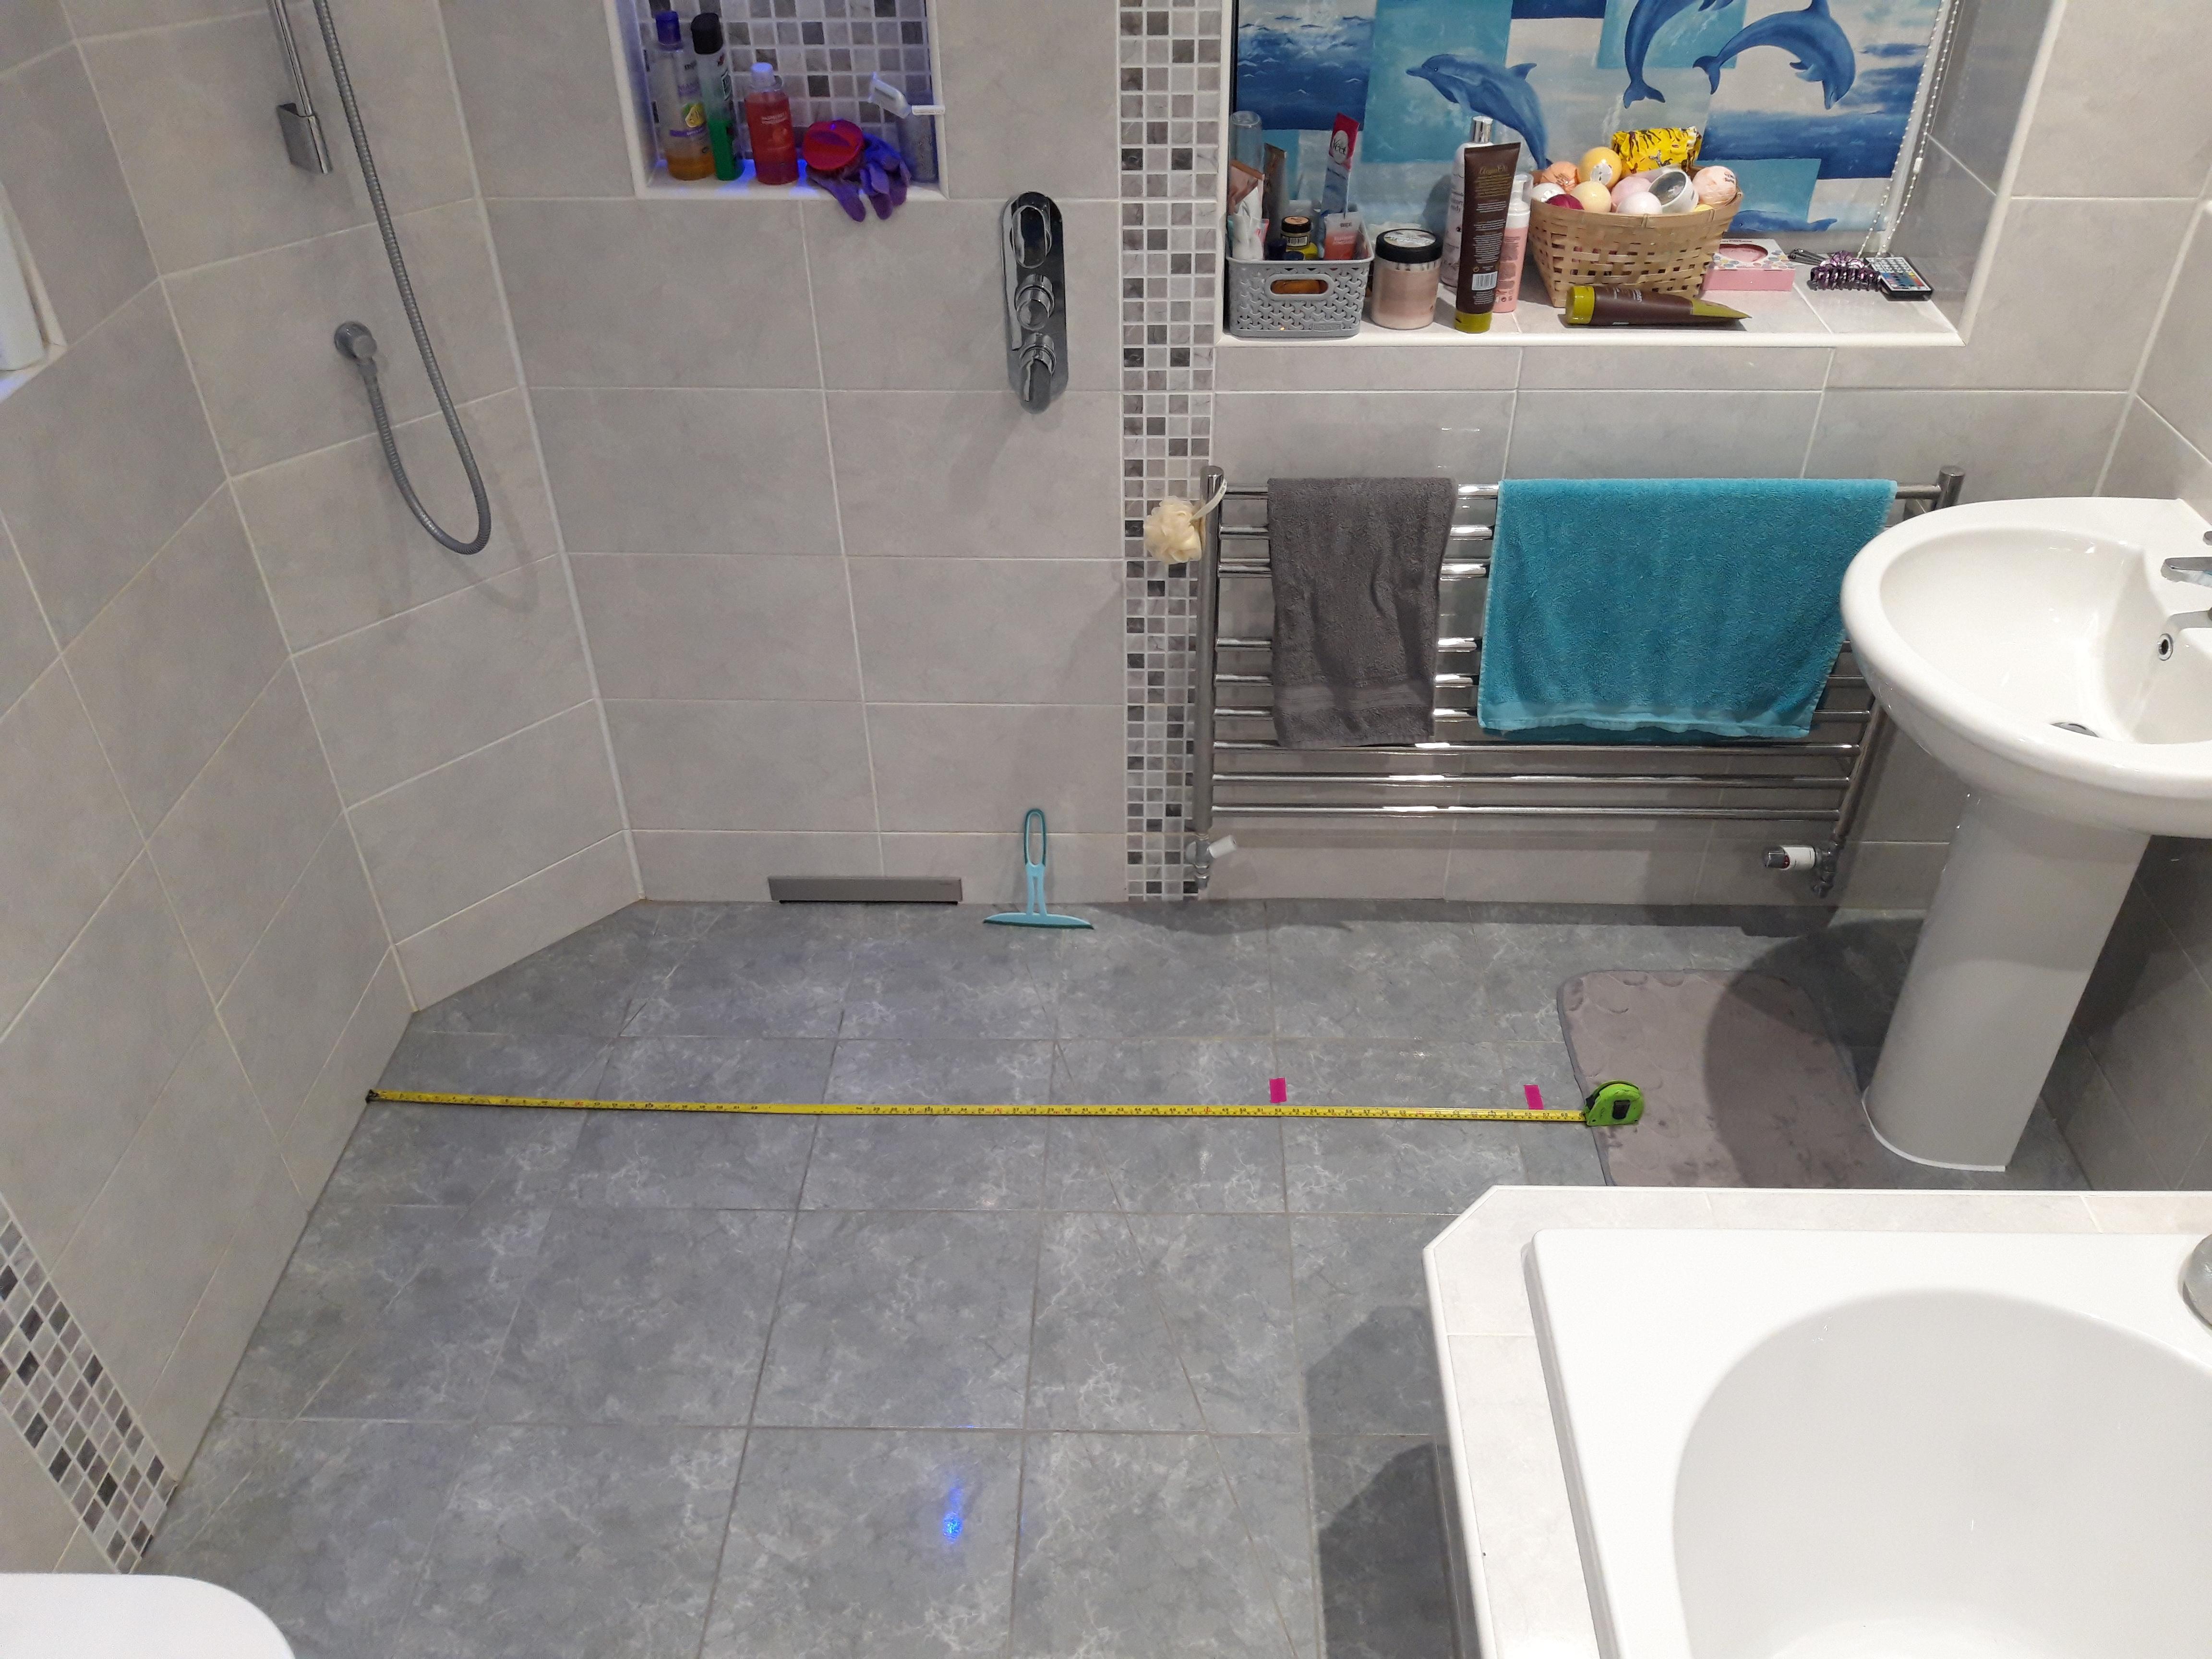
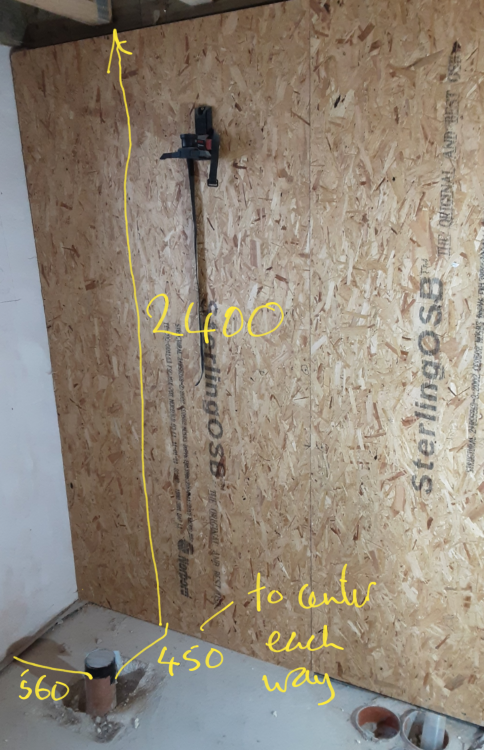
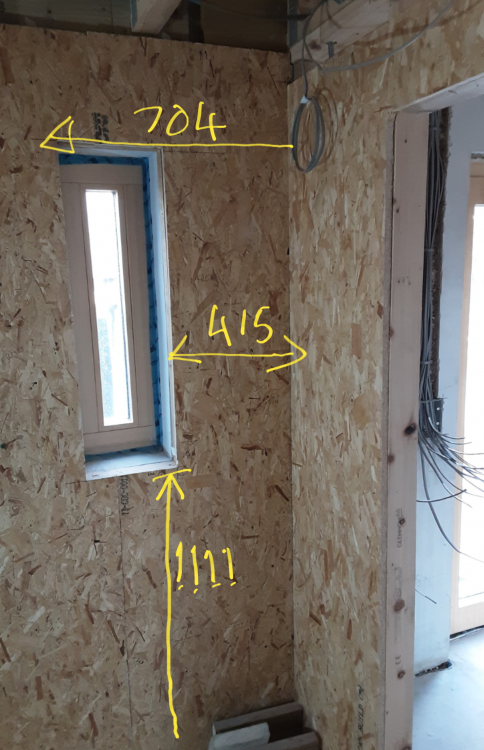
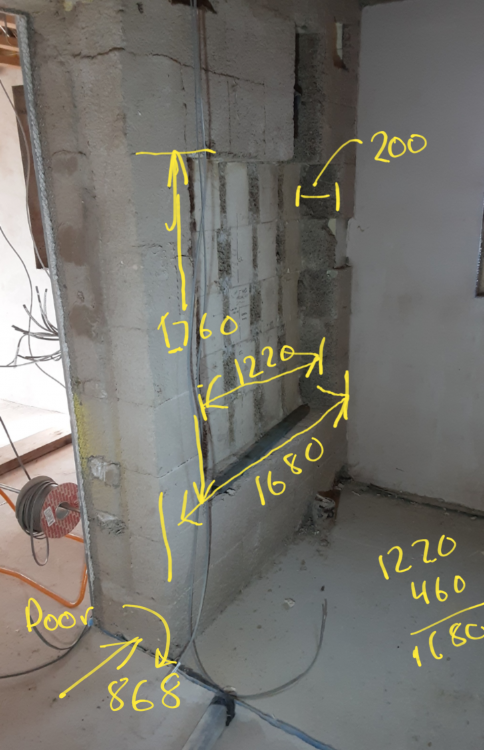
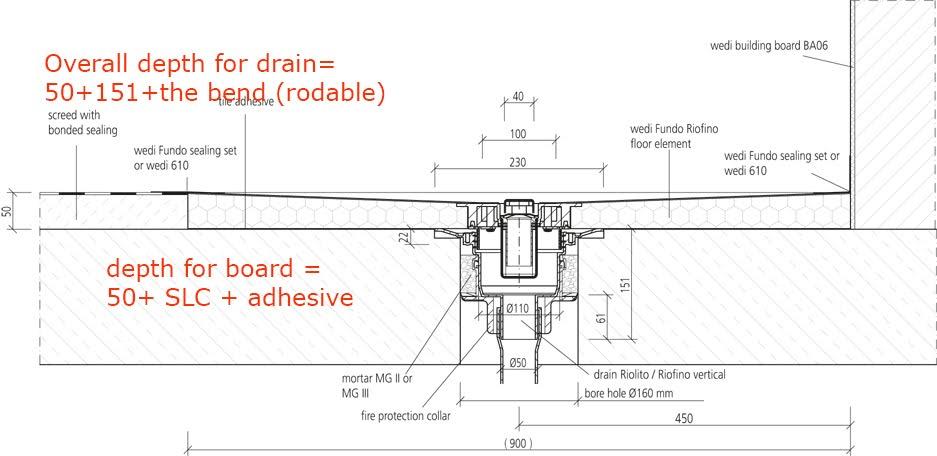
Our wetroom. I feel sick. And for months I have been doing other jobs instead - not that there's any shortage of them. But this particular one fills me with dread. Here goes. What have we got? This..... The North wall The south wall The east wall The west wall ( all bar a little bit) and we'd like to use a Wedi Riofino base for the shower bit - like this I dont know how many times I have dipped my big toe into @Onoff's posts - many many times. And while its been instructive, its also itemised what I can get wrong. Geberit Sigma frame and AquaClean Tuma already bought. And a small Geberit hand wash basin. SWMBO has the tiles detail. Small area of electric underfloor heat ( a square meter or so) On the east wall, we'd like Multipanel. Elsewhere tiles. Lets start with a simple question: walls before floor or the other way round?

 1 point
 -
Time was, AVAST was recommended as one of the best free anti virus options. Well it had an annoying habit of making you renew every year. and last time it "ran out" I could not get it to renew for free, every avenue pointed me towards a pay option. Alongside this, my computer has been complaining at critically low disk space for some time, but I could not imagine why. So today I took the decision so uninstall AVAST. Suddenly after doing so, I find I now have over 7GB of free disk space. In it's place I have installed AVG anti virus, also free and (so far) none of this registering nonsense. And I still have 6.9 GB of free disk space. So just a heads up if anyone else is struggling, it seems to be becoming awkward to renew, and it eats your disk space. Time for something different. And a quick search finds loads of people having the "fills up your disk" problem.1 point
-
Yes I only use mine to paint the outside of the house every 5 years or so. 2 day job with a scaffold tower (weather permitting, took nearly 2 months this year). Over a week if up a ladder, and the job is crap.1 point
-
apparently....
 1 point
 -
settings - passwords & accounts - add account select google from the list sign into the google account and you create it in the mail app. once it is set up you see the account in the list under passwords and accounts. Click the account. Should be a gmail heading with the email address used. This then allows you to name it So you can identify it easily from the other mail accounts. I have 6 mail accounts - separates bits of my life so I can easily organise myself. Sounds crazy but it works. Keeps the house build stuff away from the school communication etc.1 point
-
All I can say is that in our last house I fitted Multipanel to the whole bathroom, including around the shower. That was around 2006/7. Ten years later I was so impressed with the way it had performed, that I did both bathrooms in the new house with the stuff. The only thing to avoid with it is to seal the base as described, with a ~3mm thick bead of sealant under the lower edge, and to never use the plastic seal moulding that Multipanel recommend. That stuff is a design disaster, and should be avoided. There was a cheap and nasty laminate board around for a while, that used an MDF core. I can't recall what it was called, but it was far from being a good design. At least the birch ply in the Multipanel stuff is a heck of a lot more robust, and with a layer of decent laminate either side it's a pretty damned good product.1 point
-
Don't forget to cover you hinges in masking tape to keep all the sealant, goo or whatever off them.1 point
-
Not on my shift mate ?. Always floor first and then tile up and away. The only time I break that rule is if it’s mosaic in a specific area and I’ll then size the opening to take full sheets of mosaic. If you’ve tanked and sealed properly you don’t have to panic about that detail. It is preferable but not life or death. I’ve done enough “grief free” wetrooms to know ? A true Wetroom install should be OK to use WITHOUT EVER TILING IT, remember that and you’ll be fine. ?1 point
-
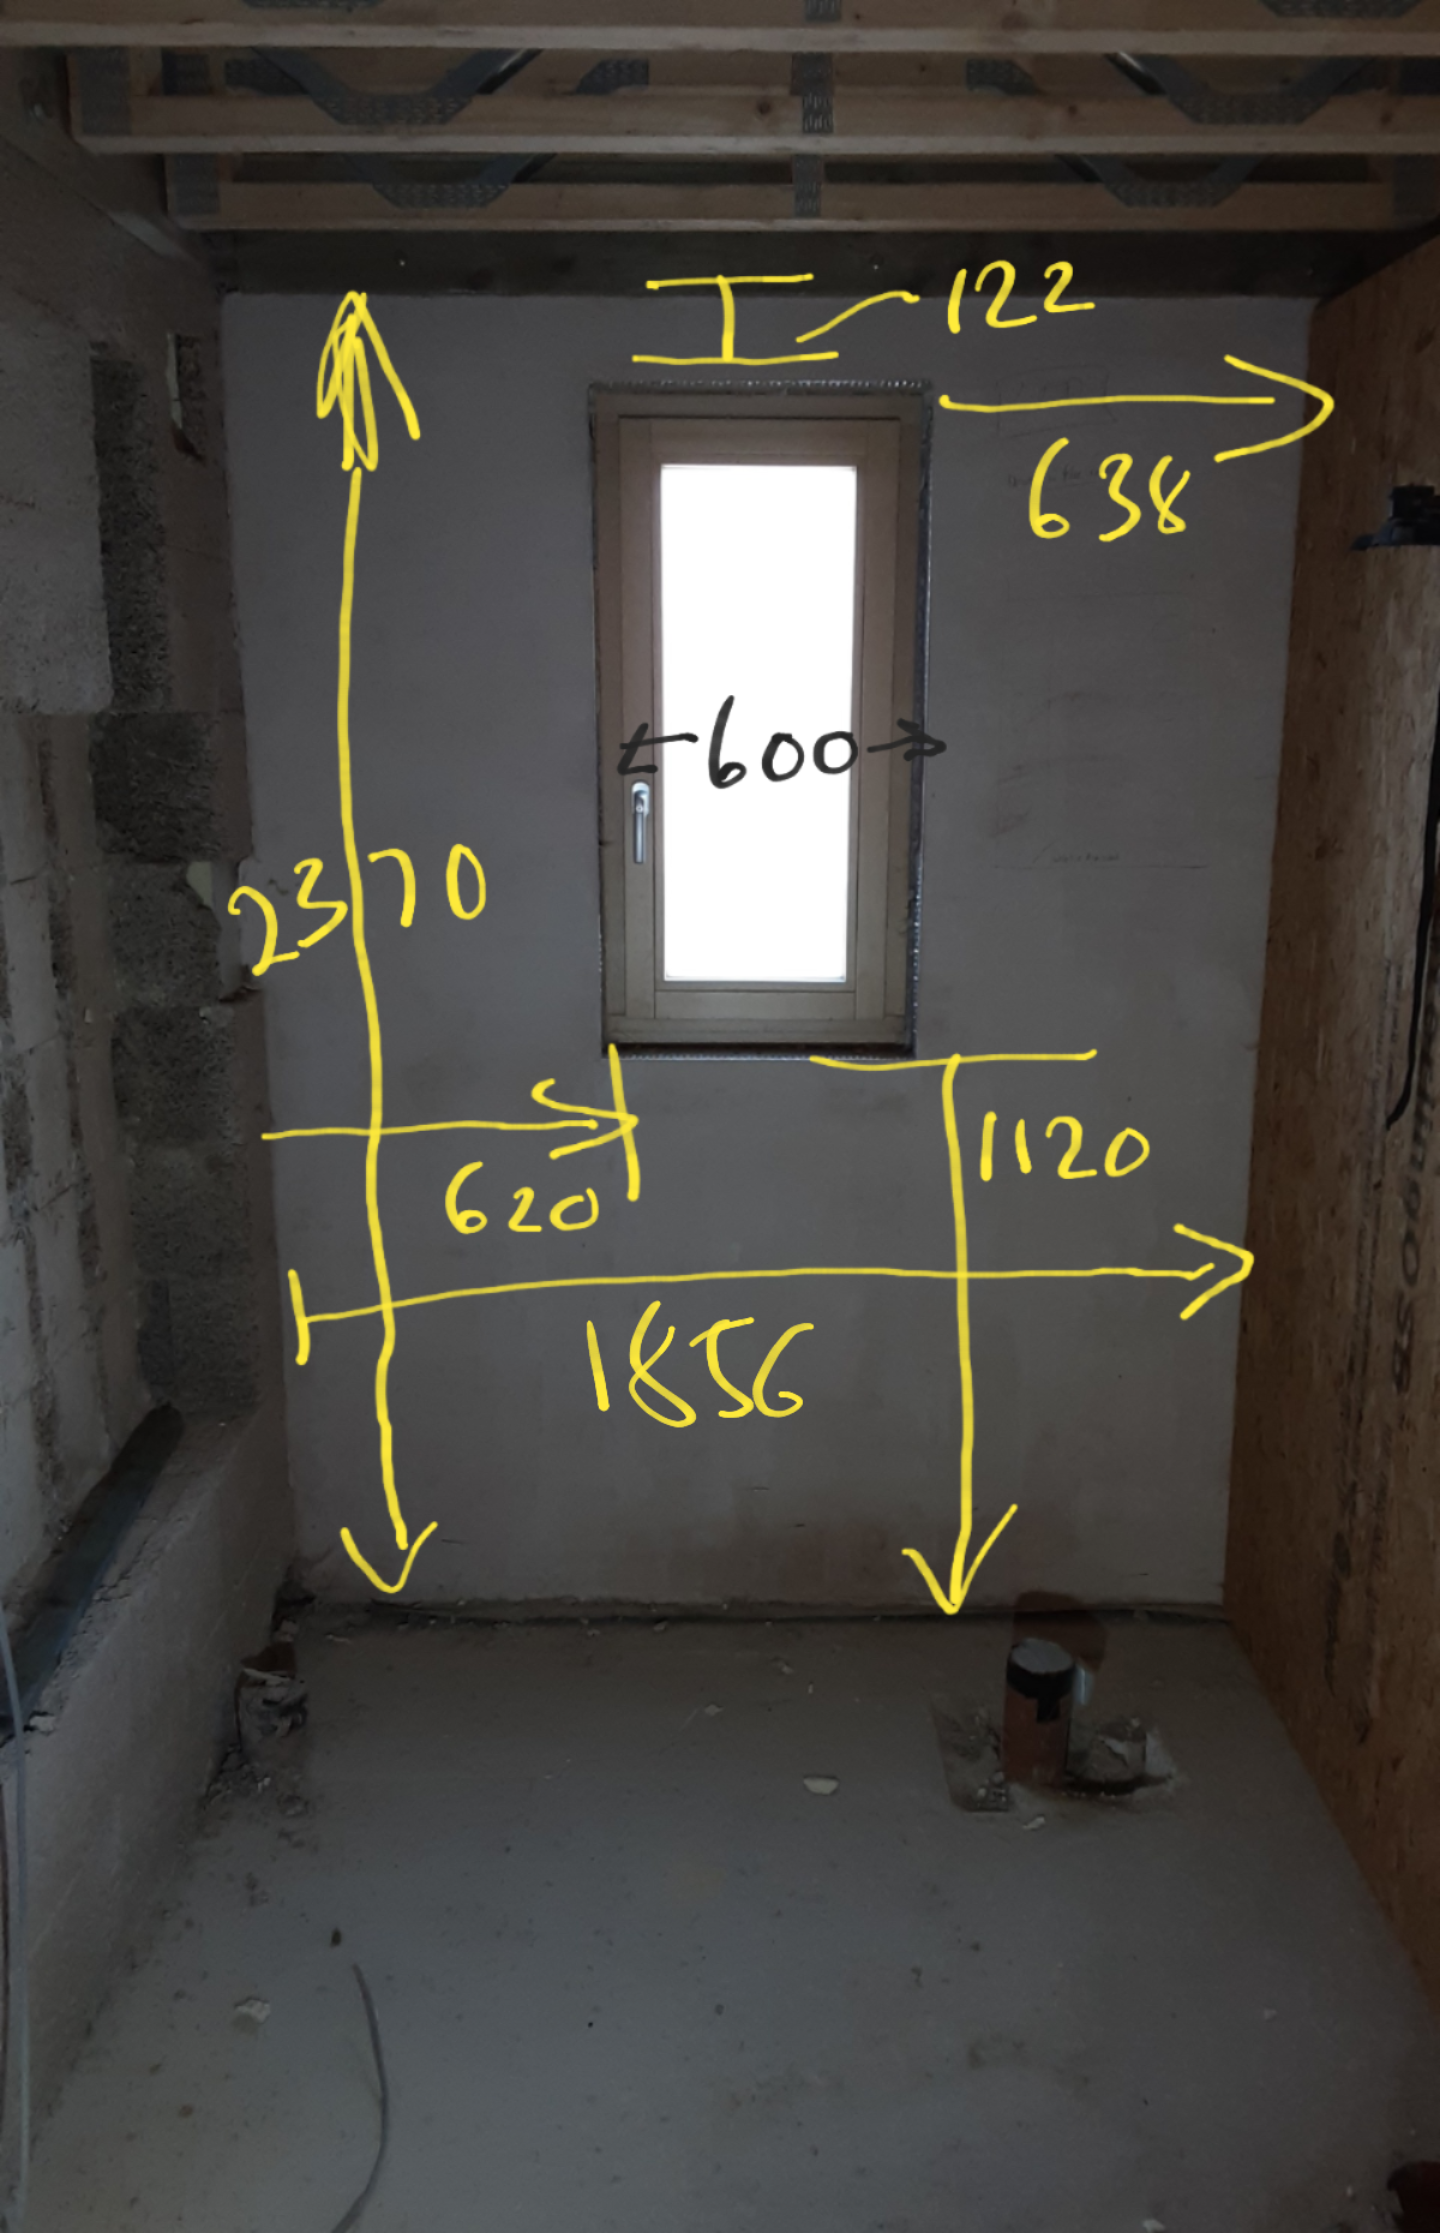
It would be a lot neater and easer to finish and paint if you tacked a skim stop on the PB face butted against the window frame1 point
-
Thank you. As I said, I am a dumb user used to "normal" computers like windows, linux etc. I was looking for settings relating to an email program. I expected to find the settings somewhere within the email program like on every other platform. I didn't expect them to be hidden away in some centralised settings application. It was as I suspected a fat finger / tiny keyboard typo. All working now.1 point
-
We got planning permission approved and our architects have had correspondence re the exemption. Finally, we can proceed now with a view to getting a builder booked..... If we are still in a house with no heating or hot water by the end of the year kill me... Oh and did I mention bubble wrap on the windows is my latest attempt to keep us warm...
 1 point
 -
I went into this knowing nothing other than I wanted a rainfall head as well as a handset riser. The mitred corner with the handset riser came later as did the decision to go no tray. The intent has always been to put a screen or pair of folding doors on the vertical mosaic strips that are strong points if it becomes an issue. The Union Jack tiled area is 1.3 x 1.3m, the first bits of pink tape. The reality is the water splashes a bit another tile over so to about 1.7m - the second bit of pink tape. To be safe 2m x 2m would be a good area in my opinion. So the seat of the wc gets a few splashes. After a shower we'll just kick the towel around the floor. We like it and it's manageable, all the time that is we're able to bend after our shower and squeegee the floor that is!

 1 point
 -
Yes, read that. But, but but. I'm living with mistakes made long ago. The configuration of both the foul wastes and the window (smack bang in the centre of the north wall) together mean that we cant have a screen. But - to get through the Regs - we will need a screen of sorts. We will erect a temporary shower curtain, wait until sign off, and then take it down. Which is why I am grateful for @Onoff's advice (and others) to tank the place to oblivion1 point
-
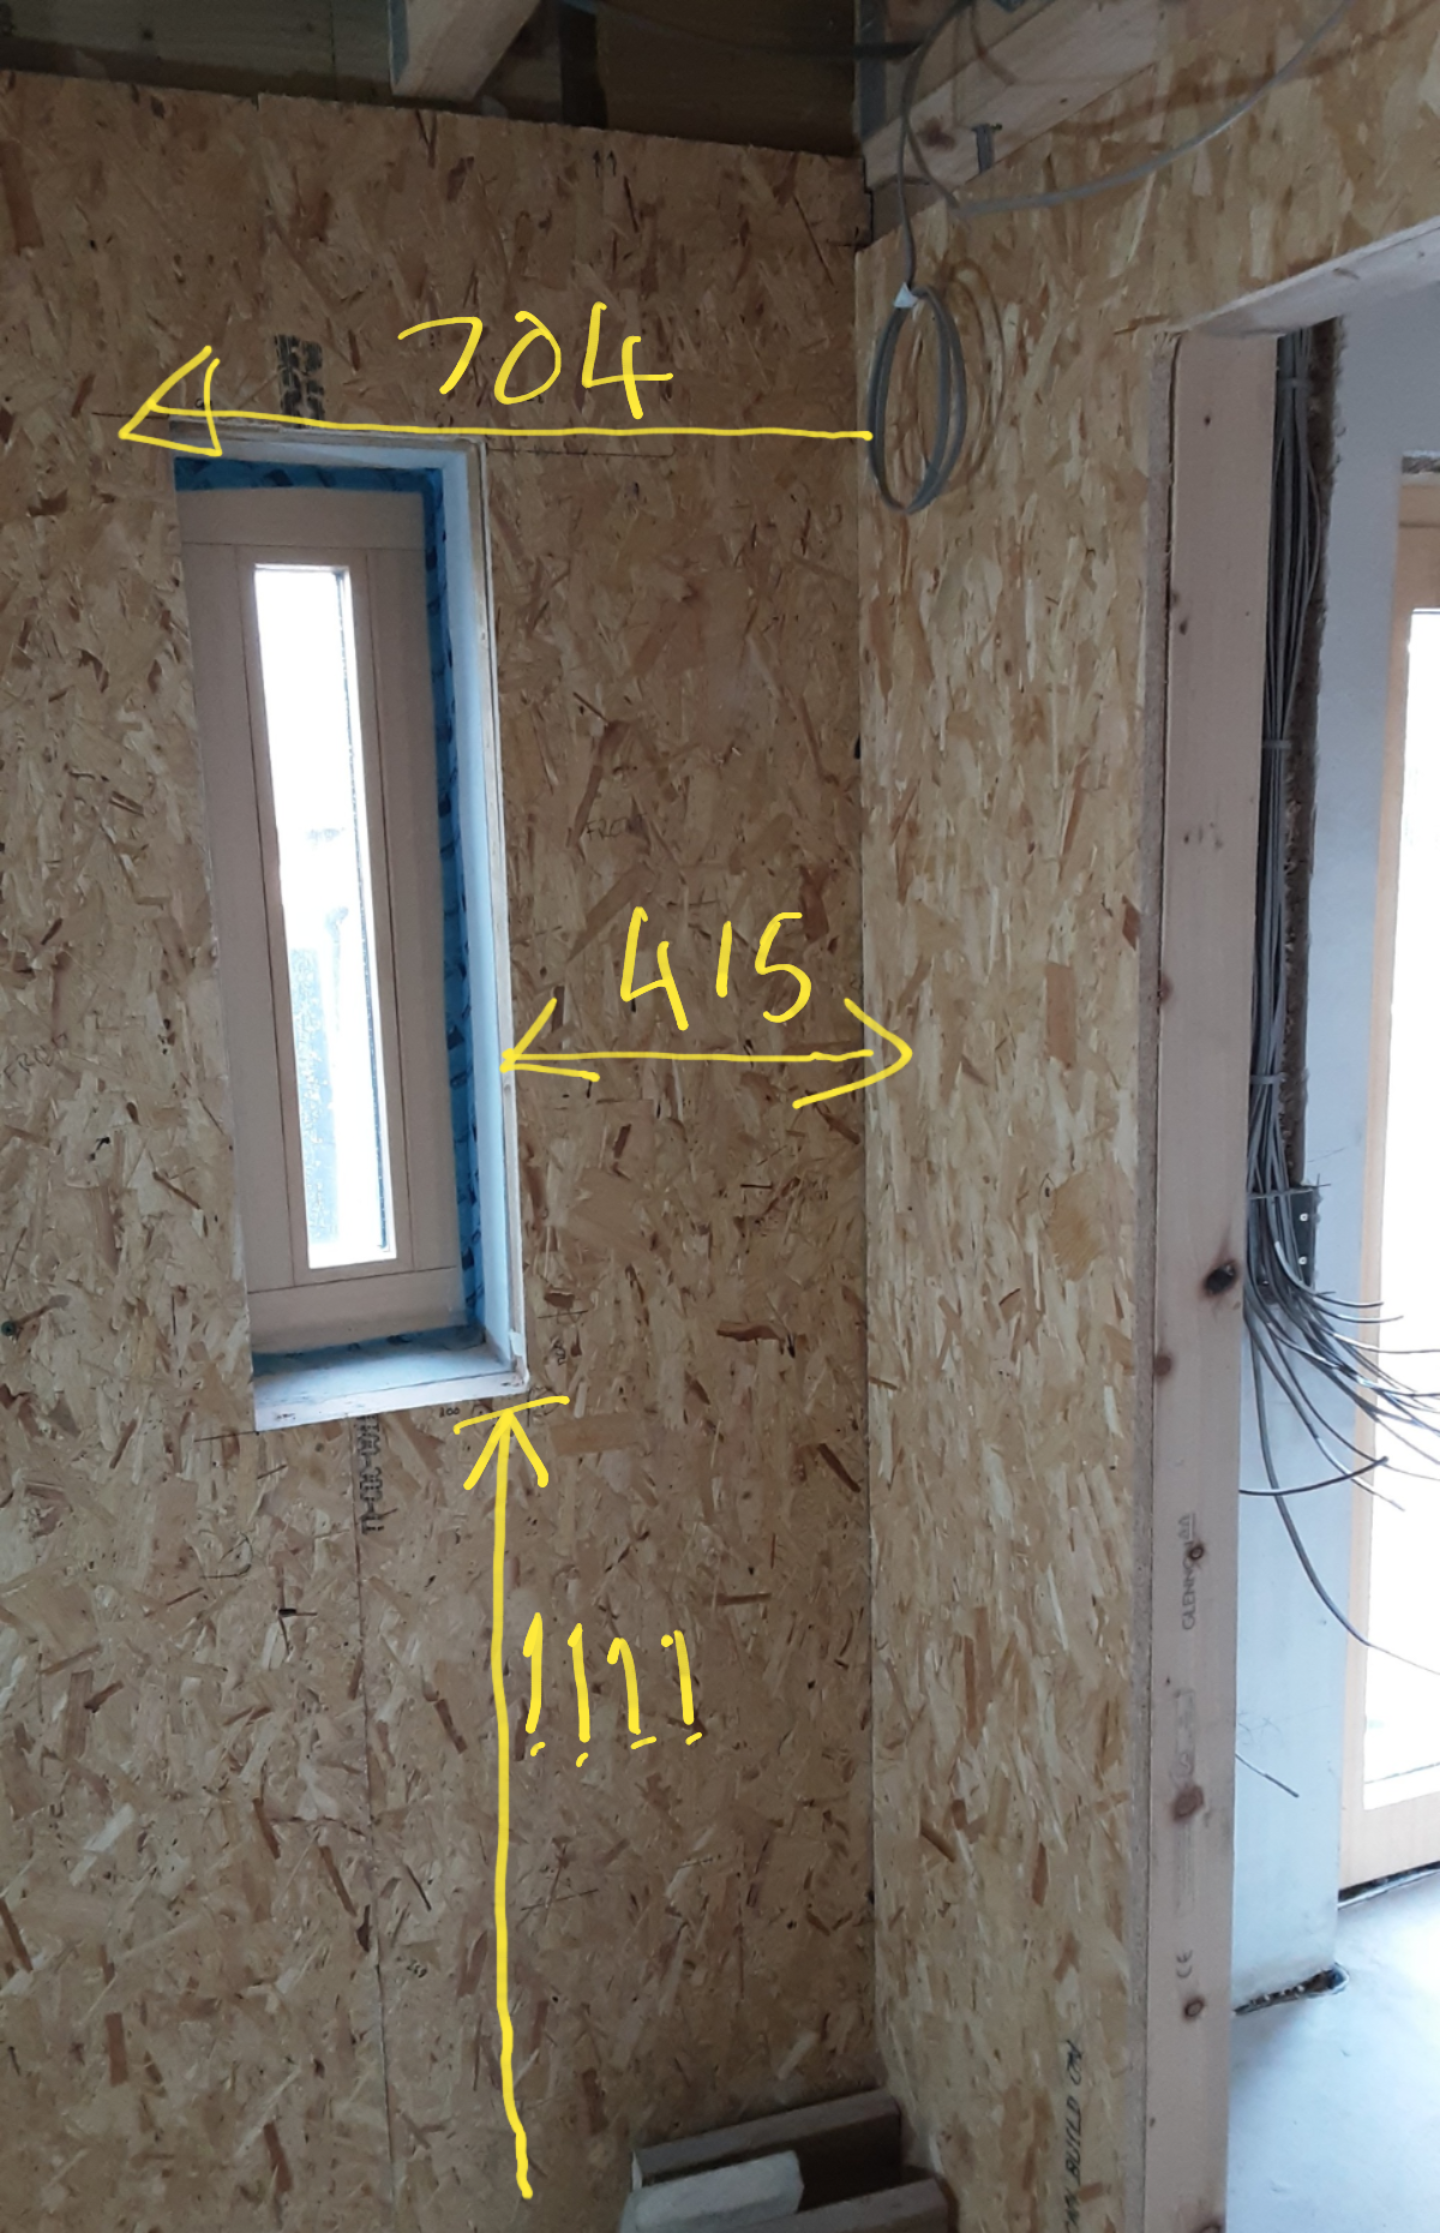
It is a mix from room to room to be honest, but we have a similar issue with some of them and I did note the reveals were getting close at some points. Another option may be for you to trim your tape back? If it was me I would pack out a little, board it, then use a fresh blade and cut down the tape at an inward angle, then by the time you FST and a bead of silicone/caulk etc. down the seam (as FST/Gypsum etc. always crack at interfaces to wood/uPVC etc.) you will hide any light mark to the window frame. Alternatively if you lightly score the tape will it tear cleanly along the score?1 point
-
used AVG for quite a while and it went through a very slow and laggy phase. Currently (three or four years?) using Panda Free and can't fault it.1 point
-
Come to think of it I did exactly that.1 point
-
Can I jump in with a dummy question ? Is it not better to plaster board the ceiling , get it skimmed , painted I.e finished - before any walls or floors ??1 point
-
To answer the original question... Leave at least 2 full tile widths / min one full rafter gap to any verge detail to ensure you don't create issues with battens and small cuts of tiles Both GSE and EasyRoof both have velux panels as standard in their systems1 point
-
As you’re looking to be buffering kWh’s of heat and not looking to add volume per se, then you really would benefit from a sizeable buffer tank, eg minimum 100L but preferably 200L tbh. A super insulated vessel is recommended unless it can be sited to utilise the waste ( latent ) heat loss beneficially eg in an airing cupboard or strategically positioned on the ground floor to contribute to local heat requirements. A low loss header will do very little to improve things as they’re normally utilised to attain hydraulic separation ( vs a dedicated buffer ). Your best bet would be to have the radiator zone valve always open whenever UFH is selected, and have one strategic radiator on manual valves as a bypass / heat loss radiator. You would again need to have that allocated where it would be advantageous / not a nuisance ( airing cupboard or bathroom towel rad(s) for eg ). The boiler will quickly heat up a small buffer, and then you’re back into the flames from the frying pan.1 point
-
...wins the prize Consider this: he starts off next to his base station bucket, and the level on his measuring staff reads (let's say) 20". Now he goes away from the base station, and the measuring staff reads 30". He tells us that he is now 10" lower than he was, but he is wrong. This is because he has filled 10" more tubing with water, and the only place that water can have come from is the bucket, which means that the level in the bucket is lower than it was when he started. Because the level at the measuring staff is the same as the level in the bucket, that is also lower than when he started So he must be more than 10" lower. Now he takes his measuring staff to another point and finds that it reads 15". He tells us that he is therefore 5" higher than the base station, but he is wrong. This is because there is 5" less tube filled with water, and the only place that water has to go to is into the bucket, so the level in the bucket is higher than it was when he started. The level at the measuring staff is therefore higher as well, so he is less than 5" higher. If he was using a conventional, two-ended tube, with one end fixed in place at the starting point, instead of his base station bucket, the error would be more obvious - if you raise one end of the tube, the water will drain out of that end and into the other. The water stays at the same level relative to itself, but not relative to the starting point. His mistake is to have fixed the tube to the measuring pole. This is how he should do it to get accurate results: Start off at the base station, with the tube held against the measuring staff. With a marker pen, mark the water level on the tube. Now, he takes the tube and the measuring staff somewhere else, and holds the tube against the staff again. But now he adjusts the tube up or down until the water level is at the mark. At this point the water level is at the same place as it was when he started. Now he can read the level off against the measuring staff, and will have an accurate measure of how much higher or lower he is. The important thing is, you must align the water level with the mark on the tube before you can gauge any meaningful change in the height of the staff. A ready made water level will have calibrated ends, to save you the trouble of marking it - you just note the number on the calibration. The beauty of this is that you don't have to see both ends of the tube - if one end is at the calibration mark, the other must be as well. That means you can be out of sight of the other end of the tube, perhaps round a corner, or the other side of a wall - as long as the water is at that calibration mark, you can measure a change in height with it. Alternatively, if you were to use a measuring staff at both ends, with the level fixed to them both, you could simply measure the difference in height between them, without needing to use a calibration mark, but you would need to be able to take the readings at both ends at the same time, which probably requires a second person. You can use a water level indoors, outdoor, round corners, over walls, in bright sunlight, it will never become inaccurate, never need recharging or new batteries, doesn't need a receiver, and only costs eight quid.1 point
-
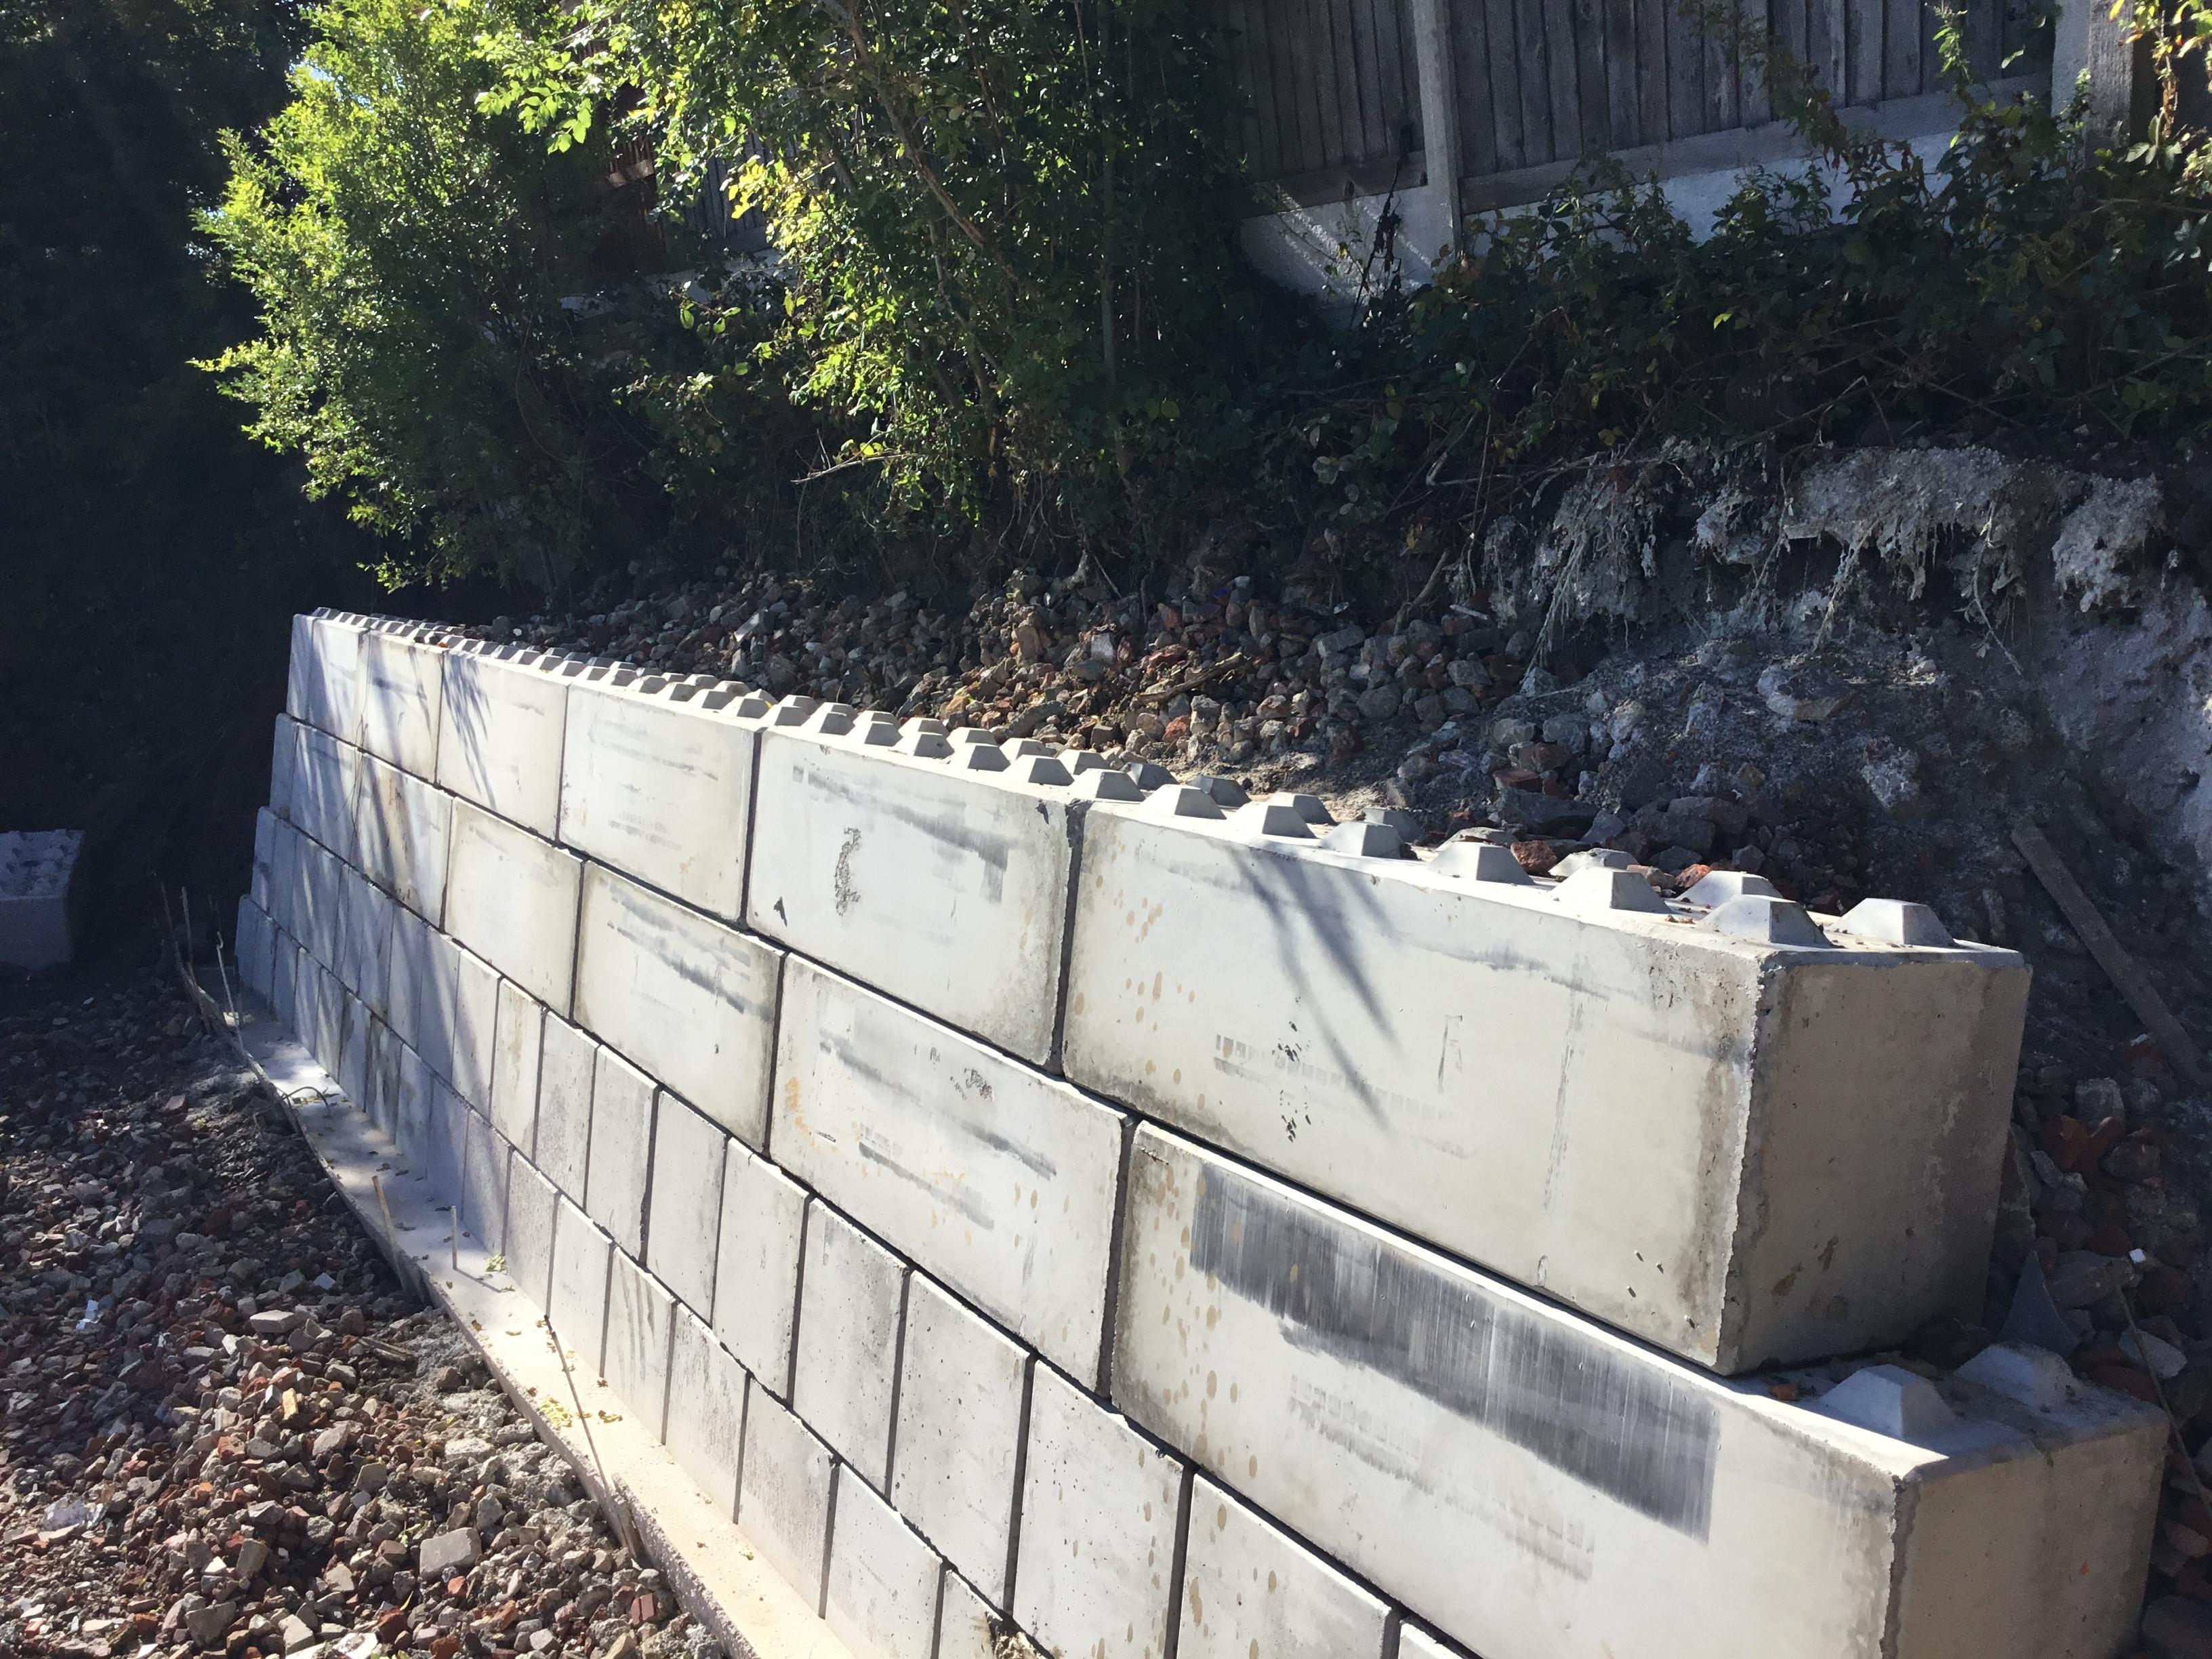
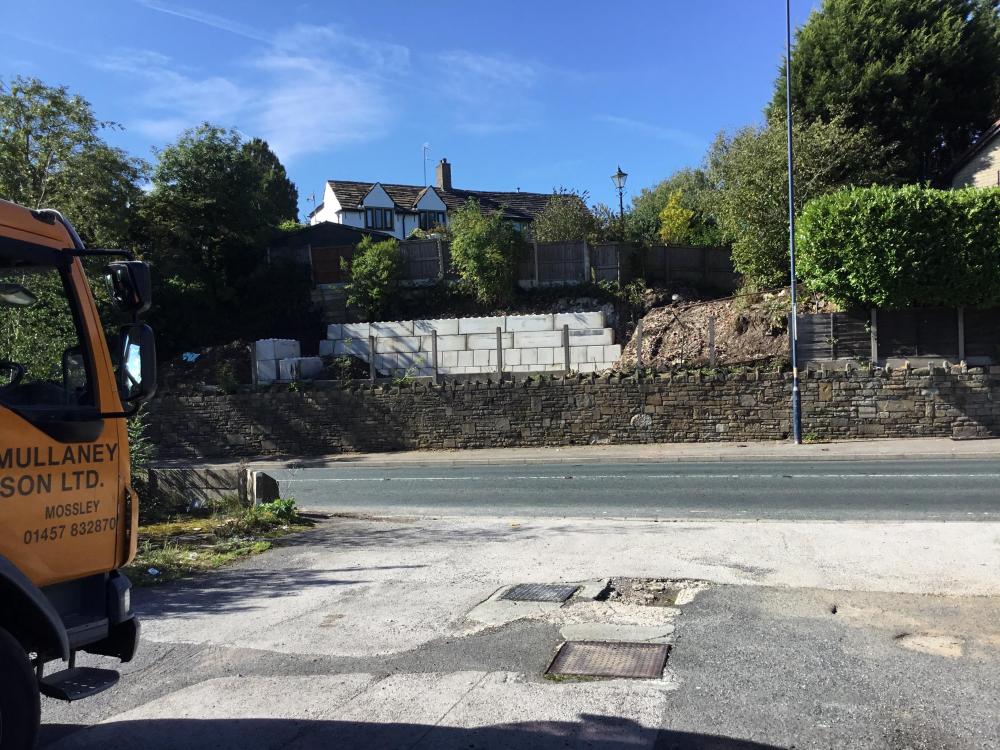
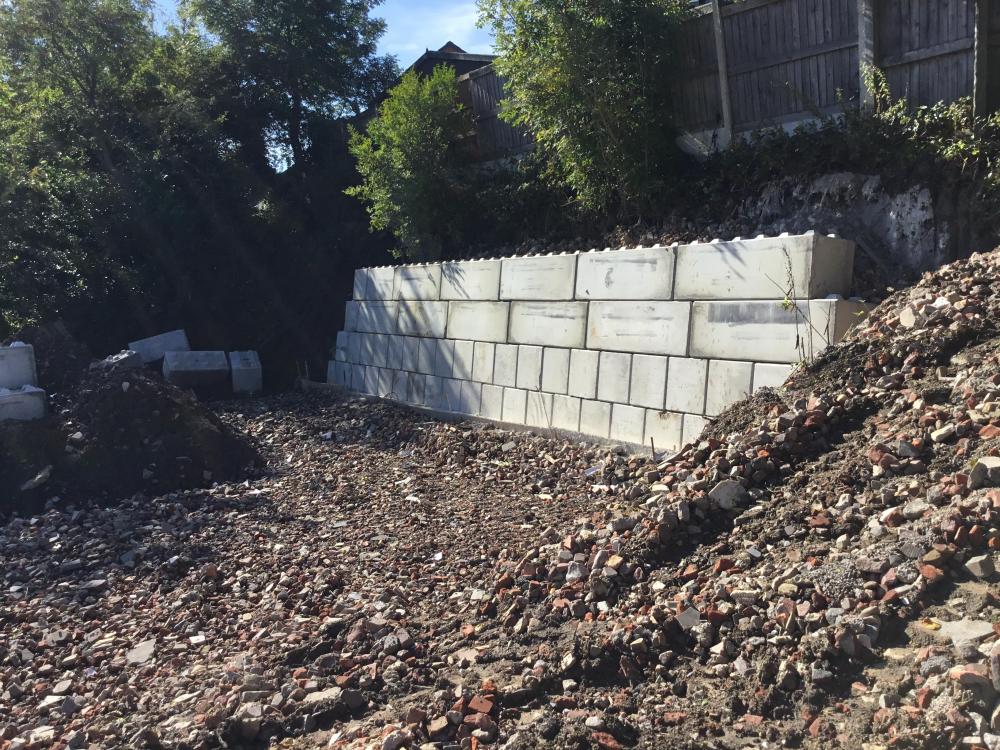
Thanks peter. That is the question I wanted a answer to. 80k labour to build a block house. I had quotes that high for my retaining wall. I built it for around £8-9k all in. The company who supplies the blocks are 5 mins away and I could have the walls stacked in 2/3 days.
 1 point
 -
I think the issue might be proving that you can get them to sit tight together using some sort of adhesive that they form a water tight barrier. How do you work the peaks. That will be a lot of cutting to get your angle. Then how plumb will they actually sit. When you come to door and window openings your going to have a lot of cuts so it's getting all these and the full pieces below to sit plumb enough to be able to fit the doors and windows. Then you have the actual openings. That's going to need a fairly big lintel which might put you out of coursing heights. You would just build a few bricks in normally and then build away. How do you do that.1 point
-
Hmmm, well the Germans strike again. Two sinks from Victorian Plumbing £119. 90 - shipping £23 Two sinks from reuters.de (Geberit) Euro 128 - shipping Euro 17.80 Other Charges £15. Where d'ya think I ordered from?1 point
-
??? There were moments when I didn't think it was going to go though! SWMBO fed the whole 6m of the snake through the blockage to start with, think she should have stopped when she hit the "wall" and started rotating then. Tbh there wasn't that much resistance. Anyway, nothing happening so I got the cordless on it. Still nothing. Think in the process I've killed this brand new Silverline snake only delivered this evening. (That's a strip down I'm not looking forward to). Put the other half litre of the cleaner down and still nothing. I was hand rodding like a good 'un and nothing was moving. Poured a couple of buckets of hot with bleach down and still nowt. I remembered school physics lessons with the vacuum pumps that ran off of the bench taps. So with me in the upstairs ensuite, No1 son on the stairs and SWMBO in the main downstairs bathroom we went for a synchronised flush. OMFG! Things started vibrating in the loft as the turd slug started shifting, the AAV was clattering like a demented Kango. Then the whoosh we'd been longing for and the sound of sweet running water down the pipe. Celebrating with some crumpets and a pint of Levy. Thanks to all who chipped in as ever.1 point
-
If so this may be of use... https://www.gov.uk/hmrc-internal-manuals/vat-construction/vconst24550 Thanks Google :-)1 point
-
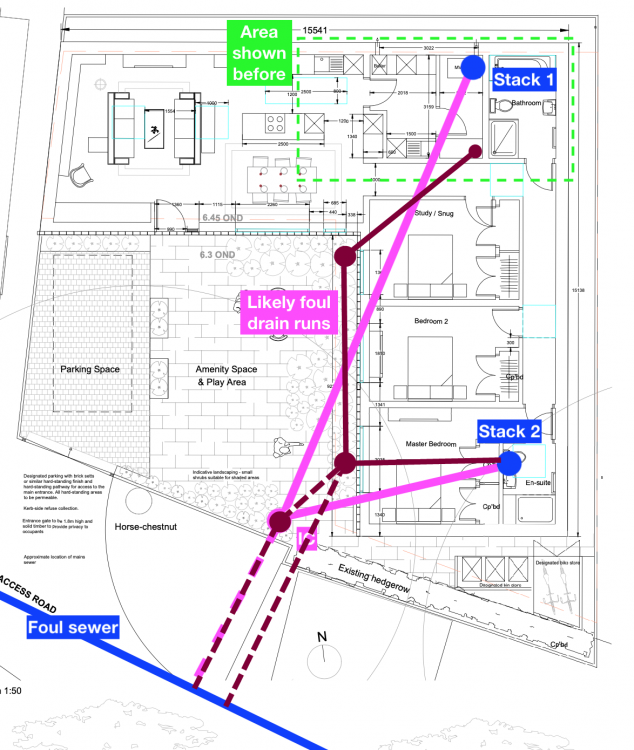
Aside: If Building Control are like mine they may want stack 1 to be open vented above the roof but say stack 2 can have an AAV. This isn't what the regs say. I believe both can be AAV if nearby houses have open vents. Its just some BCO are die hards and you have to pick your battles. I think your proposed routing will work. If you or BC are concerned about the length from stack 1 to the IC you could put another IC in the corner of the L - Something like drawing below (with or without the other IC I added further south). I'd be tempted to move the stacks nearer the shower wastes. Shower waste outlets are lower than WC wastes so they can actually be harder to run. The connection from the shower into the stack may have to be in the slab so needs planning now if you want to avoid a plinth under the shower tray or chipping the concrete away from around the stack. If you plan to have deep insulation above the slab it might be all fit in that but worth making a cross-sectional drawing showing the shower tray, waste, pipe falls and actual connection into the stack for shower and ditto for the WC. We had some difficulty with the shower waste to stack connection in one of our bathrooms. The shower waste has to drop down into a cupboard in the room below and then connect into the stack lower down. There wasn't room between the WC connection to the stack and the floor. This sort of issue is harder to fix in a bungalow. The regs also specify a minimum height from the bottom of the large rad bend to the lowest connection into the stack - so check the large rad bend will be deep enough in the ground to allow a low connection for shower. Moving stack 1 to the south would mover it nearer the shower and should make the above a bit easier but not by much Not shown but you could also consider moving stack 2 south against the southern wall in the corner of the cupboard of master bed for same reason.
 1 point
 -
The MVHR in our home has, quite literally, transformed my wife's life, and probably added years to it. Frankly I don't give a damn whether it ever pays for itself in a financial sense.1 point
-
See advice in here.. https://brickhunter.com/blog/how-to-lay-bricks-in-winter "Temperatures lower than 4°C can compromise the structural integrity of your brick wall. According to the NHBC (National House Building Council), masonry construction should not proceed if the temperature falls below 2°C, unless suitable heating is available."1 point
-
+1 Just a heads up... Some water companies try to charge vat on things like diversions or work off site in the road, claiming they can only zero rate work on site. This isn't correct. VAT 708 has a section 3.3.4 that covers.. and there are other words in that section that cover "works closely connected" with the construction of a new house which is pretty open ended. Worth a read.1 point
-
I just got all my invoices back this morning and confirmation that my full claim is payable, this includes some invoices that were in my builders name , some in my plumbers name and one for glass that was provided from a local company, the only paperwork I had for this one was a worksheet with the company name on it and amount paid, no vat number on it, I didn’t expect them to pay this one but decided to put it in anyway, happy days! Oh and it’s only 8 weeks since I submitted it!1 point
-
For a new build (in Part P land) the EIC needs to be lodged on the database by someone who is a member of one of the Part P cartels. An EICR can be undertaken by anyone that is qualified and competent, as it doesn't need to be lodged on any database. I can do an EICR for anyone, and it's fine (accepting that there may be a liability issue if I've screwed up), but as I cannot be a member of one of the Part P cartels, because I'm retired, I cannot submit a Part P EIC for a new installation.1 point
-
No, of course you can but the issue is working out how to go about getting it tested and signed off - solve that aspect and you are sorted. There are ways and options - one is a friendly electrician, usually one who is too damn busy, who would be wiling to let you first fix - let him inspect then have him back for second fix or, and this is where it gets tough, ask if you can second fix and have him check your work then at the end he will test it all, sign it off. Now this is possible, and people will say, you will never get someone to do this, but that is not true, it happens. I know a friend who first fixed his entire extension himself, I gave him guidance re. the regs, when it came to second fix he got a recommendation of an electrician from his plasterer, he came out and the friend said, "the electrician who wired this won't pick up his phone and I cannot get hold of him". Guy said no bother, checked some bits and finished it off - only took him a day to complete and cost about £260.00 The issue then comes as to how competent you are and did you not only run cables appropriately, but did you ensure you didn't snag them and kink them and rip them through holes and cause damage where the second fix chap cannot see! An extension or outbuilding is always easier - especially if the DB is of newer style and has spare ways - that way it is easy to add circuits and have them meet current regs. I have seen friends have new kitchens installed and end up needing new DB's as the old ones just would not cope with the electrical demand, so before you know it you are onto a partial rewire and a new DB! I makes sense and is the right way to do it, as much as sometimes we don't like the thought of that! The issue is that in theory you can do it all then have it inspected, but you wouldn't have the necessary test equipment. My gas man let me run in all the copper pipes under my house, he came in, spent an hour and soldered them all together - one guy was not interested and said he would need to supply and fit pipe, I told him I was not interested in him then and he told me no one would do it. Next 2 guys were more than happy to do this and the one that got the job only did so through ability to get here sooner.1 point
-
Essentially there are two different requirements in the Building Regulations themselves, but these aren't 100% clear in the guidance in the Approved Documents. The first requirement is that the foul drain has to be vented to atmosphere, such that there can be no build up of pressure inside it - the idea is to allow any gases to escape via a vent. The second requirement is that there has to be a means to prevent a partial vacuum forming in a soil pipe when a toilet is flushed or a basin or bath emptied. Common usage was to combine both of these requirements into a single vent pipe that does both functions, and either run it through the roof or run it up the outside of the house if the soil pipe is external. However, there's no need to do this at all, you can split the two functions and solve each individually. You can fit a vent pipe, to allow the foul drain to be at atmospheric pressure, pretty much anywhere along the pipe run. You can even fit one beyond the entry point of the soil pipe inside a hedge or flower bed, at fairly low level if you wish, or run an external vent pipe outside the house and up above eaves level. To resolve the partial vacuum problem you can fit an AAV inside the house, well above the highest outlet, in a position where it can be accessed for maintenance. This will open if there is a partial vacuum in the soil pipe and allow air to be drawn in, then close to prevent smells from escaping. An AAV cannot stop any build up of pressure in the foul drain, so if you fit one then you need an external vent as well. The advantage of fitting an AAV and an external vent is that there is less heat loss. Internal vent pipes act a bit like chimneys and constantly draw cool air up through them, so unless well-insulated they will draw heat from the house and can act as a focus for condensation. If you have an existing vent to the foul drain, then you should be fine with an AAV for the new upstairs bathroom. It needs to be well above the highest drain and accessible for occasional maintenance/replacement, so you can't build it into a wall without some form of access cover, plus it needs a reasonable air supply.1 point
-
I found things got a bit rocky around year 9...0 points
-
Right then. That's what I want to hear. I'll start next year then (after the divorce)?0 points
-
Hmmm, very interesting indeed. A Know-Nowt like me reads as follows and and and to cap it all off here's yer man who says ... Sho, shum shay, top down, others bottom up I have come to know and trust all of the contributors to this thread. Does this mean it doesn't matter? - Just Bloody Start Somewhere, Anywhere - and cope with the consequences?0 points
-
For a self-build, the business case for something like KwikStage (others available) is compelling. Just about to sell ours and expect to get back what we paid - roughly. Have you looked at the rental costs? Heaving KwikStage around under trees and near hedges would be a real pain in the Botticelli.0 points
-
We have a travertine counter top basin with wall mounted taps. I wouldn't go with travertine again because it stains but everything else about them is great. You can get them with overflows built in... https://www.victorianplumbing.co.uk/costa-600-x-370mm-counter-top-basin-0th-ves009?campaign=googlebase&gclsrc=aw.ds&&gclid=CjwKCAiA0svwBRBhEiwAHqKjFs3zrhMpnMhPic36B_xvzLKTVmclDSsqovoLNc6mzWn8M4idAcguTxoC_n8QAvD_BwE or you can add one hidden in the wall that bypasses the plug when the level gets too high. https://www.tapsempire.co.uk/product/ideal-standard-idealflow-hidden-basin-overflow-n8326/?gclid=CjwKCAiA0svwBRBhEiwAHqKjFi_5DK62Xm2p-79kvMlxftgAc8GxTC07UWv_k5vHNIVAWpCCs9KhJBoCfZ0QAvD_BwE Taps can be wall or counter top mounted. Our wall mounted taps seem to stay cleaner for longer as water from wet hands doesn't run down the tap or puddle around the base of the tap. Some counter top basins even have mountings for taps. I fixed our basin down with a bit of silicon same as our shower glass panels. They aren't going anywhere. The basin is also fixed down by the waste but you arent meant to do that (our counter top is also travertine and I forgot to make the hole big enough to clear the nut). I would avoid a basin with a very rounded bottom as it would be hard to clean under there (other things with rounded bottoms are fine by me :-)0 points
-
@Ferdinand “Another way is a comfortable size for 2 people (or 3 students) to enjoy themselves, “ simultaneously??? ?0 points


.thumb.jpg.bac90f3bbf6868cf2118d010d936c99d.jpg)