Leaderboard
Popular Content
Showing content with the highest reputation on 08/14/19 in all areas
-
Hello all...back from the wilderness of BT broadband...or rather lack of it. It was their problem all along. A cabinet miles away with fibre head issues. Taken them an age to get it sorted, half the village has been off. 2 engineers here telling me all was OK when clearly not, the only way they pursued further was because I showed them the village facebook page with dozens of people with the same problem. That defaulting to 4g hotspot on imac really confused the issue for me for a few days. Thanks for all your help guys.2 points
-
All builds are different the HBB will price up stuff but only if you know what stuff you need and so any list will be of use.1 point
-
@Robert Clark I too have attached the spreadsheet I used. You may find it useful. Contract sum analysis - template.xls1 point
-
Here you go: Simplified costing spreadsheet - 050421014.xls1 point
-
I think you would be surprised how knocked about they get on a building site, it would need to be very damaged to not be usable. Picture. Try not to cut them as it’s a ball ache.1 point
-
Actually @JSHarris it was to the Housebuilders Bible - as a basic reference document it gives you a good breakdown of the big chunks of a build. I wouldn’t rely on it for costing as I think they are not accurate, and is based on a sample of 1 build in reality. SPONs is very good for detailed cost management but you need to know your way around it. Paying £150 or so to an online estimator will give you the same output but shaped to fit your build and then you can work from there to customise rates and costs further.1 point
-
Build what ..?? House..? Bungalow ..? Traditional ..? Modern ..? Timber Frame..? Brick and Block..? If you’ve not already got a copy, buy one of these and have a read - it’s a good reference and starting point and then head here for the detail and the gotchas...1 point
-
@Robert Clark, while JSH spreadsheet is useful, it is comprehensive to his build - not yours1 point
-
Thanks! We're outside of our village's CA, but we are in an AONB. We're using traditional materials and construction (mix of Cotswold stone & colour through render, slate roof), but the house is definitely modern - although not a spaceship! I can have a bit of a bugbear with houses that try to look like something they're not (so for example the existing house was built in 1965 but designed to look more like a 1920s one), so very happy to have something that will look like it's been built in the here and now.1 point
-
Yay, I've taken down the remaining scaffolding. ? Big effort the last month painting the roughcasting to get this away for good, satisfying to see the house standing proud by itself for the first time. Next job will be tidying the site and emptying storage container to get this gone as well.1 point
-
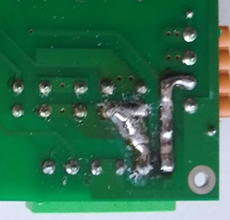
And here is the updated board. The common line is now beefed up from the input to the output connector, and the phase from the relay output to the output connector. (The latter looks a little untidy because it is covered in a clear potting polymer.) This seems to have done the trick and the board is running cooler. Plugging in the P=I²R numbers, a track resistance of 0.025Ω would generate 5W or so resistive heating, and this is enough to create a hot-spot of 50°C or so on a board without any thermal management of this size -- and this was the rough temperature that my DS11B20 was logging. Before and after1 point
-
Welcome to THE forum for self builders, accept no imitations and good luck.1 point
-
I think that @JSHarris has a spreadsheet, probably somewhere here or on his blog site, of everything he spent on his build, might be a good starting point as it is a comprehensive list.1 point
-
Welcome! I wonder, are you in a Cotswold conservation area? Will it be a traditional design or modern?1 point
-
Hi Ralph- gimp packages, opensource or imports or converting to jpeg.. unfortunately I have no idea what these words mean (well, gimp I do). Is there no way once I have the pdf that I can access it, then tinker with it? thanks, zoot.1 point
-
No. Start with the design and work 'outwards' from there. Send the design to a QS - estimators online if you like - and they will do that for you.1 point
-
I have done this, saves blocks and mortar ?, it’s only carrying a floor. 215mm wide also seems excessive.1 point
-
Is it frowned upon to put the UFH down and screed before the central heating is connected? I guess the ideal scenario is to be able to turn on the UFH once it's been screeded to dry it out but our power supply likely wont be ready for a couple of months so I'd like to get on with laying the floor so things don't get delayed.1 point
-
1 point
-
Ah, I think I misunderstood BC's comments ... it's a 10mm gap from the party wall, not a 10mm frame. The new stud frame needs a 10mm gap and it's attached to the floor, ceiling and walls either side rather than the wall.1 point
-
Yes. The way the hot water was set up was bonkers. It was set to heat DHW only for half an hour at a time (I kept that) but then with a 1 hour wait before the next burst (I changed that to half an hour) Then it was set to heat the DHW to 45 degrees with the HP then heat from there to 55 with the immersion heater. I disabled the immersion heater phase and set it to heat to 48 degrees with the HP I disabled the weekly heat to 60 degrees anti bacteria cycle after a discussion here suggested in our particular case that was unnecessary. I also reduced the DHW hsteresis to 3 degrees, I forget what it was set to originally. I set the maximum "water leaving" temperature in DHW mode to 55 degrees and in heating mode to 30 degrees. Enabling external thermostat control (the basis of external control via a programmer and room thermostats) required a DIP switch to be changed.1 point
-
1 point
-
1 point
-
1 point
-
Quite normal We had no water on so we manually pumped the pipes full of water and left full of water with a pressure gauge in place The UFH we filled with air1 point
-
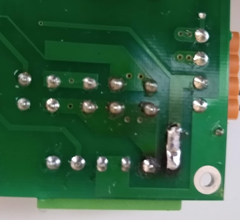
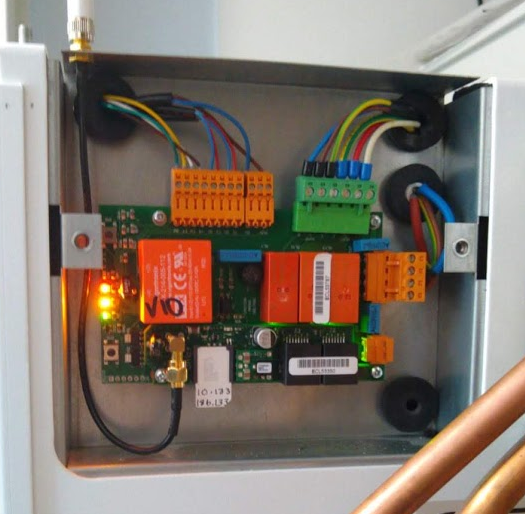
OK, the board was rather more damaged than I feared. Here are the before and after with the new connector fitted. The two RH pins below had got so hot that the through-hole liners very damaged and partially delaminated from the PCB, as had the RH trace. This is why I bulked up the track between the connector and the next through-hole component (this was the common a.k.a. AC neutral) The image below shows the refitted unit with is working OK. @JSHarris Note the crimped ferrule connectors I've got a DS18B20 taped to the replacement connector to see if I have any thermal issues, but it does seem to be working fine. PS. The 2nd pin (the 240V phase line to the heater) is getting rather warm. I think that this is because this track is probably also lifting near the pin. I will probably need to do the same trick and expose the track to the relay and bulk it up with solder. What I really need is a replacement board.1 point
-
I spent a week flying from a field near to @AnonymousBosch a few years ago. The field was full of sheep and they much preferred grazing on the shorter grass on the strip. They'd learned over time to wander off to the side of the strip whenever anyone was landing or taking off. The only exception I can recall is the strip's famous "jumping sheep", that allegedly leapt up and hit the wing strut of a friend's aeroplane...1 point
-
We had a similar shock when our potential PM produced a (paid for) cost plan that came in way above our budget, was prepared by a QS and all the calculations (areas, lengths etc) were laid out in a big excel spreadsheet. PM wanted 10% of the build cost to oversee and bring in on or under budget. At this point we politely parted company and struck out on our own. The cost plan was a great tool though and I used it to set and beat every price contained within by a significant margin, more that 30-40% in some cases. Where we overspent, it was discretionary (kitchen, stairs) and to achieve a high end finish. Also dispensed with the architect after we had planning when they asked for £10k to discharge planning conditions and do BC drawings (even though MBC were giving me detailed drawings and cals as part of the package). Did the PCs myself and dealt directly with the independent BC. No issues. We lived on site (which also saved a small fortune, 18mo in a caravan with wife, two pre-teen kids and cat was an experience) and PMd it ourselves, aside from the groundworks package and MBC package, every trade was employed directly by us (usually on recommendation). Prior to this I'd not built anything more complex than an Ikea wardrobe. I now have a 6 bed 400m2 passive house with full footprint basement, the wife, kids and cat are still here as is most of my hair, although its slighty greyer. You will drink lots of wine. This site and its predecessor was invaluable, as are the people who contribute. I tackled a few simple jobs myself (MVHR - self builder rite of passage) but left everything else to the experts. Sourced things like bathroom fittings (from Megabad), MVHR tiles, flooring, doors, skirting etc. and only had the trades supply the more basic materials where they got better rates or it was too much faff. Unless you live very remote from the site and have zero time to spend on it, I'd seriously consider it. What exactly are the architects doing for you from this point forward? What's that complicated that needs PMd to the nth degree? Our MBC package was very comprehensive, they left a fully insulated airtight shell with all internal stud walls up, service void battened out, floor deck laid etc - make sure other TFs are giving you equivalent or price in the difference to make it a fair comparison. BTW, I can recommend a great electrician in the Oxfordshire area - very experienced with passive builds and the neatest dwangs you'll ever see - PM me if you're interested.1 point


