Leaderboard


Popular Content
Showing content with the highest reputation on 03/11/19 in all areas
-
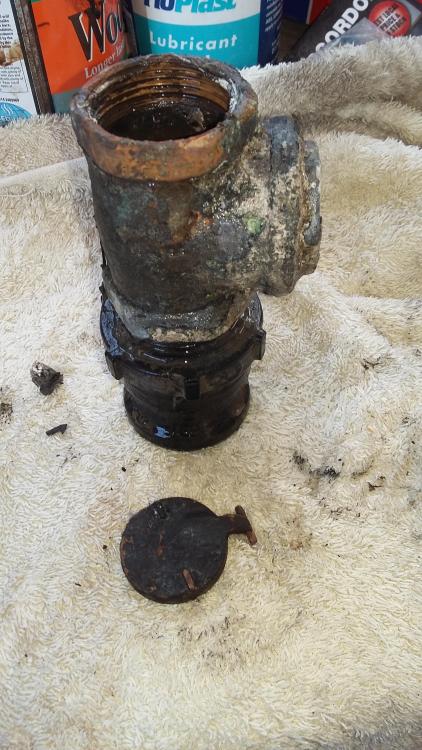
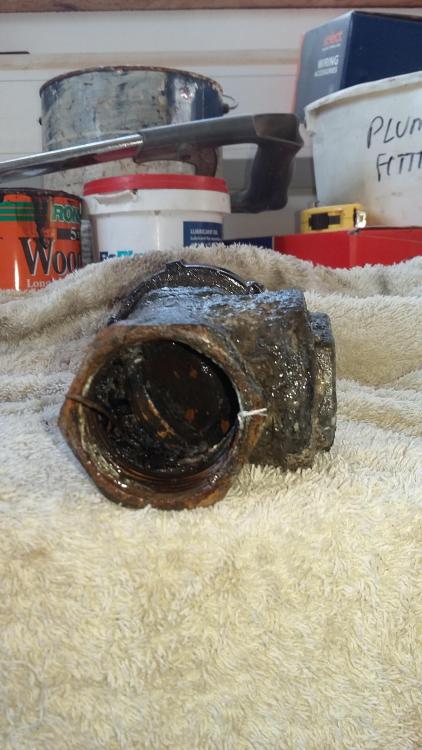
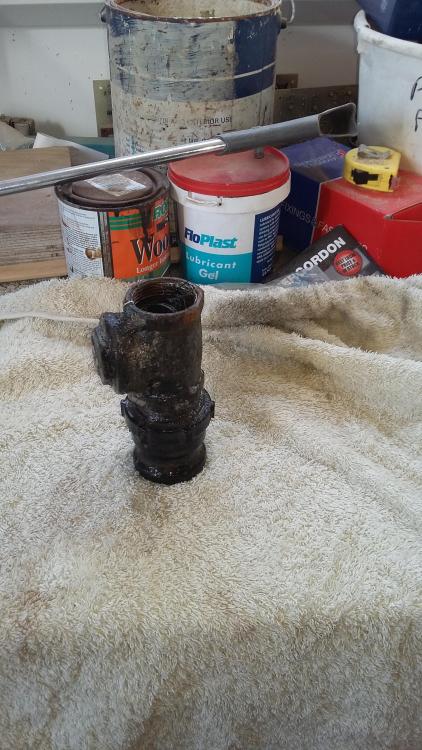
Okay all sorted this morning. Today, being the one good say in the weeks weather forecast, we set off with the intention of digging a hole in the field, But SWMBO talked me out of it. It was that fountain, or lack of fountain, at the upper test hole. WHY were we not seeing a fountain at that upper test hole. Se convinced me digging a massive hole by hand was going to be a waste of time. So we looked again at what was down at the bottom. We decided to scrutinise all the pipes and fittings within the pump chamber. There was this innocent looking fitting. It came as part of the pump chamber plumbing. It went between the 50mm mdpe elbow fitting, and the quick release pump hose fitting. There was never any mention of it being anything special. To me it just looked like they needed a female to female coupling and used a tee with a blank plug. It didn't look like it was any form of strainer. Once I had unscrewed it from the pump chamber it was obvious there was a problem, you could not see through it. . When I cleared it out, there was this what looks like a flap, wedged tight at the top of the fitting with various bits of debris packed in behind it. So it looks like this was a non return flap valve. There was never anmy mention with the pump chamber that it had one supplied, and it never worked as a non return valve as I fitted one attached to the pump at the bottom of the hose because it needed one and the one they didn't tell me they had supplied never worked. I made no attempt to put the flap back, I just cleared it out and put it back together as a dumb straight coupler. It is all now working, and now we did get a fountain out of the top test hole, albeit not very high. But the pump now clears the contents away up the hill into the soakaway at about the rate I always remember it working at. A big relief that the soakaway appears to be functioning correctly and no need to dig up the field. The digger man has been stood down.
 3 points
 -
Having lived in our MBC house with underfloor heating for just over a year I personally would never choose to go back to radiators. Nothing compares to the comfort and utility of underfloor heating and I am sure you will regret it if you decide to go down the conventional route. It was a no brainer as far as we concerned to get them to lay the pipes before the pour and if I recall correctly it was more than a half days job for the three guys as the pipes have to be cable tied to the rebar. I am sure it is also the cheapest and most convenient way to heat your house. Worth every penny.2 points
-
If I needed central heating in a low energy house I would consider skirting heating not conventional radiators.2 points
-
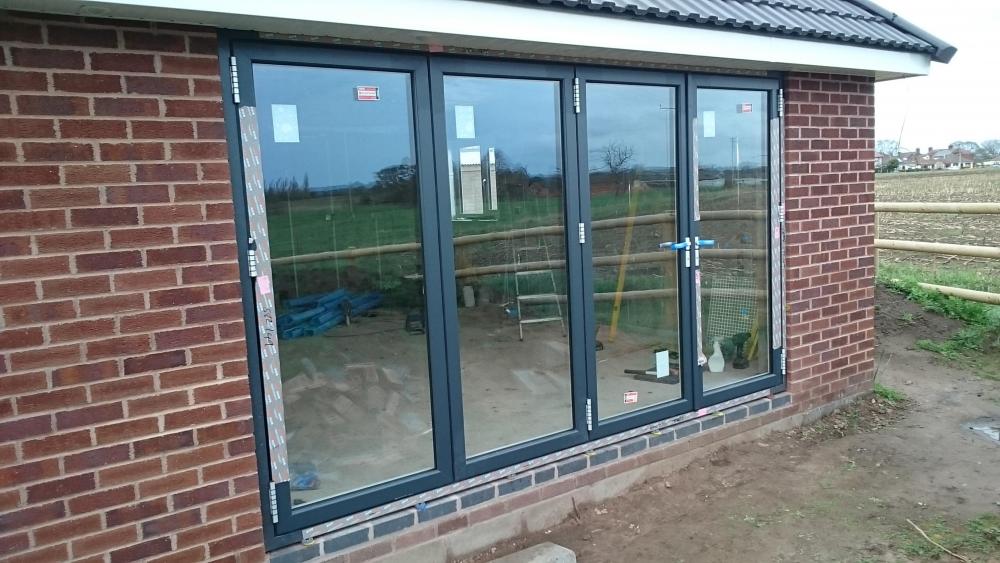
Hi. Here's my Warmcore doors fitted this weekend at my self build. They are well made and look and feel a quality item. I'd seen the bad reviews for Warmcore but decided to go with them for various reasons. I think you need to find a supplier with a proven record on this system but that's the same with all aspects of a self build. Good luck.
 2 points
 -
The middle one doesn't have 12% softwood. Yes it is, but it's much more directly a function of the absolute humidity, the water vapour density. I think you're right, the dew point temperature will curve within the spans of materials with the same properties. However, in the past I've convinced myself that it'll curve downwards (sag) so approximating it with a straight line is safe (conservative). If there isn't a dew point problem on either side (interface) of the material then there won't be one anywhere within the material. Therefore, for diagrammatic purposes approximating it with a straight line is understandable. But then, with a bit of computer power to hand it does seem a pity not to calculate it every 10 mm or whatever.1 point
-
Tom Foster likes [¹] WUFI for this. [¹] or liked, been a while.1 point
-
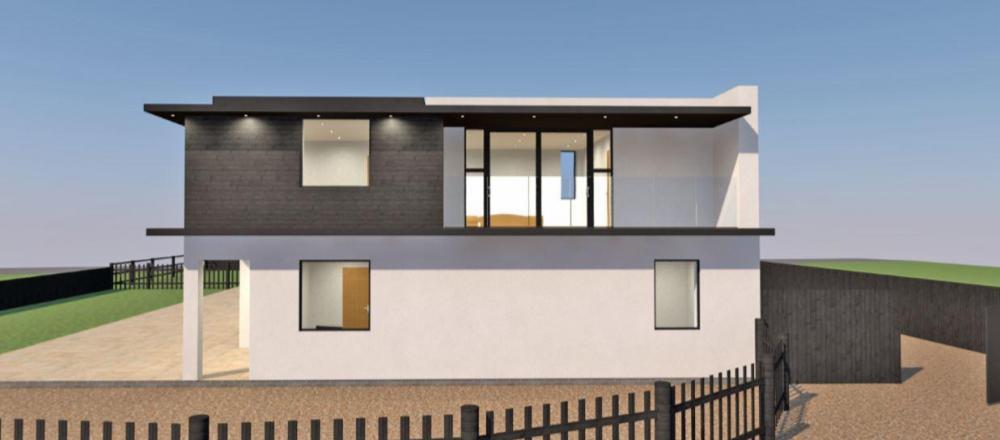
Update: Since our council strongly objected to us having second floor and being higher than neighbours, we ditched the idea (goodbye, my sun-lit art studio! I'll have a gym to slave in instead... matter over spirit 'n sh*t, you know ?) and instead decided to be true hobbits and designed a basement instead. Changed roof to half-hipped. Re-submitted for 2nd pre-application advice. This time it took them three weeks, we even had a secret incognito site visit from the offices (who visited in a stealth mode), who discovered that we were too close to the boundary and wants us now to set in away from the boundary by another 550mm. Oh woe. Our plot is quite narrow (c. 12m across) so chopping off half a metre is painful. On a positive site, he acknowledged the new roof "as an improvement" on the current scheme and did not object to the basement. Now awaiting final set of final-final drawings so we could apply for a full permission.... fingers crossed...1 point
-
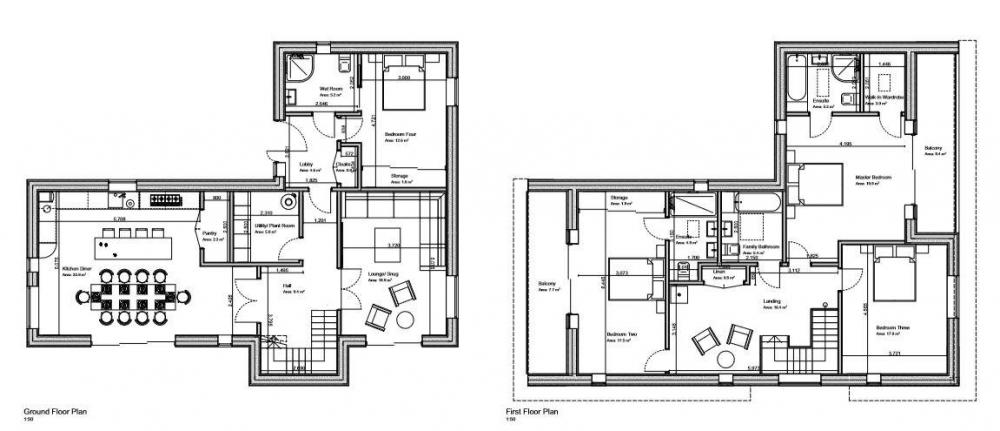
@lizzie No, you are on the right track . Using your layout drawing information, I calculated your floor area as 124.4 m2, so if you have high ceilings then your calculated volumes seem OK. Using my calculated floor area of 124.4 m2, the Part K minimum ventilation requirement in accordance with Table 5.1(b) - 124.4x0.3x 3.6 = 136 m3/hr, which highlights that your house has been well over-ventilated on a day to day basis at the design rates of 220 m3/hr taken from your attached documents. The reason that you have more extracts than most houses is that you have extracts in the plant room and your Master Bedroom, which were not really essential and do not need to have such high airflows in those two rooms. If you use the passivhaus/din method for sizing the airflow for normal situations then assuming 5 people living in the house gives supply airflow of 5 X 30 = 150m3/hr and using 50m3/hr for the kitchen, 30m3/hr for the bathrooms and utility and 20 m3/hr for the toilet this give s total extract rate of 160 m3/hr ( ignoring the dressing room and plant room for the moment). So, not too much out of balance. Also, all within the Part K requirements. So what I would do is to set these extract rates above for kitchen, bathrooms and toilets which all meet or exceed the minimum BR extract rates for these rooms)and use a lower rate of 10 m3/hr for the dressing room and plant room (both small rooms) = total extract rate of 180m3/hr. For the supply rates use 40m3/hr (2x20m3/hr) for the living room, 35 m3/hr for the snug and 35 m3/hr for the Master Bedroom and 30m3/hr for each of the two bedrooms = total supply rate of 170 m3/hr. Use these rates to set up the system for Setting 3, with your F7 filter in place. Then, set Settings1, 2 and 4 as detailed in your Operation Instructions. I would operate the system on Setting 2 on a day to day basis, when there are just two of you (and then dog) in occupation. It will be much quieter at all settings, more comfortable, cost less money to run and should give you everything to want..... and of course it complies with the BR. Hopefully, with your enthalpy HE , you will also see more comfortable RH% I am sure that my thoughts set out above will be picked apart by others reading it and they will identify any issues with what I have summarised. Again best of luck1 point
-
@Russell griffiths Unless you’ve very carefully planned for ways to control the effects of shrinkage of the cladding i’d strongly recommend using seasoned timber rather than freshly sawn.1 point
-
A fine view from beneath!1 point
-
@lizzie, I'm concerned that you can feel a "rush of air" as that indicates a pretty high air flow rate. When our system is running at it's normal setting, there is no sound at all in the house, and the only way to feel air movement is to stand on a chair and hold a hand over a supply terminal, when it's just possible to feel a very slight draught up close to it. Ours is set to change all the air in the house about every 2 1/4 hours, which seems fine. The air always feels fresh, smells don't seem to linger or move from one room to another (an example, I've just cooked a chicken korma in the kitchen, with no cooker hood and without boosting the MVHR and there's no smell at all outside the kitchen door). We do tend to get low relative humidity (down to maybe 30%) when it's very cold outside, which reflects the low humidity outside. I find this a bit annoying, as I've suffered from chronic rhinitis for years, which is triggered by high or low humidity (and alcohol...). We've never had the humidity in the house high enough to trigger it, but have had it low enough to do so, so I've invested in an ultrasonic humidifier for my study, which seems to work very well (when I remember to top it up). I suspect that you may be reacting to the low relative humidity rather than the air quality, as the feeling I get when the air is excessively dry is one of being bunged up. It starts as a subtle feeling that the air's a bit stuffy, then progresses to being increasing harder to breathe, enough that I become aware of the effort involved. The only drug-free fix is to spend ten minutes breathing in clean steam, which is a bit like a miracle cure for an hour or so, until the dry air brings the symptoms back.1 point
-
I had samples from lots of suppliers...Rustwood, Vastern, Silva, Vincent et al all were very helpful in sending me bits of wood. I had them all lined up outside for months weathering. i knew I wanted vertical and I knew I wanted a hidden fixing profile. I always intended to have cedar but just couldn't find one that was exactly 'it'. In keeping with my house style I wanted a very crisp clean look not at all rustic.. One day the nice man at Vincent Timber in Birmingham sent me some random samples of his choice (after sending me lots of my choice that were unsuitable when I got them) - he thought I might like this and bingo.......Siberian Larch with a factory applied sacrificial coating of new age gris. I knew as soon as I saw it that it was the one for me. I am hugely pleased with it and the service from Vincent Timber was excellent.1 point
-
Very much depends on the look you want, Russell. We wanted a rustic look (pretty much had to because of planning restrictions) so opted to use very cheap local waney edge larch. Not that easy to fit, and it's proved to be a bit wild, in that I've needed to go up and remove a fair few ring nails (anyone know an easy way to remove these bastards?) and replace them with screws. I'd have liked to have used a more tidy-looking, vertically planked, cladding, perhaps in planed cedar, but the planners (well, conservation officer) wouldn't go that far, it was either local stone cladding (ludicrously expensive) or waney edge (cheap but a bit wild and mobile). When looking around I found that Vastern Timber (not who we used) were the best in terms of price and quality for planed timber cladding. They were also very helpful the couple of times I drove up there to get samples to try and convince the planner that tidy-looking cladding would look OK.1 point
-
Look in the first floor bathrooms and the walk in wardrobe. I missed it on the second draft because it's a very fine dotted line1 point
-
3rd Draft arrived this afternoon - I think we are there!!
.thumb.JPG.5b27cd550358faa4bfaa1286c6e26b4a.JPG)
.thumb.JPG.da8dec07946d3ee27789451cd40da56a.JPG)
 1 point
 -
5mm sealant is not at all unusual. I would go for a decent bead all round. I have go some glass panels fitted to the river wall and there is about 15mm mastic either side of of the glass.1 point
-
Thanks for this information. I have sent an email asking politely if we could get the schedule as the quote suggests. So hopefully we will get a positive response.1 point
-
My quote from December is: And without foundation (does not apply to me):

 1 point
 -
Our payments were rounded to the nearest £100, so the percentages aren't very neat, but they were roughly: 16.5% deposit with order 21.6% two weeks before commencement of foundation works 33% on the morning of frame delivery 12.4% on completion of frame erection, including felting and battening of roof 16.5% on completion of a successful air test (less than 0.6 ACH @50 Pa)1 point
-
Mine didn’t change schedule as such but the dates of first and second fix materials were more fluid as they were dependent on how we got on with the previous stage. The first delivery got us to watertight so the pressure was then off to a degree. The second fix payment varied from the original quote as it included things like internal doors and we upgraded a few things before second fix delivery was due. It was all done completely transparently however with the additional costs agreed to.1 point
-
If it helps, my MBC terms (2016) were: 10% Deposit 15% Sign off of drawings 20% on foundation material delivery 20% on frame delivery (first load) 15% on completion 10% on air test pass I though that those terms were reasonable.1 point
-
@Coops85, I have had a timber-frame company blatantly move the goal posts on me after a quote. In the quote, the company in question made a mistake by overlooking something which I had specifically told them about. When I double checked that they had included it they simply went away, investigated, and increased the quote without an apology. I bit poor in my opinion although they did then make a concession when I objected. Personally I would view payments terms as part of the quote and therefore would want to be treated fairly if a change was needed, with advance notice, an explanation and an apology. In your case, could it be a response to the Brexit uncertainties and import prices. By front-loading cash from you they can front-load their ordering too, reducing their risk?1 point
-
DIY pipe laying takes a fair bit of time, and that means arranging for a break in the middle of the slab laying process. At a guess I'd say you need to allow a couple of days to mark out, lay and tie in the UFH pipes. This would be a fair bit quicker if there were two of you doing it. The guys that laid ours had a well-worked out system where they spent an hour or so accurately spray marking the locations of walls, doorways, the stairs, kitchen and utility room units, the WC etc, on to the EPS, just after the steel fabric and the ring beam steel was laid and tied in (a bit over a days work for our smaller slab). The UFH pipes were laid and tied in the afternoon before the concrete pour. When laying the pipes, one chap held the coil of pipe and paid it out as the other tied the pipe to the steel. Seemed to be an efficient way of working. Here's a photo showing how they did it:
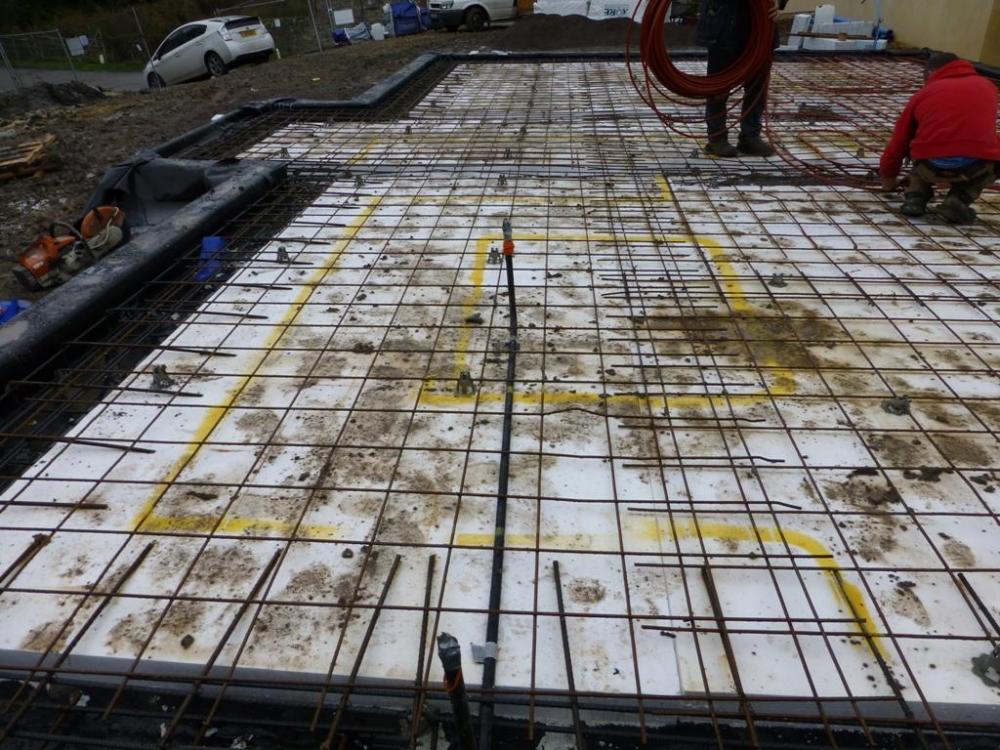 1 point
 -
I can't see a real problem with that setup.1 point
-
Me too. Some friends have skirting heating and it works very well indeed, and you wouldn't know there was any heating system fitted unless you were told about it.1 point
-
I think the person-in-the-street increasingly expects to see UFH in a new build. Everyone I know who's done a significant extension, refurb, or new build has included UFH. Re: costings, I'll be interested to see how you get on. I'd happily pay more (a lot more, actually) for UFH. The heat it gives is far more even and pleasant than any radiator-heated house I've been in. We did actually heat our house for a period last year with a single 2kW electric column heater in the kitchen. Amazingly, it was fine even when it was very cold, but the temperature wasn't evenly spread through the house by any means. With a low energy house, how do you distribute heat if your heating requirements mean you can only have a very small number of radiators? If you have a lot of solar gain in any particular area, don't underestimate the advantage of UFH pipework moving heat around the slab. We have a huge south-facing slider that gets quite a bit of solar gain in the shoulder months. Without running the UFH pump, I suspect that the floor beside the slider - several square metres of our dining area - would become uncomfortably hot. There's nothing stopping you from getting someone else in to do the UFH heating pipework, or doing it yourself.1 point
-
It's also worth considering whether UFH is the best form of 'wet' heating. There's a lot more to UFH than just the pipework and it is less efficient than radiators or skirting heating. It does have it's advantages but I wouldn't say it was a no brainer.1 point
-
That's in. Just waiting for the CT1 to go off: Then I'll nut the tails and waste up:1 point
-
Something like mine? Took some working out: Timber frame covered with moisture resistant pkasterboard generally and Aqua Panel in the wet room corner and behind the wc: NB: Aqua Panel is a whole different ball game to mrpb. Pretty much inflexible by comparison and cracks quite easily so get your studs dead flush. Dusty (old circular saw and carbide edged jigsaw blades) to cut and needs special screws. The bottom "shelf" of the Aqua Panel (where the beer is above ) projects over the wall panel that comes up to it. When all the boarding was done I tanked the pocket with the blue stuff, Aqua Seal in this case. This is the 10mm white pvc trim I used for 8mm tiles. I went for the tile flush with the trim so you don't feel the trim edge: Trim on. I stuck mine on with clear CT1. @Nickfromwalesfavours mitre bond but I couldn't get on with it: (I wanted chrome or stainless trim btw but was overruled ) Back tiles on first - sits behind the bottom tile btw: Bottom tile in second, mine slope toward the front by a few degrees. A bit of plastic helps to check the fit and get the tile out again: Then the top: Then the sides last. See the sloping bottom tile? Note the 1mm shims all round. I take no credit for the majority of this. Mainly done with advice from @Nickfromwales. Standing on the shoulders of giants me!1 point
-
Hello, Sorry not to reply sooner. We used ARP Ltd from Leicester for the guttering. Really pleased with it. Very good quality. They were really helpful. I purchased directly as they are only about 30 mins away & their sales rep came out & measured up & specified what was needed. ARP also sell via builders merchants.1 point
-
NOW this is what I call usefull Inforamtion ! Thanks .1 point
-
The reason I am very cynical about Project management is one previous roll I had, as well as designing the bloody machine I had to keep updating the project plan. Of course things kept changing, the spec kept changing, estimates of timescale kept changing. I was ending up spending more time keep adjusting the project plan than doing any design. Had it not been for the fact I needed to maintain employment and an income, I would have told the managers "just forget this project plan and just let me get on and design and build it, you will get your machine a lot quicker that way"1 point


.JPG.d0cea172a4330a698ded61f20a83c82c.JPG)

.JPG.a1baf38bbdd8567a3324755864a9591d.JPG)


.jpg.c21f3ac78c9b7efd90cbdcb312744dc5.thumb.jpg.7adcad4c0e384f5ecd7d56b0618df6e5.jpg)